Final Project
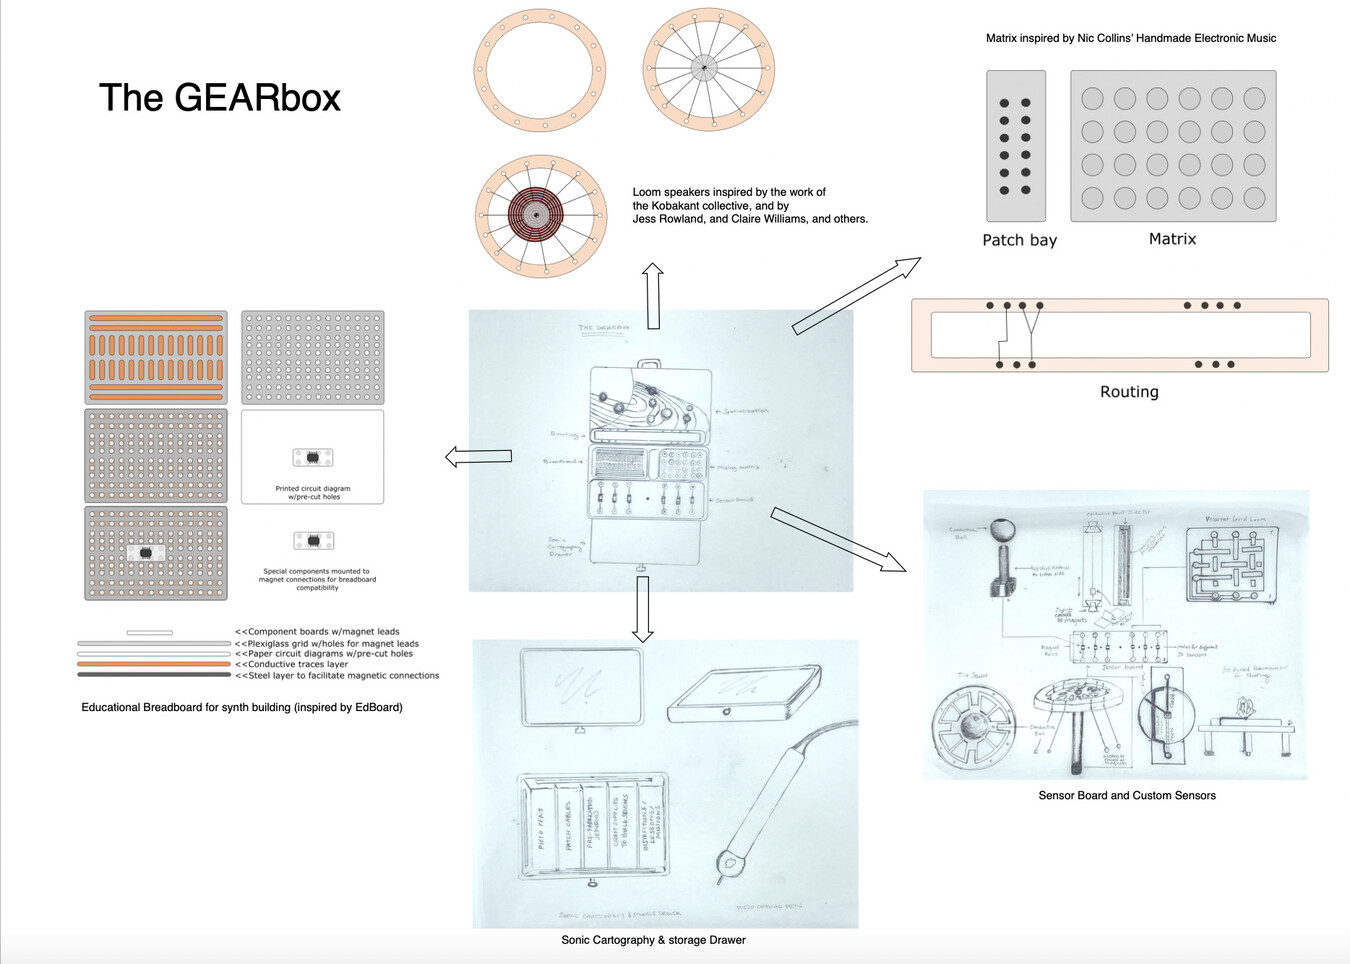
The GEAR[box] is a modular music-making STEAM education toolkit that fits in a suitcase. It is named after the Girls Electronic Arts Retreat, a STEAM summer camp I launched in 2019. The ‘box’ part of the name is intended to invoke the idea of a boombox. (I also stole the brackets in the name from Think[box], a gigantic makerspace about an hour from where I live.) Inside the box there are several different tools to generate and/or manipulate sound: a sensor board, a custom breadboard, a matrix, patch bays, a modular paper audio mixer, a sonic cartography drawer (more on that later), and a spatialization system. Each of these sections functions independently, but can also be used in combination as a tool for creative musical expression and electronics education.
The GEARbox is named after the Girls Electronic Arts Retreat, a STEAM summer camp I teach. The ‘box’ part of the name is intended to invoke the idea of a boombox. Inside the box there are several different sections (a sensor board, a breadboard, a matrix, patch bays, a modular paper audio mixer, a sonic cartography drawer (more on that later), and a spatialization system. Each of these sections functions somewhat independently, but can also be used in combination as a tool for creative musical expression and electronics education.
Below, I provide a bit more detail about each of the different individual components of the GEARbox. Given the travel theme, some of these are inspired by tourist attractions around the world, but I’m not yet sure whether I want to lean into this or not.
For the principles and practices assignment, in addition to creating a sketch and description for my project, I started to try to answer some of the questions we need to address towards the end of the semester about prior work. On that page you can also see the beginnings of a project plan and some initial questions I am mulling over. I hope to update the plan soon, I lost most of it when my computer crashed mid-editing a Gantt file one day. I am copying a bit of the principles and practices assignment below since it provides a useful overview for my project:
What will it do and who will use it?
The GEAR[box] is a modular toolkit that supports authentically integrated STEM and arts learning. It has modules and/or kits dedicated to circuit building, sensing, transduction and electromagnetism, spatialization, mixing, signal routing, graphic notation, and more. The GEAR[box] is designed to support kids ages 8+ and in particular, will be used by kids in the Girls Electronic Arts Retreat to compose, improvise, and perform music, perhaps to facilitate virtual ‘travel’ through digital space, and to learn about electronics, music technology, and creative sonic practice.
You can also think of my project like the TIMARA (Technology in Music Related Arts) studios in a box. The different modules in the box are loosely based on the different resources we have in TIMARA. While we regularly bring kids to our studios, we also try to get out to different schools when possible. Often this involves a ton of packing and unpacking of equipment and supplies, and there are many technologies that just don’t travel well. I’m excited about the idea of having boxes always ready to go that will support STEAM education activities outside of the studios.
Prior Research
The GEAR[box] is inspired by a whole slew of projects by others and also by prior research I have been working on with my students in the Crafting Sound Lab. I will share photos of my lab’s prior research in the final project page and also go into more detail about other project inspirations on that page, but here are a few relevant links for starters:
- Travis Johns Suitcase Synth
- EdBoard
- Little Bits
- Chibitronics
- Nic Collins’ Handmade Electronic Music
- Kobakant Collective
- Claire Williams
- Jess Rowland
- Machine in a suitcase (I have seen Neil show this project several times but am having trouble tracking it down right now.)
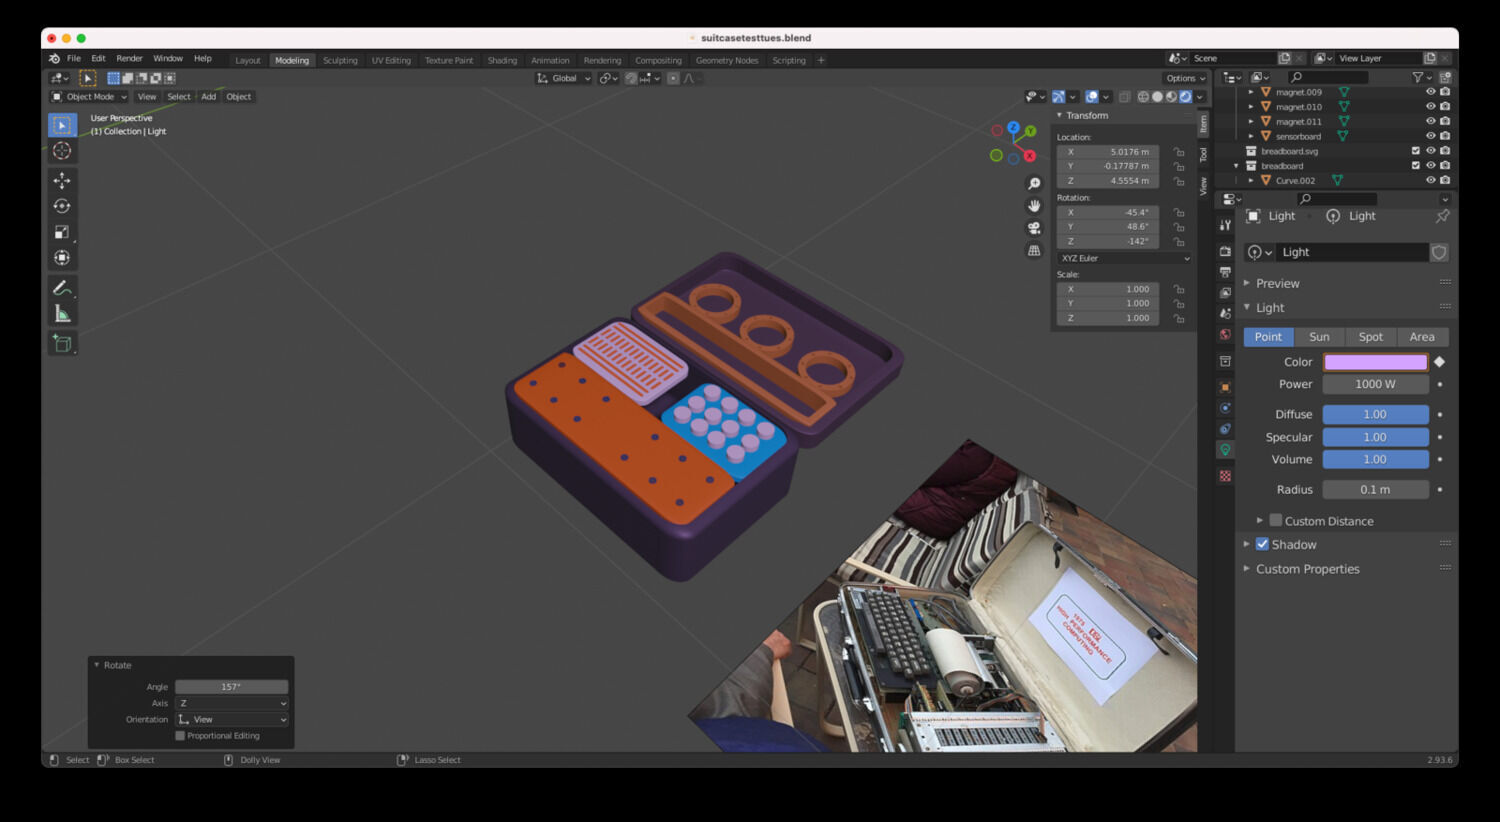
During the CAD week, I worked on creating a 3D model of the project in Blender.
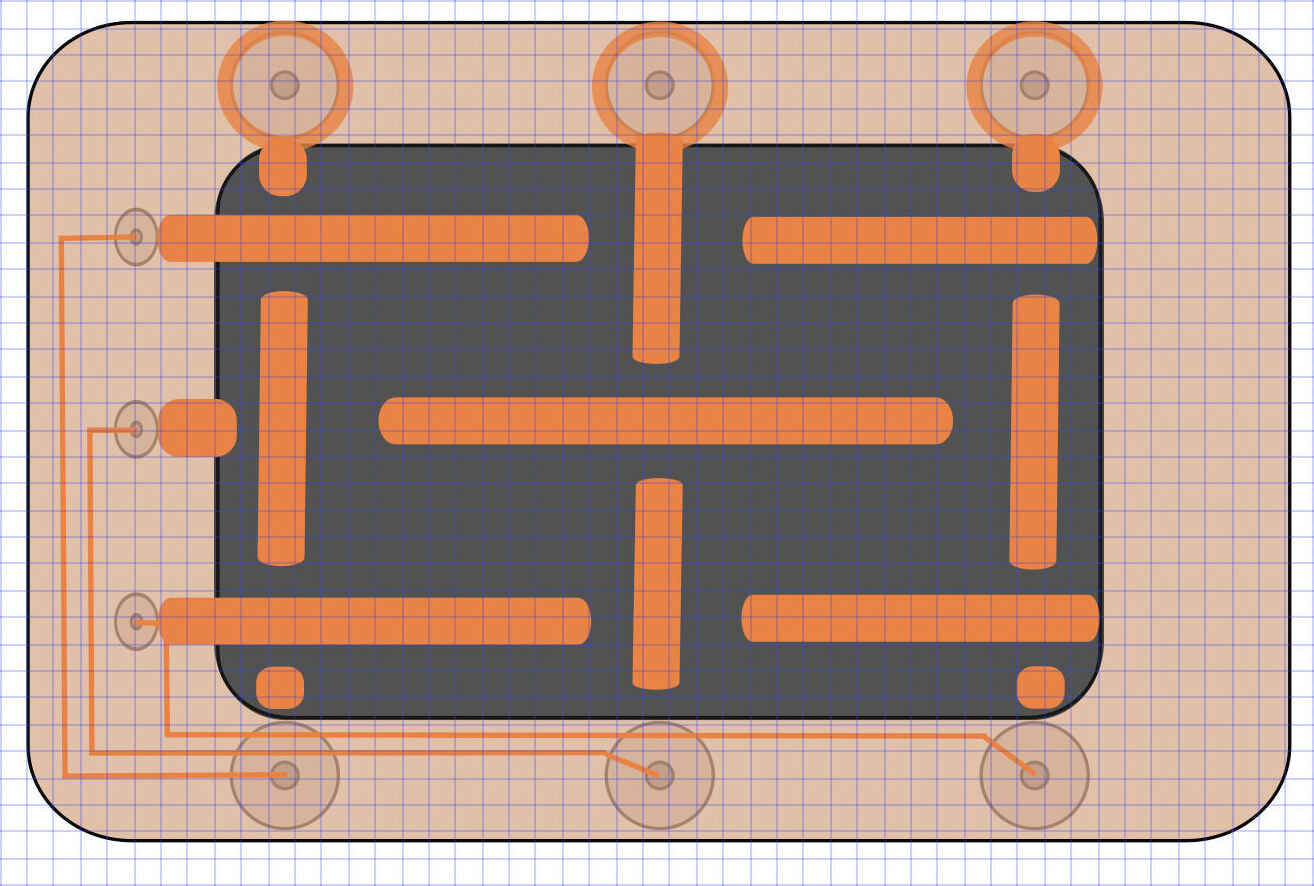
I also worked a bit on some specific project elements – like some of the sensors – in Inkscape.
I was planning on building a part of some of the sensors during the computer controlled cutting week but need to circle back on this once I have the right mats for my vinyl cutter. I did start designing the speaker looms modeled after the solar system parametrically in Fusion, which you can see below.
Overview of Different Modules to come
Sensor board
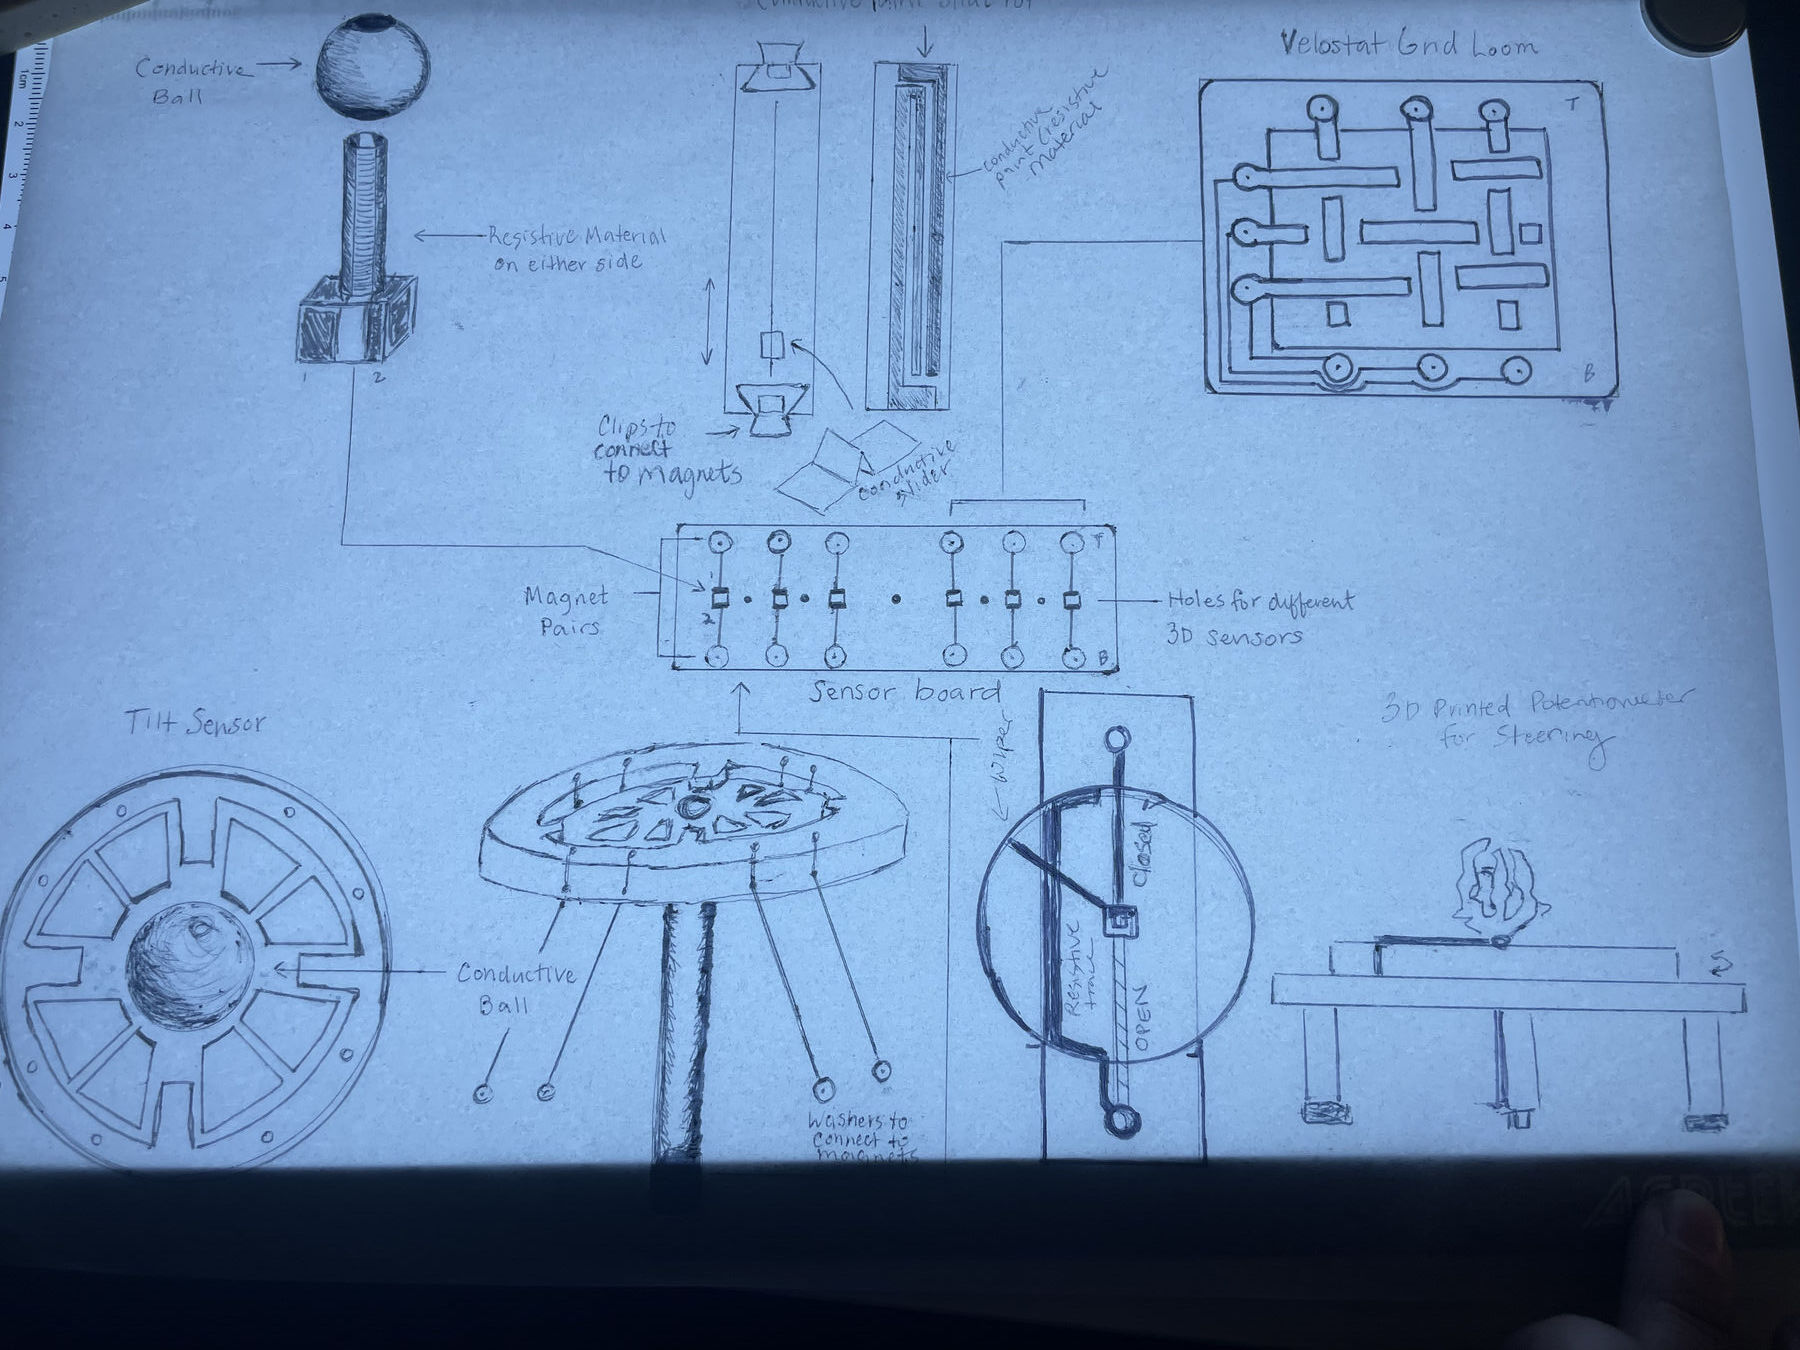
The sensor board is the largest GEARbox module; it spans about half of the main suitcase compartment. On the top of the sensor board, there are six magnet pairs. Each pair of magnets is pre-wired to a board tucked away inside of the suitcase, so the magnets function as connection points for custom and DIY sensors. My students and I were actually already building something similar last semester in preparation for a different project that uses a tablecloth with a custom, embedded velostat sensor.
The sensor board comes with several pre-fabricated custom sensors to foster different modes of interaction and to facilitate learning. I also will provide tools and materials for students to design and build their own sensors after they learn from pre-fabricated sensors.
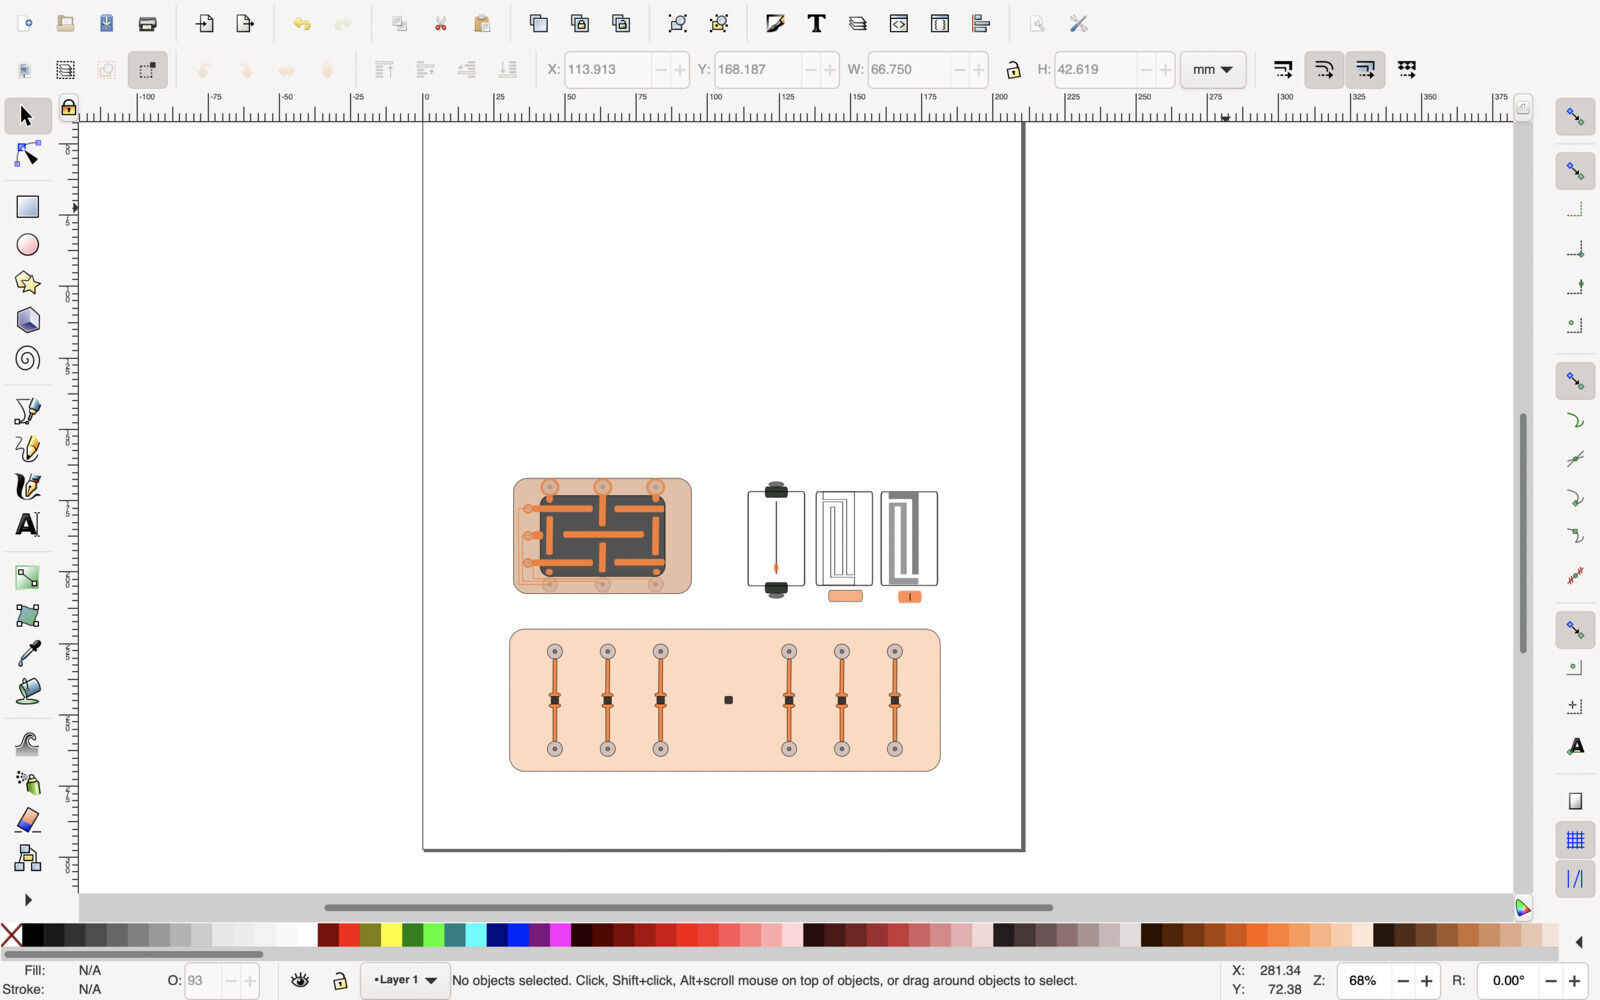
- Ball Drop: This sensor features a conductive ball that connects two resistive materials on opposite sides of an insulating material.
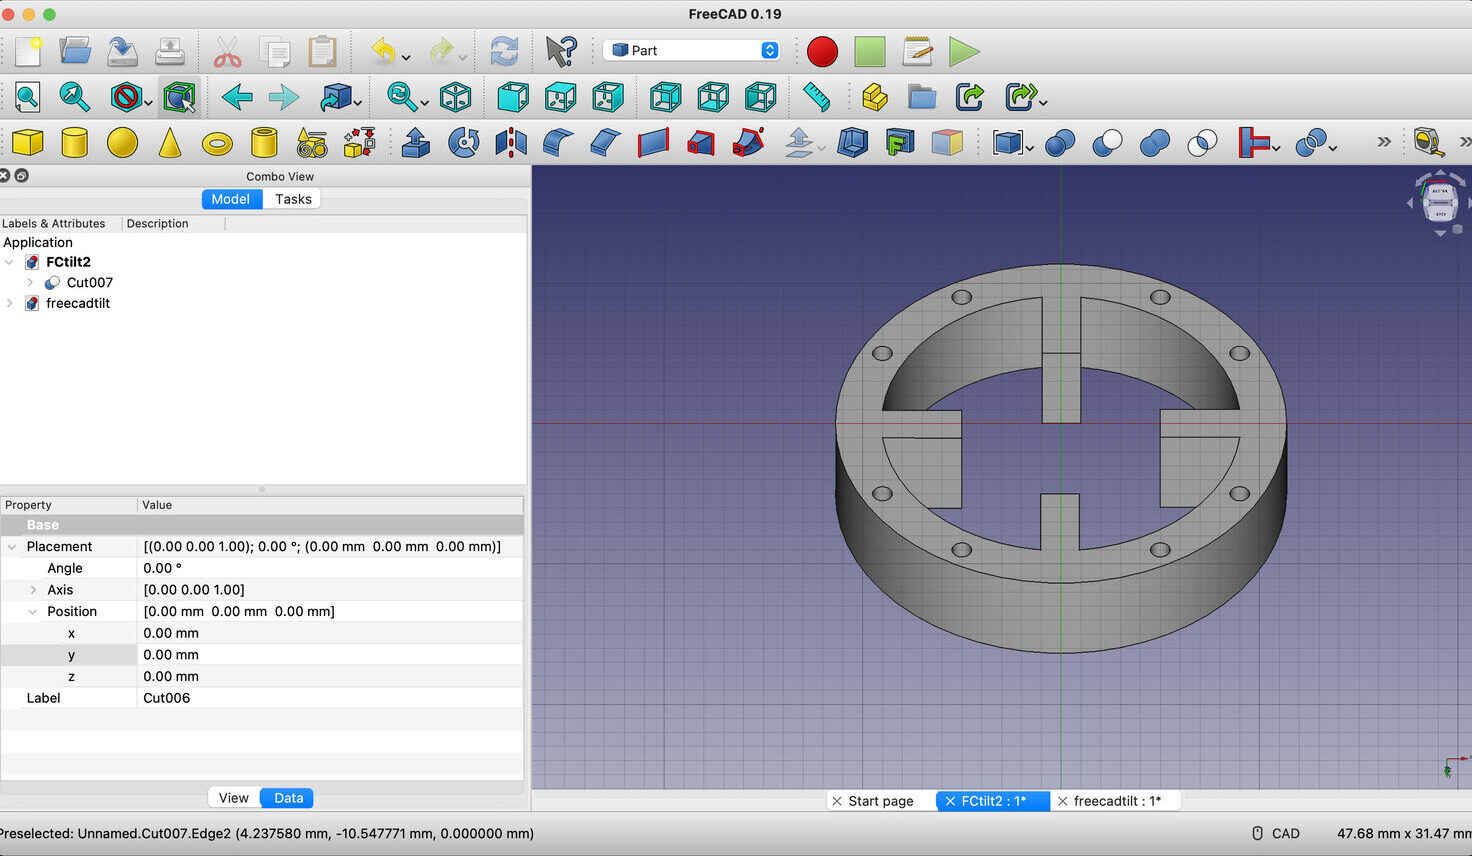 - This tilt sensor (which works across several of the sensor board magnet pairs) is inspired by the Kobakant wearable e-textiles tilt sensor, and by those handheld games where you move a ball around a maze inside plexiglass. The sensor is shaped kind of like a pizza, with plexiglass notches to help guide a conductive ball to settle in particular locations. Each section of the sensor contains two pieces of conductive material that are routed from the internal conductive pads to different magnet pairs on the sensor board with stretch sensor pairs. As the metal ball moves to different locations in the sensor, different electrical connections are made. The stretch sensors will allow the sensor to have a bit more variability in the data than would be possible with pure conductive connections. My main questions for this design right now are: how can I make sure it is stable enough? And, how can I make it rotate on all axes?
(../images/w03/inkscape/w3inkscreenprintconductivetrace.jpg) - Screen printed conductive ink sensor: This sensor is a very simple sensor that aims to approximate a traditional slide pot using paper, conductive ink, and tape. While I could just use another set of magnets or metal to connect the ends of the paper sensor, I think it would be nice to find or create a metallic clip to make the connection a bit easier. The clip model is inspired by the Chibitronics ‘love to code’ clip.
Velostat Grid Loom: This loom is inspired by the Kobakant velostat matrices [LINK]https://www.kobakant.at/DIY/?p=7943 which I had my students exploring last summer. This loom takes up half of the sensor board’s six magnet pairs. It is designed so that the weft connections are routed from the side of the loom to the magnets on the other side via the frame of the loom. (I am not yet sure how to best achieve this routing, but it could simply be routed via wires/ribbon cable if necessary.)
Steering wheel: This sensor is inspired by (though is not a precise replica of) a traditional potentiometer. A circular rotating feature with a ‘wiper’ is layered on top of a resistive trace and the resistance changes based on the position of the wiper. A 3D printed structure is affixed atop the circular feature to facilitate gripping and turning the wheel.
Universal connector: The universal connector is designed to encourage and facilitate campers’ exploration of their own sensor designs. The universal connector is a magnetic conductive piece that has many different types of terminals from screw terminals, holes for tying and sewing, small clamps, and snaps, and hooks.
Originally, I was imagining that the sensor board would talk wirelessly to an external computer, and perhaps send MIDI data or ASCII symbols in order to talk to a kid-friendly programming language like Scratch. It could be fun to imagine the suitcase as a game controller that allows kids to navigate through virtual worlds they have created.
However, as I have been thinking more about the project, I could also imagine using the sensor board primarily to manipulate sound. I have been thinking about incorporating a patch bay so that the different modules of the suitcase can talk to each other. If this is the direction I take, the sensor board could function primarily as a tool for signal processing.
I am pretty torn about this because I can see a lot of pedagogical value in both versions. I would love to be able to switch between modes, but I’m not sure that is a realistic goal. In any case, I would be grateful for ideas/feedback on this question!
The sensor board will help campers learn some fundamental principles and properties of electronics: like conductors, insulators, resistors and how these materials can work together to create sensors. As campers design their own sensors, we can work towards creative learning outcomes, encouraging campers to articulate, plan, and implement their own designs, and to experiment, prototype, and iterate on their designs. This will also afford an opportunity to explore more complex ideas such as circuits, voltage, current, and resistance, and Ohm’s Law.
Sonic Cartography Drawer
The Sonic Cartography drawer is a multipurpose light box, storage drawer, and surface for drawing and listening with custom contact mic pens (piezo pens). From a sonic perspective, the point of this drawer is to afford an opportunity to experiment with drawing and gesture as an input to some of the other modules on the board. The light box is also designed to support tracing images (or maps), and so one idea is to develop missions that would encourage campers to create musical ‘maps’ that could guide their journey.
The drawer also has compartments located underneath a frosted acrylic piece that store materials and supplies to support use of the rest of the Gearbox and related activities.
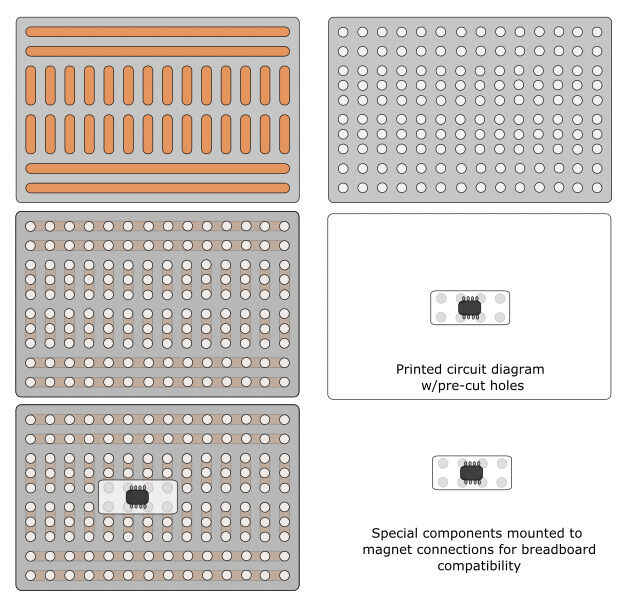
 Breadboard
I would like to devote one kit module to a user-friendly breadboard on which campers can build their own synths to interact with other GEARBox modules. This module is based both on our own prior research (inspired by Kobakant’s pin cushion breadboard) and also some educational breadboards I recently encountered online.
Breadboard
I would like to devote one kit module to a user-friendly breadboard on which campers can build their own synths to interact with other GEARBox modules. This module is based both on our own prior research (inspired by Kobakant’s pin cushion breadboard) and also some educational breadboards I recently encountered online.
In the 2020 version of GEAR, we wanted to create a breadboard-like tool that would allow campers to build circuits remotely without soldering, but that would also allow kids to see the underlying conductive traces and the conductive connections that they make. We also developed a clear vinyl overlay with a printed circuit to help indicate where components should be placed. The two main issues with this approach were:
- The circuits were a bit difficult to assemble since they required some precision and could be finicky since conductive connections relied on component contact with conductive tape -The circuits were single use and pretty wasteful
I was therefore really blown away when I came across the EdBoard, developed by students at the Atlas institute at UC Boulder. They solved the ease-of-use issue, the reliability issue, and made a creative, interactive tool that allows kids to learn and use their imagination through story cards that help with the circuit building process.
I would like to develop a module with a similar design but optimized specifically for the creation of simple sound-generating circuits. I think this will mainly mean creating some dedicated sonic output jacks that can route sound to the other modules.
I would like to find a way to make sure that the breadboard is as flexible as possible so that kids could use it to experiment with their own circuits and maybe even find a way to connect some of the sensors on the sensor board, while also making sure that it is an intuitive interface.
Spatialization
Located on the outer side of the top half of the suitcase, the ‘outer space’ of the GEARbox is devoted to loudspeakers. The design is intended to mimic the solar system, using custom-built loudspeakers as planets. The loudspeakers will be woven (with magnet wire) on small laser cut wooden looms. Amplifiers will be designed to fit directly on the back of the speaker looms. I think I might include a photocell on the input volume or gain in order to allow the levels (spatial diffusion) to be adjusted on the fly with a flashlight or by waving your hand in front of the (back) of the relevant loudspeaker. Ideally, the amplifiers would be built with their own custom breadboard system (like a smaller version of the main breadboard).
Because the speaker looms take a while to weave, an alternative would be to cut coils out of copper tape, I am just worried that these will not be as effective loudspeakers.
I am starting out with the planet looms. I used this site to get the values for my different planets.
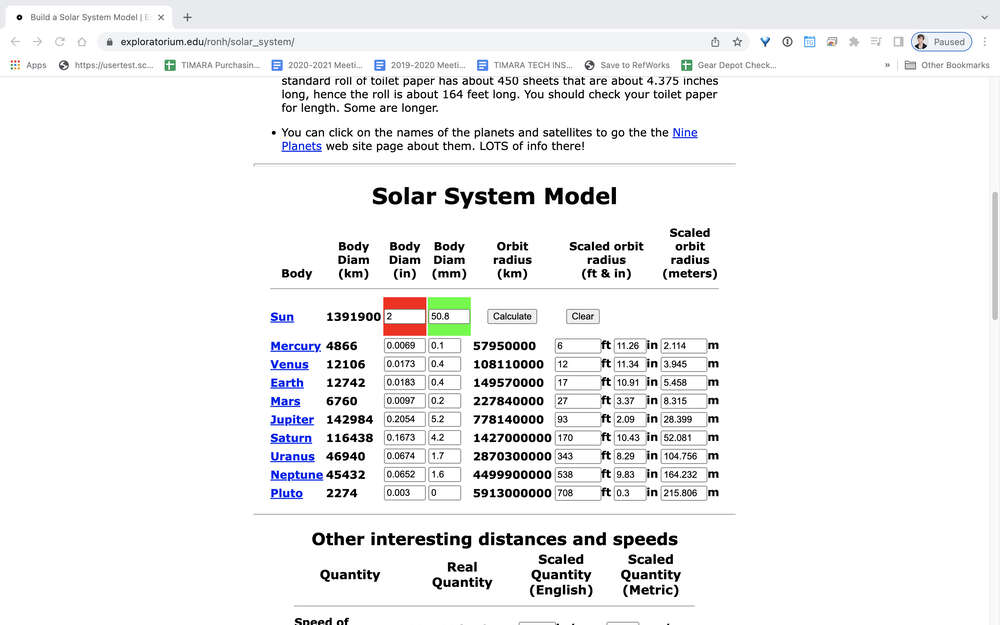
I realized I would not be able to include the sun – given its size – if I wanted to have a reasonably accurately scaled model. Saturn and Jupiter also pose problems because they are so much larger than other planets. Mercury and pluto pose problems on the other end of the scale. I may have to make some of these planets just stickers rather than actual speakers. Or perhaps I can use copper tape for some of them.
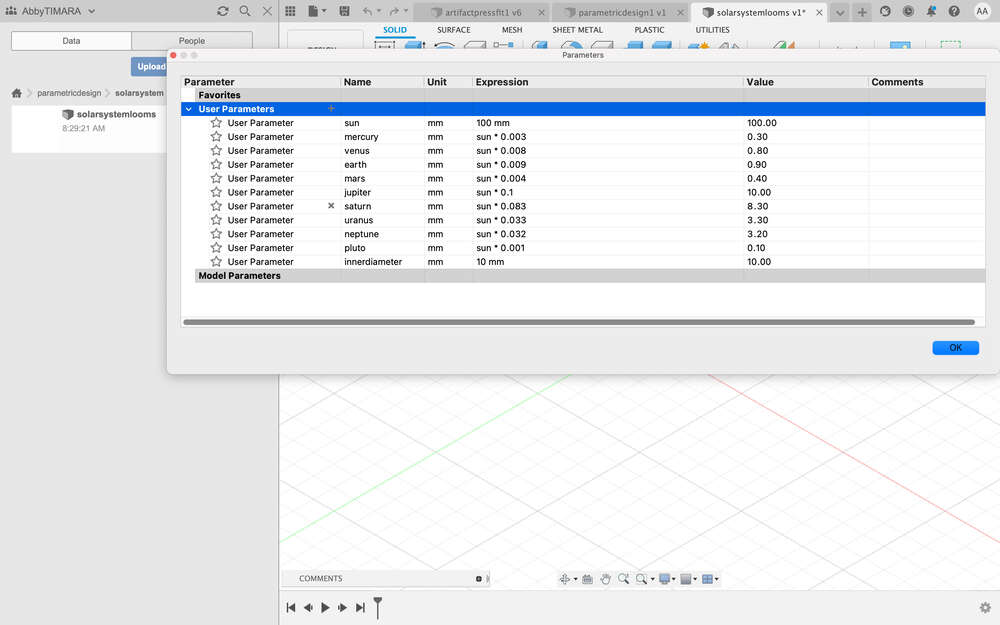
I made a new solarsystem folder in fusion and a new solarsystemlooms design space. I began by creating a spreadsheet for the diameters of the planet bodies. I entered a value for the sun and equations based on this value for the rest of the planets. I also made a parametric value for the amount to subtract from a given body to get the inner circle diameter.
Here is the spreadsheet:
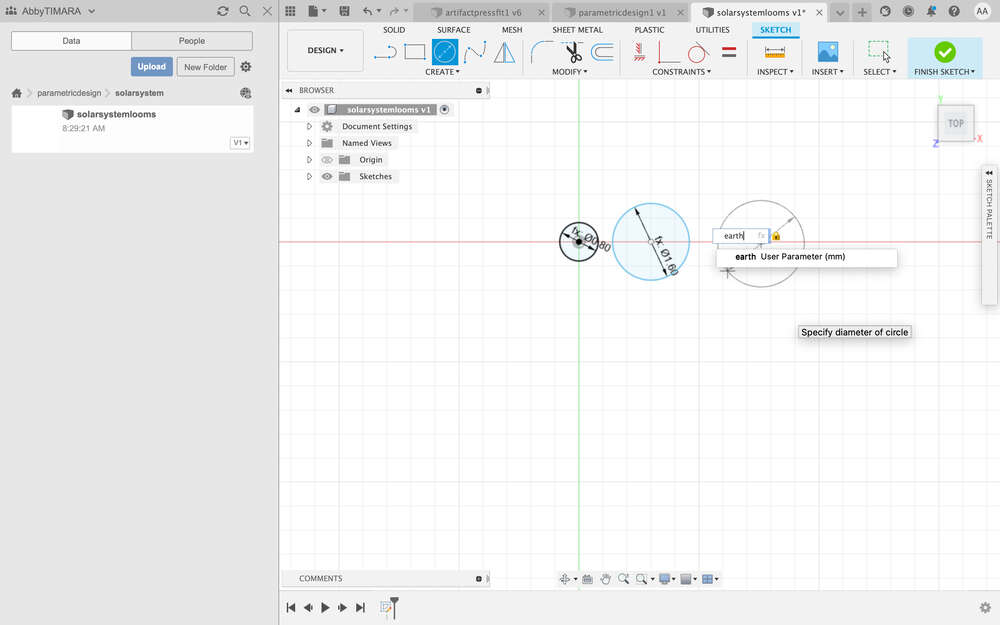
Here I am in the process of entering the diamters of the planets:
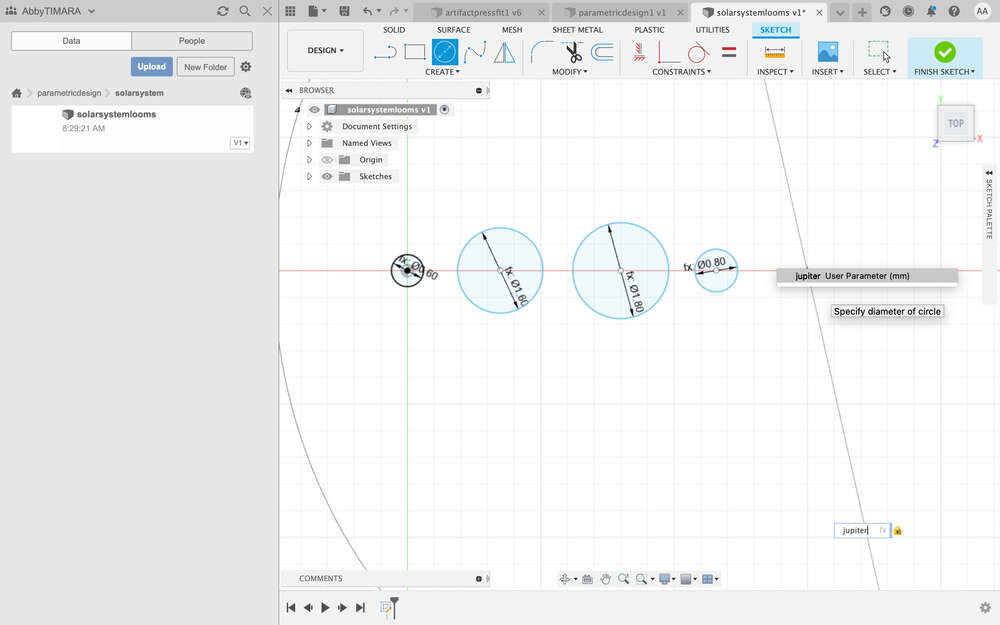
Jupiter is large:
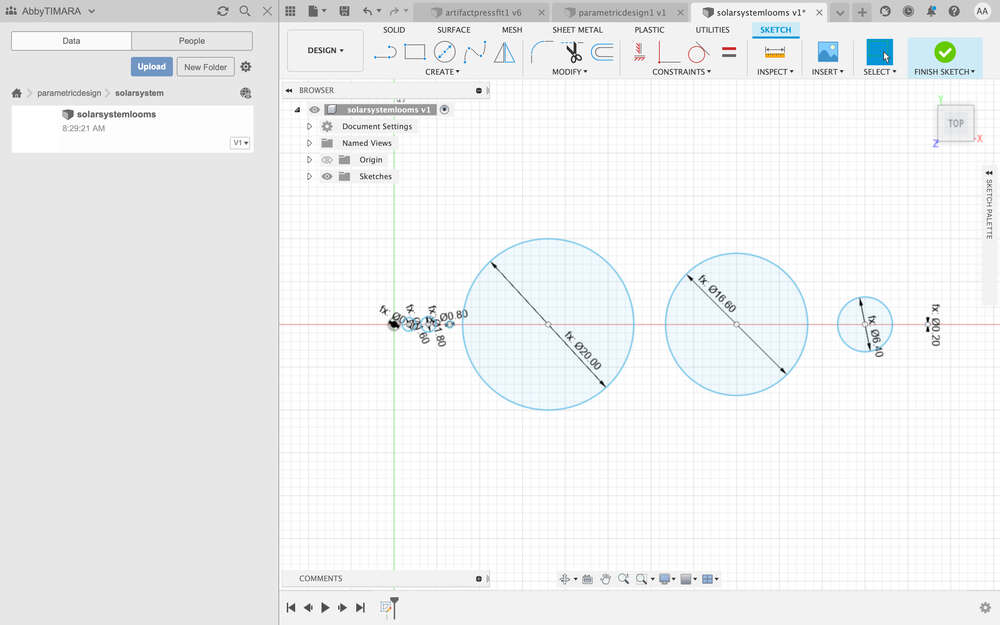
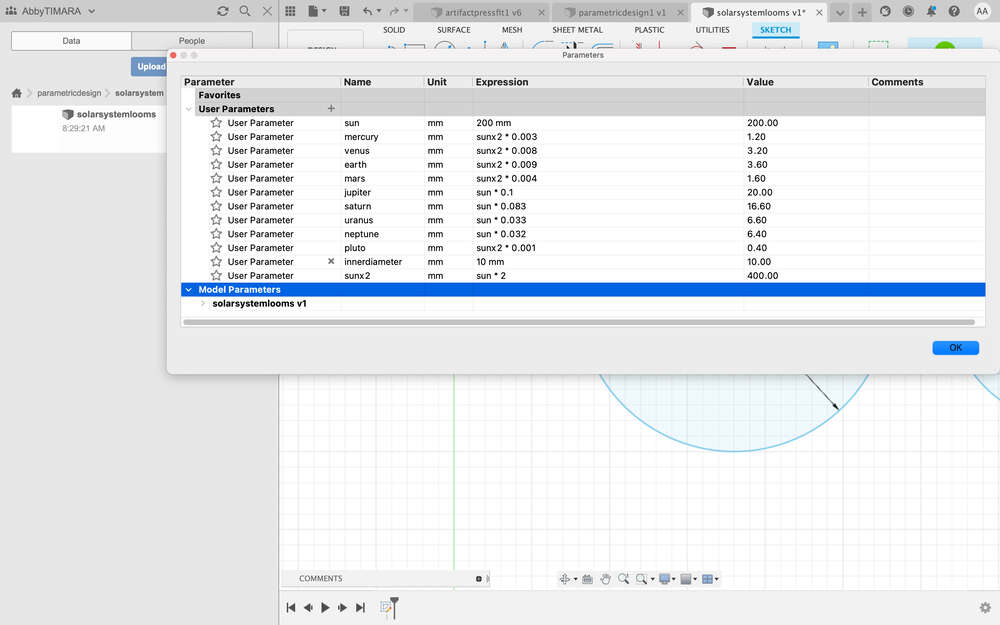
Here are all the planets where the sun – not pictured – is 200 mm:
This made me think that maybe what I need to do is have an inner ring of planets on the inside of the suitcase and an outer run of planets on the outside of the suitcase. And maybe I can make a note of a different scaling of the sun for the inside and outside of the suitcase. In addition to the solar system itself, it could provide an opportunity to discuss both scaling and perspective and perhaps artistic license, too…
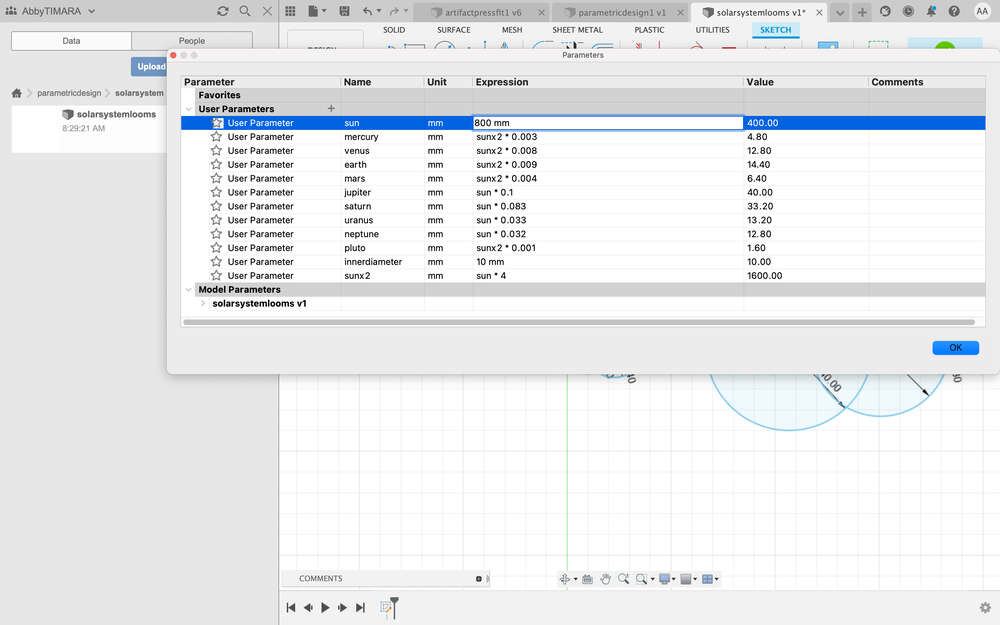
Since these speakers will be looms, eventually, they require two concentric circles to form the body of the loom. Next, when I went to add the inner circles, I planned to make the diameter of each of these circles equal to ‘nameofplanet’ - innerdiameter. However, in some instances, the innerdiameter parameter was going to be much too large. I decided to update my parameters spreadsheet to have two innerdiameter values, one for the larger planets and one for the smaller planets. I also decided to make two different sun values so that I could play with the scaling of the sun. I feel like I can make the case for using a value of sun*4 for the planets that are closer to the sun. Pluto makes less sense to include in this category and given all of the controversy about whether it counts as a planet, I’m happy to drop it from the GEARbox.
I experimented with the second sun:
And changing the parameters of the first sun:
Until I found values I thought would work for making speaker looms:
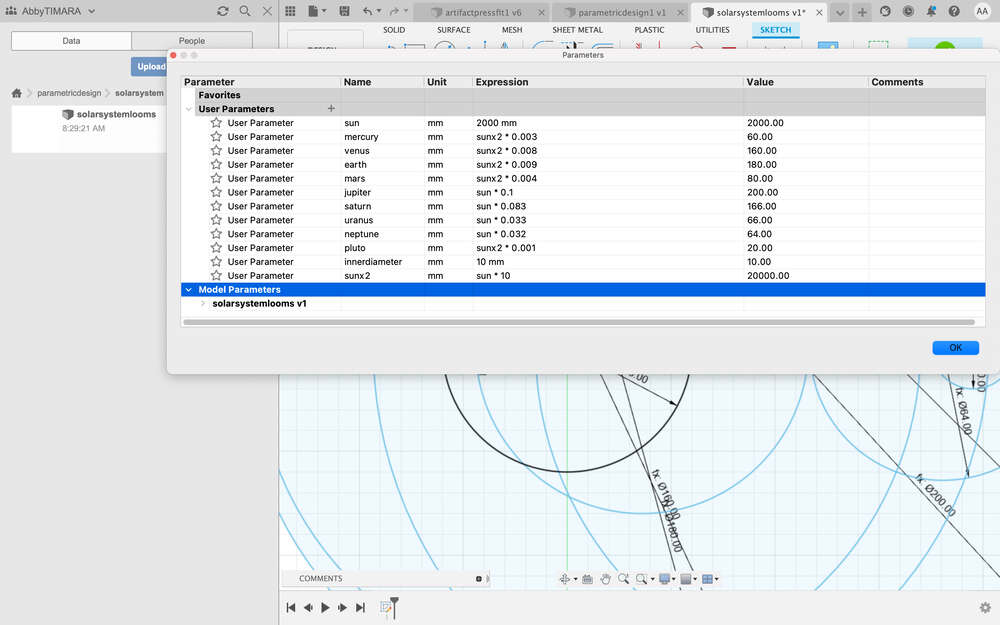
And then I set about making the inner diameter for these objects:
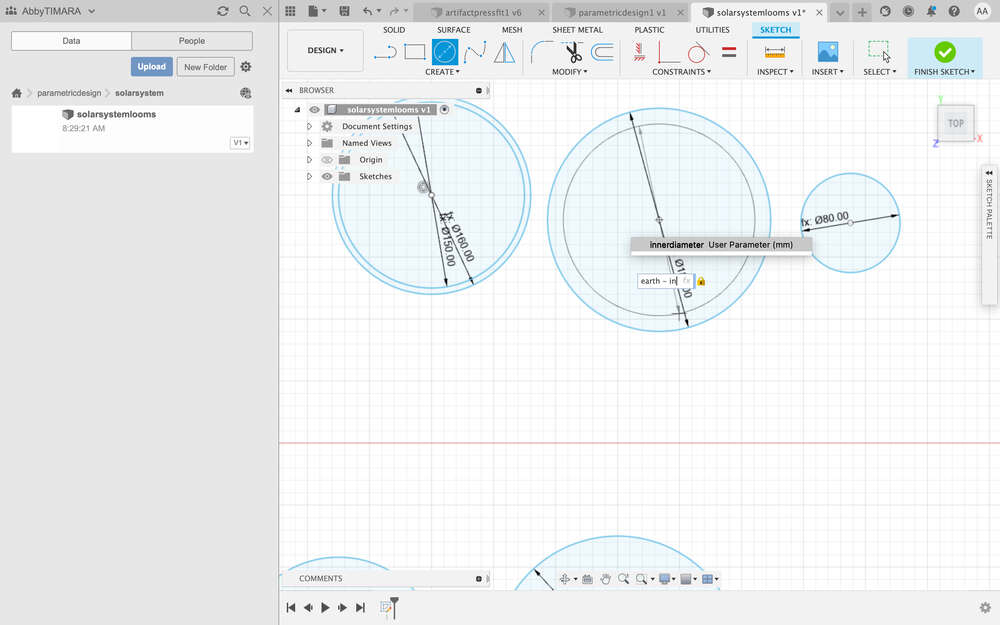
I realized perhaps I should have made one object and then scaled it to the correct size to save time. I will try this alternative workflow next time.
Next I needed to place holes in an array and I found this tutorial on the topic.
Mixer
When you open the GEARbox, the top half of the suitcase is devoted primarily to amplifiers and to the loudspeakers described above. However, a small strip of the top half of the suitcase, right above the hinges, is devoted to a very basic module for routing and possibly mixing audio signals. The module includes space for several inputs and for 8-9 outputs. (Can someone tell me definitively whether Pluto is a planet?) Between the inputs and outputs, there will be a space to place one of several interchangeable cards with functional conductive tape routing diagrams. Each card routes the audio signal in different ways (e.g., one signal to many speakers, two signals to one speaker, and so on).
I am trying to decide whether to incorporate any sort of variable resistor (perhaps a pressure sensor w/velostat) into this design so that it is more of a mixer rather than simply a routing device…I think it probably does not make sense since there will already be light-sensitive volume control at each speaker location.
Light Display
This section would very much be a bonus section; I am not sure I will have time to complete it, but I could imagine a star-inspired light display, perhaps using this tutorial as a starting point.
Prior Research
A lot of what I am trying to do for my assignment builds on prior work I have completed with students in my research lab. I aim to update this section to show a few examples in the near future.
To explore
During a global open time today, Milliam shared some useful tutorials about working with composites. In this tutorial, they are making a suitcase with composite. Milliam also shared their own experiences with making a helmet using composite here. I hope to explore composites more during wildcard week.
Original student template materials below for reference
Materials…coming soon
| Qty | Description | Price | Link | Notes |
|---|---|---|---|---|
| 1 | Material one | 22.00 $ | http://amazon.com/test | Order many |
| 1 | Material two | 22.00 $ | http://amazon.com/test | |
| 1 | Material three | 22.00 $ | http://amazon.com/test | |
| 1 | Material five | 22.00 $ | http://amazon.com/test | |
| 1 | Material eight | 22.00 $ | http://amazon.com/test | |
| 1 | Material twelve | 22.00 $ | http://amazon.com/test | |
| 1 | Material eleven | 22.00 $ | http://amazon.com/test |