Final Project - Toaster Oven to Solar Toaster Oven to Solar Tardis Oven - The FabWho Toaster Tardis
The Awesome Power of The Sun
Each day the showers the earth with 14,000 times the energy used by the human economy. It is delivered wirelessly, equitably, and for free. It hasn’t missed a day on the job in 4.6 billion years. It provides the energy needed to overcome entropy in the living world. The sun is the ultimate source of energy, order and structure for the Gaia, the living earth.
Overview Of My Project - The Solar Toaster/Tardis Oven (STO) or Fabwho Toaster Tardis (FTT) 
Conventional thinking about using solar energy ignores efficiency
My final project is a solar toaster oven (STO), a project meant to bring attention to the fact that solar energy has become so cheap that we can do dumb things with it. Discussions of sufficiency and the wise, efficient, and effective use of energy as ways to meet humanity’s energy needs have taken a back seat to increasing the supply of cheap renewable energy from wind and solar.
This focus on energy supply means that we are building solar panels and wind generators whose energy will ultimately be thrown away. The construction, installation, and maintenance of solar panels and wind generators have ecological consequences. We should be manufacturing and installing as few as we really need.
Deep Solar Toaster/Tardis Oven (STO) Theory
The chart below illustrates how pervasive wasted energy is in the US economy. Look at the right side of the chart. It shows the ultimate destination of energy as it flows through the economy, ending up as either rejected (wasted) energy or useful energy services. You can see that Rejected Energy or wasted energy (the light grey box - 66.7 quads) is twice as much as the energy used to provide Energy Services (the dark grey box, 31.1 quads). And as I will explain below it’s even worse than that.

The chart is called a sankey chart - informally known as a spaghetti chart because it looks like a bowl of spaghetti. Let’s untangle the spaghetti to better understand energy efficiency and the US economy.
The chart shows how energy flows through the US economy, how it is transformed and what use the energy is put to. On the left you can see the various sources of energy that provision the US economy. The middle shows how energy is transformed as it flows through the economy. On the right is a summary of what the energy ends up doing in the economy.
As you can see on the right of the chart, the largest output of the US economy is wasted energy (2/3 or 66.7 quad wasted out of 97.7 quads total). As an example, electric generation from coal, oil or nuclear energy sources wastes about 2/3 of the energy in the fuel. Only 1/3 of the energy in the fuel is turned into electricity and 2/3ds is wasted right at the power plant in the process of making the electricity.
You can see on the right of the chart that 1/3 of energy flowing through the economy provides useful energy services. But these energy services are often provided using systems that operate far below what the laws of thermodynamics would allow for efficiency, therefore much of the energy used for “energy services” is also wasted. Often the systems used to provide energy services use 5 to 10 times the energy than is required by the laws of thermodynamics. In other words, much of the energy that provides the “energy services” on the right side of the chart is also wasted.
Here’s an analogy that illustrates what happens to energy in the US economy. Imagine a city with water piped in from 10 miles outside the city. The pipe is leaky and for every 100 gallons pumped through the pipe to the city, 66 gallons of water leaks out through the pipe. The city needs more water and is considering installing a new more powerful pump. It would be smarter and cheaper to fix the leaks in the pipe, which would triple the amount of water available to the city - from 33 gallons using leaky pipes to 100 gallons using repaired pipes with the same pump.
The current discussion about sustainable energy focuses almost exclusively on replacing the non-renewable fossil fuel and nuclear energy sources on the left side of the chart with solar based renewables (wind and water power are ultimately derived from solar energy). The rest of the highly inefficient economy is left alone.
My project illustrates what could be done in the broader economy by reducing energy demand first and powering with renewables second. My project is a superinsulated toaster oven that can be powered by 1/10 the energy (and 1/10 the solar panels) required by a conventional toaster oven.
Beyond thinking of efficiency is the consideration of sufficiency - how much is enough? When do increases in consumption and energy use begin to decrease rather than increase human well-being?
The construction, installation, and maintenance of solar panels and wind generators have ecological consequences. We should be manufacturing and installing as few as we really need.
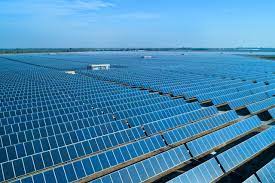
My last job before the fabacademy course was working on a large solar and wind project. The solar project will have a capacity of 300 megawatts and cover an area 1.6 km wide by 5 km long with solar panels. Solar electric panels are so cheap that we’re covering the earth with projects like this to create energy that, for the most part, will provide no useful purpose.
Weekly Progress
I’ll put progress updates on my final project. Most recent updates are first below.
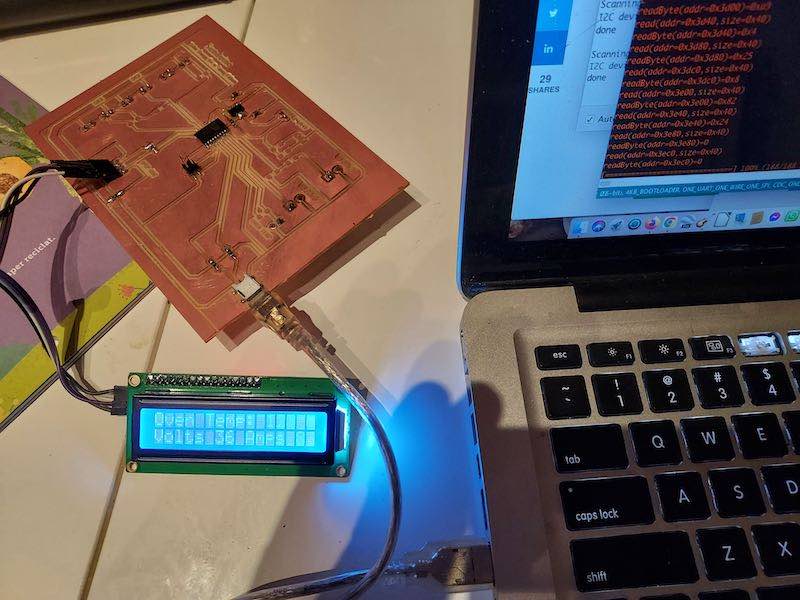
June 13, 2022
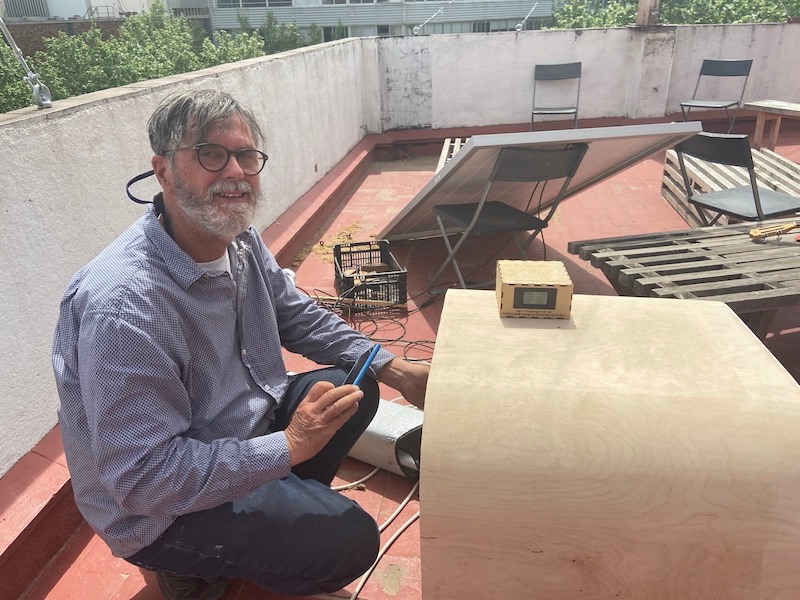
These past few days I worked on the video, my slide, and packaging the electronics with the new ESP board. For fun I did some engraving by hand using the sun and a Fresnel lens
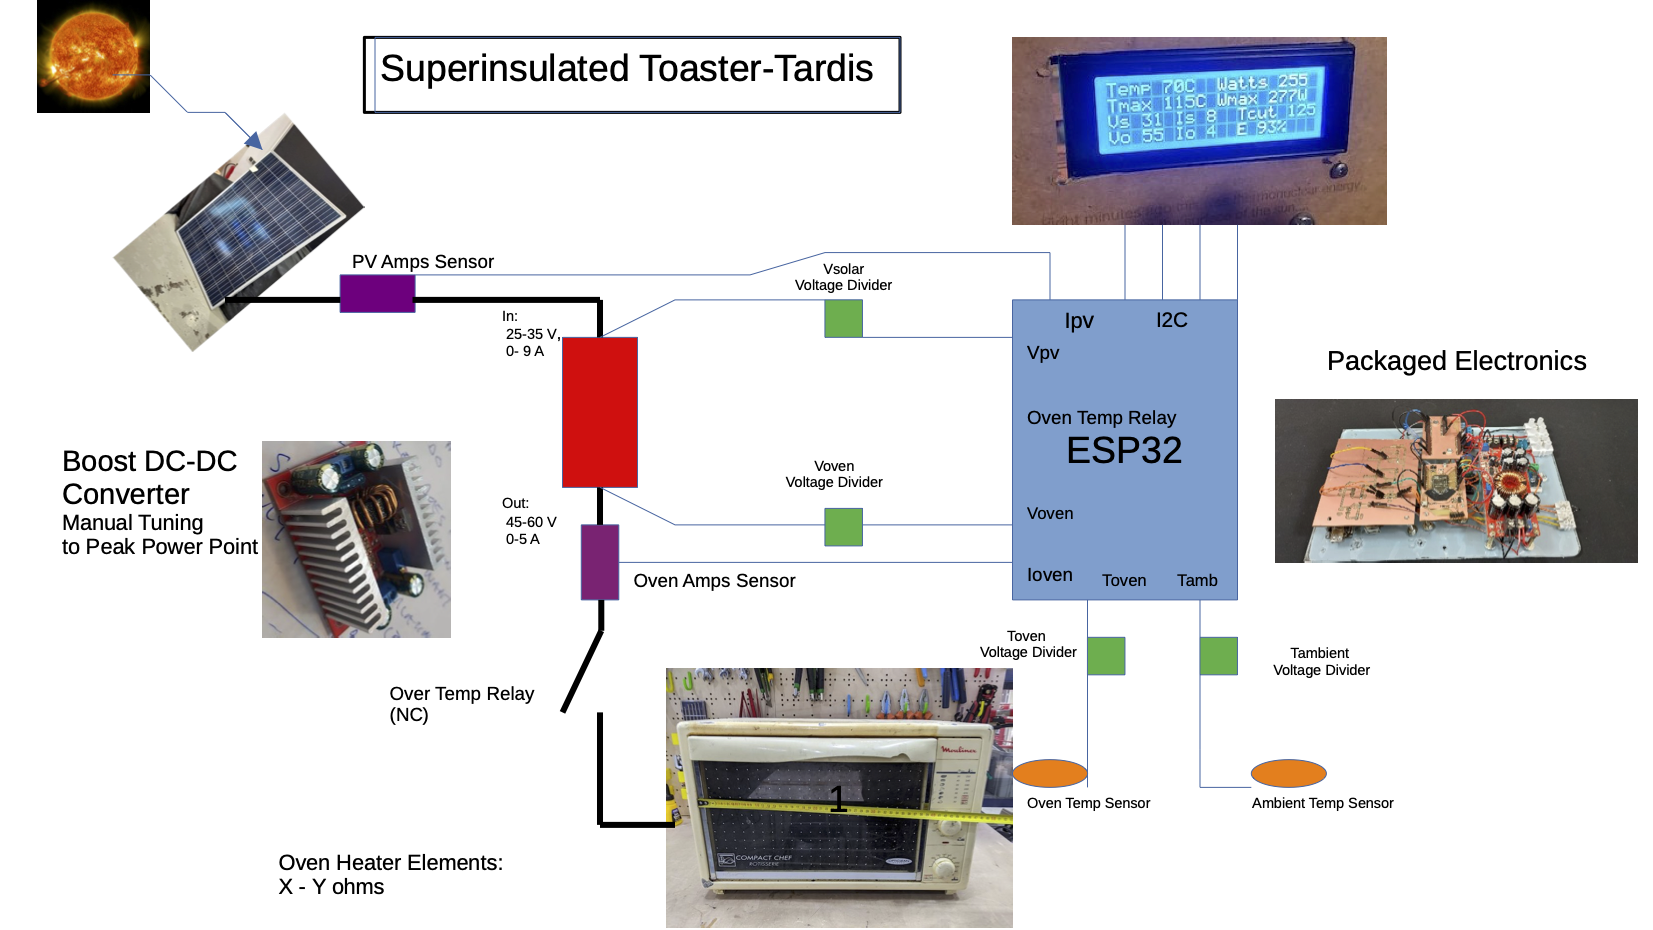
Final Design Block Diagram
SAMd21, SAMD11 based Sunduino Controller and relay board

ESP32 Based Controller Board
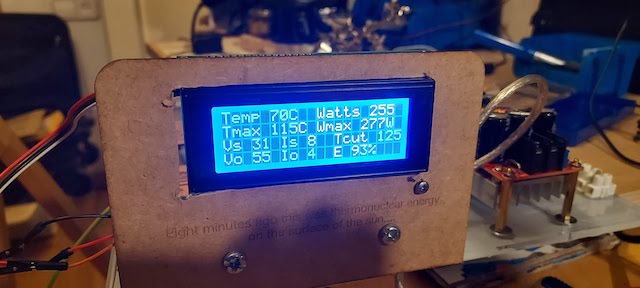
Display driven by ESP32 controller showing oven parameters
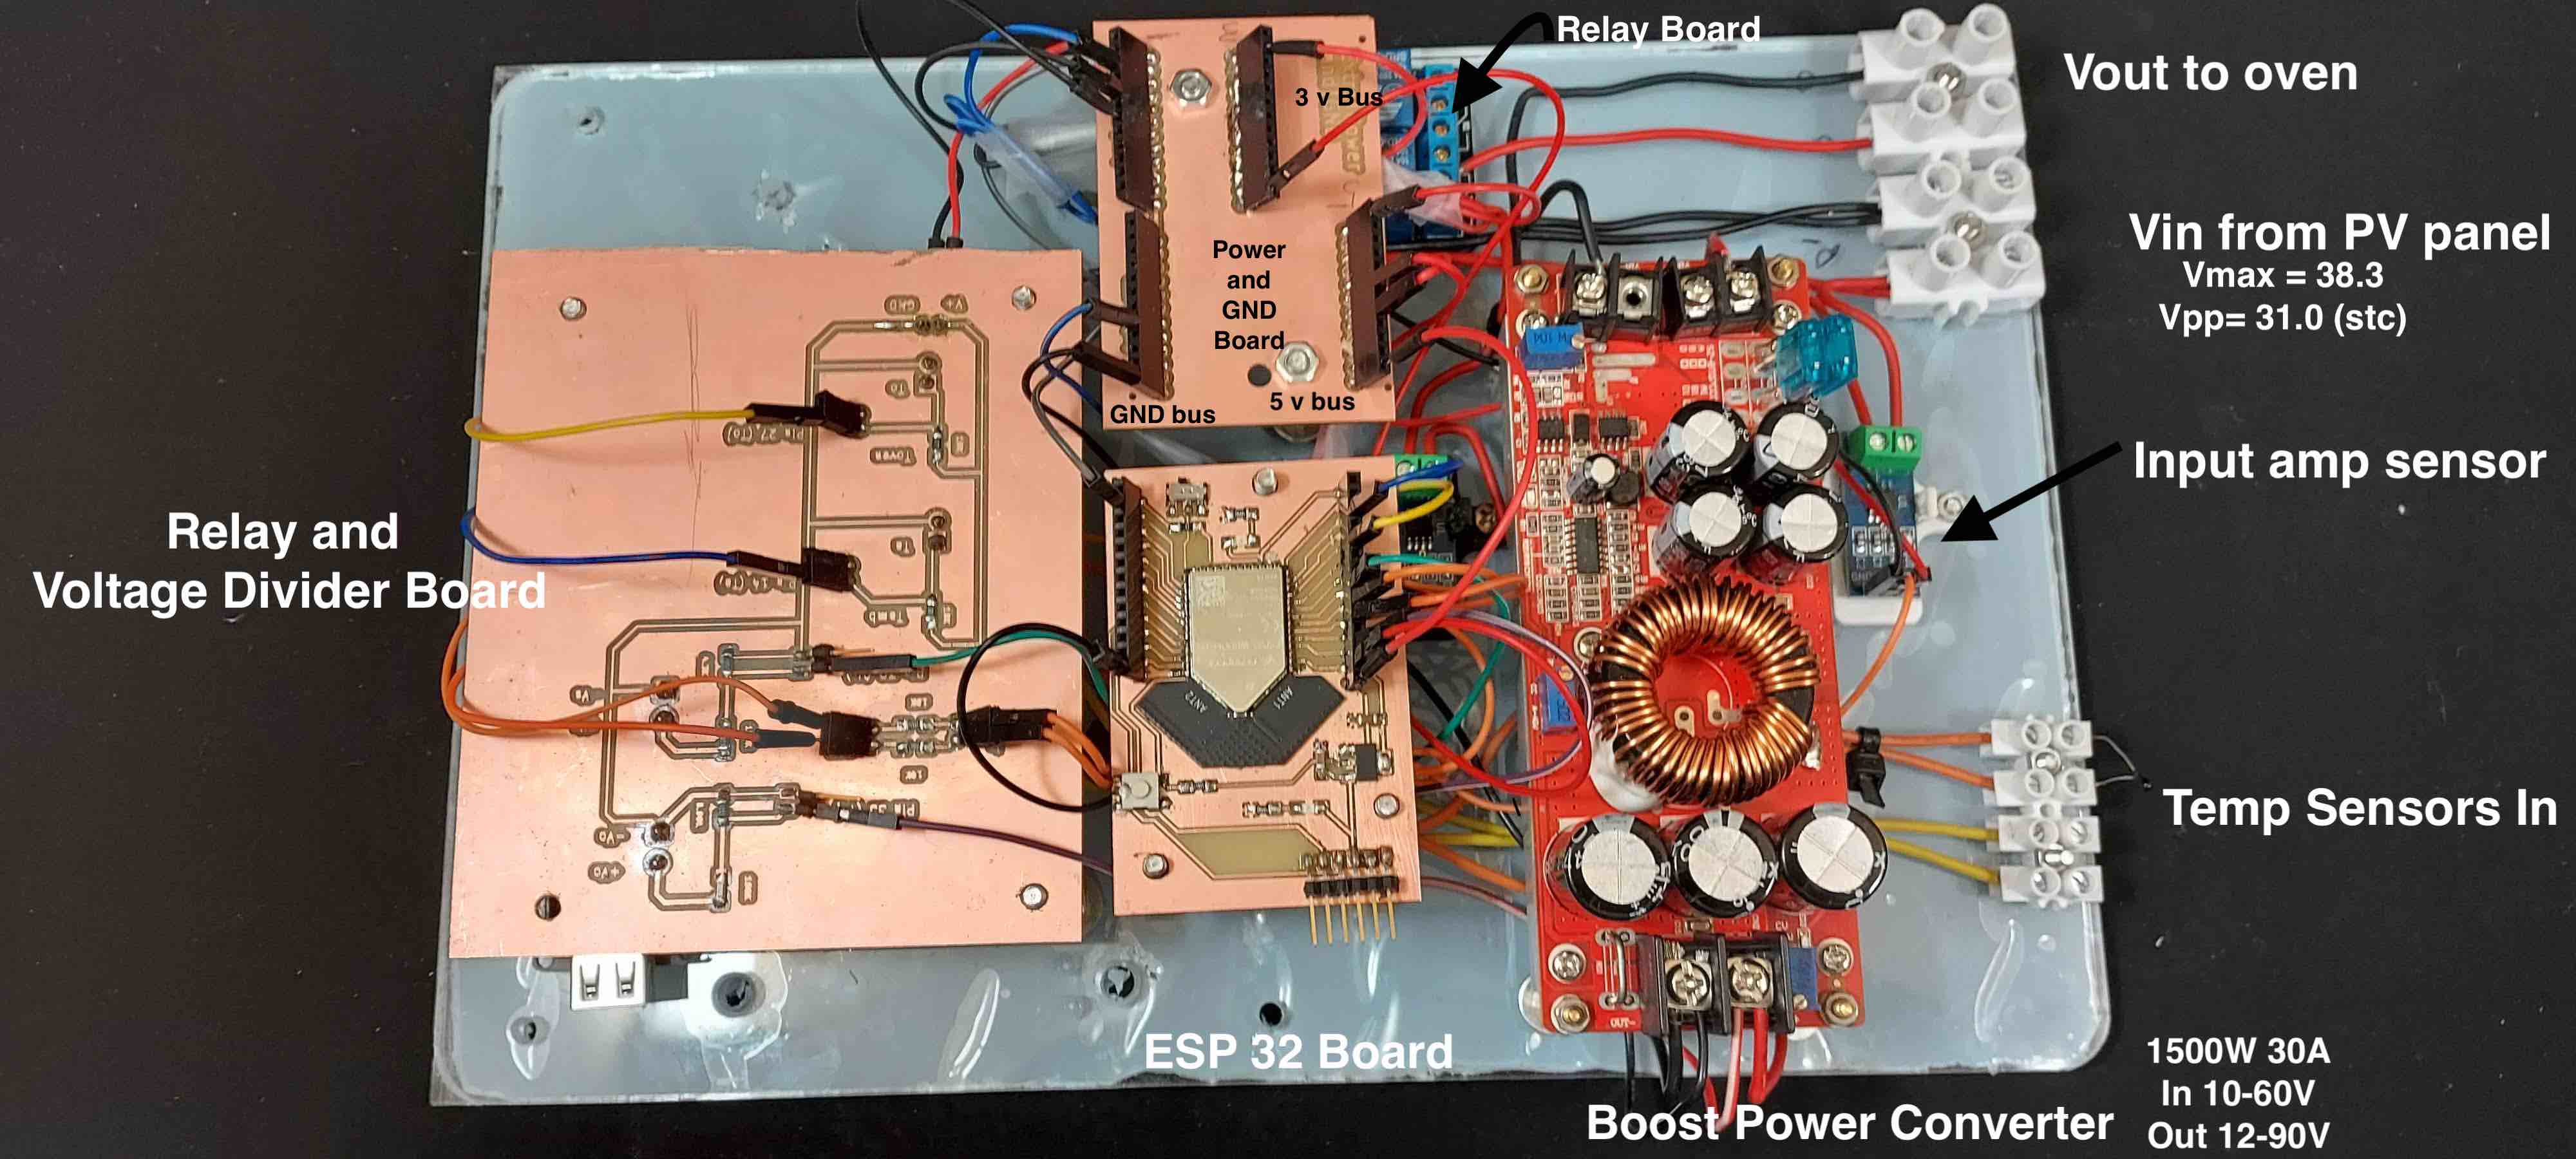
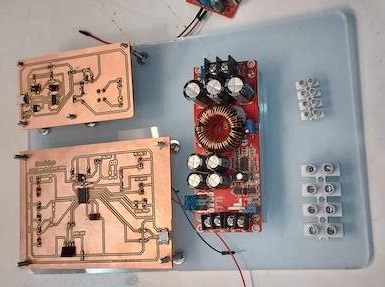
Had to switch to the esp32 because even the Samd21 didn’t have enough memory to run my programs for monitoring temperatures and energy flows and operating the relay for the oven. I was able to run each individual module of the program on the SAMd21 but when I put them all together it ran out of memory. The i2c library and the calculations needed to display temperatures both take more memory than the SAMD21 has. I tried many options over several days to get more room on the SAMD21, including using it without the bootloader, none gave enough memory. On the advice of Josep and Eduardo I switched to the ESP32, which meant designing and making another controller board and integrating it into the sensors and display that I used.
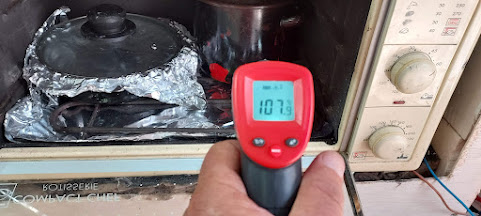
June 8, 2022 Success!! 

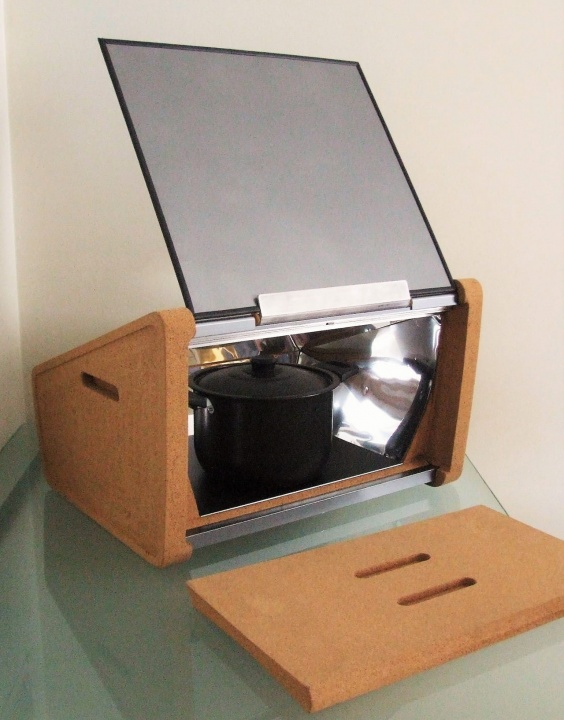
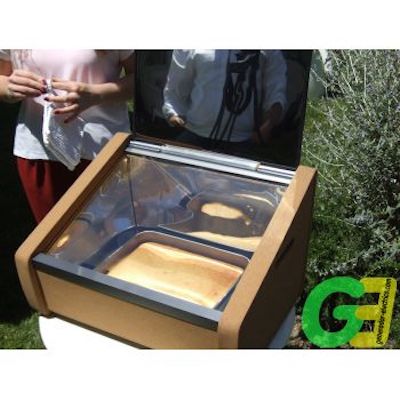
My criterion for the success of the project is to make a paella - I made two this week.
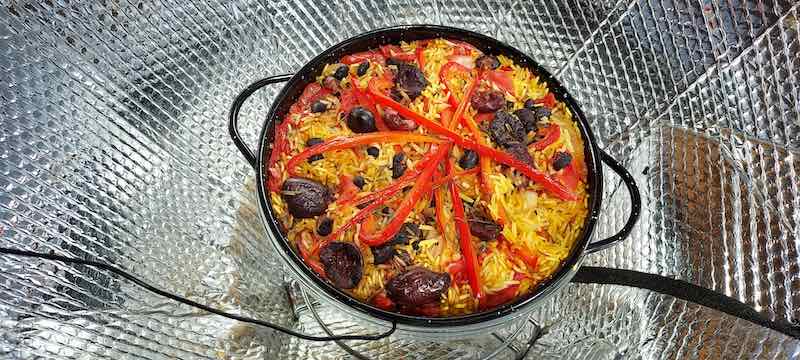
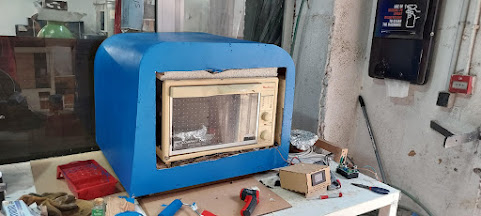
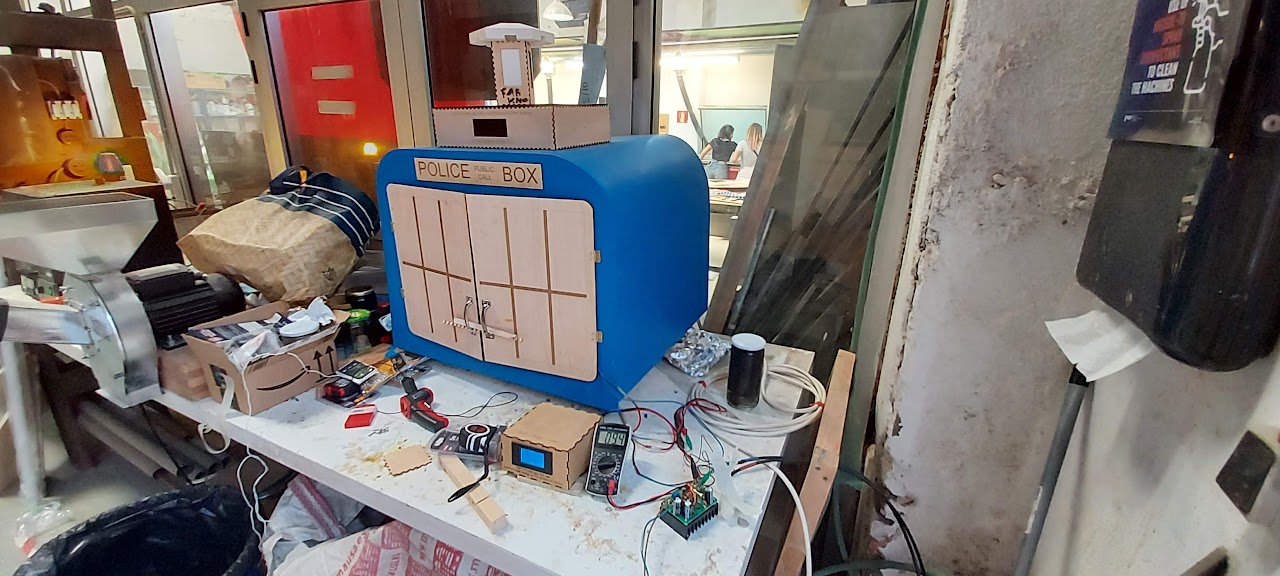
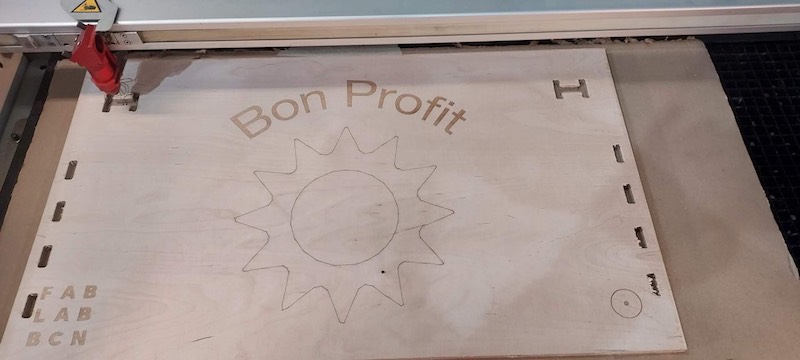
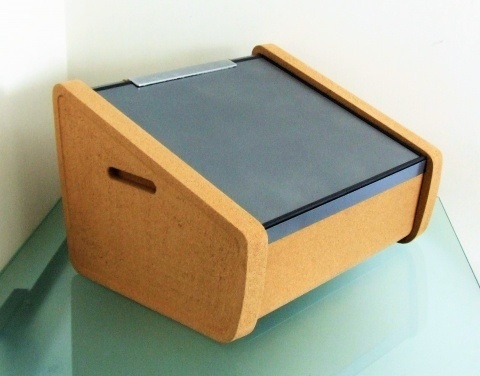
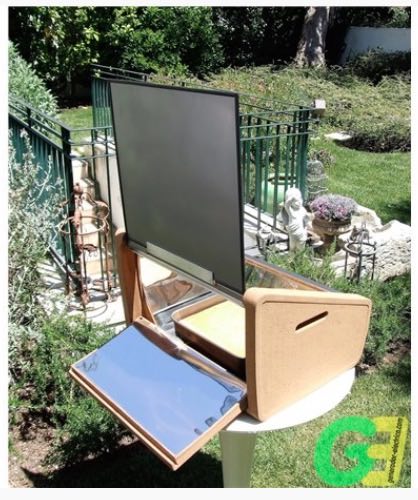
This week I finished the outer insulated cover for the oven and decided, for fun, to make it look like a Tardis from Dr Who - The FabWho Toaster Tardis.
WIth the oven insulated and enclosed I got temperatures over 100 deg c and was able to cook a delicious paella.
By concentrated all the solar power in just one bottom element, I was able to use the oven like a hotplate and got a really good soccorat (the delicious crispy rice part of a good paella). I can see that the oven could have a number of modes - hotplate using the bottom elements, broiler using the top element, and oven using both the top and bottom elements.
June 1st
This week I discovered that the SAMD21 chip I chose for the main control board does not have enough memory to do what I want. It would run the display, but if I added any calculations it ran out of memory. I tried loading it without a bootloader, still not enough memory. I tried commenting out various parts of the code to see what was taking memory but it seems that it will not work.
Switched to the ESP32 on the recommendation of Josep and Eduardo I have an ESP32 test board and it runs all of my code with plenty of room to spare. This means milling stuffing and debugging a new board and repackaging everything.
I was allowed to move my oven and solar panel from the roof to the first floor lab, which made things an order of magnitude easier to work on. Did lots of experimenting manually adjusting the output voltage on the DC-DC converter so that the peak power point of the PV panel was matched to the oven elements under different cloud/sun conditions.
PERHAPS use a different image or the video of me adjusting to the peak power point
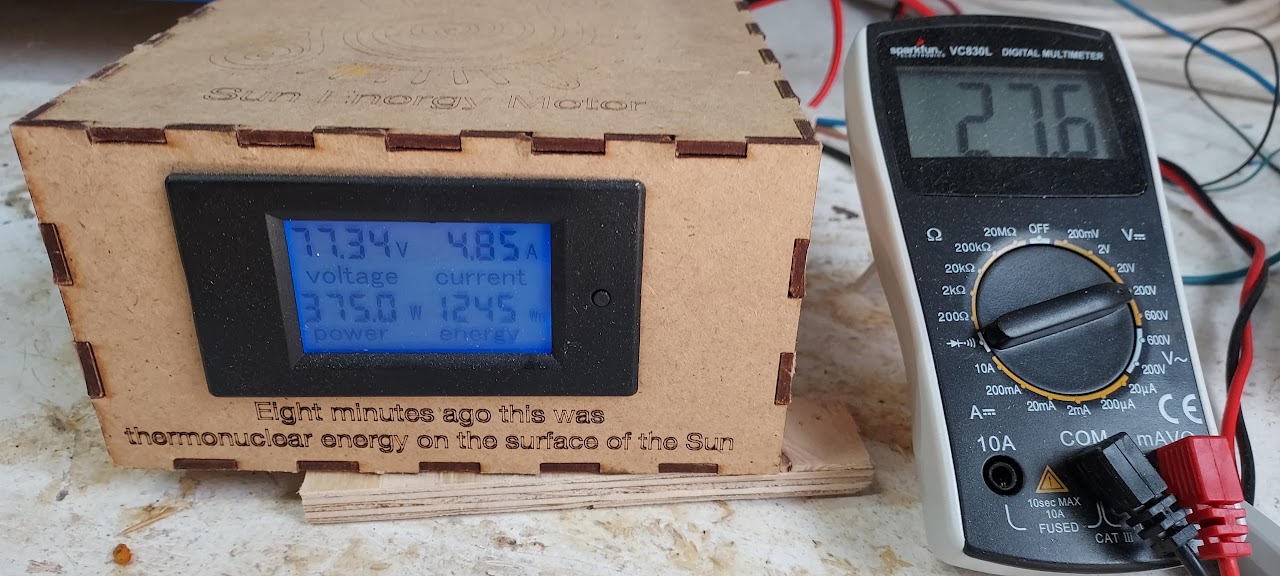
Got the power used by the oven up to 345 watts from 140 watts with no DC DC power converter. I was surprised because the panel is rated at 277 watts under standard temperature and conditions ( STC). I think this is due to shiny aluminum box next which reflected additional sunlight on to the panel.
I finally got to do some serious cooking.
May 20
Lots of progress since my last update. Built the relay board and tested it, got a boost dc-dc converter, mounted them all on a piece of acrylic
Thought it might be useful to have the pin outs on my boards:
Pin assignments
RELAY BOARD (SAMD11 14 PINS)
1 PAO5 SDA (I2C)
2 PAO8/XIN
3 PAO9/XOUT
4 PA14 OR2
5 PA15 SCL (I2C)
6 PA28/RST RST (PROGRAMMER)
7 PA30/SWCLK CLK (PROGRAMMER)
8 PA31/SWDIO DIO (PROGRAMMER )
9 PA24 D- (USB)
10 PA25 D+ (USB)
11 GND
12 VCC (3.3 V)
13 PA02 0R1
14 PA04 0R3
SUNDUINO (SAMD21 20 PINS)
1 PA05 NO CONNECTION (NC)
2 PA06 NC
3 PA07 ON/OFF
4 PA08/XIN NC
5 PA09/XOUT NC
6 PA14 0R1
7 PA15 OR2
8 PA16 OR3
9 PA22 SDA (I2C)
10 PA23 SCL (I2C)
11 PA28 RST
12 PA30/SWCLK (PROGRAMMER)
13 PA31/SWDIO (PROGRAMMER)
14 PA24 D- (USB)
15 PA25 D+ (USB)
16 GND
17 VCC (3.3 V)
18 PA02 V TEMP SENS
19 PAO3 SHUNT IN
20 PA04 PV VOLTS
4 line lcd - GeekPi I2C 20x4 uses LiquidCrystal I2C library by marco schwartz
2.42 in OLED display, set up for SPI can use I2C by resoldering some resistors
May 15
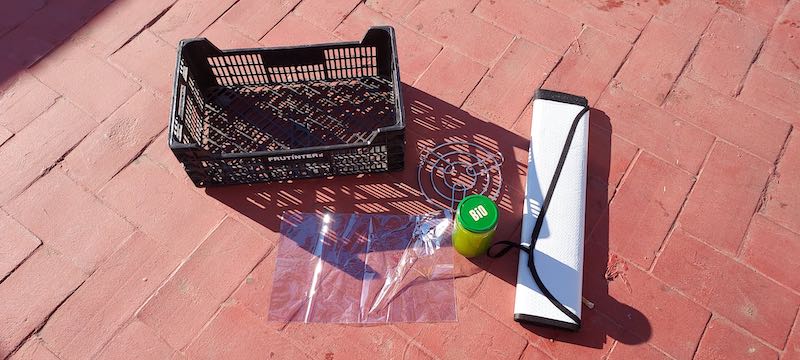
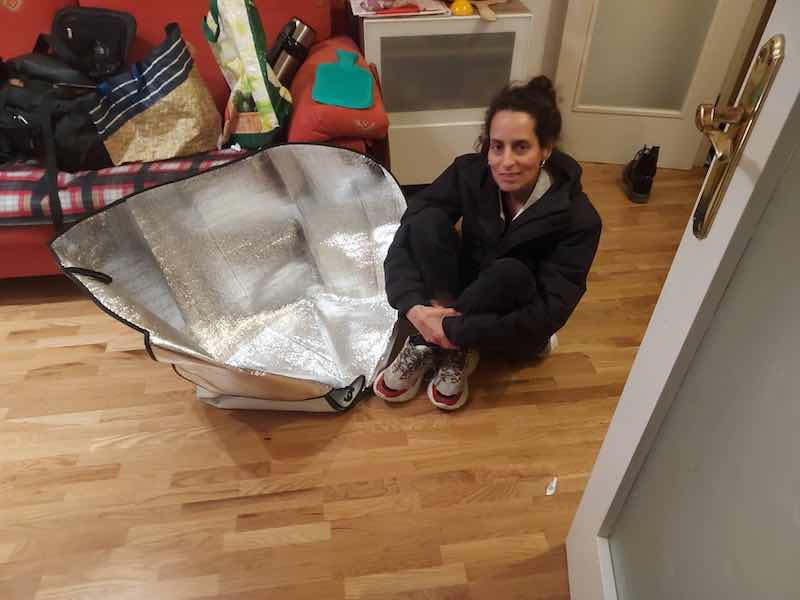
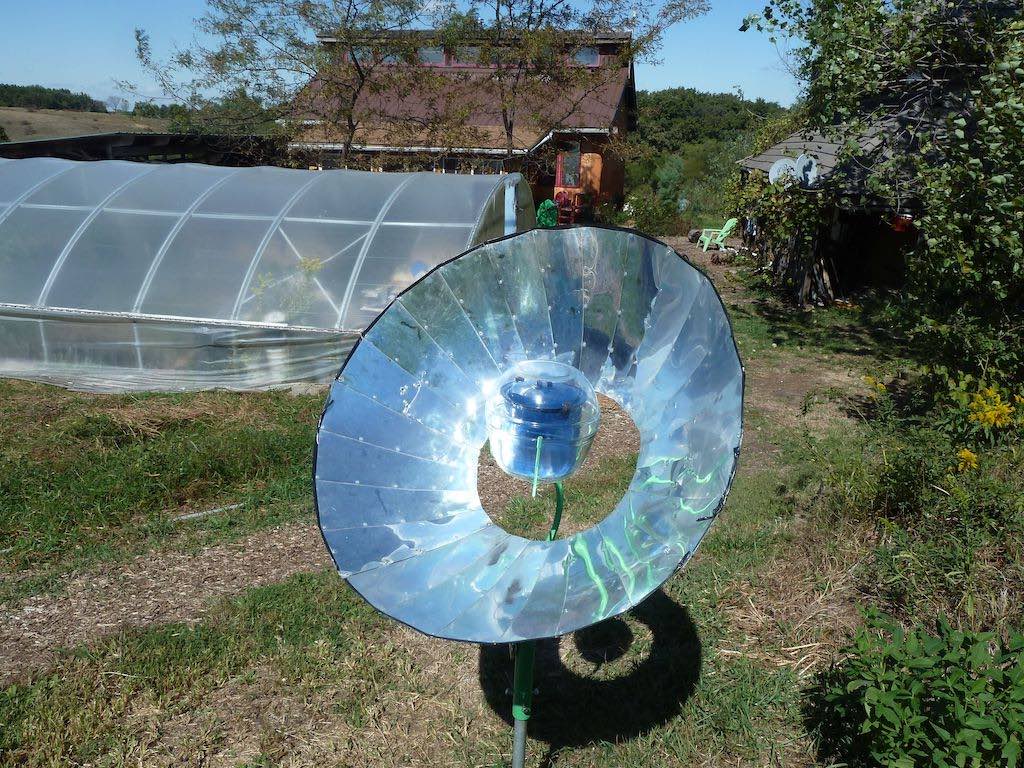
I built a couple of other solar ovens that use the light and radiant energy of the sun directly.

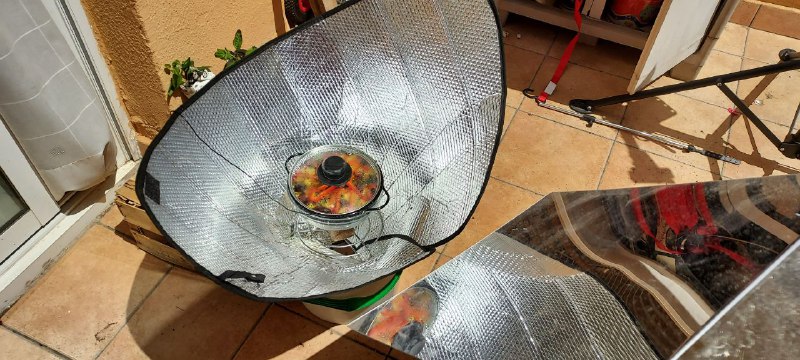
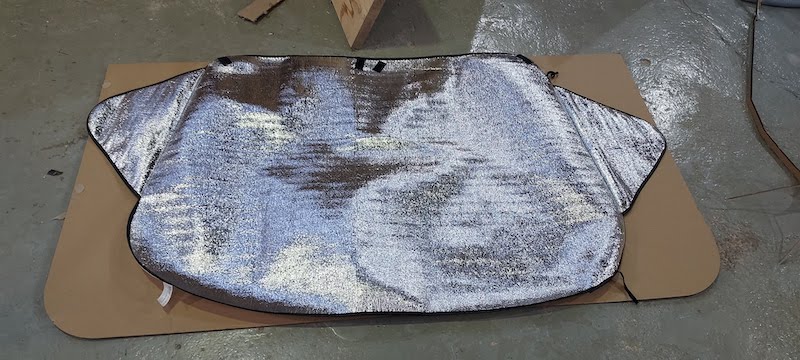
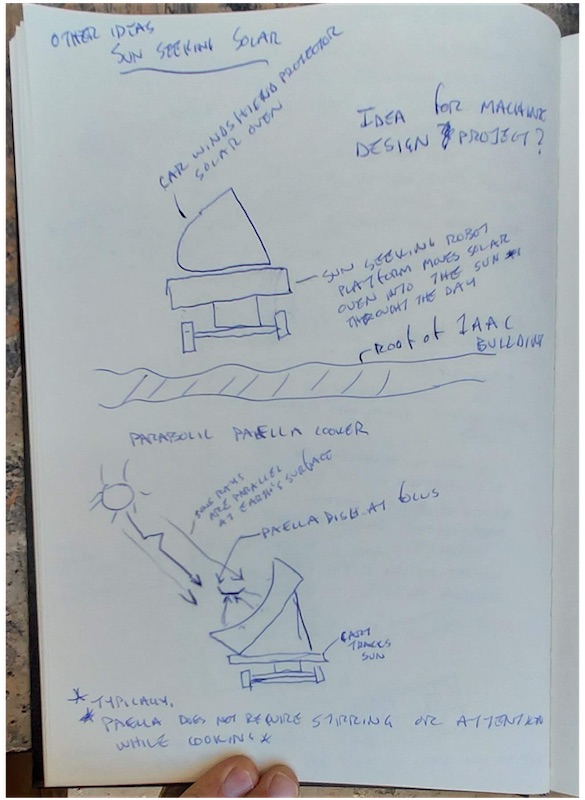
I got the first idea for a cone style solar oven from a reflective car windshield cover I got at Els Encants market for 1 eu
Car windshield cover solar oven kit
Oven assembled
Oven in use
Box Oven, opens from glass or back
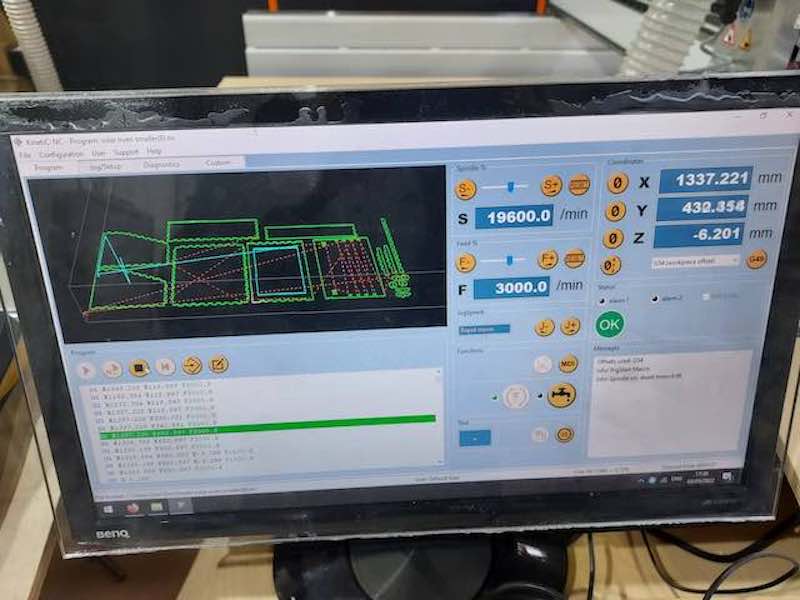
Screenshot of Raptor CNC machine cutting the box oven
Maxi-sized windshield cover based oven under construction - cardboard backing cut on laser. This one had great potential but got destroyed by rain on the roof
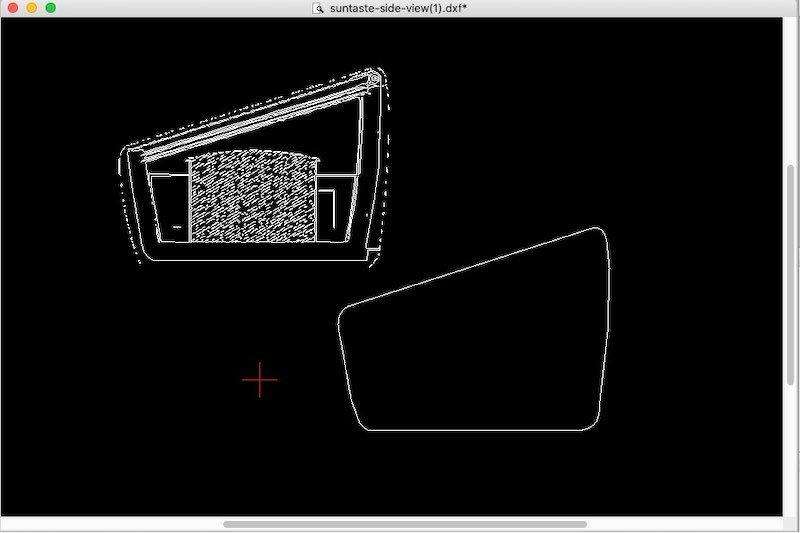
Suntaste Oven
Working on making a cardboard version of this beautiful and elegant cork oven


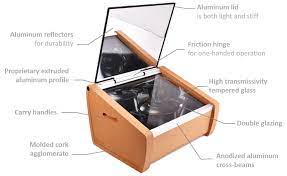
I found a section drawing of the Suntaste Oven and scanned it into Librecad. I traced the outline to make a pattern for laser cutting cardboard insulation in the shape of the oven.
After Fabacademy I plan on continuing designing a series of large powerful direct solar ovens for making things like bread, pizza, and paella at farmers markets and festivals.
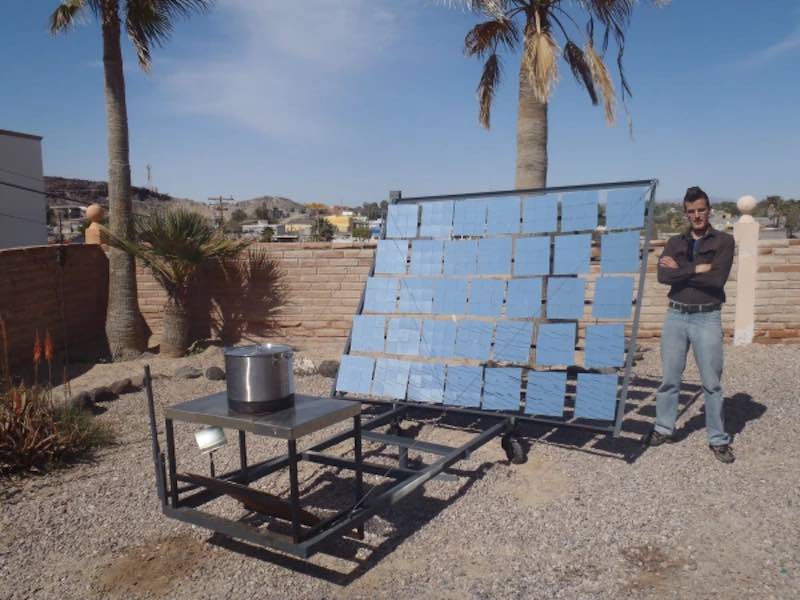
Found these two solar bakeries in France that use large format solar ovens to bake bread commercially:
They use this oven, designed in Finland
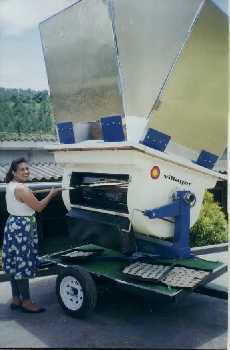
The Villager, another large solar oven
And finally…
This one reaches 400 degrees F
April 20
Test insulated oven, research mosfets for inverter, set up voltage monitoring and temperature sensing


April 4
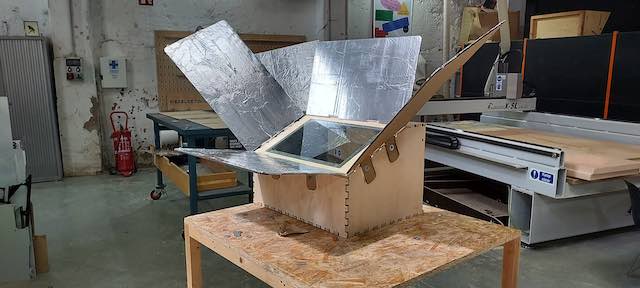
Working on the cover and insulation
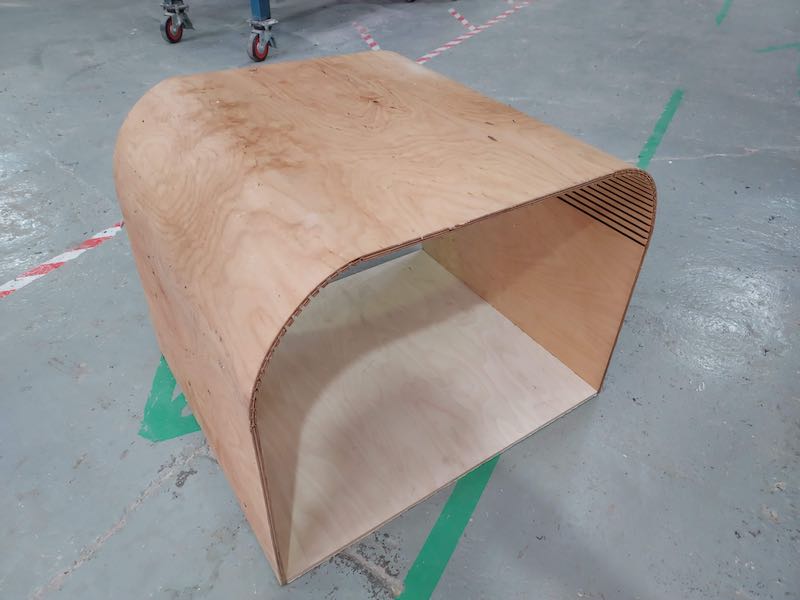
I designed a curved cover for the oven, made of 9 mm plywood and cut on the CNC machine. The curve was made by cutting closely spaced grooves in the plywood at the corners. I made several test corners:
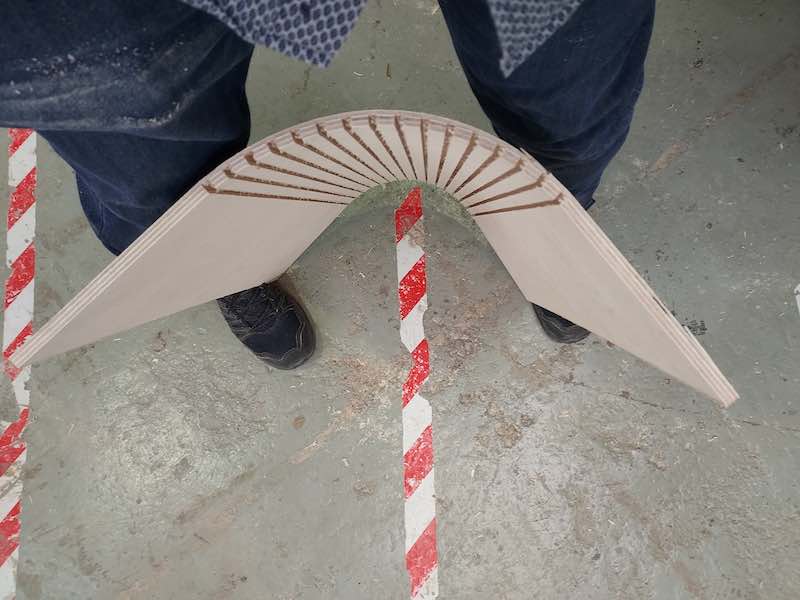
The top and sides of the cover were made of one piece of plywood, the bottom, back and front each made from separate pieces of plywood. The first time I cut the top and sides piece I made a mistake and the corners were not in the right place, which made the box crooked. I had the cnc machine do two cuts from separate files - one for the outside of the box and one for the kerfs - on the second cut the origin didn’t line up with the origin on the first cut:
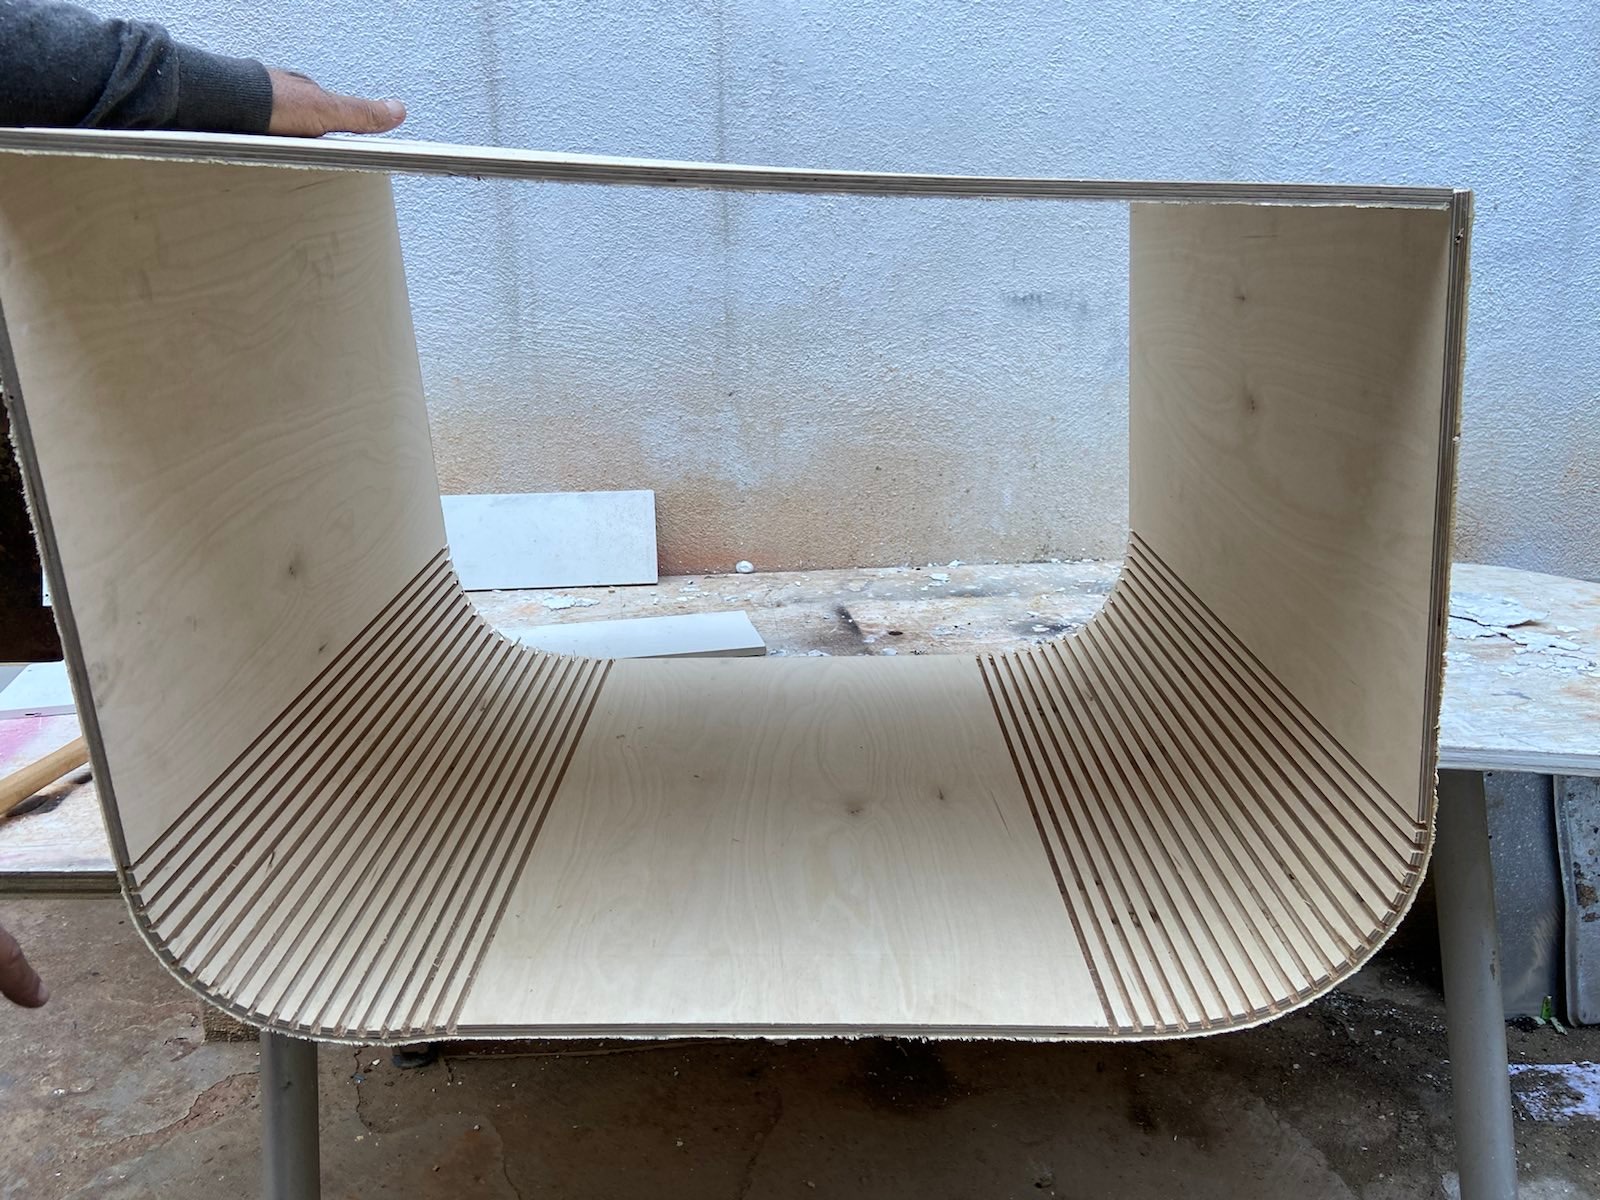
Redid the cut using one file for the outside and the kerf. Success with the cover on the second try!
March 20th
Sky That Day

I’ve chosen the SamD11c 21 pin package, it meets the requirements I have for inputs and outputs - the Samd 11c 14 pin package is too small.
March 15
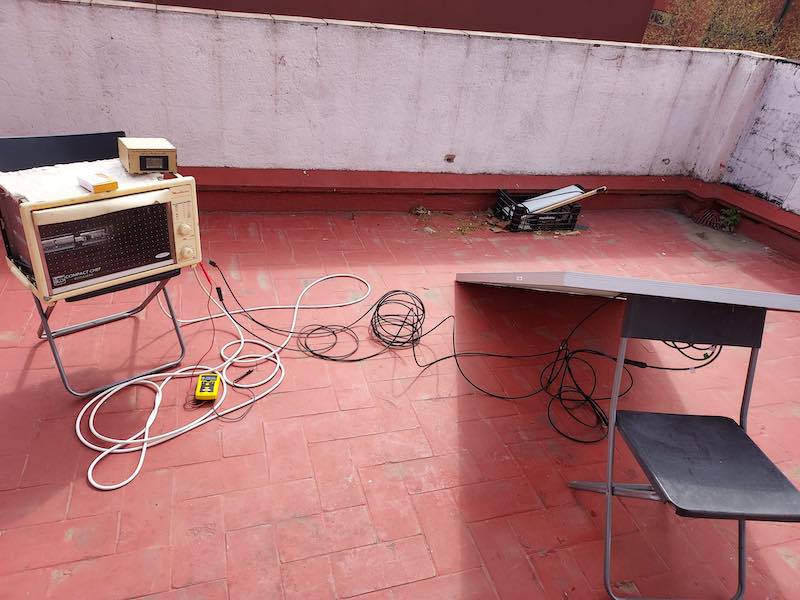
In the last couple of weeks I have been testing the uninsulated oven and the panel on the roof of the IAAC building.
Here’s my testing set up:
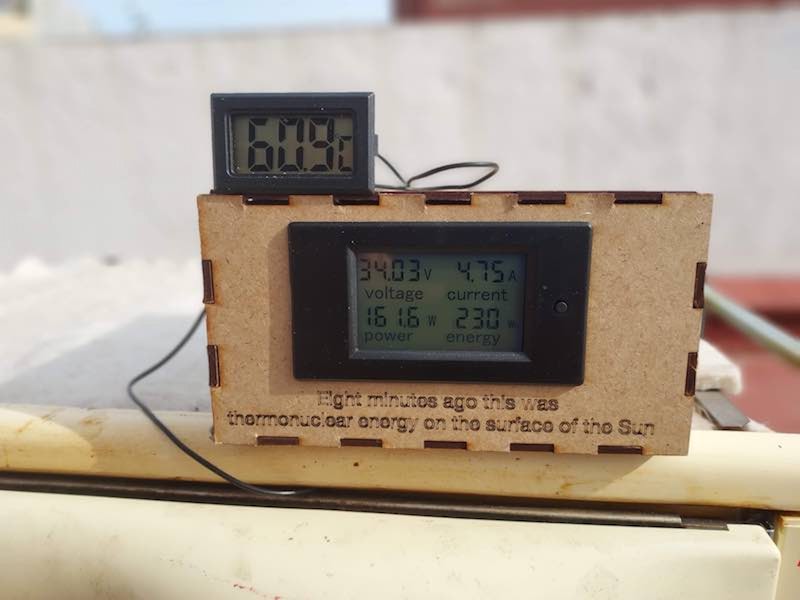
Here’s a test with the top element and both bottom elements all connected in series.
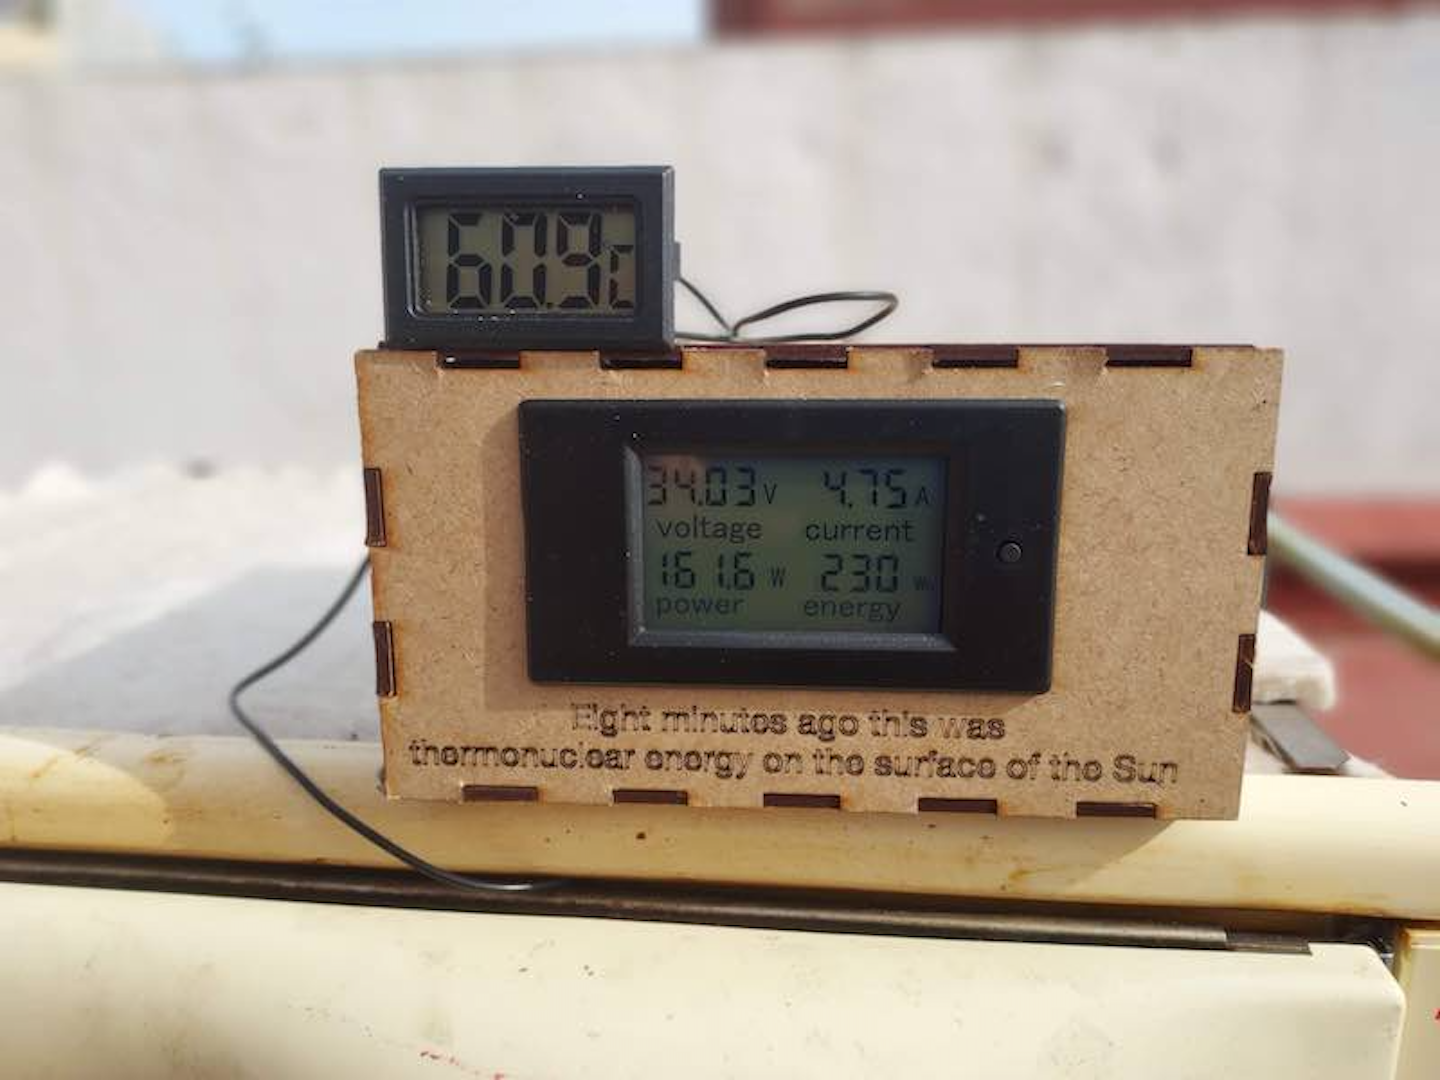
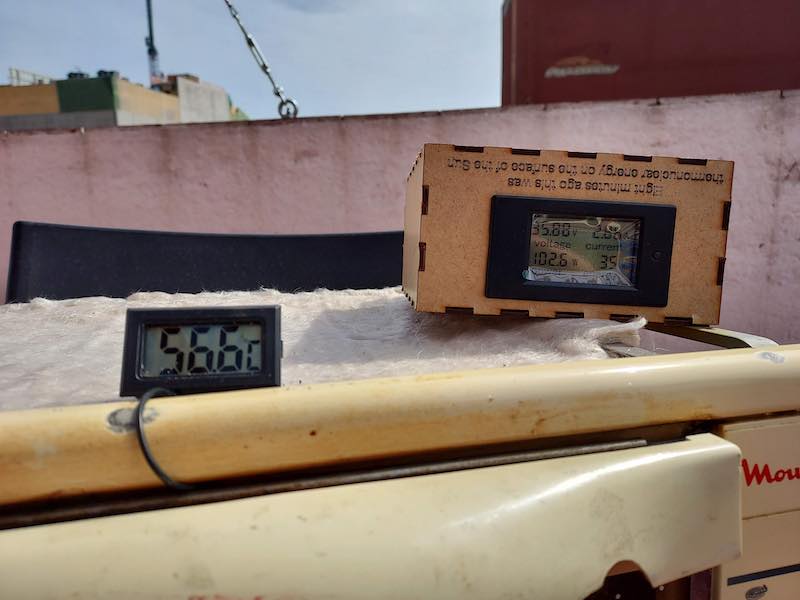
The oven was at 60.9 deg C, electricity delivered to the oven from the panel is 34 volts, 4.75 amps, 161 watts, 230 w-h delivered to the oven so far that day.
This is far below the 277 watts that the panel could deliver if it operated at it’s peak power point on a sunny day. This is typical of the kind of performance I got before I hooked up the boost DC-DC power converter that allowed the solar panel to operate at it’s peak power point.
Higher Oven Temperatures Require More Insulation
Simply insulating the oven would make the temprature in the oven higher. Here’s why: Adding insulation slows the rate of heat flow from inside the oven to outside the oven. If the energy delivered to the oven stays the same, the temperature inside the insulated oven will rise so that the rate of heat lost through the walls of the oven the rate of heat given off by the elements in the oven.
Let’s look at this a little closer. The formula for conductive heat loss through the wall is:
Q= A*(Tin-Tout)/R
Where:
Q= rate of flow of heat through the walls
A= area of the walls of the oven
Tin= temp inside the oven
Tout= tmp outside the oven
R= insulation value of the oven walls (the resistance of the walls to the flow of heat trhough them)
In the case of the Solar Toaster Oven (STO):
Q = the amount of energy that is delivered delivered to the oven and converted into heat, a constant in our example.
A = the area of the walls, a constant
To = the temperature outside the oven, a constant
Ti = the temperature inside the oven, a variable
R = level of insulation surrounding the oven
If R goes up (more insulation) then Ti, the inside temperature of the oven must also go up to keep Q, the heat lost through the walls of the oven equal to the heat delivered to the oven.
Due to the conservation of energy clause in the laws of thermodynamics, all the heat that is delivered to the heating elements must eventually escape through the walls of the oven (some heat is also lost through radiation and convection but let’s ignore that for now)
OVEN HEAT FLOW DIAGRAM
Let’s say we keep the energy delivered to the oven the same and we add insulation (increase R). This will slow the rate of heat flow through the walls of the oven. For a short time, the heat flowing out through the walls is smaller than the heat being delivered to the oven. The oven temperature has to quickly rise until the energy flowing through the walls is equal to the heat delivered to the oven. Adding insulation means that the temperature difference between inside the oven and outside the oven (Tin -Tout=Td or delta T) will have to increase.
In simple terms, all the heat that is flowing into the oven escapes through the walls of the oven. Added insulation slows heat flow through the walls, assuming the temperature in the oven stays the same. Heat flow through the walls is driven by the temperature difference between the inside the outside of the oven. Insulation lowers the flow of heat through the walls for a given oven temperature. Therefore the oven temperature must rise until all the heat from the elements in the oven can flow through the walls of the oven.
Note the similarities of the heat flow equation to the flow of electricity in a circuit. In an electric circuit, a voltage difference drives current through a resistor. In the oven, a temperature difference drives heat through the thermal resistance of the walls of the oven. If the resistance goes up, the voltage difference must go uo for the same amount of current to flow.
DIAGRAM
Law of Diminishing Returns for Adding Insulation
Doubling the amount of insulation will cut heat loss in half for a given Td. Lets say we have a heat loss of ten and we double the insulation thickness from 1 inch to 2 inches. The heat loss will be cut in half from 10 to 5. Now lets double it again, from 2 inches to 4 inches. Again the heat loss is cut in half, this time from 5 to 2.5. So the first added inch of insulation saved us 5 units of heat. But the second 2 inches of insulation only saved us 2.5 units of heat. Lets double the insulation again, from 4 to 8 inches. Again, we cut the heat loss in half, from 2.5 to 1.25. So now 4 inches of insulation only saves 1.25 units of heat.
Insulation added......... Heat Saved
1 inch............................ 5
2 inches ...................... 2.5
4 inches........................1.25
For the solar toaster oven, I chose to put in as much insulation as I could without making the whole oven too big. More than 10-15 cm of insulation would start t make the oven too big to easily move around. I decided to make the cover big enough so that I could add 15 cm of insulation to the oven.
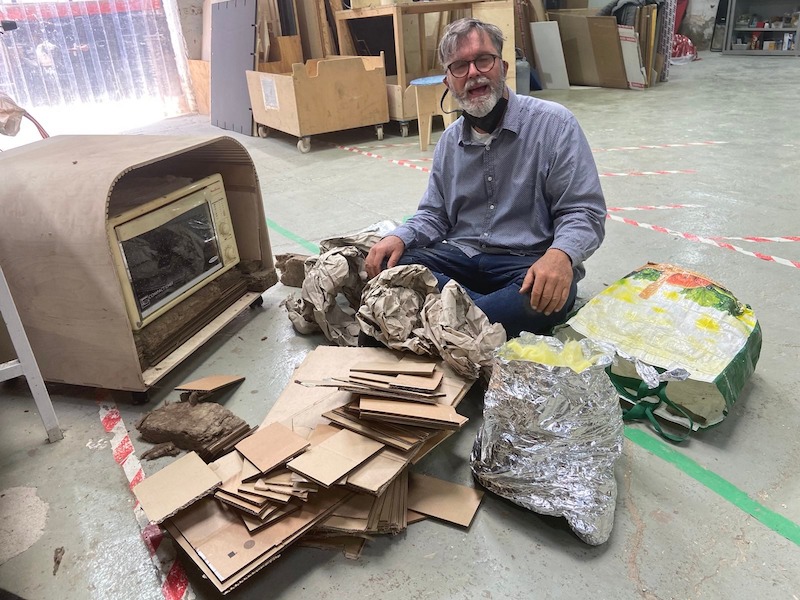
I got the insulation from construction dumpsters in the IAAC neighborhood. One concern was getting insulation that could handle the higher temperatures close to the oven. I ended up using fiberglass insulation close to the oven (good to 540 deg C), then cardboard insulation (good to 250 deg C) cut to fit on the laser cutter, then expanded polystrene insulation (good to 100 deg C) furthest from the cover.
Video of me carrying fiberglass insulation back to IAAC on my bike
 Insulating the oven with found materials turned out to be really time-consuming, messy, and difficult to fit closely around the oven. I would like to try growing mushroom insulation between the oven and the cover - it is good to 225 deg C.
In the CNC week I describe building the cover to hold the 15-20 cm of insulation.
March 8
Back of the box solar oven
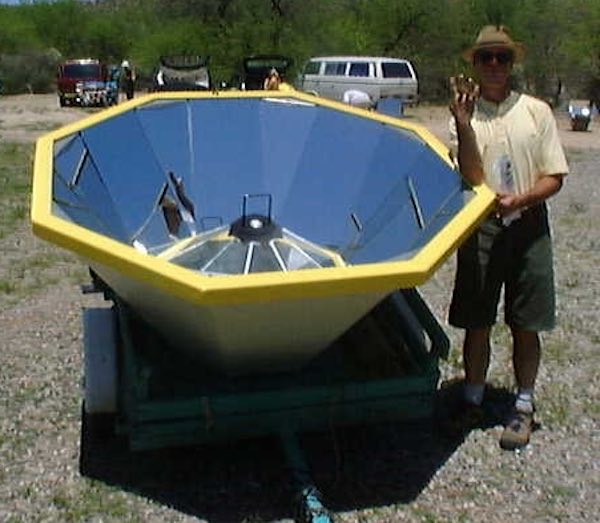
During fabacademy I built a series of conventional solar ovens for cooking my lunch on the roof. The first one was inspired by finding a reflective windshield cover at the El Encants market for 1 eu.
Solar oven “kit” for cone style oven
Assembled cone style oven capable of temperatures of 100 deg C
Making tea
Temps of 100 degrees c or more
Here’s what the sky looked like that day - a few hazy clouds
Box Solar Oven - box cut out on CNC, reflectors cut from cardboard on laser cutter and faced with aluminum foil
PUT IN PICS OF OTHER SOLAR OVENS
March 1st
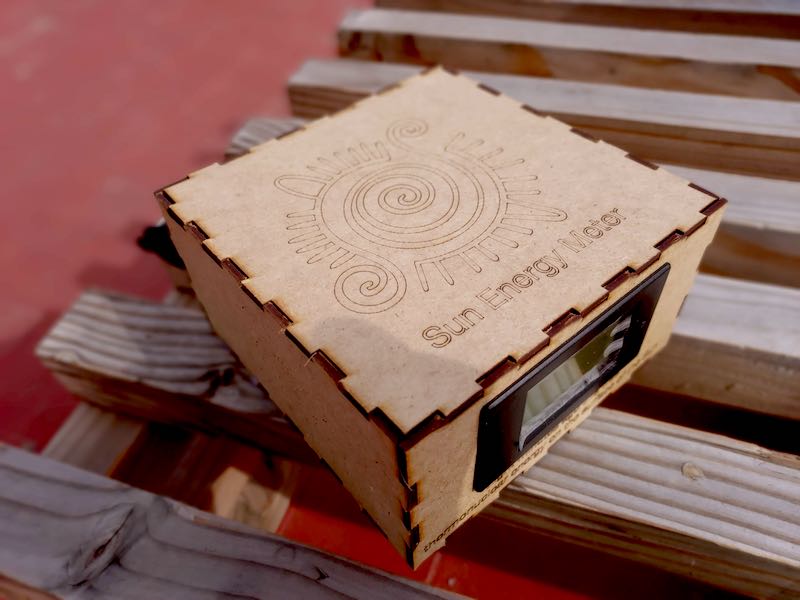
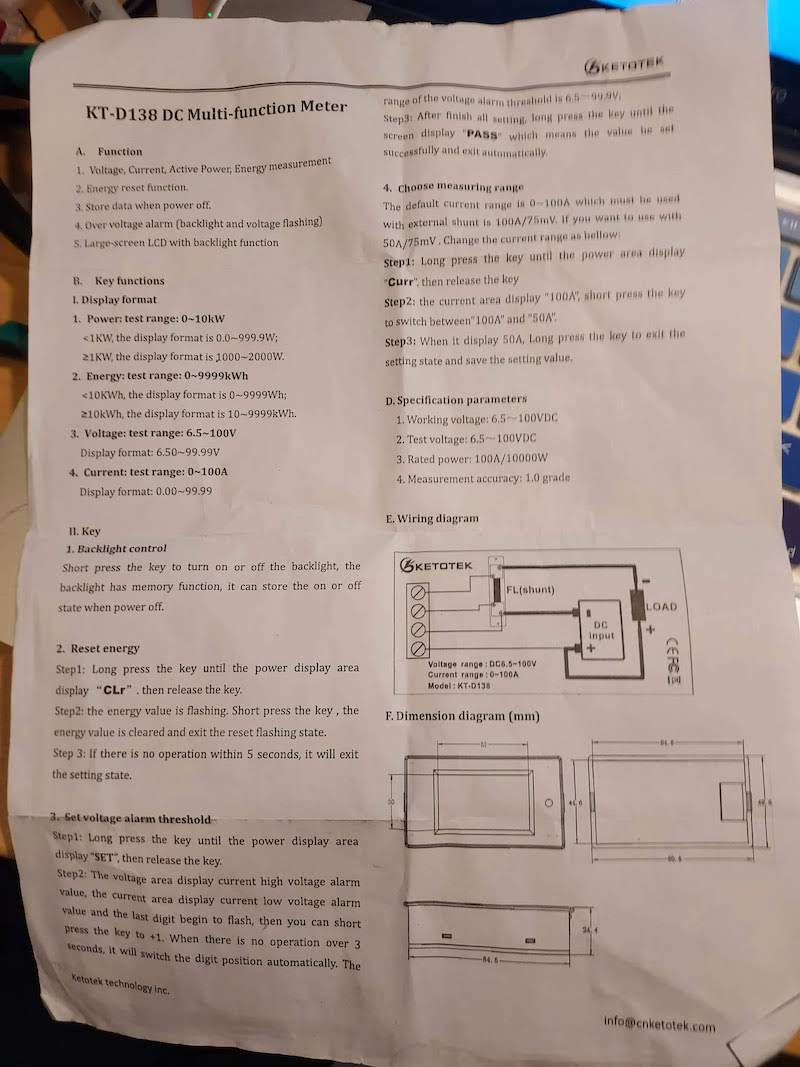
Now that I had the solar panel and oven, I needed a way to measure current, voltage and power. I designed and built a Sun Energy Meter to measure the flow of energy from the panel to the oven. It measures voltage, current, watts (power) and watt-hours (energy).
I used a Mayan sun graphic for the top
The meter has two cigarette lighter inputs - one for energy from the panel and one for energy to the oven.
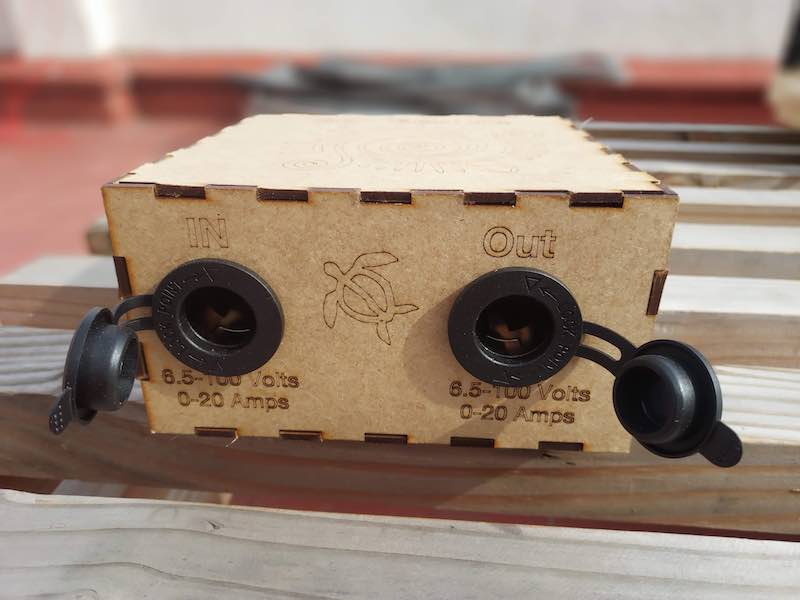
I designed the box using rhino and cut it with the laser cutter.
The sunmeter is designed around a digital volt, amp, and power meter I bought it from Amazon for 25 eu. It is designed for use with solar electric systems. Note it uses a shunt to measure up to 100 amps.
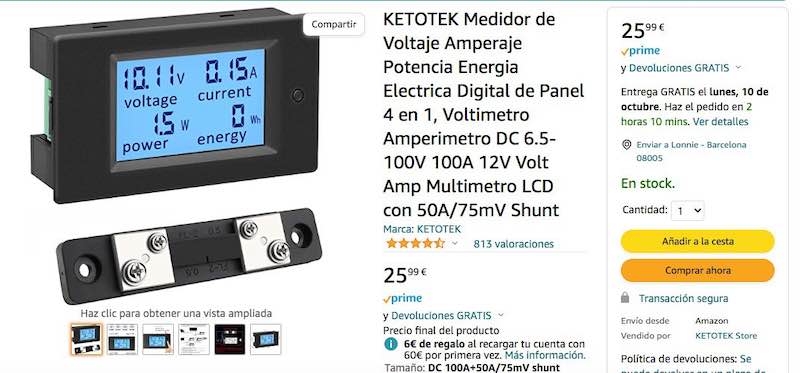
Data sheet for meter
SCHEMATIC OF SUNMETER
Feb 28, 2022
Obtanium
Here’s what I’ve collected for materials to date:
Toaster Oven
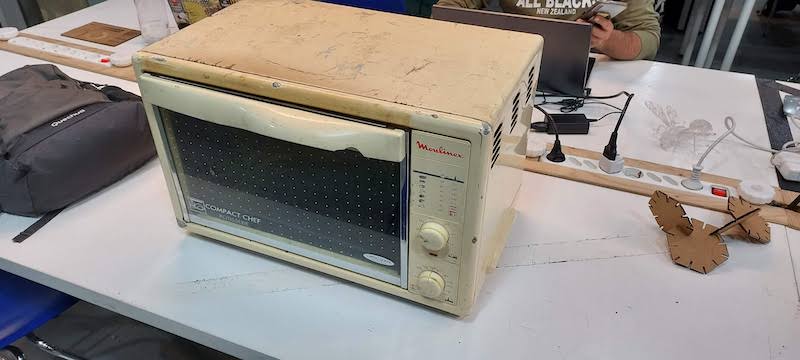
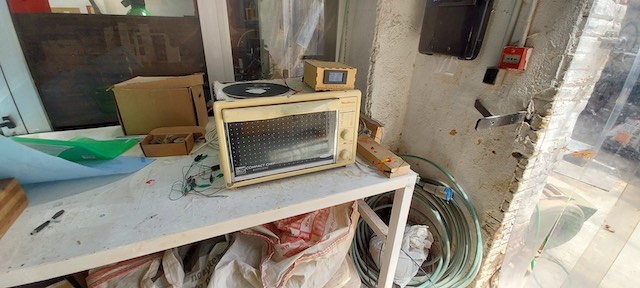
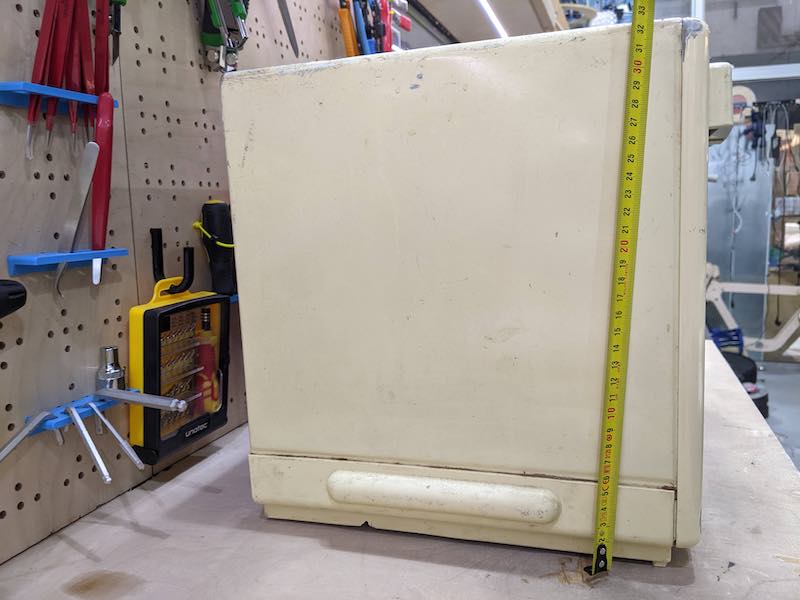
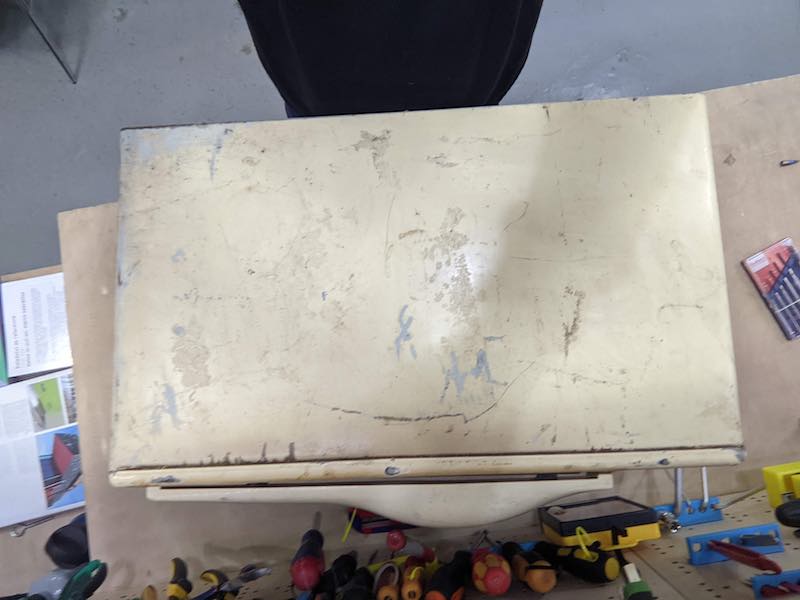
I found a used toaster oven at a scrap dealer near IAAC for 3 eu.

Barcelona has a lively subeconomy of people who collect scrap metal in shopping carts every day. I look at the carts closely as I drive by on my bike to see if they have any parts for my projects. According to the Guardian, there are 50-100,000 people doing this kind of recycling in Catalonia and they recycle 100,000 tonnes of metal a year worth 10 billion euros.
Guardian Catalonia metal recycling article
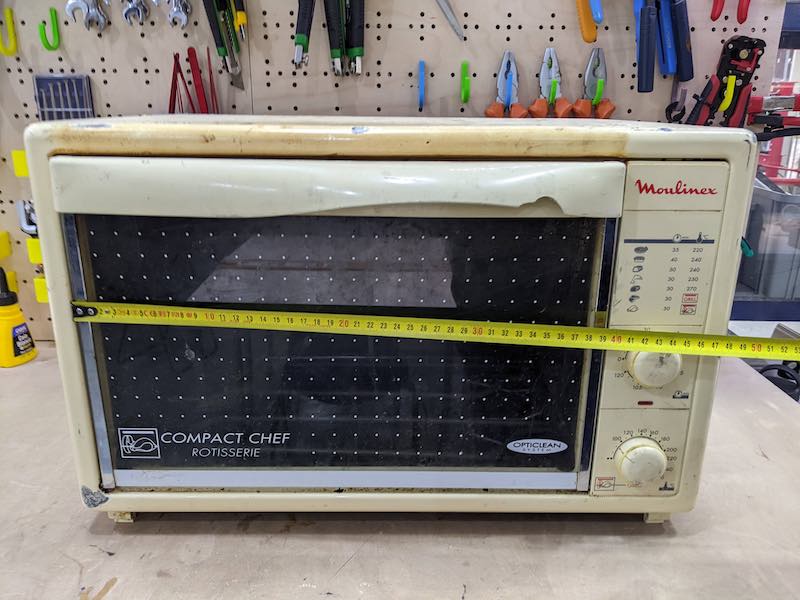

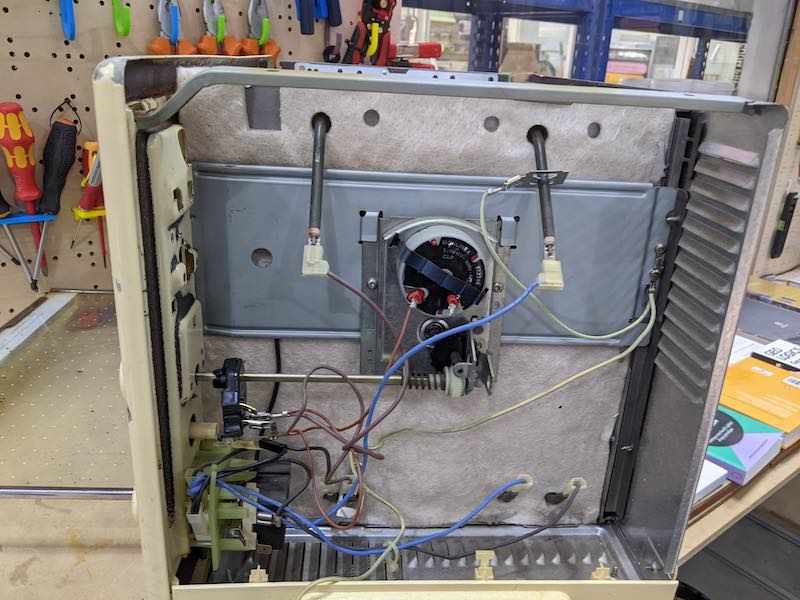
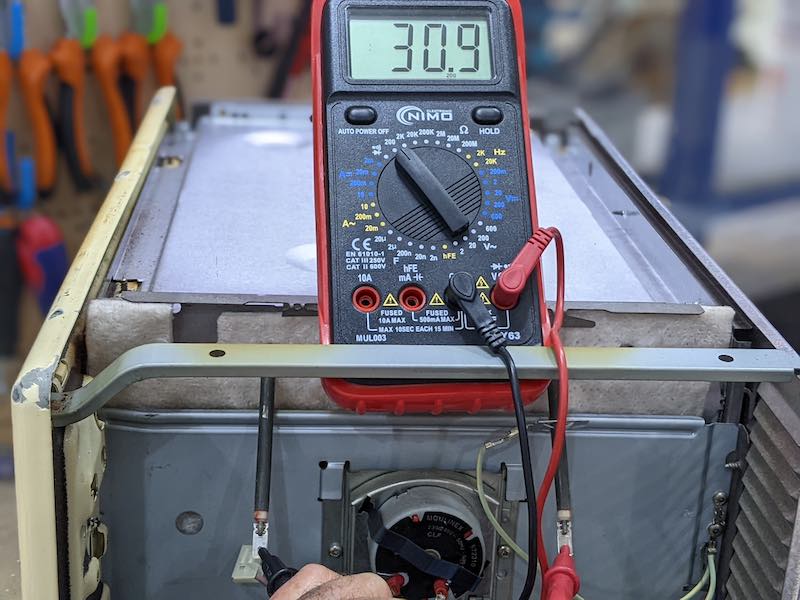
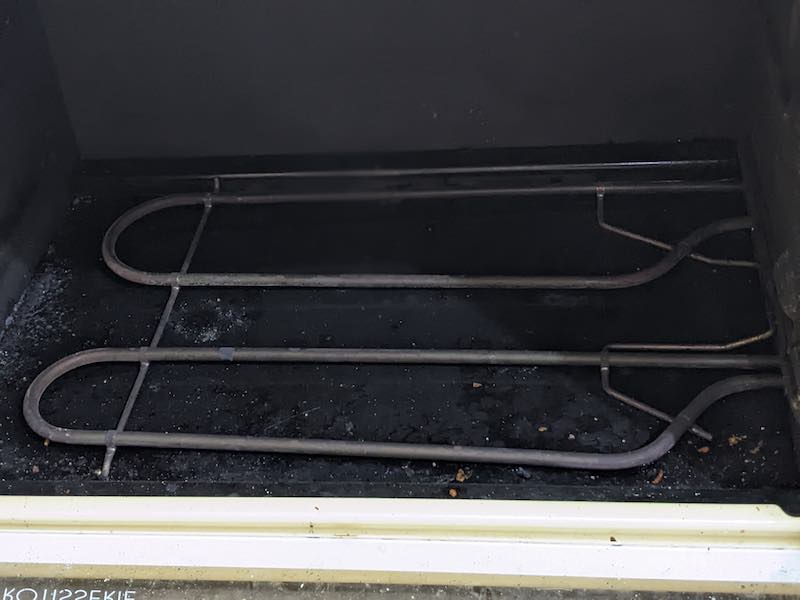
Oven Heating Elements
The oven has 3 elements, two in the bottom (153.1 ohms together in series) and one in the top (30.9 ohms).
The resistance of all the elements in series is 184 ohms:
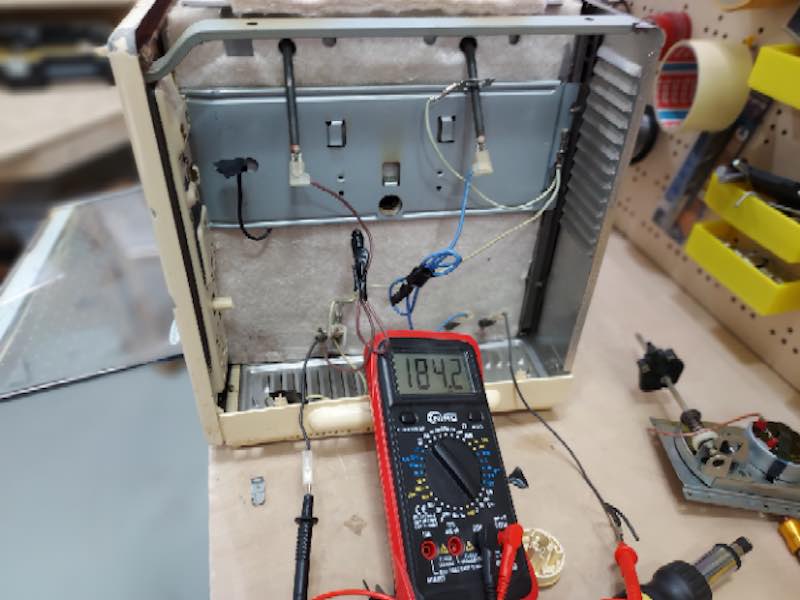
Oven Top Element resistance is 30.9 ohms
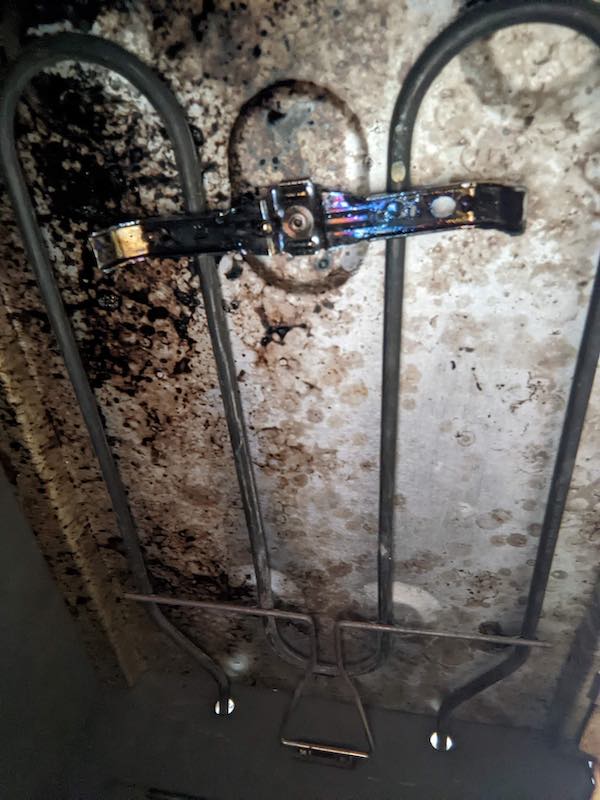
Two oven bottom elements total resistance is 153.1 ohms
Solar Panel
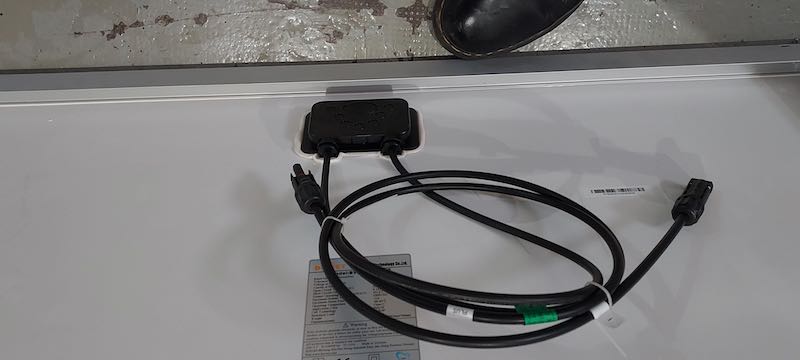
I found a used solar panel on Wallapop (like a Spanish Craigs List or Facebook Marketplace). It’s a 270 watt panel made by Boviet Solar in Vietnam. Cost was $120 including delivery to IAAC. Specs below:

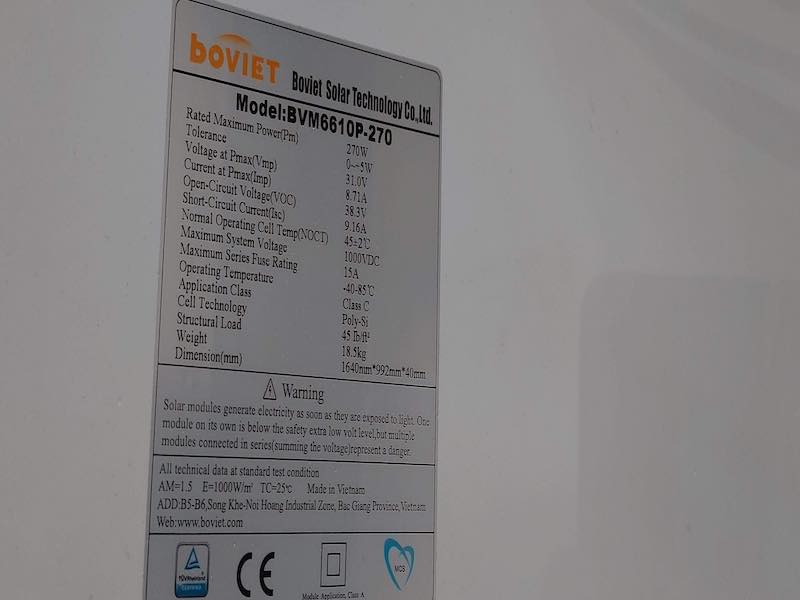
The solar panel has two MC4 connectors, one for positive and one for negative.
Given the electrical specs on the back of the panel I can construct a rough I-V curve for e the panel:
Power Conditioning Design Ideas
The peak power point of the solar panel (31 volts, 8.7 amps) and any combination of individual, series, or parallel connection of the oven resistance elements do not match. This means that when I hook the solar panel in full sun directly to the oven, I will only get a fraction of the rated power of the panel. Tests confirm that I only get a maximum of 160 watts delivered to the oven when it is connected directly to the panel. The panel is rated at 270 watts.
I will need some kind of power conditioning to match the solar panel to the oven to allow the solar panel to operate at it’s peak power point and provide 277 watt rated power to the oven. I’ll need to raise the voltage that oven elements see to 80-100 volts and allow the panel to operate at around 31 volts.
I explored using an inverter and a boost switching mode power supply. I’ll discuss these options next:
Simple inverter circuit to boost solar panel voltage voltage from 30 to 200 volts
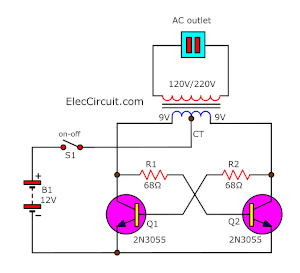
I love this circuit because it uses only analog electronics and no microcontroller. It will not have very good voltage regulation under varying load, and the waveform will be a square wave rather than a sine wave. This doesn’t matter much because the load is resistive and will not be harmed by non-sinusoidal waveforms of varying voltages.
The transistors used in this circuit are obsolete but I manged to find a bag of 10 of them on-line for cheap. I am scouting the metal recyclers for a transformer to try this circuit.
Here are some other inverter circuits:
Youtube inverter circuit build
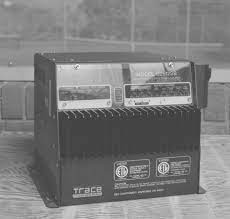
Building an inverter is very meaningful to me because when I started living off grid (1990) the missing link that enabled off grid living beyond 12 volt dc systems was the inverter - a black box that magically transformed the DC solar generated electricity in my batteries to 120 volt AC power just like from the power company. I still remember the thrill I got from my the Trace 2412 - 2400 watts max output, 12 volt input. It was like magic to see solar energy transformed into grid quality power. It cost $1500 in 1991 and weighed about 70 lbs. I used it to power my house and shop for a decade until lightning destroyed it.
For decades I’ve had a dream to build my own inverter - hope to make that happen during Fabacademy.
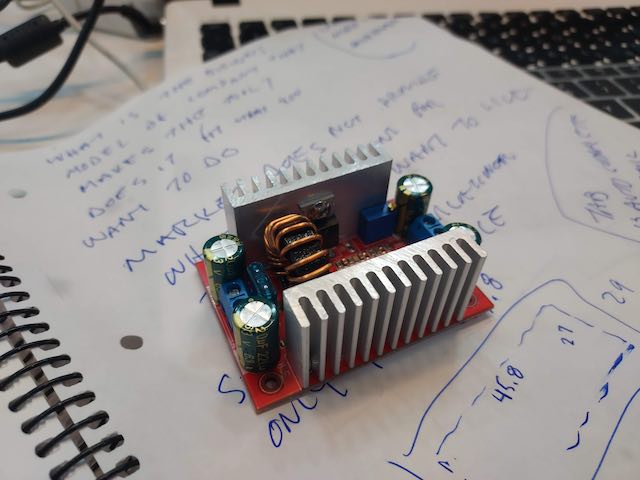
Boost power supply circuit
Fellow student Marco suggested a boost power supply instead of an inverter, and he drew a circuit diagram and explained to me how it works. Formulas are from the Texas Instrument doc on boost power supply design. I think I can get many of the parts from junk dealer computer power supplies. I haven’t been able to find a center tap, 5-8 to 1 ratio transformer needed for the inverter so I am glad to have this alternative.
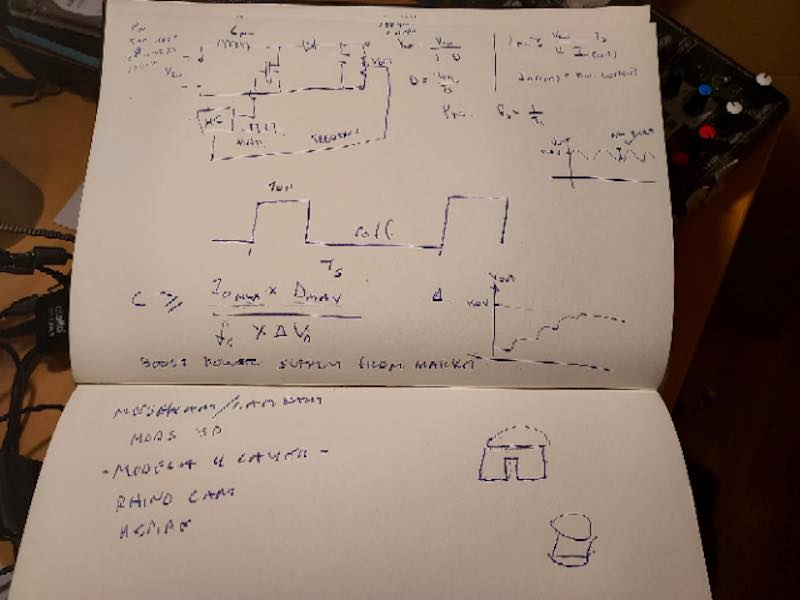
These kind of power supplies can efficiencies of 95%, versus about 75% for a home built inverter. The voltage can be easily adjusted with a potentiometer. To change the voltage on the inverter requires changing the transformer winding ratio.
I decided to use a boost power supply and on Neil’s recommendation I bought one rather than building one.
I got it from Amazon for about 15 eu. It takes an input from 8-60 volts, output is adjustable from 12-83 volts. It can put out a maximum of 1200 watts and 20 amps.
Jan-Feb 2022
Initial Thoughts on My Final Project
Ultra Low Energy Cooking - Toaster Oven to Solar Cooker
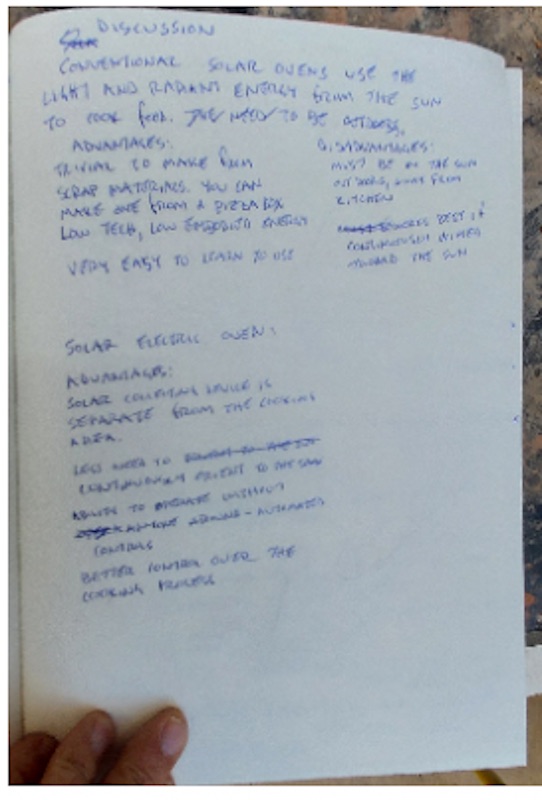
I’ve cooked hundreds of meals on a conventional solar oven. Conventional solar ovens use the light and radiant energy directly from the sun to cook food. They need to be outdoors, directly exposed to the sun, which is often inconvenient for cooking. They need to be made of materials that can stand exposure to the outside because you will inevitable leave the oven out on a rainy day.
For a while I’ve been dreaming of a solar oven that could sit in my kitchen. One way to do this is to use a solar electric panel to collect the energy outdoors and feed the electricity into a super insulated cooking appliance inside.
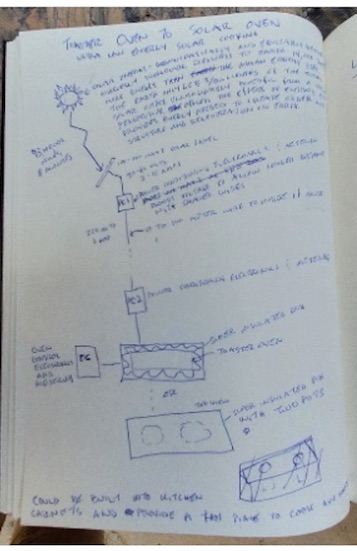
For my final project, I will explore the design and construction of a ultra-low-energy solar electric cooker. I’ve included my notebook sketches but since they are pretty rough it gave me a good excuse to start the learning curve on Inkscape.
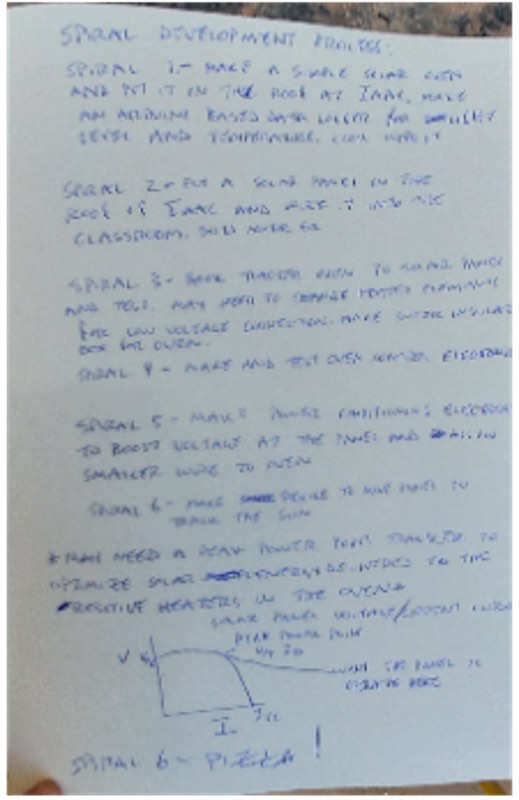
One thing I like about this project for Fabacademy is that it is well suited to spiral and parallel development. I can start by getting the solar energy delivered to the lab, then connected to a cooker, then insulate the cooker, then develop each electronics module, then build a tracker for the PV panel, etc. At each stage I have a working system. And each stage can be worked on in parallel.
January 2022 Initial Design Block Diagram of Final Project
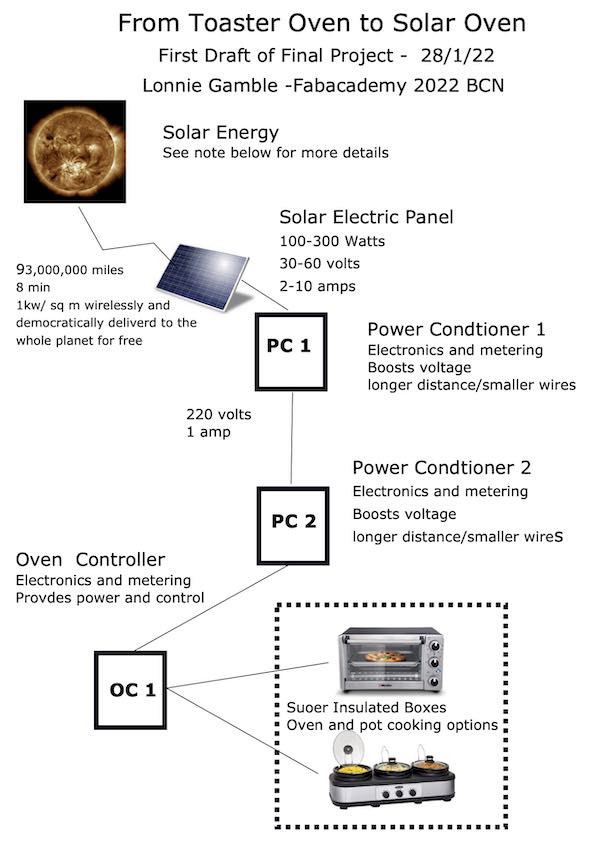
June 2022 Final Design Block Diagram of Final Project
Initial Sketches - Late January:
First concept block diagram
Pros and Cons of Solar Electric Cooking
Some Other Solar Oven Ideas
Spiral Development Process
Research
Here is partial list of what I need to figure out next:
- Back of envelope calcs on physical parameters - energy needed to cook, power and energy available, amps, volts, watts, component parameters
- Wire sizing from the panel to the cooker
- Natural insulation options (check with MDEF - I love the possibilities for synergy at IAAC!)
- Insulated box design issues - safe and elegant. BUD principle - Beautiful, Useful, Durable.
- Obtain some toaster ovens to see how they might need to be modified
- Research peak power trackers for resistive loads so panel can operate at peak power point
- Research dc voltage conversion options
- Find a panel to use - Joseph says IAAC may have some, otherwise they are pretty plentiful and cheap on Wallapop (Catalunya based equivalent to Craigslist and ebay. Craigslist and Ebay do not work well here)
Feb 1 Final Project Ideas
This week I worked on defining my final project idea and started getting used to the documentation process. I have many project ideas, some of which I hope to pursue in Fabacademy outside of the final project. I’ll document my research on those in the Other Projects page of this website. Some of the things I considered before settling on a project involving ultra low energy cooking using a solar electric oven:
- Direct solar electric sawmill
- 3d printed bamboo joinery
- wind powered skateboard leading to a commercial wind powered land truck transport system.
- Virtual musical instruments using the kinect and virtual reality goggles
- Off-grid systems control and monitoring
Files
References
Open Source Solar Cooker Plans
Simple hot plate solar electric cooker
Solar electric cooker under development
Simple inverter schematics:
Very simple inverter
https://www.homemade-circuits.com/7-simple-inverter-circuits/amp/
https://youtu.be/T8S6aitoXs4