Week 05: 3D scanning and printing
Assignments:
-
Group assignment: Test the design rules for your printer(s). Document your work and explain what are the limits of your printer(s) (in a group or individually.
-
Individual assignment: Design and 3D print an object (small, few cm3, limited by printer time) that could not be easily made subtractively. 3D scan an object, try to prepare it for printing (and optionally print it)
What to learn:
-
Identify the advantages and limitations of 3D printing
-
Apply design methods and production processes to show your understanding of 3D printing.
-
Demonstrate how scanning technology can be used to digitize object(s)
Have you?
-
Linked to the group assignment page
-
Explained what you learned from testing the 3D printers
-
Documented how you designed and made your object and explained why it could not be easily made subtractively
-
Documented how you scanned and prepared an object (for 3D printing)
-
Included your original design files for 3D printing (both CAD and common format for 3D printing)
-
Included your hero shots
DOUBT: Define cannot be easily made subtractively Answer: Your model has undercuts), overhangs, nested parts, meshes etc.
DOUBT: What is a common format for 3D printing Answer: STL, OBJ or 3MF (please make your file small for the repository, compress reduce etc.)
DOUBT: Should I include my scanned file(s) Answer: Not necessary, files can be very large
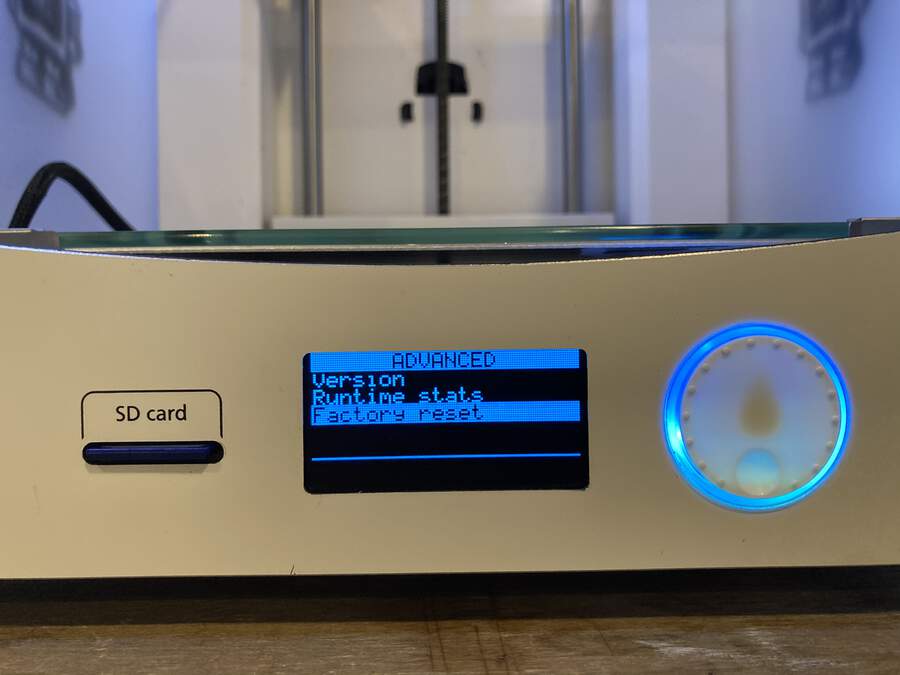
LEARNING ABOUT THE 3D PRINTING MACHINES AT DEN WAAG:
3D PRINTER PRUSA
-
At the FabLab we have a 3D Printer : Prusa i3 mk3
-
It has very good improvements, mainly in the printer head.
-
The protection case is done with IKEA table(6 euros x2) + printed joints.
-
Left side has a board(Arduino board with some H bridges on top of it to control the gears ) to control the Prusa
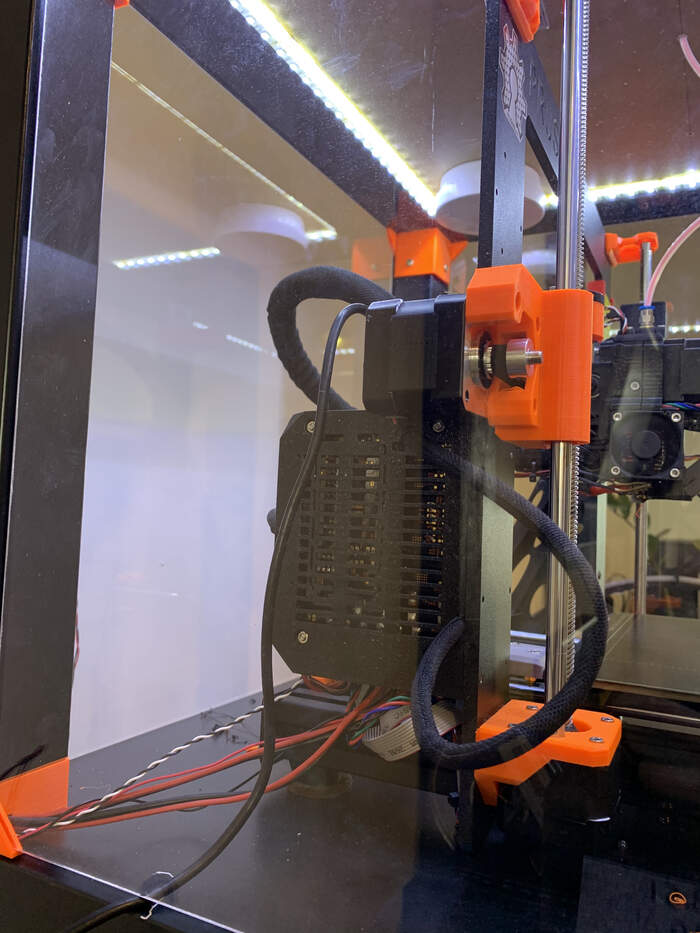
-
2 motors for the z axis
-
1 motor for x axis with a belt
-
1 motor for y axis with a belt
-
Another gear in the printer head for the filament: nozzle: 0.4mm heating block temperature control
-
Tube for guiding the filament into the gears that are connected to the central motor
-
The filament is getting fluid and comes out of the nozzle.
-
Thickness filament: 1.75mm
-
The nice thing of Prusa is that you can tweak a lot of the settings in software and machine, but you can also make more mistakes.
PRINTER BOT 3D PRINTER:
-
Nozzle: 0,4mm
-
Thickness filament: 1.75mm
ULTIMAKER PRINTER:
-
Nozzle: 0.4mm
-
2.85 mm thickness for the filament
-
Ultimaker: less tweaking, less chance of making mistakes, less fancy possibilities
-
Ultimaker: you have to use cura software
MATERIALS:
-
PLA: biodegradable (corn based), quite sturdy, but also quite easy to break
-
PET: more flexible, it is stronger
-
Under extrude(you push less material through the nozzle that is needed) allows for flexible filament = nice mesh (cool designs)
-
At the lab we also have flexible filaments, wood filaments, cork filaments, PVA filament (lower temperatures than PLA), solvable filament (dissolves in water, acts like a moulding), lipstick red PLA, high temperature filament(to undergo high temperature setting), iglidur (High wear resistance, complies with the fire prevention requirements of the FAA, lubrication-free and maintenance-free, higher temperature resistance up to 180°C), …
WHEN YOU INSERT MATERIAL:
-
You cut material in 45 degrees before inserting the filament.
-
You push the filament till it stops (limit)
-
To get the filament to the nozzle you have to heat it up 1,75mm ->0,4mm
-
Press on (orange button)
-
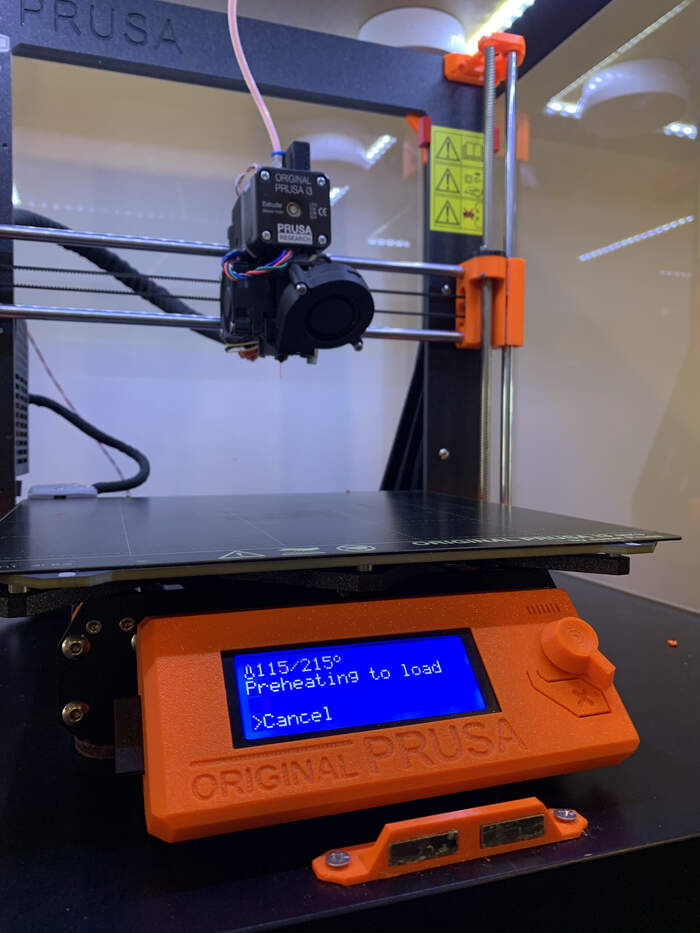
Go through menu: load filament
-
Tell the machine which filament I am using: machine is interested in the temperature of the nozzle
-
PLA: nozzle will be 215 degrees/ bed temperature 60
-
Push and it will start preheating, when it beeps it it heated
-
Press the button to load filament and push it a bit from above
-
Filament starts going out of the nozzle
-
Yes
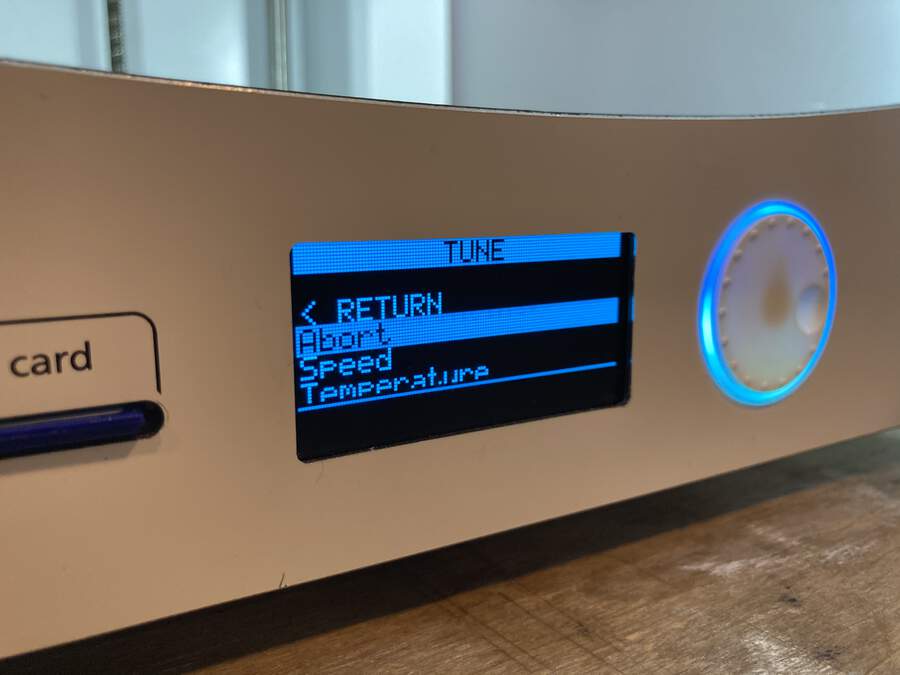
CALIBRATING MACHINE (everytime you move it around or you change something in order to check everything is in place)
-
We will use wizard mode (calibrates all xyz): guides you through:
-
Start new beginning > continue > yes
-
Fan test > ok
-
Clean the nozzle for calibration
-
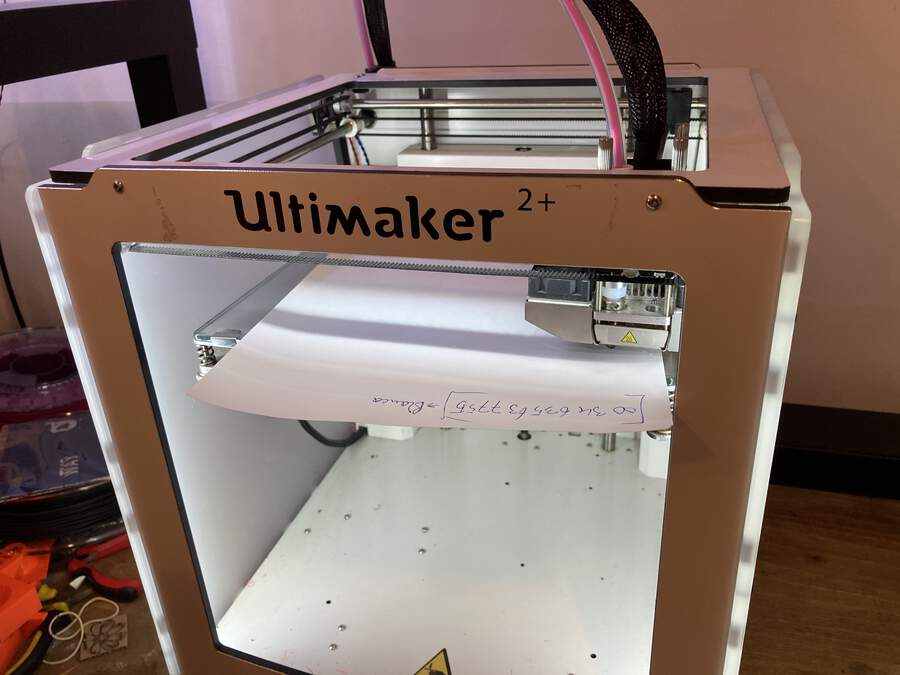
Remove the heat bed > place a piece of paper under the nozzle
-
Calibration is ok
-
Is filament loaded > Yes
Now we have to calibrate the distance from the tip of the nozzle and the bed sheet:
-
Test print (photo)
-
The nozzle has to drop the filament like an elipse shape (not too flat, not too circle shape)
PRINTING TEST:
-
Insert sd card
-
Always prints a line to test
-
The first layer is always the biggest problem because if it is not perfect it is going to be a mess.
-
The nozzle was too high = base came out bad > stop the machine and calibrate again z axis (bed)
-
Clean bed with paper with glass cleaner
PROBLEMS THAT CAN GO WRONG:
-
filament is finished
-
roles of filament can go under another one and get stuck when pulling them out (be careful with this)
-
wrong temperature for the filament in the laser head: too high: becomes more fluid than it is supposed to be, you have to open up the head and get that clog out.
-
wrong temperature of the bed: printed shape starts getting loose
-
it is a lot about temperature, speed,
PRINTING OUT AGAIN:
- First layer should stick to the bed (it is not cooling the layer), after first layer it will start cooling down.
TUTORIAL ON PRUSA SLICING SOFTWARE (more options than Cura):
-
Settings: Print settings: 0.20 speeds // Filament: Prusament PLA // Printer: i3 mk3
-
Import file: Import > STL, OBJ, .. (first option)
-
We will use STL format
-
Import object
-
Place on face button to put it flat on print bed
-
You can go move it around, rotate, …
-
I do not print with support to see boundaries of the machine with overhangs, bridges, … Support > None
-
On the side we have a bar with the slices
-
The white arrow down is the nozzle
-
For good test you need no infill(what you fill in = makes mesh inside to make it more stable) > 100%
-
Brim > None
-
If you go to the advance view you have more options.
-
Print settings > more parameters: Fill density and fill pattern (multiple options). Ironing: nozzle fills the in-between gaps in between the lines (in top layer) Skirt (forget it) Support: when you have to print an overhang you can print suport underneath and remove it later When you have filament that is hard to stick on board you can modify speed section.
Look at settings online for guidance for different types of prints
3D SCANNING TUTORIAL
-
Windows + Sense = basically it is a type of camera which takes pictures and makes a 3D object from it.
-
We use iSense software to scan objects.
-
Press scan > when it shows it in green it means it is picking up the information.
-
Then it creates a 3D model
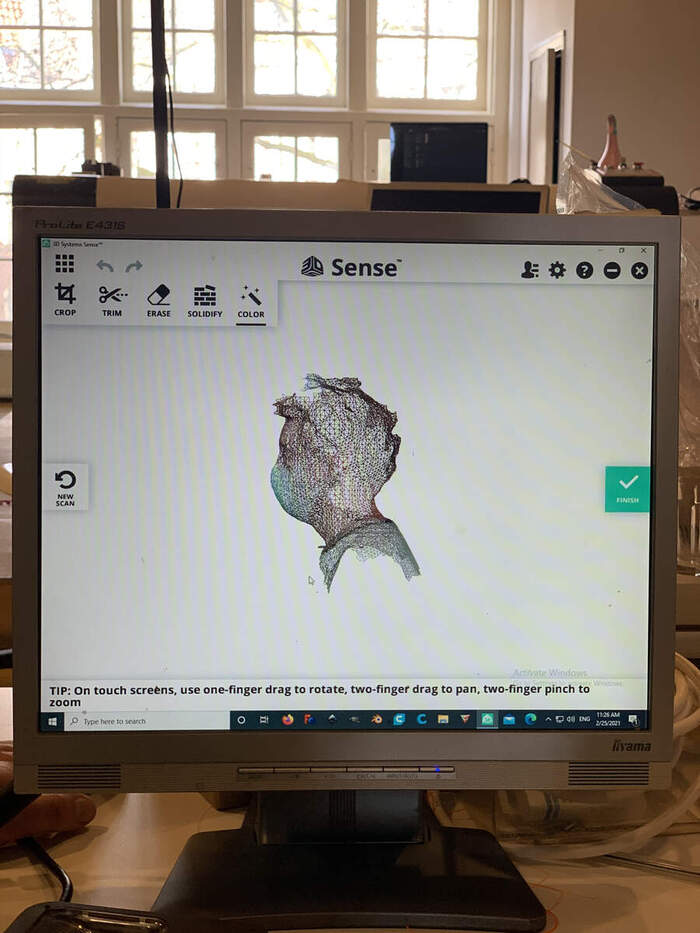
-
Press solidify to make it solid
-
Finish > Export it in STL > You can now open it in Cura
-
Open in Cura your document
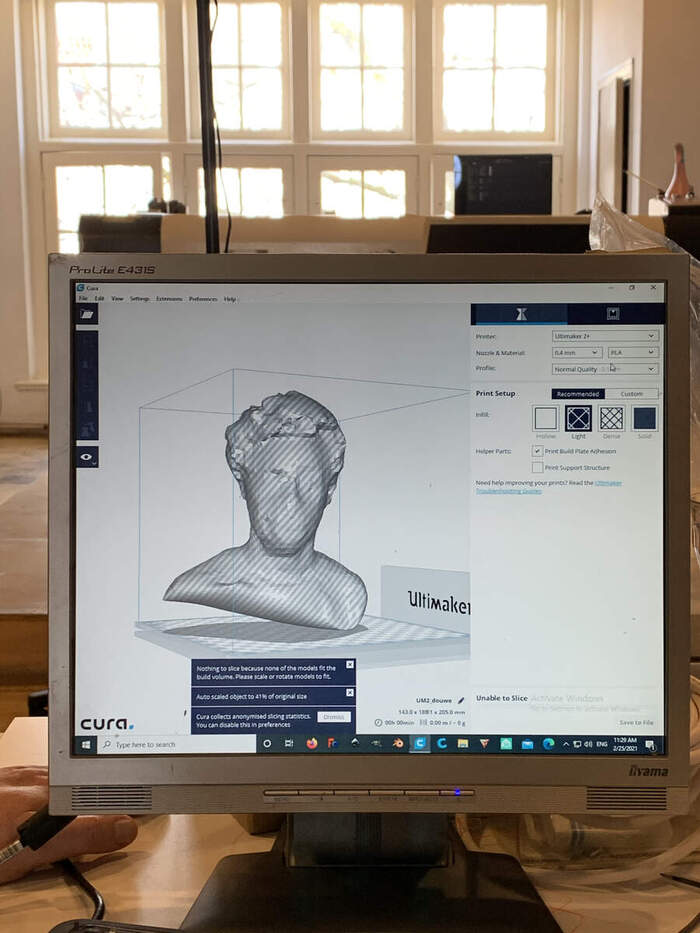
-
Scale it (too big) by 20%
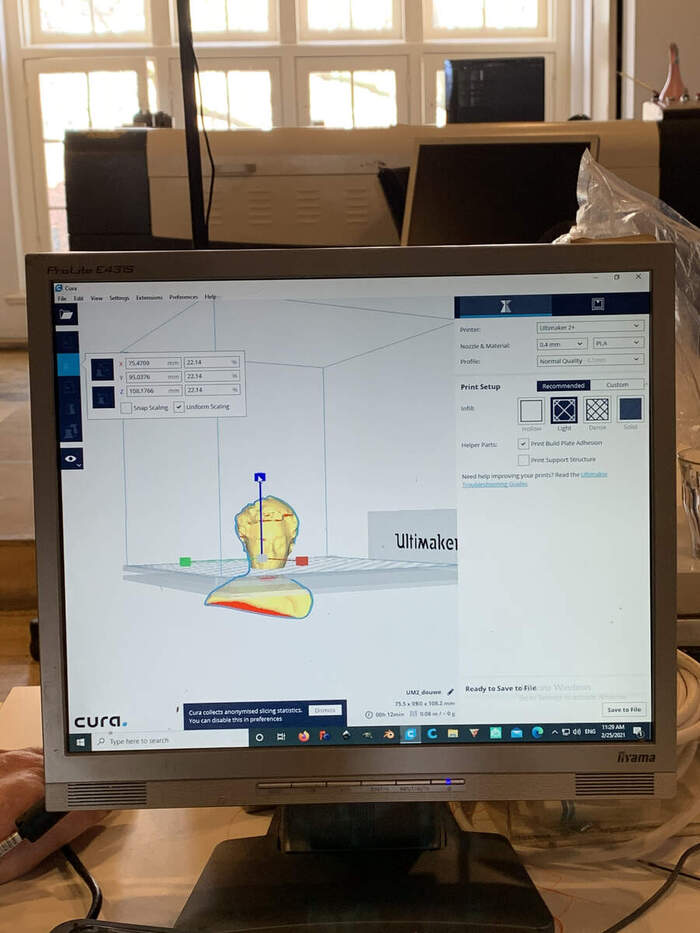
-
Send it to print.
GROUP ASSIGNMENT:
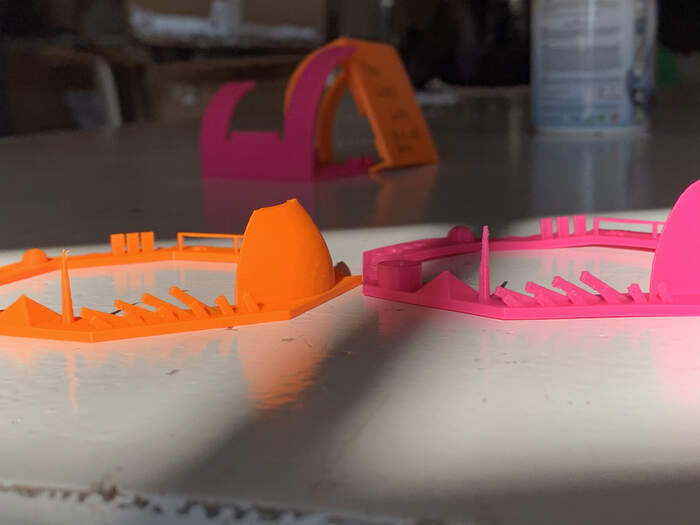
Test the design rules for your printer(s), something with overhangs, bridges, … to see the boundaries of the mahcines. Document your work and explain what are the limits of your printer(s) (in a group or individually).
For the group assignment we divided the group in two so one group would check the Prusa printing and one group would check the Ultimaker printing. For this assignment I worked with Douwe on the Ultimaker.
FIRST ATTEMPT:
-
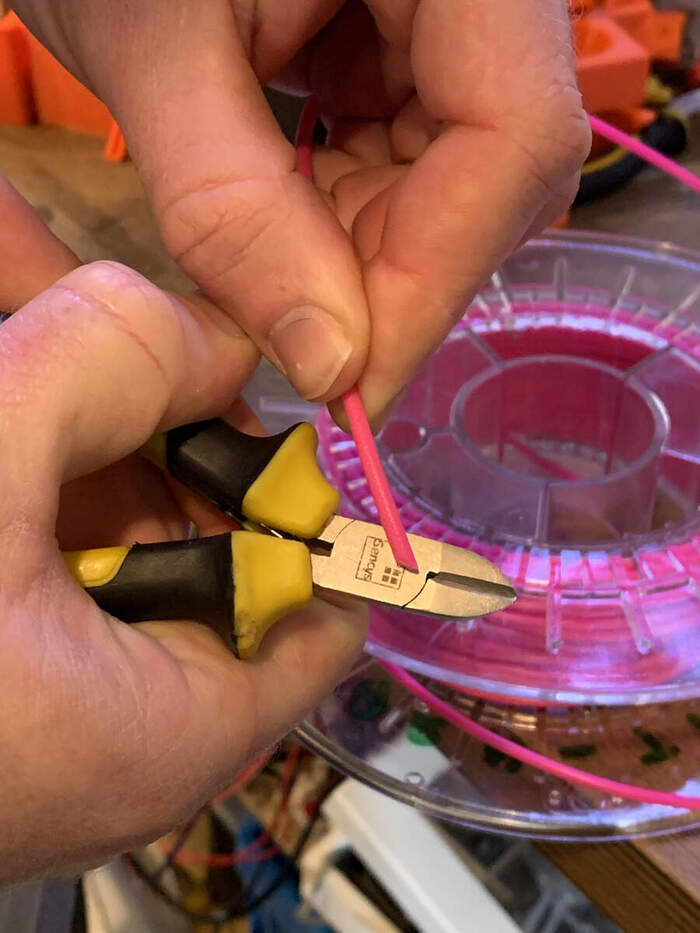
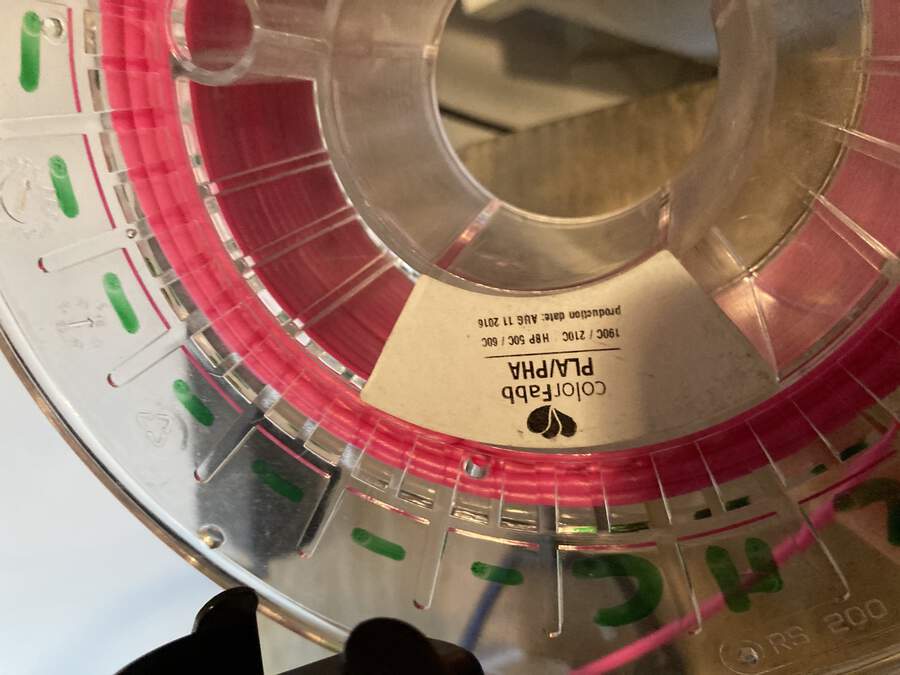
We choose our filament; we will be using a Colorfabb magenta filamenta made of PLA. We cut the filament 45 degrees to insert it in machine.
-
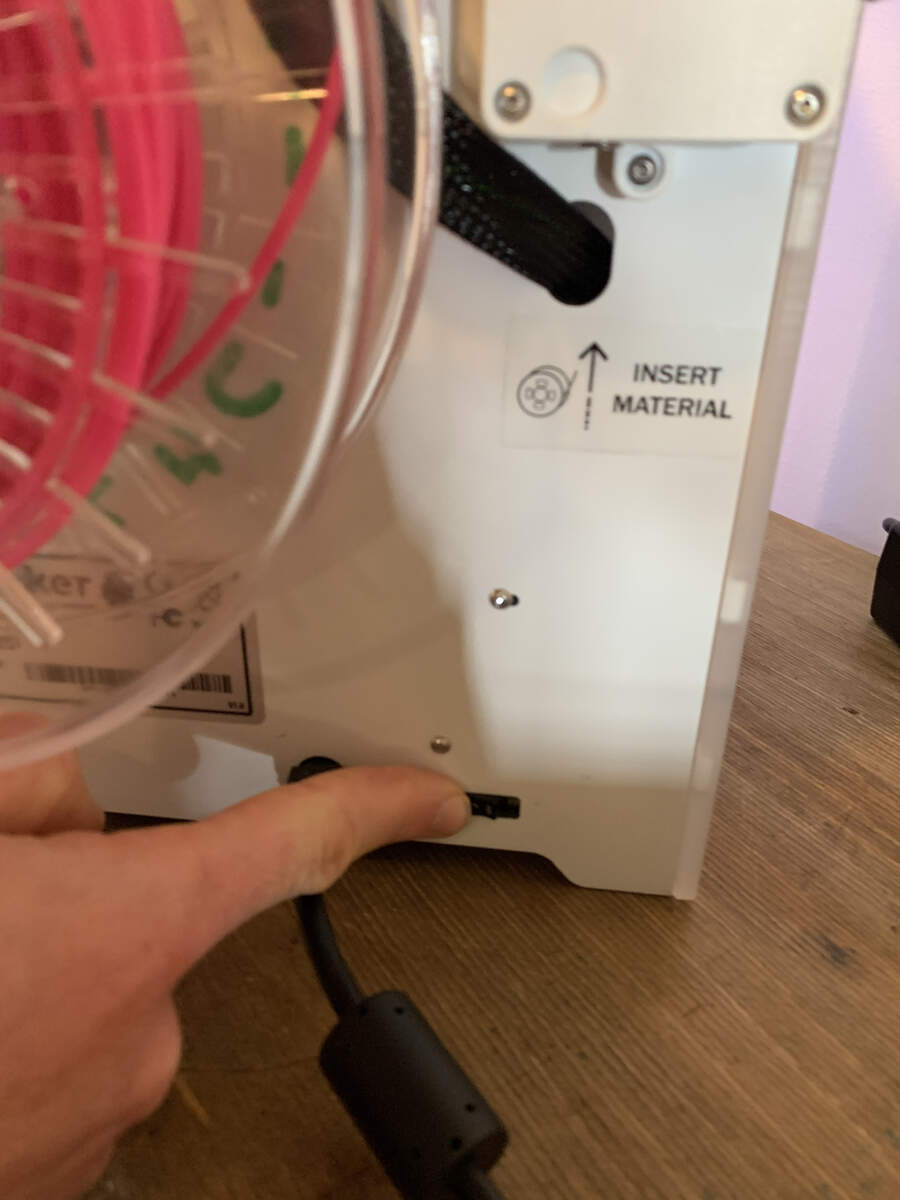
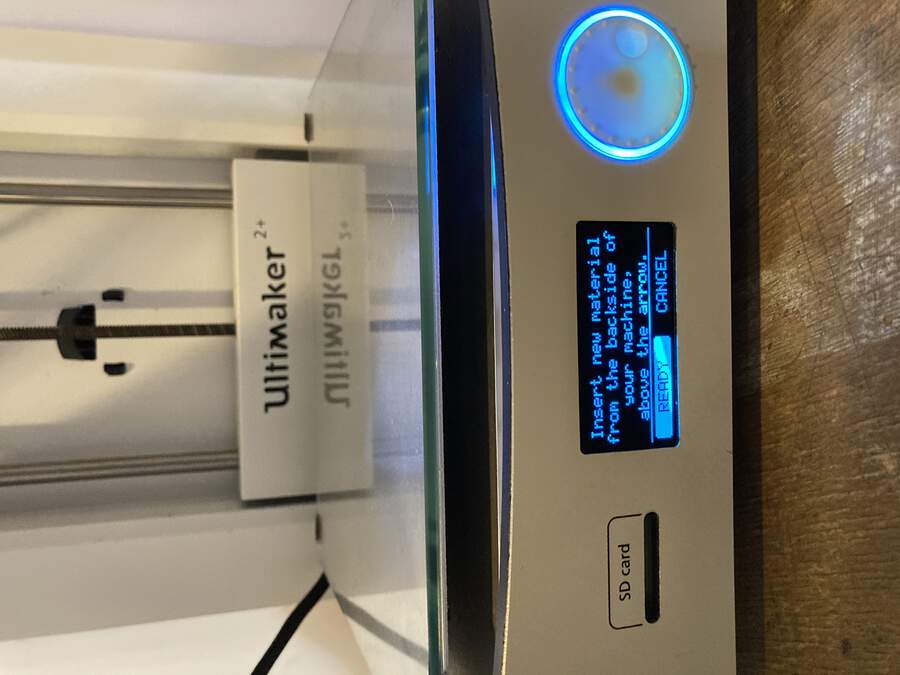
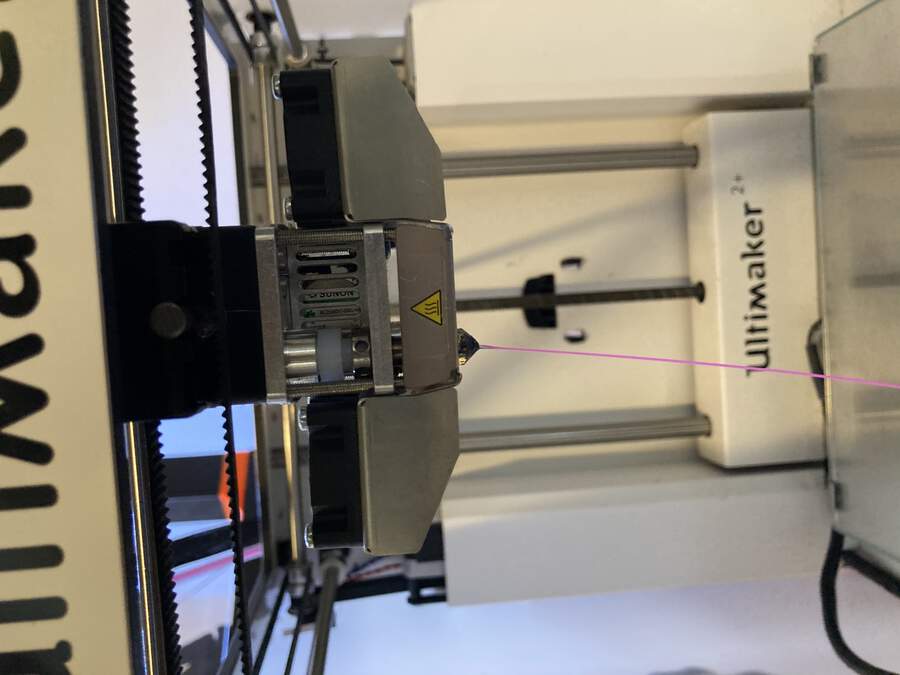
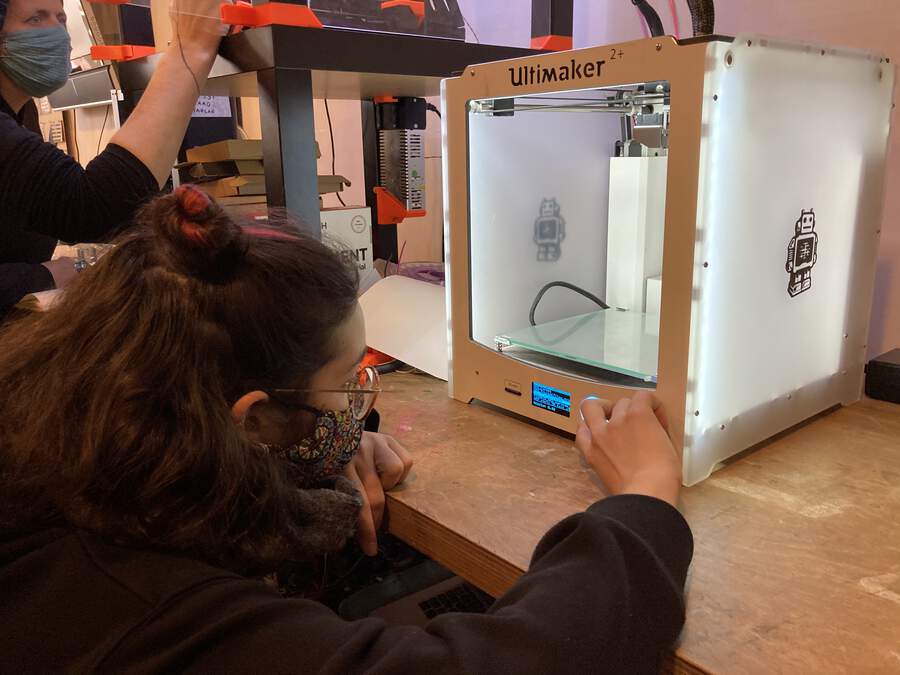
Then we insert the filament role at the back of the Ultimaker 2+ (printer we will be using)
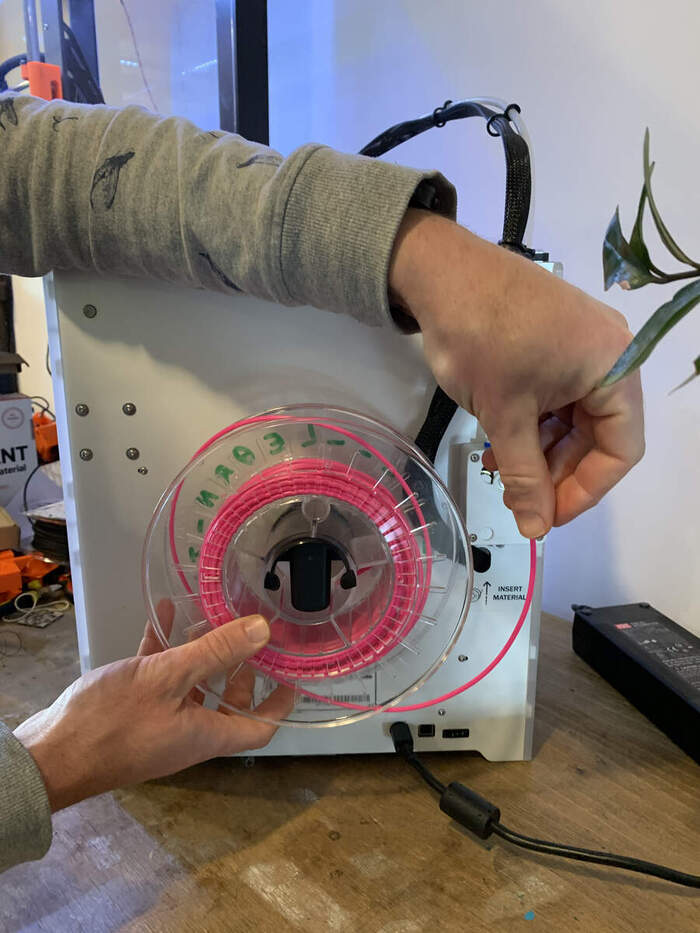
-
Turn on the ON button at the back of the printer
-
With the wheel you can move around the printer menu. We press Menu > advanced > load filament
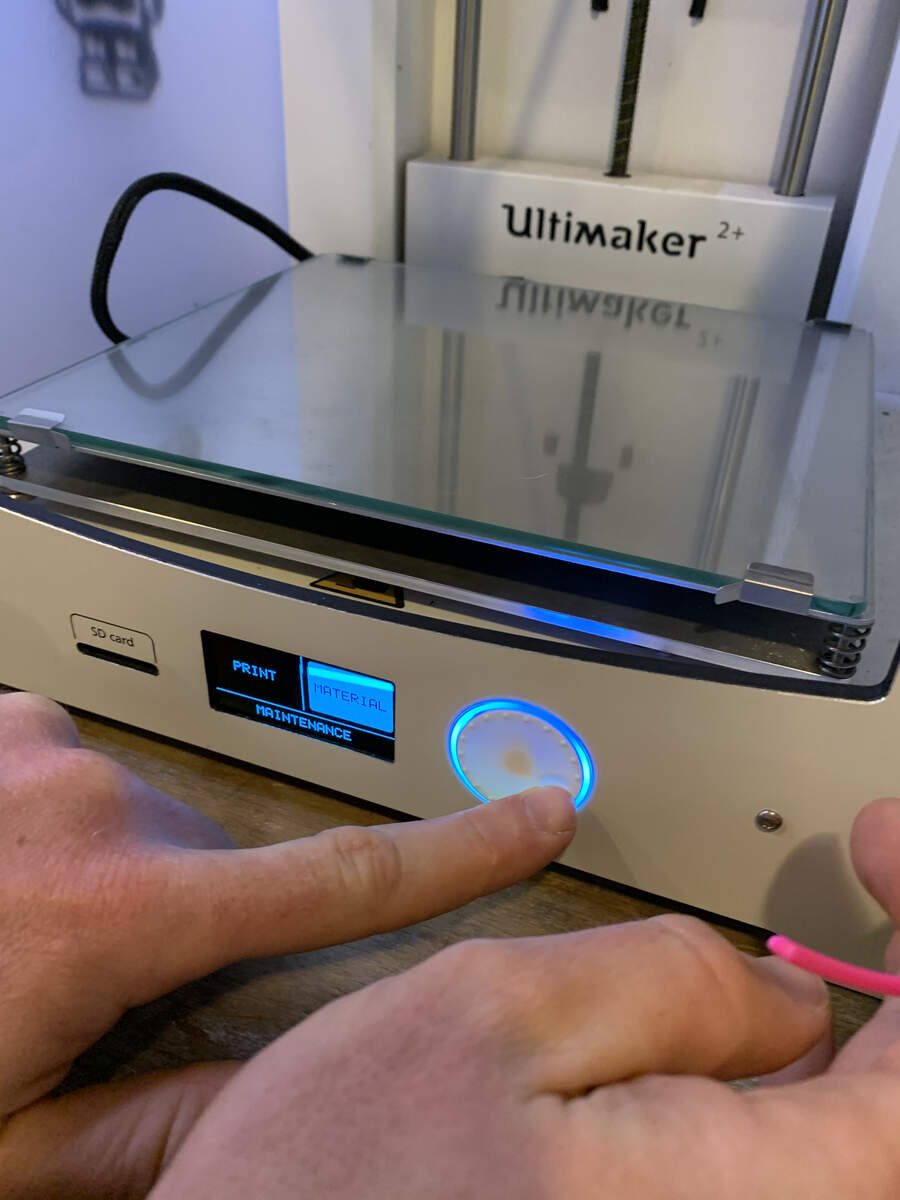
-
Loading material
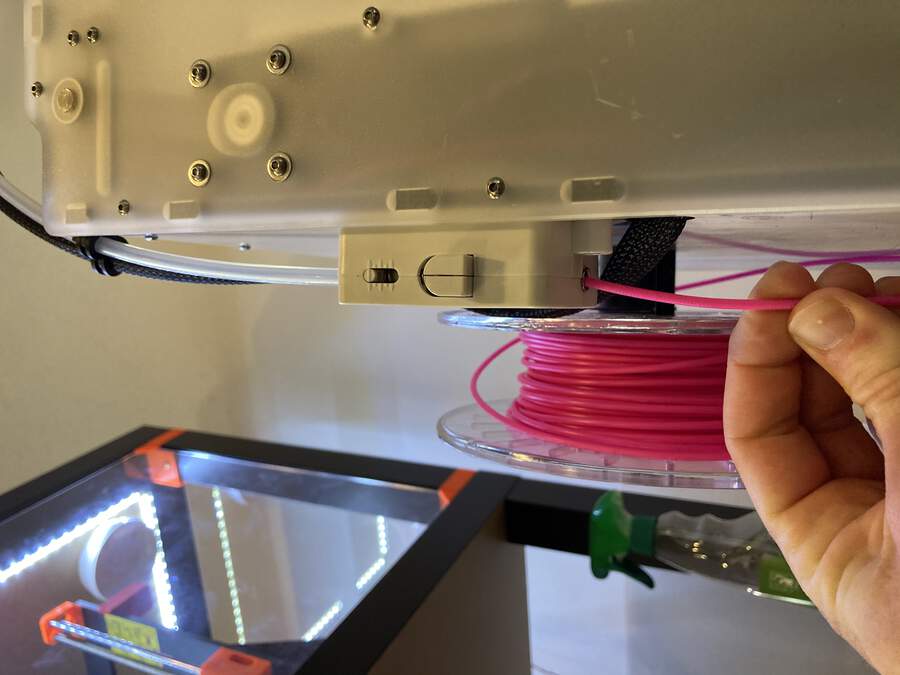
-
It will start going up slowly through the tube
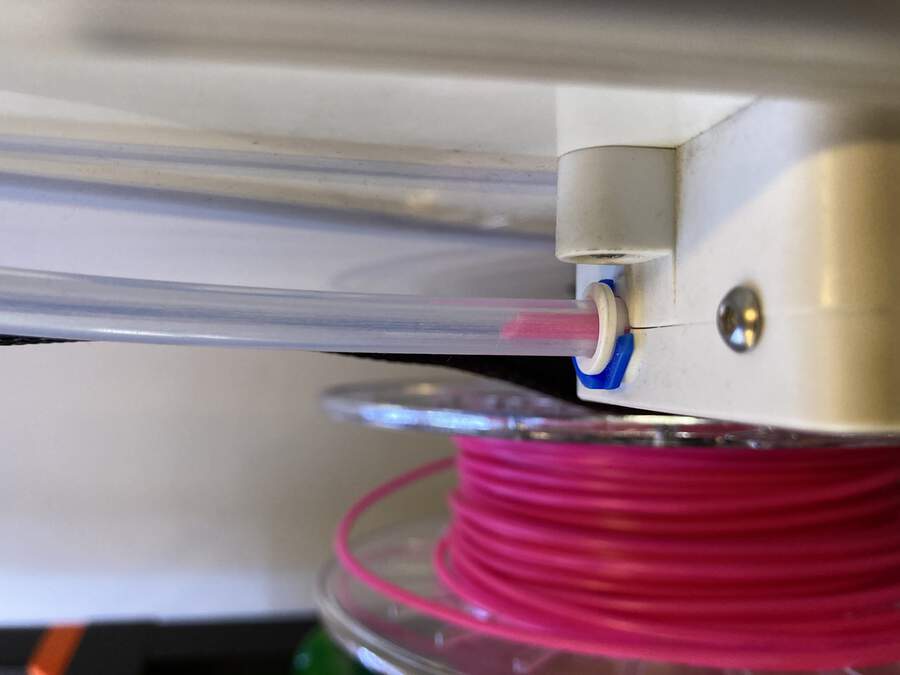
-
Until it gets through where you can press ready and it will start going through very quickly till the printer-head.
-
There will be some waste filament from the last printing coming out which you will have to remove until you see your filament colour.
-
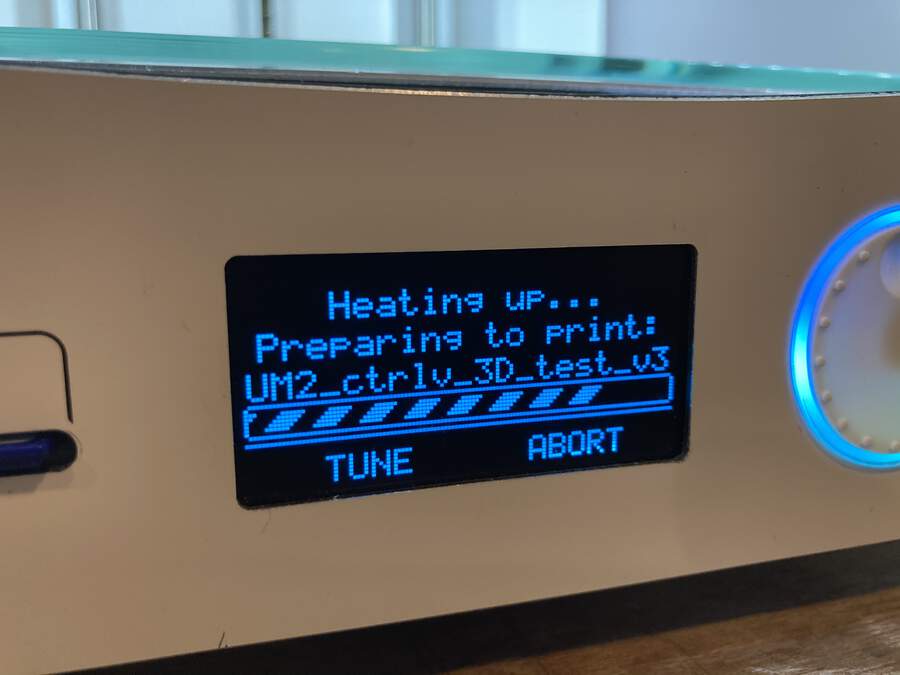
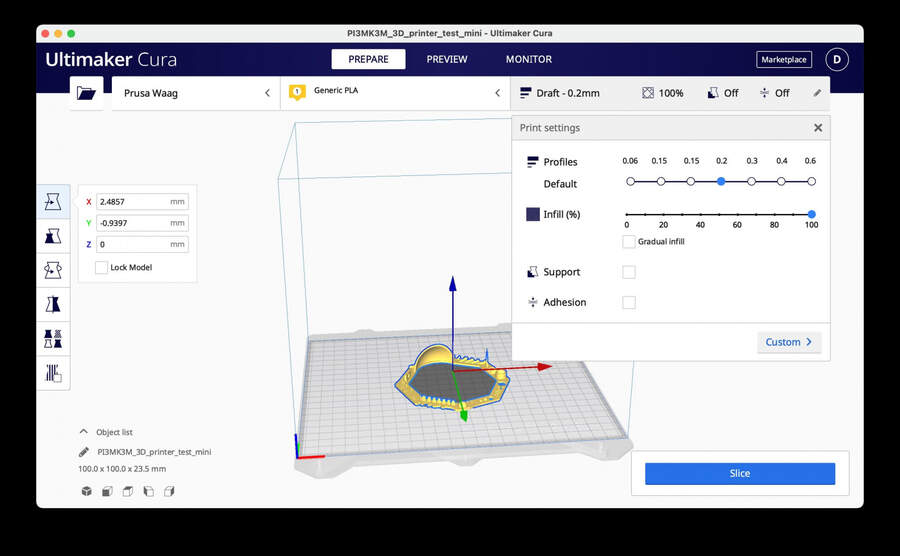
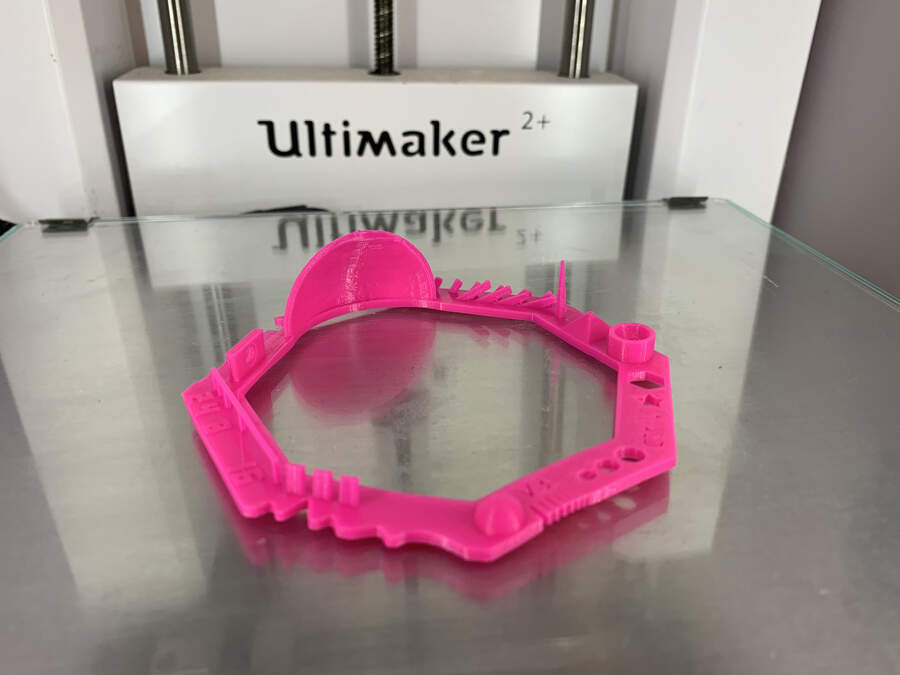
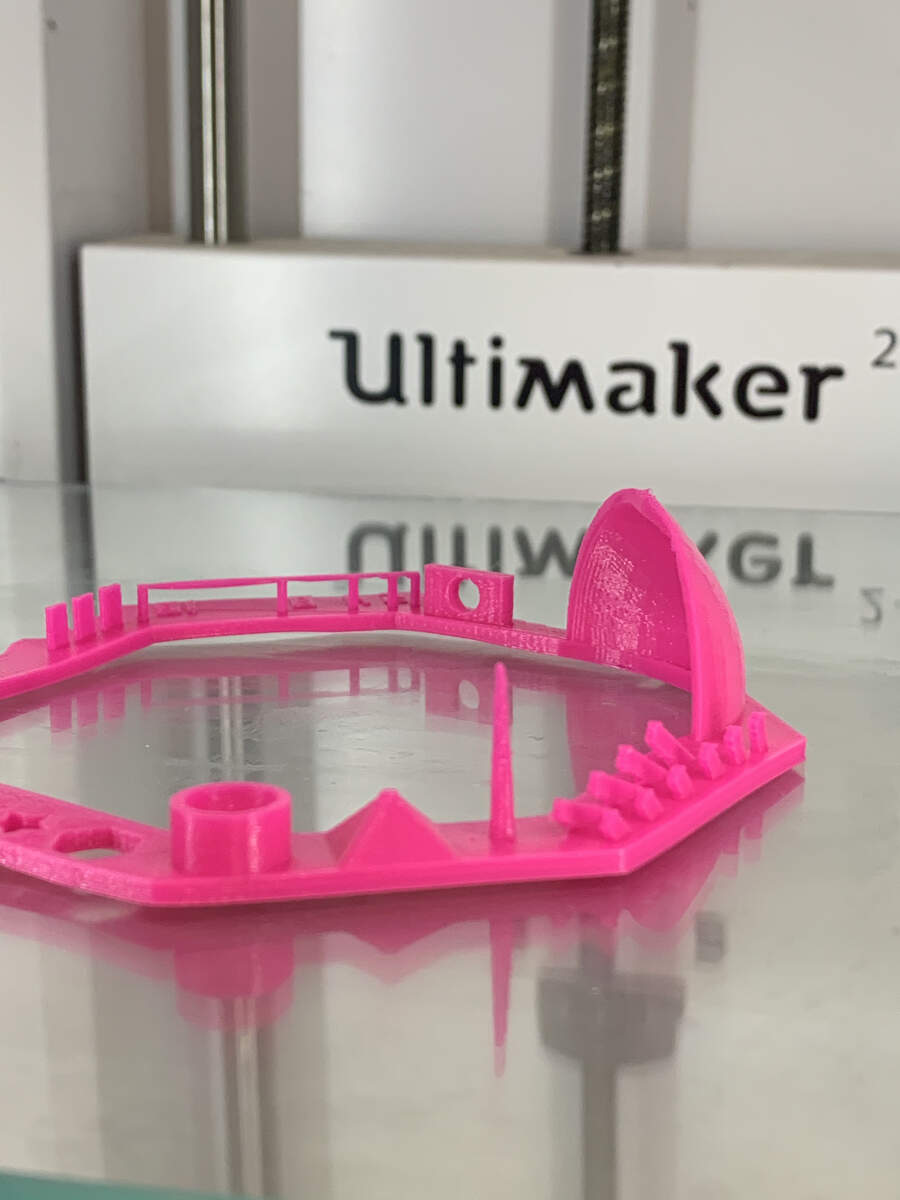
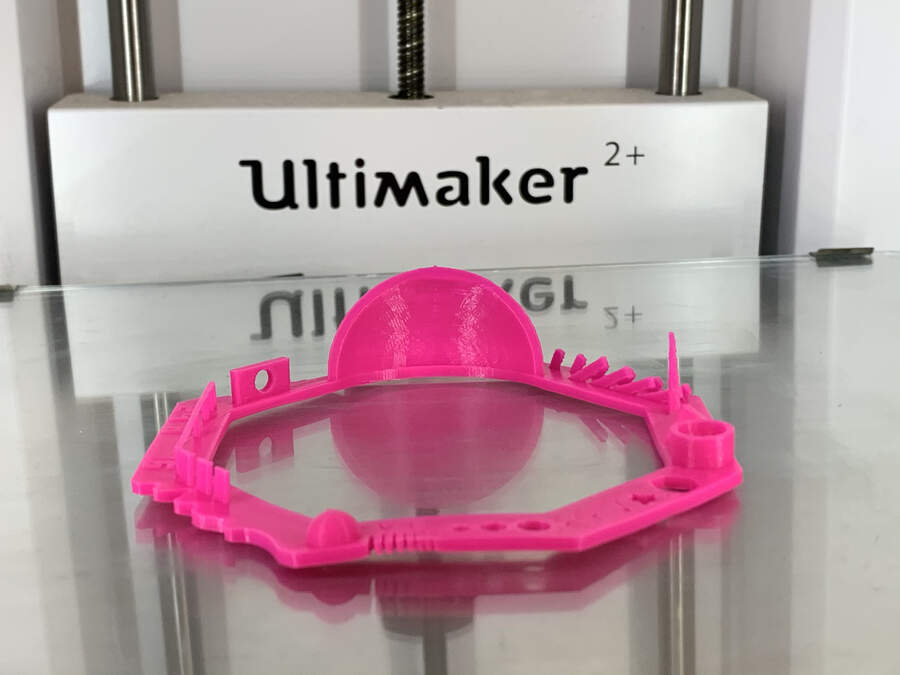
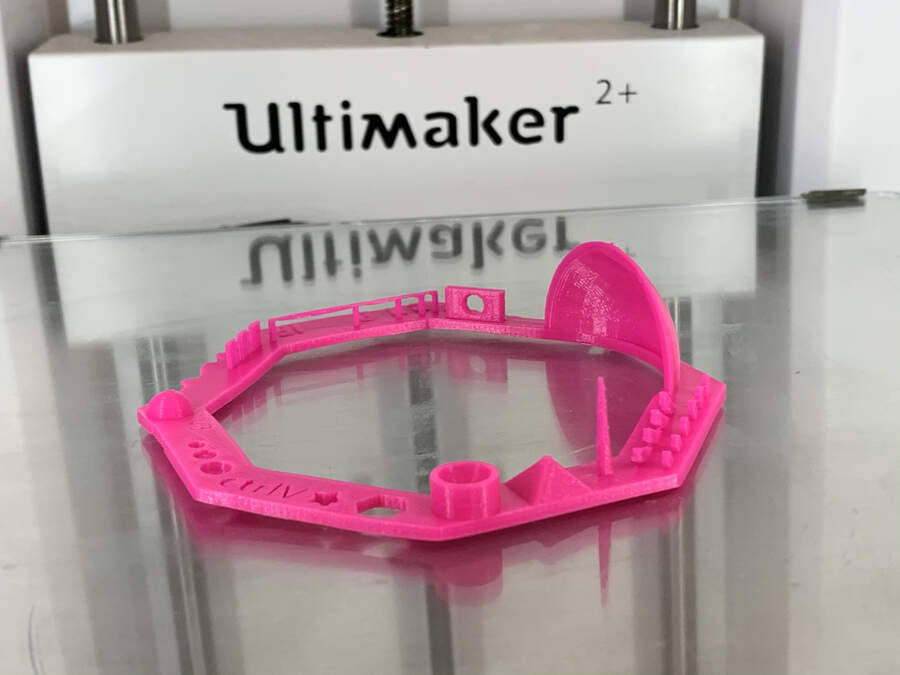
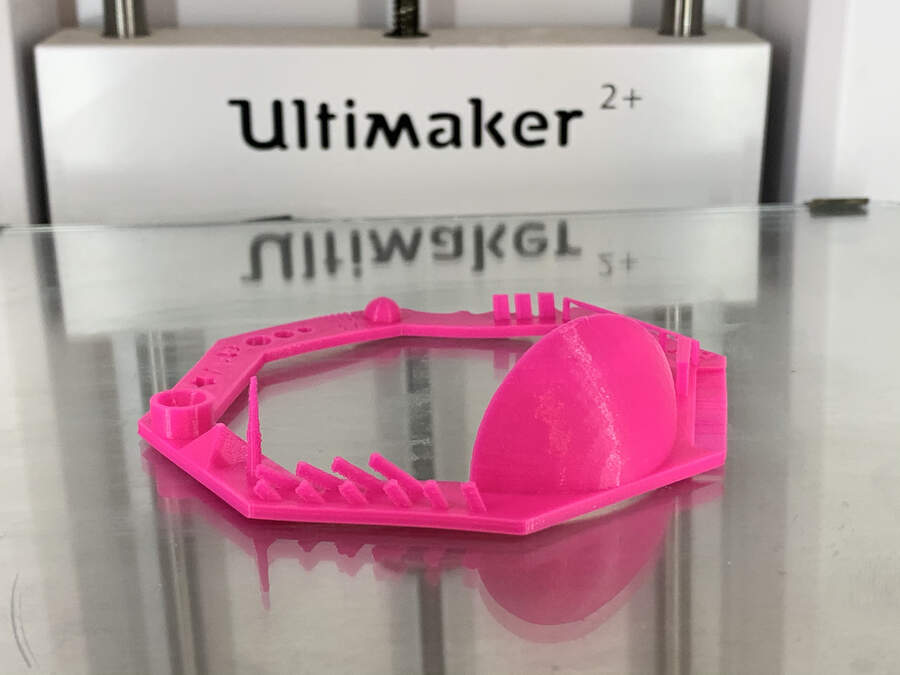
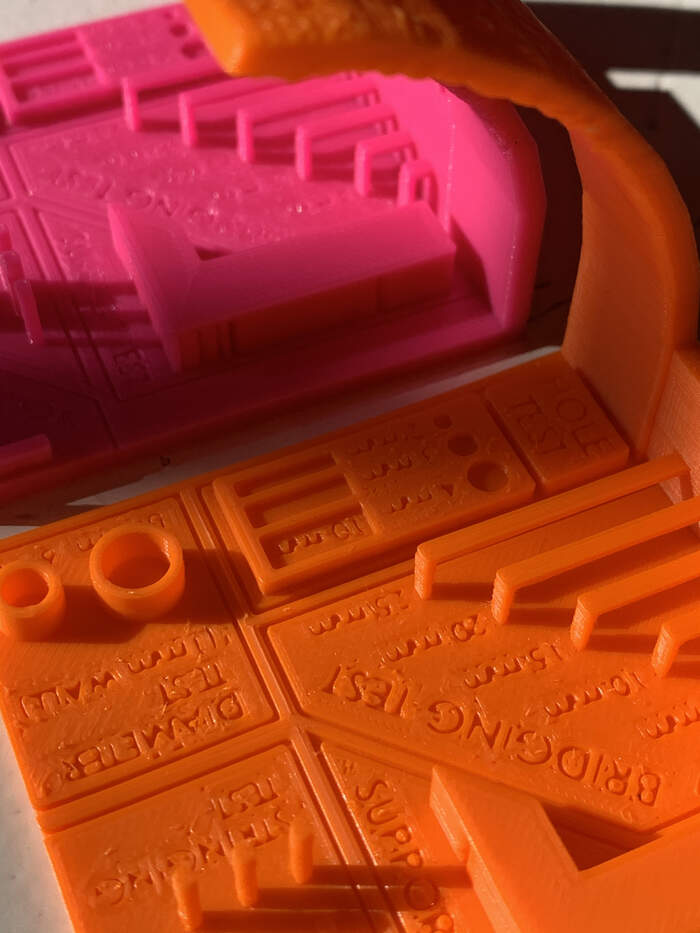
For the group assignment we have decided to use this 3D printer test from Thingiverse. We downloaded the file to our computer. With this file we have an easy option to check problematic printing/slicing stuff.
-
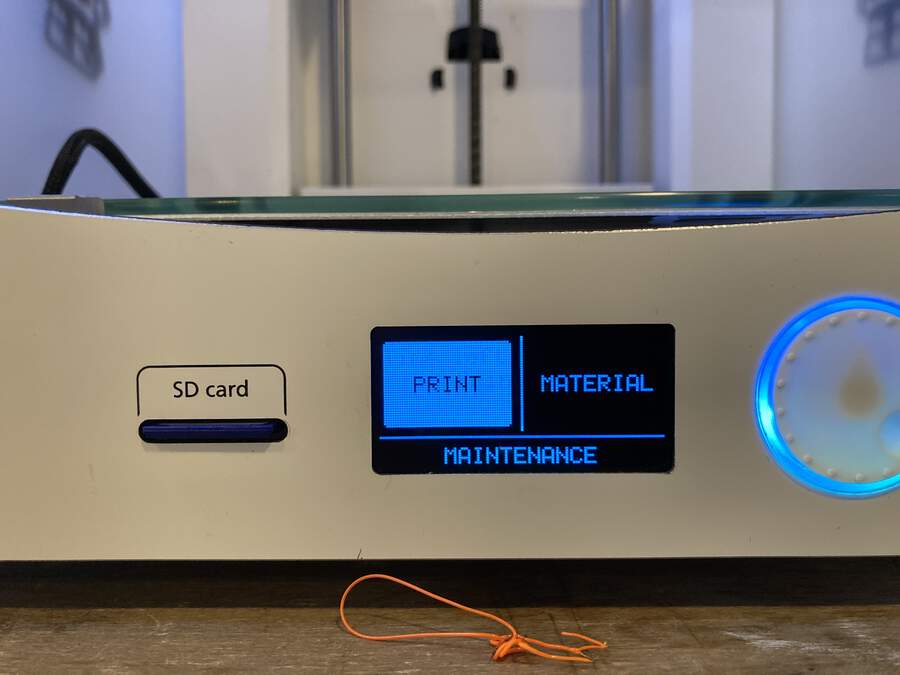
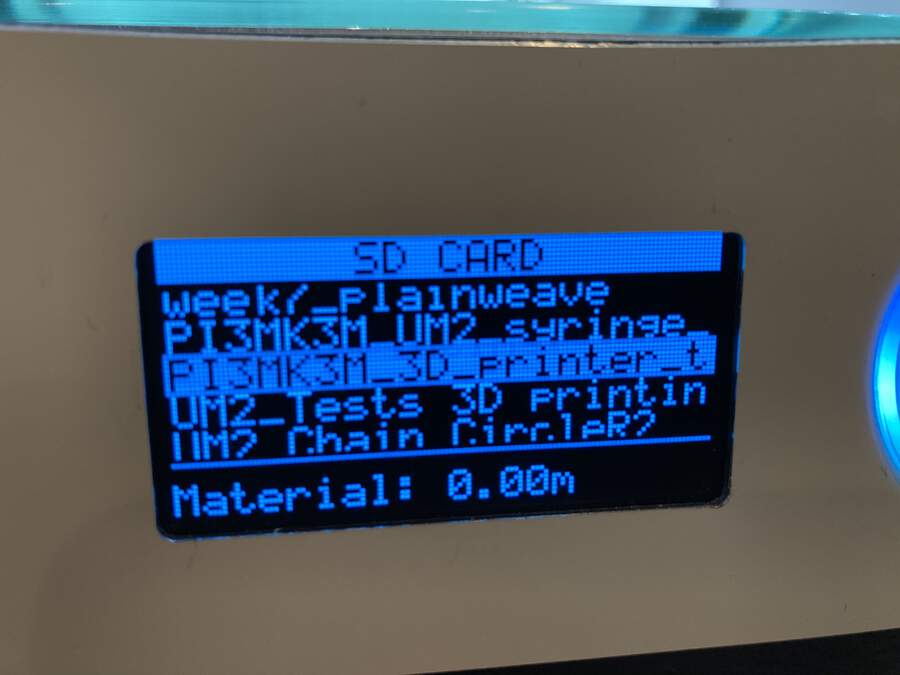
Open Cura > Slice it > save it as G-code > save it in SD card
-
We inserted SD card
-
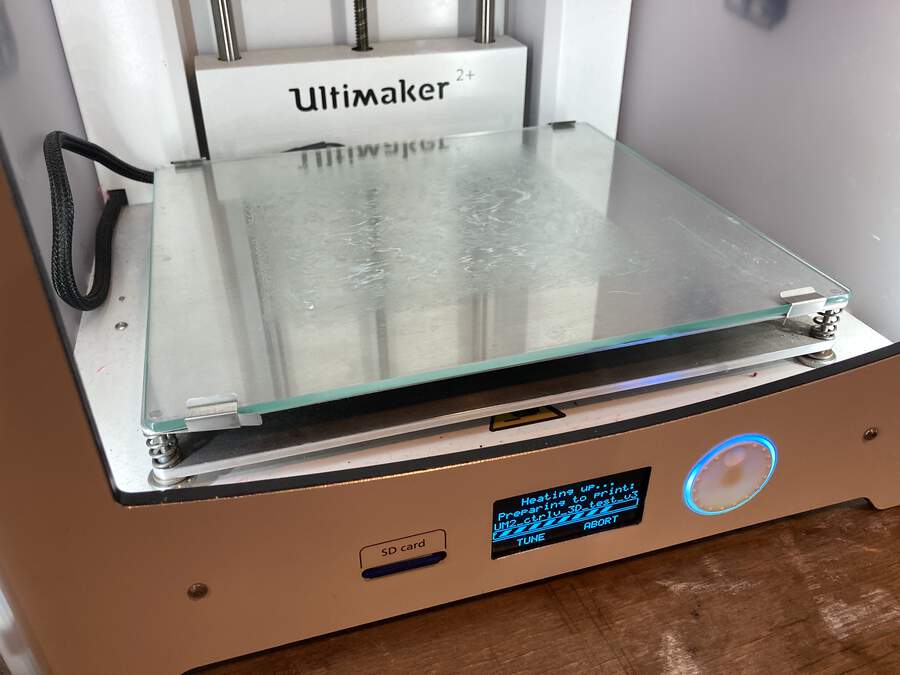
We choose the file we are going to print and pressed PRINT.
-
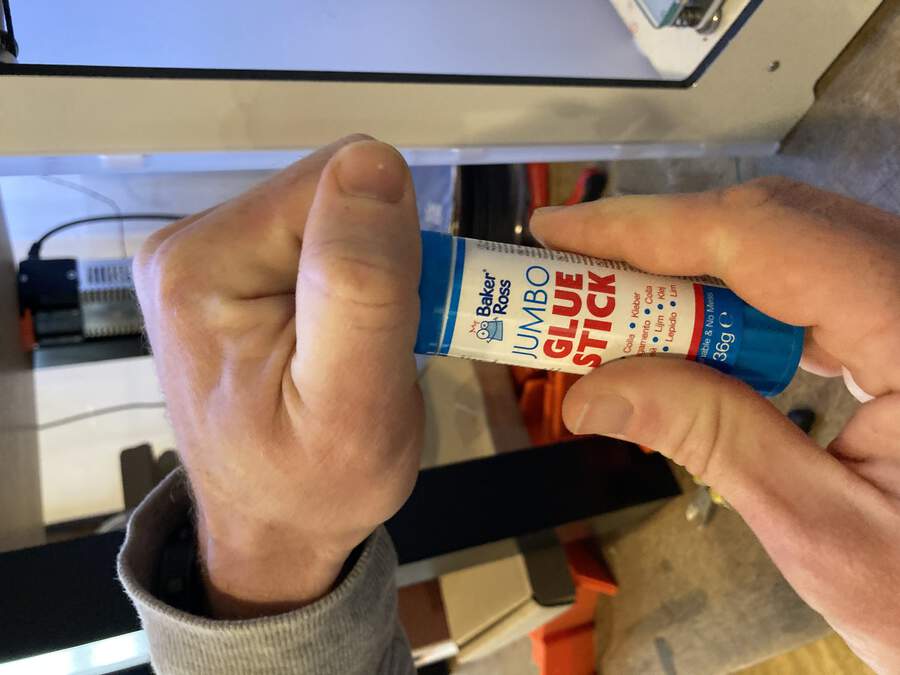
While the machine was heating up Douwe put some glue with a glue stick in the bed to help the printing piece stick to it (we later discovered it was maybe too much glue)
-
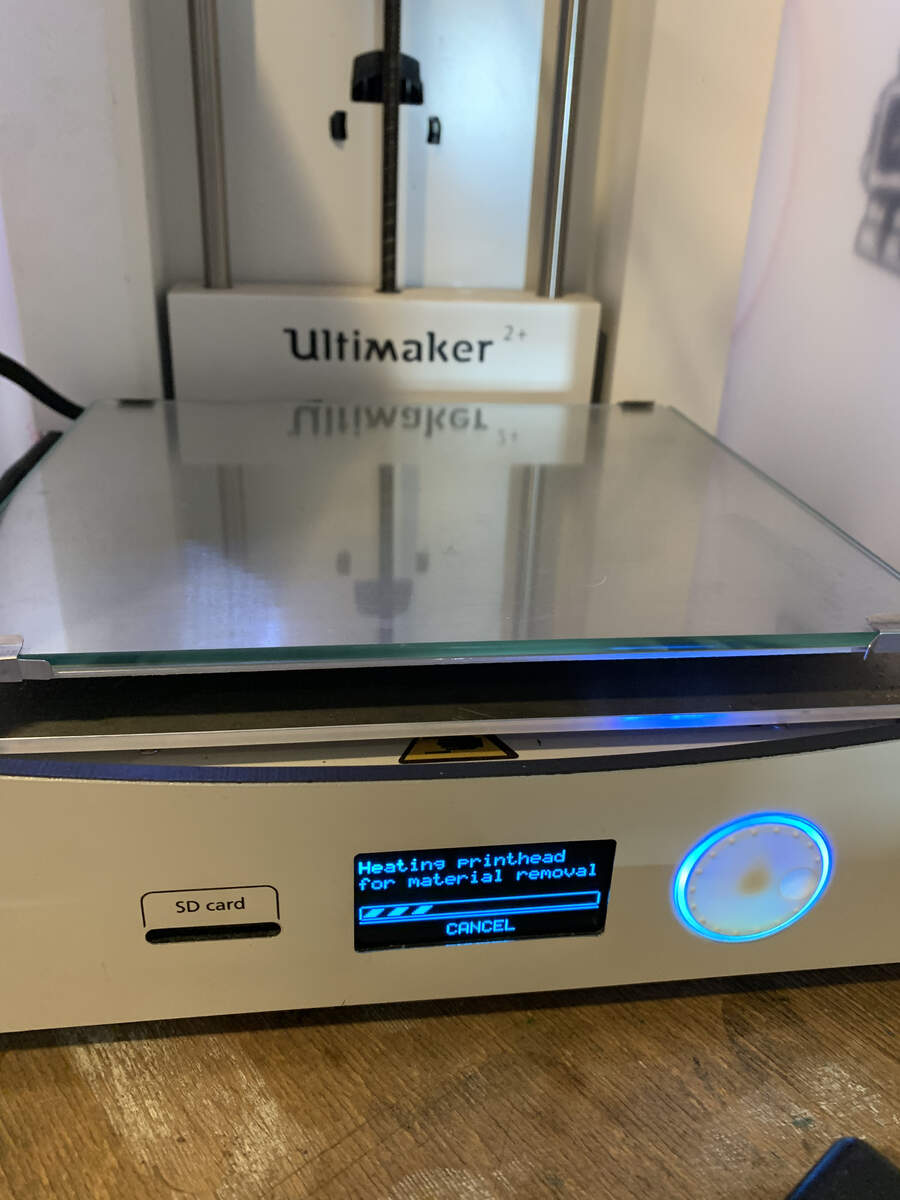
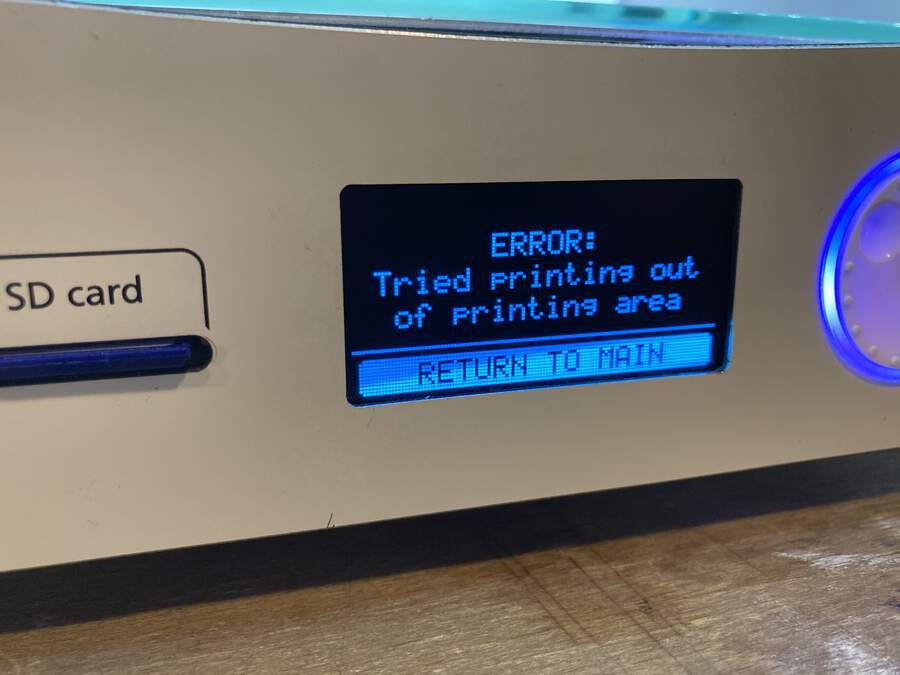
MACHINE ERROR!!!!!!!!! We did not checked the settings and we did not calibrated the machine! So what came out was a total mess. We stopped the printing and went back again to Cura.
SECOND ATTEMPT:
In Cura we discovered we had to specify some more settings;
-
Change printer type to Ultimaker2+
-
Change printing settings as stated in the Thingiverse link which were: Rafts: Yes
Supports: No
Resolution: 0.1mm or higher
Infill: 30%
In Cura we could not find the raft option. I looked for raft meaning and use and this is what I found: Raft is an older technology. It still is used by a few people but you don’t really need it anymore. Instead we have learned to get parts to “stick like hell”. For your non-heated bed printer, I recommend blue tape and here’s the key: clean the blue tape with isopropyl alcohol. This removes the waxy surface that keeps the tape from sticking to itself before you unroll it. There are other tricks - you need to print the first layer slower and hotter and squish it a bit into the tape so you might need to level slightly lower. Also a brim makes a huge difference and is much easier and cleaner to remove than a raft.
-
After changing the resolution and infill we saved the file and went back to the machine.
-
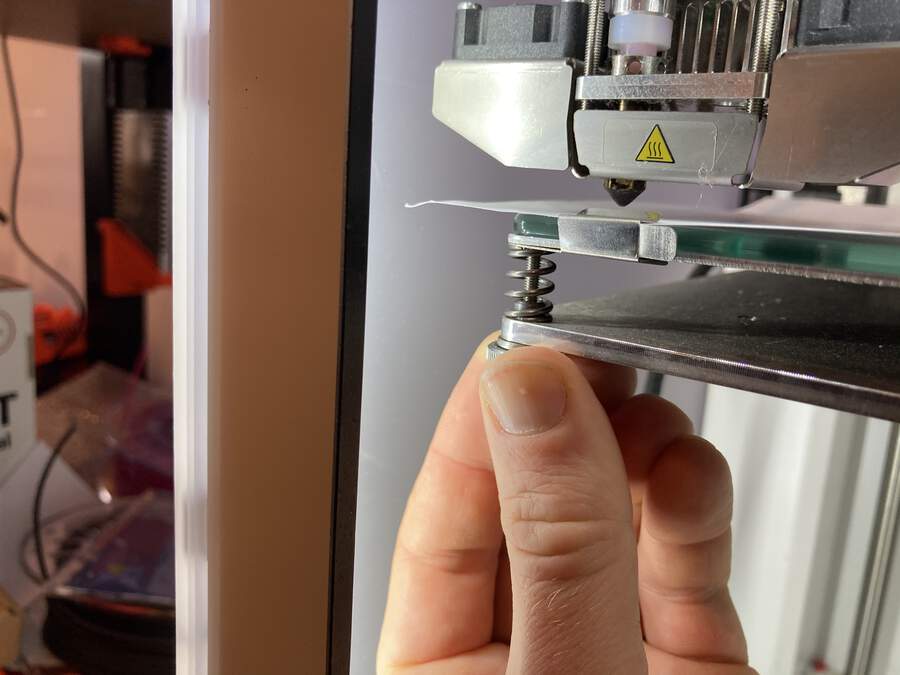
We calibrated the machine after watching this helpful video, specially the nozzle + bed calibration (which we had to repeat various times). The machine guides you through the whole calibration process so we did not really document it. This is the mode you have to choose:
-
A very important thing Douwe and me figured out when calibrating was that when you unscrew the bed it goes up and when you screw it goes down.
-
We insert the SD card for second time and press PRINT. This time we did not use glue. It does not work again (the structure was very loose and did not stick to the bed) so we press PAUSE and go back to Cura.
THIRD ATTEMPT: - After the second attempt I went to Rutger, student from 2019 (den Waag) and checked his settings for the machine which were “set the printing temperature on 208 and a layerheight of 0.15mm. We did not use any support for the print. The fill density was set on 20%”.
- We also checked the temperature that the filament showed:
Nozzle temperature: 190-210 Bed temperature: 50-60
-
The parameters we changed in the end were: Changed speed to 40mm/s (when you have filament that is hard to stick on board you can modify speed section.) Nozzle temperature: 210 Bed temperature: 60 density 20% layerheight 0,15mm
-
Third attempt was also a fail because this time it did not even draw the shape, the filament was all tangled in the nozzle. We PAUSE the machine and clean the nozzle.
FOURTH ATTEMPT:
-
We first re-calibrated the nozzle again.
-
We then realised Rutger did not use the Ultimaker 2+ but the Printrbot Metal plus, so probably we should not be following his settings for the machine.
-
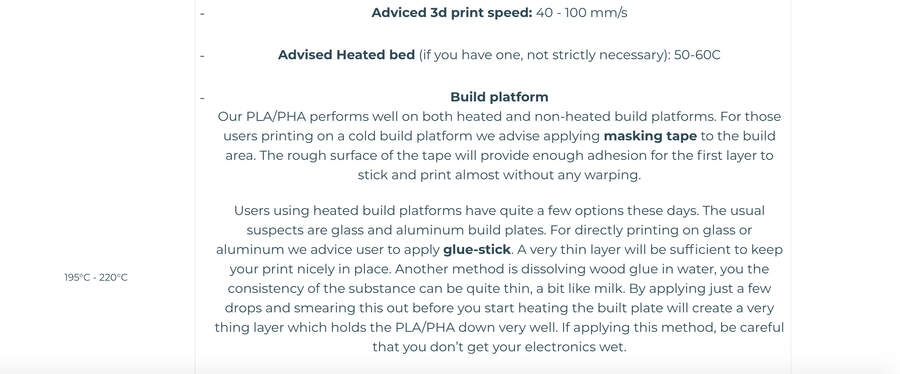
We try to see if understanding the filament material will make our printing better. We found this very useful information of our material here.
-
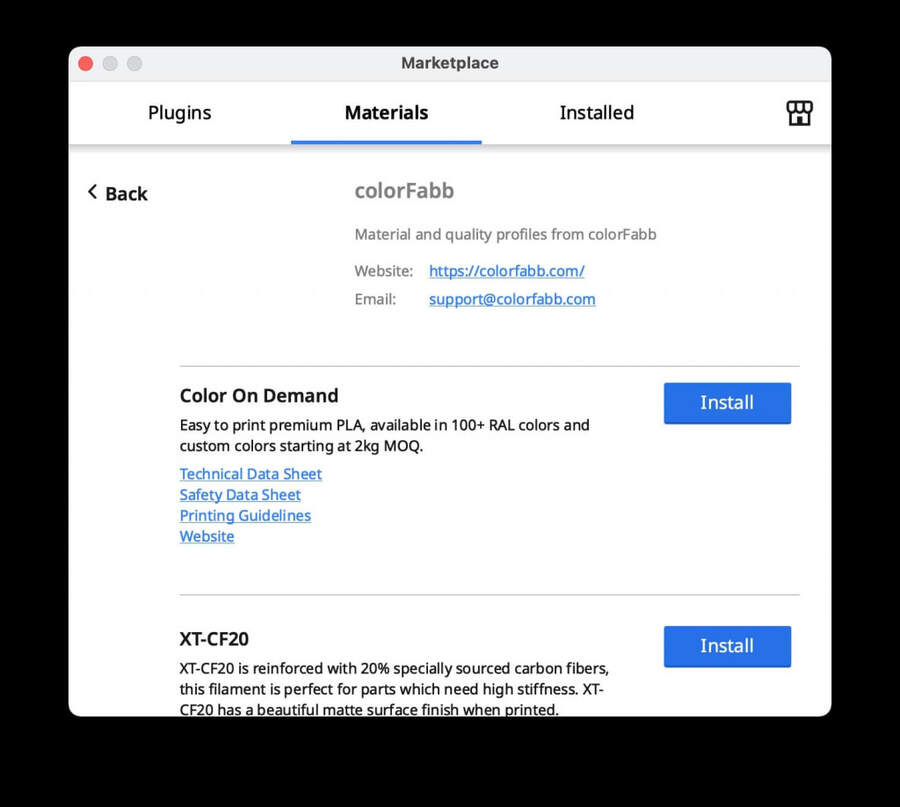
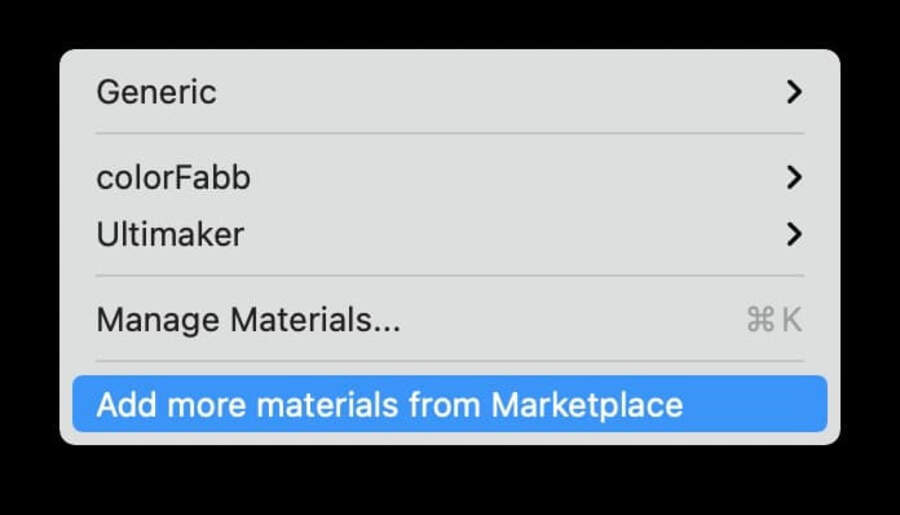
We also added the printing material in Cura > colorfab PLA (we added the colorfabb specific material library which we downloaded from their website by adding specific material from marketplace option in Colour options in Cura)
-
From the material information we change the following parameters: speed to 60mm/s and we try to add glue but less amount than in the first attempt (we do this just when the heating of the bed is about to finish so it does not dry out).
-
We add the material again:
-
It works! Finally! It started printing the base correctly:

-
We remove the piece with the spatula:
-
The final piece looked like this:
-
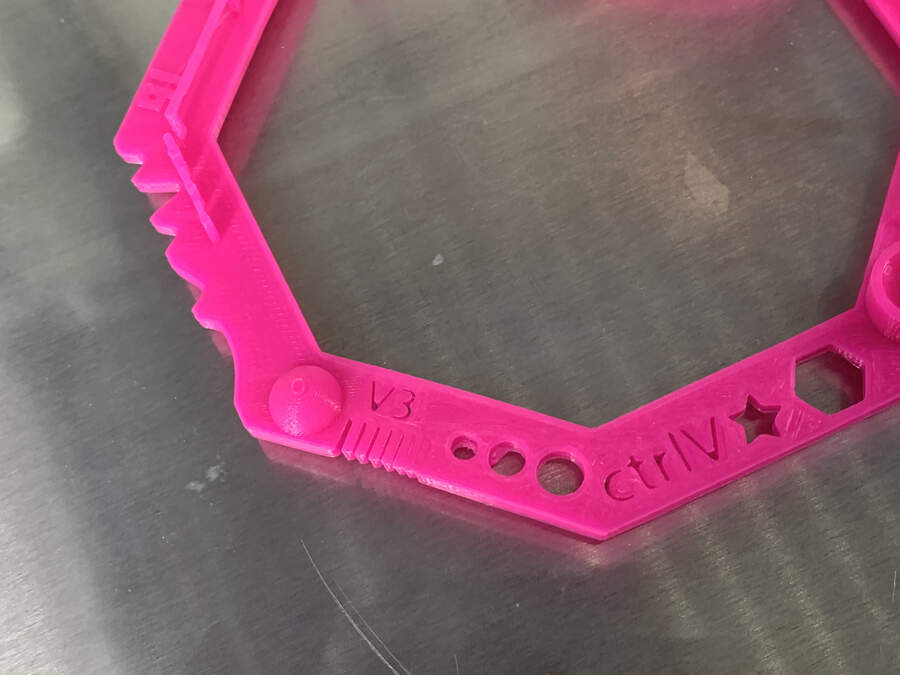
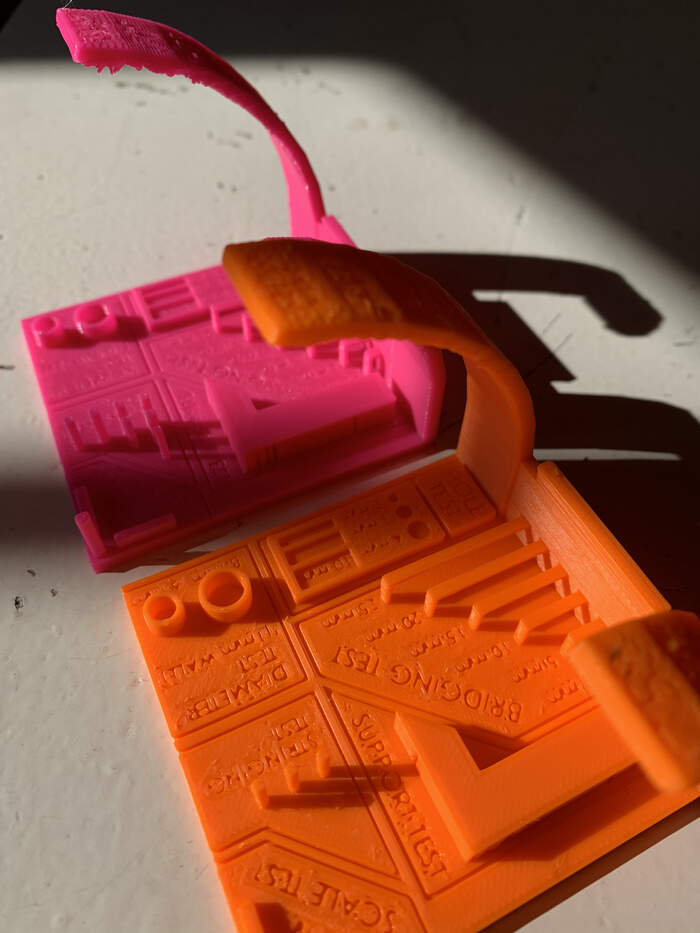
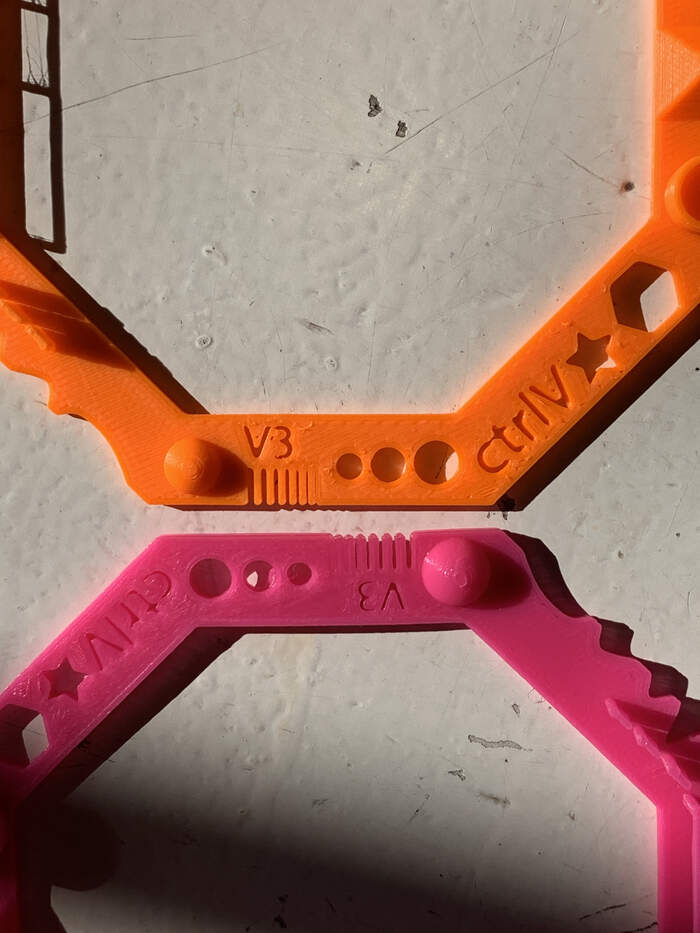
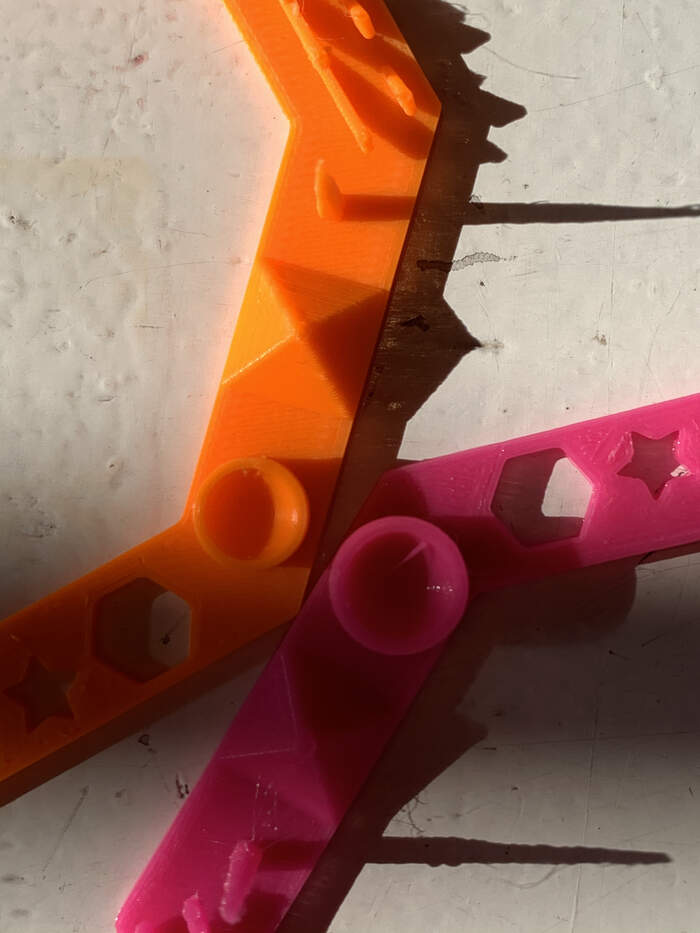
We looked into the shape in detail to see if it had any constraints, these where the details from it:
-
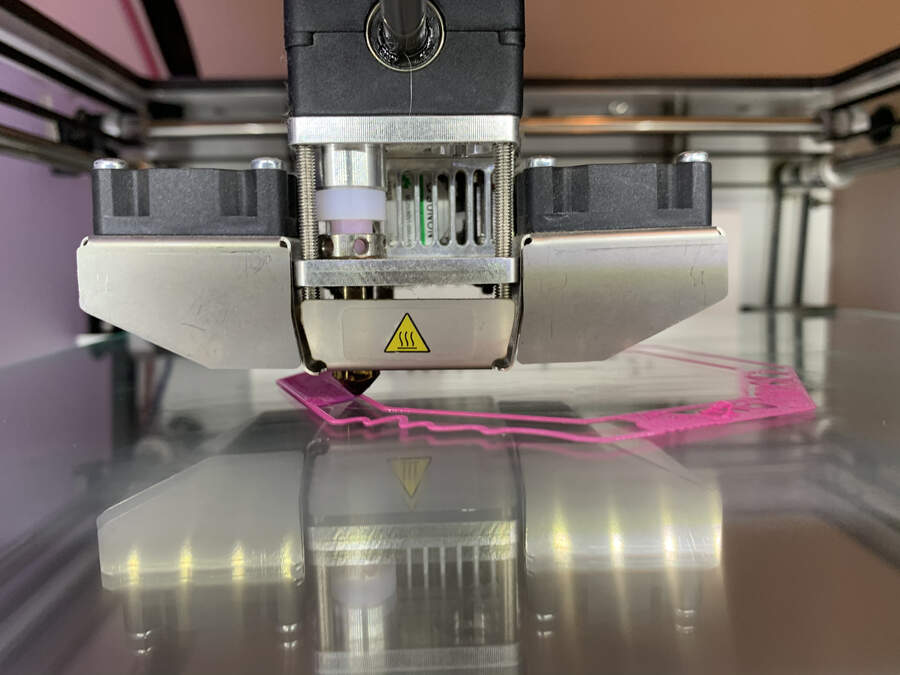
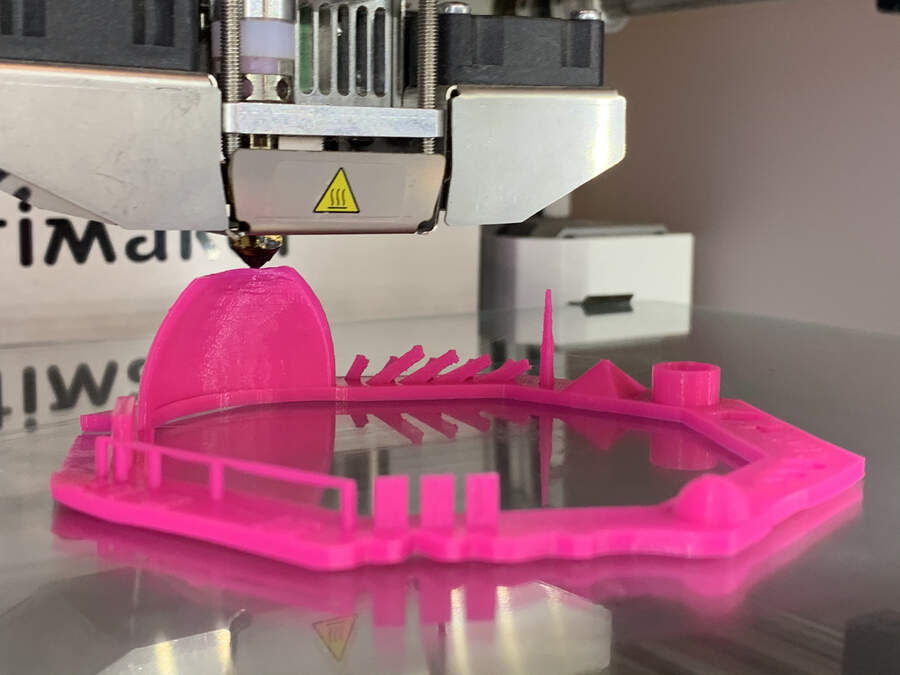
The tests included in the file are:
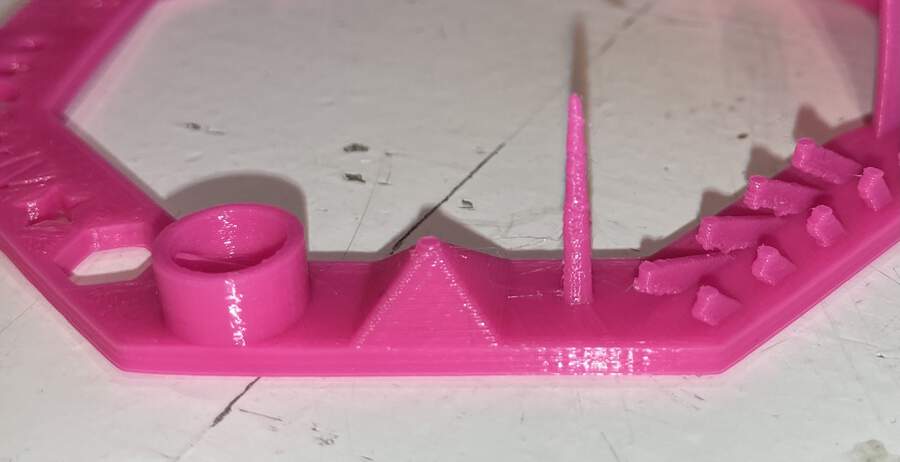
01 Nut, Size M4 Nut should fit perfectly
02 Wave, rounded print
03 Star, Sharp Edges
04 Name, Complex Shapes
05 Holes, Size 3, 4, 5 mm
06 minimal Distance: 0.1, 0.2, 0.3, 0.4, 0.5, 0.6, 0.7 mm
07 Z height: 0.1, 0.2, 0.3, 0.4, 0.5, 0.6, 0.7, 0.8, 0.9, 1.0, 1.1 mm
08 Wall Thickness: 0.1, 0.2, 0.3, 0.4, 0.5, 0.6, 0.7 mm
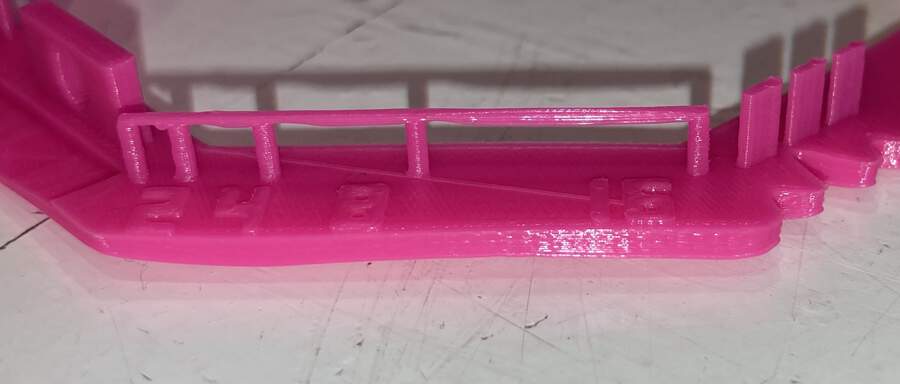
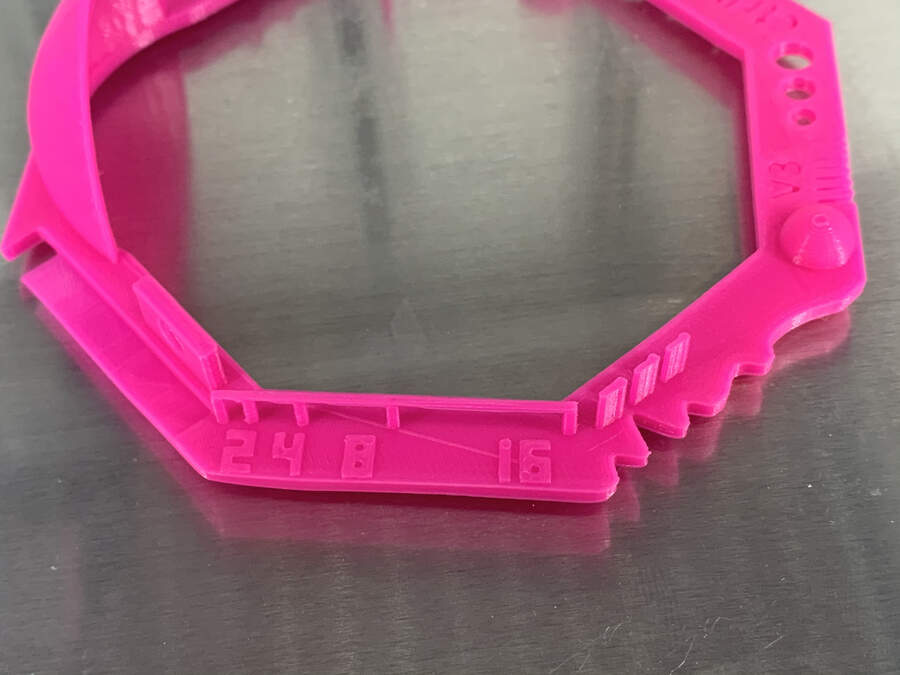
09 Bridge Print: 2, 4, 8, 16 mm
10 Sphere, Rounded Print 4.8mm height
11 Sphere Mix, 7 mm height
12 Pyramide, 7 mm height
13 Overhang: 25, 30, 35, 40, 45, 50, 55, 60, 65, 70°
14 Warp, does it bend?
15 3D Print Font, optimized for 3D printing
16 Surface, Flatness
17 Size, 100 x 100mm x 23.83 (10mm width)
18 Spike, minimum Layer Time, 21 mm height from Bottom (include Baseplate)
19 Hole in Wall, 4 mm diameter, check for proper print
20 Raft Test, raft should be just under the model
21 Retract Travel, check retract settings for longer travel
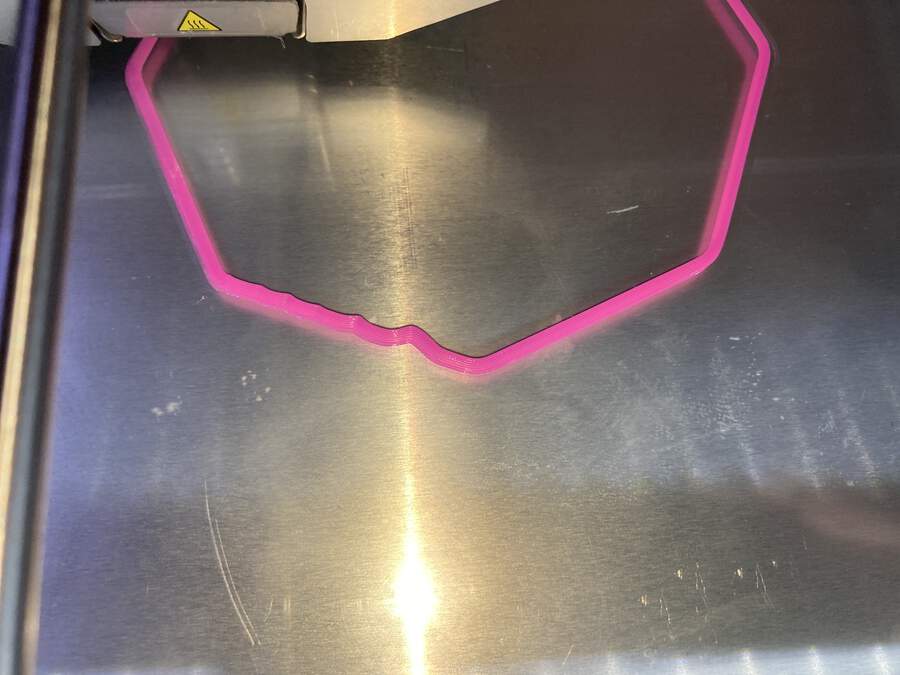
- We concluded that the test came out quite accurate except for two areas which did not look as smooth as the rest. As you can see below the overhangs did not work out very accurate as well as the minimal distance (0,1mm) which is does not go through directly.
I learned that the important printing settings have to do with some key features which are: - Layer height: is the resolution of your print, the smaller the layer height, the more detail your print gets but the longer it also takes to get printed. We used a layer height of 0,15mm and the print came out quite accurate, but the precision of overhangs was not that accurate. Maybe with a higher layer height the print would have come out more precise (but this would mean more time too!). Overall we were quite happy with the result.
-
Speed: specially affects overhangs and bridges, if it is too high the printer can make the filament thinner and less sturdy.
-
Temperature: specially affects overhangs and bridges, if it is too high the filaments takes longer to cool down and solidify so it can fall more easily.
-
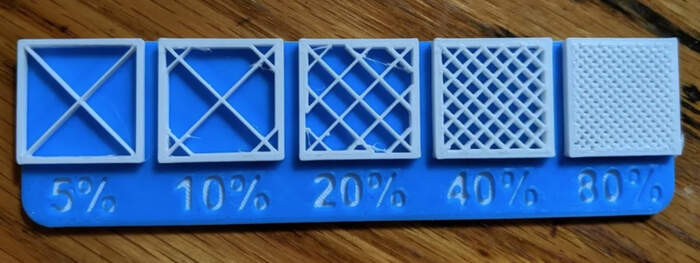
Infill density: it is what exists within the walls of the design. It plays a huge role in the strength, weight, structure, buoyancy and more of the print. Infill density (fullness of the inside) can significantly affect material consumption. It is usually represented in %, see below. For most “standard” prints that don’t need to be super strong, infill density of 15-50%. This density percentage keeps print time low, conserves material, and provides okay strength. Functional prints need to be strong. Therefore, we recommend using a higher infill: more than 50% (don’t be afraid of going as high as 100%).
-
Infill pattern is the structure and shape of the material inside of a part. Ranging from simple lines to more complex geometric shapes, infill patterns can affect a part’s strength, weight, print time, and even flexibility. Across different slicer programs, there are many different infill patterns. For example, Cura (4.7) has a selection of 13 different infill patterns; so does PrusaSlicer (2.2). Simplify3D has only six. Different infill patterns have different attributes, like complexity, material efficiency, and the number of planes of connective strength (2D or 3D). Standard prints: Grid or triangles Functional prints: Cubic, gyroid, or octet Figurine and model prints: Lines Flexible prints: Concentric
-
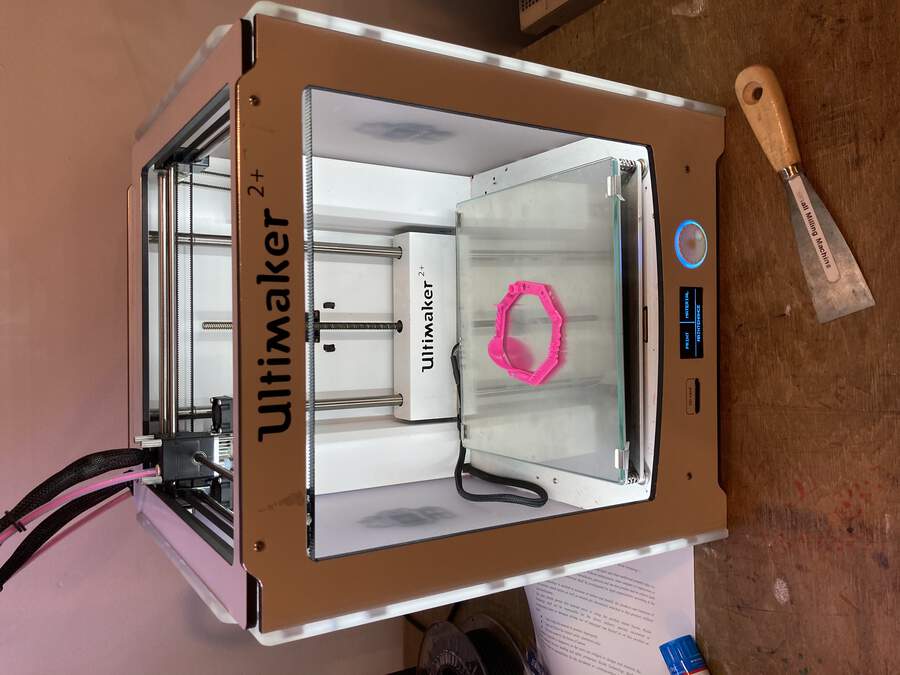
Accuracy: some printers are more accurate than others. At our Fablab we tested two types of test, one in each printer. The result was that Prusa(orange) did a much better job over Ultimaker(pink), specially at the overhangs and the very thin mm gaps.
INDIVIDUAL ASSIGNMENT:
Design and 3D print an object (small, few cm3, limited by printer time) that could not be easily made subtractively.
Additive manufacturing involves adding layer (or bits) after layer (or bits). First of all, 3D printing is an additive process. It manufactures objects by building them up layer by layer. You can watch this build process as it happens, which is useful when you’re testing a new design.
Subtractive manufacturing involves taking away layer (or bits) after layer (or bits). Subtractive manufacturing, like CNC machining, involves cutting material off of a larger piece of stock. Similar to injection molding, infill can’t be adjusted, with the interior being completely solid.
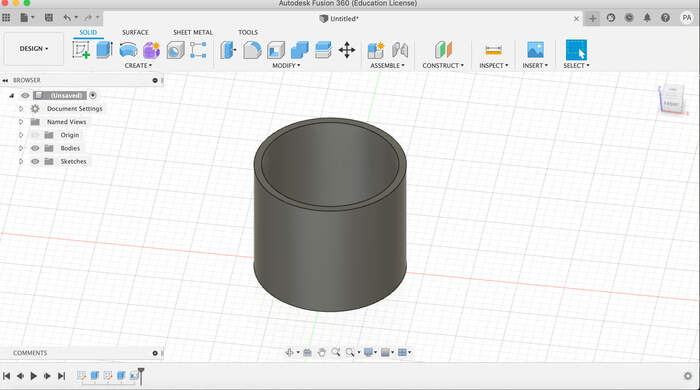
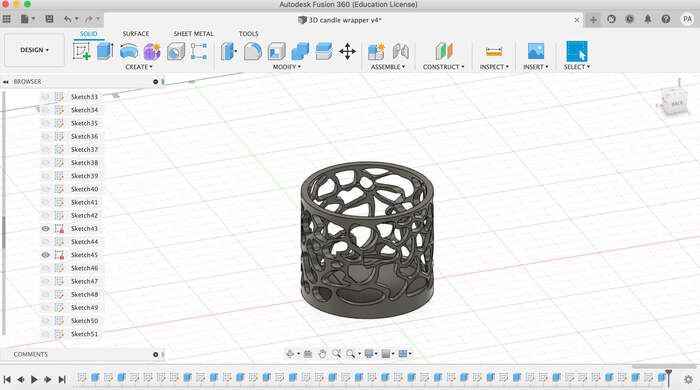
My first idea to design were rings with the extrusion option but Henk told me it was too much hassle to clean the machine after so I decided to create a candle lamp. I drew the shape in Fusion 360. These are the steps I took:
-
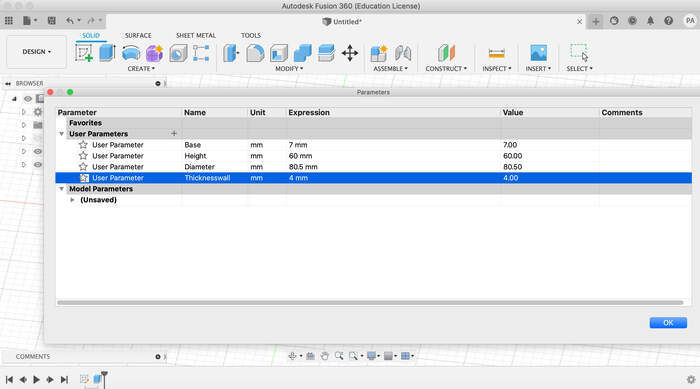
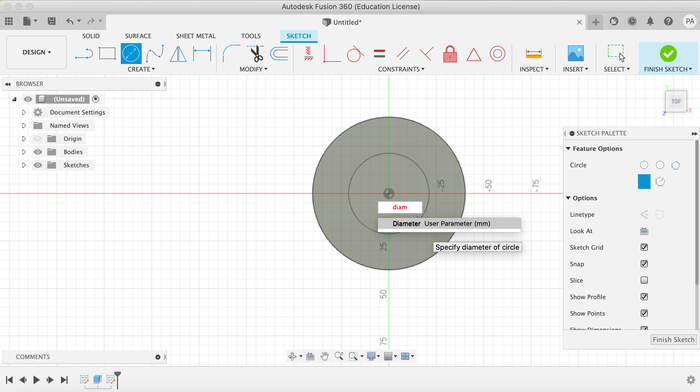
First I created parameters for the cylinder:
-
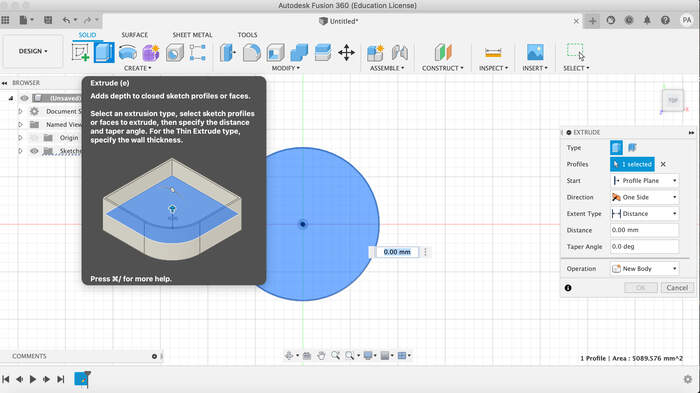
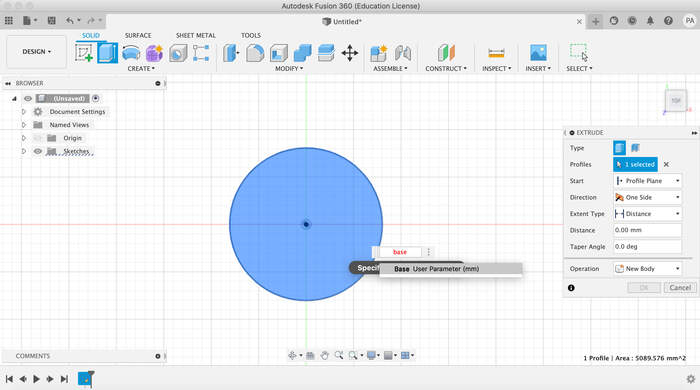
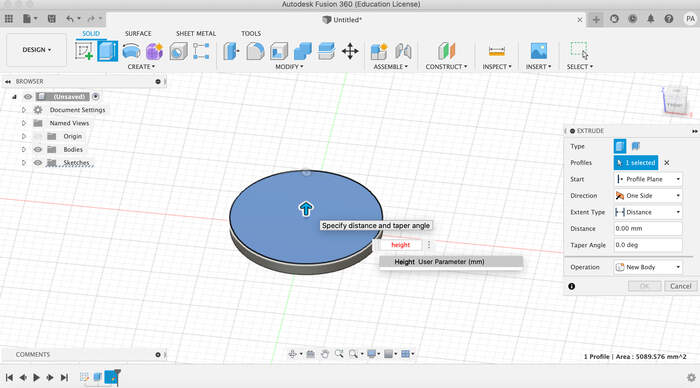
Then I drew the base in sketch mode and extruded it with the following parameters.

-
I selected the top face of the base to draw a circle of the same dimensions on top and extrude it with the height parameter.

-
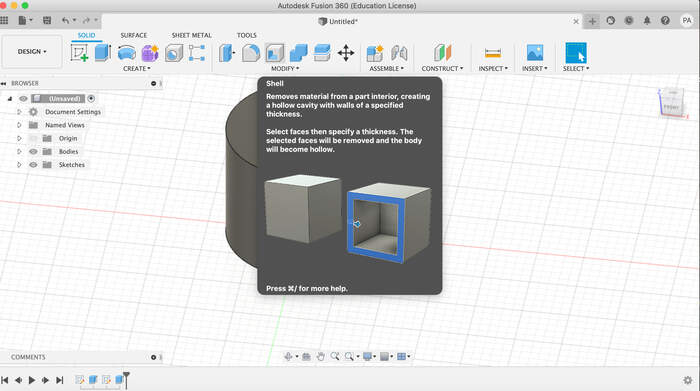
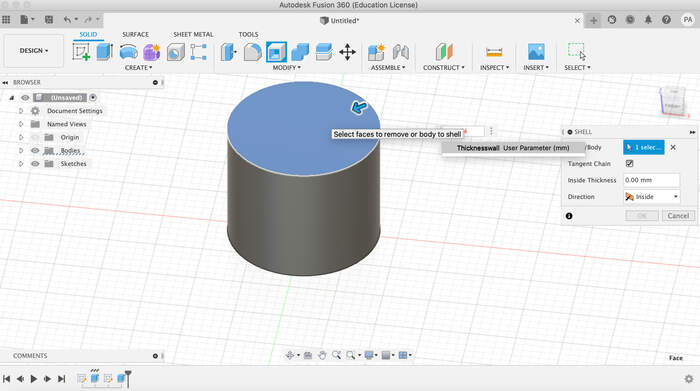
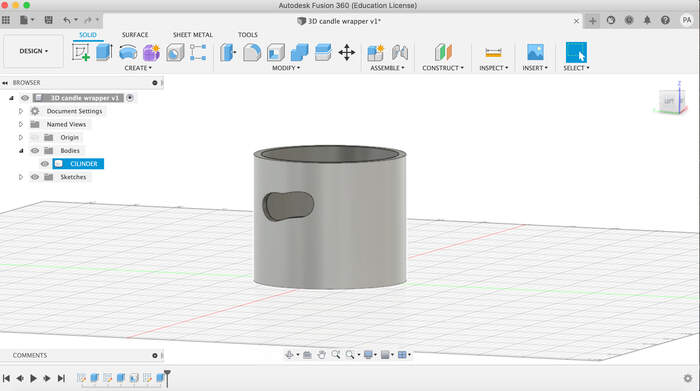
After I used the shell option to remove the interior layer and leave only the cylinder wall thickness.
-
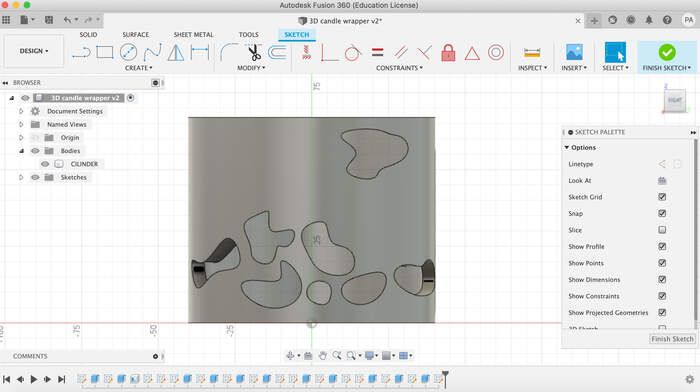
When I finished the cylinder I created sketches of different shapes and extruded them on different sides of cylinder to make the holes trough which the light of the candle will go through.

-
I continued extruding holes till I got the final piece:
-
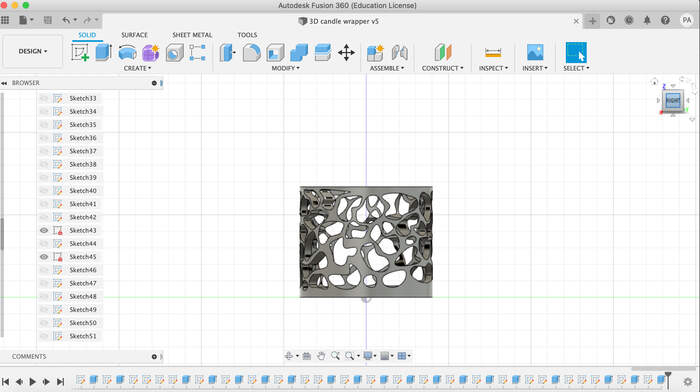
I select the body and export the whole structure as STL.
-
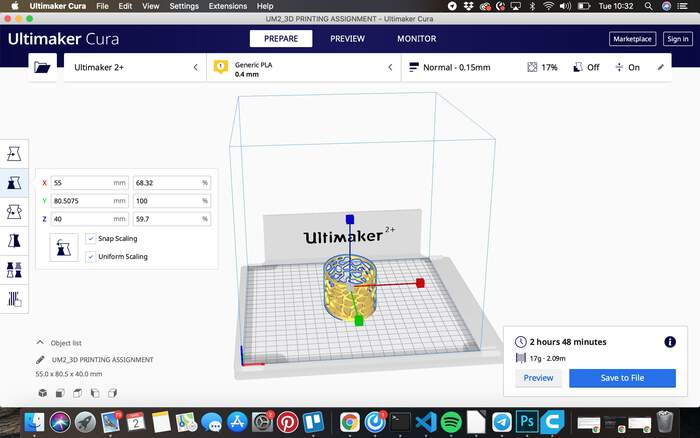
I downloaded Cura, chose Ultimaker 2+ (3D printer we have at den Waag) and imported the STL file.
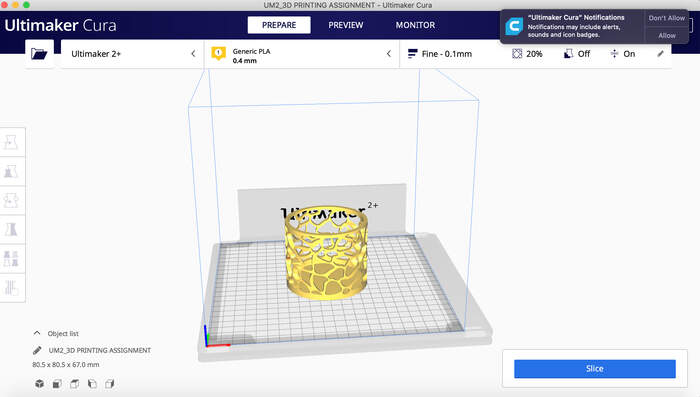
-
I choose the different settings: Ultimaker 2+ // PLA in material section// 0.15mm layer //
I looked into Printing settings for similar shapes: 3D printer:Flashforge CREATOR 0.2mm layer heigth 2mm shell 60 mm/sec 0% infill
FIRST ATTEMPT: no filament was coming out of the filament. I tried calibrating the machine.
SECOND ATTEMPT:
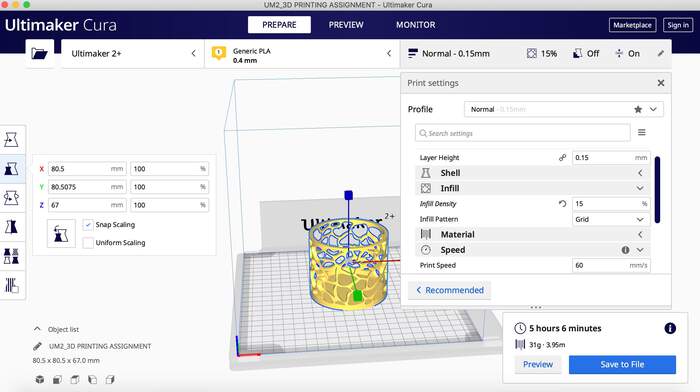
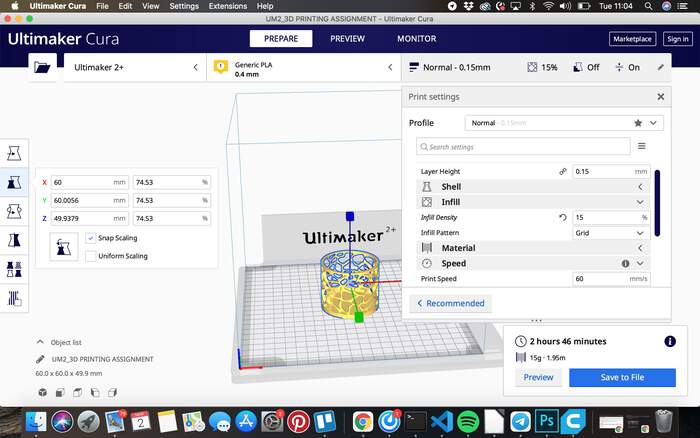
- I went back to Cura and changed the printing settings to the following: speed to 60mm/s //density 17% // layerheight 0,15mm // glue on bed // and played around the size of the print so it would not take 5 hours. Still no filament coming out.
THIRD ATTEMPT:
-
As the material did not come through the nozzle I tried reversing the material, I noticed it had a slight error as you can see below (this is why it was not going through the nozzle completely).
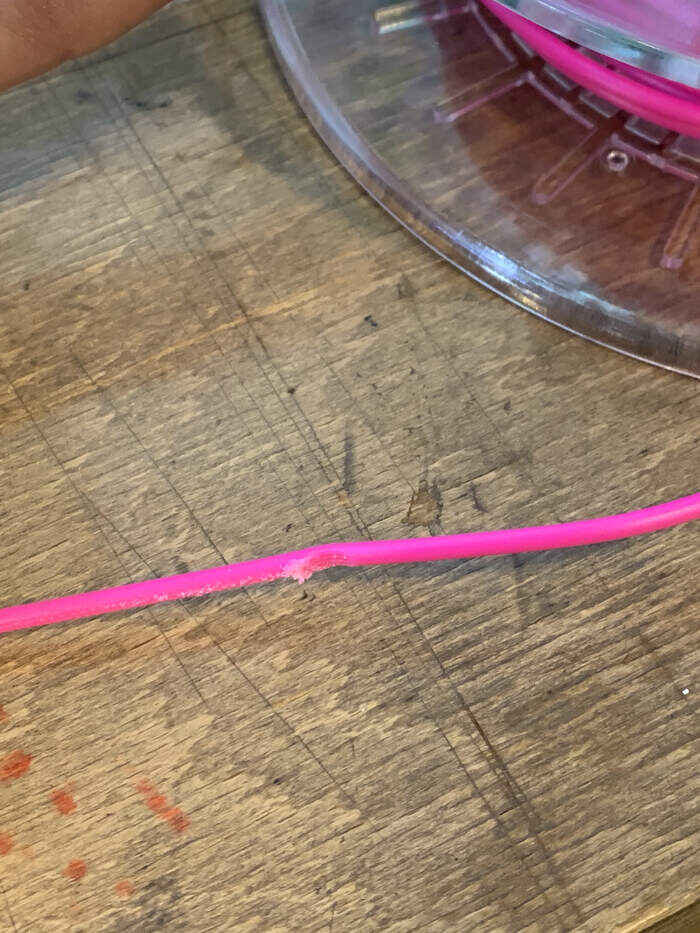
-
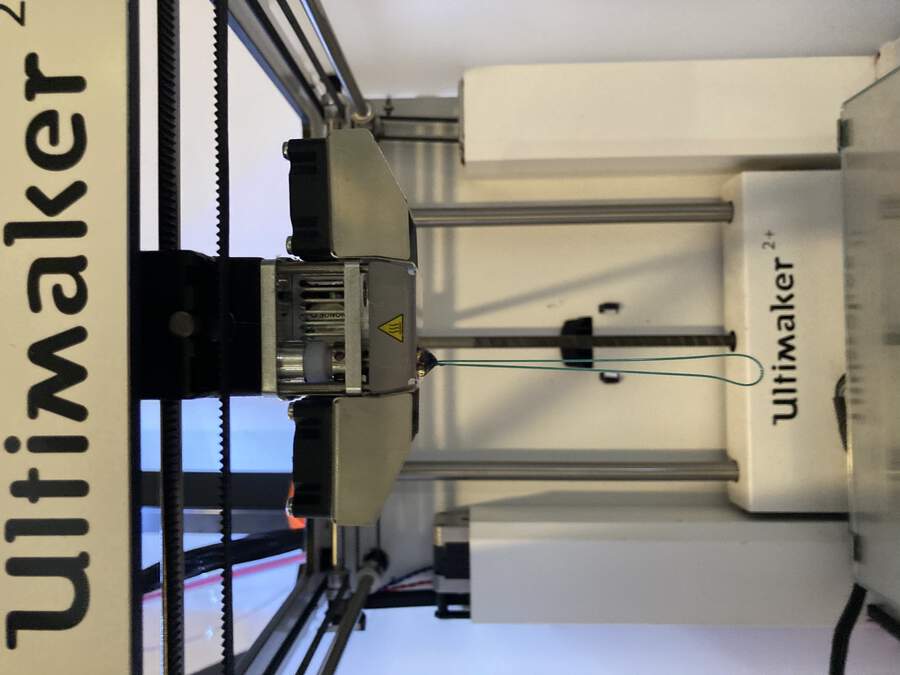
I cut off the piece and inserted again the material for the printer. I recalibrated it and wala! it worked, the waste material from the previous print was coming out. I let it come through till I see the pink color filament I chose. I press print. It starts printing.
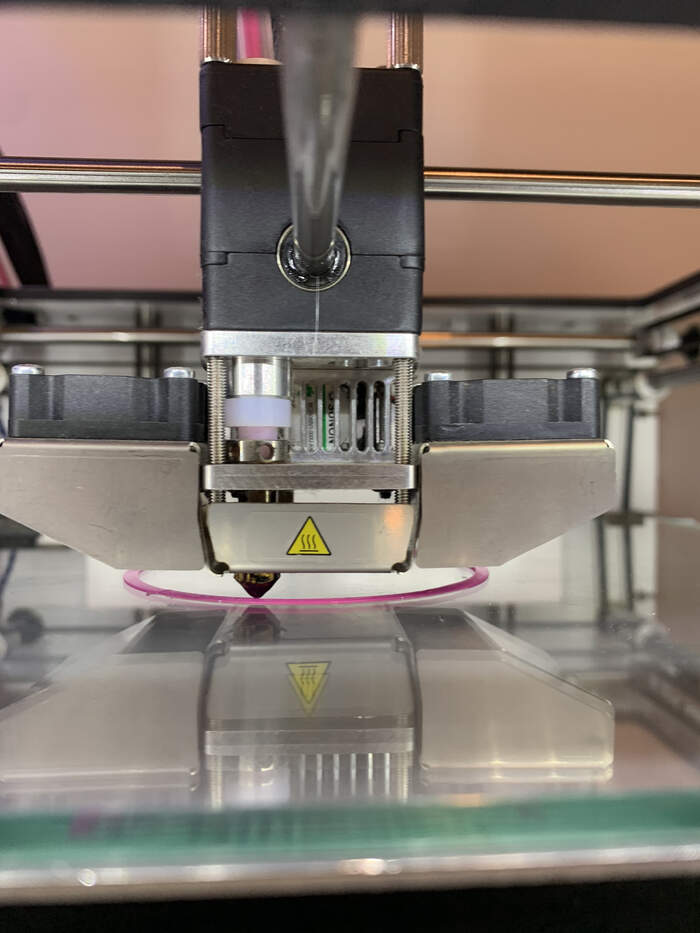
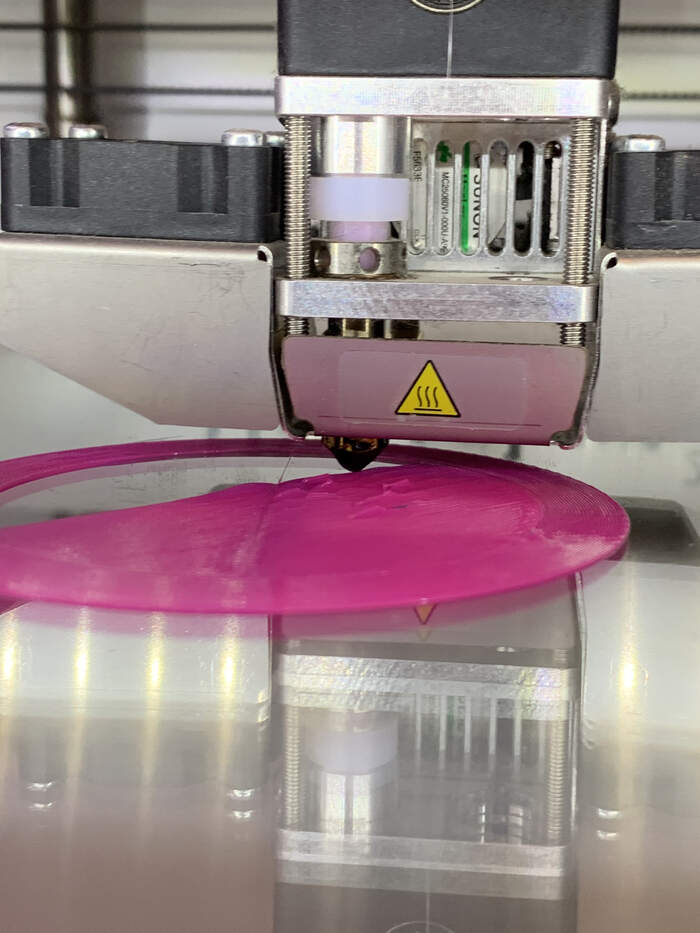
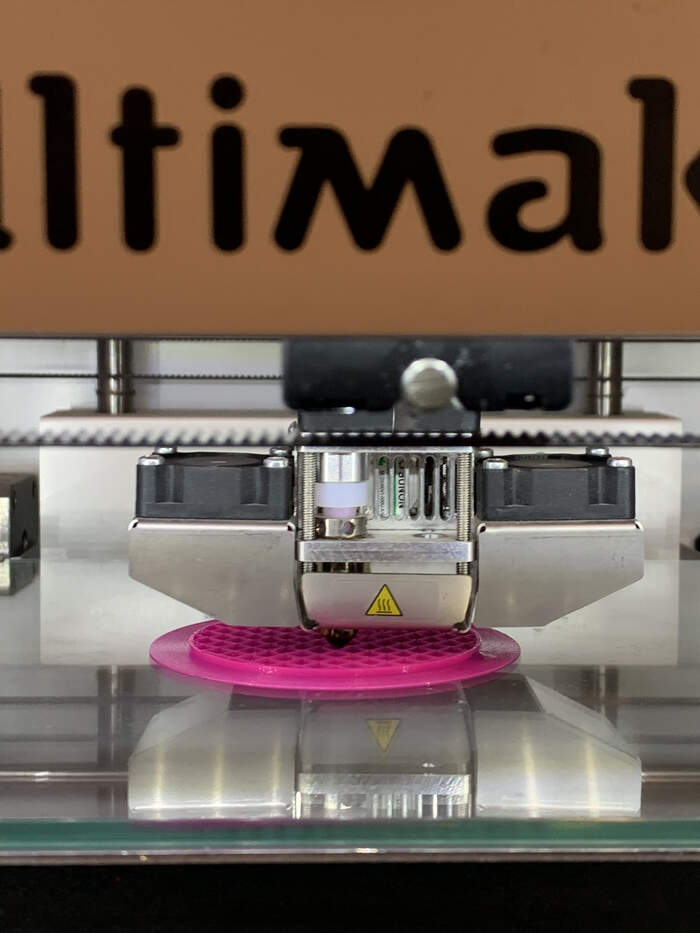
PRINTING PROCESS:
-
Here I noticed that the bed was not still well calibrated because it was going wrong on one of the sides of the print, in the end it worked out fine but for the future Michelle showed me this print for calibrating printing beds.
-
Creating the base:
-
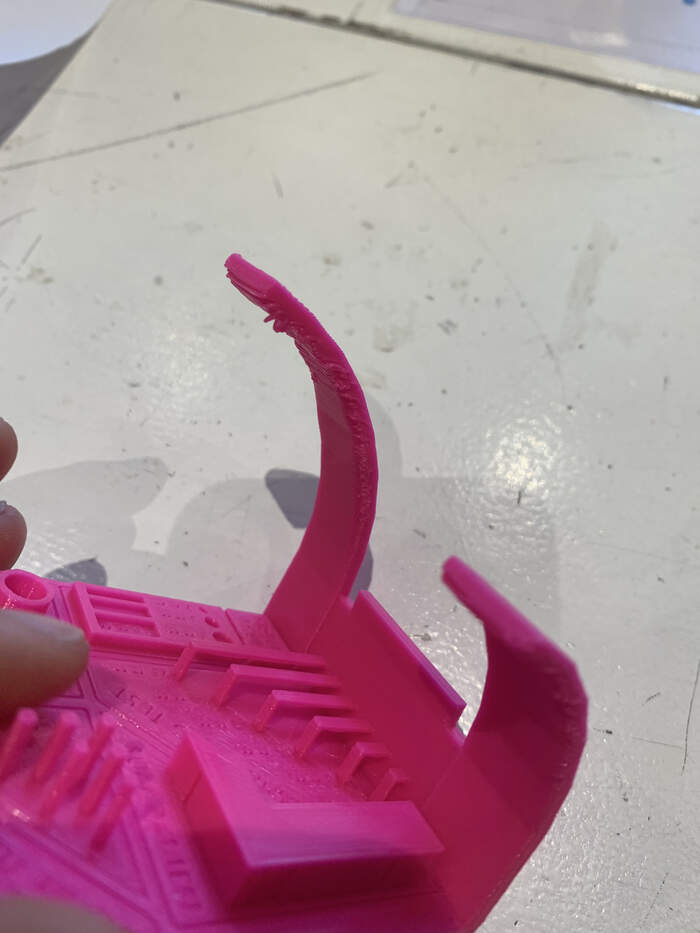
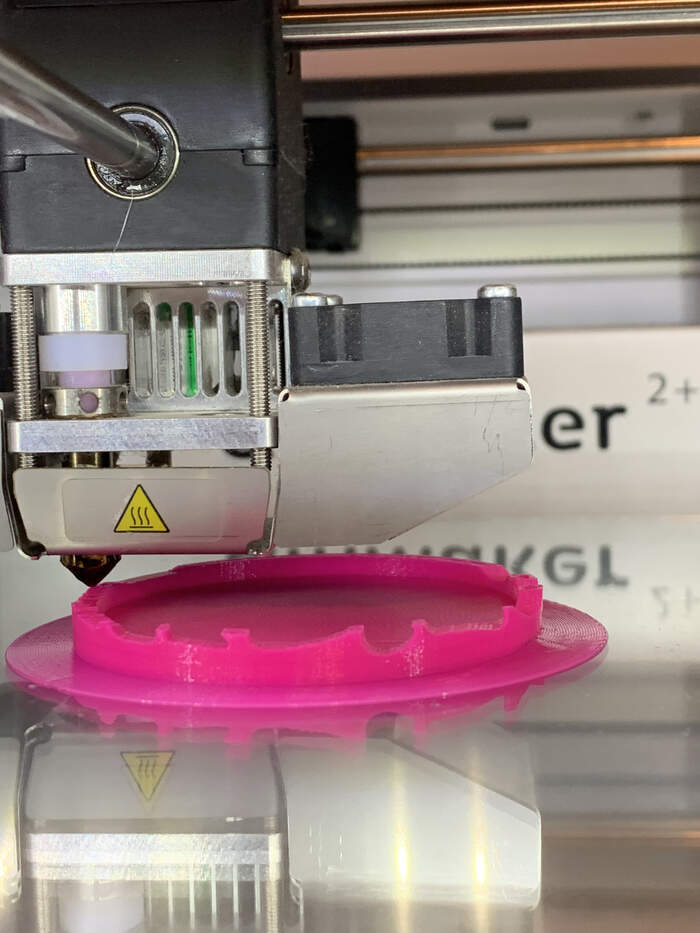
Here it started to create the overhangs:
-
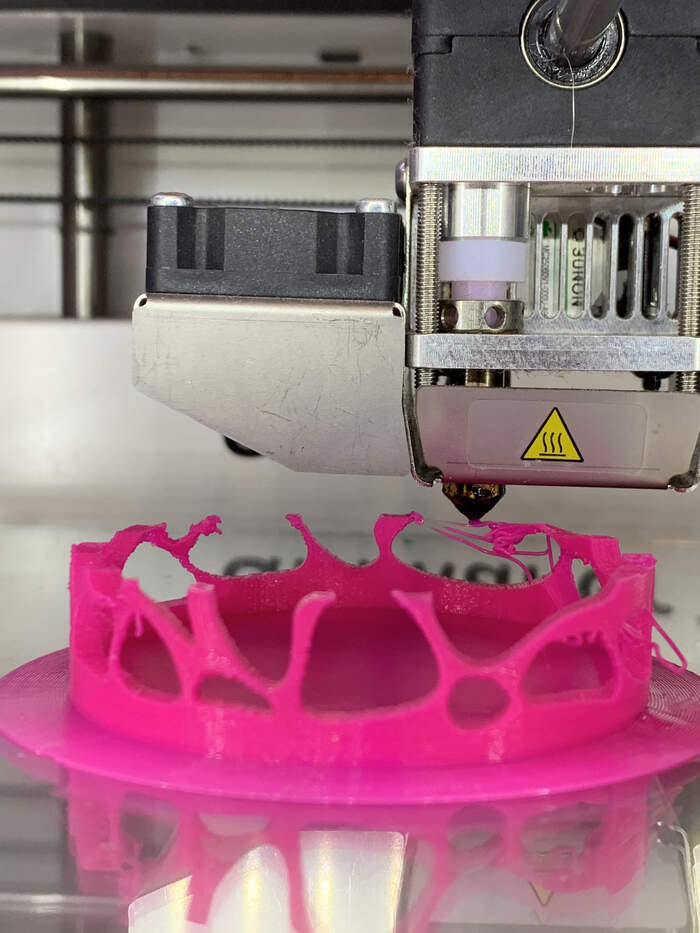
Some went really wrong because the printer started printing on the air (below I discovered how to fix this):
-
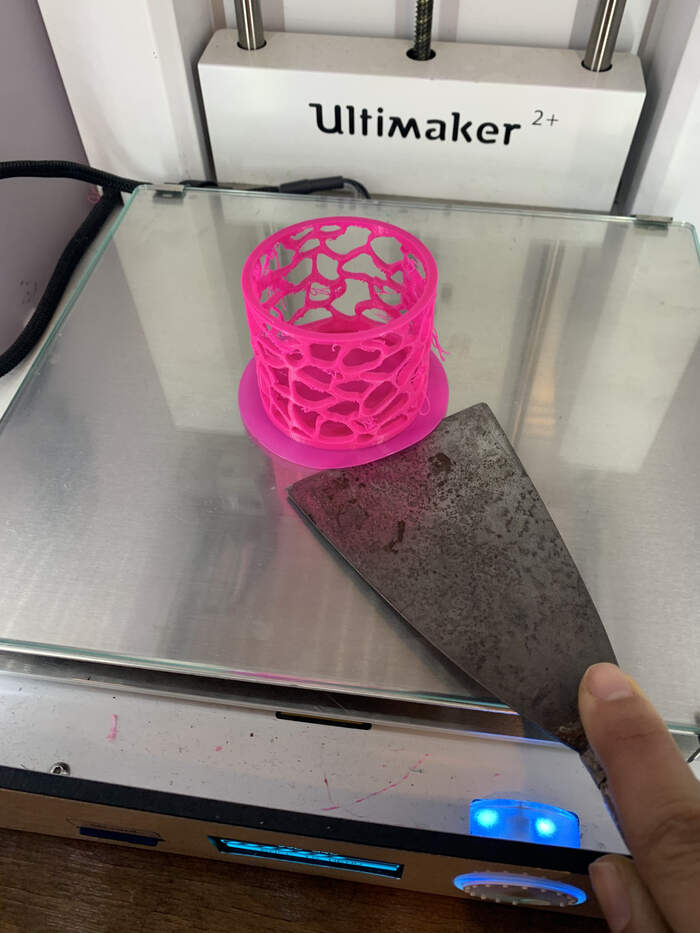
When finished I pulled it out with a spatula, after the printing bed had cooled down:

CONCLUSIONS OF THE ASSIGNMENT:
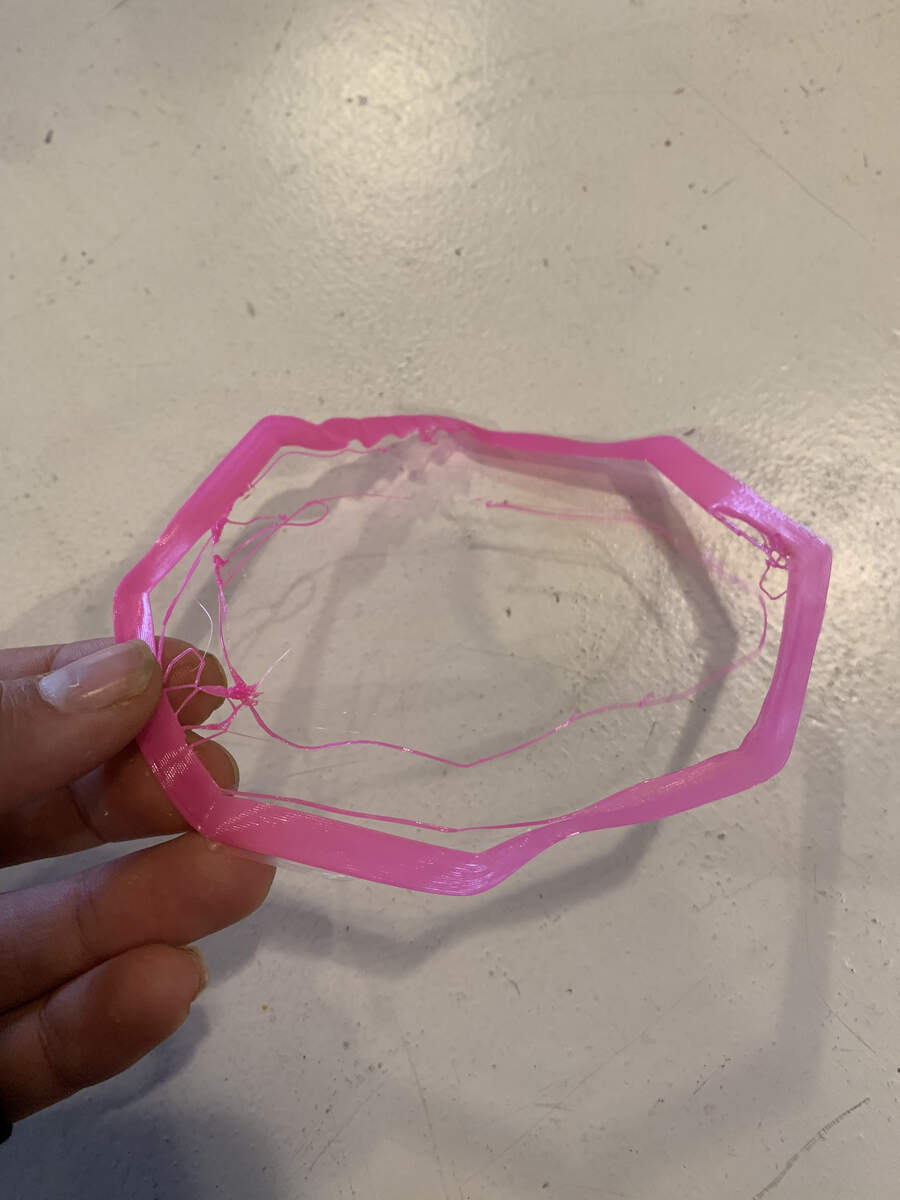
-
When I printed out the piece I realised the candle might melt the PLA, so maybe I should use a LED light instead.
-
I really liked printing out this shape because it is very inspired in kind of biomimicricy design and natural shapes so I really wanted to give it a try.
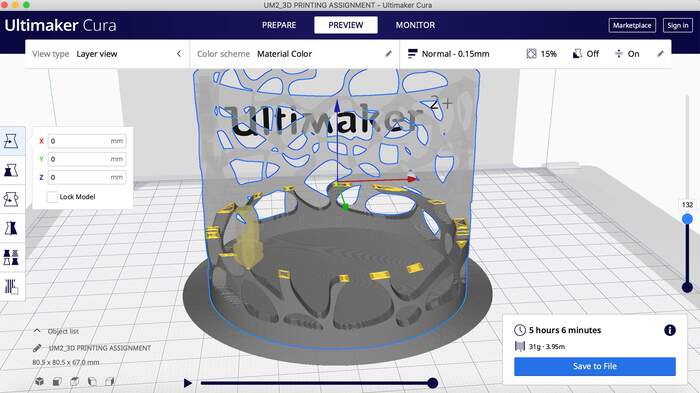
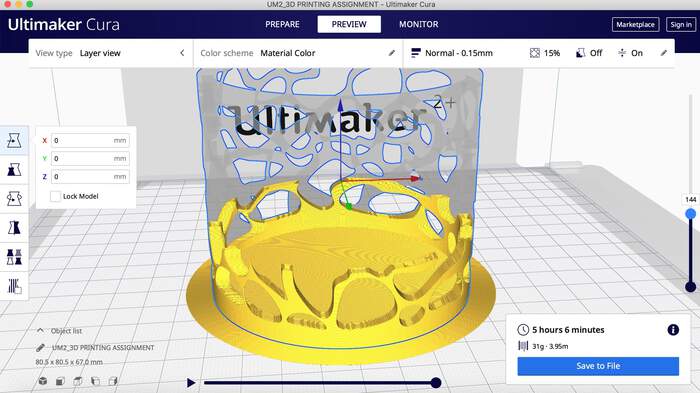
-
I noticed there are parts where the printer would print in the air. Lucia showed me how to check this on the Cura software before printing as you can see below (In these cases it maybe advisable to create some kind of support underneath):
-
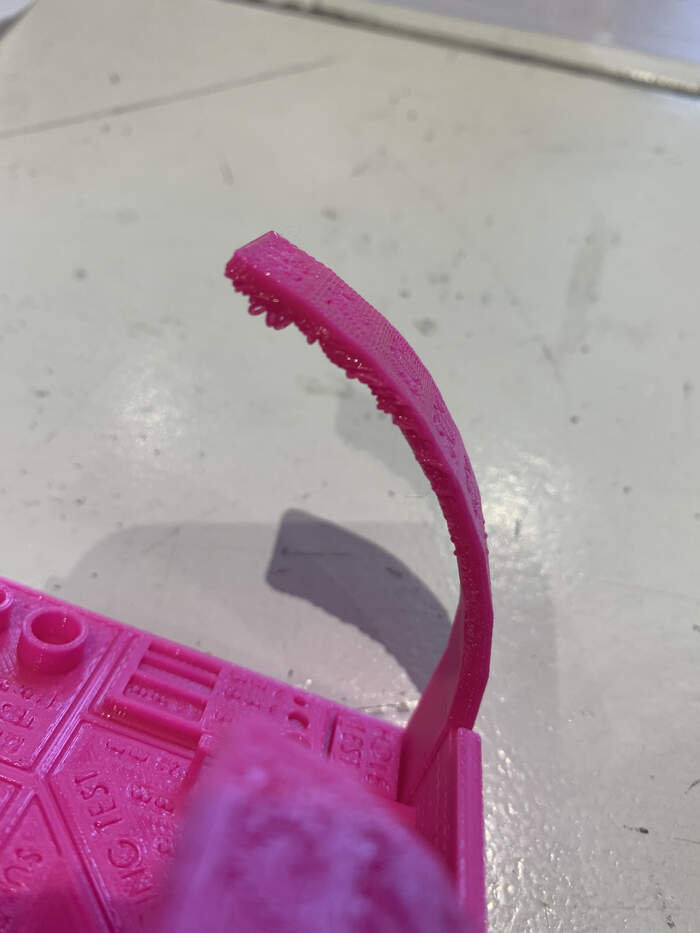
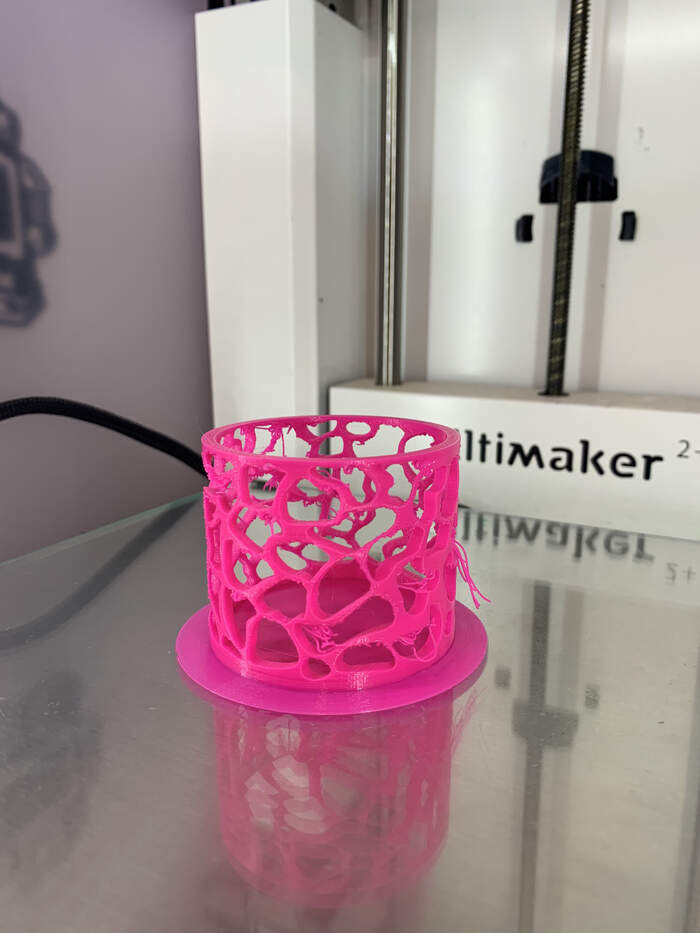
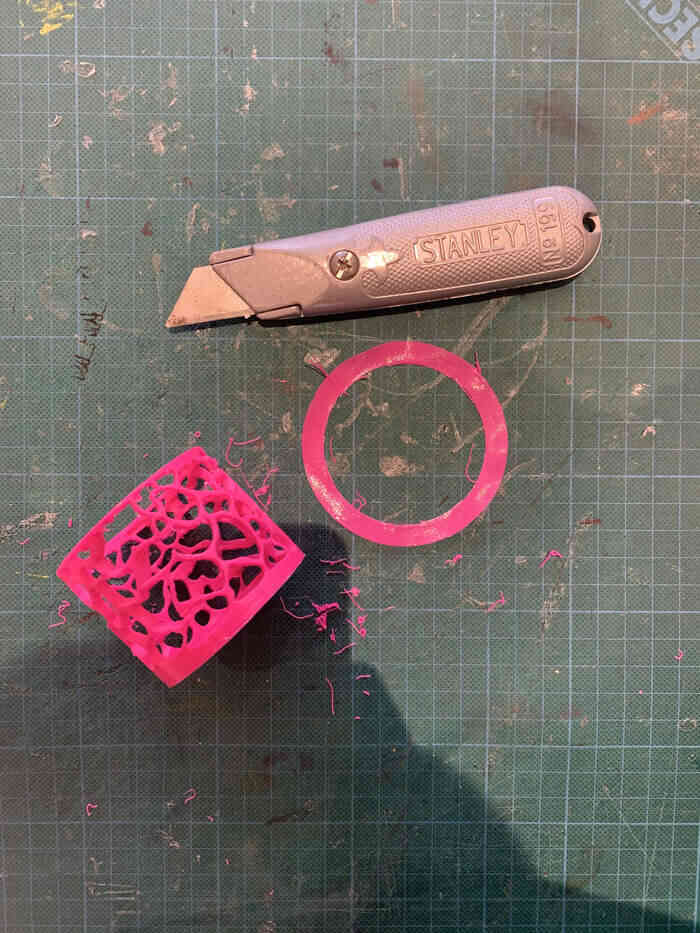
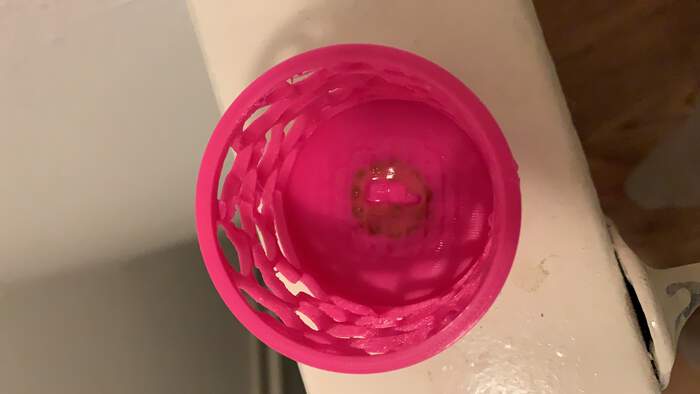
In general the print came out quite stable in the end, although some of the traces were really thin. I sorted out the messy parts with a knife so it would look a bit neater.
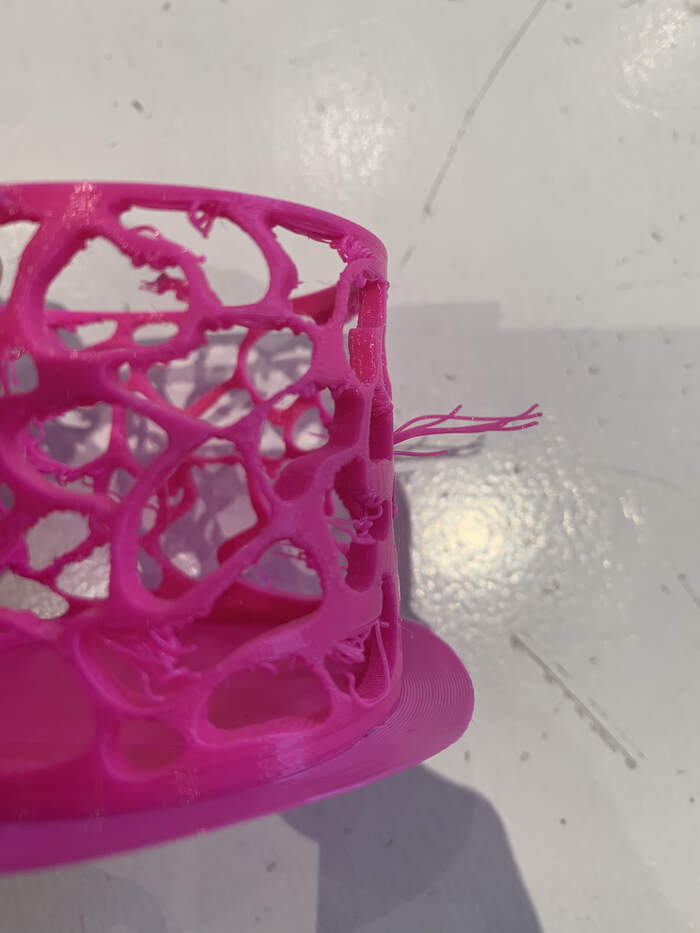
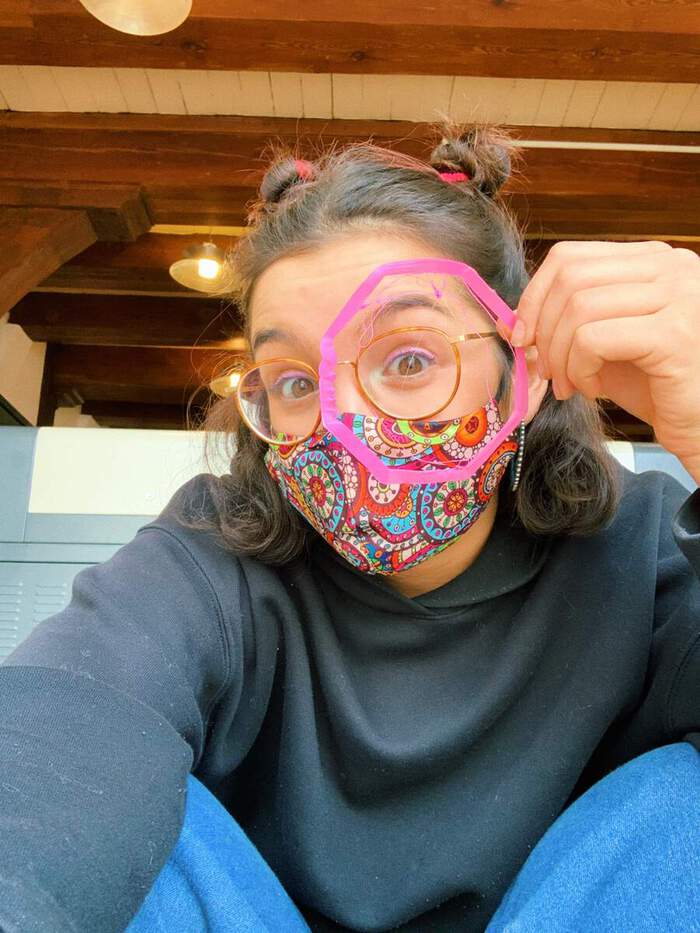
-
This is the final result
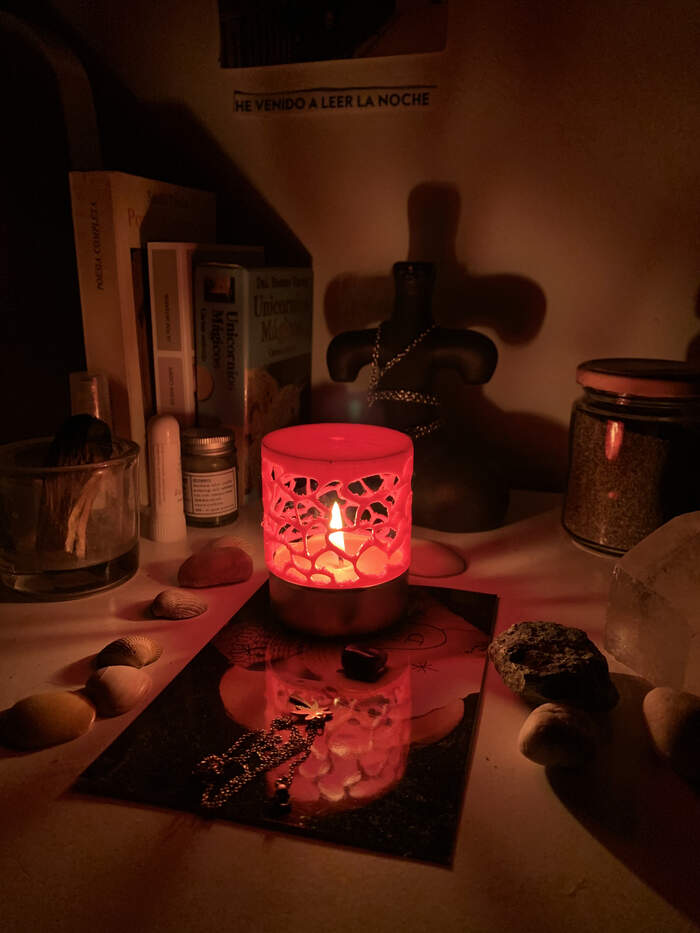
-
And this the reality:
-
Overall I am quite happy because I learned how to print this types of shapes which I thought they would be quite complicated and now I can learn from my errors and not design something that would burn as I also feel my design was a waste of material.
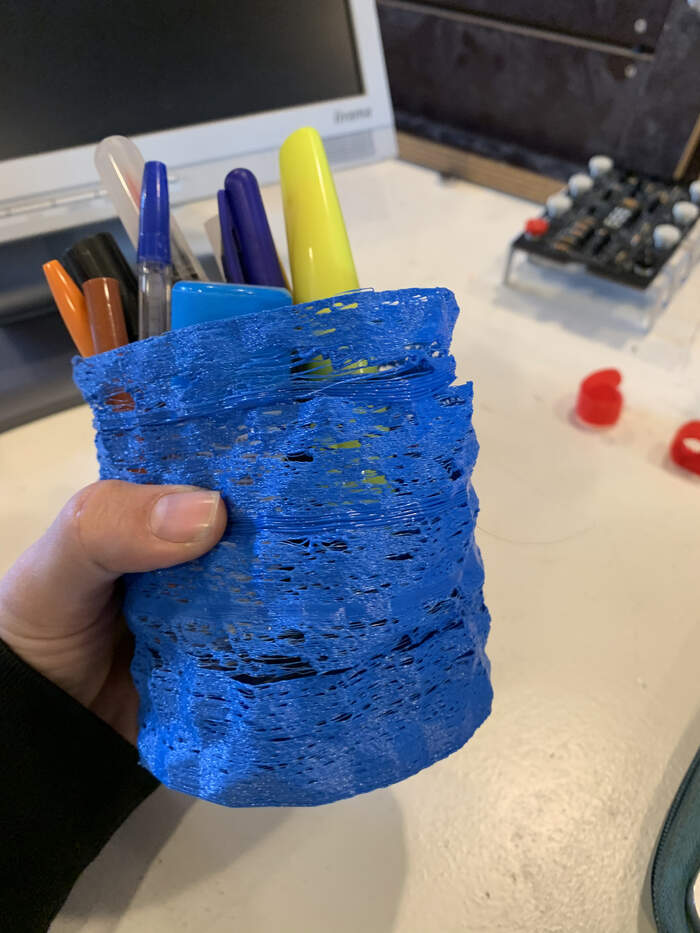
TRYING OUT NEW DESIGNS:
I have decided to try to print voronoi earrings to learn from my mistakes. I have discovered that the organic-type structure I designed has a specific structure name which is voronoi. Voronoi is a pattern based on a partitioning of a plane into regions based on distance to a specific subset of the plane. I learned you can easily create Voronoi structures by:
-
Drawing your shape in Fusion 360 and then turning it voronoi through Meshmixer.
-
You can also download a Fusion 360 plugin but this is not open-source so I went for Meshmixer.
I created a shape in Fusion 360.
3D scan an object, try to prepare it for printing (and optionally print it)
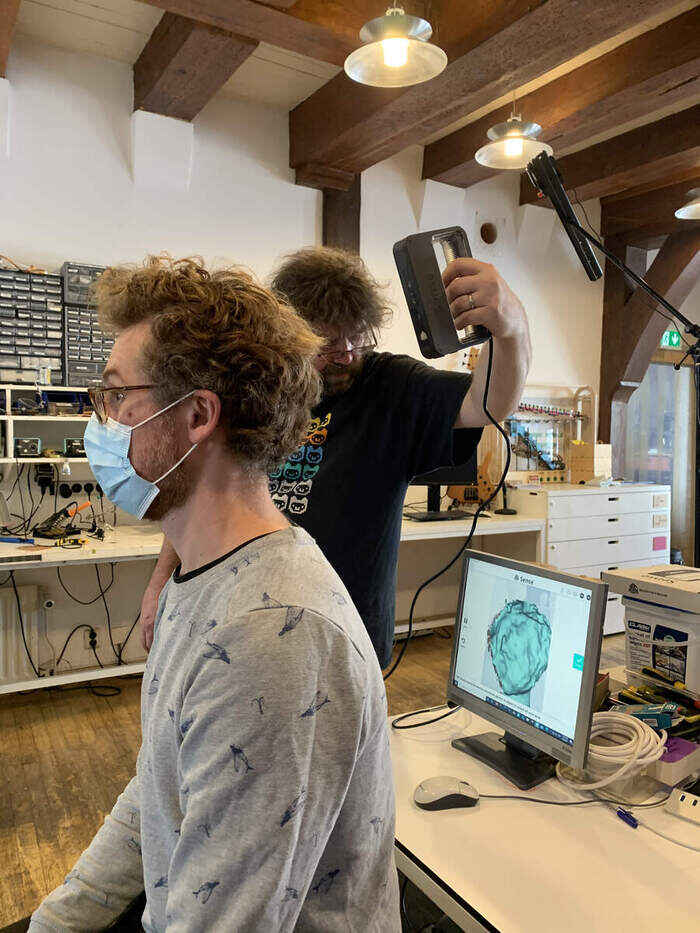
-
Scanning process was quite simple, especially because my colleagues at den Waag improved the features for designing as you can see below. Instead of moving the scanner around the object the scanner is left still attached to a stable structure and the object is scanned by rotating the white surface.
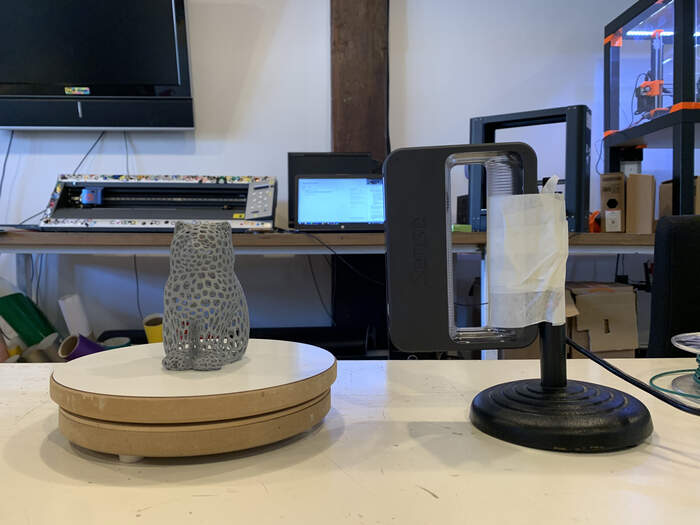
-
I scanned a cat that was lying around in the FabLab which although it had holes it was quite easy to scan. I used the rotating table by moving it very slowly so that it would capture all the pieces of the structure.
-
I then solidified the traces and exported as OBJ.

-
I decided to not print my scanned object because although I feel 3D printers are good for very specific prints you can’t do with other machines I feel sometimes we use them in a very wasteful mindset. I leave here a very interesting article about the true degree of biodegrable PLA.
Files to this week’s assignments:
- This is 3D.STL file for the design I made | 3D.stl