Week 01: Principles and practices and project management
Assignments:
- Plan and sketch a potential final project
What to learn:
- Communicate an initial project proposal
Have you?
- Read the Fab Charter
- Sketched your final project idea/s
- Described what it will do and who will use it
Steps of this week assignment:
Step 1: Lecture notes from 27.01.2021
Definition of digital: unreliable devices could become reliable, it has an exponential scaling in error.
Neil relates technology to biology, how biology is a fundamentally a digital process: For example; the ribosome reads the code, which are the aminoacids we are made of, processes and corrects errors and assembles them like technology using them for manufacturing, it is like a molecular lego. He makes reference to how with a small number of properties, like the essential 22 aminoacids, we can all make technology.
MIT: crossing boundaries between digital and physical: internet of things
The main goal of digital fabrication is personal fabrication.
Possible books to read which will give me insights to what I mention above:
Possible minds: 25 ways of looking at AI:
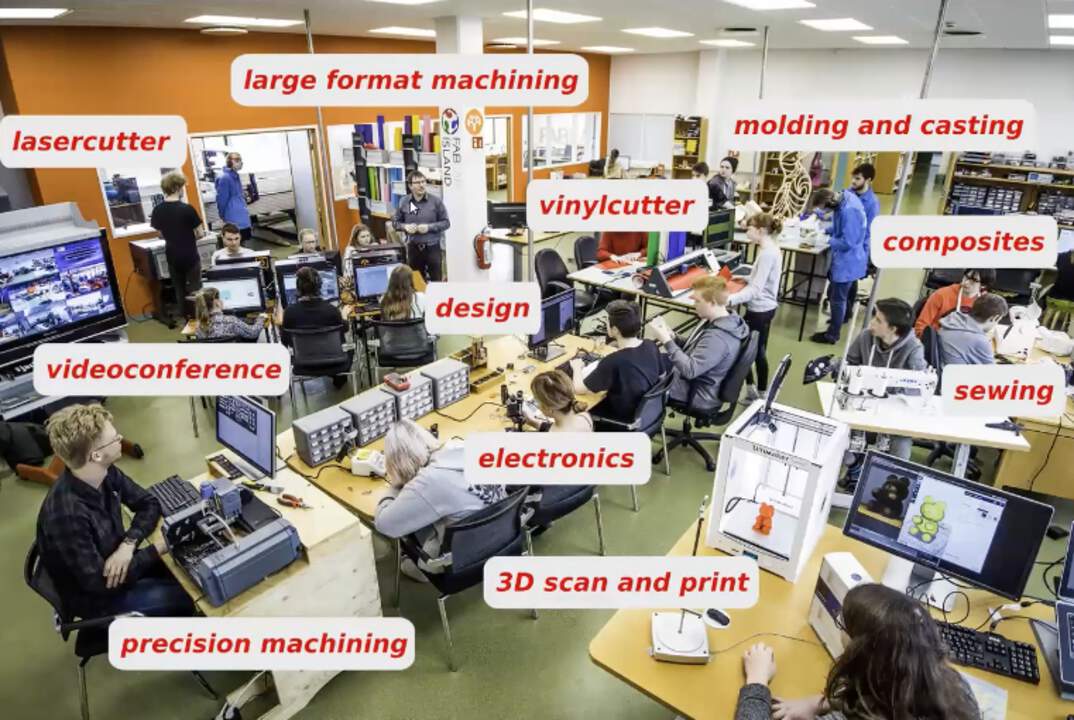
What is a Fablab?
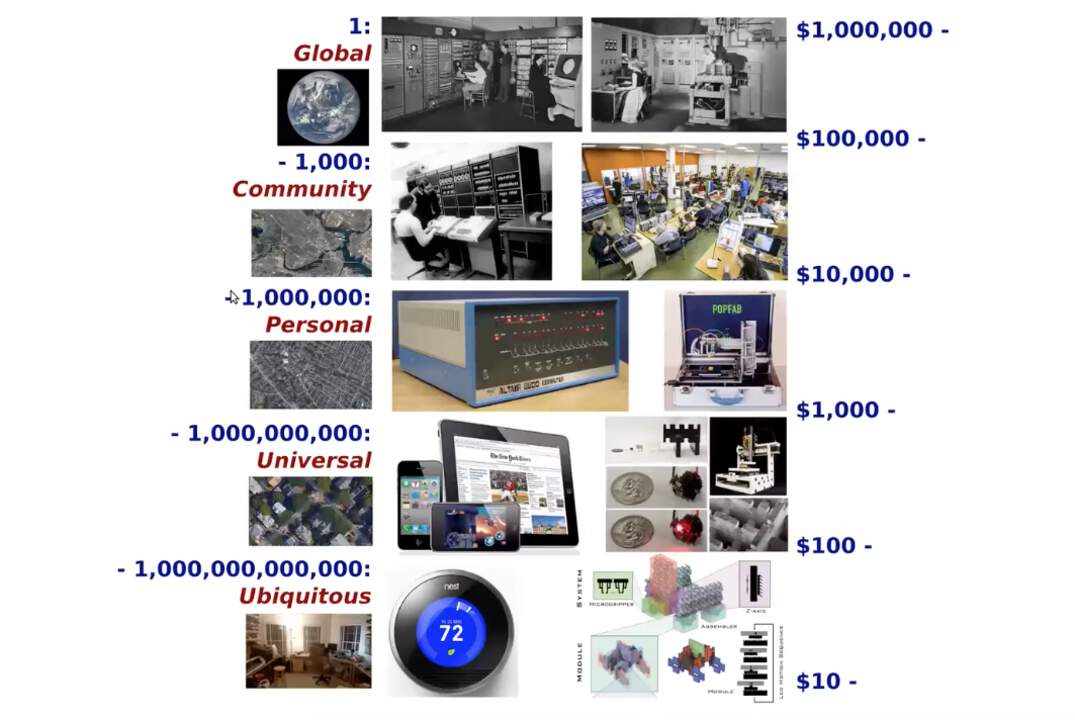
Neil states Fablabs start from an analogy from mini computers there were 1000 mini computers and now there are 1000 fablabs.
The structure of the fab academy program goes from: - A central education node, at a place like MIT where you go there for processing = mainframe computer - Then you have online classes which is like time sharing = you are a terminal connected to a mainframe computer - The Fab Academy works like the internet, each of you works as a student in workgroups, with peers around you, each of you have mentors locally and then we are connected globally. The Fab academy helps propagate best practices, builds a collaborating community and leads to all sorts of networks growing in the community. This is the internet of education, it is learning in educational networks. Merging communication, computation and fabrication.
There is also a very important point which is how to make a fab lab in a fab lab, envisioning the possibility that in the future we will all have our own fab labs, like we all have laptops that come from that mini computer. Seeing digital fabrication as urban manufacture, empowering consumption to become the creation. If you empower someone to produce, it fundamentally changes how an economy works. It creates a whole new notions of what is consumption, what is creation, what is a business, how does an economy function. What are the implications of someone able to do things? Check this example of the project Popfab lab
You dont go to a fab lab to use the machine but rather to do the machine, coming from the idea that kids not just use a computer but rather learn how to make a computer.
We are going to work in a fab and make a fab lab, the technology in the coming decades will evolve, what we are really doing is giving the possibility that anyone can make anything anywhere related to how we live, learn, work and play, and the most amazing thing of all is that it is something that we are discovering together, no one can teach me.
Is the fab lab a service? The labs that succeed end up doing all of these things: - teach classes - have members pay for access - free access for the community - work with existing company - create your own company - create community infraestructure - do outreach in the community
Step 2: Plan, sketch and communicate a potential final project
For my final project I have several ideas I still have to develop and see which one really is the one I am looking to make.
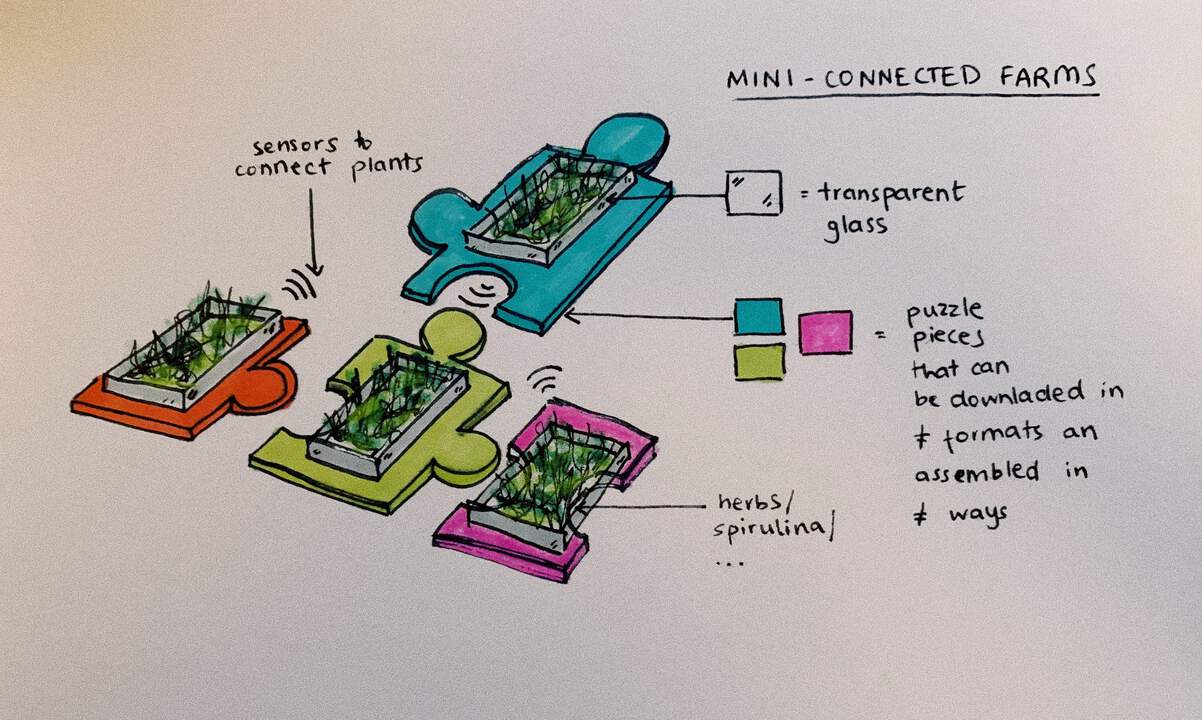
First option: mini-connected farms
I have this idea of creating mini farms/gardens which can connect between each other (physically and virtually) so you can track the different nurturing effects there is when you put plant “X” next to plant “Y” and if they are beneficiating from each another or if they are harming their plant neighbours. In each of these farms you can plant herbs/ small fruit plants/ sprouts/ spirulina farms/… and they can be assembled in infinite possibilites (through puzzle connections) to enable people to grow their own veggies at home. The flexibility of having individual structural devices you can scale up gives the possibility to the user to adapt the farm to the available space they have at home.
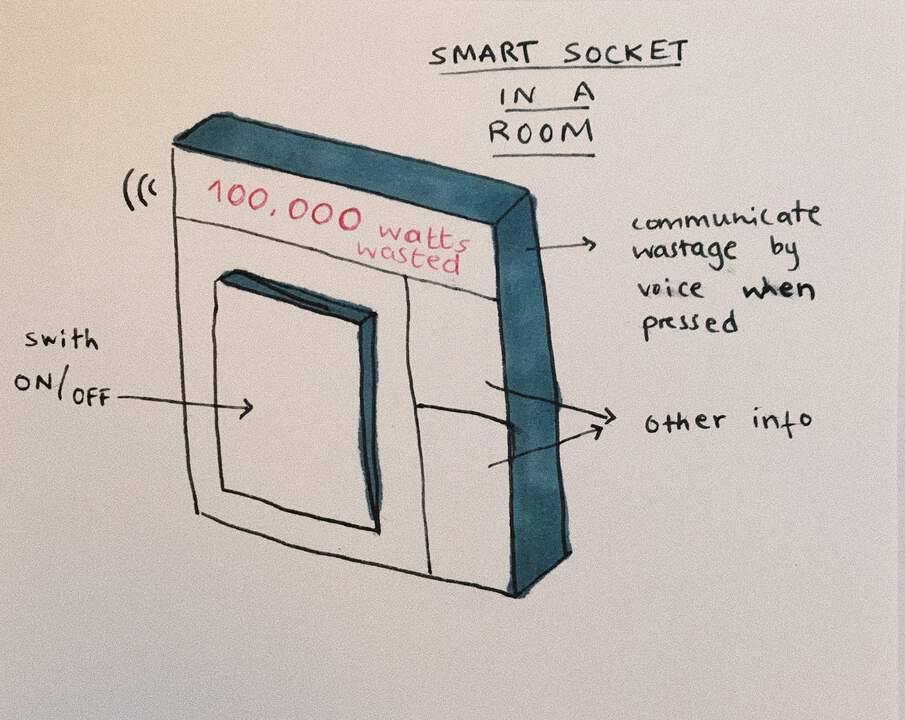
Second option: smart sockets
Everyday I gain more conscious of the amount of energy we “throw” when leaving lights on for no reason at home. This is why I thought of designing a smart socket which will be connected to the light source(s) of the room and track the movement/ use of the room. This information would be received in the socket and it would deliver the info in infographics to the user to raise awareness of our maluse of energy and encourage the users to use it wisely.
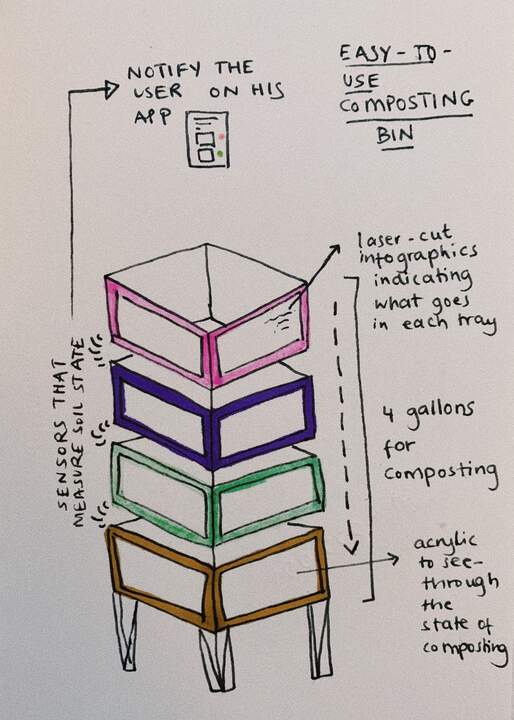
Third option: smart composting bin
My mum and me have always wanted to start composting but I kind of wanted to do it my own way and have some kind of intelligent sensors that would make the whole composting process easier. I like this idea because I think if you make the composting process more “guidable” you can encourage people to incorporate it in their homes and produce less waste! Lucía has a similar vision to this composting bin so it would be very cool if we could work together in this project.
Week 01: Project management
Assignments:
- Build a personal site describing you and your final project.
- Upload it to the class archive.
- Work through a git tutorial.
- Signed and uploaded Student Agreement
What to learn:
- Explore and use website development tools
- Identify and utilise version control protocols
Have you?
- Made a website and described how you did it
- Introduced yourself
- Documented steps for uploading files to archive
- Pushed to the class archive
- Signed and uploaded Student Agreement
Steps of this week assignment:
Step 1: Lecture 27.01.2021
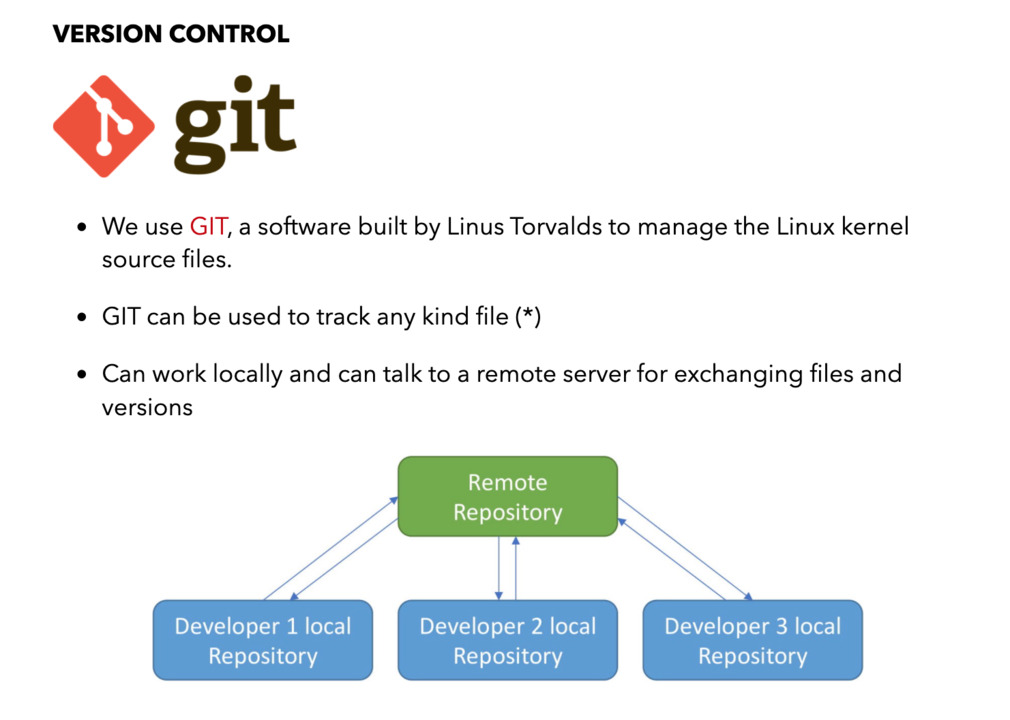
Version control: it enables you to manage history; instead of having 1 set of files on a project you can follow the history: having different versions of a project. It also handles branching and merging between and within files, it allows a peer-to-peer development and creates local and remote versions.
Gitlab and git is how I am going to build my work to create the documentation of my projects. I have to build a site through a web developer on my local computer and then syncronise it to the server. You can directly change the files on the Gitlab website but it is easier to configure your local laptop in order to be able to push and pull files to and from the server, it does the syncronization of files for you automatically (instead of me having to change the different versions remotely and locally).
Understanding the hierarchy of building websites from raw codes to gui codes:
-
W3C: makes the standards for the web
-
HTML: hypertext markup language
-
HTML5: extensions for the web like videos
Templates:
-
Vim plain, text editors
-
Atoms, sublime,…: more powerful editors
-
Libre Office: word process editor and you can also view it as a webpage view > web > demo allows you to view it without learning the codes, through a graphical interface
-
Javascript: programming language for the web, allows you build all kinds of interactivity into the page.
-
Markdown: a way to make webpages without learning the code through different punctuation, dashes and asterisks, easy way to format webspages.
-
Mark serve: local server that lets you serve it
-
Strapdown: lets you build it interpages
-
Hugo, jekyll, mkdocs, templates to build websites using .md
-
CI, CD, YAML: production pipelines
-
CGI, PHP, security
Neil recommends to experiment with all of them.
Blogs, wikis, documentation:
-
Fabdoc: a server site: easy to make the .md pages like a cronological diary with pictures and captions with your phone as a way to build class documentation
-
Gitbook: framework to build books on top of git, not just a website but a book
-
Docuwiki/ Tiddlywiki/ Hattawiki: server wikis are sites that organise a set of pages
-
Moveable, wordpress: big content manager, you can only use them online, it has security vulnerabilities
A good way to make your website, browse on pages of students, find pages you like, use their templates, see how they built their websites, experiment. Pick what fits you best.
Resources when videoconferencing
-
Speakerphone: to avoid echoes when videoconferencing
-
OBS studio: to create multiple cameras, multiple sources, a whole video production studio
-
Simple screen recording: create screen recordings to build documentation in your page
Resources for project management: open tools to manage dependencies
-
Taskjuddler
-
Openproj
-
GanttProject
-
Trello
-
Taiga
-
GitLab
General principles on managing projects:
-
Triage: Each week you are going to run out of time, decide what you can finish or what you can leave behind “Have the time control the tasks, not the tasks control the time.” Neil Gershenfeld
-
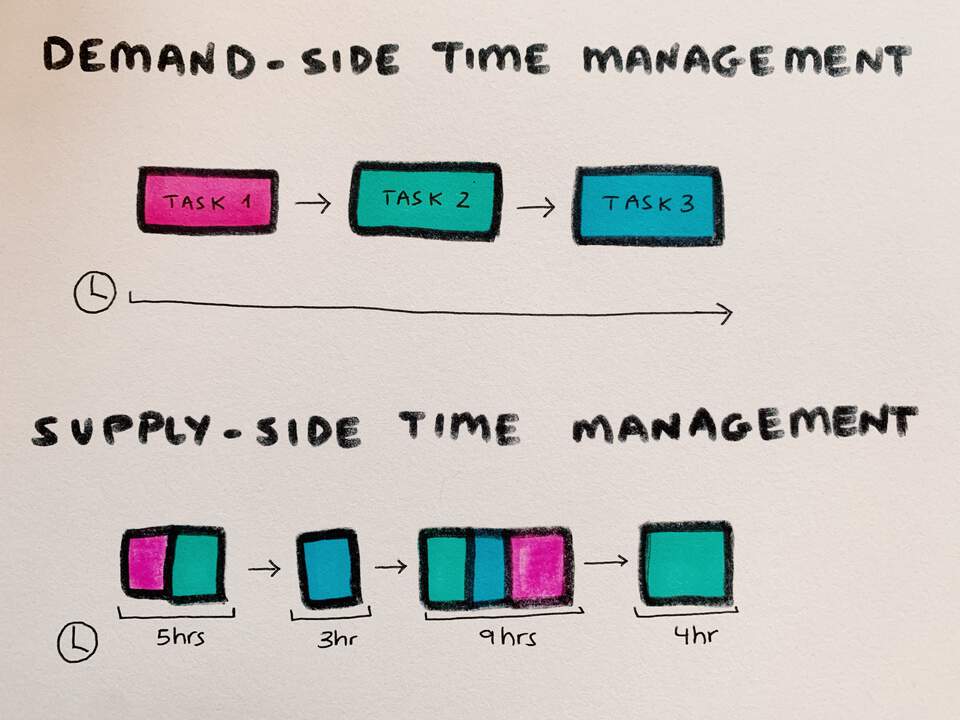
Demand-vs supply-side time management: different ways to work: With demand: you do a task then another one With supply-side: each week you divide your time and decide the amount of time in design, prototyping, etc and each of these chunks you do to the extent you can triage to finish
-
Serial vs parallel development: work on a series of tasks in parallel so it doesnt block other tasks
-
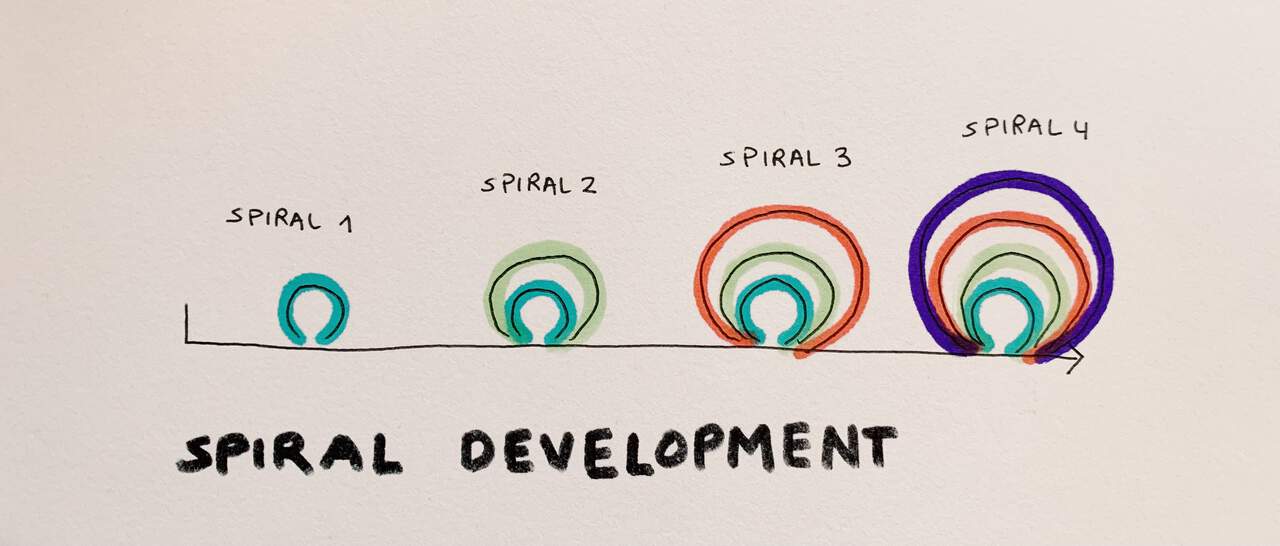
Spiral development: instead of having one big loop where you do your whole project from start to end; you work from small spirals to big spirals, each spiral adds new features to the project, creating a reduced but complete version of the project tested.
-
Bottom-up vs top-down debugging: start with simple things that work and add complexity, break it into modules, separate parts that you debug separately and you can join to make them work at the end.
-
Document as your work, each day, will take a minimum of 3 hours each week to complete
-
Mythical Man- Mouth: book full of project management insights
-
Expect to spend between 20-30 hours per week working on Fab Academy assignments.
-
Assume that you will have ONLY two “Work Sessions” every week.
-
Update your time schedule and SSTM plan if delays are unavoidable.
-
It is critical that you always remain aware of the time remaining for each work session.
General essentials of Fab Academy:
-
Ensure that you have documented everything in enough detail in your archive. Design files and code must be present in the archive in generically readable forms such as DXFs, STLs, etc., as well as in the original editable format (antimony, solidworks, eagle, CAD, etc).
-
Externally host your large files (+10MB) and link to them.
-
Acknowledge work done by others. Pay attention to licenses for work. Take photos, notes and screenshots as you work
-
compress and resize your images for web. Use these to explain and describe what you do. A ‘hero shot’ is the best photo showing your finished project.
-
Abide by the Commercial Board Policy.
-
All weekly modules must be completed, you must have globally presented a Machine and a Final Project (with video & slide) before you are eligible for Graduation.
-
Final project must meet the basic requirements
Mistakes you will make:
-
Key path: how you tell the server who you are, git won’t work if the permissions aren’t set right, SSH key
-
Git status: if you edit the index file, the git status tells me it has a modified file, before you push your work you have to check the status, before you commit your work you have to check what it is.
-
Commit and merge work before you push
-
Refresh browser after editing page
-
Use relative rather than absoute links to files
-
Be careful with archive size, check size before commit through:
NCDU: tool to view the size of files, lets me navigate through and view the size of files
Imagemagick: compress, resize pictures for web.
Ffmpeg: compress, encode videos for web.
You want to make them as small as possible! So your sites are efficient and download quickly.
Step 2: Installing Homebrew
The first step I took was to download Homebrew. Homebrew is a default package manager for Mac users which automatically upgrades, installs and maintains open source programs for you. It is an easy experience for anyone familiar with the command line and a good way to learn the command line for newbies like me. To install Homebrew instructions here:
Useful commands for Homebrew:
Installation happens with the command
brew
It has thousands of formulae so it is better to have an idea before searching. These commands show how many formulae there are:
 search
 wc
The tree command gives directory structures:
tree
Favorite utilities of Homebrew:
-
pyenv, rbenv, nodenv to manage Python, Ruby
-
imagemagick to convert images
-
pandoc for scriptable document conversions, for example swithching from .docx to .md or .html
Step 3: Connecting to Gitlab
For this assignment we have to build a static website.
I received an email to access my account in Gitlab which will be the repository for my documentation of the entire Fab Academy. Check it here.
This diagram shows how the fab academy uses GitLab:
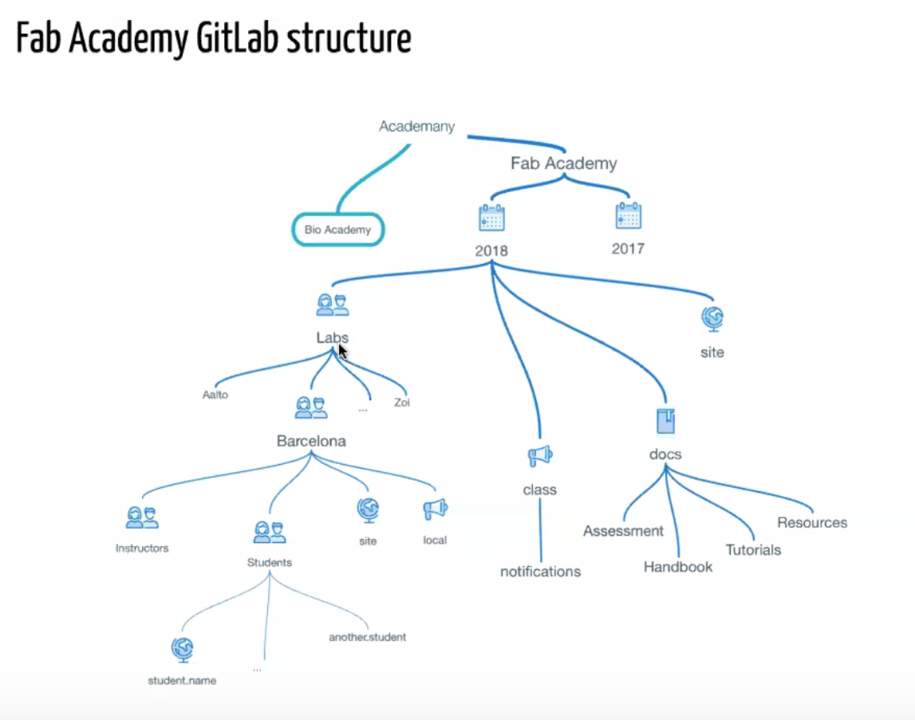
To start of I am given an MkDocs template which I have to modify in order to complete this week’s assignment.
TO USE ISSUE TRACKER ON GITLAB: Create issues in the class repository so it appears to everyone. I turned my notifications on issue trackers from Profile icon > Settings > Notifications or directly go to the issue and turn notifications on.
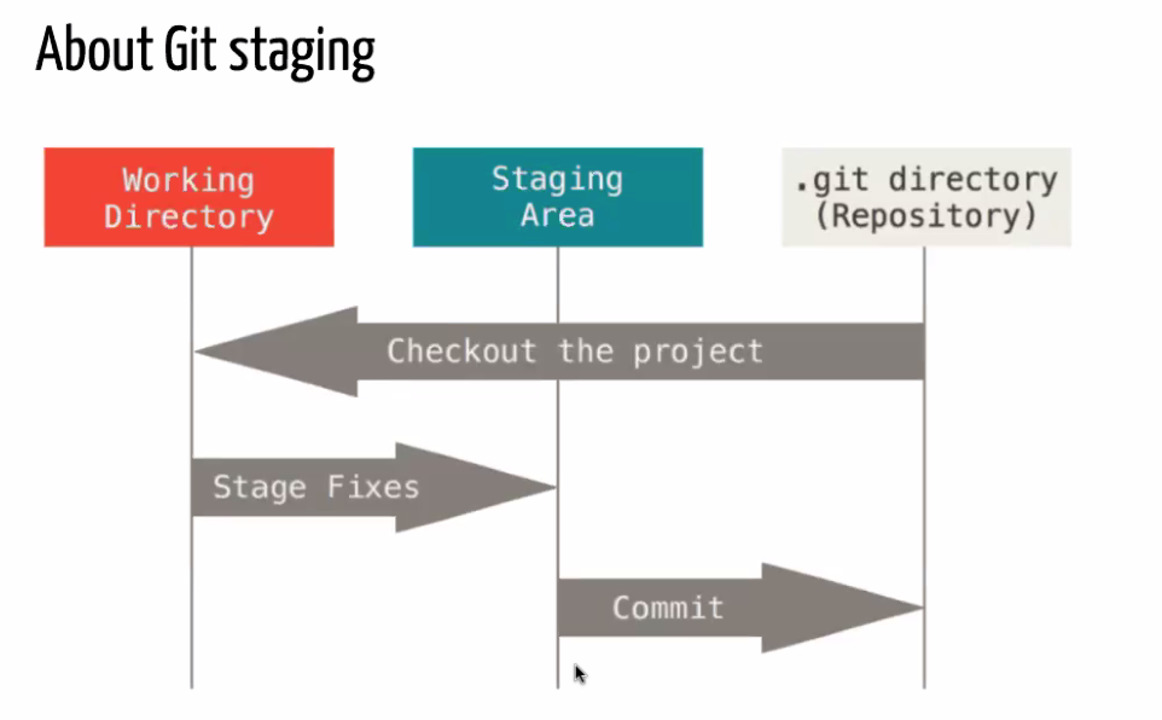
Step 4: Syncronising my computer files with my files on the server, GitLab
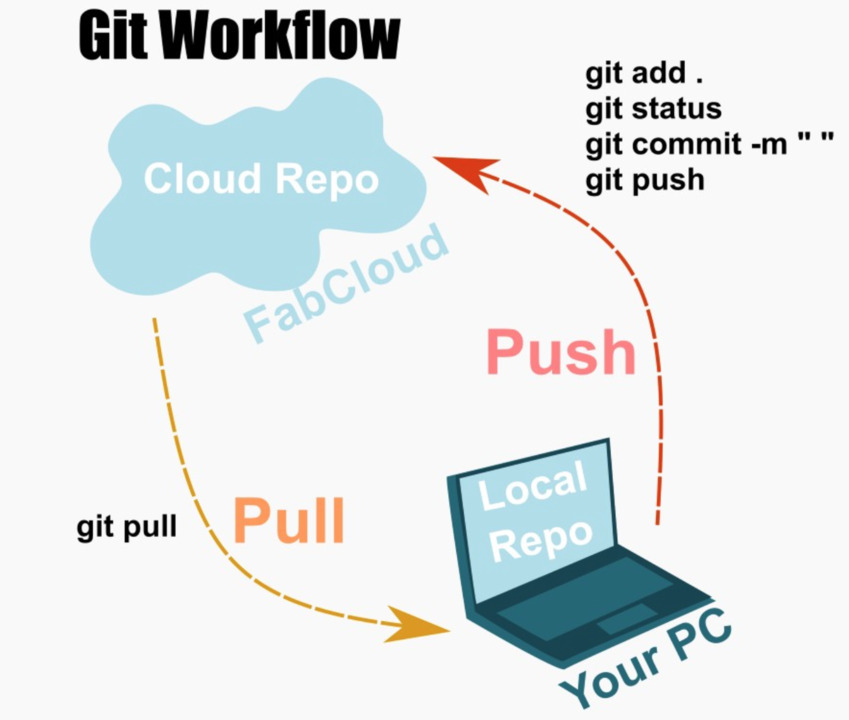
Git is the system which will allow me to push files from my local laptop to the server, GitLab, and pull files from the server to my laptop. This is what I was talking about before called version control. Version control is a nice way to document work; allows experimentation; if you want to try a new idea, you can move in steps, if it fails and you want to return in a safe history of steps you can. It took me time to understand that there are two copies of the same set of files, one on the gitlab-server and one on my own computer. There is a specific method of connecting those sets of files, which will make up a static website if I run them on Gitlab.
The following steps where in order to syncronise what I have on my computer and on the server:
First I checked if I have git installed, for this I typed in the terminal:
git --version
I already had it installed, this appeared:
git version 2.30.0
Then, I have to configure a username and email which will allow me to setup git locally:
git config --global user.name "Your Name Comes Here"
git config --global user.email you@yourdomain.example.com
Git is going to use this name and email whenever you add something to the Git history.
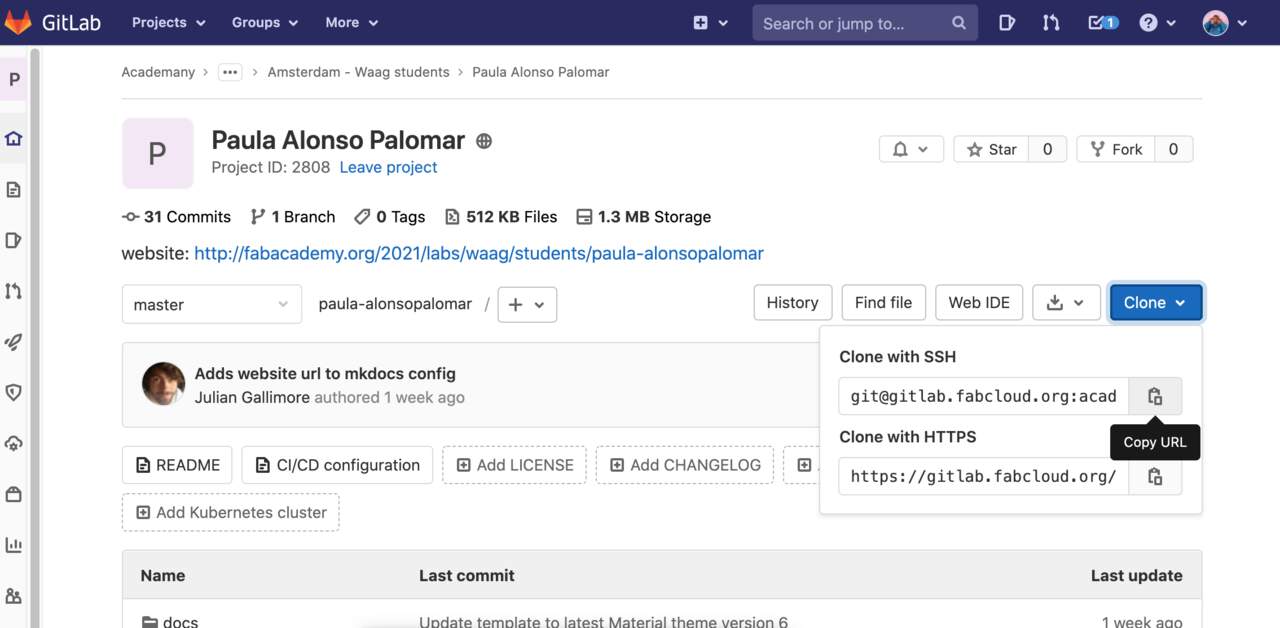
There are two ways of getting the website repository on my laptop to work locally: HTTP and SSH
Copy my personal repository through HTTP: I copyied the link from the clone section in my gitlab server. Then I went to my Terminal >
cd
Dragged my “FABLAB 2021” folder to the terminal as a way to tell the terminal where we are located now > Enter > Pasted the https code like follows:
git clone https://gitlab.fabcloud.org/academany/fabacademy/2021/labs/waag/students/paula-alonsopalomar.git
A folder called “paula-alonsopalomar” was created. This will be my repository folder:
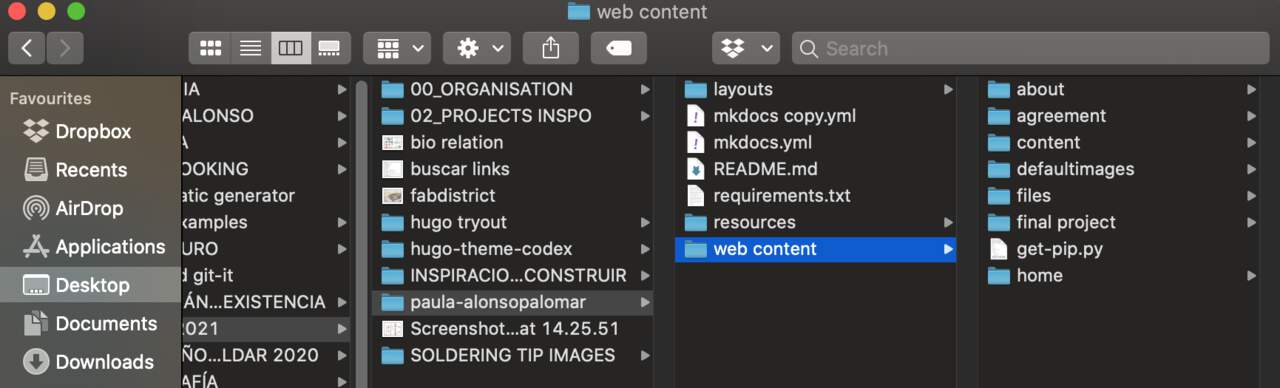
The cloned folder is connected to the structure of the Mkdocs template which looks like the photo below:
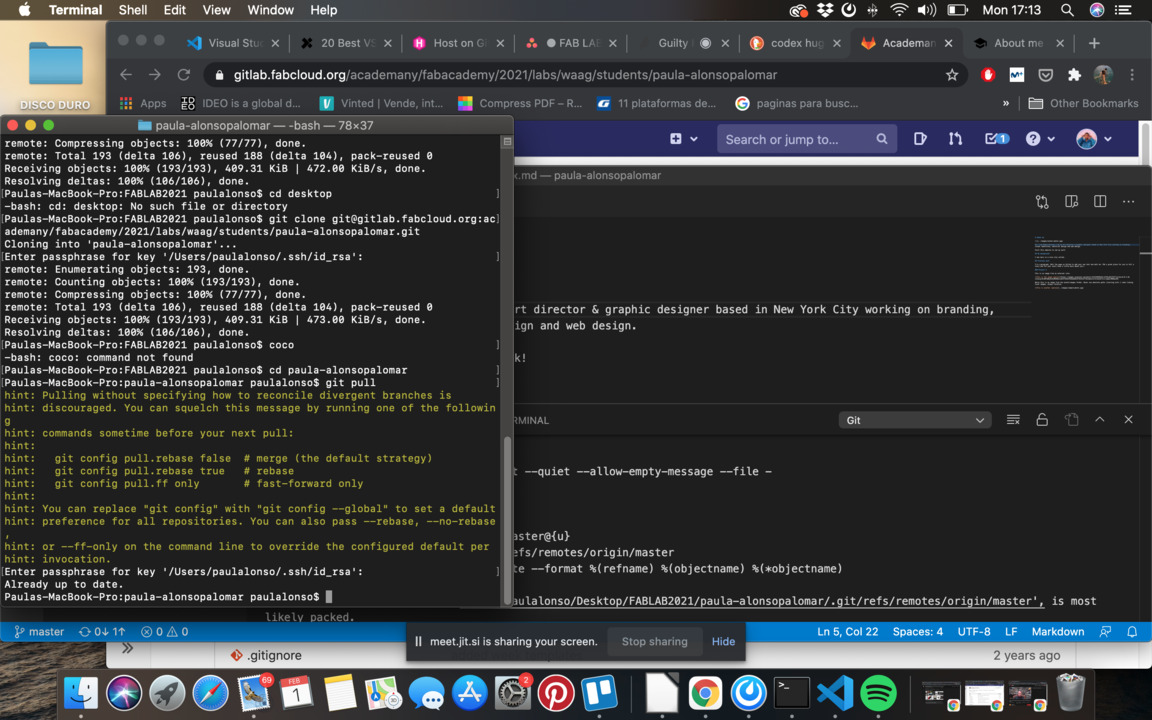
The other way of cloning my repository is setting up a SSH key (which I then read it was easier to use):
This will allow me to upload stuff without putting passwords and username every time I want to push/ pull as a way to authenticate yourself to gitlab. An SSH key consists of a pair of files. One is the private key, which should never be shared with anyone. The other is the public key. The other file is a public key which allows you to log into the containers. To check if I have an SSH done I checked in the terminal with the command:
ls ~/.ssh
There is no SSH key done so I will set it up by:
ssh-keygen -t rsa
This starts the key generation process. When you execute this command, the ssh-keygen utility prompts you to indicate where to store the key. Press the ENTER key to accept the default location. The ssh-keygen utility prompts you for a passphrase. Type in a passphrase. You can also hit the ENTER key to accept the default (no passphrase). However, this is not recommended. Enter the passphrase a second time to continue. After you confirm the passphrase, the system generates the key pair. Your private key is saved to the id_rsa file in the .ssh directory and is used to verify the public key you use belongs to the same Triton Compute Service account. Never share your private key with anyone! Your public key is saved to the id_rsa.pub;file and is the key you upload to your Triton Compute Service account. You can save this key to the clipboard by running this:
pbcopy < ~/.ssh/id_rsa.pub
Open Gitlab > User account settings > SSH Keys > Paste the public SSH > Save
From the GitLab server I go to the individual page > I click on the clone button > 2 options to clone the repository into your own computer > I choose SSH option to avoid entering username and password
Go to Terminal:
git clone "paste SSH URL" > Yes
My SSH is done!
I learned to do all these steps through this very helpful tutorial called: Documentation Website Basics with Git and GitLab
Step 5: Setting up VSC
Visual studio code is a code editor which will allow me to organise the content I will then upload to the server. After having a look a the ones mentioned I decided to download VSC as all my peers are working with this one and it will be beneficial in order to help each other out. I also find it a very easy interface to use. Download VSC here
-
When opening VSC we have the option to drag the folder we just created and drop it, it opens it up directly in VSC and we can start working on our documentation files.
-
VSC has a common user interface and layout of an explorer on the left, showing all of the files and folders you have access to, and an editor on the right, showing the content of the files you have opened.
-
You can split the editing page by clicking the Split Editor button in the upper right of an editor.
-
I also changed the colour theme of my page which you can do in Code(on a Mac) > Preferences > Colour theme
-
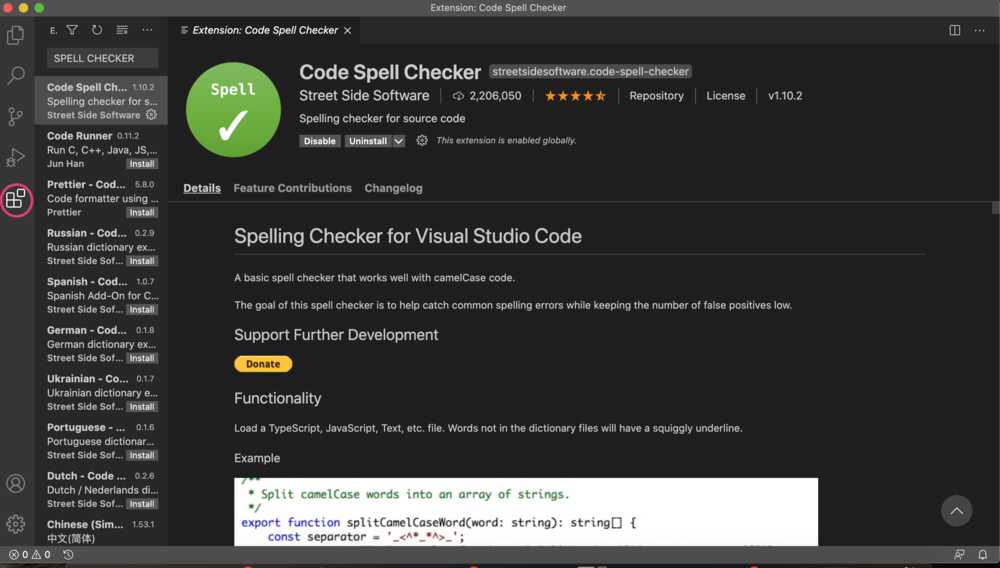
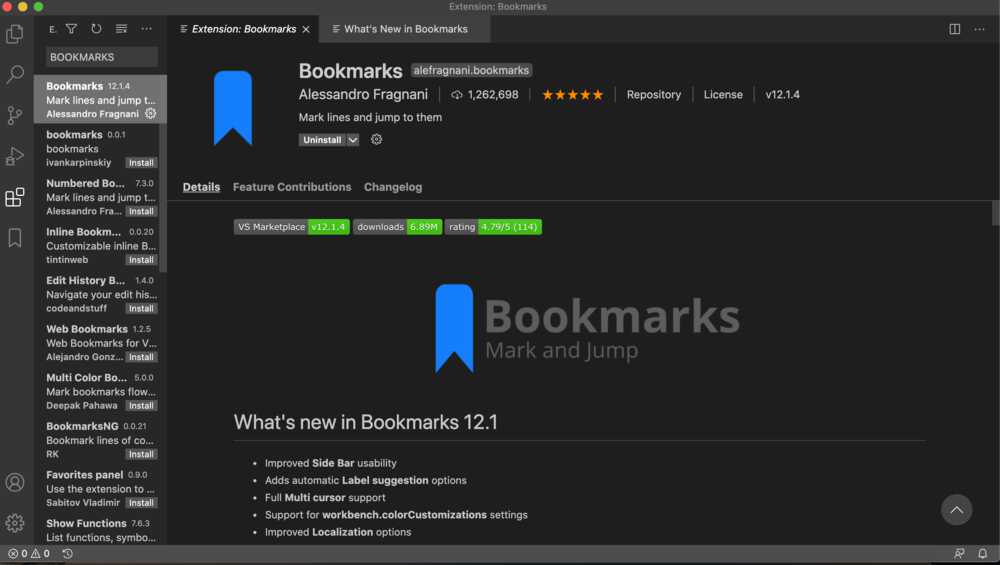
By clicking the extension button (highlighted with pink) you can browse and download extensions for VSC. I downloaded Code Spelling and Bookmarks.
-
I start modifying the files from my MkDocs template folder called paula-alonsopalomar. I start with the index.md
DOUBT!! Can I insert HTML language in the visual studio code or can it just be markdown language? You can insert anything you want into any file in VSC, VSC is merely a text editor with extra’s and html can also be part of your markdown file.
I start creating my index with HTML:
<!DOCTYPE html>
<html>
<head>
<title>Fab Academy 2020</title>
<meta charset="utf-8"> For special characters
<meta name="viewport" content="width=device-width"> To make your website responsive
</head>

<body> Where your visible part of your website is going to be
<h1>Fab Academy 2020</h1>
</body>
</html>

<!DOCTYPE html>
<html>
<head>
<title>Fab Academy 2020</title>
<meta charset="utf-8">
<meta name="viewport" content="width=device-width">
</head>

<body>
<h1>Fab Academy 2020</h1>
<p> This is a paragraph of text that tells that this site is a Fab Academy documentation website.</p>

<ul>
  <li> About </li>
  <li> Final Project </li>
  <li> Assignments
    <ul>
      <li>Week 01: Principles and Practices</li>
      <li>Week 02: Computer-Aided Design</li>
    </ul>
   </li>
</ul>
</body>
</html>
Then I added an anchor tag to the about me menu a href=”about me” it tells html what file it should open when it clicks on it. Just playing around html, to test.
Step 6: Choosing a static site generator
I realised I rather start with a website static generator like the following: (as they are easier to use and they will generate the HTML for me). Although I really want to come back and work with HTML as it is something I have been thinking of learning a while ago!
How can I further develop it? Click here for HTML guidance
The following are possible static generators I can use to make my website:
-
Dreamweaver (more fancy, part of Adobe software)
It took time to understand that the structure of my website through a static generator works like the following:
REPOSITORY (content(.md)+images) + THEME (structure and aesthetic which you can download from a static website generator) –> GIT PUSHES TO THE GITLAB –> CREATES WEBSITE
Working with MkDocs
I installed Mkdocs through homebrew with the command:
brew install mkdocs
Mkdocs allows you to do your documentation in .md(markdown) and then gitlab has a special way of creating an html from the .yml file. Material themes for Mkdocs can be installed with .pip (This is what the website I already have is made of). More help here
I realised the material themes from Mkdocs are quite a small tool so I dive into Hugo and Jekyll which have more themes.
For content guidance I downloaded a markdown cheat sheet here and uploaded it into my vsc editor.
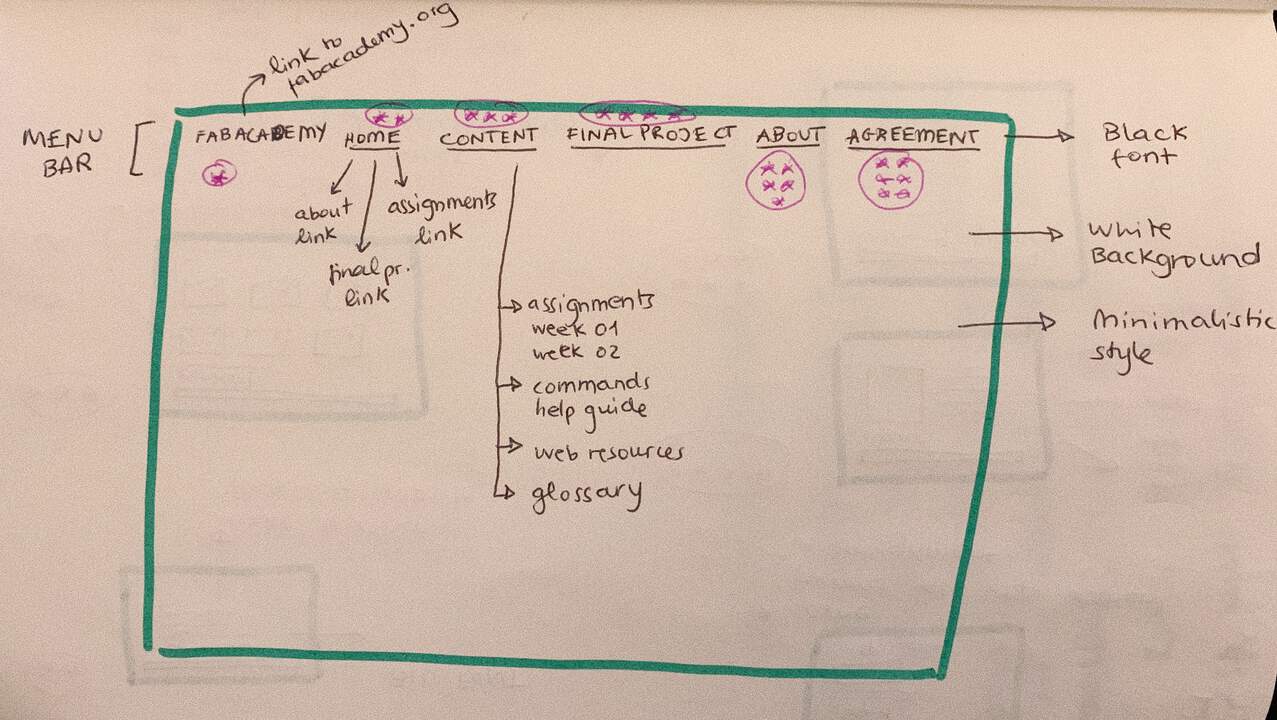
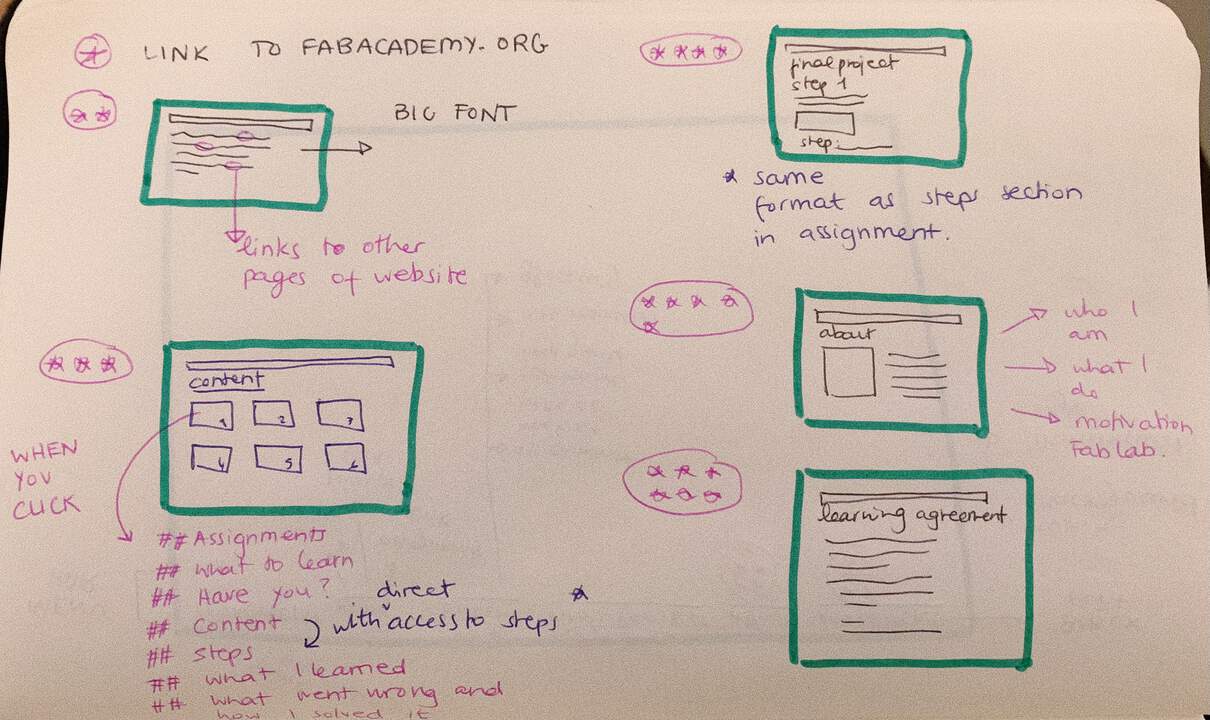
Step 7: Designing the structure of my website
Recommended structure of website:
-
About me: who are you, where you come from, motivation to be in the fab academy
-
Final project: for now you will have a short description and sketch of hyphothetical final project
-
Assignments: Week 01: Project Management....
I designed the website structure as you can see in the sketches below:
My initial plan is to try and set up Hugo for my website and if I can’t manage it for Wednesday’s assignment, my backup plan is to use the Mkdocs template till I manage to work Hugo out.
Step 8: Understanding Hugo
I would like to develop my website with Hugo for the following reasons:
-
it is very fast
-
it is great to have a blog (which is what I am going to do with documentation)
-
it is also good for a person that does not want to deal with a content management system (like Wordpress)
-
it is very flexible in the sense that you have the option of Hugo creating the HTML for you but if in the future I want to go deeper with HTML coding I can also create the HTML myself
-
it is open source and has a great community help platform
Therefore, I start to play around some Hugo tutorials in order to understand how it works.
Hugo comes with a set of repository folders as an already made structure for your web content.
Nadieh helped me out to understand how Hugo worked with GitLab. “You don’t need to do any installing on Github or Gitlab of Hugo, you basically only tell GitLab (or GithHub) where to find the already available Hugo. For example, in my gitlab-ci.yml the first line is image: registry.gitlab.com/pages/hugo/hugo_extended where I tell GitLab where to find Hugo.
Lucia sent me this very helpful website to learn how start with Hugo.
These were the steps I followed for an Hugo quickstart:
Install Hugo, using the following command in terminal through homebrew:
brew install hugo
Create a New Site
hugo new site quickstart
The above will create a new Hugo site in a folder named quickstart in my computer. In my “FABLAB2021” folder I create a new folder called hugo tryout where I move this new quickstart folder to. This will allow me to try the hugo theme on a different folder than the original repository folder (in case something goes wrong).
Meaning of folder names inside the quickstart folder:
-
content: where you put your text
-
static: where you put your images
-
themes: where you put your themes (I can save as many themes as I want and switch from one to another as many times for my website.)
-
config.toml: where the info of what Hugo has to do is
Add a Theme Check the available hugo themes here. I will try with the Ananke theme which is the one that the guide suggest starting with. I download the theme from GitHub as a zip file > Rename that directory to “ananke” > move it into the “themes/” directory of the quickstart folder. Add the theme to the site configuration in the terminal:
cd quickstart (you have be in this folder)
echo 'theme = "ananke"' >> config.toml
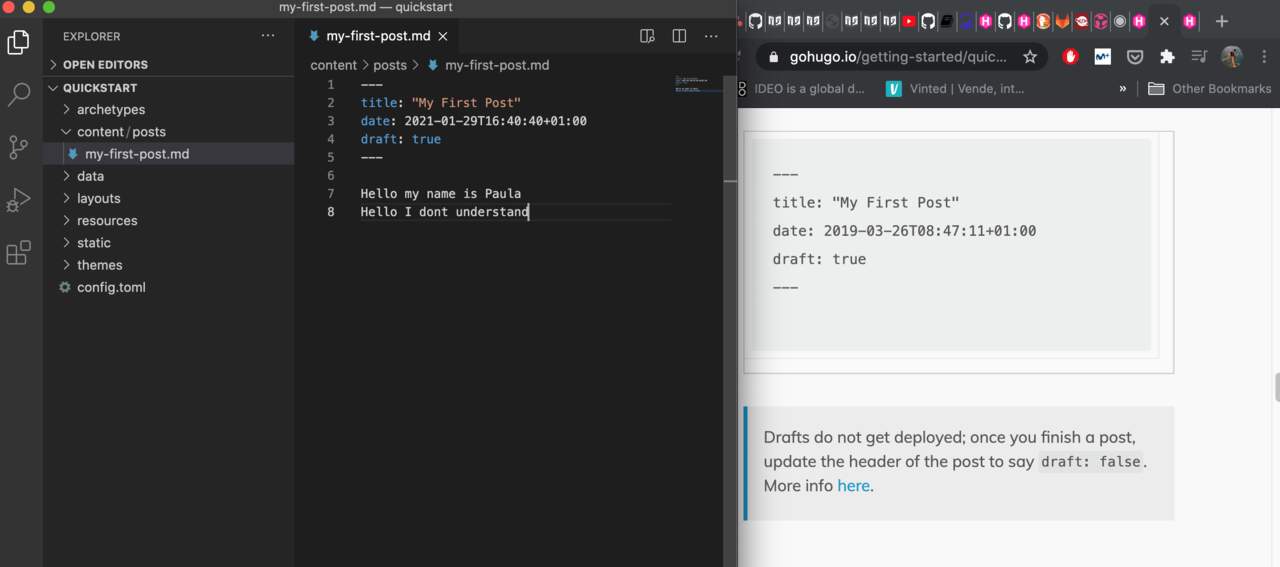
Add Some Content You can manually create content files by opening the quickstart folder in VSC > create a post (.md format) in the content section (where your text will be) Or by commands where you can do a few things like add title and date:
hugo new posts/my-first-post.md
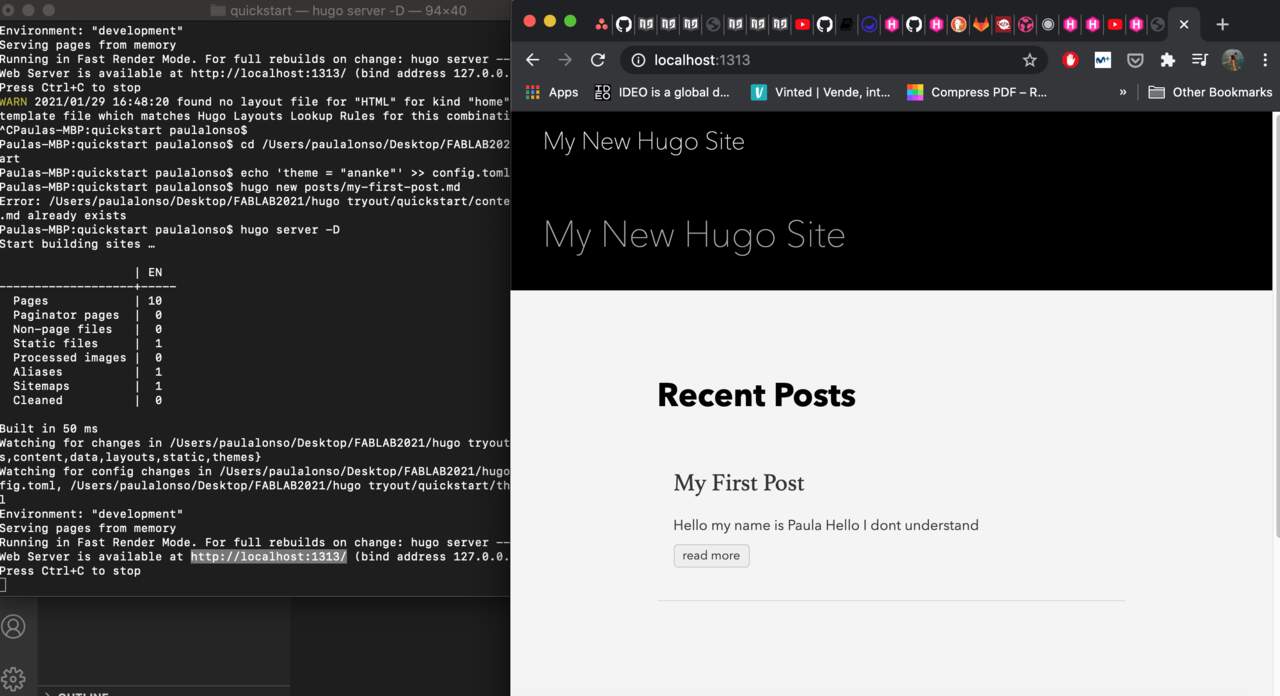
Start the Hugo server Now, start the Hugo server with drafts enabled in terminal to make an image of my website:
hugo server -D
Something like this will appear
                   | EN
+------------------+----+
  Pages            | 10
  Paginator pages  |  0
  Non-page files   |  0
  Static files     |  3
  Processed images |  0
  Aliases          |  1
  Sitemaps         |  1
  Cleaned          |  0

Total in 11 ms
Watching for changes in /Users/bep/quickstart/{content,data,layouts,static,themes}
Watching for config changes in /Users/bep/quickstart/config.toml
Environment: "development"
Serving pages from memory
Running in Fast Render Mode. For full rebuilds on change: hugo server --disableFastRender
Web Server is available at http://localhost:1313/ (bind address 127.0.0.1)
Press Ctrl+C to stop
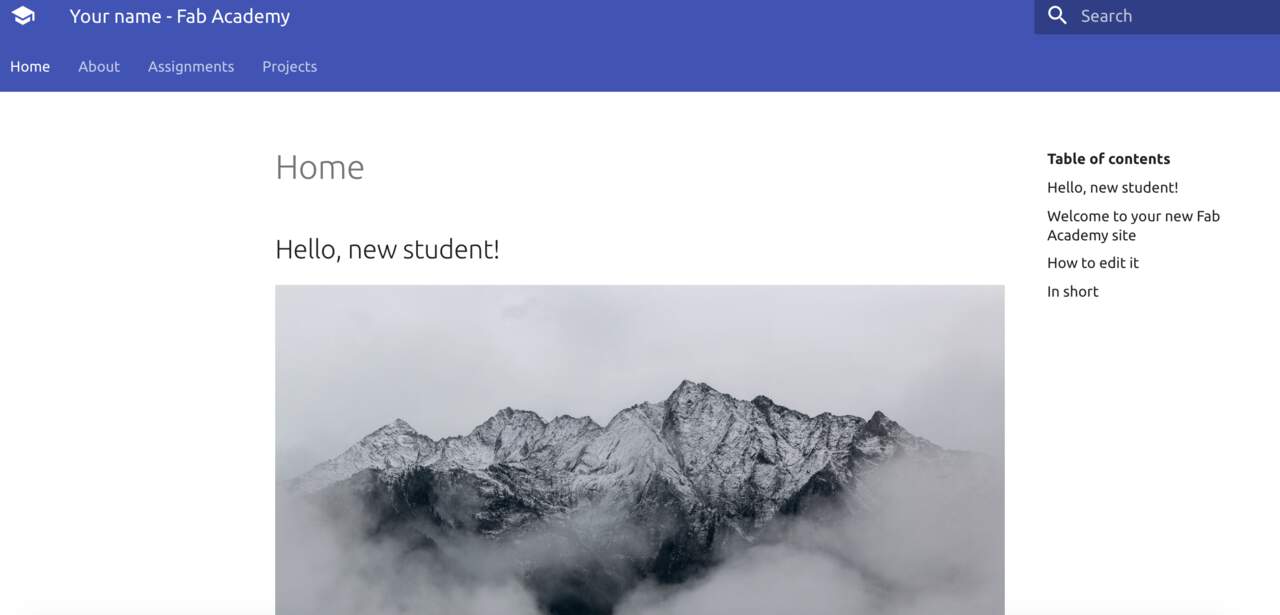
The http site which appears will be the hugo website which is generated by modifying the files in your quickstart folder. If you paste it in the server it will appear.
Customize the Theme Your new site already looks great, but you will want to tweak it a little before you release it to the public.
Open up config.toml in a text editor:
baseURL = “https://example.org/” languageCode = “en-us” title = “My New Hugo Site” theme = “ananke”
Replace the title above with something more personal. Also, if you already have a domain ready, set the baseURL. Note that this value is not needed when running the local development server.
Tip: Make the changes to the site configuration or any other file in your site while the Hugo server is running, and you will see the changes in the browser right away, though you may need to clear your cache.
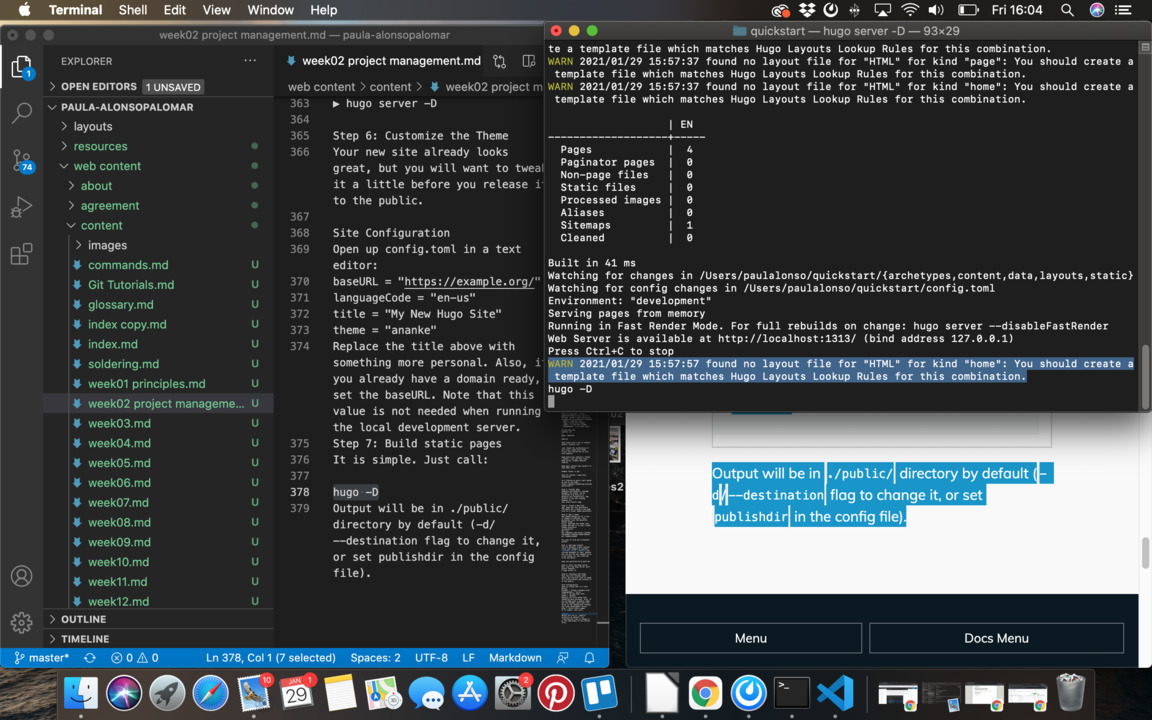
Build static pages through the terminal command:
hugo -D
Output will be in ./public/ directory by default (-d/–destination flag to change it, or set publishdir in the config file).
To create website locally:
hugo serve -D
It worked!
Step 9: Choosing theme from Hugo
I went to the hugo themes website and chose https://github.com/jakewies/hugo-theme-codex
I did all the steps from the previous quick start page but something went wrong.
If I dont find the solution to this, my backup plan is to upload everything from the MkDocs theme which is already done for the Fab Lab Academy.
Trying to fix problem Hugo-theme
I started to watch some Hugo tutorials to understand Hugo better.
This command shows the location of your hugo file:
which hugo
Creating a new hugo website:
Step 10: Image and Video Optimization
Image Optimization
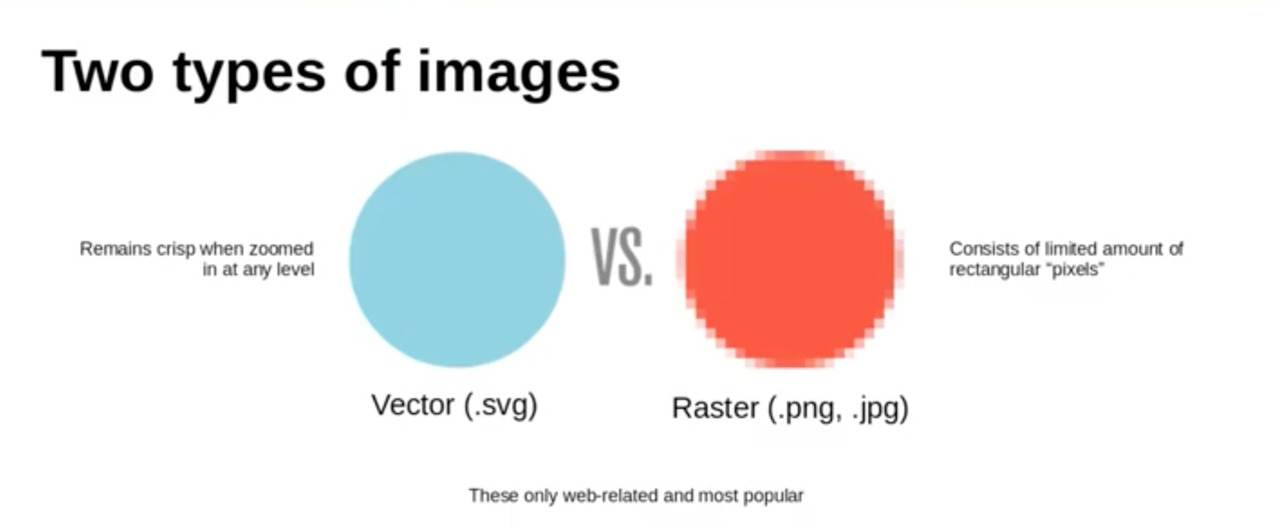
In web design there are 2 types of images: - Vector: clear high resolution shapes which remain crisp when zoomed in at any level (.svg) - Raster: consists of limited amount of rectangular “pixels” (.png, .jpg)
![]()
Images and videos are a combination of coloured pixels which create an optical illusion = what you see.
Tools for image Production and Editing:
-
Dropbox: to syncronise phone to the laptop for documentation
-
Screenshots: image capturing
-
Krita: open source image editing
-
Gimp: open source image editing
-
Photoshop: image editing
-
Inkscape: vector editor open source
-
Scribus: layout editor: vector image, creation and editing (think illustrator and InDesign)
Tools for image optimization:
With GUI:
-
Preview (MacOS)
-
IrfanView (Windows)
-
gThumb (Linux)
With command line:
- Image magick: used to automate image processing, more efficient and fast way to optimize images, very useful when building an automated web
Video Optimization
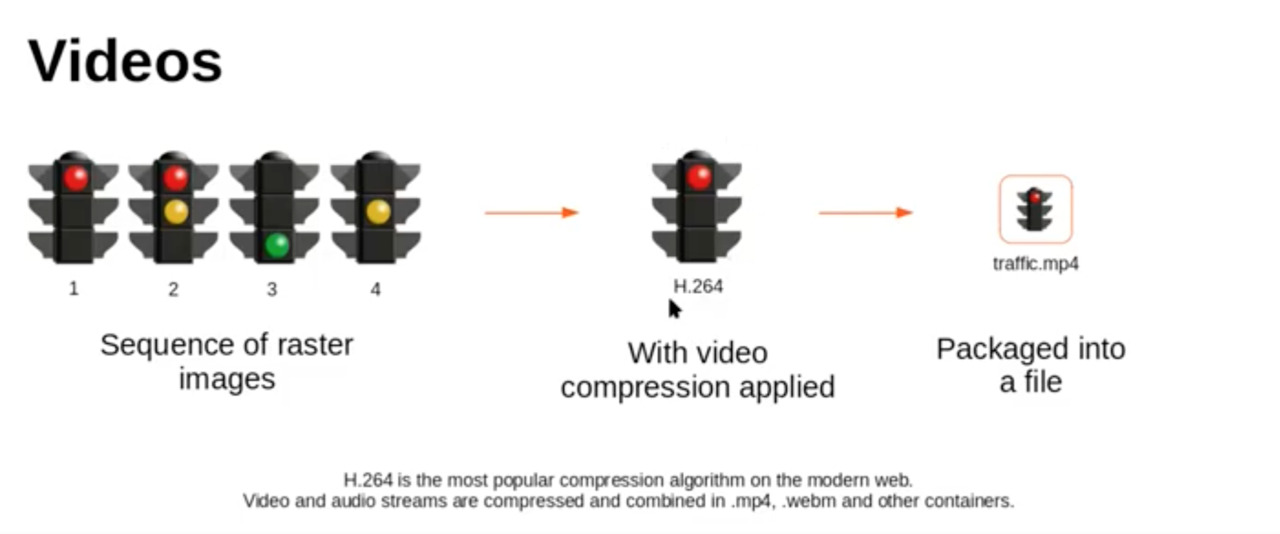
Videos are sequences of raster images > with video compression applied > the sequences are packaged into a file.
Tools for video production and editing:
-
OBS Studio: video production: open source broadcasting software studio, to record your screen
-
Kdenlive: open source video editing
-
Adobe Premiere
-
Zoom: to record lectures
Tools for video compression:
With GUI:
- Handbrake (all platforms)
With command line:
- Ffmpeg: to automate website videos
H.264 is the most popular compression algorithm on the modern web. Video and audio streams are compressed and combined in .mp4, .webm and other containers.
Learning how to work with Imagemagick and Ffmpeg:
I started by installing imagemagick through Homebrew by typing in the terminal:
brew imagemagick
Then I did the same with Ffmpeg:
brew ffmpeg
I started to learn how to actually modify my images to upload on the website:
-
You start with raw images/videos from camera/ phone in a folder called for example “PRINCIPLES”
-
Jump into the terminal
-
Look for that folder, I can either type:
cd (+ drag the "PRINCIPLE" folder)
or look for the folder by running the following commands:
cd Desktop
ls
The terminal shows the folders inside Desktop. I choose “FABLAB 2021”
cd FABLAB 2021
ls
It shows again the list of folders, now I see the “PRINCIPLES” folder, so I open it.
cd PRINCIPLES
ls
A list of the images and videos that I have in this folder appear underneath ls
- To find information about image size I run an imagemagick tool:
identify 'paste the name of the image'
These are the parameters that will appear: INSERT IMAGE OF YOUTUBE TUTORIAL THAT SHOW data:
-
JPEG: format of image
-
4032 x 3024 size of pixels (the part you will be looking at)
-
8 bit: each pixel is 8 bit
-
srgb colour
-
To find information about video size I run an ffmpeg tool:
ffmpeg -i pastevideoname.format
The information is more extense for videos:
-
Metadata: brand, other info about the creation of file,
-
Duration
-
Bitrate
-
Usually these videos they consist of streams (which have info about the compression codec), also size, fram rate
-
Stream 0:1 Audio info
-
Change image size with Imagemagick
convert -resize 1280x720 (nice web scale) "inputoriginalimage.format" image-resized.format
ls
It shows the list of images + the new resized one
ls -l
It shows more details about all the images (here you can compare the sizes).
- Change image quality with Imagemagick:
convert -resize 1280x720 -quality 65 "inputoriginalimage.format" image-resized-65.format
The kB go even lower (75.1kB) Open to check quality but this should look good.
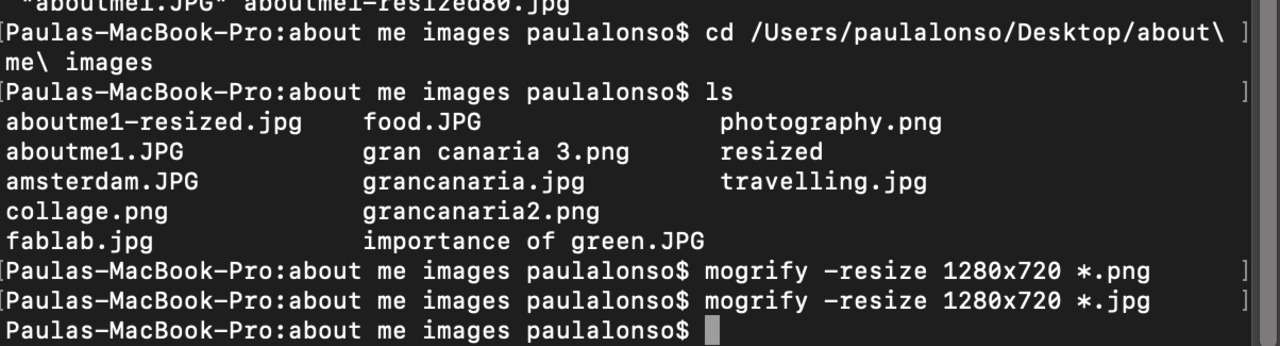
I also learned how to make a batch image size converting through the following command, once you are in the folder with all your images in the terminal:
mogrify -resize 1280x720 *.jpg
You can also use the following command to know more about the files (for example see the last time they were modified)
ls -al
To batch convert png to jpeg:
mogrify -format jpg *.png
- Change video size with Ffmpeg to webformat:
ffmpeg -i "nameoforiginalvideo.mov" -vf scale=1280x720 video-resized.mp4
To cut video:
ffmpeg -i "nameoforiginalvideo.mov" -ss 4 -t 5 -vf scale=1280x720 video-resized-5s.mp4
The video has been cut down to 1.4mB.
-i stands for input we are going to use
-vf stands for video filter.
Compress. The file comes out with 4.4mB (this should look good).
Open to check.
-ss where we are starting to cut the file in seconds
-t number of seconds we want to take from the file
- How to put these images and videos in website:
We go to Hugo repository > content directory > create folder called media > insert the new files
To upload an image:
Open Text editor > Open content page > Copy image location from text editor repository > Write down a reference for the image in content “This is a potential final project image:” and then write:

hugo server
Check your website online.
To upload a video: Markdown has no video tag, so you have to introduce shortcodes (layout snippets so you can introduce in markdown)
{{<video>}}../videolocation.mp4{{</video>}}
Create video shortcode: Layouts > create a new subfolder > layout/shortcodes > add a file called video.html > Write the following html coding in otder to access the content between the video tags. > To give it an html structure around it online.
<video controls autoplay="true" loop="true" width="500">

    <source src="{{ .Inner }}"
            type="video/mp4">

    Sorry, your browser doesn't support embedded videos.
</video>
I found a better way of linking videos (thanks to Douwe) which was:
<video width="320" height="240" controls>
  <source src="../../images/restofpath.mp4" type="video/mp4">
Your browser does not support the video tag.
</video>
I have been linking all of my fab academy videos this way.
I found all this useful information in Fab Web Basics/Image and Video Optimization
Now is time to put them into practice!
DOUBT: Can I host photos and files outside the archive? Answer: No. Photos should be resized, compressed and stored in the archive.
DOUBT: What size should my website be? Answer: In the order of tens of megabytes. Ideally growing at an average rate of 1-2 Mb per week.
Step 11: Commiting
How to publish your website? Publishing your website is done using Gitlab CI. You create a gitlab-ci.yml file of type HTML. You upload a static webpage. Every time you update any file in your projects (using git or the web interface) your website will be updated*
How does it work? Using Docker
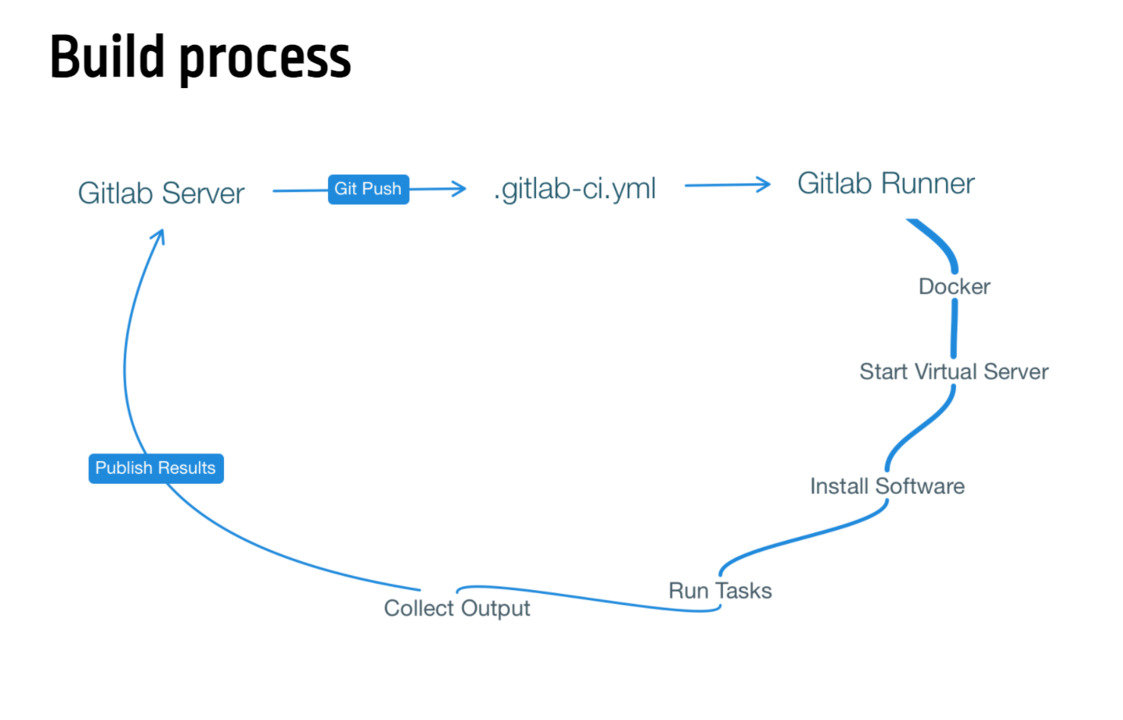
GitLab CI (continuous integration) allows to start a virtual server, install software on it nd execute it for performing one or more tasks, storing results and publishing them on the web
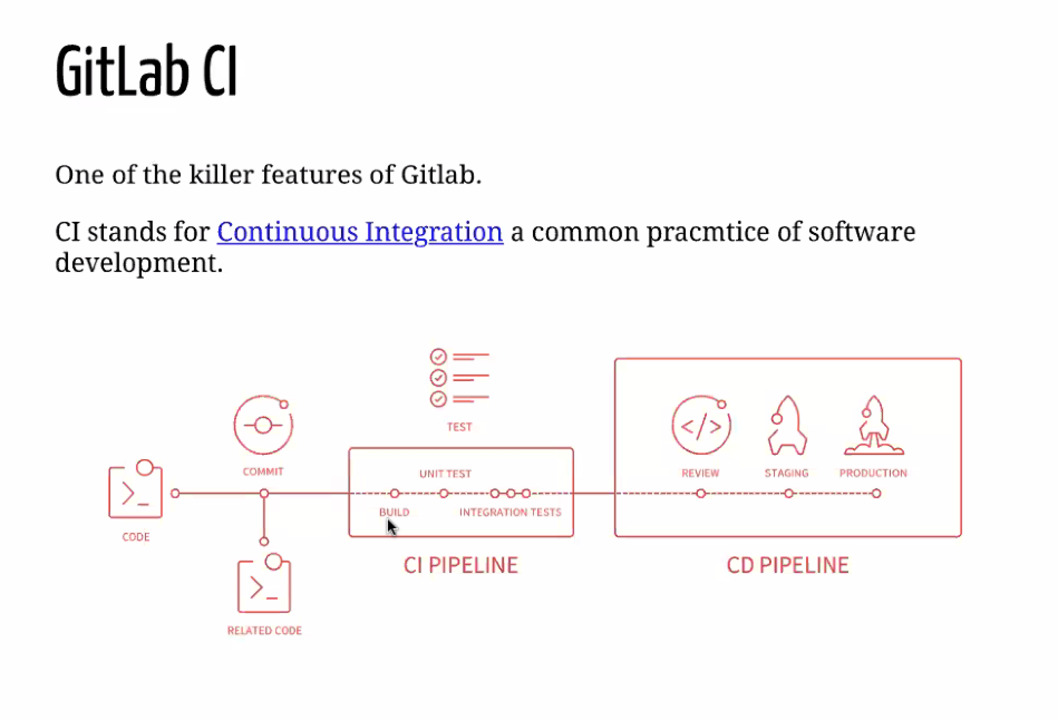
This process is described by the gitlab-ci.yml file you create into a folder
- Commiting files to website from Terminal:
cd paula-alonsopalomar
git status (to tell you the files that have been modified, shows up a list)
git add *file name* (to add files to the staging area, intermediate area, not yet a commit)
git commit -m "Add index file of my doc website" > Enter (to commit with a message describing what you are adding)
git log (after commiting to see what happened, extra info)
git rm (in case you need to remove a tracked file)
git reset commit number (if you want to go back to a commit, copy the commit identifier)
git push (in order to push it to the gitlab repository)
You should see an output message = your local changes are uploaded in your repository.
Open GitLab > you will see the message you put for the update > click there or in the commit section > you see all the changes that have been done.
Other Git key commands:
git pull (for downloading the last copy of the repository of the server)
git merge (to have a working copy)
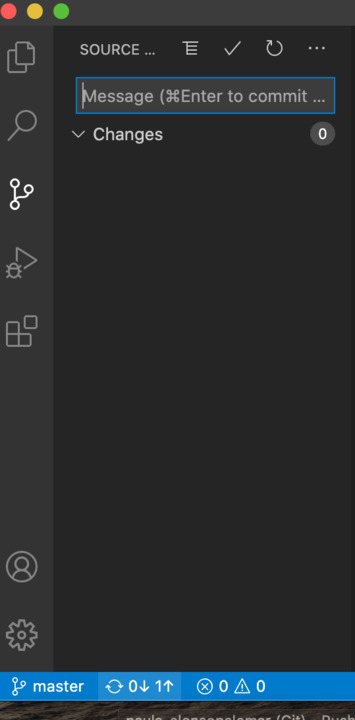
- Commiting files to website from VSC:
You can also commit your files to the server through VSC through the section shown below, which is an easy GUI way to do this.
I have had some problems trying to commit from VSC. When trying to push I get this error:
Git: git@gitlab.fabcloud.org: Permission denied (publickey).
I tried fixing this but I haven’t managed to find the solution to this. Instead I will be commiting my files through the terminal as this still works!
DOUBT: What format should I save my files in VSC to push to the server .md the real content of your site, where you will type all text for your documentation .yml There is one .yml file with all the technical things it is already there somewhere (you don’t have to touch it, if you are happy with the look and feel of the current site)
Step 13: Installing Git it
Git it is an app to learn git, I have installed it to desktop through the following link
Step 14: Installing website with Mkdocs
As I have had some problems installing the hugo theme I have had to work with Mkdocs in order to upload my website in time.
Step 14: Building website from Hugo
I will try to continue adding steps on my journey to build an Hugo website.
What I learned
- This week I have learned SO MUCH is unbelievable. I am still trying to create mental maps in my head to organise all these structures and systems I have been working on. I will try to upload these as soon as possible.
- I have learned that you have to have a backup plan in case your “fancy” plan does not work out.
What went wrong and how I solved it
PROBLEM 1: HUGO THEME CODEX NOT WORKING
PROBLEM 2: VSC PUSH/ PULL GUI OPTION NOT WORKING
(I will post the solutions to these when I find them)