Final Proyect
GiveMe Tronics
The GiveMe Tronics is an automatic component dispenser (originally intended for electronic components). Its manufacture can be done easily, only with a 3D printer, a small laser cutter and the necessary electronic components.
It is an Open Source project, so everything can be downloaded freely. The only condition that I propose is to share the modifications or adaptations that are made to the design so that any user can benefit in the same way.
2.- 3D Design:
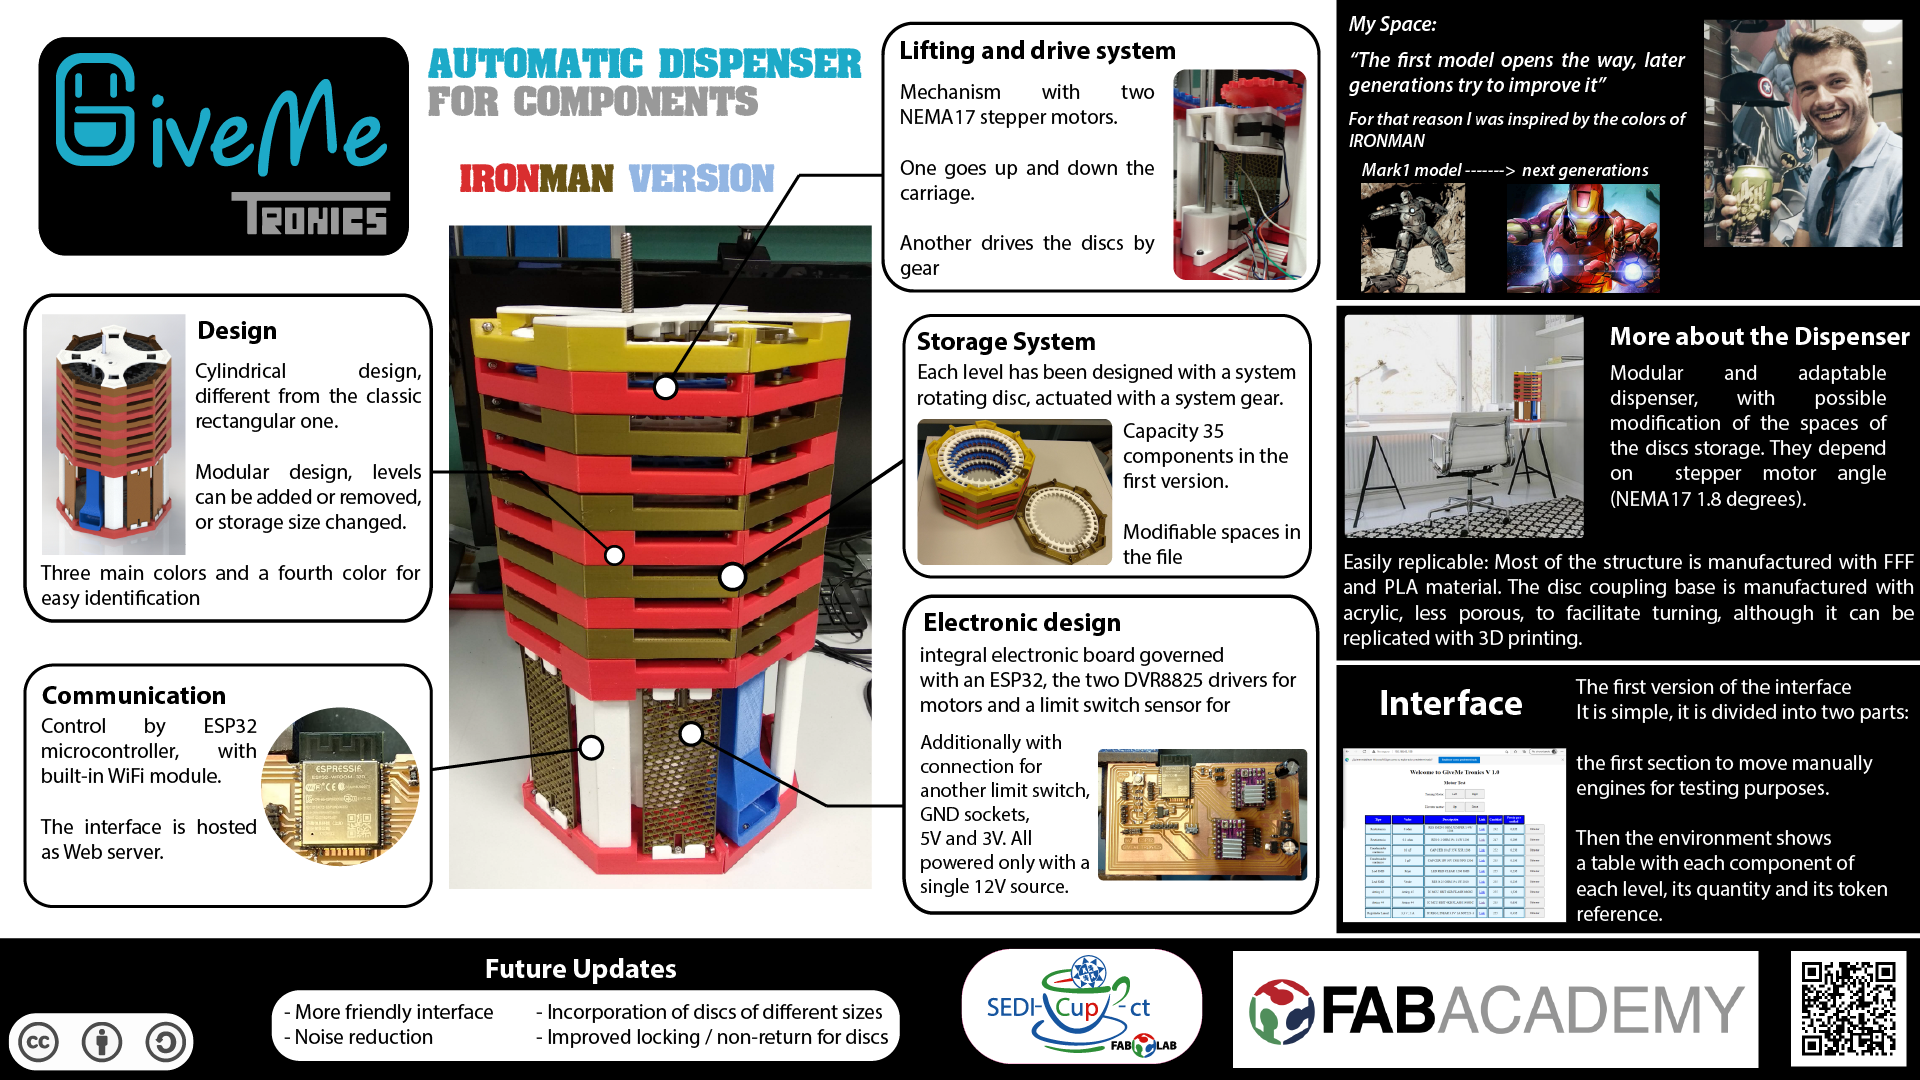
The design is totally creative, everything designed from scratch. I was looking for information on other automatic dispensers, but the designs I found were more classic, all with a rectangular shape, matrix, with motor drive to open and close drawers.
Then it occurred to me to design one with a cylindrical shape so that each level was one on top of the other. In addition, in this way, the volume of the device only increases upwards, differently than, with a rectangular design, in which, when adding rows for components, it grows to height and when adding columns, it grows to width.
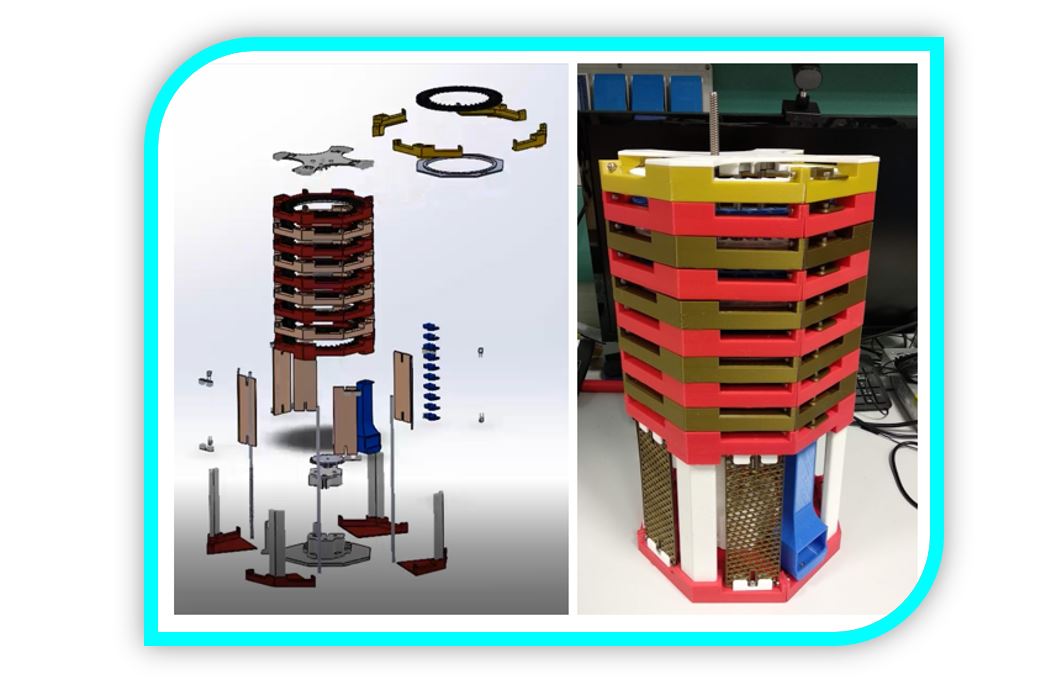
The first version I have called IRONMAN, because I have taken this comic character as an inspiration for the colors. Also because IRONMAN in the comics, is characterized by wearing armor and the first design of his armor was basic, his design was conceived to get out of a situation. From this first design of his armor, he was modifying it, each version for the better. This is a bit the idea of this Open Source project.
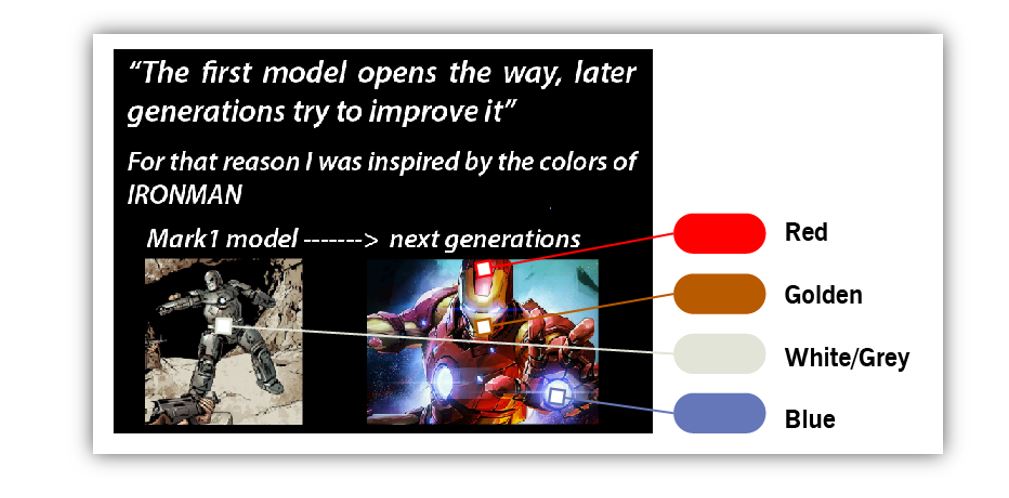
Each level of component storage is modular, it can be removed or added whenever desired, or resized for a larger component by acting on the part file. It is only necessary to take into account the angle of rotation of the stepper motor to adapt the space of the cell, the exit gap and indicate the number of steps necessary to act with the rotation at that level.
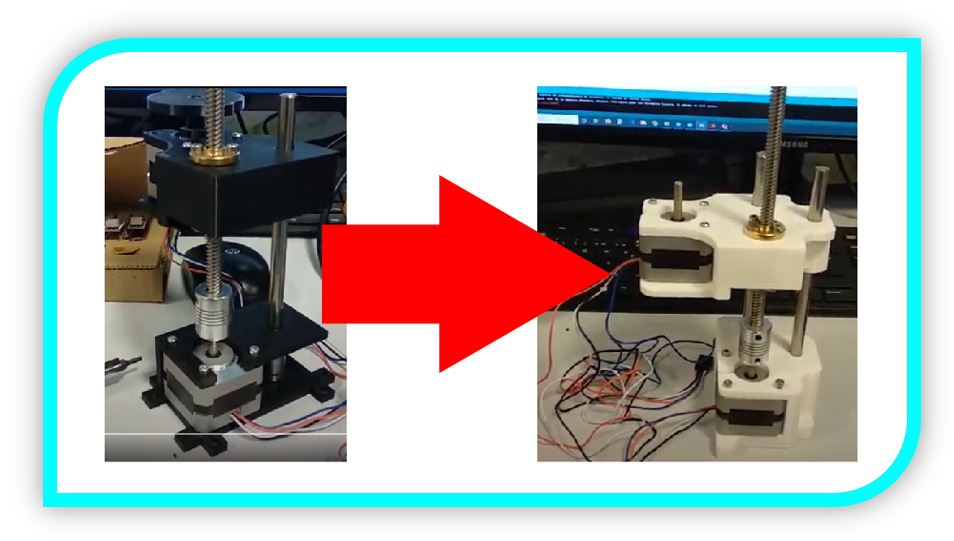
The level selection system is made with a stepper motor and a threaded rod, a system based on an elevator. To understand this system a little better, you can consult examples on the web about elevators created with Arduino.
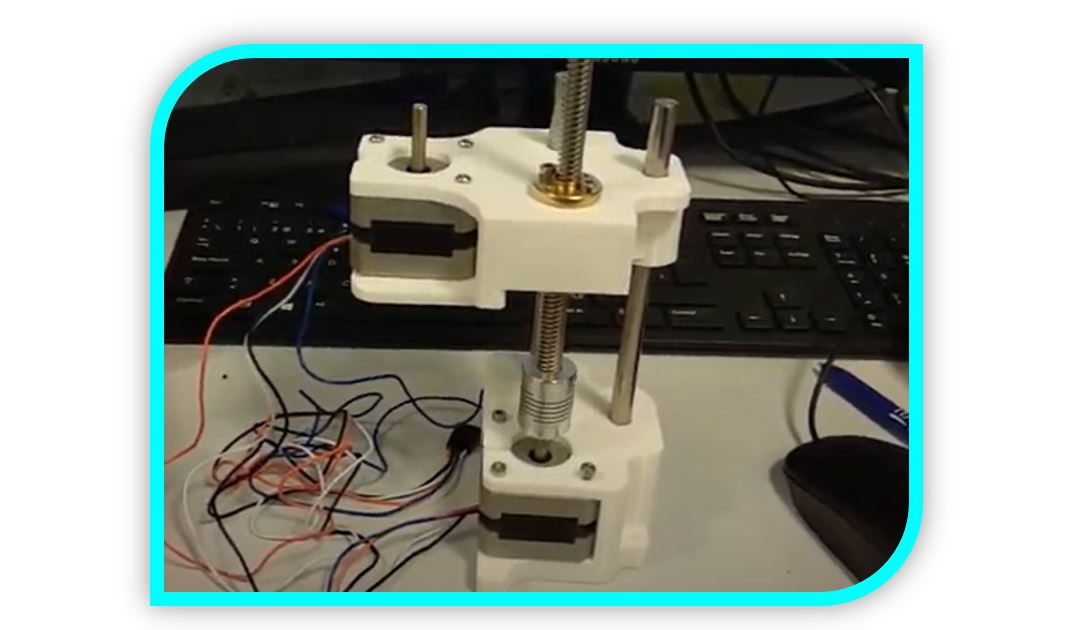
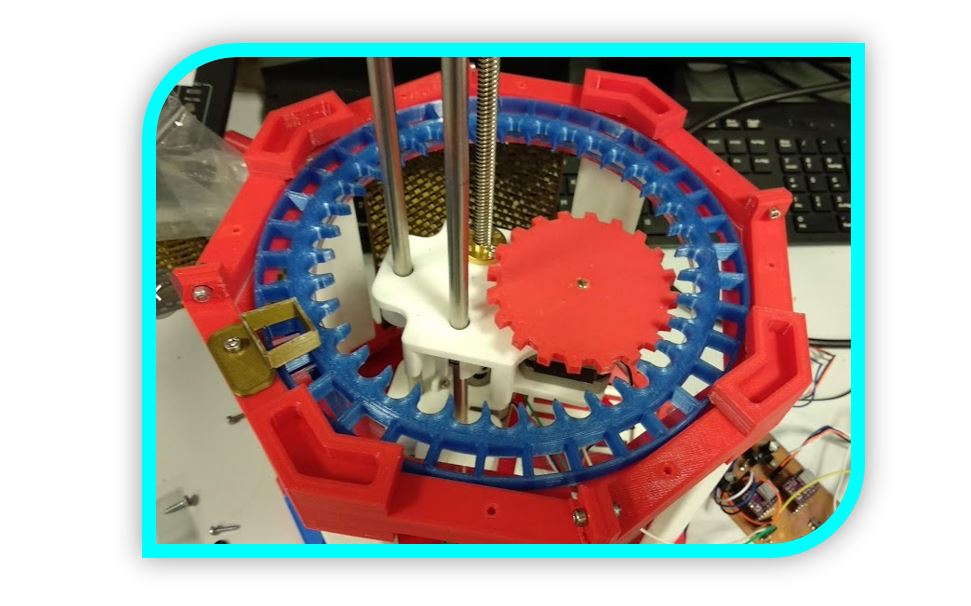
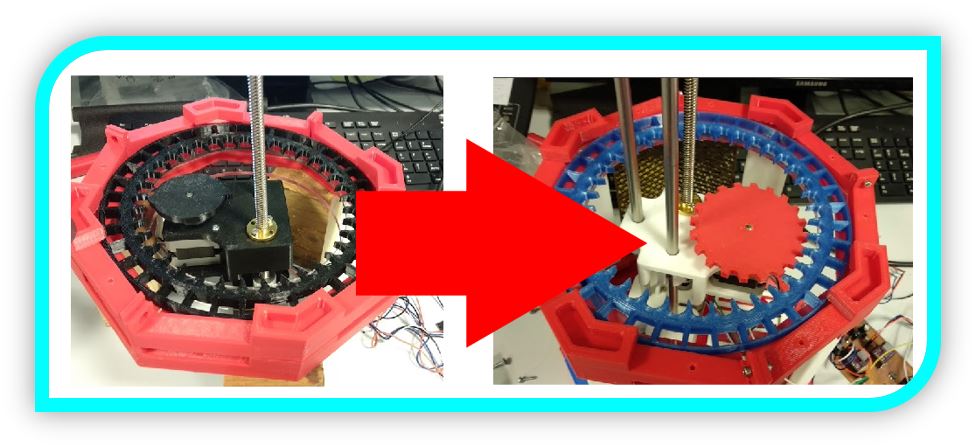
The system of dispensing the component of each level, consists of another motor with a gear on its axis, in this case one with 20 teeth, since the complete turn of the stepper motor (360 degrees) has 200 steps, so every 10 steps one tooth rotates 18 degrees, and for every 18 degrees of each level disc a gap has been created for each component. Then, when the motor is driven, 10 steps are rotated with the gear, which is transmitted by 18 degrees on the storage disk as the movement to go through a complete storage space of a component and the component falls down the dispensing chute.
3.- Fabrication:
3D Printing:
For the 3D manufacturing process, all the pieces have been created so that they can fit in a desktop-type 3D printer with a (20x20) cm bed. I have used an Ender 3Pro model, an Anet A8 and a Sigmax R19, the latter being larger, but I have only used it to remove the parts more quickly.
The material used has been PLA, as it is a safe, resistant and economical material.
Laser Cutting:
The pieces made with laser cut, have been the bases for the discs of each level. An acrylic material has been chosen because it is completely smooth and facilitates the sliding of the rotating discs.
In addition, it has been used to create a more aesthetic red base on the base of the dispenser.
I thought of using it on the protective walls, which would also be interesting to be able to see the internal machinery, but in the end I used a grid created by 3D printing.
Milling:
The project has created its own electronic board, the GiveMe Tronics Board. It is an integral board, in which the two modules for the motor drivers (DVR8825) and two pairs of pins have been incorporated to include two limit switches. In this version only one is used, the one at the bottom, to take the reference of the initial height. The other is designed for the user who wants to incorporate the upper limit if necessary.
The board has been designed to be powered by a 12V source. I have integrated two regulators, one to convert 12V to 5V and the other to convert 5V to 3.3V which are the ones used by the ESP32 microcontroller.
I have left 4 3.3V pins, 4 5V pins, 2 12V pins and 4 GND pins free, for future incorporation of modules or sensors.
There are also 4 free I / O pins and the 6 pins for programming the board with the USB-TTL cable.
4.- Assembly:
For assembly, only M3 (3mm) metric electronic screws with nuts of the same size are required. For the methacrylate part, it is convenient to use adhesive and the necessary tools (screwdriver, cable protector ...).
| Part | Material & Comments | Price | Source |
|---|---|---|---|
| Disc frame (octagonal) (4 pieces, 1 tier) | PLA (17h 39min) 163gr [Ender 3pro printer] | 4,08€ (per nivel) | Filament2print |
| First level structure (octagonal) | PLA (19h 32min) 175gr [Ender 3pro printer] | 4,38€ | Filament2print |
| Frame base (octagonal) 1unit (4 required) | PLA (4h 23min) 45gr [Ender 3pro printer] | 1,13€ | Filament2print |
| Pillars the 4 units | PLA (11h 22min) 137gr [Ender 3pro printer] | 3,43€ | Filament2print |
| Fixing base 1 | PLA (9h 3min) 106gr [Ender 3pro printer] | 2,65€ | Filament2print |
| Disk1 | PLA (6h) 47gr [Ender 3pro printer] | 1,18€ | Filament2print |
| Base for 1st Nema17 and trolley for 2nd Nema17 | PLA (13h 47min) 146gr [Ender 3pro printer] | 3,65€ | Filament2print |
| Gear | PLA (1h 38min) 17gr [Ender 3pro printer] | 0,48€ | Filament2print |
| Top cover | PLA (6h) 58gr [Ender 3pro printer] | 1,45€ | Filament2print |
| End stepper support | PLA (39min) 6gr [Ender 3pro printer] | 0,15€ | Filament2print |
| 14 pieces for protection wall bracket | PLA (5h 27min) 40gr [Ender 3pro printer] | 1€ | Filament2print |
| Wall pack x2 (necesitan 4pack) | PLA (1h 20min) 20gr [Ender 3pro printer] | 0,50€ | Filament2print |
| Dispenser output | PLA (6h 38min) 57gr [Ender 3pro printer] | 1,43€ | Filament2print |
| 9 ducts for outlet | PLA (2h 49min) 24gr [Ender 3pro printer] | 0,60€ | Filament2print |
| Electronic Board Support | PLA (50min) 6gr [Ender 3pro printer] | 0,15€ | Filament2print |
| Acrylic disc bases (1 per level) | Acrylic (2min) 50cm x 20cm a table of 50cm x 100cm | 8,47€ | PerezCamps |
| Milling | Copper Board (100 x 127)mm (3h milling) | 1,60€ | Digikey> |
| Nuts and bolts | M3 (3mm) pack diferent lenght | 12€ aprox | Amazon |
| 2 smooth rods | 2 x (8mm x 200mm) | 10€ (both) | Amazon |
| 1 threaded rod | 1 x (8mm x330mm) | 9,25€ | Amazon |
| 2 Nema17 engines | NEMA17 1.3A 40mm | 34€ (both) | Amazon |
| 1 Flexible fixation | (6 x 8 x 25) mm, Diameter: 19 mm | 1,80€ | Amazon |
| 3 bearings model1 | Diameter 8mm | 2,07€ (the three) | Amazon> |
| 2 bearings model2 | Diameter 8mm | 1,54€ (both) | Amazon |
| 1 ESP32-WROOM-32D | WIFI MODULE 32MBITS SPI FLASH | 3,44€ | Digikey |
| 1 5V regulator | 5 v ; 1 A | 0,34€ | Digikey |
| 1 3V regulator | 3,3 v ; 1 A | 0,39€ | Digikey |
| 2 DRV 8825 driver modules | DRV8825 18pins | 5€ (both) | Amazon |
| 2 100uF capacitors | Row:30 Cell:2 | 1,50€ (both) | Amazon |
| 3 0K resistors | RES SMD 0 OHM JUMPER 1/4W 1206 | 0,06€ (the three) | Digikey |
| 3 10K resistors | RES SMD 10K OHM 1% 1/4W 1206 | 0,09€ (the three) | Digikey |
| 2 1uF capacitors | CAP CER 1UF 50V X7R 1206 | 0,38€ (both) | Digikey |
| 1 10uF capacitor | CAP CER 10UF 35V X5R 1206 | 0,14€ | Digikey> |
| 1 1K resistor | RES SMD 1K OHM 1% 1/4W 1206 | 0,03€ | Digikey |
| 1 smd LED (blue) | LED BLUE CLEAR CHIP SMD | 0,36€ | Digikey |
| 1 reset button | SWITCH TACTILE SPST-NO 0.05A 24V | 0,92€ | Digikey |
| 1 switch | SWITCH SLIDE SPDT 100MA 12V | 0,87€ | Digikey |
| 39 Male connection pin | CONN HEADER SMD 40POS 2.54MM | 3,9€ | Digikey |
| 32 Pin female connection for driver | CONN HDR 8POS 0.1 TIN PCB | 3,2€ | Digikey |
| 1 square 2-pin power connector | TERM BLK 2POS SIDE ENT 3.5MM PCB | 0,54€ | Digikey |
| TOTAL | 166,00€ |
5.- Programming:
I have done the programming of the microcontroller with the Arduino ID interface, because it is the most comfortable for me and it may be one of the friendliest or known to other users.
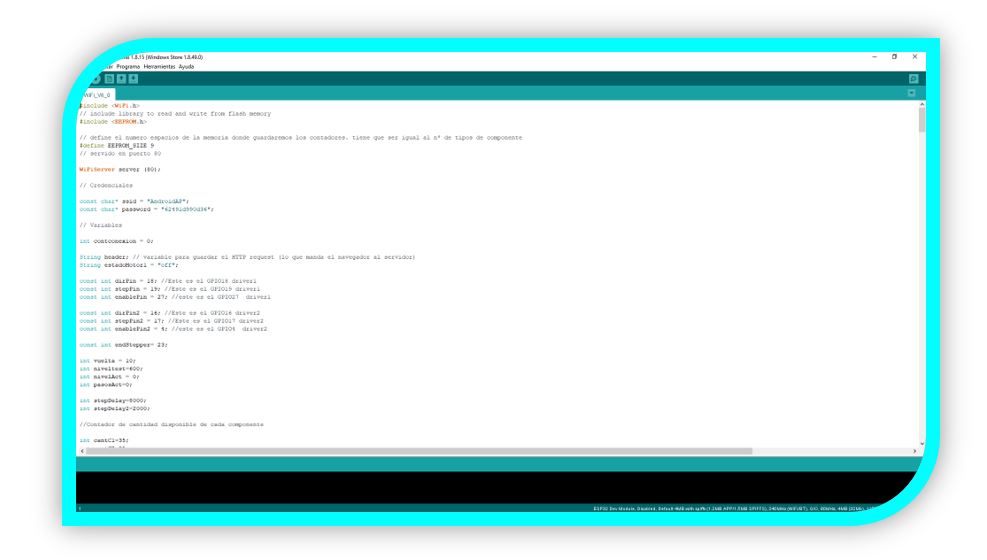
With the programming I have developed the code for the control of the motors and the sensor and I have also embedded the page in HTML code for the control web server with the ESP32 WiFi module.
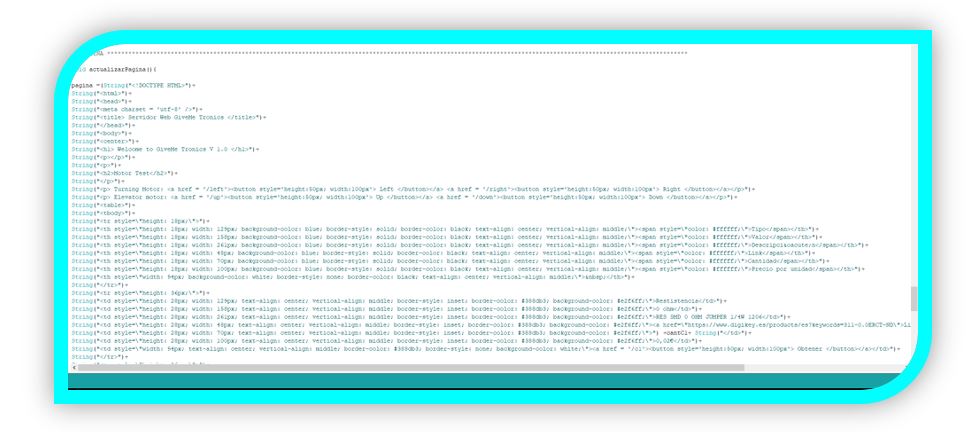
The HTML environment of the first GiveMe Tronic V1.0 version is quite simple, it has some first "left" and "down" buttons to test the spin motor that controls motor 1 and two "up" and "down" buttons that controls motor 2, responsible for raising and lowering.
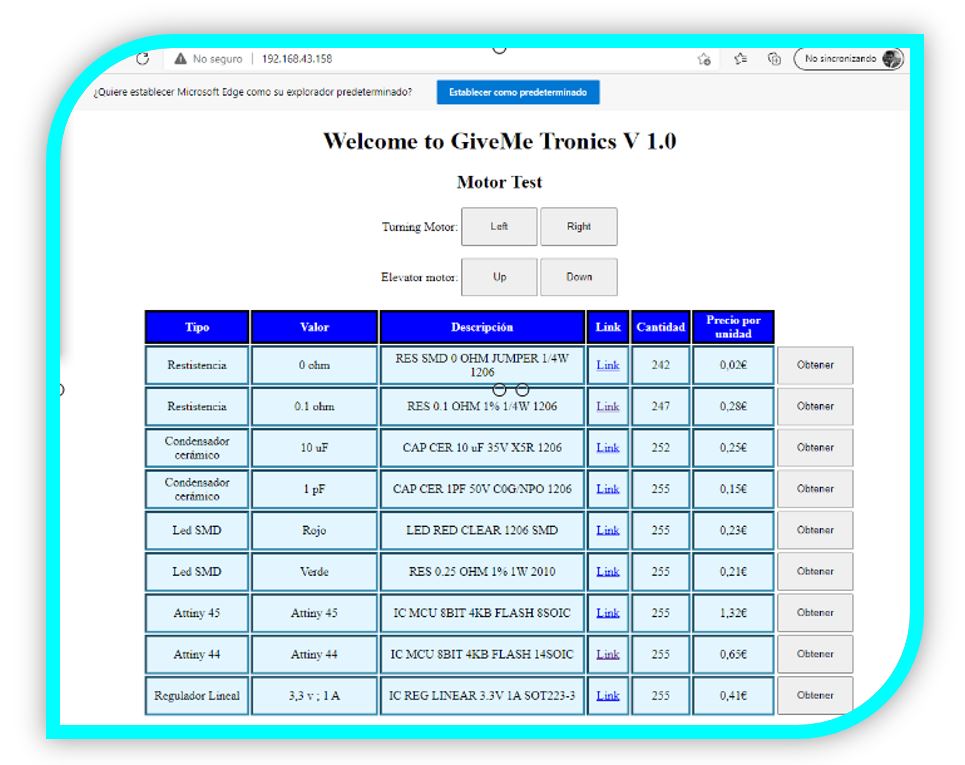
Then I have created a table to indicate the components that are in each level, with their name, their identification code, their web link to consult, the price of each unit, the quantity and next to the button to dispense each one of them.
6.- Tests and evolution:
I started working with a vertical structure with two rods, a threaded one that is responsible for raising and lowering the car and another smooth to reinforce. This idea was to minimize the number of components, but it was a bit unstable. To improve the stability of the car, I added another rod.
Regarding the turning system, I started with a two-tooth gear, in this way, every half turn, a component would be dispensed. But with this design, it had little contact surface and it made it a bit difficult to control the spinning of the disc properly. That's why I opted to make the ultimate 20 tooth gear, with a larger contact surface and requiring less spin to dispense a component.
7.- Final Result:
The dispenser works correctly as long as the discs are positioned properly aligned by hand. As an improvement in future versions, this alignment should be made automatic.
The sound of the car raising and lowering motor is a bit loud, it would be nice to study how to reduce the noise.
In this first version, all the storage discs have the same spaces, 36 boxes, for 35 components (the one in the dispenser outlet conduit is always free). Discs can be created with fewer spaces, but larger, also adapting the outlet duct.
10.-FILES
GiveMeTronics parts
Assembly video
Laser cutting files
ESP32 files (programming)
What went well?
In general, the pieces fit together correctly and the way to add or remove levels does not create instability.
In addition, the communications by webserver have not caused problems when testing with several devices.
The power supply is sufficient to power the entire device and there is no voltage drop or need for more power.
What would you do different next time?
It would be good to try metal gears, although the idea of the project is to manufacture all the parts in the most affordable way.
I would try to create a more rounded look to the structure to make it a bit more aesthetic.
What could be improved?
Include a non-return element in the turning system to better control the positioning of the storage cells.
I would try to find another motor or find a way to reduce the noise when activating the mechanism.
It would be fun to use the ESP32 to connect the web interface with a voice assistant like "Alexa" "Google Assistant" "Siri" ...
further development:
I would like to try to connect the web interface with my personal voice assistant device.
I would like to try some system for a better control of the discs, possibly with some magnetic system that does not influence the components, tabs, some locking device ...
I will also try to update the website and add some visual improvement, information, future links ...
As I have created an open source project, I hope someone else can improve it and find it interesting.
Fab-Weeks
Are you looking for my assignments?
Ipsum Dolor
Vehicula fermentum ligula at pretium. Suspendisse semper iaculis eros, eu aliquam iaculis. Phasellus ultrices diam sit amet orci lacinia sed consequat.