Final Project
My initial project idea was to make a smart modular trashcan. But I wanted to try something else, a lot of ideas came into my mind. Including electric skateboards, waterless hand washing equipment etc. But since we had pandemic restrictions that kept us from going to the lab for more than a month, we lost a lot of time. So i decided to go ahead with the smart modular trash can itself.
Smart Modular Trashcan
The basic function that the trashcan would have for the prototype would be taking input from Ultrasonic to open the trashcan lid.
Further on, more functions will be added to the product including:
- Using app to open lid
-Having a system to unload the garbage when full by sending signals to main system.
As of now, I am intending to build the basic function and make a small scale version of the final product.
What will I do?
My plan from the start was to make a smart modular trashcan with a replaceable can inside. I wanted to make it as small as possible while integrating all the electronics. This version of the trashcan that I made is for office and workplace utility. The trashcan is fully automated and takes input from a sensor to open as well as close its lid. It would later support features such as tracking the emptiness of the can, as well as communicating those details with the trash collector. The project is titles HEX+ for its shape. It will take up a hexagonal form when multiple trashcans are attached to each other. The acrylic box will have a cardboard box inside, that can be replaced from time to time. This basically solves two problems. One is that, many people refuse to use trashcans and just litter around the cans because they don't want to touch it since it is unheygienic. The second problem is that small dirt, like the carbon from pencil scrapings tend to stick to the insides of normal trashcans used in offices. This forces to replace the trashcans as a whole after a few months. Improper disposal of such plastic bins are threatening to the environment. Later on, a wifi module would be integrated to the box that would communicate to the trash collector regarding the fullness of the trashcans. Bigger versions of these trashcans can be used to encourage the general public to use them.
Background study
According to a survey conducted in India, about why people still litter around trashcans, it is observed that, trashcans with lids had more trash around it compared to open trashcans. While the city was installing closed trashcans in public places to avoid animals and bird eating from waste and littering the places around trashcans. It was also found out that people do this because they do not want to touch the trashcan lids as it could be unhygenic.


The aim is build a cost effective smart trashcan so that, people would stop littering around trashcans. While at this, I also studied about countries like Japan and Taiwaan who got rid of trashcans to clean the public places. There are also strict rules to stop people from doing that.


This indeed was an interesting article, but in a country like india, if we do not put trashcans in public places, people wont hesitate to litter wherever they want to. So such installations can encourage people to use trashcans.
Who has done what before?
Many have put forward the idea of smart trashcans and there are countries that use these trashcans in public places. A variety of designs for these are available in the market but they are generally much more expensive than regular trashcans. I also found many arduino projects on smart trashcans on the internet too.
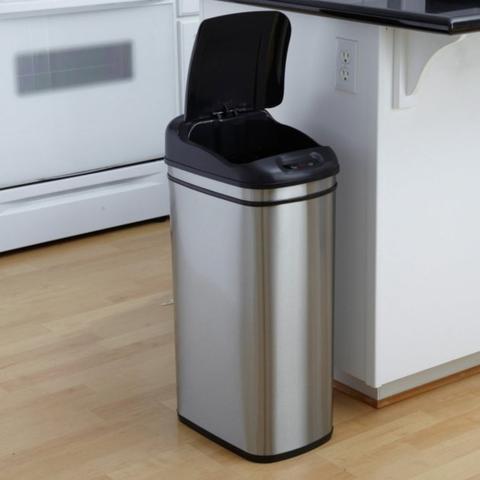
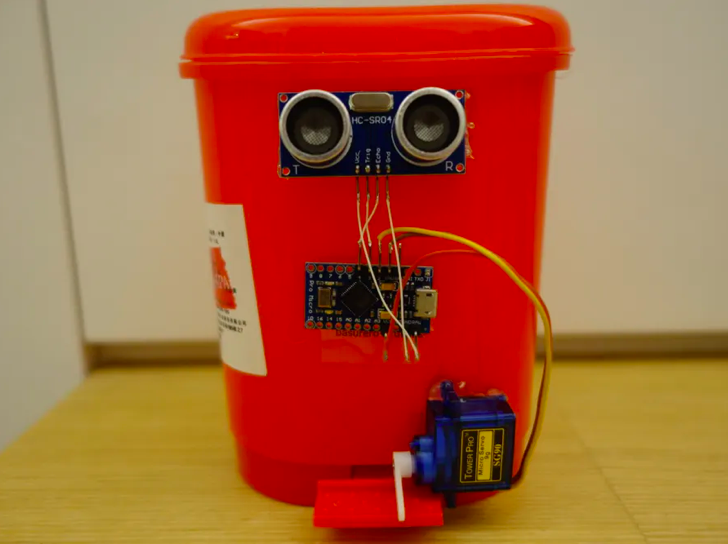
But among these, I couldnt find any modular ones that can be used to segregate different types of waste, send signals to trash collector as well as open and close on it's own. Also, I am intending to design it in a hexagonal pattern to accommodate maximum modules in lesser space while making the design unique and aesthetic.
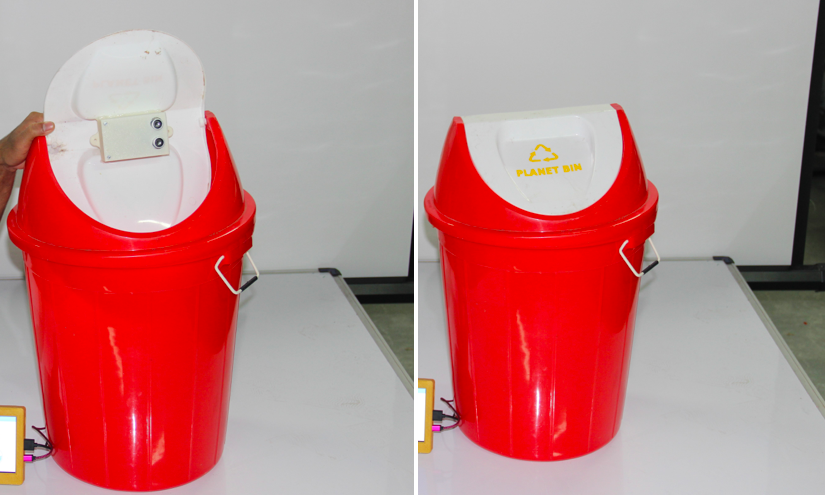
This is another interesting related project that I found on the internet.A similar project done with FabAcademy was Salman Faris's Smart Waste bin
What will I design?
My intention is to design a trashcan that would open and close on the detection of hand, as well as can be controlled by a phone. Since "charity begins at home" and it is easier to troubleshoot when within range, I believe it would be most appropriate to start implementing these at the lab first and then gradually expanding.
So I will be designing a mechanism that
- Open/ closes without touch
- Can be opened on command from across the room and
- Sends notifications when full
What materials and components will be used?
The list of materials used for the project as well as their prices are as listed below.
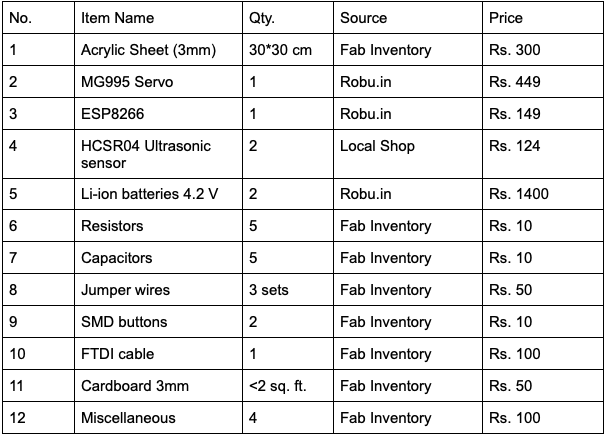
The total price for the development of the project was around 2752 INR. That would be around 37 US dollars.
What parts and systems will be made?
The entire project is to be fabricated as no existing systems are used. I will be designing and fabricating
-The acrylic box with lid attached
-The extended load arm for the Servo Motor, and
-The casing for electronics which will be 3D printed
What processes will be involved?
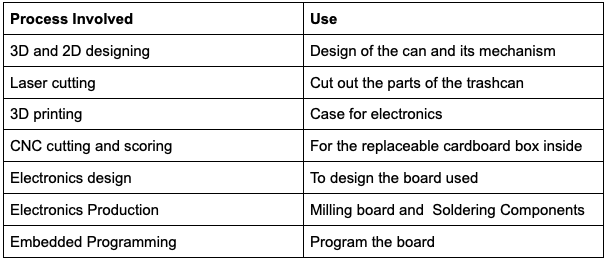
What questions need to be answered?
- How will the half hexagonal shape of the bin be formed?
The pieces for acrylic are going to be joined together using silicone. This will not be entirely practical for production. This method of adhesion was used since the surface of contact between the two pieces are less and the sheet was too small to bend and get the shape. The actual model will be 3 times bigger, which means acrylic bending can be used to get the shape.
- How will the trashcan communicate?
The ESP8266 module in the trashcan will be connected to the wifi used by other devices in the building. An app will be used as an Interface to communicate with the micro controller.
- What are the input and Output devices?
The inputs are received through the Ultrasonic Sensors as well as from the app. The outputs would be the Servo Motor and the notification pings on getting full.
-Where can this be used?
The ultimate aim is to make it capable for public usage, but that would require more time. As of now, it can be used within the same building in different rooms, offices, schools, colleges, hotels and homes.
How will this be evaluated?
The project is scalable, and is capable of hitting the market as it is much affordable than the currently available smart trashcans that only opens and closes and does not come with other features. The cost of making can be reduced tremendously at production. The app can be developed and more functionalities can be integrated later on. Even as of now, it can reduce the effort janitors put in to check if trashcans are full every day, as well as can be controlled via command.
What has worked? What hasn’t?
So far, I encountered two major issues with my design. The first was an issue with the opening hinge of the lid. The issue here was that the distance between each cut of the design of the lid was to be placed perfectly, as the lid would stay lower than the rim if the distance was too less, and wouldn't open easily of the distance was too far apart. I did a bunch of test cuts to fix this issue and then found the right distance. More about this has been explained in the final project documentation.
The next issue was with the circuit. The circuit was not managing the power at first and burnt my ultrasonic sensor at first. This was because the circuit got short and power for the motor was passing on to the ultrasonic sensor. I figured this out and re-milled the circuit and soldered it carefully to fix this problem. I had issue with some more things further. The major issue was t incroporate communication using blynk with the project, but I decided to do it further after my presentation, and show the minimum required working as of now an do the further with spiral development.
Project Management
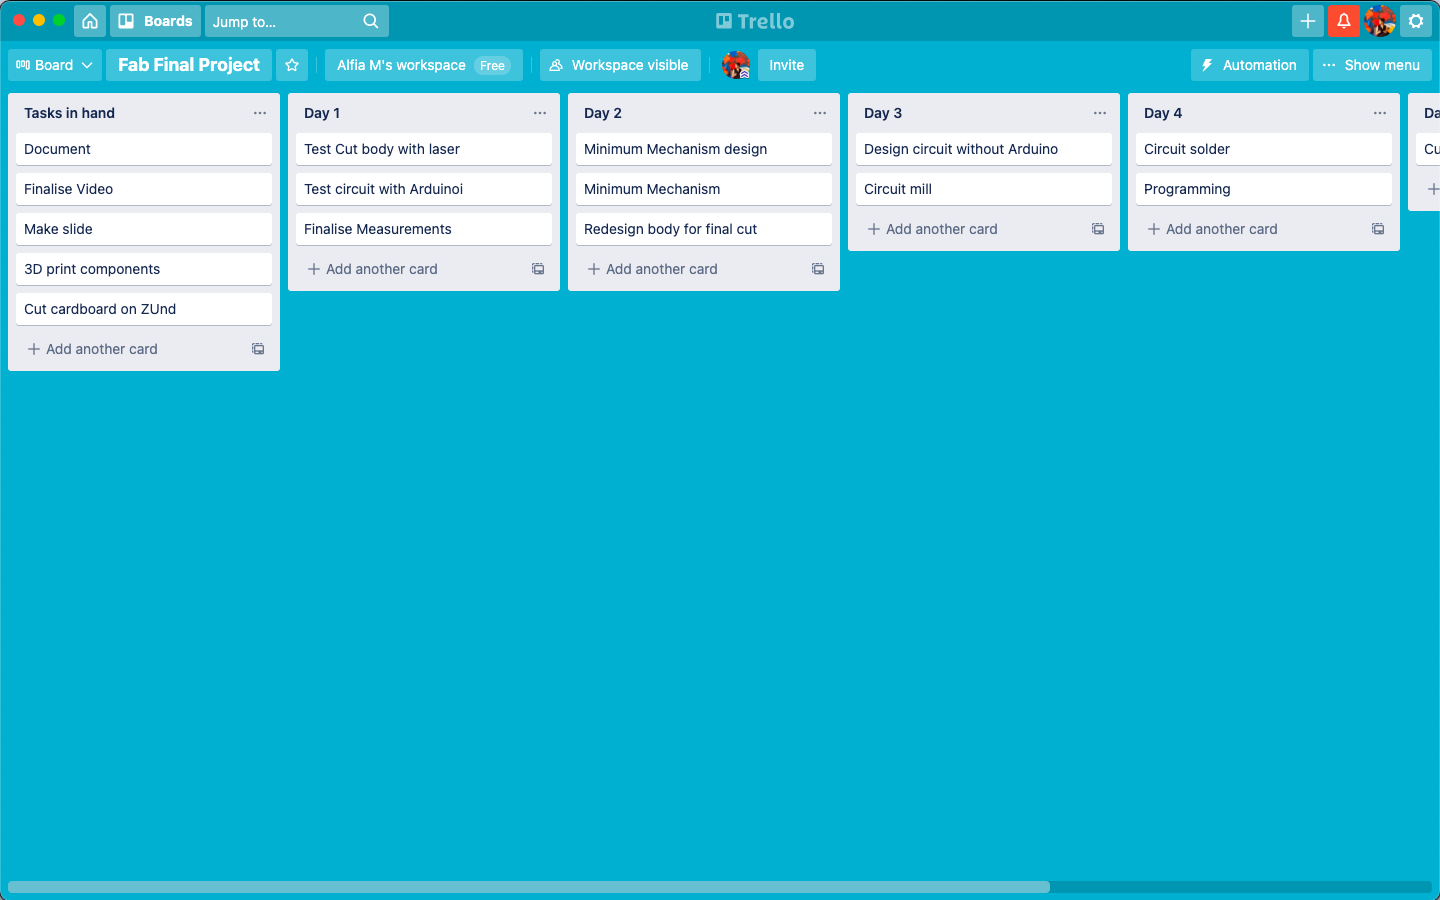
I decided to start with my final project works and do it with a schedule. I am using Trello to manage my project and tasks in hand.
Trello is a web-based, Kanban-style, list-making application and is a subsidiary of Atlassian. Originally created by Fog Creek Software in 2011, it was spun out to form the basis of a separate company in 2014 and later sold to Atlassian in January 2017. The company is based in New York City.
Input/ Output Basic Idea
The can takes input using an Ultra Sonic sensor that opens the lids of the can without physical contact. The sensor is placed on the top of the can next to the lid. On placing hand above it, the lid opens up and remains closed otherwise.
Sketch and Design
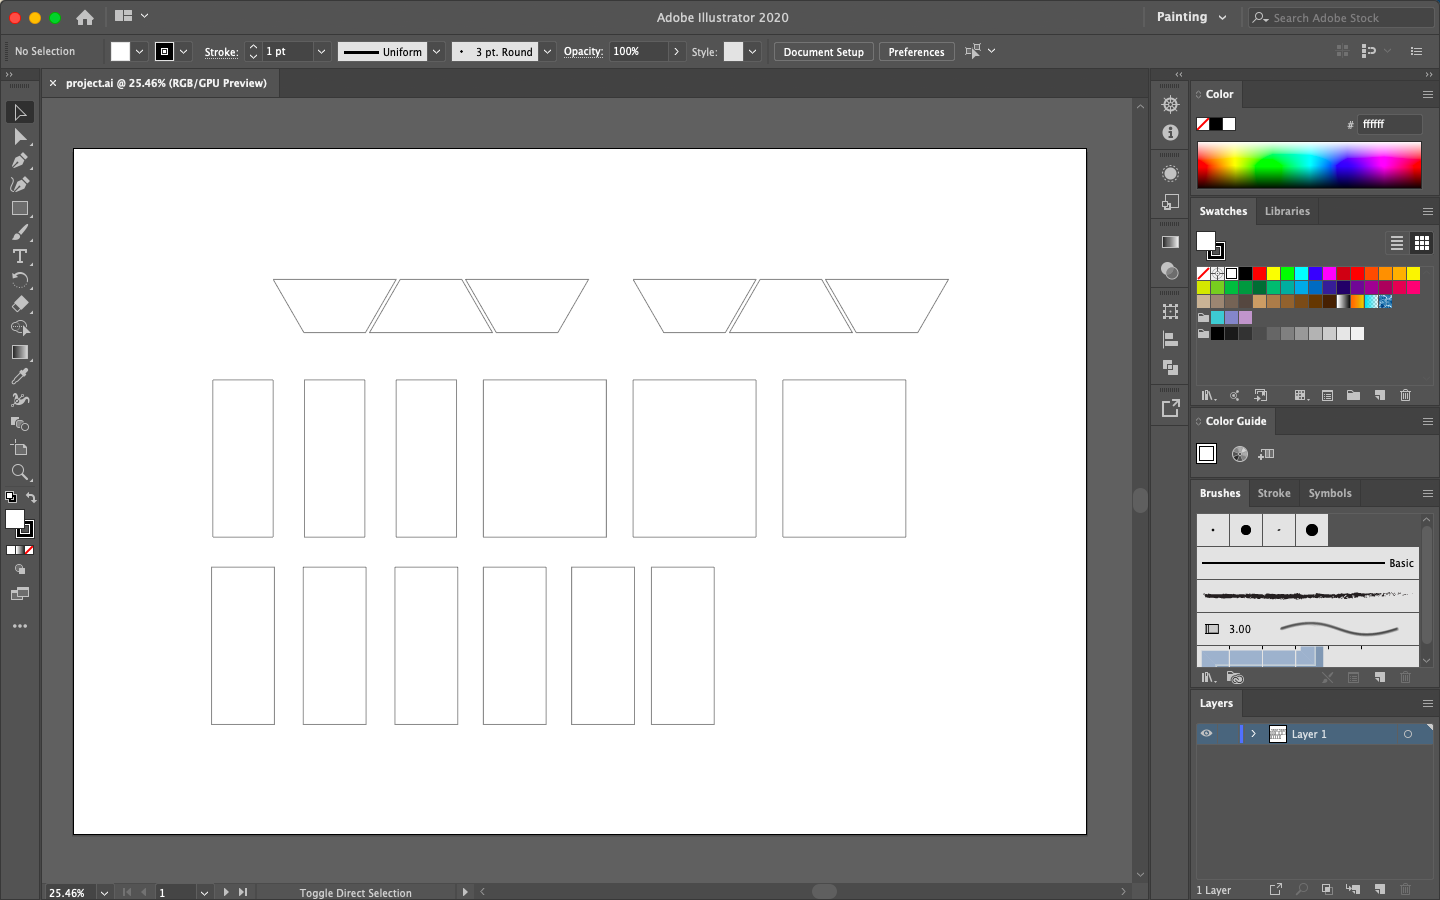
I started off with a basic sketch of the project on paper. The sketch shows the front and back view. I then drew the components on Adobe Illustrator to see the shapes of each panel.

I then did the 3D design on fusion 360 and added material and appearance to the modules.
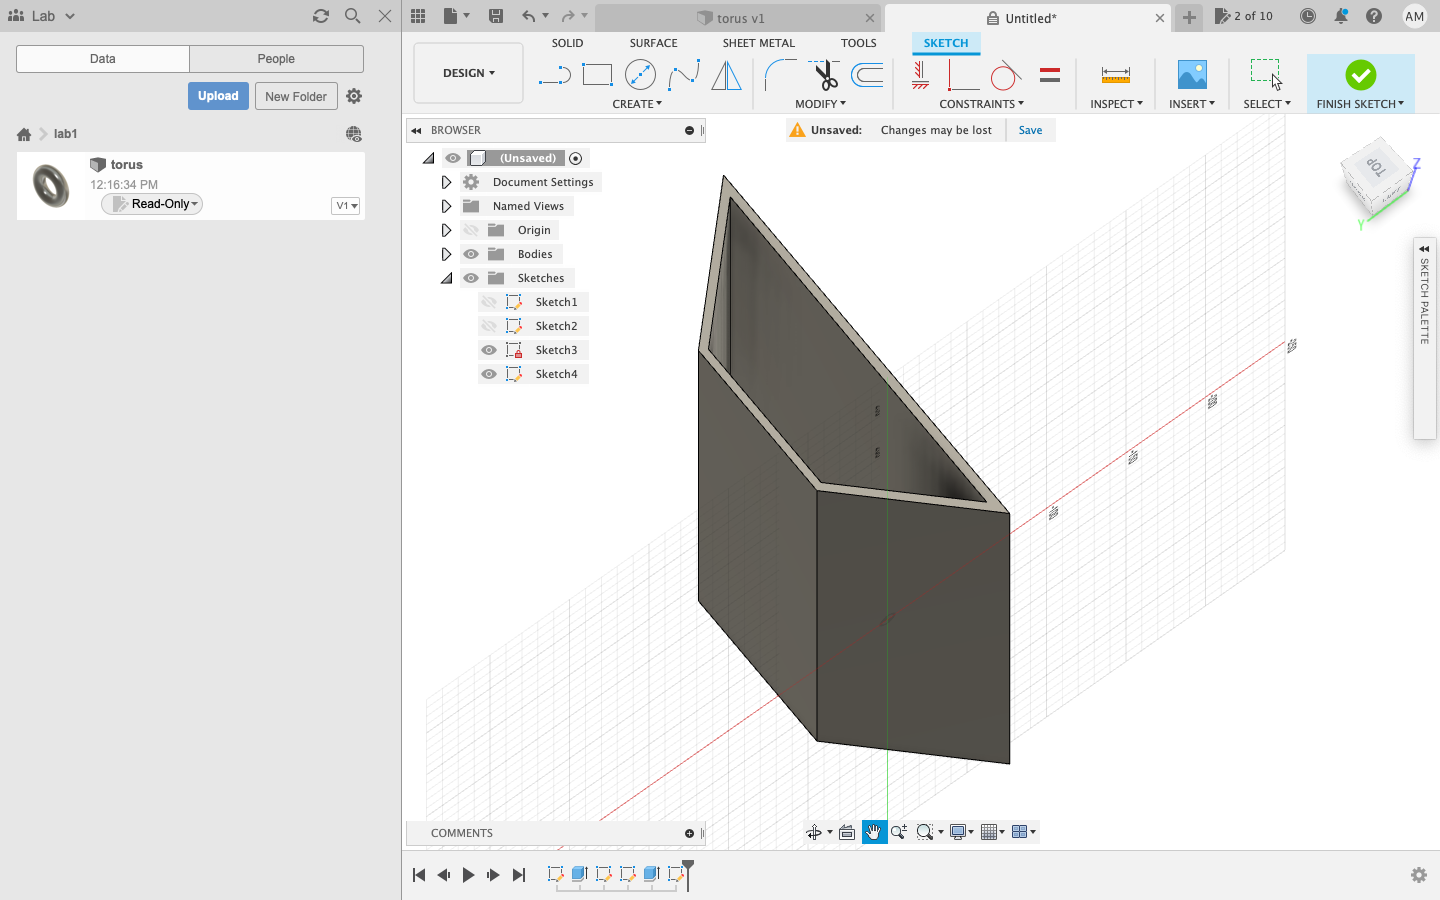
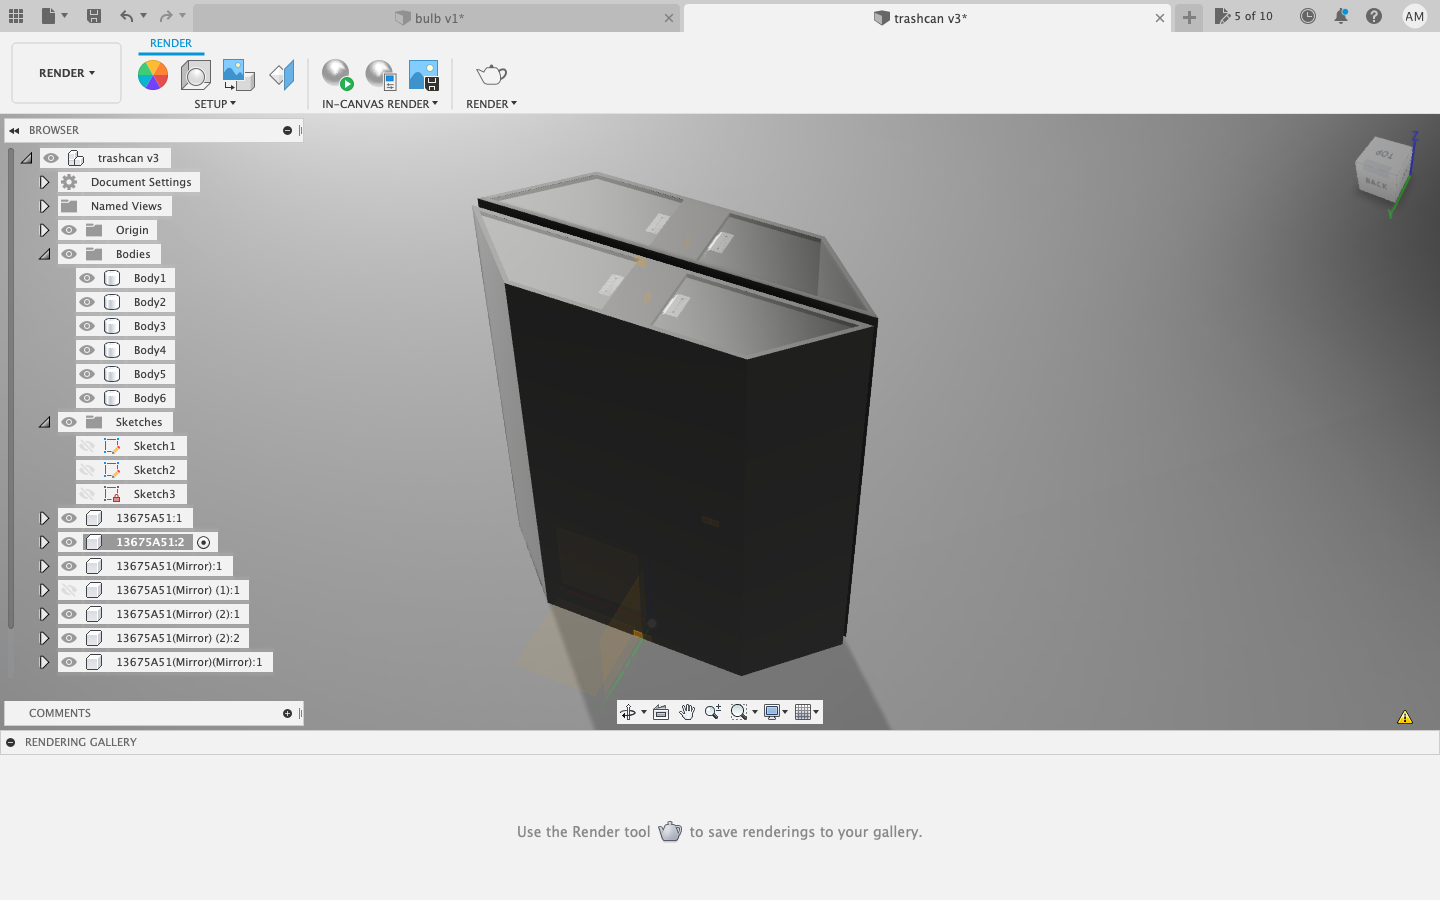
I had an idea of how to execute the design and the concept of modularity within the project. Now it was time to go ahead with the technicalities.
Electronics
Output and Input
As mentioned earlier, I am using a servo motor for output and ultrasonic sensor for input. I have previously experimented with a number of servo motors. You can see the documentation on Output week documentation
For input, I used an ultrasonic sensor. An ultrasonic sensor is an electronic device that measures the distance of a target object by emitting ultrasonic sound waves, and converts the reflected sound into an electrical signal. Ultrasonic waves travel faster than the speed of audible sound (i.e. the sound that humans can hear). Ultrasonic sensors have two main components: the transmitter (which emits the sound using piezoelectric crystals) and the receiver (which encounters the sound after it has travelled to and from the target). In order to calculate the distance between the sensor and the object, the sensor measures the time it takes between the emission of the sound by the transmitter to its contact with the receiver. The formula for this calculation is D = ½ T x C (where D is the distance, T is the time, and C is the speed of sound ~ 343 meters/second).
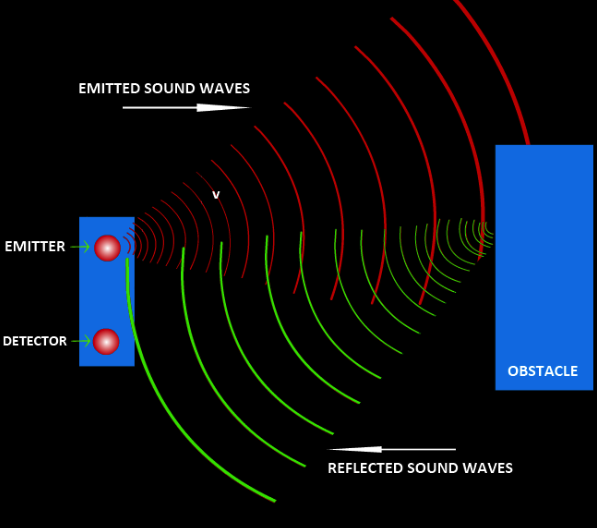
I am using the HC-SR04 ultrasonic sensor for this project, as that would be perfectly enough for the specific need.
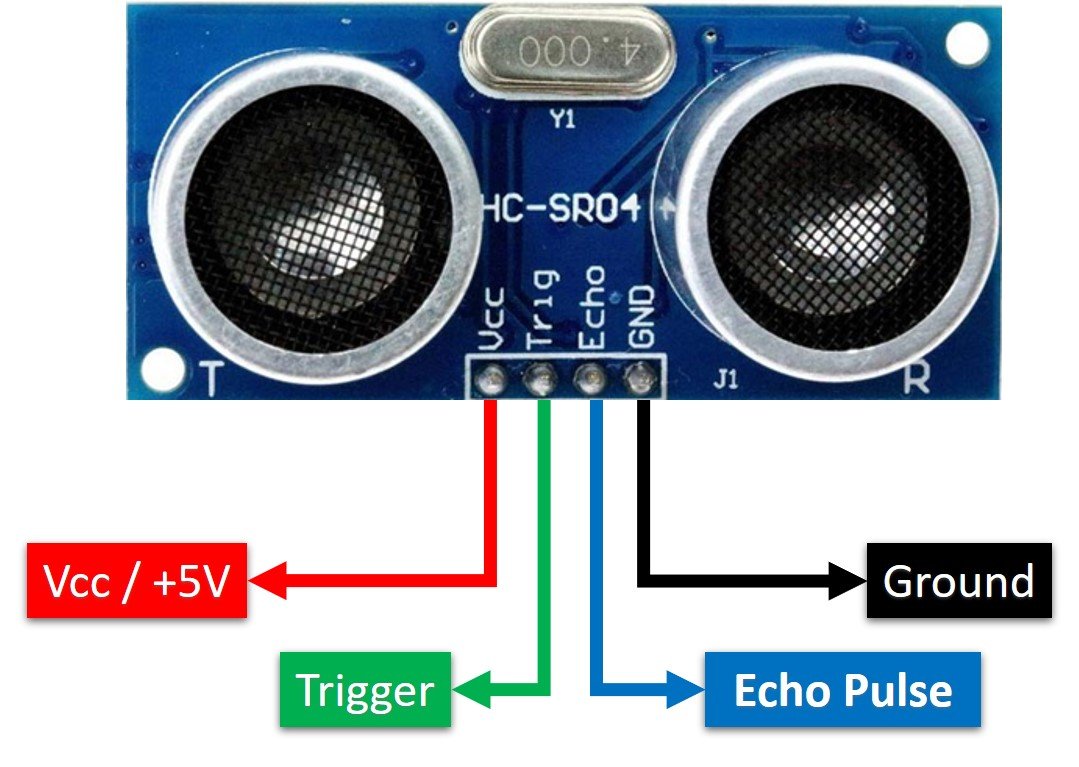
Components and connections

Now that I have decided what my input and output were, It was time to finalise the components. I made a list and collected the required components from the inventory after designing it on eagle. I decided to go ahead and draw the rest of the circuit. I used Autodesk Eagle to draw the schematic and the board for the circuit while parelelly figuring out what all components to use on the circuit.
For the micro controller, I decided to go with the ESP-8266. I opted for this because, I wish to integrate for functions to the circuit later. So, the micro-controller was chosen focusing on the scalability.
ESP 8266

The ESP8266 WiFi Module is a self contained SOC with integrated TCP/IP protocol stack that can give any micro-controller access to your WiFi network. The ESP8266 is capable of either hosting an application or offloading all Wi-Fi networking functions from another application processor. Each ESP8266 module comes pre-programmed with an AT command set firmware, meaning, you can simply hook this up to your Arduino device and get about as much WiFi-ability as a WiFi Shield offers (and that’s just out of the box)! The ESP8266 module is an extremely cost effective board with a huge, and ever growing, community.
Technical specs include:
Processor: L106 32-bit RISC microprocessor core based on the Tensilica Xtensa Diamond Standard 106Micro running at 80 MHz[5]
Memory:
32 KiB instruction RAM
32 KiB instruction cache RAM
80 KiB user-data RAM
16 KiB ETS system-data RAM
External QSPI flash: up to 16 MiB is supported (512 KiB to 4 MiB typically included)
IEEE 802.11 b/g/n Wi-Fi
Integrated TR switch, balun, LNA, power amplifier and matching network
WEP or WPA/WPA2 authentication, or open networks
16 GPIO pins
SPI
I²C (software implementation)[6]
I²S interfaces with DMA (sharing pins with GPIO)
UART on dedicated pins, plus a transmit-only UART can be enabled on GPIO2
10-bit ADC (successive approximation ADC)
For the rest of the connection, I used a number of components for my board. The schematic diagram of the circuit is shown below.
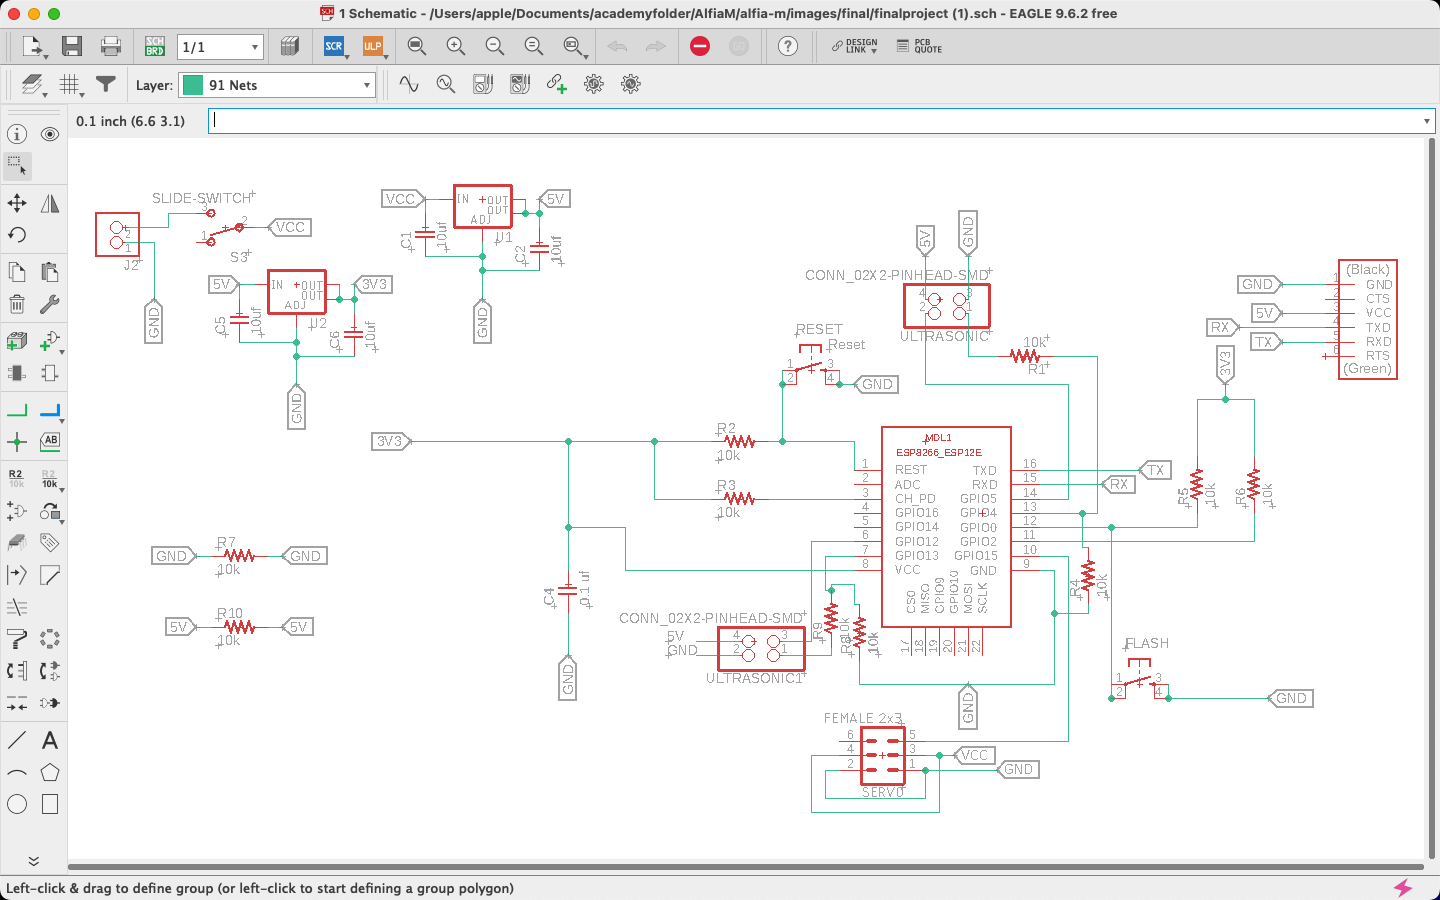
I then fixed all the connections and arranged the circuit on the board. The board design is shown below.
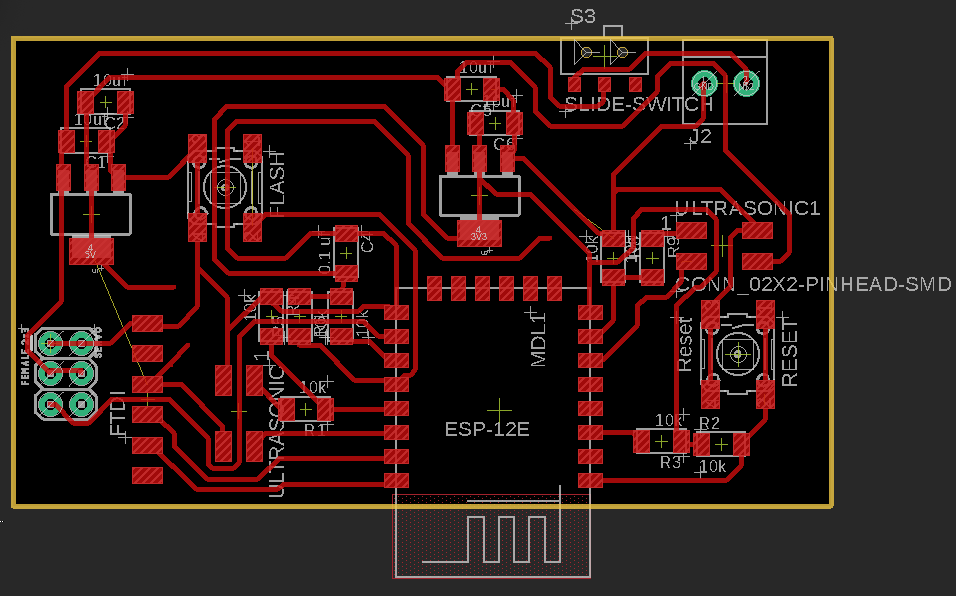
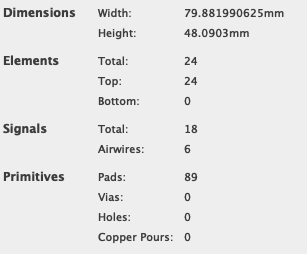
Now that the design has been completed, it was time to mill the board and start the soldering. I checked the size and design rules before milling that board. The dimensions were as follows:
Machining
It was now time to mill the board. I used the Modella like we did previously.
I fixed the machine and changed the drill bit to the cut bit in order to mill the circuit.
I opened Mods and uploaded the file to it to mill. The details are as shown in the image

Soldering
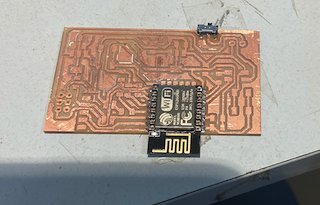
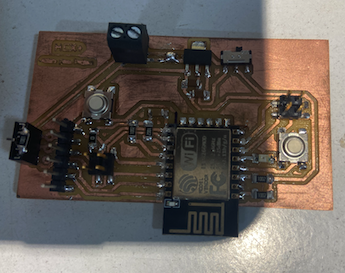
Once I was done with the milling, I started soldering the components. I started with the micro controller, which was ESP8266.
Programming
I wanted to test out the program first using arduino before programming my board to see if it works.
#include
#include
#define TRIGGER_PIN 12
#define ECHO_PIN 13
#define TRIG2 5
#define ECHO2 4
#define SERVO_PIN 15
float duration_us, distance_cm, depth_cm, duration_in;
Servo myservo;
const int DISTANCE_THRESHOLD = 10;
int servoNow = 180;
const char* ssid = "iPhone"; //WiFi Name
const char* password = "alfialfi"; // WiFi Password
void setup()
{
Serial.begin(74880);
pinMode(TRIG2, OUTPUT);
pinMode(ECHO2, INPUT);
pinMode(TRIGGER_PIN, OUTPUT);
pinMode(ECHO_PIN, INPUT);
myservo.attach(SERVO_PIN);
myservo.write(180);
Serial.printf("Connecting to %s ", ssid);
WiFi.begin(ssid, password);
while (WiFi.status() != WL_CONNECTED)
{
delay(500);
Serial.print(".");
}
Serial.println(" CONNECTED");
}
void loop()
{
read_distance();
Serial.print (duration_us);
Serial.print (" ");
Serial.println (distance_cm);
Serial.println (duration_in);
Serial.println (depth_cm);
if (distance_cm <= DISTANCE_THRESHOLD)
{
moveTo(90);
delay(5000);
moveTo(180);
}
delay(500);
}
void moveTo(int angle)
{
int error = angle - servoNow;
int inc = (error > 0) ? 1 : -1;
for (int i = 0 ; i < abs(error); i++)
{
servoNow += inc;
myservo.write(servoNow);
delay(10);
}
}
void read_distance()
{
digitalWrite(TRIGGER_PIN, LOW);
delayMicroseconds(2);
digitalWrite(TRIGGER_PIN, HIGH);
delayMicroseconds(10);
digitalWrite(TRIGGER_PIN, LOW);
duration_us = pulseIn(ECHO_PIN, HIGH);
// calculate the distance
distance_cm = 0.017 * duration_us;
digitalWrite(TRIG2, LOW);
delayMicroseconds(2);
digitalWrite(TRIG2, HIGH);
delayMicroseconds(10);
digitalWrite(TRIG2, LOW);
duration_in = pulseIn(ECHO2, HIGH);
depth_cm = 0.017 * duration_in;
}
I then programmed the actual circuit.
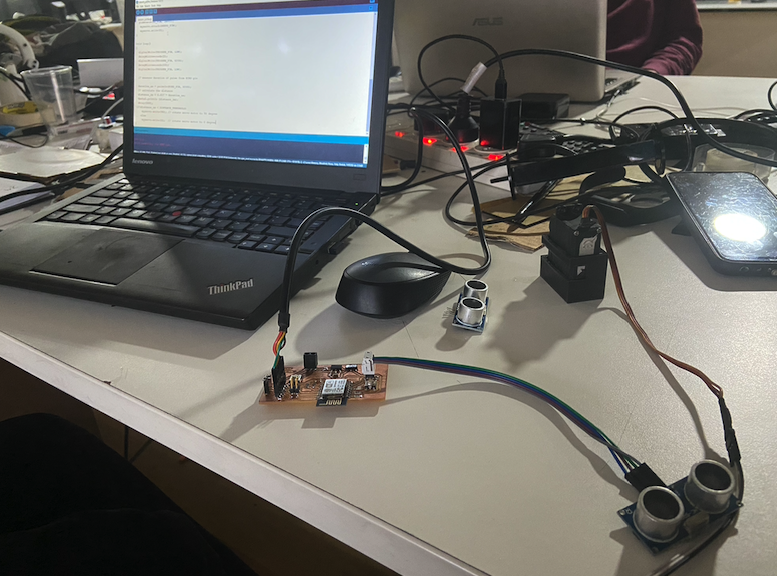
The source file of the code for the project is here
Testing
Once I finished with the circuit, and the coding, it was time to trouble shoot the circuit and test it. One important part of my circuit are batteries for the circuit. Firstly I wanted to test the voltages on the batteries and see if i need to charge the batteries for use.


Once I figured the voltage on the battery, I charged it, so that I can have enough voltage on my battery to power my circuit. While at this, I also checked the voltage across my circuit to see if everything was fine.
Fabrication
Once I was done with the basic functionalities of my project, I decided to proceed with the fabrication of the rest of the structure. I was troubled with a major issue here because the trashcan was supposed to be in a pentagonal fashion. The problem with this type of structuring is that the surface aria between the gluing portions are really small and it adhesives wouldnt seamlessly glue to the surfaces. Another option was to 3D print the box. But the size has to be large enough to fit in all the components.
This was the trickiest part, but since i was short on time, I decided to go ahead and find a solution asap. That is when I realized how silicone adhesive is used to seal glass and still make it look seamless. I decided to go ahead and use black silicone adhesive to seal up the small gap formed by the angling of the acrylic sheet. When doing this, it solves two of my problems while maintaining the size of the bin.
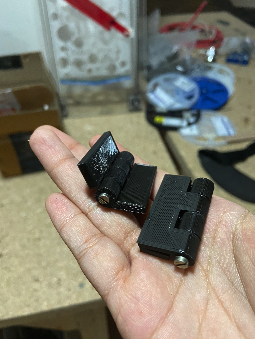
Another interesting struggle that i faced, was with the lid for the bin. The bin had to be closed perfectly and be controlled by the mechanism. I initially thought of using hinges and 3D printed a couple of types, but this was not practical as there was no gap between the lid and the bin to allow it to move with the hinge and the hinge was to be placed inside, as i wanted a seamless finish. I came up with a solution for this as well. I tried a few things and figured out that making the contact area flexible, I could make a perfect lid which seamless, as well as works perfectly. But for this, it took a lot of trial and error.
Laser Cutting
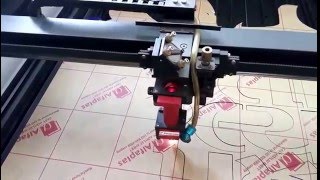
I started by laser cutting the panels. Once the panels were cut, I measured the sizes and checked the flexibility of the lid. The file is attached on the bottom of this page. I used fusion 360 to design the whole project. i did multiple test and trials to find the right lid. The images of the lid i designed is shown below.


The lid had to be easily lifted by the servo, while not hanging lower than the rim of the container. For this, I did multiple trials. A couple of the trials are shown in the videos below.
The above lid was too clumsy. This is because the distance between the two cuts are really small and the cut part does not actually hold the weight of the rest of the lid by it's own, without support.
This cut was perfect as the distance between the cut pieces. This helped to keep the lid in place, while still making it easy to open with the servo motor I had planned to use. So I made some changes to the design that I had done already and fixed it so as to match this flexibility.
3D Printing
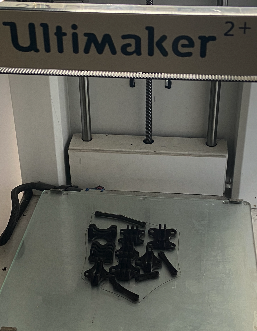
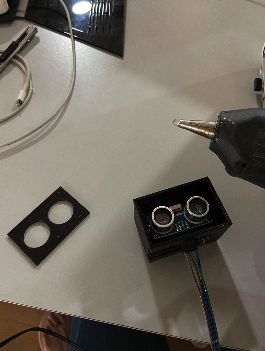
I 3D printed the hinges for trial, but ended up not using any, since I got a much better solution. Another set of parts that I 3D printed was the casing for the electronics circuit that was to be placed inside the trashcan.
Assembly
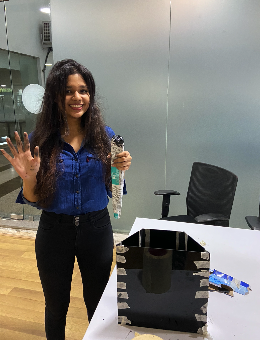
Now that I had all the components ready, I had to start assembling and gluing every part. As I mentioned earlier in the documentation, I used a silicone adhesive to put the laser cut part together. I first stuck the entire pieces together using masking tape to hold it all in place. I then placed masking tape onto the sides of the edges so as not to have the silicone stuck everywhere.I then used my fingers to take the silicone and applied it through the gap.
Once that was done, I applied silicone from the inside of the box and carefully on the outsides. Here is a picture of me all messy holding a tube of silicone adhesive.
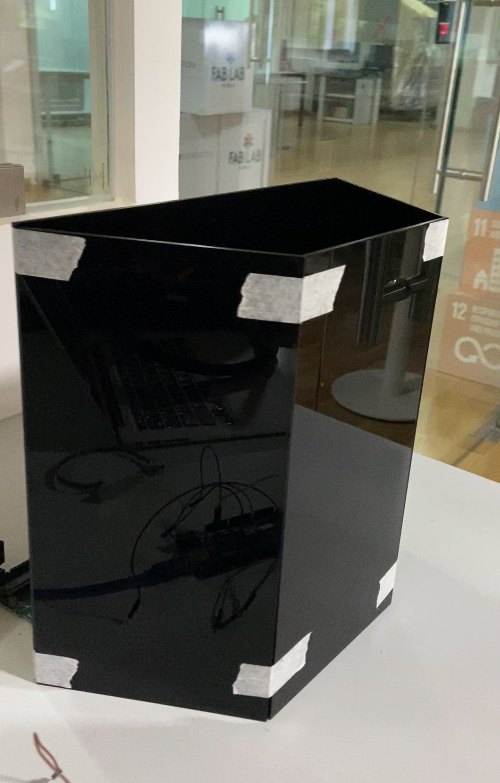
Once I was done with the entire assembly of the box, I decided to use the cardboard box I made during the wildcard week to use inside the bin, as a replaceable box.
The link to the documentation for the cardboard box is here
When that was done, I decided to start putting together the electronics inside the casing. I used superglue to do that as the casing was supposed to be permanently stuck to the walls of the bin and only the cardboard box was to be replaced from underneath.When that too was done with, I decided to test it again one last time to see if it was working. All the work I had done so far had come to this moment and I had my fingers crossed. I placed my hand over the sensor and the lid opened! VOILA! The project is working. I had also started coding a few more things, including using blynk to send messages from the trashcan to a smartphone. But as of now, this was enough for the submission and I am planning to do a spiral development for the product and advance further.
I also used the sticker I designed in week 3 and put it on the box. The final product looked like this
Dissemination Plan
Market Opportunities
The product can be made available in offices, schools, colleges and any buildings. The current products in the market does not incorporate all the features together while there are other features like automatic garbage disposal bag changing etc. Considering small spaces like individual office cabins and classrooms, such facilities are not required. So with all the required features, the trashcan would also be a good design upgrade to rooms. Mass production will further reduce the cost of individual trashcan making smart facilities available for affordable prices.
Future plans for the project include
-Controlling trashcan using virtual assistants like Google Assistant, Alexa, etc
-Screen display of filled trashcans in the janitor's room
-Test product in public places and check practicality
Licensing My Project
I decided to license it under the creative commons as it seemed perfect for my work. This licenses indicates that others can share and adapt my final project as long as they give appropriate credit and indicate if changes were made. And when they shape or adapt my work they should distribute my contributions under the same license. In addition, they may not use the material of my final project for commercial purposes. You can also easily create license by going to Creative Commons.
The license for my final project is shown below.
HEX+ by Alfia M is licensed under Attribution-NonCommercial 4.0 International
Submission
The final presentation video and slide that I presented are shown below.

What are the Implications?
The entire project was a huge learning experience for me. Developing,designing, fabricating, documenting, managing, programming, licensing, and presenting of the project not only helped me understand the methods and ways of working on a project professionally, but got me understanding the potential problems and issues I could face while working on an industrial project. Some conclusions I drew from the work i did and testing are the following:
-The lid is working as expected and there is no damage to the mechanism
- The electronics mechanism is working and the ultrasonic sensor is reading the motion and working perfectly in every try.
-The removable base made of cardboard is a perfect choice for recycling of trash.
- The communication system can be programmed to the board.
- THe electronics are perfectly sepereated from the trash collection and can be removed for programming further, making it easy for further changes.
-The project is scalable and cheap to produce because of the availability of the materials and cheap production cost.
Files
The source file of the code for the project is here
The source file of the schematic is here
The source file of the board is here
The .f3d file of the project is here
The .obj file of the project is here