DanDuino
Description
An easy to mill Arduino clone!
I will make a mill-able board that is compatible with the Arduino Uno and Adafruit Metro 328. This board will and will not have the following features
- ATMEGA 328P AVR 8-bit MCU (maybe a ATtiny3226 can be used in the future)
- Serial TTL programming header for a USB to Serial converter cable (FTDI)
- No USB
- FTDI Programming Header for FabTinyISP boards made in Fab Academy as a newb project
- Surface mount dip socket (oh the horror, Neil!) for easy chip replacement and Troubleshooting
- 5VDC only (no 3vdc! to KIS)
- Power LED
- SCK LED 9.
Credits
Based on Adafruit METRO 328 By: Limor Fried & KTOWN
My DanDuino Project Plan
- Design the board
- Mill the board
- Stuff the board
- Test and trouble shoot the board
- Program the board with FluidNC
- Configure FluidNC using my Foam Crawler GRBL documentation as a reference.
- Run test g-Code
Grbl Firmware
Compiling
Compiling Grbl Via the Arduino IDE (All Platforms): Recommended for all users.
Above did not work trying this:
For Linux: Last updated: 2012-03-02 by speters. (Tested on ???)
Make sure you have the prerequisite libraries installed: avr-gcc and arduino by running:
sudo aptitude install arduino
At a terminal prompt, change directories to where the grbl source code located. Then type the following to compile and build the firmware:
make clean
make grbl.hex
The above did not throw and errors and created a grbl.hex file in the grbl-master folder.
Next I ran these commands:
lsusb
Which found my Arduino at: Bus 003 Device 006: ID 10c4:ea60 Silicon Labs CP210x UART Bridge
dmesg
Which returned a shit ton of data lines.
So I used the terminal search function and looked for “CP210x” and this came up:
[ 7644.830468] usb 3-2.4: cp210x converter now attached to ttyUSB0
So then I tried uploading the hex file to the Arduino:
avrdude -v -patmega328p -Uflash:w:grbl_v0_9j_atmega328p_16mhz_115200.hex:i -carduino -b 57600 -P /dev/ttyUSB0
sudo apt update
java –version returned
Error: Could not find or load main class –version
Caused by: java.lang.ClassNotFoundException: –version
So I need to install java
sudo apt install default-jdk
The I did these steps:
NOTE: Before starting, delete prior Grbl library installations from the Arduino IDE. Otherwise, you’ll have compiling issues! On a Mac, Arduino libraries are located in ~/Documents/Arduino/libraries/. On Windows, it’s in My Documents\Arduino\libraries. On Linux (Ubuntu), it’s in /usr/share/arduino/libraries If you cannot find the grbl library in order to delete and reinstall, check the sketchbook location in the IDE via file -> preferences and view /sketchbook/location/path at the top.
Download the Grbl source code. Click on the <>Code Tab Click the clonedownload button on the Grbl home page. Click the Download ZIP Unzip the download and you’ll have a folder called grbl-XXX, where XXX is the release version. Launch the Arduino IDE Make sure you are using the most recent version of the Arduino IDE! Load the grbl folder into the Arduino IDE as a Library. Click the Sketch drop-down menu, navigate to Include Library and select Add .ZIP Library. The Add .ZIP Library command supports both a .ZIP file or a folder. In our case, there is no .ZIP file. You can confirm that the library has been added. Click the Sketch drop-down menu again, navigate to Include Library, then scroll to the bottom of the list where you should see grbl. IMPORTANT: Select the grbl folder inside the grbl-XXX folder, which only contains the source files and an example directory. If you accidentally select the .zip file or the wrong folder, you will need to navigate to your Arduino library, delete the mistake, and re-do Step 3. Open the GrblUpload Arduino example. Click the File down-down menu, navigate to Examples->Grbl, and select GrblUpload. Do not alter this example in any way! Grbl does not use any Arduino code. Altering this example may cause the Arduino IDE to reference Arduino code and compiling will fail. Compile and upload Grbl to your Arduino. Connect your Arduino Uno to your computer. Make sure your board is set to the Arduino Uno in the Tool->Board menu and the serial port is selected correctly in Tool->Serial Port. (There are some controller boards on ebay that have the Arduino Pro bootloader on it, if you get error messages like “avrdude: stk500_getsync() attempt n of 10: not in sync: resp=0x20” then choose another board, try Arudino Pro/Pro Mini) Click the Upload, and Grbl should compile and flash to your Arduino! (Flashing with a programmer also works by using the Upload Using Programmer menu command.)
Via the Arduino IDE (All Platforms): Recommended for all users.
Amd the GRBL Library installed in the Arduino IDE!
For Ubuntu: Last updated: 2021-05-08 by ooxi, based upon the work of EliteEng.
The following has been tested on Ubuntu 20.04 and an Arduino Uno. It will compile grbl from source code and flash it to your Arduino. It should in theory work with other flavours of Debian too.
On a brand new Ubuntu box, the install process goes like this:
install the avr build tools by running:
sudo apt-get install avrdude avr-libc gcc-avr make unzip
Compile the GRBL source code and create the firmware file:
cd /home ## or a location you want to download the source code to.
‘wget https://github.com/gnea/grbl/archive/master.zipunzip master.zipcd grbl-mastersudo make grbl.hexTo flash the firmware to your Arduino Uno, plug the Arduino in using the USB cable (Confirm that the device is located at /dev/ttyACM0 and run the following command:sudo PROGRAMMER=”-c arduino -P /dev/ttyACM0” make flash`
That’s it, the firmware should now be installed on your Arduino.
KiCad design
Rivet Vias
I once again used Favorit Rivets as vias to make a double sided board. I used 1.0mm ID rivets:
| ID | OD +/- 0.03 mm | Drill ⌀ | Shaft L +/- 0.10 mm | Head ⌀ +/- 0.15mm | wall d +/- 10% |
|---|---|---|---|---|---|
| 1.0mm | 1.4mm | 1.5mm | 2.5mm | 2.2mm | 0.2mm |
Each Rivet costs:
| Order Code | Description | Price per 1k | Price Each |
|---|---|---|---|
| 700-028-2 | Favorit RIVETS 1.0mm ID | $52.50 | 0.525¢ |
I’m using 6 vias, so total cost is $3.15
CAM
I once again prepared my boards for CAM, by exporting SVG files from KiCad via File, Export, SVG… then selecting Copper layers: F.Cu, B.Cu, Edge.Cuts and then clicking Export. This exports a file called *-brg.svg with * being your KiCad project name. In my case 3PakCNC-brd.svg
Next cleaned them up in Inkscape. I used these steps as I have documented previously: clean-traces-in-inkscape.
The final SVG works well on many levels, including the fact that it can be viewed directly here and simply left click save as and you can use the file too!
Milling
Feed Rates
Feed Rate For 0.0100” (0.25mm) dia Tapered Stub End Mill The calculated feed rate for my 0.0100” (0.25mm) dia Tapered Stub End Mill is:
0.0100” (0.25mm) dia - multiply your peak spindle RPM by 0.00328 with 20 IPM (500 mm/min) z-axis plunge rate.
12000 * 0.00328 = 40 IPM or 1000 mm/min
So Cut Settings for Easel are:
Manual: Feed rate = 1000 mm/min Plunge rate = 500 mm/min Depth per pass = 0.3 mm All other settings as default.
Stuffing
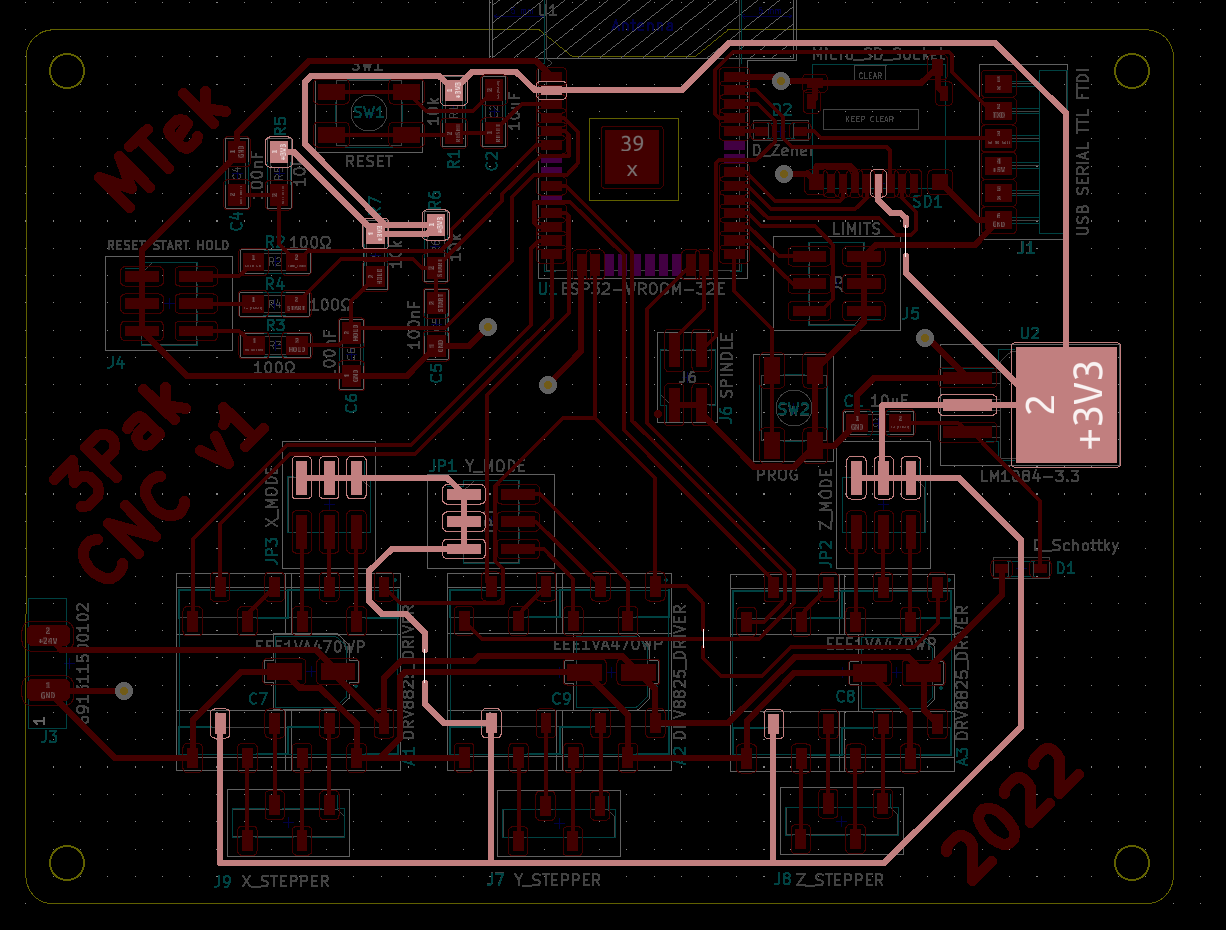
Interactive BOM
I used the BOM below to hand pick and place my components.

Above: Click image to access the HTML Interactive BOM (iBOM) generated by KiCad.

I printed the iBOM and out some clear double stick tape on it. Then I selected the components from my Stanley bins and my Digi-Key order and stuck them in the iBOM
Soldering
Then soldered everything on my board.
Testing
 I used the KiCad “Net Inspector” to highlight individual nets, for trouble shooting. I used my USB to serial programmer and plugged it into the FTDI header on my board.
Next I checked my board for shorts with a multi-meter. There were no shorts.
I jumped the 5vdc pin to the 3.3vdc regulator to power the ESP32 during programming. I need to add a jumper to switch between 12-27vdc and 5vdc in the future.
I powered up the FTDI cable with my USB hub and verified that 5v was present, they were and the measurement was 5.xx vdc. I also felt the chips on the board to see if they were not hot, indicating a short or other issue.
Notes
None so far.