 Erwin Kooi
01 - Project management
This week focusses on setting up the tools for project management and project documentation. This will be the foundation to complete one of this week’s assignments, where you have to publish a plan/sketch of a potential final project.
The assignments for this week are:
- Explore and use website development tools
- Identify and utilise version control protocols
And as a sub-assignment:
- Sign the student agreement and commit it to your repository.
- I work with git for version control in my personal projects
- I have recently migrated my personal site ewak.net from WordPress to a static site generator Hugo
- I want to learn if there are new tips and tricks for optimizing my current git workflow.
- I want to get fluent with MarkDown, so it will not distract me in later weeks.
- If time permits, I want to work on the theme for this website.
- My basic git workflow is sound. I will not change that.
- Markdown is really powerful for writing portable documentation.
- Theming in Hugo is very flexible, extensive and can lead you down a rabbit hole fast.
This documentation site on FabAcademy’s Gitlab will serve as the project where I want to update my skils on git, markdown and to develop a structure that I can use for coming weeks. This page is also setup using that template. Sections can be changed or removed, but this will provide me a basic set of questions that will help me to document my progress.
My git workflow is as follows:

My master-branch contains my published files in a known-good state. CAD drawings, source code, documentation. My development-branch contains my work-in-progress in a somewhat known-good state (but not completed yet). My feature-branches contain experiments and try-outs. They can be scrapped if the experiment fails and I go back to the development branch. This will allow me to work on separate features at the same time by switching to the relevant branch.
An example with the cad design of a coffee-mug:
git init coffee-mug # initialize git repository
cd coffee-mug # go into the repository
# create an empty cad file and call it coffee-mug.cad
git add coffee-mug.cad # add the cad file to the repository
git commit -m "Initial commit" # commit the empty file
git checkout -b development # create (-b) and checkout the development branch
git checkout -b mug development # create (-b) and checkout the mug branch and make it a child of the development branch
# create the model for a cup and save the cad file
git commit -m "Created plain mug" # commit the changes
git checkout development # switch to the development branch
git merge mug --no-ff # merge the modified cad file into the develoment branch, keeping the reference (--no-ff) to the mug branch
git branch -d mug # delete (-d) the mug branch
git checkout -b ear development # create (-b) and checkout the ear branch and make it a child of the development branch
# modify the model to contain an ear
git commit -m "Added ear to mug" # commit the changes
git checkout development # switch to the development branch
git merge ear --no-ff # merge the modified cad file into the develoment branch, keeping the reference (--no-ff) to the mug branch
git branch -d ear # delete (-d) the mug branch
git checkout master # switch to the master branch
git merge development --no-ff # merge the modified cad file into the master branch, keeping the reference (--no-ff) to the development branch
This workflow was derived from a detailed article on the git site that can be found here.
A great but very detailed view of this workflow can be found here.
I tested a number of themes and pushed them to the Gitlab repo. This does bad things to the repo size on the server, as all changes are stored in the git index. I reverted back to the original commit that resets the repo to the state FabAcademy set it to in the beginning.
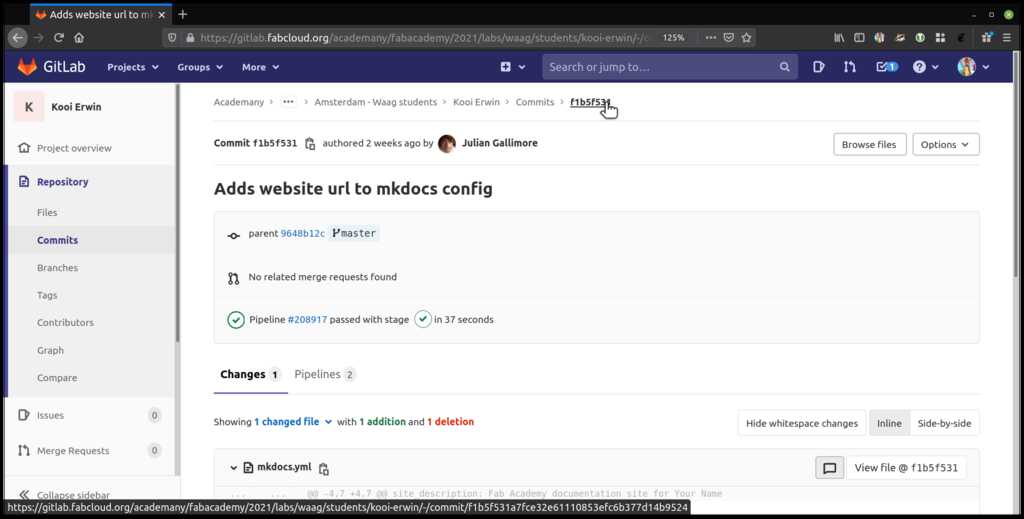
First, I needed to find the ID of the last-known-good commit. This can be found in Gitlab by looking at the commits tab.
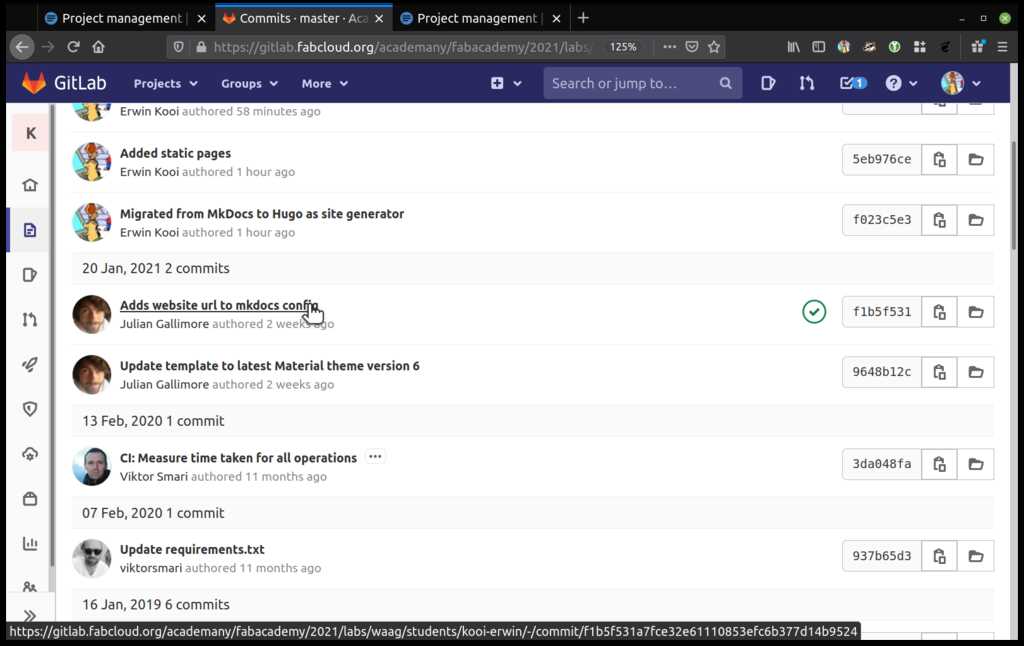
The last commit not made by my is f1b5f531 and it is made by Julian Gallimore. (The full ID is f1b5f531a7fce32e61110853efc6b377d14b9524, but the first eight characters are enough.)
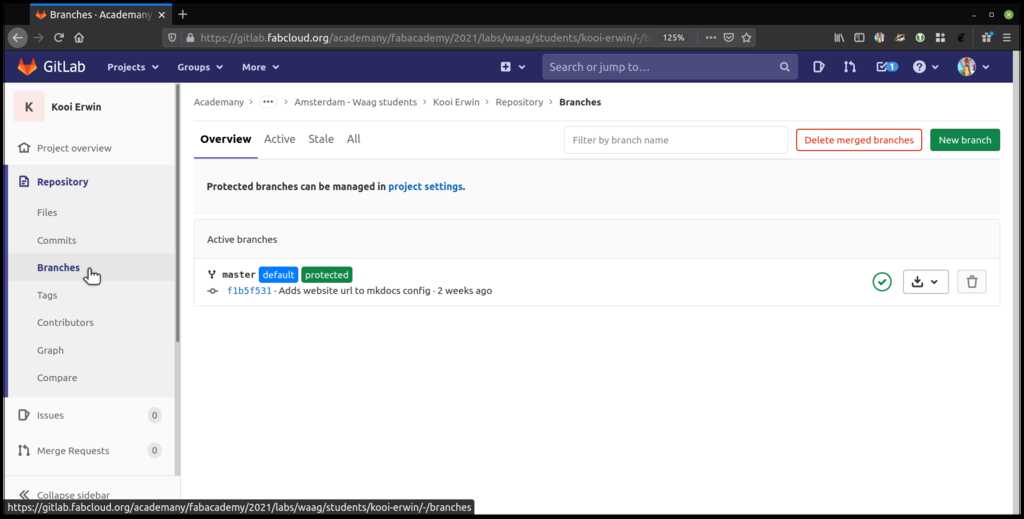
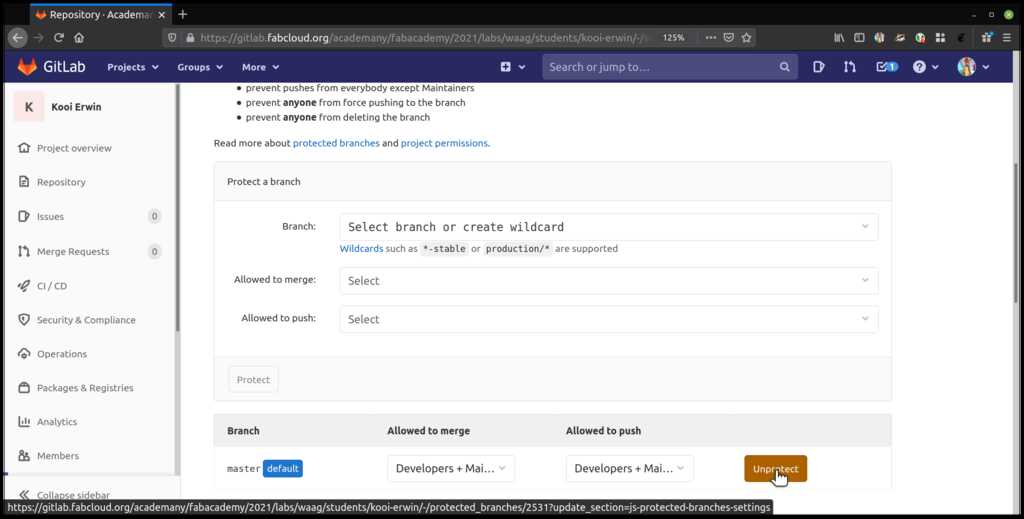
The master-branch in the Gitlab repo is protected, so developers (me) can only work with merges and not accidentally erase things.
As displayed on the screenshot above, the unprotecting can be done in the “project settings”.
WARNING
Make a copy of the directory to save your current work or you will loose it.
On my local repo, I executed the git reset command:
git reset --hard <commit id found in step 1>
#git reset --hard f1b5f531
The local directory now only contains the files I received from FabAcadamy.
The now unprotected Gitlab repo must also be set to this state.
DANGER
This is your point of no return.
git push --force
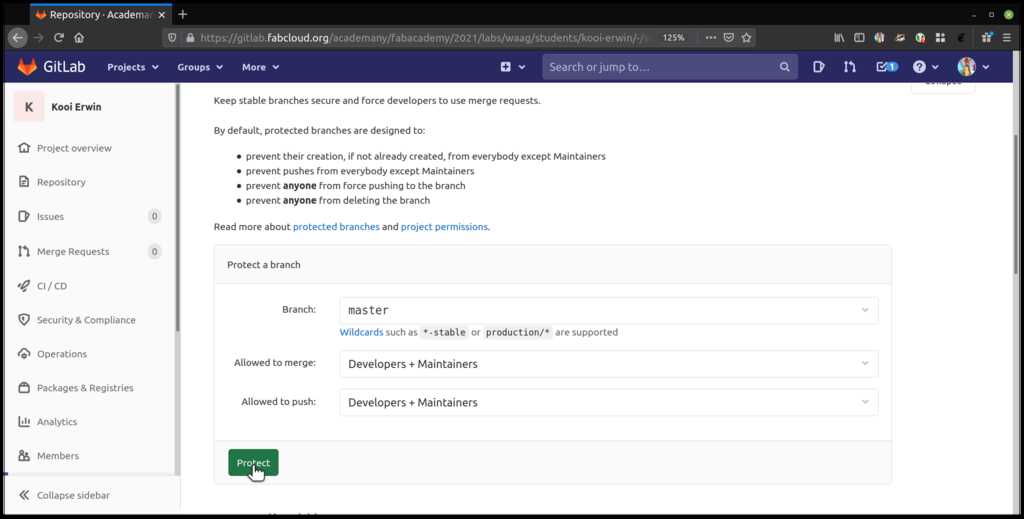
Having a protected branch is a good thing, so I want to reprotect it.
The unprotecting was done in the “project settings” tab, the protecting is also done in this tab.
Select which branch (master), select who can merge (Developers + Maintainers) and select who can push (Developers + Maintainers).
Now you can protect your branch.
CONGRATULATIONS
You are now back at square one.
Markdown provides a very portable way of writing documentation. If you have some experience in working with markup languages (like HTML), then this is very easy to learn and understand.
| Description | Markdown | HTML |
|---|---|---|
| heading | # | <h1> |
| heading | ## | <h2> |
| link | [title](url) | <href> |
| image |  | <img> |
| bold | ** | <b> or <strong> |
| italic | * | <i> or <em> |
| line | ___ | <hr> |
| code | ``` | not applicable |
For my personal site, i recently switched from a dynamic WordPress site to a static Hugo site. This was mainly for security reasons, as it is one code base less to keep up to date.
I experimented with both Jekyll and Hugo. Jekyll is written in the ruby programming language and can be extended with modules called gems. Hugo is written in the Go programming language. The installation of Jekyll introduced quite a challenge in dependencies, different ways of software deployments (the gems) and left a lot of undefined software on my system. Hugo was a self-contained binary and extentions (like themes) can be added to the site, instead of the system.
This made me select Hugo as my favorite generator.
My fellow student Nadieh Bremer already started with a Hugo site and she found the correct configuration to get the Gitlab build pipeline to generate a Hugo site.
image: registry.gitlab.com/pages/hugo/hugo_extended

variables:
  GIT_SUBMODULE_STRATEGY: recursive

test:
  script:
  - hugo
  except:
  - master

pages:
  script:
    - hugo -F
  artifacts:
    paths:
    - public
  only:
  - master
Now I can focus on a report structure.
My weekly reports should be concise and provide reviewers and interested people an overview of my progress that week. It contains three main sections
- Summary
- What is the assignment
- What do I think I already know
- What do I want to learn
- What did I learn
- Project
- Project specific sections, related to the things I want to learn
- Reflections
- What went right
- What went wrong and how did I fix it
- What would I do differently next time
Some weeks will comprise of very different topics, like this week. Then the topics will be organized in separate pages. The Hugo static site generator facilitates this by automatically generating a table of contents depending on the file structure. The file structure of this site will be like:
content/
+-- _index.md
+-- about/
|   +-- index.md
|   +-- <page-specific files>
+-- report/
    +-- week_00/
    |   +-- index.md
    |   +-- <report-specific files>
    +-- week_01/
    |   +-- index.md
    |   +-- <report-specific files>
    +-- week_02/
    |   +-- index.md
    |   +-- <report-specific files>
    +-- ...
The _index.md (as opposite to index.md) signals the site generator that the directory should be used in the table of contents, but there is no content.
The Hugo static site generator does not come with a default theme, but there is an extensive set available on the theme site. As a challenge, I started creating my own from scratch. The Hugo documentation provides a ton of information on the working of the generator. Some of the most important concepts are the templates, partials and layouts.
A page is generated from a layout. A layout is a template of html code with placeholders for content. A layout can be created from a number of partials* (linked sub-html files).
<!DOCTYPE html>
<html lang="{{ .Site.Language.Lang }}">
<head>
    {{ partial "head" . }}
</head>
<body>
    <div>
        {{ partial "site-header" }}
        <main>
            <aside>
                {{ partial "menu" . }}
            </aside>
            <div>
                {{ template "main" . }}
                {{ partial "page-footer" . }}
            </div>
        </main>
        {{ partial "site-footer" . }}
    </div>
</body>
</html>
All html tags can be modified using css classes like <aside class="nav">.
For each type of content like a page, a blog post or a weekly report, a specific template can be created. A page can be very plain, while a blog post contains an author, date of publishing and pre-defined frontmatter.
Frontmatter is the snippet of text that is place at the top of the content to identify its properties. This is the frontmatter for this page:
---
type: report
title: Principles and practices
author: Erwin Kooi
date: 2021-01-31
lastmod: 2021-02-03
draft: false
image: header.png
categories:
    - documentation
    - project management
    - project setup
tags:
    - git
    - version control
    - hugo
    - markdown
weight: 10
geekdocDescription:
geekdocBreadcrumb: false
geekdocFlatSection: true
geekdocHidden: false
geekdocToC:
geekdocHiddenTocTree: false
geekdocCollapseSection: false
geekdocAnchor: true
---
I did not find enough time to brush up on CSS to get an awesome theme and have all placements work all the time on all devices. I therefor selected Geekdoc as base theme and added a report-template for my weekly reports. This template has been checked in with the other content of this site.
At this moment, some frontmatter parameters like image: are not used in the template, but I plan on extending the template during the following weeks when my mind is looking for a distraction.
A dedicated page to the FabAcademy Student Agreement has been created and uploaded to the repository to indicate my signing of this agreement.
I live in Microsoft Visual Studio Code.
I have tried a lot of different editors in my life (from vi (no emacs), notepad and atom to the full blown Microsoft Visual Studio). VS Code really clicked for me as it is cross-platform, light-weight(-ish) with a clean UI and very extensible with plugins.
The plugins I have currently installed are
- ansible
- c/c++ linter
- code spell check
- esphome
- git graph
- json
- platformio
- python
This allows me to quickly write notes while keeping an eye on the directory structure. The integrated git functions will notify me if there are files to be committed (although I do most git commands by hand).
A special note on the excellent PlatformIO programming framework. This saves so much time and handles a lot of the low-level commands for specific frameworks, debugging and flashing that I have a monthly donation set up.
In order to quickly resize images and photos to a workable (and checkin-able) size, I wrote a small bash script that invokes the ImageMmagick utility. And called it fac
#!/bin/bash

if [ -z "$1" ]; then
  echo "Usage: $0 <file selector>"
  exit 1
fi

for FILE in `ls "$@"`; do
  NAME=`echo "${FILE}" | awk '{ print $1 }' FS=.`
  EXT=`echo $FILE | awk '{ print $2 }' FS=.`
  magick $NAME.$EXT -resize 1024x -strip -quality 50 -background white -flatten $NAME.jpg
done
this will take all files specified on the command line, resize images to a with of 1024 pixels, remove exif data, compress the image and save it as a .jpg file.
Example:
fac *.png will take all .png files in the directory, process them and store them with the same name as .jpg.
fac *.png *.bmp will take all .png and .bmp files in the directory, process them and store them with the same name as .jpg.
If no command line parameter is specified, an error is shown.
This week we also make a start with the first ideas and sketches of possible final projects. Selecting a direction for a final project will greatly help absorb the material in the coming weeks as it can be related to an end-goal.
I already have some directions I would like to exploreFinal Project
- Facial recognition for my horses
- This can be used for a food-dispenser.
- It is non-invasive.
- Strong on electronics
- useful
- add-ons needed in the future
- A creative time-displaying thingy
- a clock is always useful
- can be very creative
- A self-leveling picture frame
- OCD-pleasing
- only operational once (and for demo’s)
- A wooden puzzle box with storyline
- can be very creative
- provides good integration for different techniques
- A bike tracker using LoRaWAN
- link to home automation
- lots of small components needed (hard to produce yourself)
- A midi-controlled physical device (laserharp?)
- can be very creative
- Something with a vertical linear actuator
- awesome technology
- not much online documentation
- patented?
I will work out sketches for the wooden puzzle box, as it provides the most opportunities for learning different techniques and different creative styles.
The different side-panels can contain stand-alone puzzles that feed the overall storyline. This helps to divide the project into small sub-projects. Each panel can be made using a different technique (electronic, mechanical, optical, …), while some generic techniques need to be developed for the entire box (locking mechanism for panels).
And most importantly: It is fun!
Inspiration for this kind of puzzle boxes can be found on de Youtube channel of Chris Ramsey.

There are six faces on a box. The bottom will not be used for a puzzle. The top will open automatically when all puzzles have been solved and reveal the treasure. That leaves four sides for puzzles.
Possible themes are “old lab equimment”, “old radio equipment” or “steampunk”. This is to be decided and will be influenced by the storyline.
Puzzles will be a mix of electronic and mechanical puzzles. Some ideas:
- Play “Simon says” by poking a finger in the correct hole in the correct sequence
- Guess the PIN on a numeric keypad and display
- Ignore the countdown timer and speaker to increase the time-pressure
- Open a locked drawer by solving a puzzle (and reveal a key)
- Set the correct level in wWater reservoirs using valves
- Enter the correct combination on a mechanical combination lock
- Enter the correct combination on an electronic combination lock (with panel meter and rotary encoder)
- Place wires in the correct color sequence
- …
This was the first week with assignments and deadlines. Even though we cannot meet IRL, the Mattermost chat server and Jitsi conference server provide quick and informal communication channels to the other students and help in quickly getting directions in finding an answer to issues.
Preparing the weekly report structure and breaking the assignments in chunks to fit this structure helps allotting the proper amount of time per chunk. Allowing some slack at the end helps in recovering from issues that arise during the execution.
When including plain HTML in Markdown, the tags must be closed. So when including an <img src=""> tag,
it needs to be closed by a closing slash like <img src="" />
When I switched from my own theme to Geekdoc, the FabAcademy hugo build pipeline broke. It turns out that Geekdoc tries to calculate the size of the git repository and publish it. However, the pipeline is using a Hugo docker container that does not have git installed. Delving into the theme’s scripts I found the references to git and disabled them. This restored the build pipeline.
Resolving this took quite some time, because the error message Git not in $PATH set me on the wrong foot. The build script checks out the master branch using git, so you think git is there. But the build script then spins up a docker container with the static site generator and that container does not have git installed. So the container correctly reports that git is not available and the build fails.
I would test more themes locally before committing them to the master branch and pushing them to the FabAcademy Gitlab server. This will reduce the size of the repository.