WEEK 02
- 1.-Introduction
- 2.-Blender
- 3.-Solidworks
- 4.-Illustrator
- 5.-GIMP
- 6.-Inkscape
- 7.- My experience and conclusions from week 2
- Files
Computer aided design
3D
2D
Download
Fab-Weeks
Are you looking for my assignments?
Links and notes
more information:
Week 02: Computer aided design
1.-Introduction:
This week I worked with 2D and 3D design, to practice the techniques,
options and software to create the designs of my final project.
I made some examples for my initial 3D parts. I converted raster images
into vector images and did renderings and animations. All this using different software.
My week journal:

2.-Blender:
Modeling with Blender:
Blender is a free and open-source 3D computer graphics software toolset used for creating animated films, visual effects, art, 3D printed models, motion graphics, interactive 3D applications, virtual reality, and computer games.

to install Blender you need go to the website.
www.blender.org

Select your version of OS and install.

This is the last version at this moment, 2.9 version, I started working in 2.8 version because I had installed it on my computer.
But, the final render I worked it in the new version to test.
In my first practice whit blender I deleted the initial square and I put a plane to do a floor. In the add primitive menu,
there is different options.

To do click in an object you can place it in the scenery. In the transform menu you can change the position, the size, the rotation, etc.

I added more primitives in deferments positions.

Later, I added two kinds of textures in the primitives.

One kind with emissivity emissivity another without.

I positioned the camera and I rendered the scenary.

Final result:

The animation:
In this point I installed the new version to test. I started the animation stage.
To animate, you need to select the desired objects to move and add keys.

These keys allow you to create temporary position points, to indicate towards which
positions the object must move, or which movements it must perform.

With the f12 key or from the menu, I render animation.
A new practice
I started a new proyect.
Add plane and scale x=5 y=5.

After I put other plane in a perpendicular position, and I scaled it size.


I changed to edition mode.

And I deleted one vertex.

In Blender with the letter “g” you can move the vertex and other elements, and with the letter “e”
is possible generate more nodes.

Now I pushed the number 7 to change the view.

In this position is easier to press the “a” letter to select all vertex and spin the geometry.
Menu add with spin option

I configured the parameters to 360 degrees.

Rotating the view.

I Finished the revolution and I add textures.

I positioned a camera.

It is possible to enlarge the camera view using the menu parameters.

I activated the render mode. This is the result.

After this test, I made another model of revolution to use curved lines.

Using 3D to 2D: Making a cover in Blender
We can add 3D words in Blender and move them in a certain position.

If we add a little words or tittles in our design.


In a different height.

We can add a perpendicular camera and the lights.

And use the render to make the cover.

3.-Solidworks
SolidWorks is a solid modeling computer-aided design (CAD) and computer-aided engineering (CAE) computer program published by Dassault Systèmes,
that runs primarily on Microsoft Windows.
website: https://www.solidworks.com/

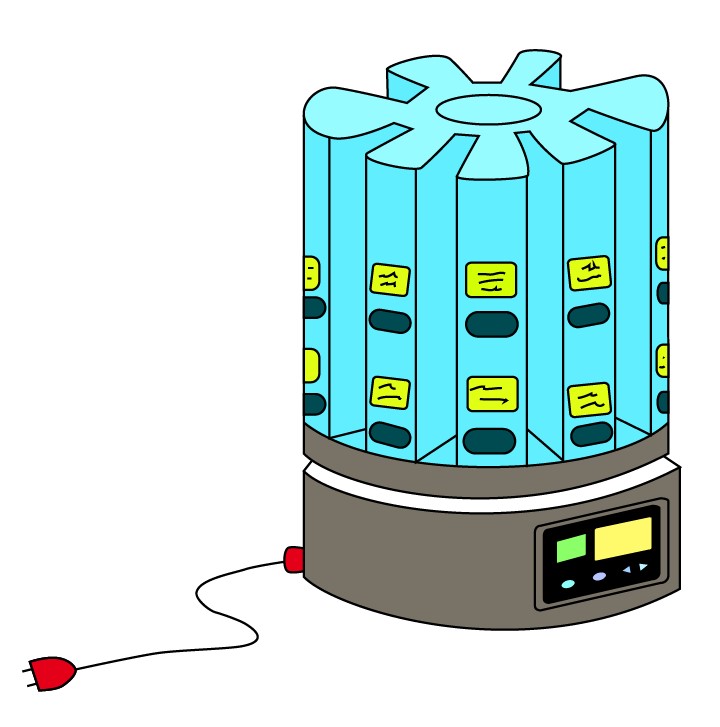
Making of a firts 3D design of my final proyect
To do this design I will use Solidworks, because i known the program. This is better
program than blender to work with dimensions and sketches.
I run Solidworks and I create a new part. I select a plane and I draw a sketch.

I use extrusion to generate volume. The result is a annular disk.

now I add other area to extrude in the disk.

Next, I create a sketch on the surface of the disk with its corresponding dimensions.

And I use the command to generate a hole.

With this operation, I can create a circular pattern to generate the other holes.


I save this disk, and I create a new part. This part will be the base of the initial disk.

New sketch and extrusion.

This is the base disk.

I save this part and I create other new part. This part is the pillars to mount my structure.
I draw some auxiliary lines to calculate the slot to insert the annular discs.

I extrude the pillars and this part is done.

Now I draw the base of my structure, with the slots to insert the pillars.

I use a circular pattern to trace all the complet sketch and I extrude it.

At this moment I have all the part of the cover of the model of my structure.
I will create other parts to represent the idea of my automated system.
Right now I can go create an assembly.
To create an assembly, I click on a new assembly in the menu and insert my first two parts.

Then I need to insert the references between the parts, with faces, edges, axes, vertices, etc. common.
For example, two sides, face to face.

And the last one with the central side.

Then I use and circular pattern to place the other pillars.

But I need to remove two pillars to clean the output of the components.

After that I place the ring bases. I place one of them.

I set the others with the parameters of a linear pattern.

I do the same with disk containers.

This is the base of my main structure. Now I add the other components.
Later I assign the textures of the components one by one. I use the texture’s menu.

I add the lower external cover with textures.

I add the superior external cover with textures.

Finishing the initial model, I active the render mode with "FotoView 360". Is a complement of SolidWorks.

I set the parameters of the render and run it.

The result is a fotorealist picture.
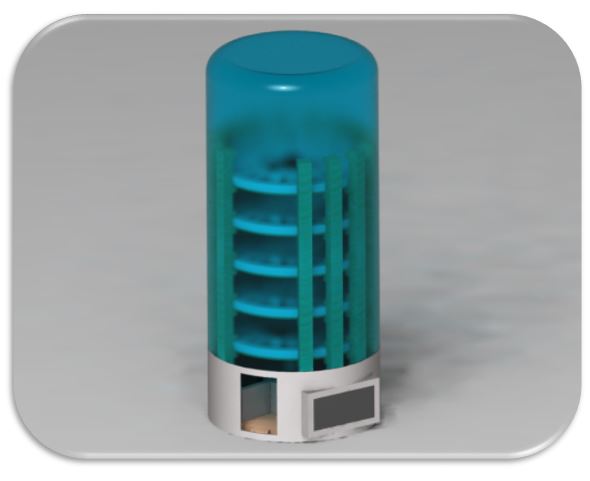
I make a simulation with this assembly.

4.-Illustrator
Adobe Illustrator is a vector graphics editor and design program developed and marketed by Adobe Inc.
Raster to Vector:
To do this section I will use the Illustrator program.

I select one of my handmade sketches. I import the sketch from a scanned image.

To do this, I use the Pen Tool to draw the lines within the image.

I erase the padding and set the size of the lines.

With the point selection tool, I round the vertices using the modifiers.

Using the pen tool, the line and the curves, I draw the rest little by little.

This is the result of the complete linear sketch.

Then I can erase the scanned image, because I have the vector image.

Right now I can fill in the white areas with colors.

Full image with color.
The comparison:
Automatic Mode:
In Illustrator it is possible to use an automatic mode to make a verctorial image quickly.
For example:
Using fast vectoring.

Using high-fidelity vectoring.

Using 3 color mode.

Black and white mode.

Technical drawing mode.

5.-GIMP
GIMP is a free and open-source raster graphics editor used for image manipulation (retouching) and image editing, free-form drawing, transcoding between different image file formats, and more specialized tasks.

Download http://www.gimp.org.es/descargar-gimp.html
Tutorials http://www.gimp.org.es/modules/downloadse/

This is GIMP’s interface.

To do an example with GIMP. I import an image.

So I use the magic wand tool to remove the background.

with the free selection tool, I erase the rest of the background.

with clean design…

I create a white layer, to make the background.

then I return to the drawing layer, activate the alpha mode and remove the background of this layer to make it transparent.

With the eraser tool I clean the defects.

Now I export the raster image to Inkscape.

6.-Inkscape
Inkscape is a free and open-source vector graphics editor used to create vector images, primarily in Scalable Vector Graphics (SVG) format. Other formats can be imported and exported.

Website: https://inkscape.org/es/release/inkscape-1.0.2/
Download and install the program:

I import the GIMP’s image:


From path / trace bit maps, I start working to make it vectorize.

The object is vectorized.

So i apply colors.

7.-My experience and conclusions from week 2
In this second week I was able to work a little more on the idea of my final project. Make a first part assembly and design for the automatic dispenser discs. With the 3D design I was able to see better what pieces I would need to modify and adapt in the future.
With the 2D design I tried GIMP and Inkscape, which I had never used before and was able to compare the results with Illustrator who knew it. They were not a bad option as an alternative and they are also free.
FILES
BlenderSolidWorks
Illustrator