Principles, Practices and Project Management
This week I learned about version control, web development using SSGs, and sketched out some ideas for my final project.
Page Summary
- Version control
- Git and GitLab
- Setting up Git for FabAcademy documentation + SSH keys
- Basic workflow and repository structure + Working through a Git Tutorial
- About CI/CD
- Web Development with Static Site Generators
- YAML file
- Web Design
- Misc upload practices
- Important and Interesting Links
- Initial Final Project Ideas
- About page
1. Version Control
Version control, is the practice of tracking and managing changes to software code.
Version control systems are software tools that help teams manage changes to source code over time.
Ref: What is version control
2. Git and GitLab
Git is an open source distributed version control system.
GitLab is a web-based Git repository for faster and more efficient collaboration of software code.
FabAcademy uses a self-hosted version of GitLab on FabCloud at gitlab.fabcloud.org, which is where all projects related to the academies and student documentation websites are hosted.
Ref: Git
3. Setting up Git for FabAcademy documentation
On Fabcloud our individual repositories are housed under Academany > FabAcademy > Year > List of Labs > Lab > Students > Name
One way to log on to Fabcloud is use login credentials from fablabs.io. It is the same login credentials used used for other FabAcademy communication - like Nueval for assessment and the Network.
-
Install Git on local computer.
To install Git through the command line - Terminal app (macOS), first install Homebrew, a package manager using the instructions on the website.

and then
brew install git
There are other ways to install git as mentioned on the website too.
Ref: git-scm -
Configure user
To configure a user from scratch, in terminal, add a Git username and set an email for uploading. In my case it is:
git config --global user.name "mitalee.parikh"
git config --global user.email "emaitee@gmail.com"
This helps in tracking who makes the changes on the shared gitlab repo which is public. -
Generate SSH key
Check if an SSH KEY already configured
cat ~/.ssh/id_rsa.pub
If not, generate it using
ssh-keygen -t rsa -C "emaitee@gmail.com"
Then use the above command again to view the public key and copy it:
cat ~/.ssh/id_rsa.pub
Upload this key on the Gitlab Website on the browser. It usually begins with ‘ssh-ed25519’ or ‘ssh-rsa’. Go to user profile > Settings > SSH keys and copy it there.
Now, the Gitlab server is securely linked to the local computer. -
Start a git repository
There are several ways to make a repository:
1. On the GitLab website, create a repository and then clone it locally.
2. In the terminal initialising it from scratch usinggit initby changing current directory to desired location.
3. Cloning an existing one.
Since our student repos on GitLab already have a default template installed, we can directly clone it on our local computer, wherever you want to store your documentation.
Your student repo consists of the default student template. First task is to clone this existing template to your local repo. After you cd to your local repo, use this to clone.
Now, a clone of the template is made on the local repository.`git clone git@gitlab.fabcloud.org:academany/fabacademy/2020/labs/barcelona/students/mitalee-parikh.git`

4. Basic workflow and repository structure
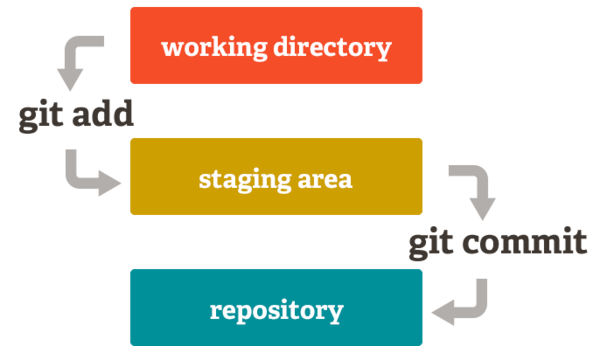
The most routine workflow for git : status-(pull)-add-commit-push
git status to check what’s happening with the current directory, check if the local and remote repos are synced or need to be updated
git pull to pull files from the remote repo to the local repo, very important if multiple people are pushing to the repo
git add . to add all changes from the working directory to the staging area
git commit -m "action msg" to commit changes from the staging area to the local .git repo, adding a message helps identify and keep a track of the changes made in that particular commit
git push to push only the changes from the local .git repo to Gitlab cloud repo
I find this diagram very helpful to visualise the directory structure:
My first commit from git log

Some other commands that might help:
git clone Clone a repository into a new current local directory, to do once at the beginning of documentation
git init Create an empty Git repository or re-initialize an existing one (starts a .git folder on local computer where all changes will be saved)
git help for help with git commands
Git had very detailed error msgs, so it is advisable to read and follow them to find solutions with issues.
git diff Show changes between commits, commit and working tree, etc
git log Show commit logs
It is easier to undo a staged file, i.e. after git add
but more difficult to undo a committed file, after git commit, but still possible using
git reset --soft HEAD~1 first and then use git restore --staged <file>... to unstage.
Check this guide in case I need to undo anything.
Ref: How to undo (almost) anything with Git
5. About CI/CD
Continuous Integration compiles websites with static site generators.
Ref: docs.gitlab.com/ee/ci/
Here is a guide to understand how and why commit > build > test > stage > deploy works so effciently.
Ref: CI/CD Explained in 100 Seconds
How it works…
You create a gitlab-ci.yml file (HTML).
Then a “runner” server picks up your “Pipeline”
Reading your .gitlab-ci.yml file will execute your scripts in Docker.
After completing your steps in the .yml file, GitLab stores the results and publishes them on the web.
6. YAML file
First git reads the YAML file .gitlab-ci.yml in the repo.
GitLab has a list of example repositories for common static static site generators or HTML at gitlab.com/pages.
Understanding the default Mkdocs-CI YAML file in the repo
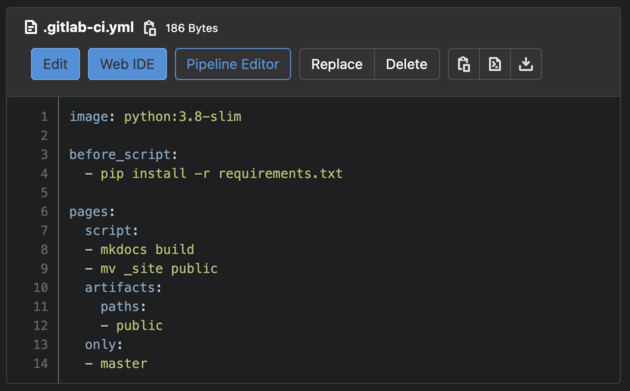
# What type of container should run this job (where the script will run)
image: python:3.8-slim
# This is the "job" name
pages:
  # This tells GitLab which group the "job" belongs
  stage: deploy
  # Set any environment variables to be available inside the container
  variables:
    GIT_DEPTH: 1000
  # These are the commands that will run in the job
  script:
      # This is a specific mkDocs command to make the HTML
      - time mkdocs build --site-dir public
  # Tells GitLab which folder to copy out of the "job" to send to another "job"
  artifacts:
    paths:
    # Select the public folder in this case, so it can be sent to GitLab Pages
    - public
  only:
      - master
7. Web Development with SSGs
The basic way to make a website is using HTML code for content, and maybe using CSS and javascript for styling.
Another efficient way to make websites is to use static site generators.
To develop my webpage, I use the existing Mkdocs to first understand how it works. Jekyll is another option I want to use to make a custom themes maybe later on.
There are many options of Static Site generators like Hugo, Jekyll, Gitbookdocs, Mkdocs, Middleman, etc. each with their own special features for the kind of website one wants to make.
This GitLab page has a list of example repositories for common static static site generators or HTML at gitlab.com/pages.
The basic way to start is clone one of these, unattach and start modifying.
Setting up Mkdocs
Intalling and upgrading package manager pip pip install --upgrade pip to install mkdocs: pip install mkdocs
To view the changes on my local server http://127.0.0.1:8000 I used mkdocs serve
Ref: Markdown basic tutorial
Mkdocs guidelines has all instructions to customise the website.
Setting up jekyll
I followed this Jekyll tutorial by Giraffe Academy. Before installing jekyll, I checked if I had these supporting things, and updated them:
1. Homebrew: to easily install software packages
2. Ruby: programming language that jekyll is written in
3. RubyGems: package manager for ruby
4. Bundler: to track and install gems and versions in a group, for jekyll themes
Homebrew, Ruby and Gem were all pre-installed.
So I checked versions using
ruby -v and gem -v
I installed bundler with gem install jekyll bundler, but got a permissions error msg.
So, I tried it with sudo like so: sudo gem install jekyll bundler and it worked.
And then to make sure checked version: gem install jekyll bundler
To view the changes on my local server http://localhost:4000 I used bundle exec jekyll serve the first time and
Jekyll serve everytime after.
8. Web Design
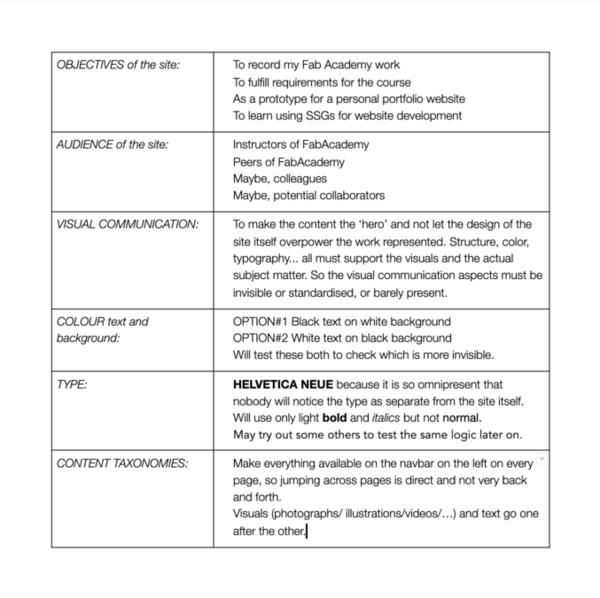
I wanted my website to be as simple as possible from features, animations, colours, etc. So that the content is not overpowered by any distractions. I used the MKdocs material theme document guide to change colours, fonts, etc.
I did a quick exercise to define some aspects for the web design:
9. Misc Practices
There is a 10Mb limit per commit for FabAcademy documentation, so all big images, videos (if not hosted) need to be compressed into smaller sizes.
du -sh * to check file sizes
du -sh * | sort -n sorts the files by size
Before pushing, I used ncdu to check sizes of files. To compress my images I installed and used ImageMagick. I found it very efficient to quickly convert or compress images for the web, and also to make quick GIFs.
After some trial and error, i figureed these basic commands and settings I can use for my workflow:
To compress photos taken from my phone:
convert IMGname.HEIC -resize 25% -quality 50% -density 72 jpg:extent=300kb IMGnewname.jpg
To compress images taken as screenshot from my computer:
convert Screenshot.png -resize 50% -quality 50% -density 72 jpg:extent=300kb newname.jpg
To make a quick GIF:
convert -resize 25% -delay 15 -loop 0 IMG_1380.HEIC IMG_1381.HEIC IMG_1382.HEIC IMG_1386.HEIC IMG_1387.HEIC IMG_1388.HEIC animation.gif
And to check the existing properties of an image:
magick identify -verbose focus.gif
I also check individual file sizes by changing current directory in terminal and using du -sh *|sort -n
10. Important and interesting links
Principles and Practices notes + video
Project Management notes + video
Everything is a file
Linus kernel development video
The Bash Guide
FabLabBCN local documentation guides
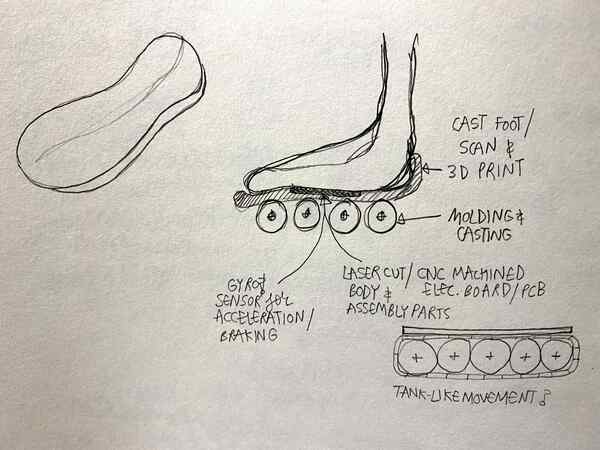
11. Initial Final Project Ideas
Idea 1: Light source
For my final project, I want to make a versatile lamp. A light source that can keep resultant light on a surface constant irrespective of external daylight.
Also, to add some mechanics and automation, make the form versatile to change it from being indirect light, ambient and a task light whenever required.
CAD - make 2D for cutting/production files & make a 3D model, animate and render
Inputs - light sensors to measure light color (add light intensity later)
Output - Multicolor LED to change output to match resultant light
CAM - lasercut parts, use vinyl cutter for origami folds
3D printing - joints, make casing for PCB
Electronic design, production and embedded programming - To make the micro-contoller PCB
Network and Communication - Add WiFi module to control it remotely
Interface and Application programming - To make a GUI (phone app?)
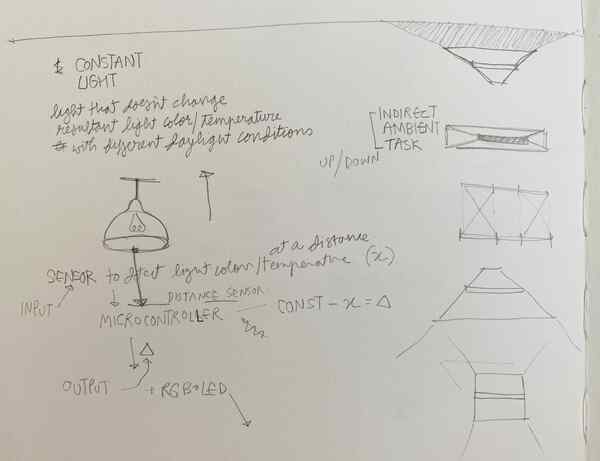
References for the origami form: Meduse Lamp
For the light app: Philips Hue
Bang & Olufsen
Idea 2: Modular Robotic Cube
Another idea is to make robotic cubes, that can be assembled by programming themselves. Some references and ides supporing this idea:
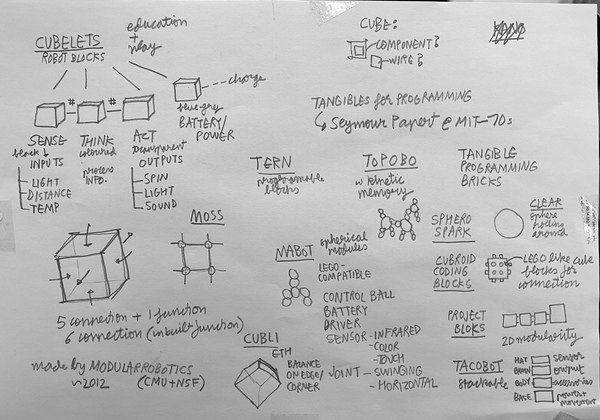


I would also like to use the simplicity and modularity structure of MTM but in respect to robotics.

Idea 3: …