16. Interface and application programming
This week we have to write an application that interfaces with an input &/or output device that we made .
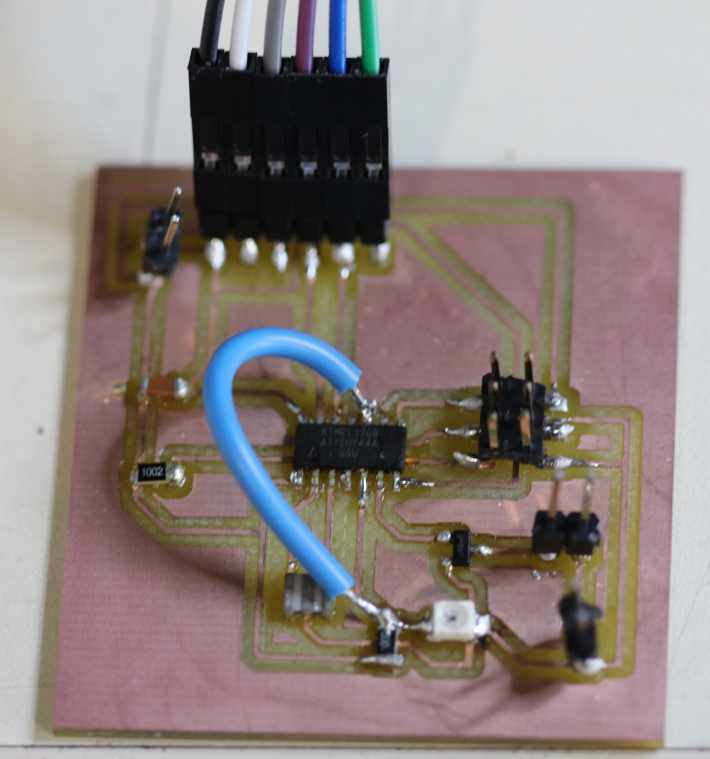
I use the input board I made on week 11 and 12
I want to make a simple connection with a computer with Pyserial then use one of the growing and powerfull system Home Assistant . With Home Assistant, I’m integrating a twitter account and a text-to-speech module.
Board
The board is simply sending by serial the value received by the phototransistor. For more explanation visit week 11 and 12
Here is a reminder of the code :
#include <SoftwareSerial.h>

//TX , PA0 , could be A0, 0 , 10
//RX , PA1 , could be A1 , 1 , 9

const int mosfet = 7; // connected to PA7 or 7 in arduino
const int phototransistor = A3 ; // connected to PA3 , A3 in arduino

int photovalue = 0;
int timing = 1000 * 10;

SoftwareSerial mySerial(0, A1); // RX, TX

void setup() {
  mySerial.begin(9600);
  pinMode(mosfet, OUTPUT);
  pinMode(phototransistor, INPUT);
}

void loop() {
    photovalue = analogRead(phototransistor);
    mySerial.println(photovalue);
    delay(timing);
}
I have just changed the timing value to 10000 to have a message every 10 seconds.
Pyserial
I install raspbian on a Raspberry Pi. They are many tutorial on how to do it, one of them is https://www.raspberrypi.org/documentation/installation/installing-images/
Then I connect the board with an FTDI to usb connection of the Raspberry Pi.
The first step is to know if the usb connection is recognised by the linux system. The command lsusb display all connected devices.

I can guess that the Bus 001 Device 005 is the FTDI connection.
If you are not sure : connect the usb cable and run the lsusb command then disconnect the usb cable and run again the lsusb command. A line should have change.
Normally Python and pip are already installed with raspbian. The following line will add the pyserial package.
python -m pip install pyserial
Then I download a code miniterm , it’s a serial terminal written in python with pyserial.
wget https://github.com/pyserial/pyserial/blob/master/serial/tools/miniterm.py
sudo python miniterm.py
With that tool, I am able to check that the serial connection is working correctly with pyserial but also to find the right port.

The name of my port is /dev/ttyUSB0 , it is also detecting that its 9600,8,N,1 related to the baudrate, bit lenght, parity and carriage return.
Then it display the content of the serial exchange between the computer and the board.

Then I write a simple python code that will interpret the sensor value by displaying jour or nuit depending on the photoresistance value.
It’s some kind of reference to the movie les visiteurs
content of simple_pyserial.py
import serial
from serial.tools.list_ports import comports
from serial.tools import hexlify_codec
ser = serial.Serial('/dev/ttyUSB0')  # open serial port

while True:
  line = ser.readline()   # read a '\n' terminated line
  if int(line) < 100:
    print("jour")

  if int(line) > 700:
    print("nuit")
  print(line)
You can launch the code with this command :
sudo python simple_pyserial.py

Python is a powerfull langage.
The following part on Homeassitant is mainly based on Python.
Homeassistant
Home Assistant is a rapidly growing system. The website describe Home Assistant as an Open source home automation that puts local control and privacy first. Powered by a worldwide community of tinkerers and DIY enthusiasts. Perfect to run on a Raspberry Pi or a local server.
One of the main advantage is that you can install it on a rapsberry Pi, a cheap computer. It is powerfull enought to run a huge amount of code.
The main goal of Home Assistant was to automate your house, also named in french Domotique. But I think the system has gone far beyond a traditional home automation system.
The information to install https://www.home-assistant.io/docs/installation/raspberry-pi/

The commands to install in a virtual environment with a fresh raspbian
sudo apt-get update
sudo apt-get upgrade -y

sudo apt-get install python3 python3-venv python3-pip libffi-dev libssl-dev

sudo useradd -rm homeassistant -G dialout,gpio

cd /srv
sudo mkdir homeassistant
sudo chown homeassistant:homeassistant homeassistant


sudo -u homeassistant -H -s
cd /srv/homeassistant
python3 -m venv .
source bin/activate

python3 -m pip install wheel

pip3 install homeassistant

hass
Then you are able to connect to a webpage on the ipadress of the RPi on the port 8123 , in my case http://10.1xx.0.42:8123/ (for security reasons, I hide some numbers with X)
The frist time you launch Home Assistant it can takes up to 10 minutes to install all the modules, so take your time…
On the first launch, since recently, you have to create a username and a password.

Then the visual interface should not be too crowded. By default you will have a meteo module, a sun module that display if the sun is set based on your GPS coordinate, and a kind of presence detector.

In my case it also detect a media player. So if like me, you have several UPNP enabled device, they could be recognise automatically. Here a Volumio player, located on http://zik.local/
Then you can edit the configuration.yaml file to add sensors.
cd /home/homeassistant/.homeassistant
sudo nano configuration.yaml
If you want to run the system at each boot, you can follow those instructions https://www.home-assistant.io/docs/autostart/ But in the scope of this page, I restarted and started the software manually with
sudo -u homeassistant -H -s
source /srv/homeassistant/bin/activate
hass
Add a Serial Sensor object.
The Serial Sensor object is described on https://www.home-assistant.io/components/serial/
By adding those lines in the configuration.yaml file located in /home/homeassistant/.homeassistant , you will enable a serial sensor.
  - platform: serial
    serial_port: /dev/ttyUSB0
So the file will look like
homeassistant:
  # Name of the location where Home Assistant is running
  name: Home
  # Location required to calculate the time the sun rises and sets
  latitude: 49.4668
  longitude: 2.07255
  # Impacts weather/sunrise data (altitude above sea level in meters)
  elevation: 0
  # metric for Metric, imperial for Imperial
  unit_system: metric
  # Pick yours from here: http://en.wikipedia.org/wiki/List_of_tz_database_time_zones
  time_zone: Europe/Paris
  # Customization file
  customize: !include customize.yaml

# Configure a default setup of Home Assistant (frontend, api, etc)
default_config:

# Uncomment this if you are using SSL/TLS, running in Docker container, etc.
# http:
#   base_url: example.duckdns.org:8123

# Discover some devices automatically
discovery:

# Sensors
sensor:
  # Weather prediction
  - platform: yr

  - platform: serial
    serial_port: /dev/ttyUSB0
    #value_template: "{{ (states('sensor.serial_sensor') + 1.0 ) | round(1) }}"
    #value_template: "{{ (((states('sensor.serial_sensor') | float * 5 / 1024 ) - 0.5) * 100) | round(1) }}"

# Text to speech
tts:
  - platform: google_translate

group: !include groups.yaml
automation: !include automations.yaml
script: !include scripts.yaml
Be aware that in my case the board is connected with an FTDI on port /dev/ttyUSB0 .
With the YAML format, indentation is really important and it is made with 2 space character and not with a tabulation character. The # character is for comment. Here I let 2 lines that I have commented to have some examples of a template. That means you can make directly some operations on the data.
As this modification is made on the configuration.yaml file. You will have to restart the whole system. Be aware that Home Assistant can takes time to install or update the components you have modify or install in the configuration.yaml file . Sometimes a complete reboot is necessary to update and install some components.
If everything went correctly, you should see a new module on your webpage.

By default you will see the value directly displayed above the sensor name, in this case 1003 for the Serial Sensor.
You can add differents kind of visualisation to display the data.


And in each screen you can add what they call a card .

Or you could build from scratch your own card. And you can customize the card : what data to display, and several parameters .

As Homeassistant become more and more user friendly, you can add several sensor throught the interface. But it’s more powerfull to add or edit directly the configuration.yaml and the automation.yaml files.


Doing it that way is easy but is extremly limited and you have access to only a few part of the possible integration.
To take a look at all the available integrations : https://www.home-assistant.io/components/
To demonstrate the power of this tool. I’m integrating a twitter account and a text-to-speech module.
Twitter , make it tweet
I created a twitter account with the name agrilabIOT_test . You can find the result on https://twitter.com/agrilabiot
I’ve followed https://www.home-assistant.io/components/twitter/ explanation.
You have to create a twitter APP and have the twitter Developper status https://developer.twitter.com/en/apps , at the end of the process you will get your API’s keys (4 of them as described on https://www.home-assistant.io/components/twitter/ )
For obvious reasons, I will not share all my keys on this page.
Then you add those lines in you configuration.yaml file
notify:
  - name: twitter
    platform: twitter
    consumer_key: J***************************X
    consumer_secret: U***********************************************s
    access_token: 1*****************************************l
    access_token_secret: x*******************************************V
Be aware that Home Assistant can takes time to install or update the components you have modify or install in the configuration.yaml file . Sometimes a complete reboot is necessary to update and install some components.
To check that everything is installed correctly, you can go in the web interface service , select the service you have just created notify.twitter and insert some service Data in JSON format like {“message”:”test”}. Click on the CALL SERVICE button, and the tweet should appear on your twitter account.

If you see this message on your twitter account, then the connection is working correctly.

Automation
Then I add an automation to tweet certain things depenging on differents criterias.
You can add simple automation throught the web interface.
But you will have more access by editing directly the automations.yaml file
- id: '1557822591613'
  alias: jour
  trigger:
  - below: '800'
    entity_id: sensor.serial_sensor
    platform: numeric_state
  condition: []
  action:
  - data:
      message: Jour
    service: notify.twitter
- id: '1557822662341'
  alias: nuit
  trigger:
  - above: '910'
    entity_id: sensor.serial_sensor
    platform: numeric_state
  condition: []
  action:
  - data:
      message: nuit
    service: notify.twitter
Here, I created 2 automation. One is tweeting “jour” when the serial sensor is below the value 800. The other automation is tweeting “nuit” when the serial sensor is above the value 910.

Twitter rules
As twitter as a lot of rules, you can’t tweet the same message. So I can’t just tweet jour or nuit
I modify the message with template.
- id: '1557822591613'
  alias: jour
  trigger:
  - below: '800'
    entity_id: sensor.serial_sensor
    platform: numeric_state
  condition: []
  action:
  - data_template:
      message: jour {{ states.sensor.serial_sensor.state}} a tel moment {{now()}}
    service: notify.twitter
- id: '1557822662341'
  alias: nuit
  trigger:
  - above: '910'
    entity_id: sensor.serial_sensor
    platform: numeric_state
  condition: []
  action:
  - data_template:
      message: nuit {{ states.sensor.serial_sensor.state}} a tel moment {{now()}}
    service: notify.twitter
{{ states.sensor.serial_sensor.state}} will display the value measure by the sensor and {{now()}} will write the time.
You can go to really advance level of templating with condition, random, …
Text-to-speech module
I choose to install Pico Text-to-Speech one of the Text-To-Speech module, as described on the https://www.home-assistant.io/components/picotts/ page, you have first to add some software with
sudo apt-get install libttspico-utils
Then you can add the following line in the configuration.yaml file
tts:
  - platform: picotts
    language: 'fr-FR'
You have also to give the right access to pusleaudio that will play the sounds.
sudo apt-get install -y vlc-nox apt-utils alsa-utils nano pulseaudio
sudo usermod -a -G audio root && \
sudo usermod -a -G pulse-access root
sudo amixer cset numid=3 100%
I’ve added the command to set the volume to 100%, on a raspberry pi they are set by default at 40% …
Then you can try a simple test. Go in the Services , select tts.piccotts_say and write {“message”:”Bonjour sa fonctionne”} then press call service and you should hear the message on a speaker connected to the 3.5mm audio jack of your Rapsberry Pi.

If you understand french you will notice that the spelling I used is not correct. picotts does not have advanced function and French is an extremly difficult langage with many rules for pronunciation. Some other language should have better results. I add also some . character to add silence between words.
Then you can play with automation and template.
- id: '1557822591613'
  alias: jour
  trigger:
  - below: '800'
    entity_id: sensor.serial_sensor
    platform: numeric_state
  condition: []
  action:
  - data_template:
      message: jour {{ states.sensor.serial_sensor.state}} a tel moment {{now()}}
    service: notify.twitter
  - data_template:
      message: a . jour .
    service: tts.picotts_say
- id: '1557822662341'
  alias: nuit
  trigger:
  - above: '910'
    entity_id: sensor.serial_sensor
    platform: numeric_state
  condition: []
  action:
  - data_template:
      message: nuit {{ states.sensor.serial_sensor.state}} a tel moment {{now()}}
    service: notify.twitter
  - data_template:
      message: a . nuit .
    service: tts.picotts_say
Now it will speak everytime the conditions change.
You can find plenty of information to program automations on https://www.home-assistant.io/docs/automation/
Why Homeassistant ?
The power of Home Assistant comes when you want to combine many differents sensor talking different protocol , using differents platform. At this moment, Home Assistant is in version 0.92 , it has about 1366 components. Some components can control up to 100 differents kind of devices or have many differents kinds of informations.
To mention a few of them, you can send email, sms, play with google agenda, use database, do text to speech, use cameras, control temperature, have some geolocation, do mutlimedia (sound, video, pictures), have weather data … You can use API, MQTT, have interfaces with ZigBee, IrDa, 433Mhz, LoRa, SigFox, X10, and many proprietary format.
I think it is also a great ressource, because each component is written in python and it’s open source.
The upnp system detect automatically more and more devices like WeMo socket, light, fan switch, some TV or sound system…
More advanced
Outside the scope of the fabacademy, I’ve fully automated differents place where I had lived.
- id: parole_entree
  alias: parole_entree
  hide_entity: True
  trigger:
    platform: mqtt
    topic: "pi/sensor12/in_01"
    payload: 1
  action:
    - service: tts.picotts_say
      data_template:
        message: >
          '{{ [". . . . Bonjour . . Bienvenue a la maison .",". . . . Merci de toccuper de moi. . "] |random }}'
    - service: notify.NOTIFIER_NAME
      data_template:
          title: 'Appart entree'
          message: 'Appart entree {{ states.sensor.flower_1_moisture.state}} et {{ states.sensor.flower_2_moisture.state}} et {{ states.sensor.flower_3_moisture.state}} et {{ states.sensor.flower_4_moisture.state}}'
          data:
              images:
                  - /home/homeassistant/.homeassistant/photos/photos.jpg
                  - http://192.168.0.41:90/cam_pic_new.php
This part of the automation say with a text to speech a random sentence from a list to welcome when the front door is open and someone is entering (it detect also when someone is leaving and say other messages). In the same time it sends me an email with the moisture value of several of my plant and in the email it integrate 2 pictures comming from 2 differents cameras.
If you did not guess, it was to welcome a neighbour that has accepted to water my plant during holidays (and was aware and curious about the system);
- id: merci_arrosage
  alias: merci_arrosage
  hide_entity: True
  trigger:
    - platform: numeric_state
      entity_id: sensor.flower_2_moisture
      above: 40
    - platform: numeric_state
      entity_id: sensor.flower_1_moisture
      above: 40
    - platform: numeric_state
      entity_id: sensor.flower_3_moisture
      above: 40
    - platform: numeric_state
      entity_id: sensor.flower_4_moisture
      above: 40
  action:
      - service: tts.picotts_say
        data:
          message: ' . . . . . merci de mavoir arrosé . . . javais soif . . .'
This other automation detect the moisture level of some plant and thanks with a text to speech the peopel that have water them.
For those systems I combined some plant sensor in bluetooth, the text to speach directly played by the Rapsberry Pi on a speaker, the door sensor made with an esp8266 communicating in MQTT protocol, the camera were
GUI - Graphic User Interface
Apparently, this picture does not officially validate the assignement as describe below
Interface and Application Programming : - Write an application that interfaces with an input and/or output device that you made, comparing as many tool options as possible. Learning outcomes - Interpret and implement design and programming protocols to create a Graphic User Interface (GUI).
I am not sure to understand the criteria but the picture below is not enought GUI or not enought “interpret , implement or program” maybe.
Of course I want to validate this week, so I’ve decided to follow dumbly the academic way to validate wich is to use Processing.
Processing
Processing is an easy interface that interpret Java and implement library to do visual stuff. Like Arduino it was built to help artist to create more easily with computers.
It is described by wikipedia as Processing is an open-source graphical library and integrated development environment (IDE) / playground built for the electronic arts, new media art, and visual design communities with the purpose of teaching non-programmers the fundamentals of computer programming in a visual context.
Install it from https://processing.org/download/
You have also to have installed Java, if it was not done before.
I will not detail all the functions of Processing . They are plenty of tutorials on the subject https://processing.org/tutorials/
The code in processing :
PImage[] photo = new PImage[19];

import processing.serial.*;

Serial myPort;  // Create object from Serial class
int val;      // Data received from the serial port
int counter;

void setup() {
  size( 600, 600 ); //screen size
  background(0); //black baground
  smooth();
  photo[0] = loadImage( "frame_00_delay-0.13s.jpg" );
  photo[1] = loadImage( "frame_01_delay-0.13s.jpg" );
  photo[2] = loadImage( "frame_02_delay-0.13s.jpg" );
  photo[3] = loadImage( "frame_03_delay-0.13s.jpg" );
  photo[4] = loadImage( "frame_04_delay-0.13s.jpg" );
  photo[5] = loadImage( "frame_05_delay-0.13s.jpg" );
  photo[6] = loadImage( "frame_06_delay-0.13s.jpg" );
  photo[7] = loadImage( "frame_07_delay-0.13s.jpg" );
  photo[8] = loadImage( "frame_08_delay-0.13s.jpg" );
  photo[9] = loadImage( "frame_09_delay-0.13s.jpg" );
  photo[10] = loadImage( "frame_10_delay-0.13s.jpg" );
  photo[11] = loadImage( "frame_11_delay-0.13s.jpg" );
  photo[12] = loadImage( "frame_12_delay-0.13s.jpg" );
  photo[13] = loadImage( "frame_13_delay-0.13s.jpg" );
  photo[14] = loadImage( "frame_14_delay-0.13s.jpg" );
  photo[15] = loadImage( "frame_15_delay-0.13s.jpg" );
  photo[16] = loadImage( "frame_16_delay-0.13s.jpg" );
  photo[17] = loadImage( "frame_17_delay-0.13s.jpg" );
  photo[18] = loadImage( "frame_18_delay-0.13s.jpg" );

  String portName = Serial.list()[0];
  myPort = new Serial(this, portName, 9600);

  frameRate( 10 );

  counter = 18;

}

void draw() {

  if (mousePressed == true)
   {                           //if we clicked in the window
   image( photo[counter], 0, 0 );
    counter--;
    if (counter < 0)
     counter = 0;

    if (counter == 0)
      myPort.write('1');         //send a 1

   } else
   {                           //otherwise
          //send a 0
   image( photo[counter], 0, 0 );
   counter++;
   if (counter > 18)
     counter = 18;

   if (counter == 18)
     myPort.write('0');         //send a 0

   }
println(counter);

}
When I click on the window, it increase a counter, some pictures are stored in a list and the picture are counted up or down from the list to play an animation of pictures. It also sends a “1” or a “0” to the board to light up the LED.
Files
Censored keys for security reasons : configuration.yaml and automations.yaml
visiteurs.pde and the corresponding pictures are stored in visiteurs_pictures.zip