Final Project : FabSprout
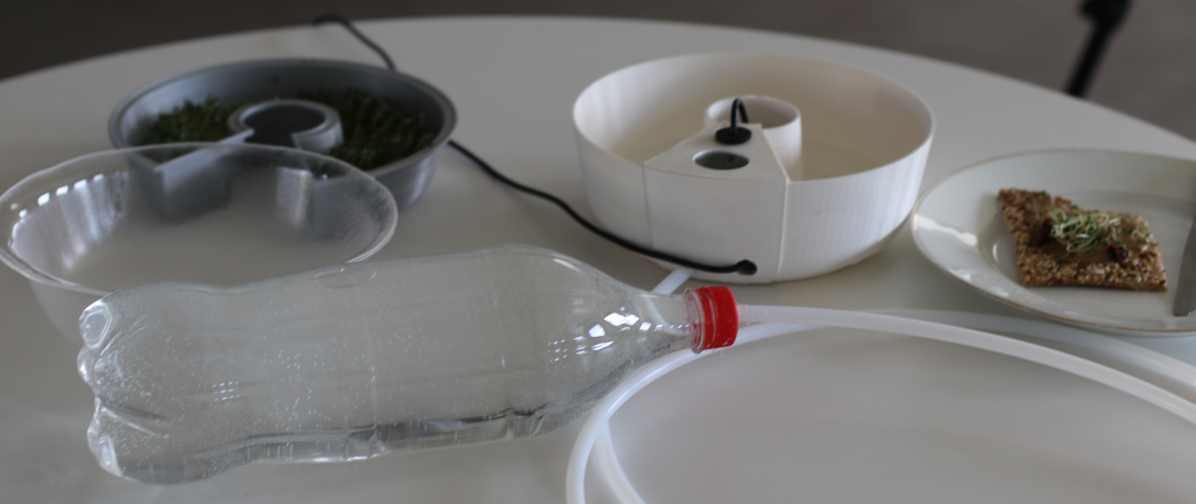
Sprouted seeds
Seed sprouted have many qualities for nutrition, a lot of vitamins and some seed like the Alflafla are nutritious. The seed sprouting is an ancestral food in many cultures.
An automatic seed sprouter make the process really easy.
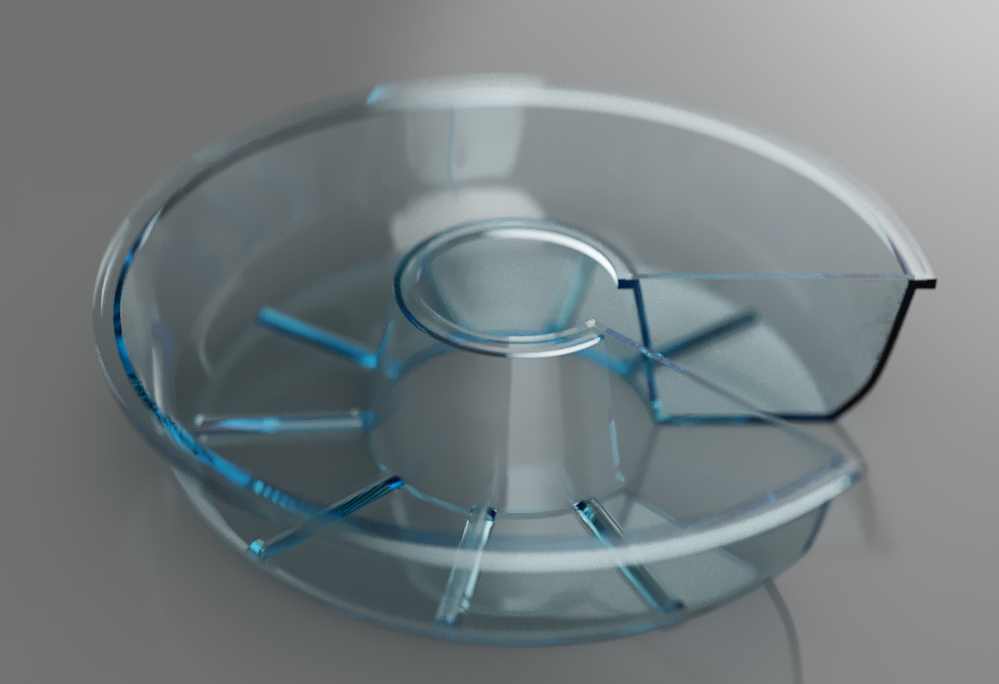
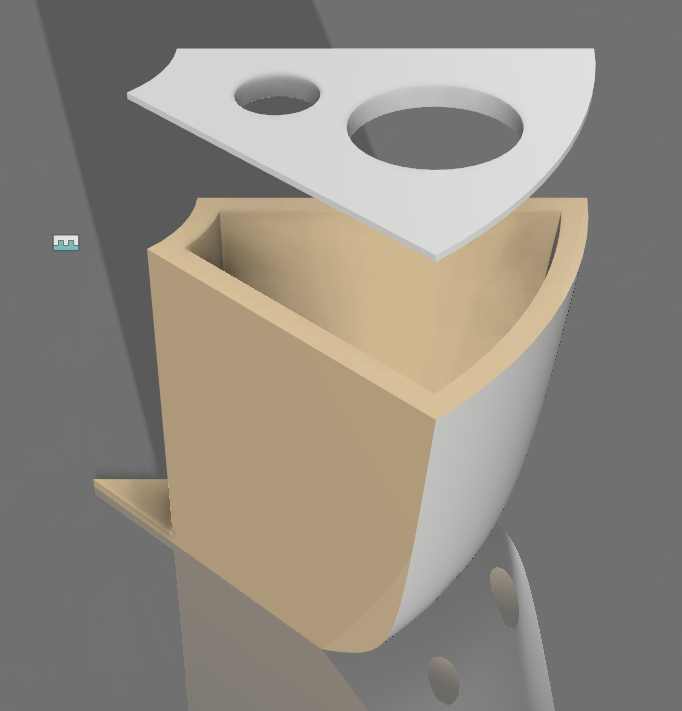
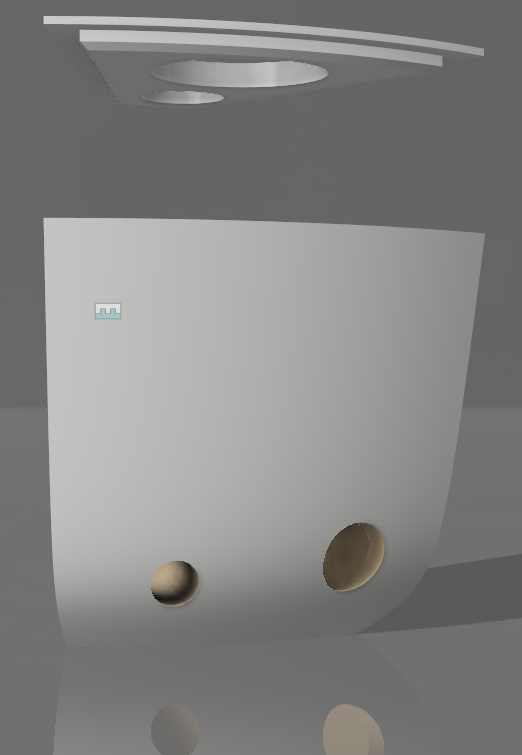
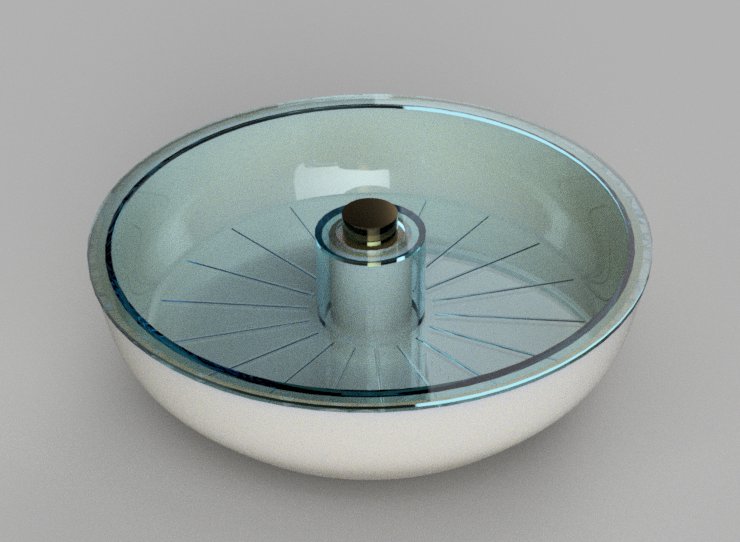
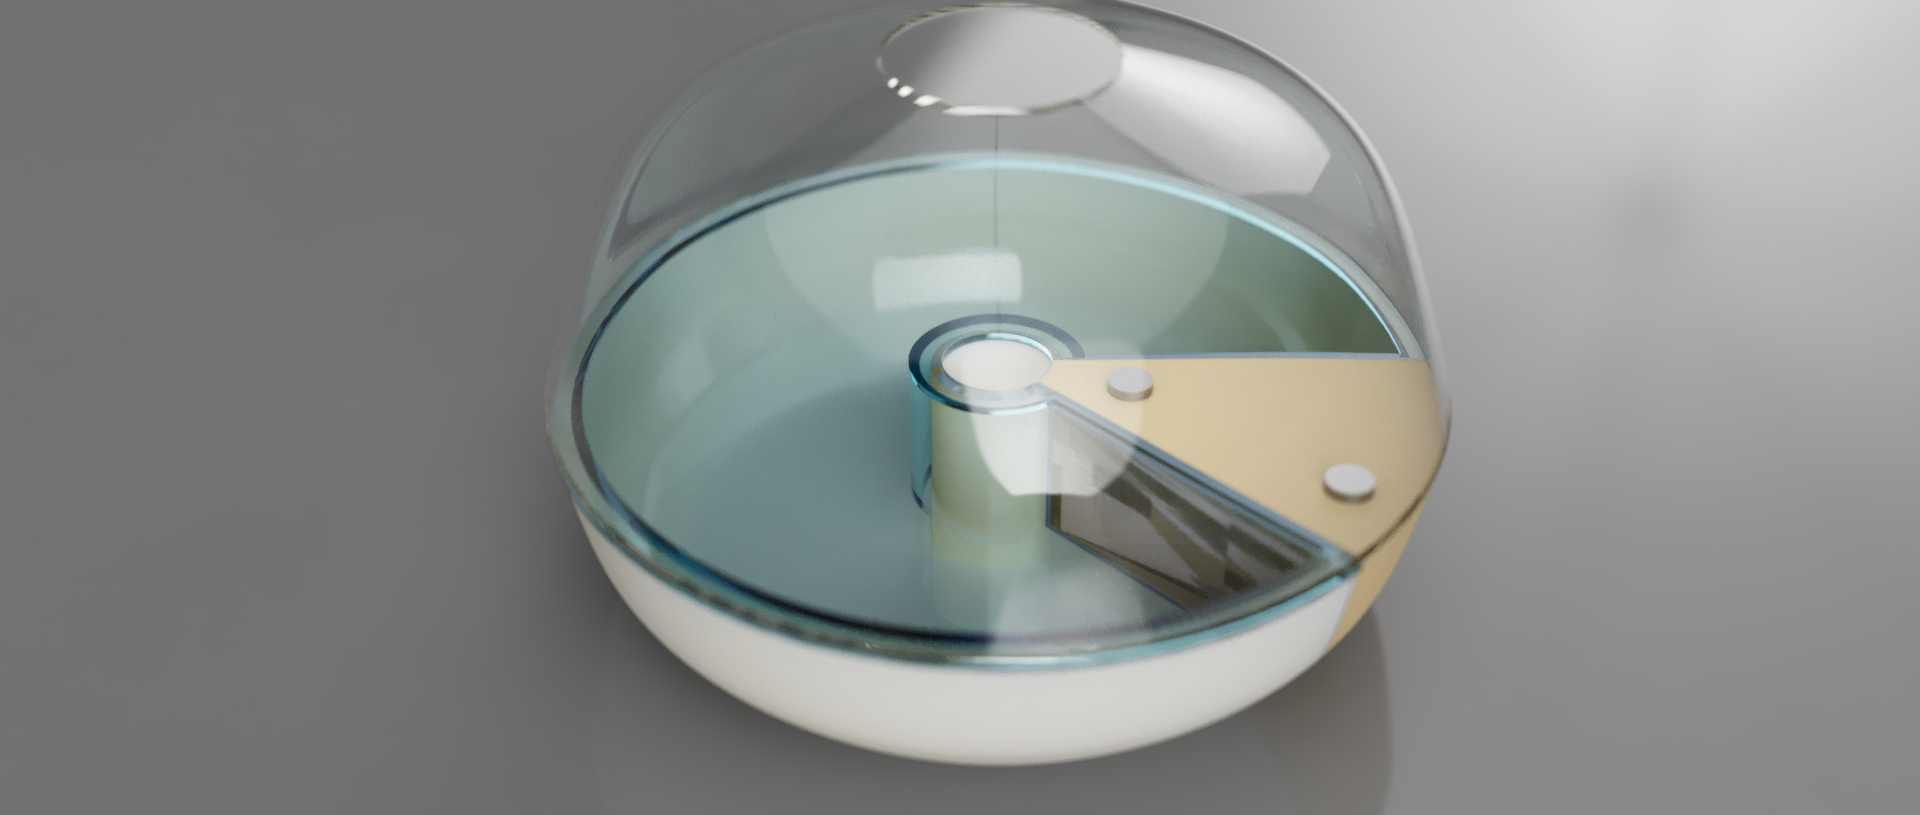
The object
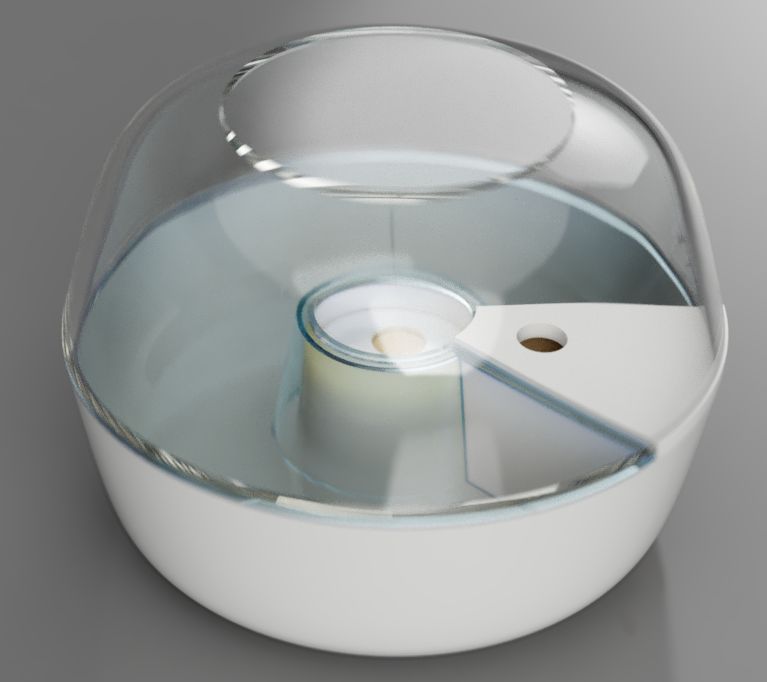
The separate elements
View from the back side
Presentation
The slide
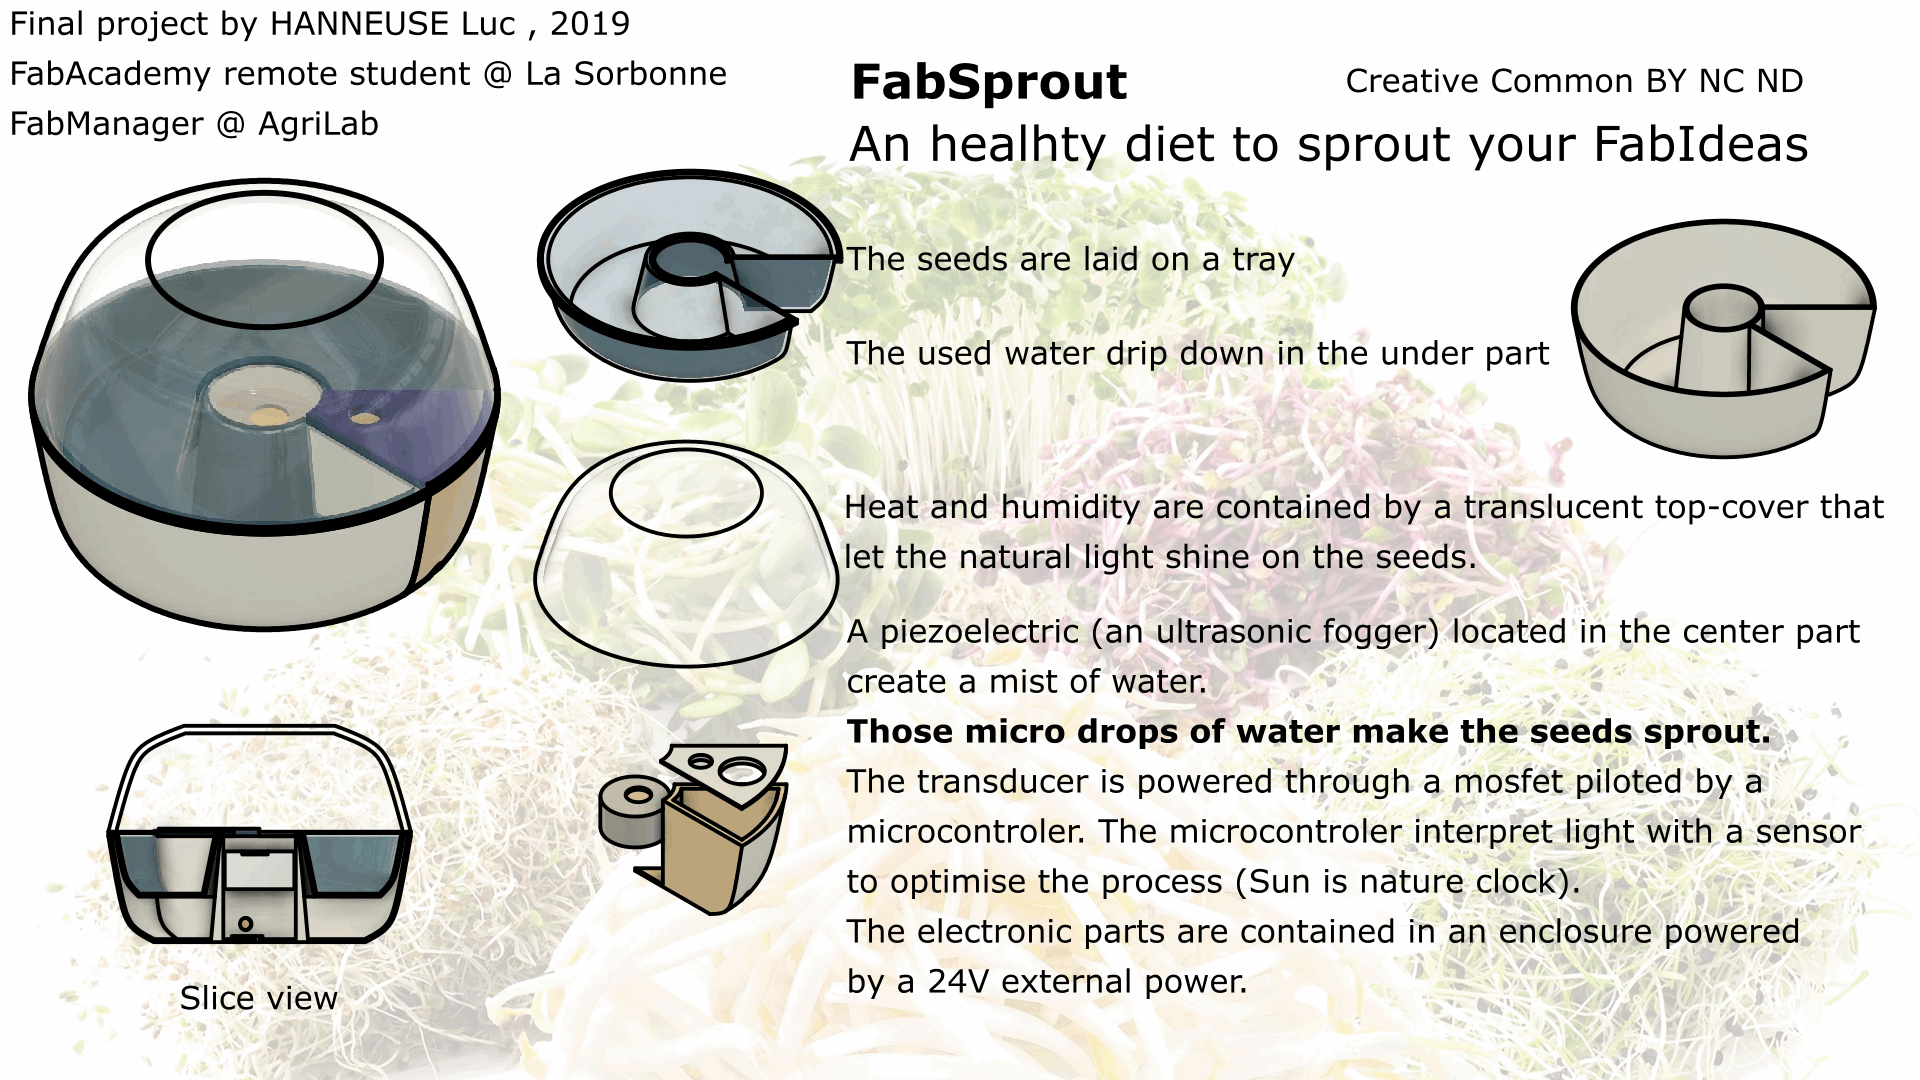
Click on the video below

First sketch and principle
Basically, you just need water and sun. And you want to avoid moisture. I want to build a smart automatic sprouter.
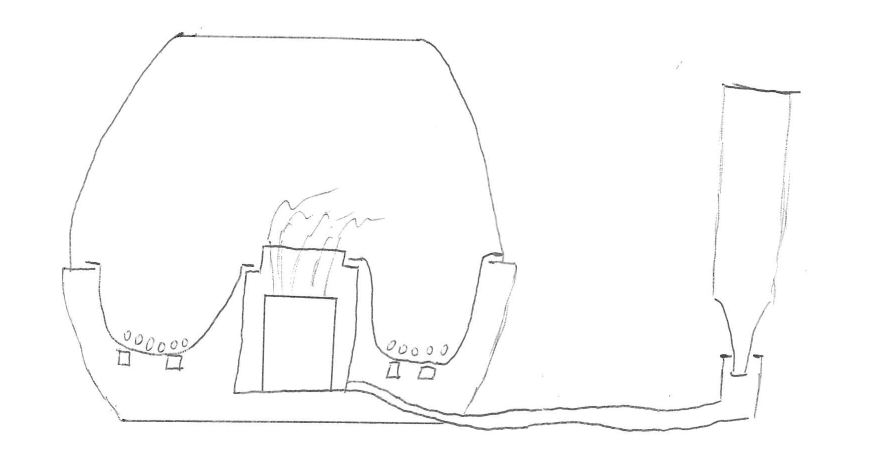
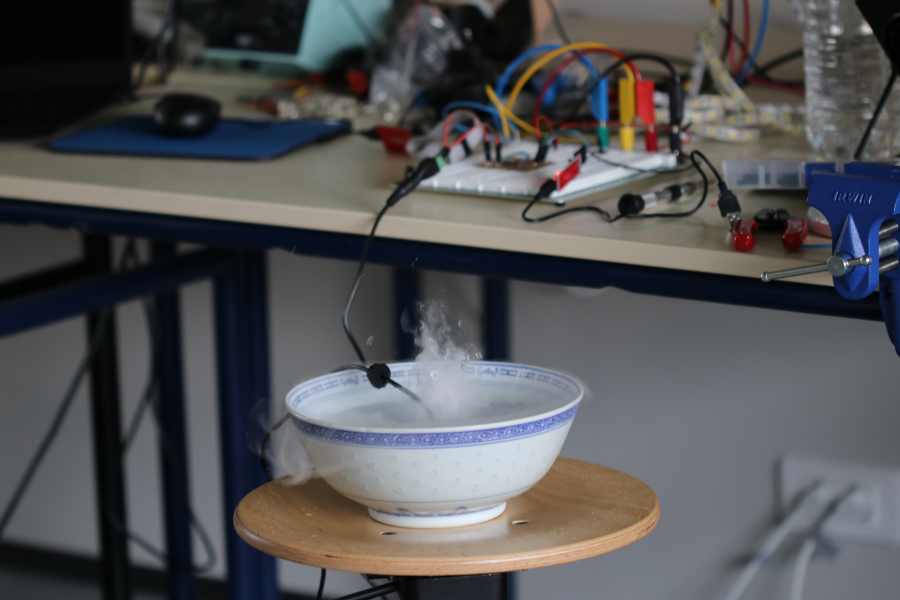
I build an enclosure to keep the mist and the warm generated by the seed. It has to be translucent, the seed needs a small amount of light. Water comes from a simple reused bottel. Communicating vessels is enough to fill the internal water tank.

The light sensor monitor the ambient light, natural daylight, it’s one of the few clock in nature.
My interest
Common problems in Agriculture are : dust, moisture, mud, rain, wind and sun.
What I’d like to explore with this project : different ways to build things that can resist moisture. I think I’ll create a mold for the enclosure then vacuum form the enclosure (it has to be water resistant and compatible with food). But maybe I’ll discover other way to waterproof 3d printing. For the electronics, I’ll have to find some way like epoxy to protect from moisture or to build a good enclosure.
What materials and components were used? Where did they come from? How much did they cost?
I plan to vacuum form most of the parts. But the vacuum forming device had limited dimensions (200 * 200 mm). I design the part with vacuum forming rules in mind but I had to 3D print some of them. With vacuum forming I can use PET which is food safe. Here I use Plexiglas and “natural” PLA for the plastic parts.
| Object | Material | Process | Price | Visual | link |
|---|---|---|---|---|---|
| top cover | 3mm Plexiglas , preferably food safe PET | Vacuum form (mold made by a CNC, wood material) | 8€ | 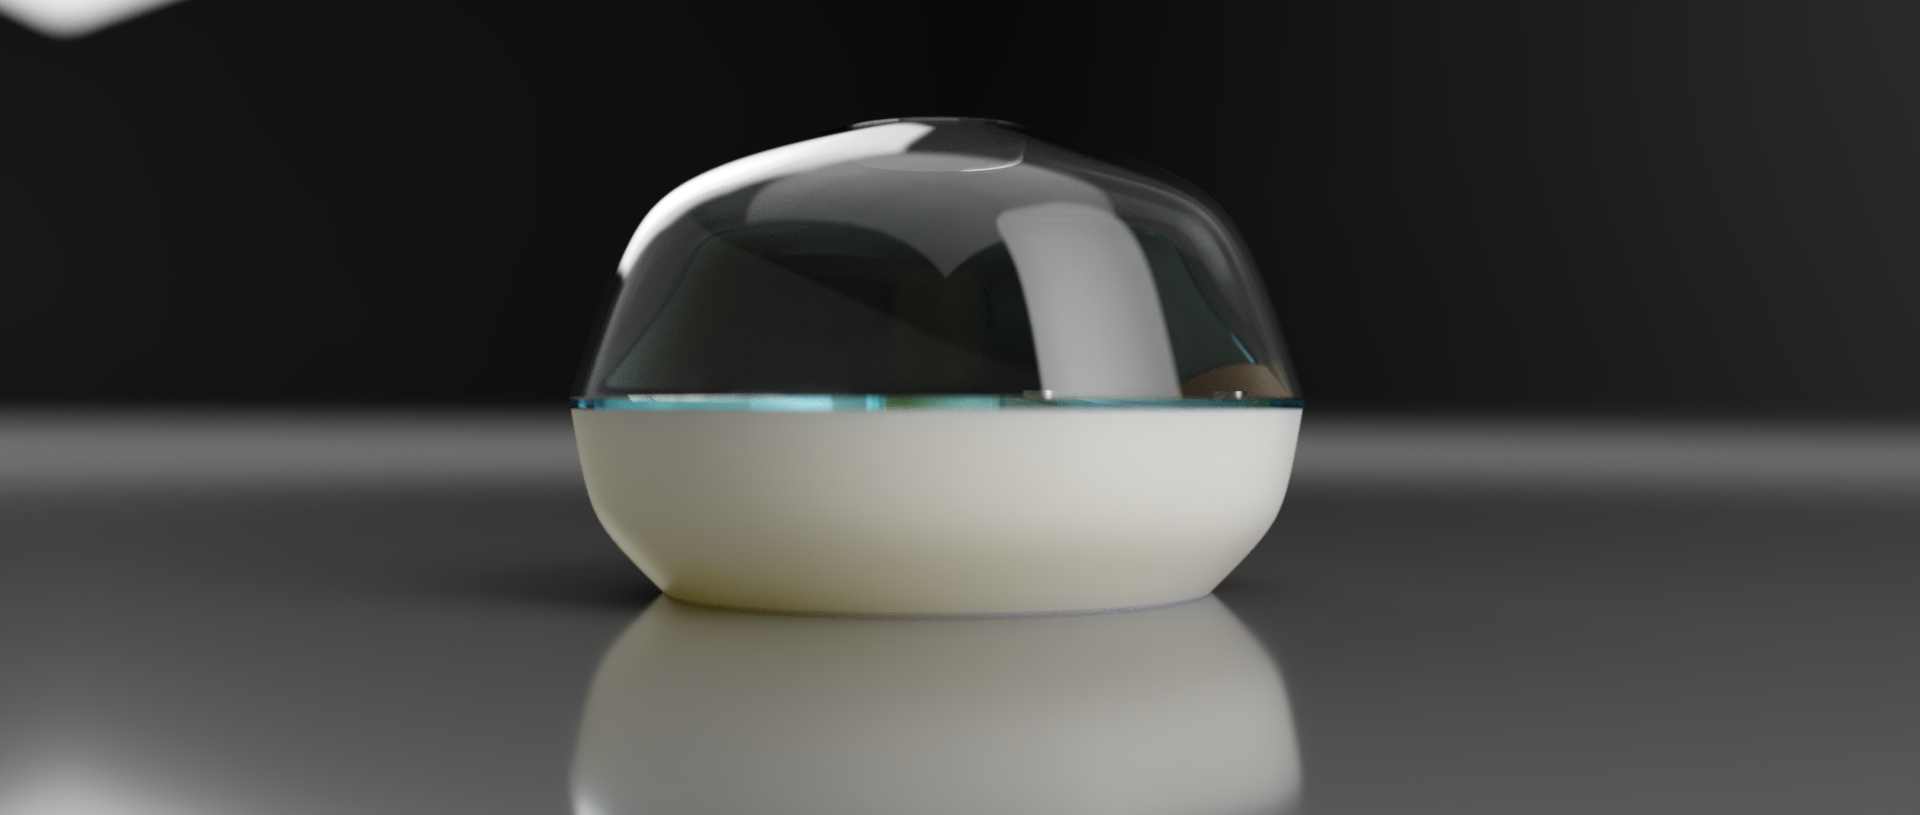 |
custom CAD files |
| bottompart | PLA filament , preferably food safe PET | FDM 3D printing | 5€ | 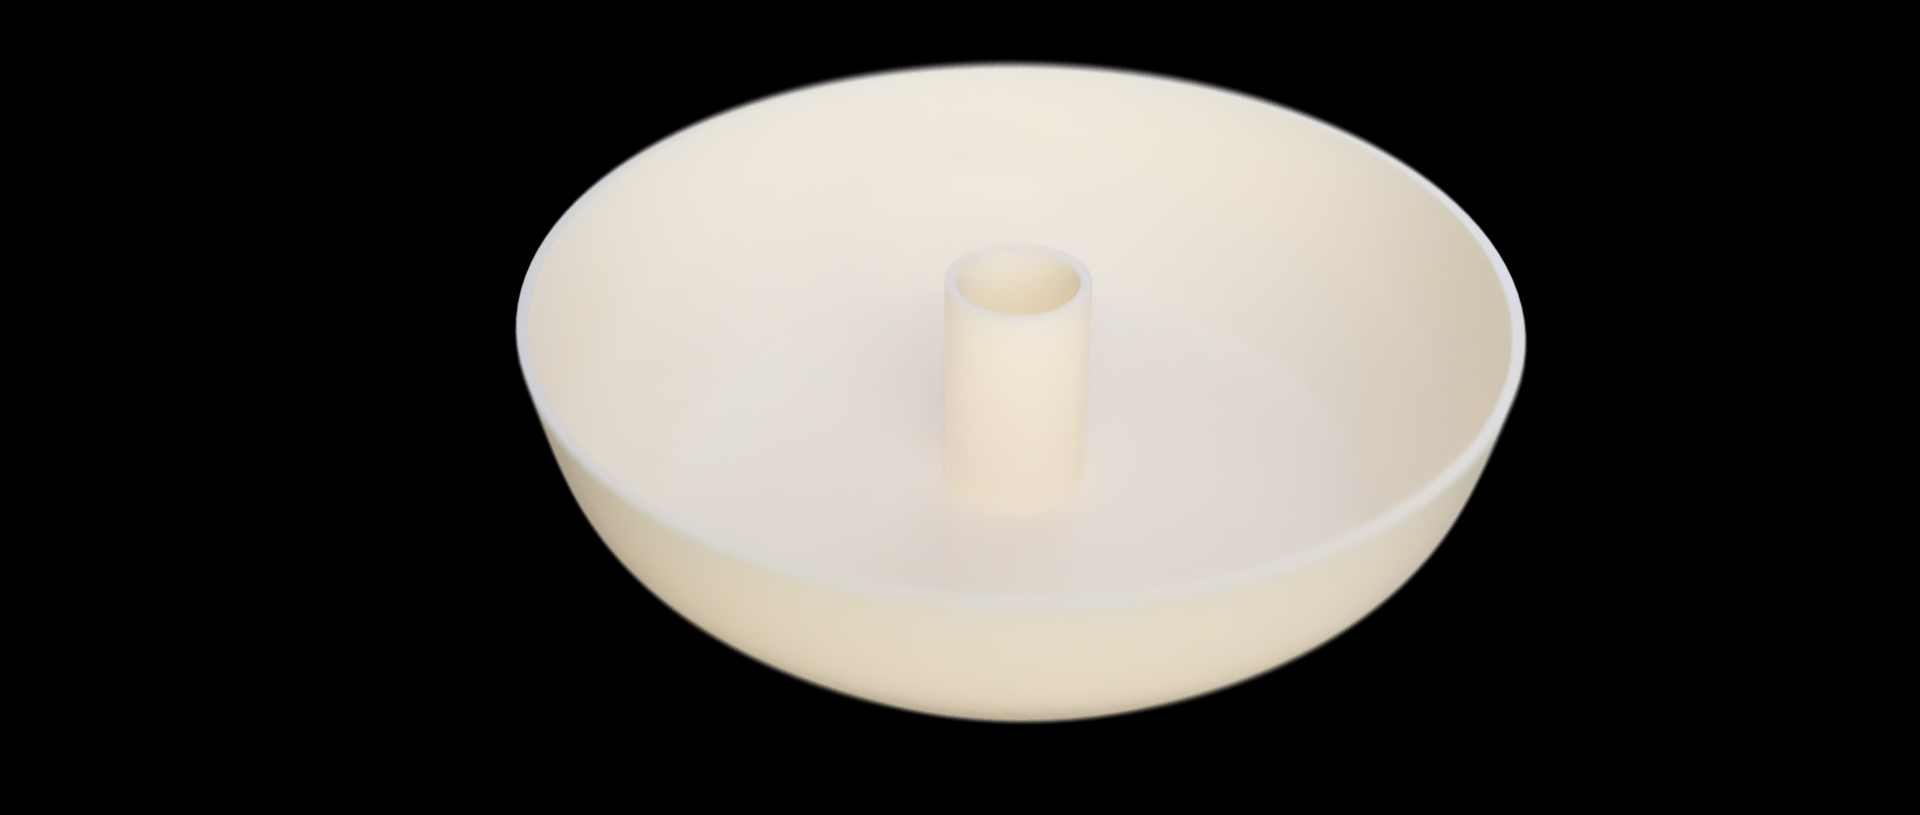 |
custom CAD files |
| tray | PLA filament , preferably food safe PET | FDM 3D printing | 4€ | 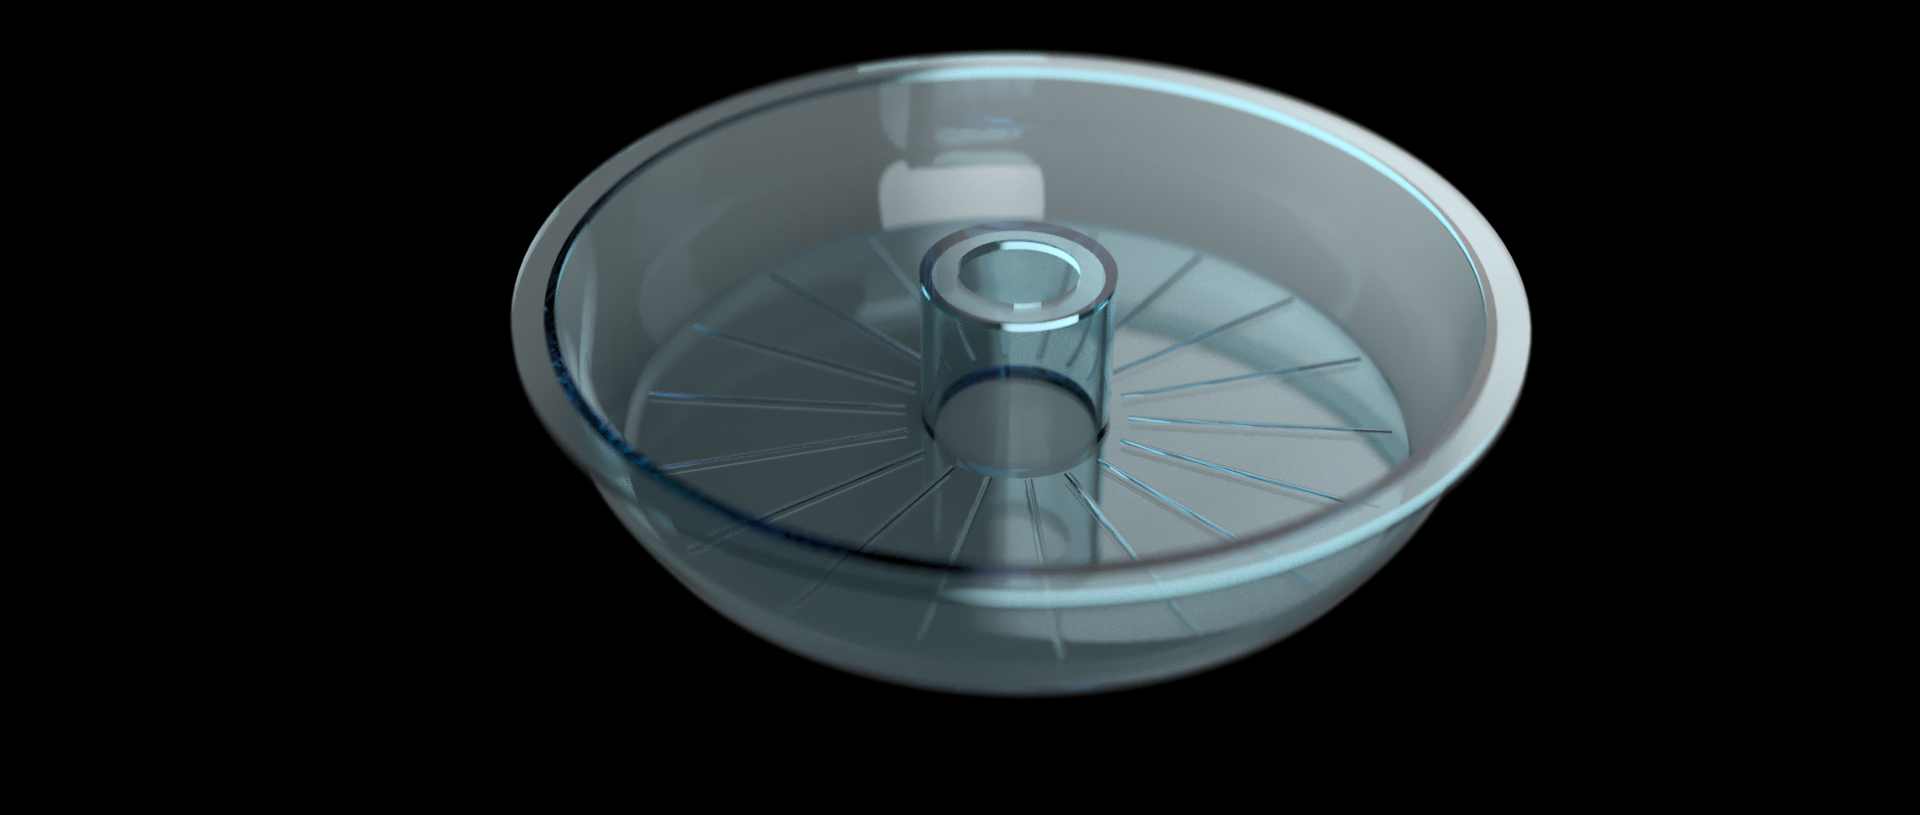 |
custom CAD files |
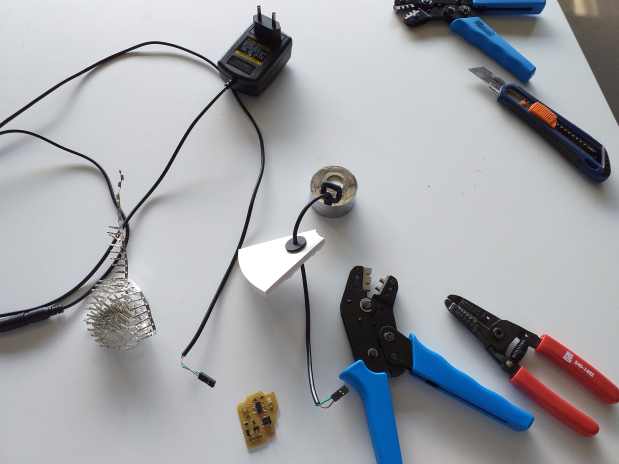
| Mist Foger and 24V DC power supply | bought on Aliexpress, China | piezzo electric element | 10€ | 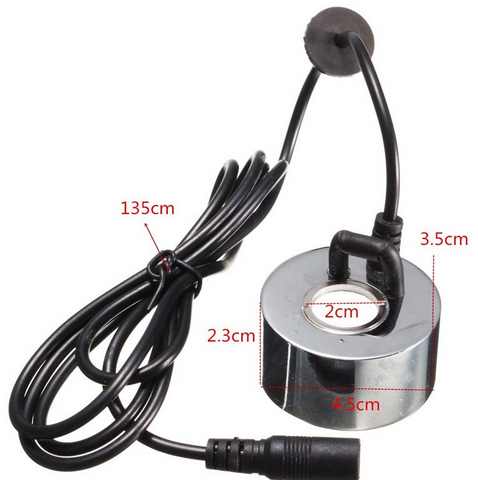 |
https://www.aliexpress.com/item/2Pcs-With-Plug-Or-No-Plup-Industrial-Incubator-humidifier-Ultrasonic-Mist-Maker-24V-Nebulizer-Atomizer-Head/32821355140.html?spm=a2g0s.9042311.0.0.7ac54c4d1Jyhep |
| NDS355AN | n-Mosfet SMD | electronic design/production | 0.60€ |  |
https://www.digikey.com/product-detail/en/on-semiconductor/NDS355AN/NDS355ANCT-ND/459000 |
| VEMT3700 | PhotoTransistor | electronic design/production | 1€ |  |
https://www.digikey.com/product-detail/en/vishay-semiconductor-opto-division/VEMT3700-GS08/VEMT3700-GS08CT-ND/1681484 |
| AtTiny84 | microcontroler | electronic design/production | 1€ | https://www.microchip.com/wwwproducts/en/ATtiny84 | |
| Resistor | SMD 1206 component | 3 * 10K , 1 * 0 Ohm | 1€ | ||
| Capacitor | SMD 1206 component | 1 * 1uF , 2 * 10 uF , 2 * 0.1 uF | 1€ | ||
| 20 MhZ resonnator | electronic | < 1€ | |||
| 2 * 1X2 pin connector | connector | 1 * 1uF , 2 * 10 uF , 2 * 0.1 uF | < 1€ | ||
| 2X3 ISP pin connector | connector | 1 * 1uF , 2 * 10 uF , 2 * 0.1 uF | < 1€ | ||
| Small coper PCB plate one side | PCB plate | PCB milling | < 1€ | ||
| Food safe 8mm diameter tube for water | Food safe tube | < 1€ | |||
| a small amount of silicone | Food safe silicone | < 1€ | |||
| A clean reused water bottle | PET bootle | reuse |
What processes were used?
3D printing, CNC 3D milling, vacuum forming, 2D PCB milling, electronic design, electronic production, input/output, integration.
What are the implications?
A cheap way to grow vegetables with high values in vitamins.
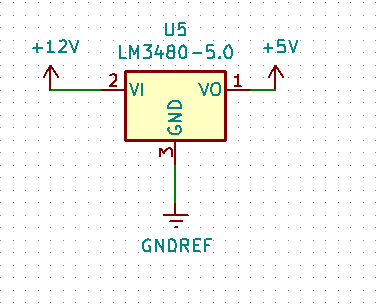
Electronics design and production, microcontroller interfacing and programming, system integration
The light sensor will monitor the ambient light, natural daylight, it’s one of the few clock in nature. The seeds normally do not have the same activity under nightlight/daylight and will not consume the same amount of water.
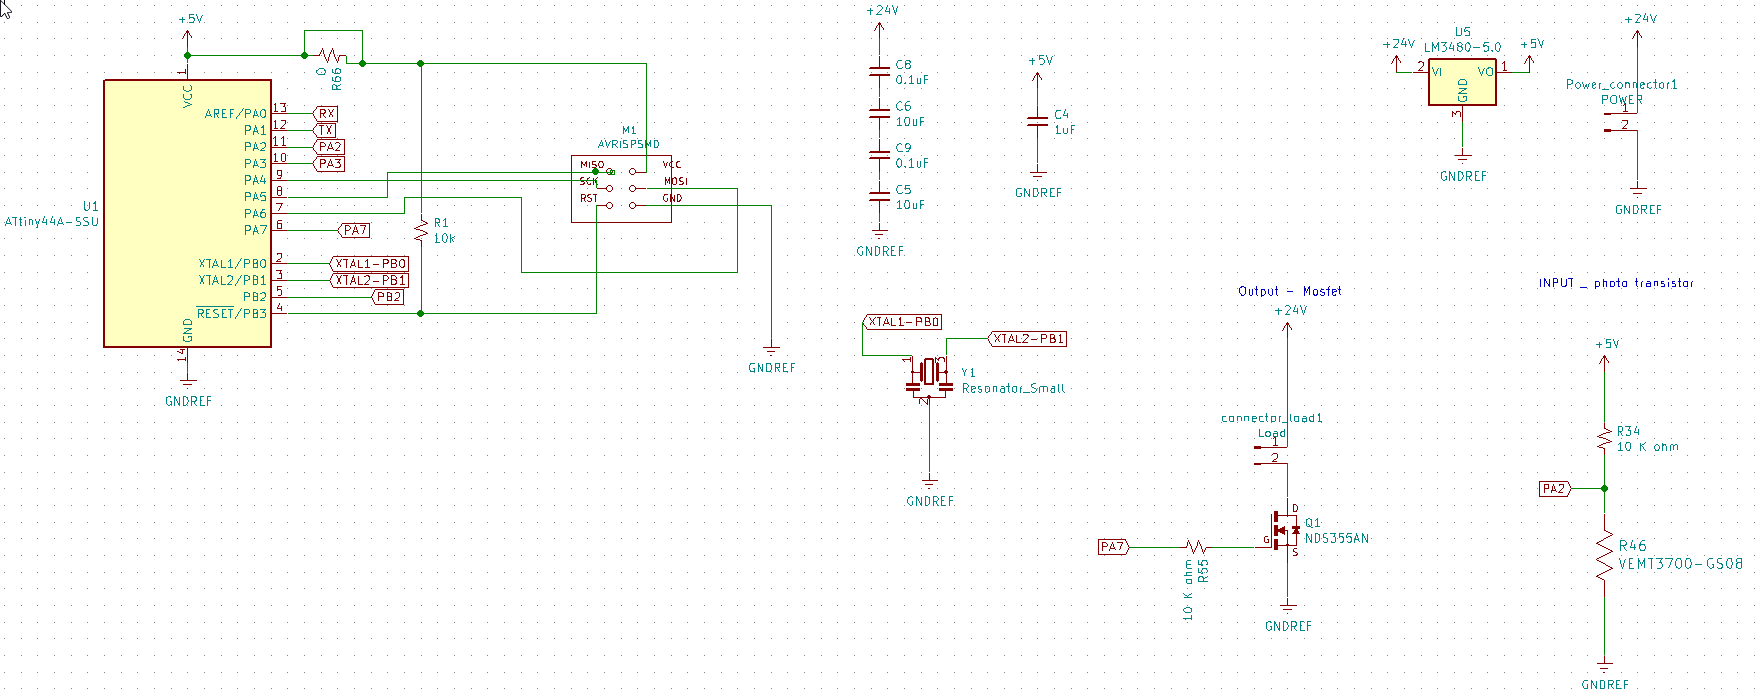
Input : Phototransistor. As explained in week 12 , the symbol of the VEMT3700 is not correct in KiCad. It is symbolized by a resistor but it is a phototransistor.
![]()
Output : mosfet connected to the piezzo electric element creating the fog.
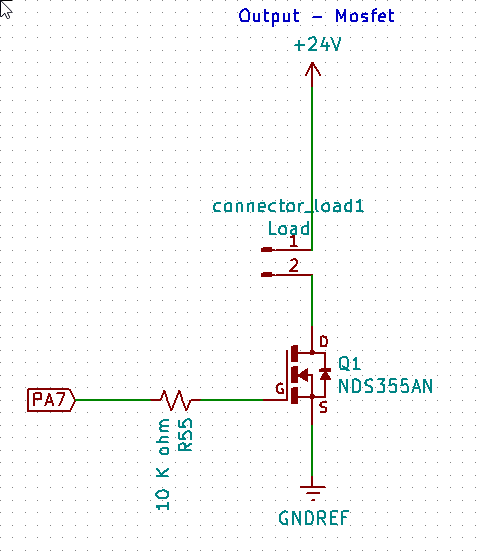
Combine those properly input and output can be optimized to make the seeds grow faster or to make them more vigorous. The piezzo electric element of the fog maker controlled by the mosfet.
The board has to be really small. I plan first to make a bigger version of the sprouter. But due to the limited dimension of the available devices, I reduce the whole size to 20 cm. I had less room for the electronic !
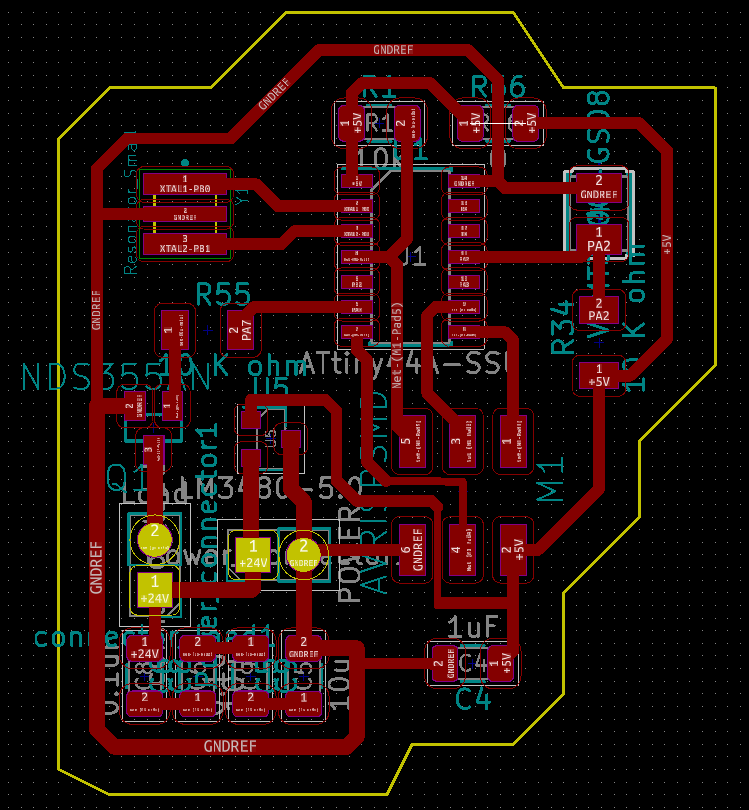
The schematic and design are made with KiCad .
The files : kicad_final.zip
The SVG files :
The RML/Gcode was made by using Mods :
RML traces with a 0.4mm 2 flutes
RML Cut out with a 1.0mm 2 flutes
Code
const int phototransistor = A2 ; // connected to PA2 , A2 in arduino
const int mosfet = 7 ; // connected to PA7 , 7 in arduino
int photovalue;
int treshold = 300; // threshold for the phototransistor
bool night = 0; // one time during night

int moisture_duration = 15000; // 15 seconde of moisture

unsigned long previous_time;
unsigned long actual_time;
unsigned long interval = 1000 * 3600 * 4; // every 4 hours

void setup() {
  pinMode(phototransistor, INPUT);
  pinMode(mosfet, OUTPUT);
  previous_time = millis();

}

void loop() {

  actual_time = millis();
  photovalue = analogRead(phototransistor);

// after 50 days millis overflow , time should be reset
  if(actual_time < previous_time){
    previous_time = millis();
  }

// the sun shine
  if(photovalue < treshold && actual_time > (previous_time + interval)){
    digitalWrite(mosfet, HIGH);
    delay(moisture_duration);
    digitalWrite(mosfet, LOW);
    previous_time = millis();
    night = 0;
  }

// one time during the night
  if(photovalue > treshold && actual_time > (previous_time + interval) && night == 0 ){
    digitalWrite(mosfet, HIGH);
    delay(moisture_duration);
    digitalWrite(mosfet, LOW);
    previous_time = millis();
    night = 1;
  }

}
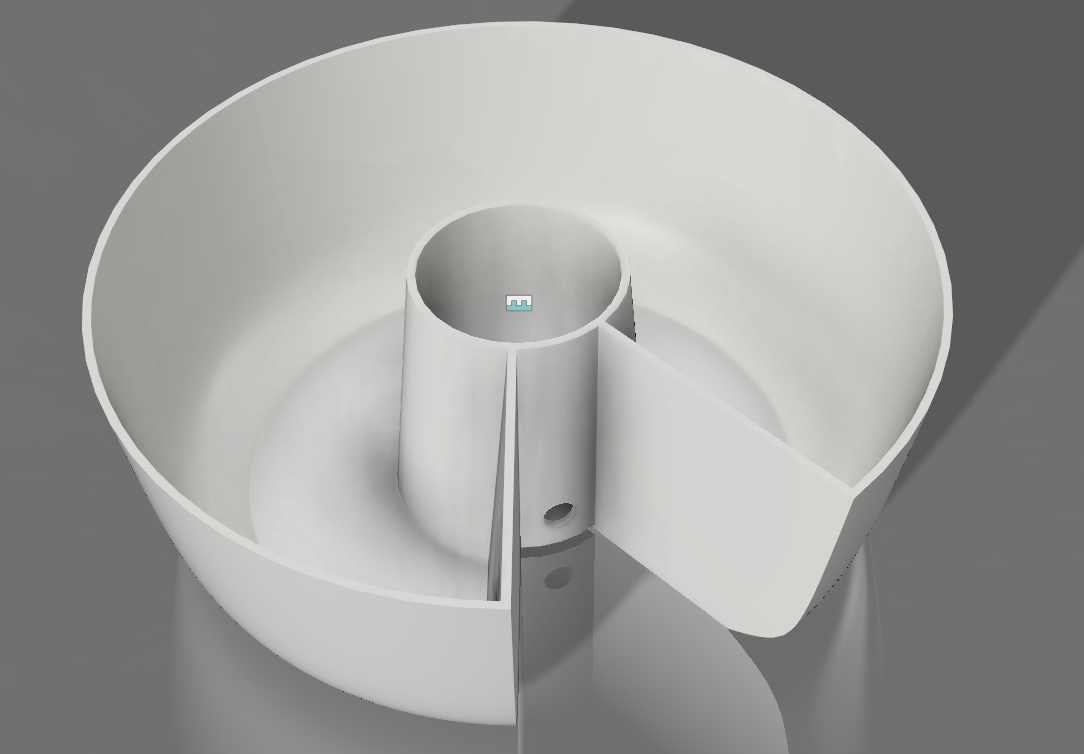
Fabrication
Technical view

Tray
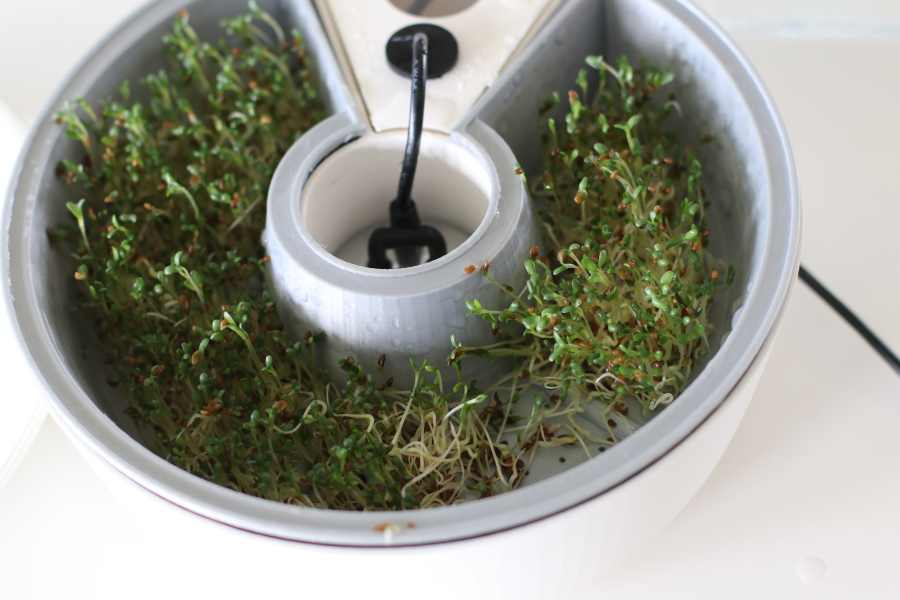
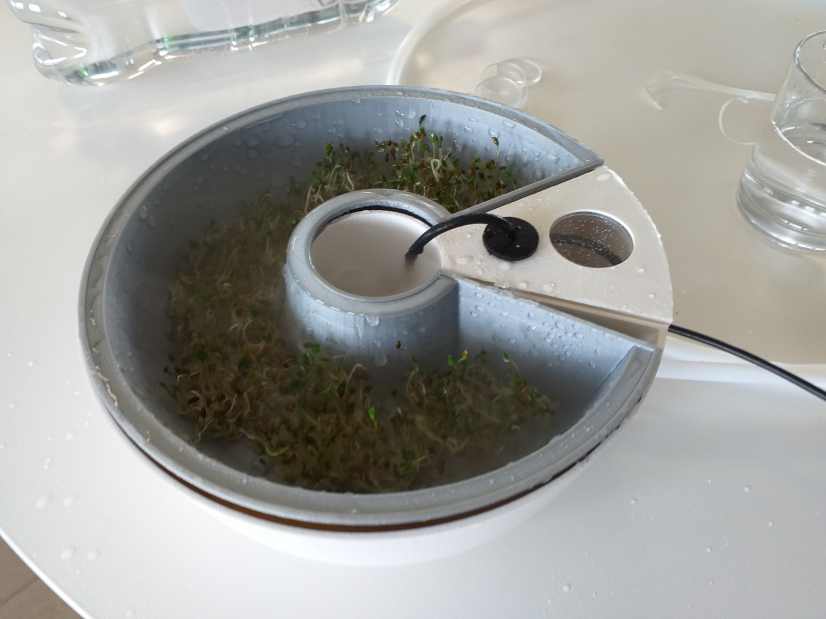
Tray for the seeds .
I did not design the holes because they should be smaller than the minimum holes capabilities of your printer. It has also been designed to be used to create a mold for vacuum forming where those kinds of holes are impossible to vacuum form.
Just drill manually some holes with a small diameter drill.
The holes should be as small as possible. It must let drip down the water but small enough so small seeds cannot fall through them.
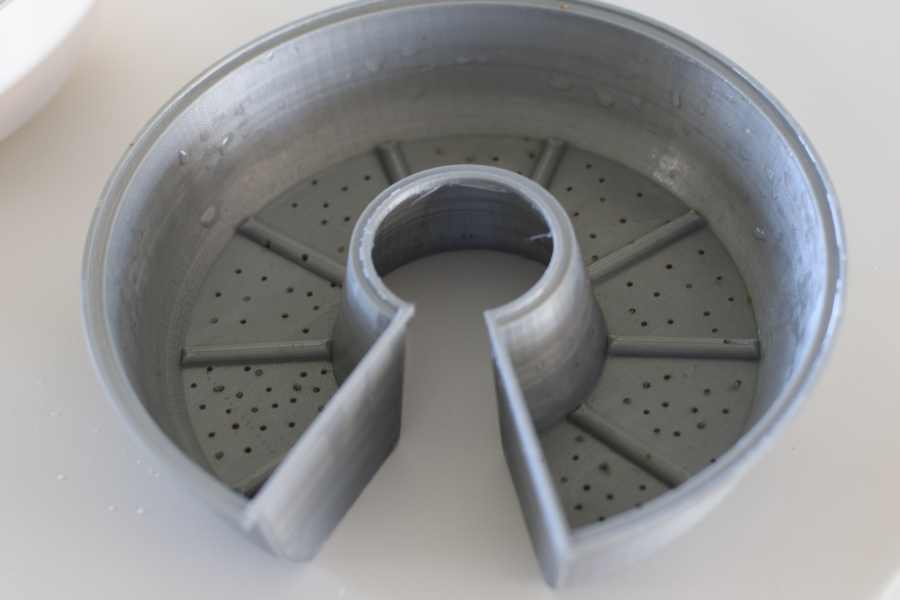
That is where you lay down the seeds.

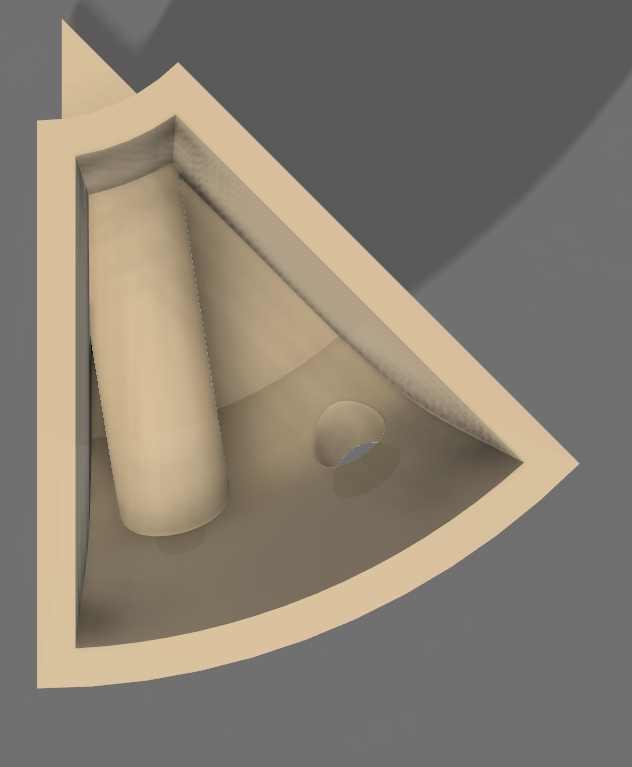
Bottom part
The bottom part that will receiv the used water and contain the piezoelectric element.
The hole receive the food safe tube that will give water to the piezo-electric element. I use silicone to seal it and make it watertight . Also pay attention to food safety with the tube and silicone.
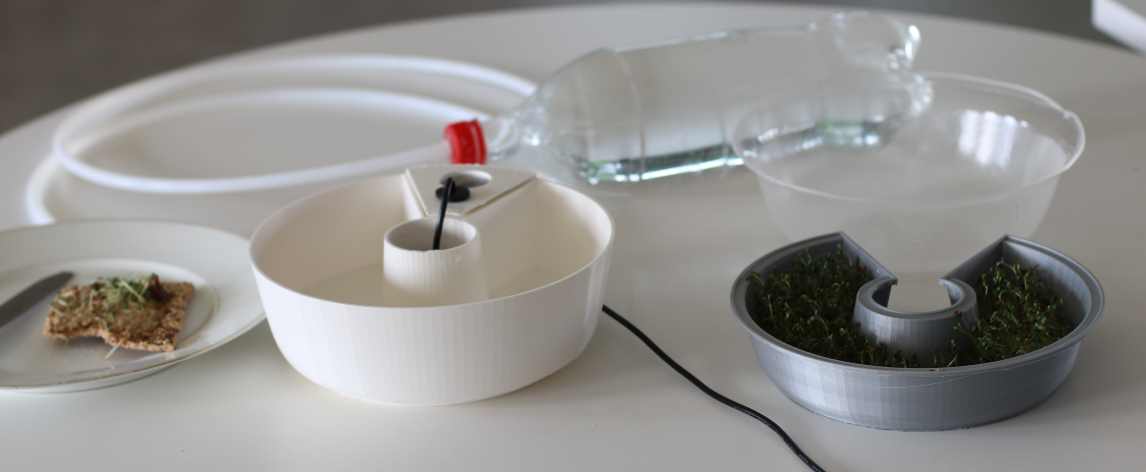
Here a picture with a reduced test version.

This part fit perfectly and connects to the Electronic container.
Some pictures of the assembly with the reduced test version.
The piezzoelectric element is placed in the middle of the bottom part .
Top cover
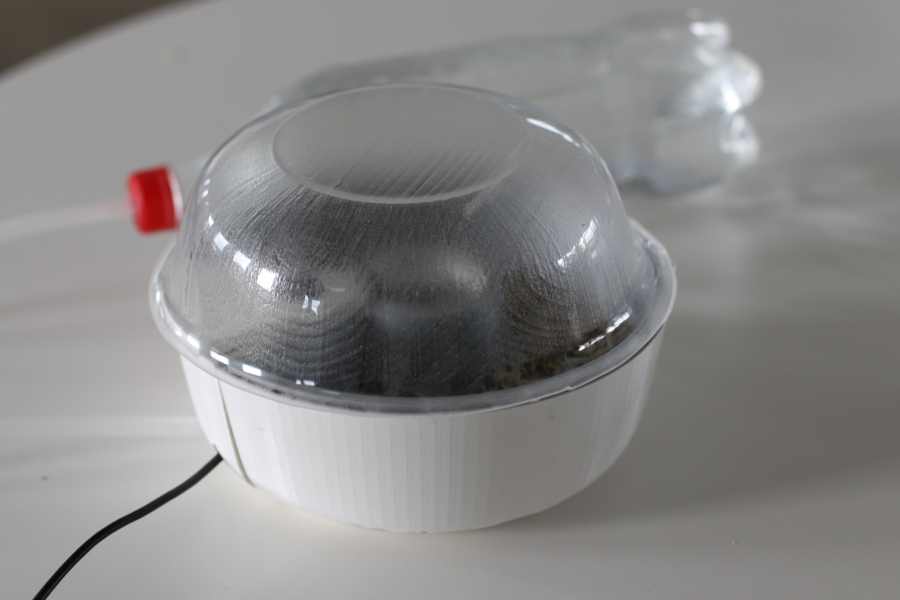
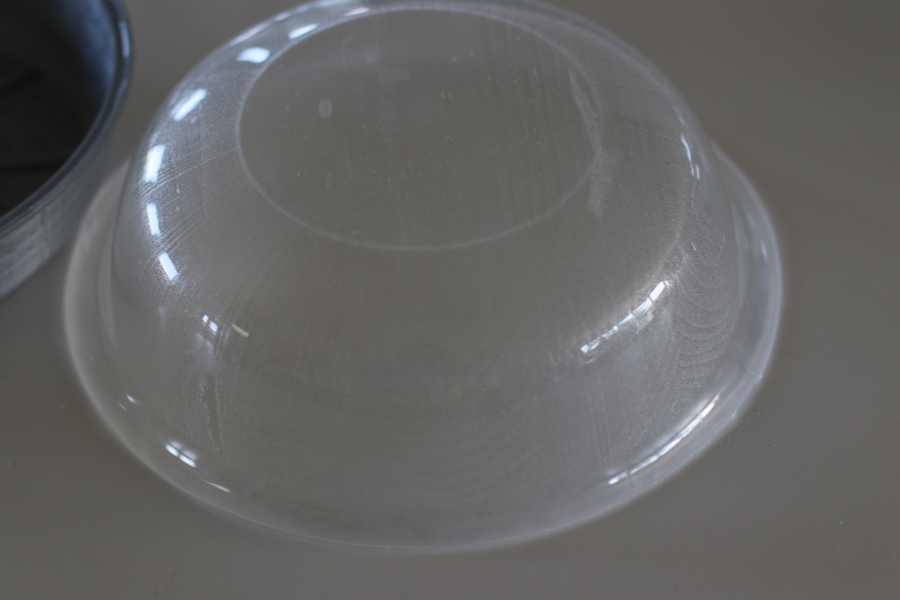
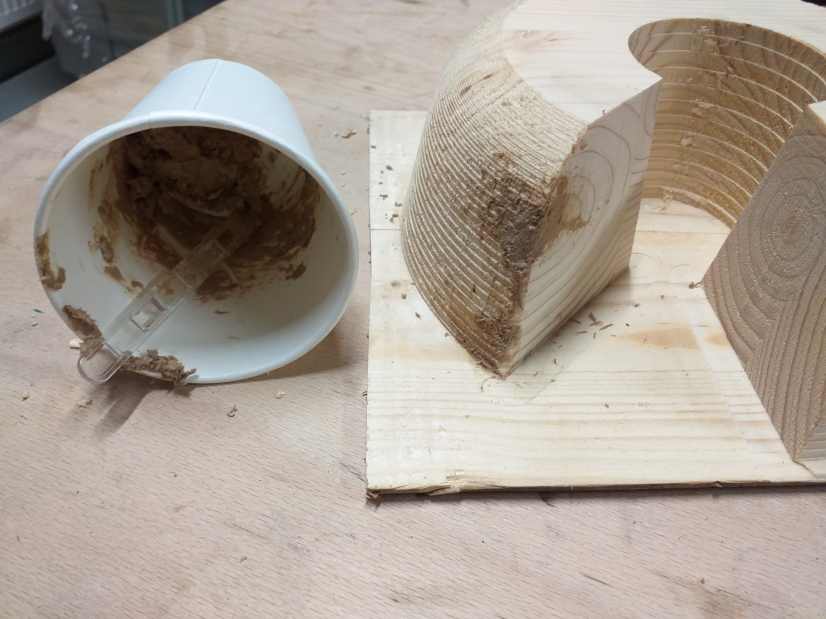
The top cover was made with vacuum forming from a mold milled in 3D CNC. Below the mold milled.
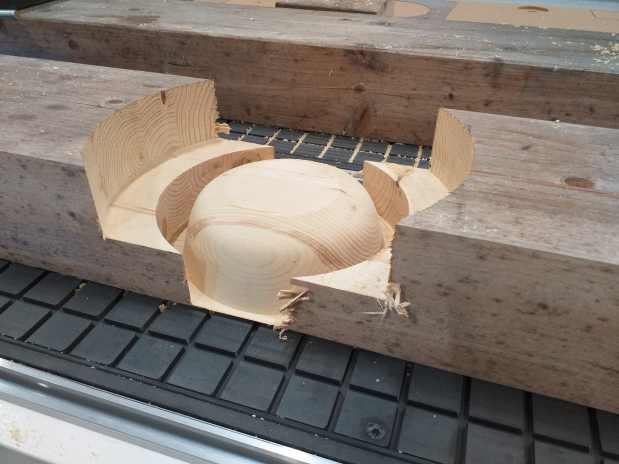
The wood sized for the mold should be at least 200 * 200 * 80 mm. Here I mill a big piece of wood that we found outside (part of a roofing that had fallen).
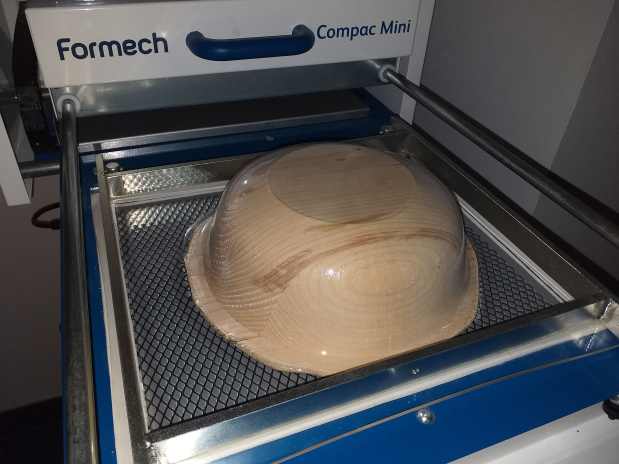
Vacuum form of a 3mm thick media ideally PET , but here Plexiglas. It has to be translucent to let the light go through.
Then laser cut the excess of material
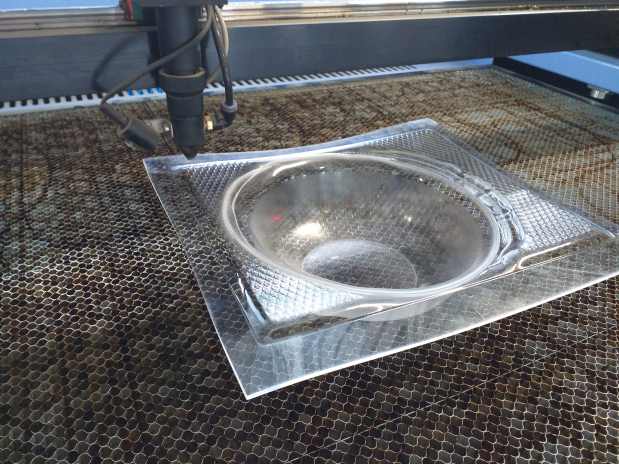
To obtain the top cover
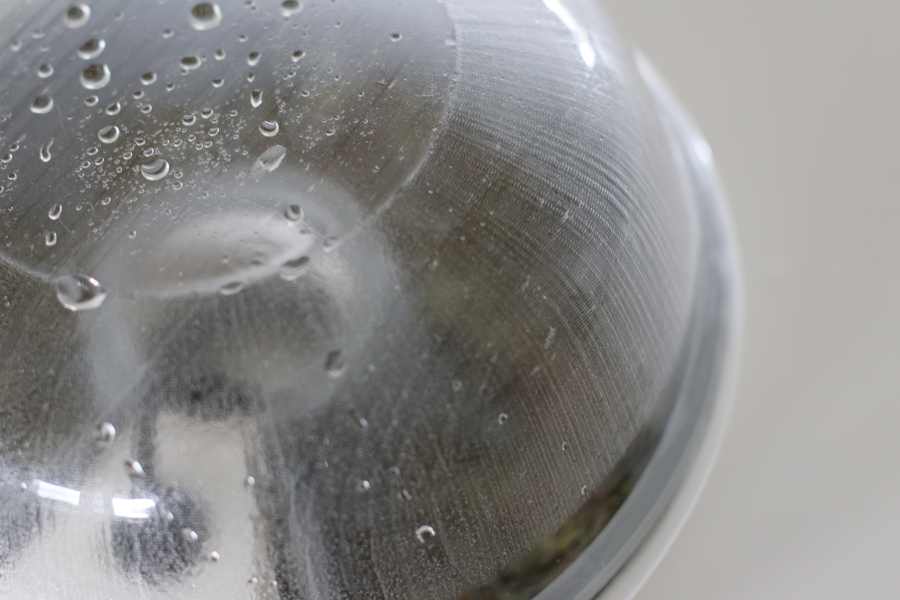
As you can see in this picture. The natural wood gives some mark on the vacuum form. You can clearly see the annual growth rings of the wood.
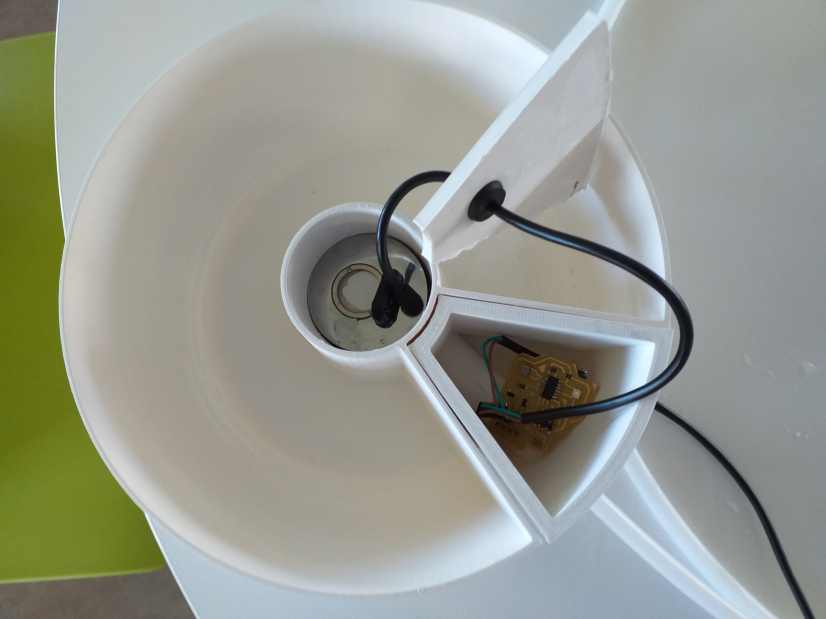
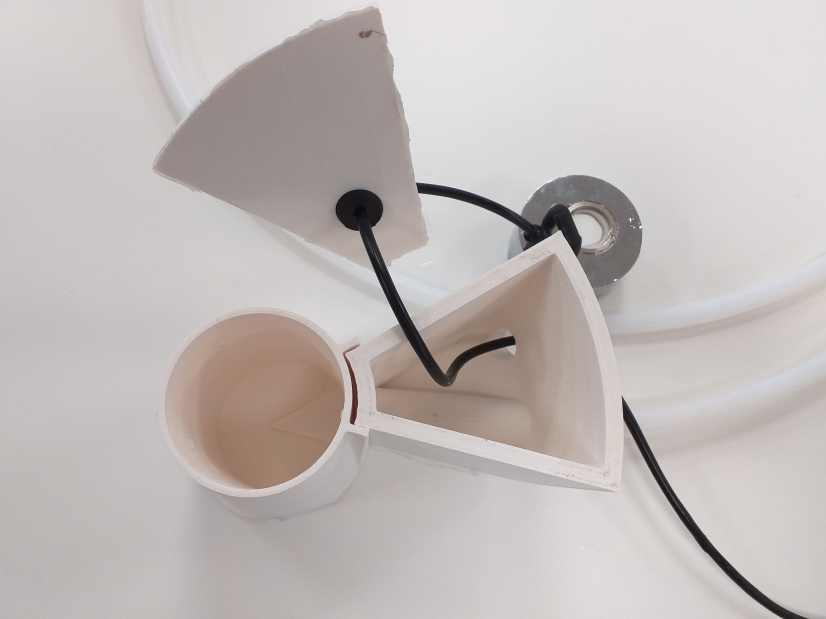
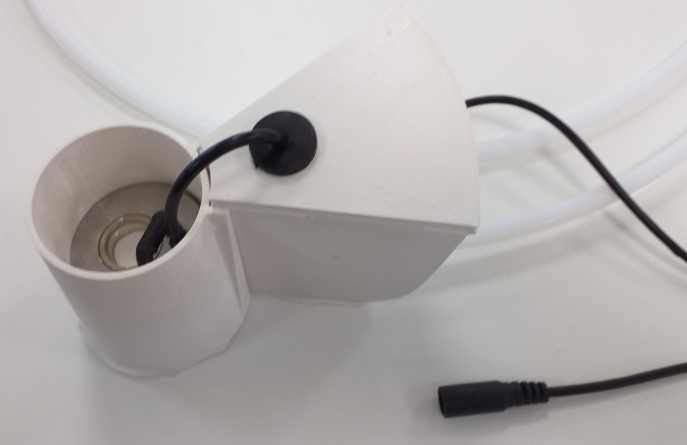
Electronic container
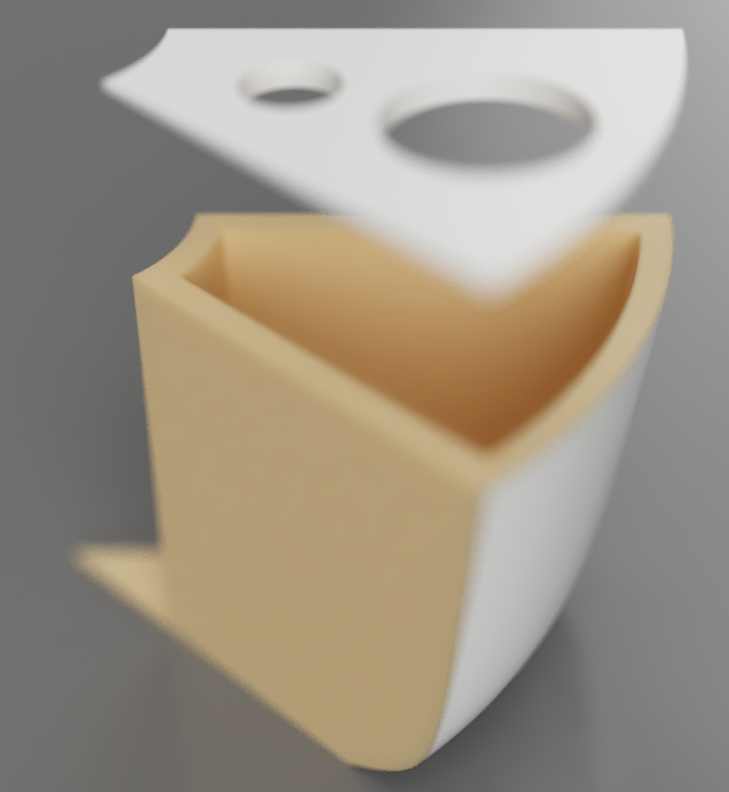
Electronic container is made of two parts.
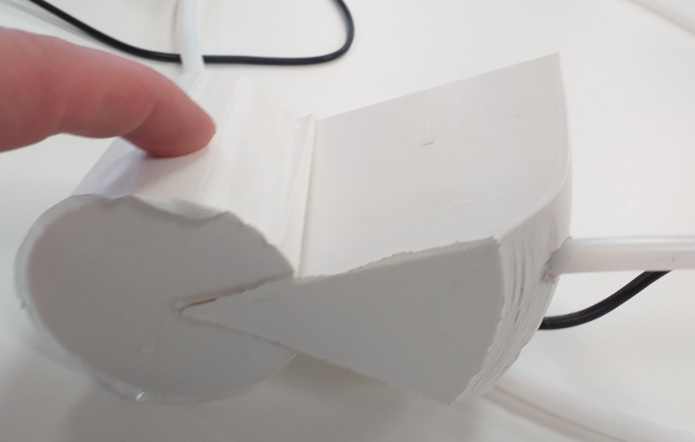
The top cover is designed with chamfer to guided precisely the fitting with a certain thickness of material to seal with the bottom part.
A hole is made to insert the electricity power coming from the external 24V power.
The water tube go through the lower part. Those parts are designed to avoid any possible contact with water and humidity ! Around the tube 3mm of 3D print seal the whole part to avoid any water leak.
The prominent triangle is a guide to perfectly fit with the bottom part. As shown below on a reduced test version .
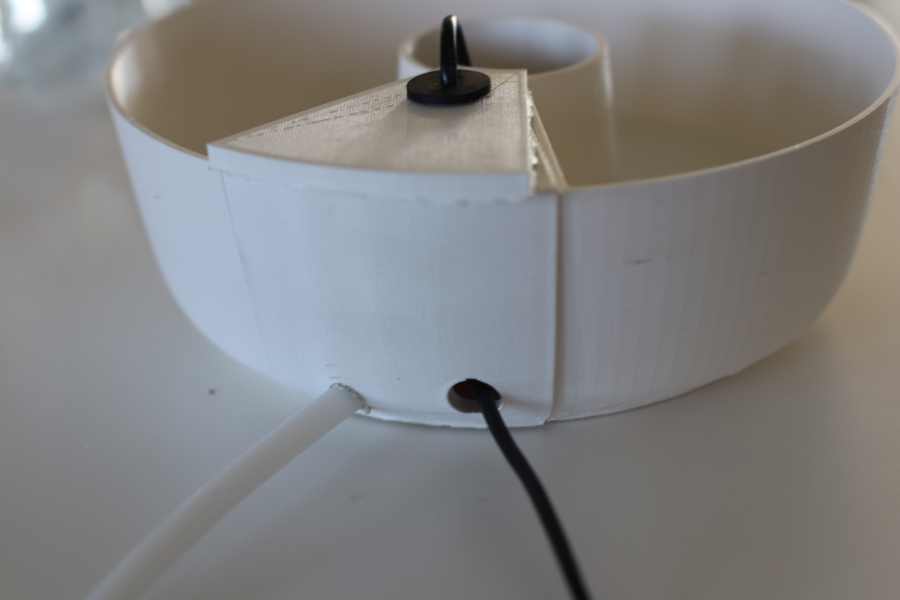
The top cover of the electronic container is designed to fit perfectly. It has 2 holes : one for the power rubber isolation and one to insert the 30mm diameter circle clear Plexiglas to let the natural light shine on the phototransistor. I did not use glue, it fit perfectly. But for long term, you should consider to seal it with food safe silicone.
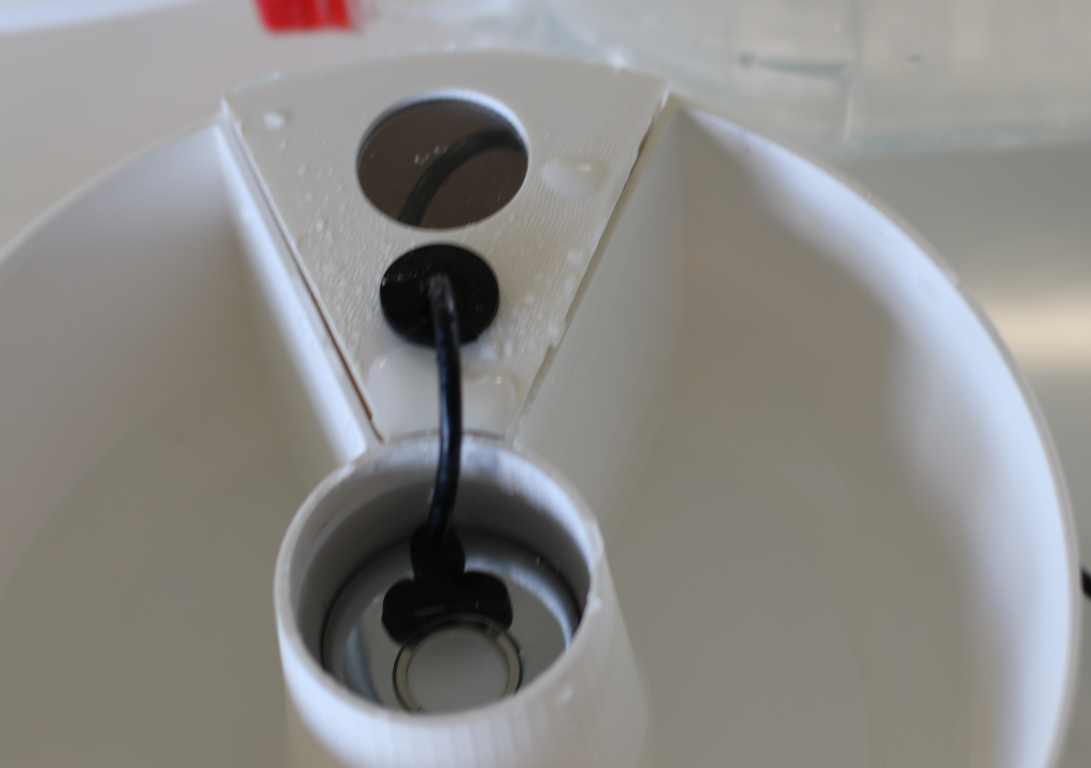
As you can see in this picture; The piezo electric element is lying in the middle of the bottom part. The electric cable goes through a rubber piece sealed in the top cover electronic part. The Plexiglas 30mm circle protect from humidity but let the light shine on the electronic.
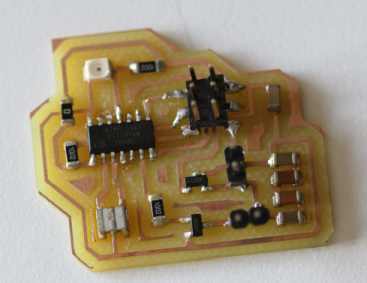
Remarks : on the above picture, it is an old picture of a previous model of the top cover for the electronic. But it shows correctly the electronic and the cable.
Week by week during the FabAcademy
I try to plan the project and use each FabAcademy weeks to explore a part of my final project.
Week01 , I describe the project with what already exists and made some first sketches
Week03 , I make the first CAD sketches, models and render
Week11&12 , I design and produce a first electronic board with the input and output I need for this project
Week13 , I had thought about implications and made other renders. I also think about later optimization.
Week14 I explore other boards, but due to a lack of time cannot use them to improve my final project, I switch to planB.
Week17 I design a board with a voltage regulator and improve my comprehension of electronic design with mosfet
Week 19 I make a creative common choice and describe the milling of a mold for vacuum forming. That week I build some reduced version of the assembly and process
Licence & Disclaimer
I share all the plans to build the device under Creative Common BY NC ND (Attribution , NonCommercial, NoDerivatives). https://creativecommons.org/licenses/by-nc-nd/2.0/

This object is made to sprout seeds. Food is a complicate subject. I cannot be responsible in any way if you reproduce the model without respecting food safety ! Just to mention a few : you have to be cautious about plastic, water quality , general hygiene (wash your hands) and edible sprouted seeds.
I cannot be responsible in any way if you reproduce the model without thinking about moisture, water and electricity. The model I design and build are watertight. At each step and for each element you should fully test to be sure you have no water leakage. Be aware, 24V up to 1 Amp in a humid environment could be deathly in extreme situations. Be sure you understand what you are doing, and keep in mind safety during tests .
Files
Electronic PCB :
RML traces with a 0.4mm 2 flutes
RML Cut out with a 1.0mm 2 flutes
3D STL files :
3D CNC mill for the mold :
Mold for the vacuum forming of the top cover
2D laser cut :
small transparent plexiglas part to transmit the light to the electronic
The CAD model :
The STEP conversion of the project
Code :