Final Project
The description of the idea
I came up with the idea of a portable vaporizer for medical herbs. The portable vaporizer will allow consuming herbals in a discreet way without being noticeable from other people.
The consumers of the tool are the people that use marijuana for medical purposes.
The vaporizer is not my invention. However, I see some potential for improving the usability of such tools. For example, my vaporizer will allow the person to chose the mode of vape production. There are two major ways of vape production: convection heating of the substance and conduction heating. Most of the portable vaporizers support only one mode.
Difference between conduction and convection heating
The difference between conduction and convection is that in convection heat is transferred by moving particles as when a fan is used to move heat from one place to another by blowing air.
In conduction heat is transferred through solids using the vibrating molecules in a substance. Some things conduct heat better than others— metals conduct heat very well, for example. You can heat one end of a metal rod and feel it at the other end. You can realize heat is being transferred by the metal from one end to the other when it travels to your hand from a heat source like when you are holding a poker in the fireplace, and you feel the heat, in the end, you are holding. @Quora

The licensing
My goal is to create an open source project for those who consume medical herbs. Those people often are more creative than the average person. However, they do not always have enough courage to create something new for them. They can consider different technologies as something complex. I want to provide them clear instructions hows to create something useful for them and learn many exciting things at the same time. Therefore, I welcome any modification of my original files. Also, I welcome other people to work together to develop a better version of the vaporizer.
An issue
Each of these heating ways has pros and cons for heating herbs.
The convection heating affects the whole area of martial. As a result, the resulted extraction of the substances is better. However, when the hot air does not go through the material, it loses the temperature. Therefore, it takes some time to heat the material after hot air being applied again. For a portable vaporizer, it means that a significant portion of air that the person inhales will be without any vapor.
The conduction heating. The good point of this way of heating is that the heating of the substance can continue even if the person does not inhale the vapor. Therefore, the material does not lose the temperature, and the vapor can be produced right way. However, this way of heating has significant cons. First, the heat applies to the material that touches the heating surface. Therefore, the produces vapor is less effective than the vapor from conduction heating. Second, while inhaling the air that goes through the material, actually cool it and decrease the vape production. Therefore, the person should control the speed of the airflow while inhaling.
Most of the portable vaporizers on the market support only one of these ways.
I want to combine both ways in my device. Moreover, I want to give the user different temperature options, and also I want to make the user choose what way of vapor production he or she prefers: Conduction, Convection, or Combo.
Here is the possible scheme for that kind of chamber.
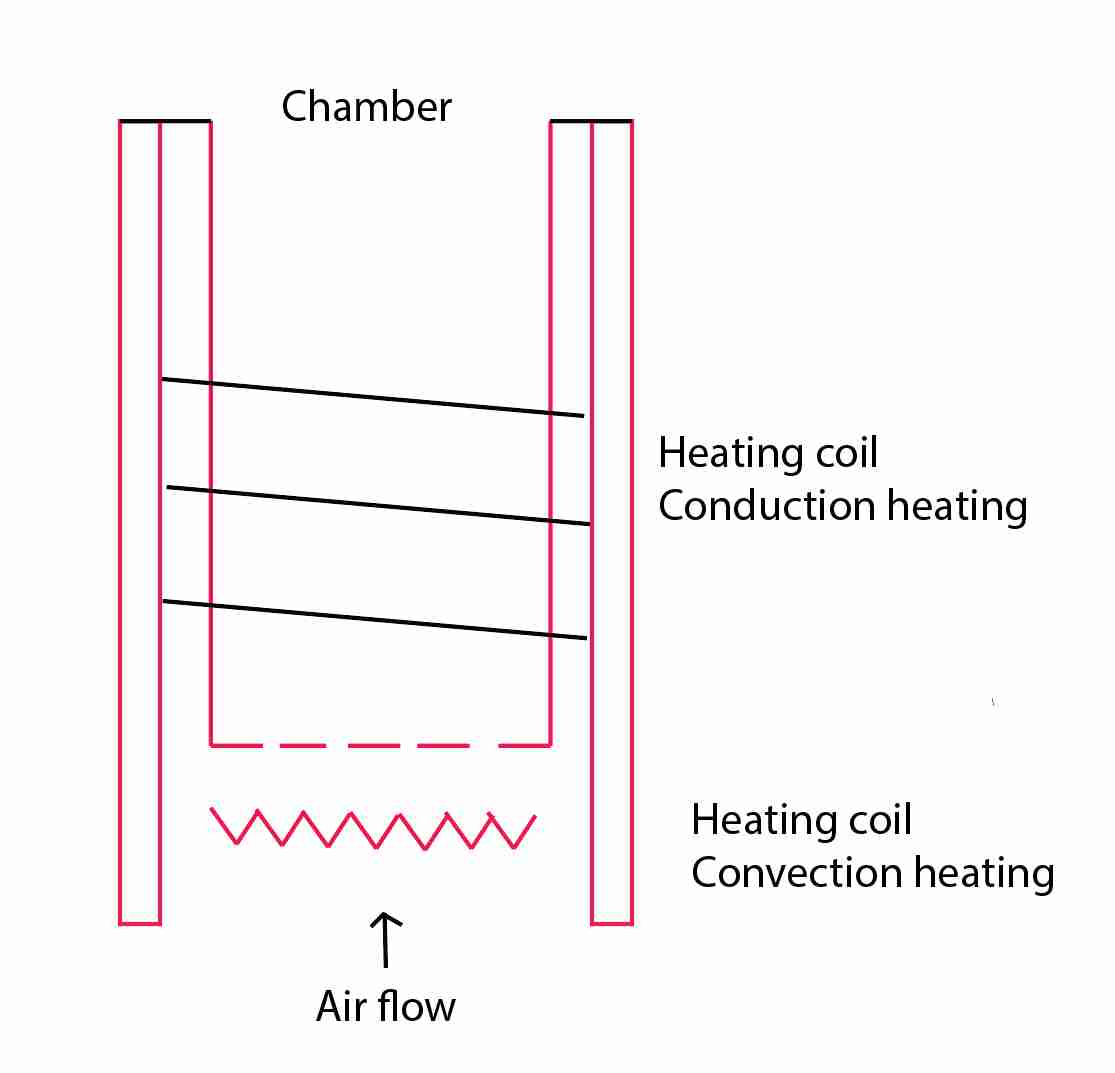
Simple sketch of the device
With my vaporizer, the user can choose vape production with both conduction and convection heating or utilize these modes separately. Moreover, the user can adjust the temperature of the airflow to get different quality of vape.
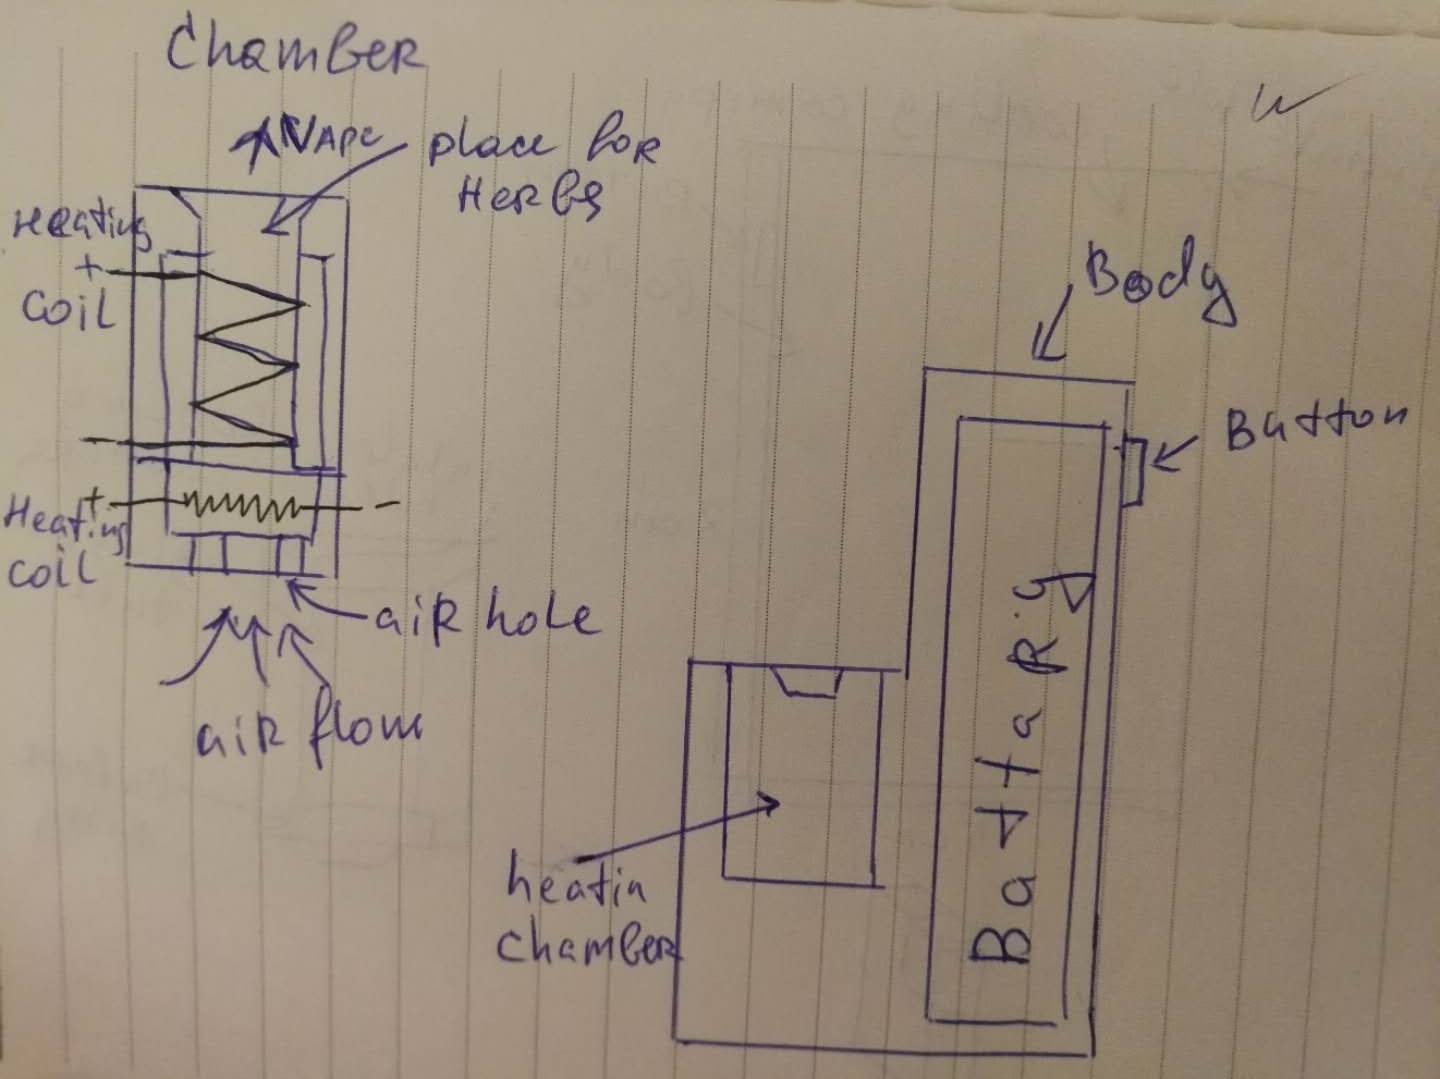
The general view
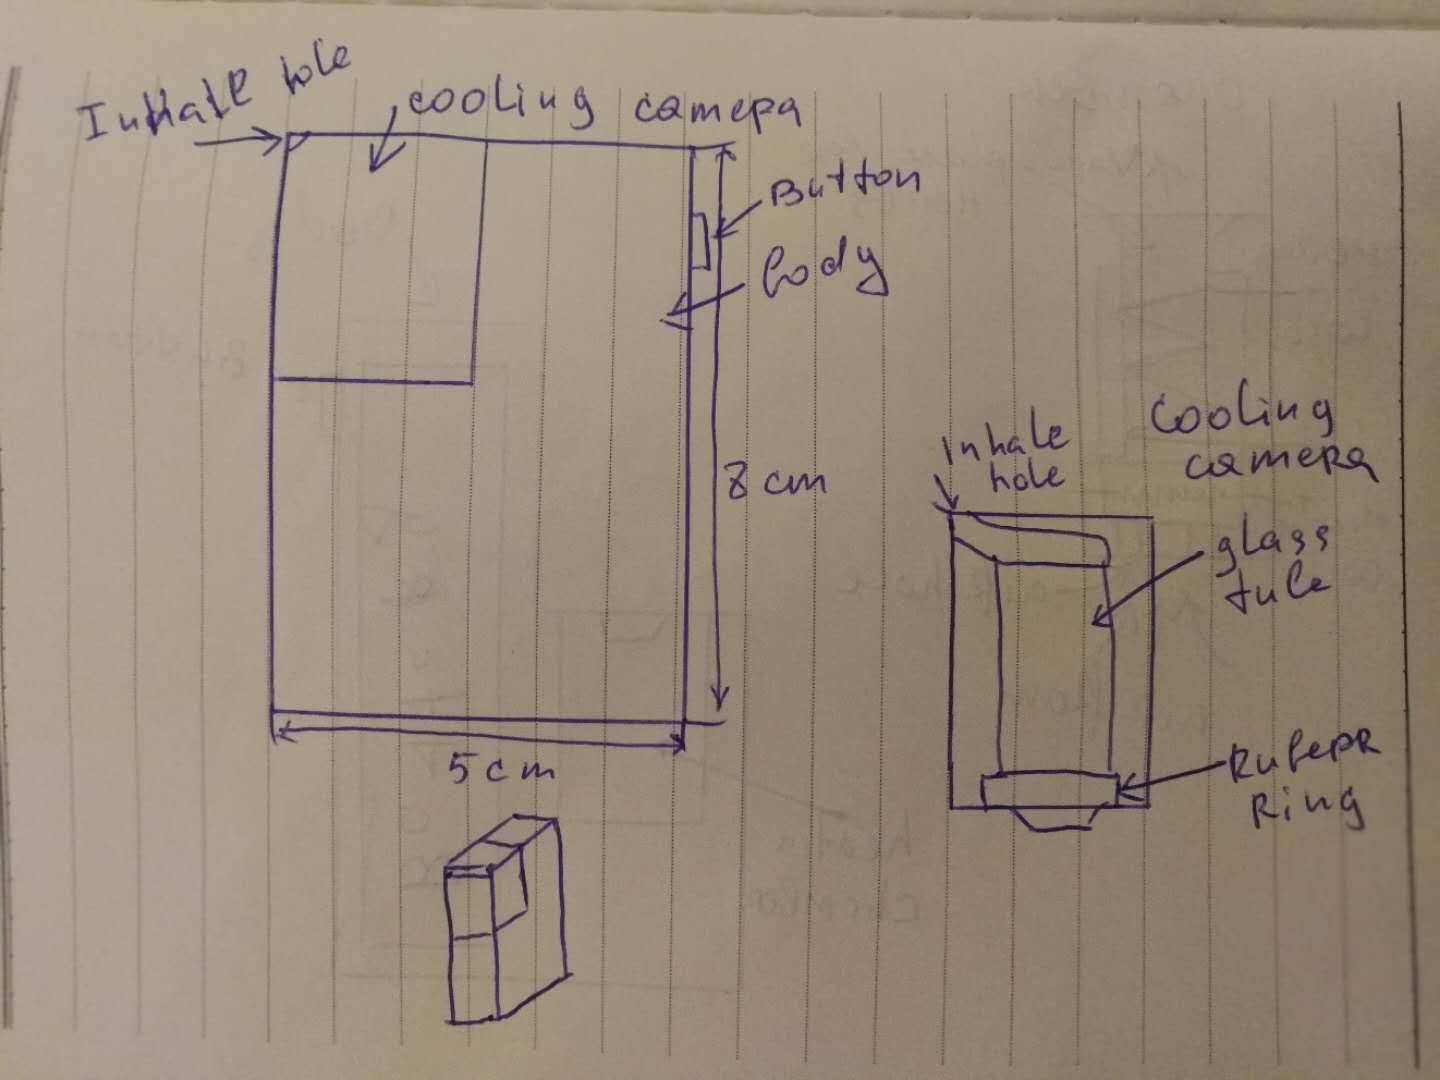
The inner scheme and the scheme of the heating chamber
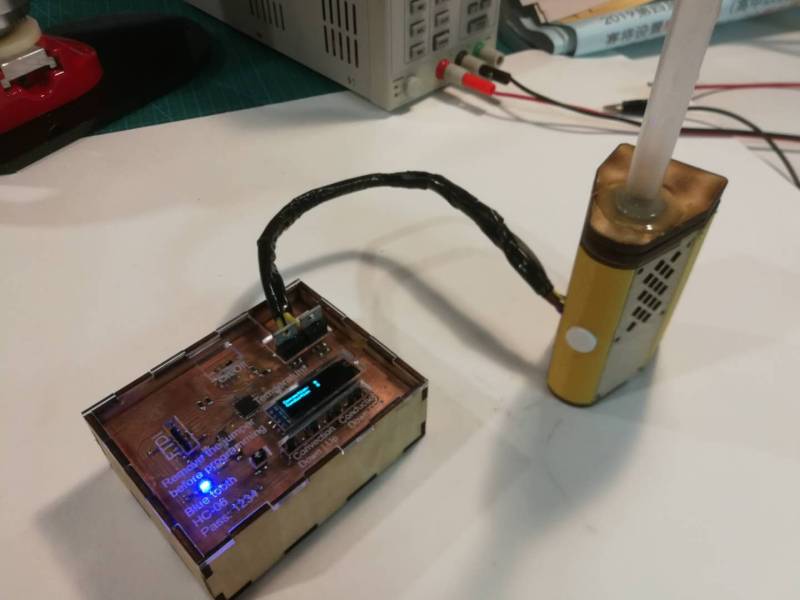
Prototype
Production process
The process was split to several parts: heating chamber, the body of the device and electronic parts.
Heating chamber
The design
More information about the design can be found here.
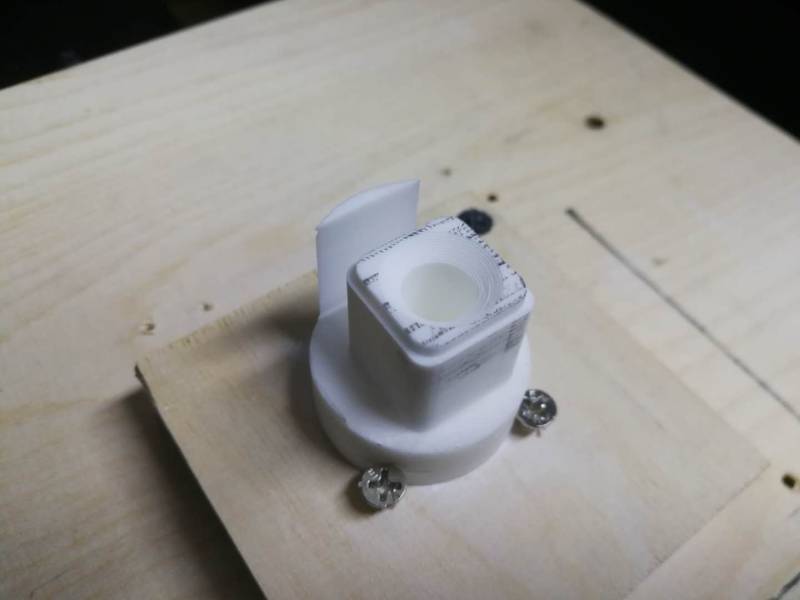
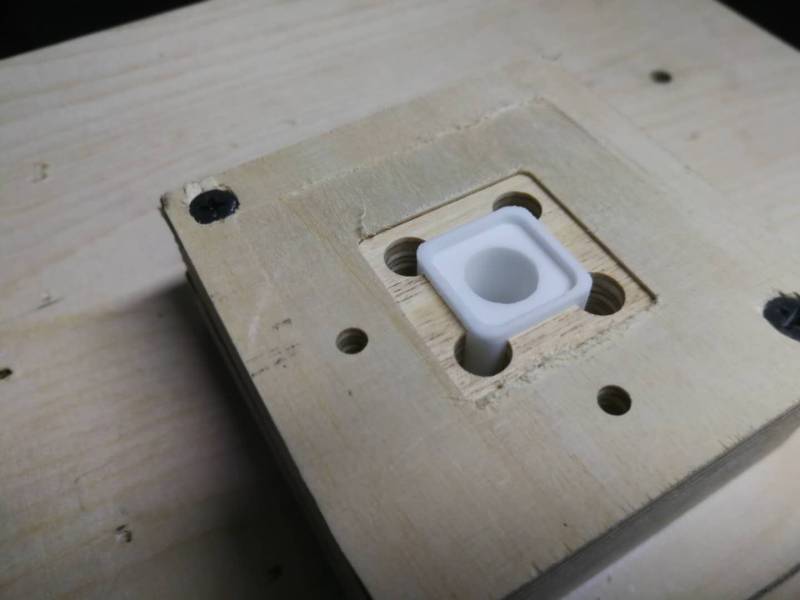
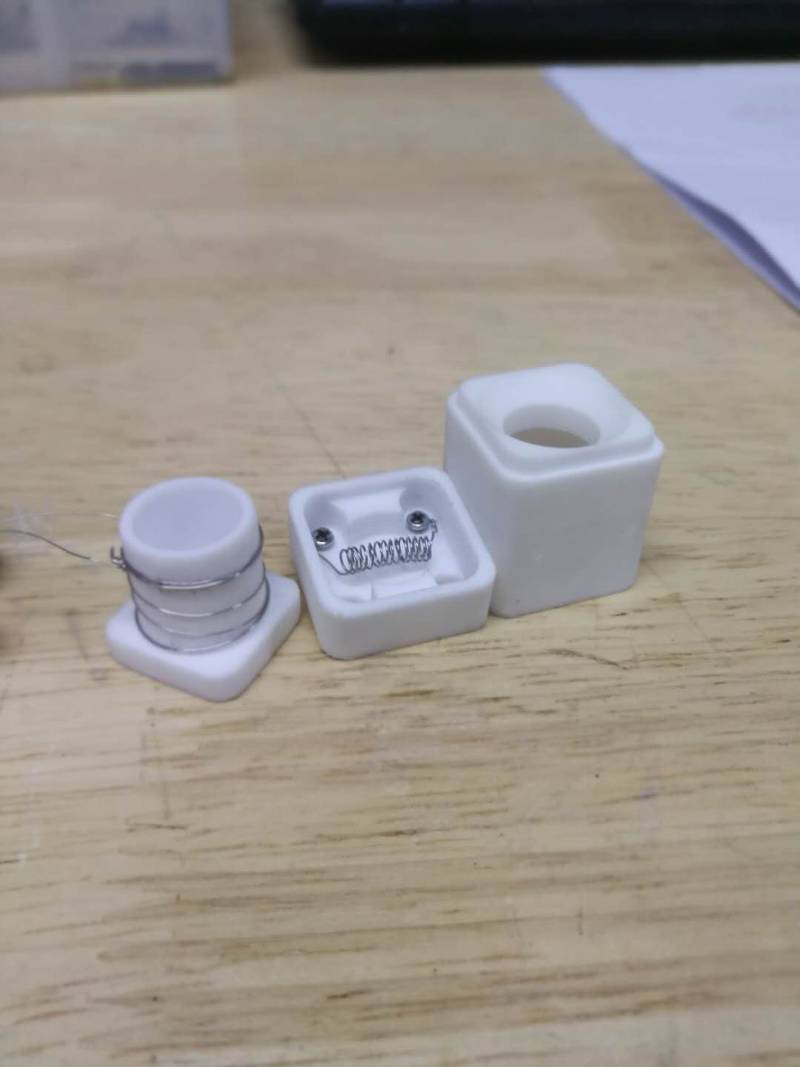
However, the final design of the chamber is like this.
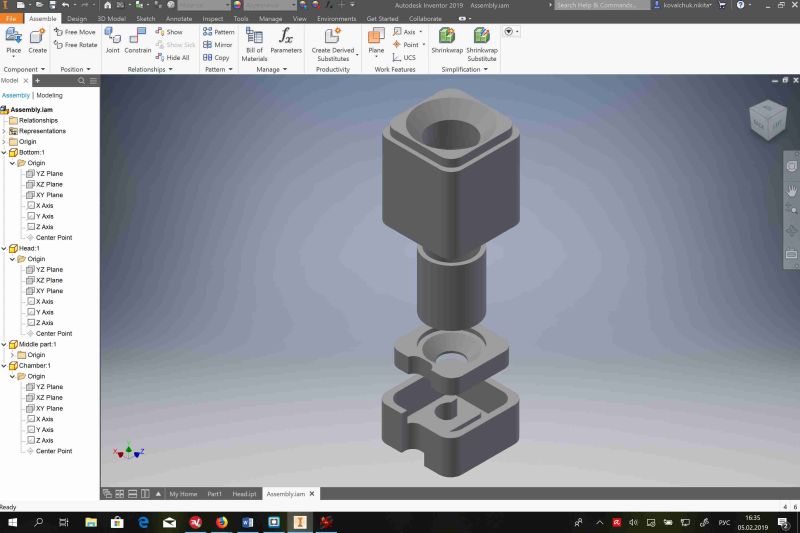
It combines three parts: head, middle part and bottom part.
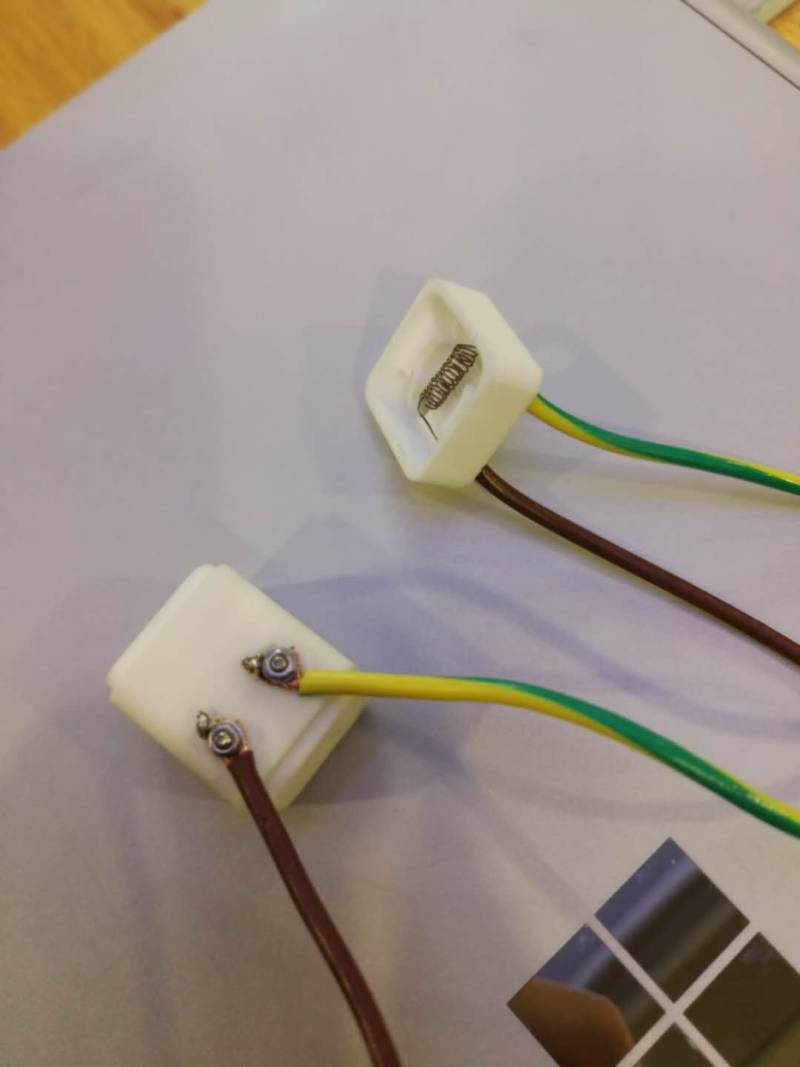
The head covers the heating coil for conduction heating, wrapped around ceramic chamber in the middle part. The botom part covers the coil for convetion heating.
The purpose of the chamber is to heat the herbs that the user wants to vaporize. Moreover, as it was already said the chamber should provide conductional and convection heating. I considered ceramic as the best solution for chamber. It is not electricity conductive, heat resistant, good at heat transition and non-toxic. There are several options for creation ceramic part:
3D printing
here are many choices for ceramic 3D printing on the market. Link There are several 3D printing technologies available to 3D print ceramic material:
- Paste extrusion: a paste extruder deposits layers of ceramic onto a build plate.
- Powder sintering: the ceramic is in a powdered form and is sintered layer by layer.
- Binder jetting: the 3D printer deposits layers of binding agent upon layers of powder.
- Photopolymerization: a light source solidifies a mix of resin and ceramic powder layer after layer.
However, there are several points that became curtail for me for my project:
- I did not have access to this technology in FabLab. It do not only require 3D printer, it also requires firing oven.
- The part shrinks after firing. Therefore, It requires some tests before finding right solution. Moreover, my chamber consists of several parts. It would be much more difficult to make these parts fit together.
- This technology is relatively expensive.
Molding and casting
This is an interesting technology. However, it also requires some test as the part should be fired after taking out from the mold. Therefore, it was not possible to make it the lab.
However, I tried to make molds and cated to experince the process. I used reisin for casting just to see what result could be.


Ceramic milling
Luckily there is special kind of ceramic that can be milled on ordinary CNC machine. It does not require firing and the part can be used right after machining. The name of the material is MACOR. It is machinable glass ceramic, that is used in many industries. Link Unfortunately, this material is quite expensive. However, I decided to use it for my final project, as with MACOR I can do everything in the Lab.
This material has following properties:
- Zero porosity and non-shrinking
- High dielectric strength
- Electrical resistivity
- Withstands high temperatures up to 1000ºC
- Tight tolerance capability
- Easily and economically machined into complex shapes and precision parts
- Non-toxic
I have chosen this material for the chamber.

I used CNC to mill the part out of the rod.
As the part has inner stucture, it was necessary to mill the part from the botton side.
On the next step I added heating coils for conduction heating and convection heating.
The look of the assembled part.
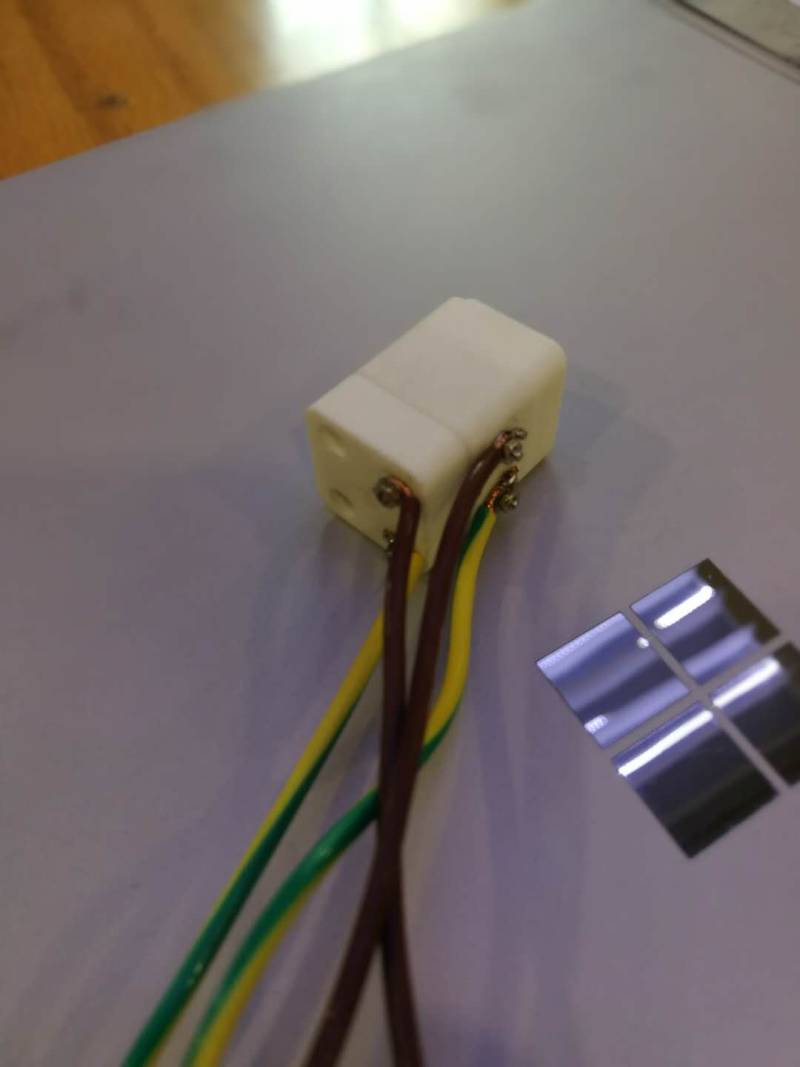
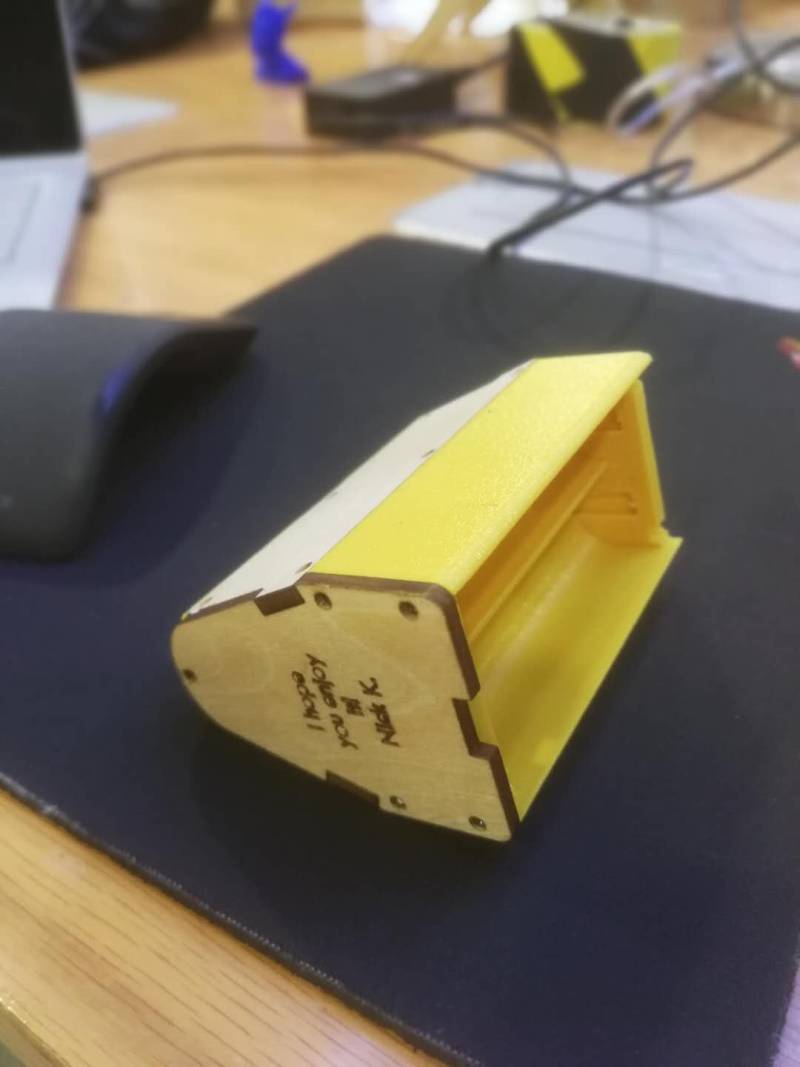
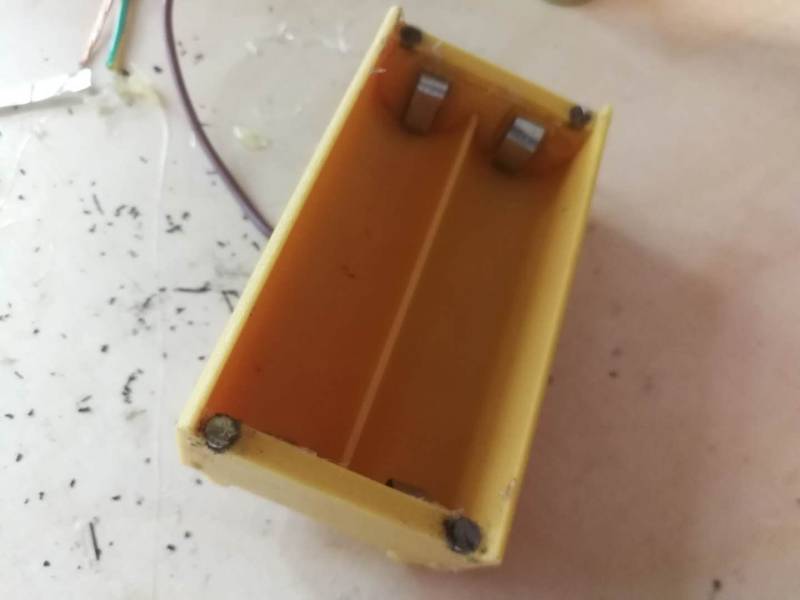
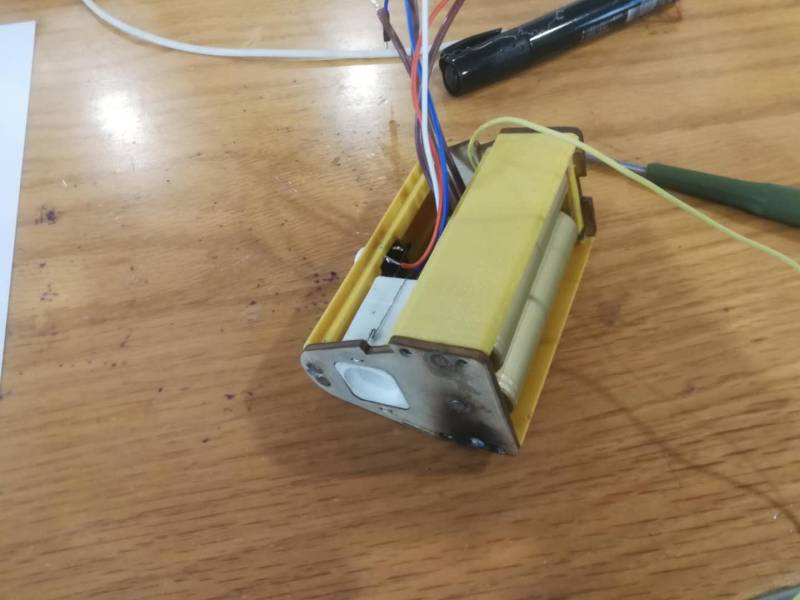
The body


Control box
PCB
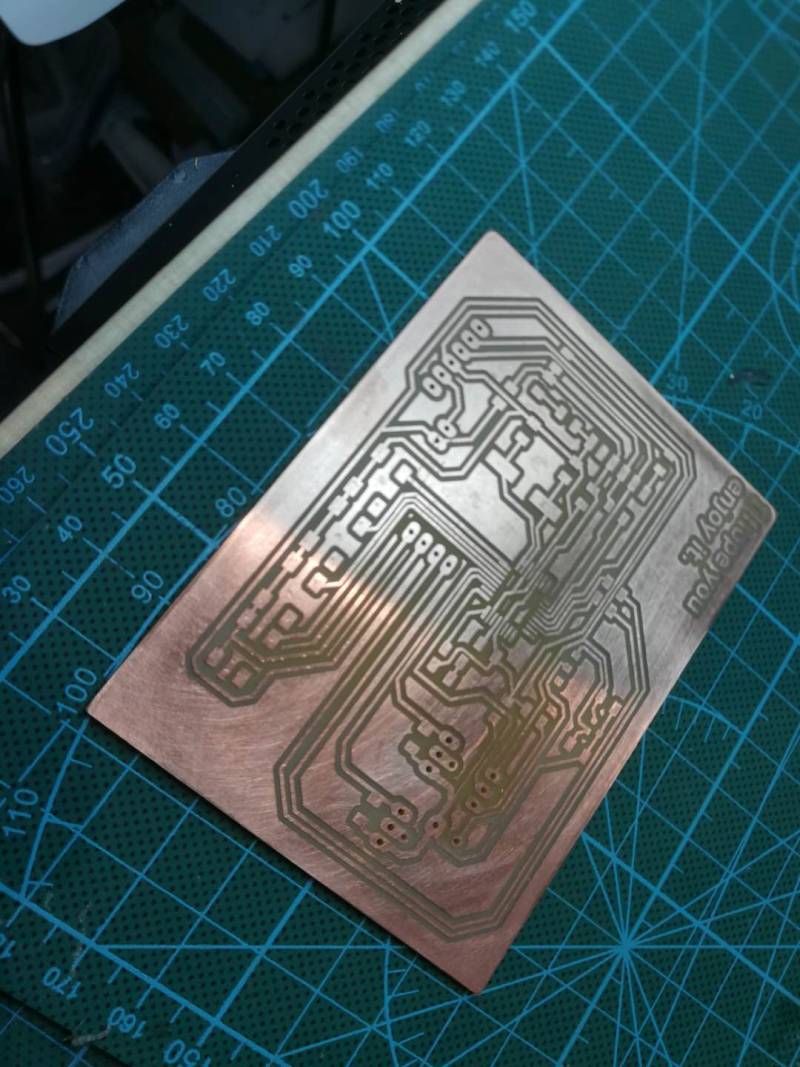
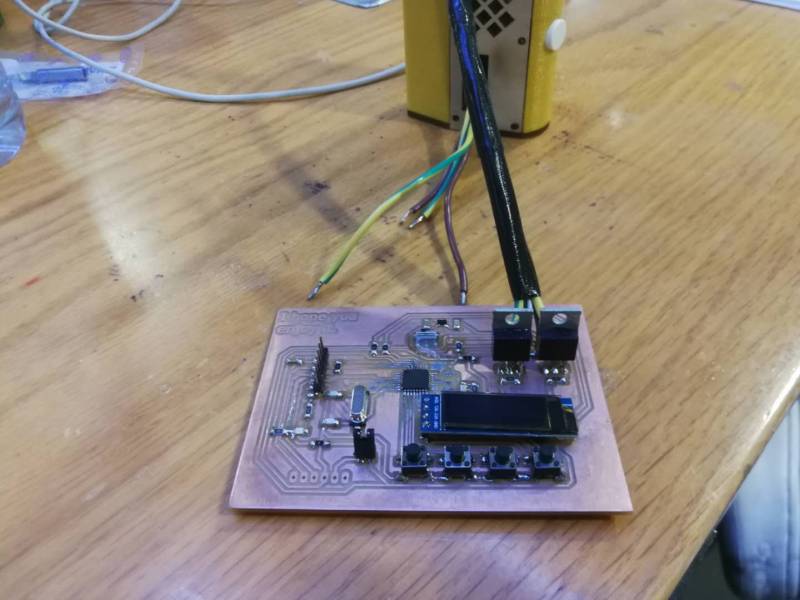

Assembling


Bill of Materials
| Material | Specifiaction | Amount | Price |
|---|---|---|---|
| Body part (prototype) | |||
| Plywood | 3 mm | 1 sheet | Price |
| PLA | any color | ||
| Body part | |||
| PEEK | 5 cm x 15 cm x 10 cm | 1 block | 100$ |
| Metal sheet | 0,5 mm | ||
| Button | |||
| Screws | 3 mm long, 1 mm diameter | ||
| Magnets | round, 4 mm x 2 mm | ||
| Glass tube | 14 mm diameter | ||
| Copper wires | |||
| Heating Chamber | |||
| MACOR | 10 cm x 4 cm | 1 rod | 50$ |
| iron-chromium-aluminium wire | 0,3 mm | 1 meter | |
| Copper wires | |||
| bolts and nuts | 1 mm diameter | ||
| Control box | |||
| Plywood | 3 mm | ||
| Vinyl board | |||
| PCB | |||
| PCB blank | FR1 | 1 | |
| Mosfet | 2 | ||
| OLED | 128 X 32 | 1 | |
| Buttons | 4 | ||
| Jumper | 1 | ||
| Pin heads | 8 | ||
| AtMega 328 | 1 | ||
| 0 omh Resistor | 5 | ||
| 10 Komh Resistor | 3 | ||
| 0,5 Komh Resistor | 2 | ||
| Slider Switch | 1 | ||
| Voltage regulator | 3,3v, 0,1 amp | ||
| Bluetooth module | HC-06 or HC-O5 | 1 | |
| LED | 2 | ||
| Crystall | 16,000 | ||
| Capasitor for regulator | 100nF | 2 | |
| Capasitor for crystall | 100nF | 2 | |
| Capasitor for reset pin | 100nF | 1 | |
| Capasitor for AREF pin | 100nF | 1 | |
| Capasitor for AtMega | 1 uF | 1 |
The code
#include <Wire.h>
#include <Adafruit_GFX.h>
#include <Adafruit_SSD1306.h>

// this constant won't change:
const int  Up_buttonPin   = 6;    // the pin that the pushbutton is attached to
const int  Down_buttonPin = 5;

const int  Up_buttonPin2   = 8;    // the pin that the pushbutton is attached to
const int  Down_buttonPin2 = 7;

const int FireButtonPin = 12;    // Fire Button

// Variables will change:
int ConvectPin = 9;    // Convectional
int ConductPin = 10;    // Convectional

int FireButtonState = 0;

int ConvectPwr = 0;
int ConductPwr = 0;

int buttonPushCounter = 0;   // counter for the number of button presses
int up_buttonState = 0;         // current state of the up button
int up_lastButtonState = 0;     // previous state of the up button
int constrainedbuttonPushCounter = 0;

int buttonPushCounter2 = 0;   // counter for the number of button presses
int up_buttonState2 = 0;         // current state of the up button
int up_lastButtonState2 = 0;     // previous state of the up button
int constrainedbuttonPushCounter2 = 0;

int down_buttonState = 0;         // current state of the up button
int down_lastButtonState = 0;     // previous state of the up button

int down_buttonState2 = 0;         // current state of the up button
int down_lastButtonState2 = 0;     // previous state of the up button

bool bPress = false;

#define OLED_RESET 7
Adafruit_SSD1306 display(OLED_RESET); // создаём объект "дисплей"

const unsigned char PROGMEM logoBmp[] = {
0x00, 0x00, 0xfc, 0x00, 0x00, 0x00, 0x00, 0x00, 0x00, 0x00, 0x00, 0x00, 0x00, 0x00, 0x00, 0x00,
0x00, 0x07, 0xff, 0xc0, 0x00, 0x00, 0x00, 0x00, 0x00, 0x00, 0x00, 0x00, 0x00, 0x00, 0x00, 0x00,
0x00, 0x1f, 0xff, 0xf0, 0x00, 0x00, 0x00, 0x00, 0x00, 0x00, 0x00, 0x00, 0x00, 0x00, 0x00, 0x00,
0x00, 0x3f, 0xff, 0xf8, 0x00, 0x00, 0x00, 0x00, 0x00, 0x00, 0x00, 0x00, 0x00, 0x00, 0x00, 0x00,
0x00, 0x7f, 0xff, 0xfc, 0x00, 0x00, 0x00, 0x00, 0x00, 0x00, 0x00, 0x00, 0x00, 0x00, 0x00, 0x00,
0x00, 0xff, 0xef, 0xfe, 0x00, 0x00, 0x00, 0x00, 0x00, 0x00, 0x00, 0x00, 0x00, 0x00, 0x00, 0x00,
0x01, 0xff, 0xef, 0xff, 0x00, 0x00, 0x00, 0x01, 0xe0, 0x0f, 0xf0, 0x01, 0xfc, 0x00, 0x00, 0x00,
0x03, 0xff, 0xcf, 0xff, 0x80, 0x00, 0x00, 0x01, 0xe0, 0x3f, 0xf8, 0x07, 0xfe, 0x00, 0x00, 0x00,
0x03, 0xff, 0xc7, 0xff, 0x80, 0x00, 0x00, 0x03, 0xe0, 0x3f, 0xfc, 0x0f, 0xff, 0x00, 0x00, 0x00,
0x07, 0xff, 0xc7, 0xff, 0xc0, 0x00, 0x00, 0x07, 0xe0, 0x38, 0xfe, 0x0f, 0x9f, 0x00, 0x00, 0x00,
0x07, 0xff, 0xc7, 0xff, 0xc0, 0x00, 0x00, 0x07, 0xe0, 0x20, 0x3e, 0x1f, 0x0f, 0x80, 0x00, 0x00,
0x0f, 0x9f, 0xc7, 0xf3, 0xc0, 0x00, 0x00, 0x0f, 0xe0, 0x00, 0x3e, 0x1e, 0x07, 0x80, 0x00, 0x00,
0x0f, 0xc7, 0xc7, 0xc7, 0xe0, 0x00, 0x00, 0x1f, 0xe0, 0x00, 0x3e, 0x1e, 0x07, 0x80, 0x00, 0x00,
0x0f, 0xc3, 0xc7, 0x87, 0xe0, 0x00, 0x00, 0x1d, 0xe0, 0x00, 0x3e, 0x3e, 0x07, 0xc0, 0x00, 0x00,
0x0f, 0xe1, 0xc7, 0x0f, 0xe0, 0x00, 0x00, 0x3d, 0xe0, 0x00, 0x3e, 0x3e, 0x07, 0xc0, 0x00, 0x00,
0x0f, 0xf0, 0xc6, 0x1f, 0xe0, 0x00, 0x00, 0x79, 0xe0, 0x00, 0x7c, 0x3e, 0x07, 0xc0, 0x00, 0x00,
0x0f, 0xf0, 0x44, 0x3f, 0xe0, 0x00, 0x00, 0xf1, 0xe0, 0x00, 0xfc, 0x3e, 0x07, 0xc0, 0x00, 0x00,
0x0f, 0xfc, 0x44, 0x7f, 0xe0, 0x00, 0x00, 0xe1, 0xe0, 0x01, 0xf8, 0x3e, 0x07, 0xc0, 0x00, 0x00,
0x0f, 0xfe, 0x28, 0xff, 0xe0, 0x00, 0x01, 0xe1, 0xe0, 0x07, 0xf0, 0x3e, 0x07, 0xc0, 0x00, 0x00,
0x0f, 0xff, 0x03, 0xff, 0xe0, 0x00, 0x03, 0xc1, 0xe0, 0x0f, 0xc0, 0x3e, 0x07, 0xc0, 0x00, 0x00,
0x0f, 0x80, 0x00, 0x03, 0xc0, 0x00, 0x03, 0xff, 0xfc, 0x1f, 0x80, 0x3e, 0x07, 0x80, 0x00, 0x00,
0x07, 0xe0, 0x00, 0x1f, 0xc0, 0x00, 0x03, 0xff, 0xfc, 0x3f, 0x00, 0x1e, 0x07, 0x80, 0x00, 0x00,
0x07, 0xff, 0x93, 0xff, 0xc0, 0x00, 0x03, 0xff, 0xfc, 0x3e, 0x00, 0x1e, 0x07, 0x80, 0x00, 0x00,
0x03, 0xff, 0x39, 0xff, 0x80, 0x00, 0x00, 0x01, 0xf0, 0x7c, 0x00, 0x1f, 0x0f, 0x80, 0x00, 0x00,
0x03, 0xfe, 0xec, 0xff, 0x80, 0x00, 0x00, 0x01, 0xe0, 0x7f, 0xfe, 0x1f, 0x9f, 0x00, 0x00, 0x00,
0x01, 0xff, 0xef, 0xff, 0x00, 0x00, 0x00, 0x01, 0xe0, 0x7f, 0xfe, 0x0f, 0xff, 0x00, 0x00, 0x00,
0x00, 0xff, 0xef, 0xfe, 0x00, 0x00, 0x00, 0x01, 0xe0, 0x7f, 0xfe, 0x07, 0xfe, 0x00, 0x00, 0x00,
0x00, 0x7f, 0xff, 0xfc, 0x00, 0x00, 0x00, 0x01, 0xe0, 0x7f, 0xfe, 0x03, 0xf8, 0x00, 0x00, 0x00,
0x00, 0x3f, 0xff, 0xf8, 0x00, 0x00, 0x00, 0x00, 0x00, 0x00, 0x00, 0x00, 0x00, 0x00, 0x00, 0x00,
0x00, 0x1f, 0xff, 0xe0, 0x00, 0x00, 0x00, 0x00, 0x00, 0x00, 0x00, 0x00, 0x00, 0x00, 0x00, 0x00,
0x00, 0x07, 0xff, 0x80, 0x00, 0x00, 0x00, 0x00, 0x00, 0x00, 0x00, 0x00, 0x00, 0x00, 0x00, 0x00,
0x00, 0x00, 0x78, 0x00, 0x00, 0x00, 0x00, 0x00, 0x00, 0x00, 0x00, 0x00, 0x00, 0x00, 0x00, 0x00,
};

void setup() {
  Serial.begin(9600);

  pinMode(ConvectPin, OUTPUT);
  pinMode(ConductPin, OUTPUT);

  pinMode(FireButtonPin, INPUT);

  pinMode( Up_buttonPin , INPUT_PULLUP);
  pinMode( Down_buttonPin , INPUT_PULLUP);

  pinMode( Up_buttonPin2 , INPUT_PULLUP);
  pinMode( Down_buttonPin2 , INPUT_PULLUP);

  constrainedbuttonPushCounter = constrain(buttonPushCounter, 0, 10); // Constarain values for settings
  constrainedbuttonPushCounter2 = constrain(buttonPushCounter2, 0, 10); // Constarain values for settings

  display.begin(SSD1306_SWITCHCAPVCC, 0x3C);  // инициализация дисплея по интерфейсу I2C, адрес 0x3C
  display.clearDisplay(); // очистка дисплея
  display.drawBitmap(0, 0, logoBmp, 128, 64, WHITE); // рисуем нашу картинку на экране
  display.display(); // выводим её на OLED
  delay (2000);
  display.clearDisplay(); // очистка дисплея
  display.setTextSize(1); // установка размера шрифта
  display.setTextColor(WHITE); // установка цвета текста
  display.setCursor(0, 0); // установка курсора в позицию X = 0; Y = 0
  display.print ("Hello, my friend!"); // записываем в буфер памяти дисплея нашу фразу
  display.setCursor(0, 10); // установка курсора в позицию X = 0; Y = 0
  display.print ("For medical use only."); // записываем в буфер памяти дисплея нашу фразу
  display.setCursor(0, 20); // установка курсора в позицию X = 0; Y = 0
  display.print ("Stay safe!"); // записываем в буфер памяти дисплея нашу фразу
  display.display(); // и её выводим на экран
  delay (2000);
  display.clearDisplay(); // очистка дисплея
  display.setTextSize(1); // установка размера шрифта
  display.setTextColor(WHITE); // установка цвета текста
  display.setCursor(0, 10); // установка курсора в позицию X = 0; Y = 0
  display.print ("May the Force be with        YOU!"); // записываем в буфер памяти дисплея нашу фразу
  display.display(); // и её выводим на экран
  delay (2000);
  display.clearDisplay(); // очистка дисплея
  // поочерёдно рисуем вложенные прямоугольники
  for (int16_t i = 0; i < display.height() / 2; i += 2) {
    display.drawRect(i, i, display.width() - 2 * i, display.height() - 2 * i, WHITE);
    display.display();
    delay(100);
  }
  delay (500);

 // поочерёдно убираем нарисованные прямоугольники
  for (int16_t i = 0; i < display.height() / 2; i += 2) {
    display.drawRect(i, i, display.width() - 2 * i, display.height() - 2 * i, BLACK);
    display.display();
    delay(100);
  }
  delay (500);
  display.setTextSize(1); // установка размера шрифта
  display.setTextColor(WHITE); // установка цвета текста
  display.setCursor(0, 0); // установка курсора в позицию X = 0; Y = 0
  display.print ("Convection:"); // записываем в буфер дисплея нашу фразу
  display.setCursor(0, 10); // установка курсора в позицию X = 0; Y = 0
  display.print ("Conduction:"); // записываем в буфер дисплея нашу фразу
  display.display(); // и её выводим на экран
  display.setCursor(80, 0); // установка курсора в позицию X = 0; Y = 0
  display.print (buttonPushCounter); // записываем в буфер дисплея нашу фразу
  display.setCursor(80, 10); // установка курсора в позицию X = 0; Y = 0
  display.print (buttonPushCounter2); // записываем в буфер дисплея нашу фразу
  display.display(); // и её выводим на экран
}

void loop()
{
   checkUp();
   checkDown();
   checkUp2();
   checkDown2();

   if( bPress){
       bPress = false;

  constrainedbuttonPushCounter = constrain(buttonPushCounter, 0, 10); // Constarain values for settings
  constrainedbuttonPushCounter2 = constrain(buttonPushCounter2, 0, 10); // Constarain values for settings

  display.clearDisplay(); // очистка дисплея
  display.setTextSize(1); // установка размера шрифта
  display.setTextColor(WHITE); // установка цвета текста
  display.setCursor(0, 0); // установка курсора в позицию X = 0; Y = 0
  display.print ("Convection:"); // записываем в буфер дисплея нашу фразу
  display.setCursor(0, 10); // установка курсора в позицию X = 0; Y = 0
  display.print ("Conduction:"); // записываем в буфер дисплея нашу фразу
  display.display(); // и её выводим на экран
  display.setCursor(80, 0); // установка курсора в позицию X = 0; Y = 0
  display.print (constrainedbuttonPushCounter); // записываем в буфер дисплея нашу фразу
  display.setCursor(80, 10); // установка курсора в позицию X = 0; Y = 0
  display.print (constrainedbuttonPushCounter2); // записываем в буфер дисплея нашу фразу
  display.display(); // и её выводим на экран
   }

{
   // read the state of the pushbutton value: // This punction FIre Ut convection coil. It works onnly if the main button is pressed.

  constrainedbuttonPushCounter = constrain(buttonPushCounter, 0, 10); // Constarain values for settings
  ConvectPwr=map(constrainedbuttonPushCounter,0,10,0,255);
  FireButtonState = digitalRead(FireButtonPin);

  if (FireButtonState == HIGH)
  {    // turn LED on:
  analogWrite(ConvectPin, ConvectPwr);
  }
  else
  {    // turn LED off:
  digitalWrite(ConvectPin, LOW);
  }
  }

{
  constrainedbuttonPushCounter2 = constrain(buttonPushCounter2, 0, 10); // Constarain values for settings
  ConductPwr=map(constrainedbuttonPushCounter2,0,10,0,255);
  analogWrite(ConductPin, ConductPwr);
  delay(15);

}

}


void checkUp()
{
  up_buttonState = digitalRead(Up_buttonPin);

  // compare the buttonState to its previous state
  if (up_buttonState != up_lastButtonState) {
    // if the state has changed, increment the counter
    if (up_buttonState == LOW) {
        bPress = true;
      // if the current state is HIGH then the button went from off to on:
      buttonPushCounter++;
      Serial.println("on");
      Serial.print("number of button pushes: ");
      Serial.println(buttonPushCounter);
    } else {
      // if the current state is LOW then the button went from on to off:
      Serial.println("off");
    }
    // Delay a little bit to avoid bouncing
    delay(50);
  }
  // save the current state as the last state, for next time through the loop
  up_lastButtonState = up_buttonState;
}

void checkUp2()
{
  up_buttonState2 = digitalRead(Up_buttonPin2);

  // compare the buttonState to its previous state
  if (up_buttonState2 != up_lastButtonState2) {
    // if the state has changed, increment the counter
    if (up_buttonState2 == LOW) {
        bPress = true;
      // if the current state is HIGH then the button went from off to on:
      buttonPushCounter2++;
      Serial.println("on");
      Serial.print("number of button pushes: ");
      Serial.println(buttonPushCounter2);
    } else {
      // if the current state is LOW then the button went from on to off:
      Serial.println("off");
    }
    // Delay a little bit to avoid bouncing
    delay(50);
  }
  // save the current state as the last state, for next time through the loop
  up_lastButtonState2 = up_buttonState2;
}

void checkDown()
{
  down_buttonState = digitalRead(Down_buttonPin);

  // compare the buttonState to its previous state
  if (down_buttonState != down_lastButtonState) {
    // if the state has changed, increment the counter
    if (down_buttonState == LOW) {
        bPress = true;
      // if the current state is HIGH then the button went from off to on:
      buttonPushCounter--;

      Serial.println("on");
      Serial.print("number of button pushes: ");
      Serial.println(buttonPushCounter);
    } else {
      // if the current state is LOW then the button went from on to off:
      Serial.println("off");
    }
    // Delay a little bit to avoid bouncing
    delay(50);
  }
  // save the current state as the last state, for next time through the loop
  down_lastButtonState = down_buttonState;
}

void checkDown2()
{
  down_buttonState2 = digitalRead(Down_buttonPin2);

  // compare the buttonState to its previous state
  if (down_buttonState2 != down_lastButtonState2) {
    // if the state has changed, increment the counter
    if (down_buttonState2 == LOW) {
        bPress = true;
      // if the current state is HIGH then the button went from off to on:
      buttonPushCounter2--;

      Serial.println("on");
      Serial.print("number of button pushes: ");
      Serial.println(buttonPushCounter2);
    } else {
      // if the current state is LOW then the button went from on to off:
      Serial.println("off");
    }
    // Delay a little bit to avoid bouncing
    delay(50);
  }
  // save the current state as the last state, for next time through the loop
  down_lastButtonState2 = down_buttonState2;
}
Assignments from previous weeks
Files
Body
- plastic parts: Battery holder, Front Part
- plywood parts: Back cover, Left side, Right side, Top, Pipe holder, Top
Control box
PCB
- Eagle file: PCB
Heating chamber
- Ceramic parts: Head, Bottom, Middle part,
Demonstration
The presentation sheet Link
The presentation video Link