Embedded programming

Programming in Arduino

Hello code in Arduino language

This code calls a blink function to make the LED blink when the push button is pressed

photo

In the code, set the pin number according to the pin diagram

photo

Settings

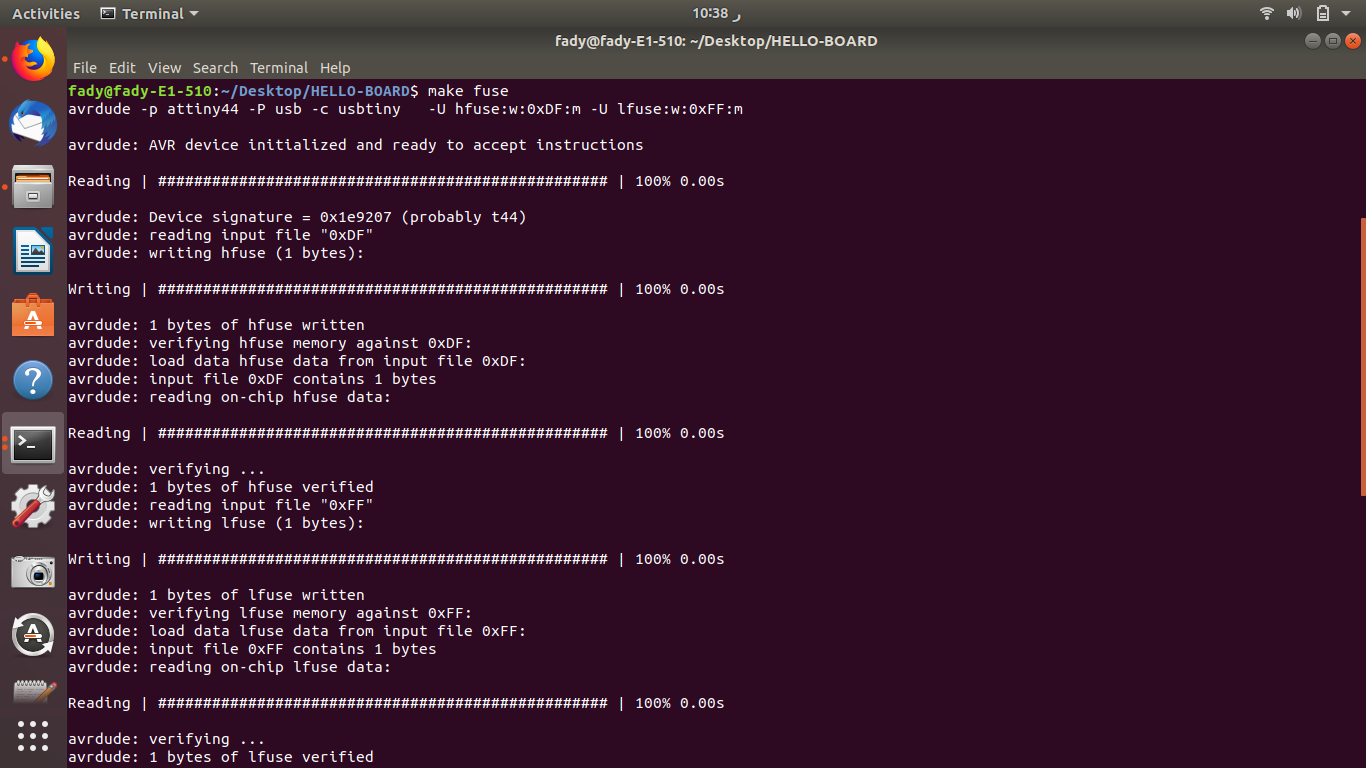
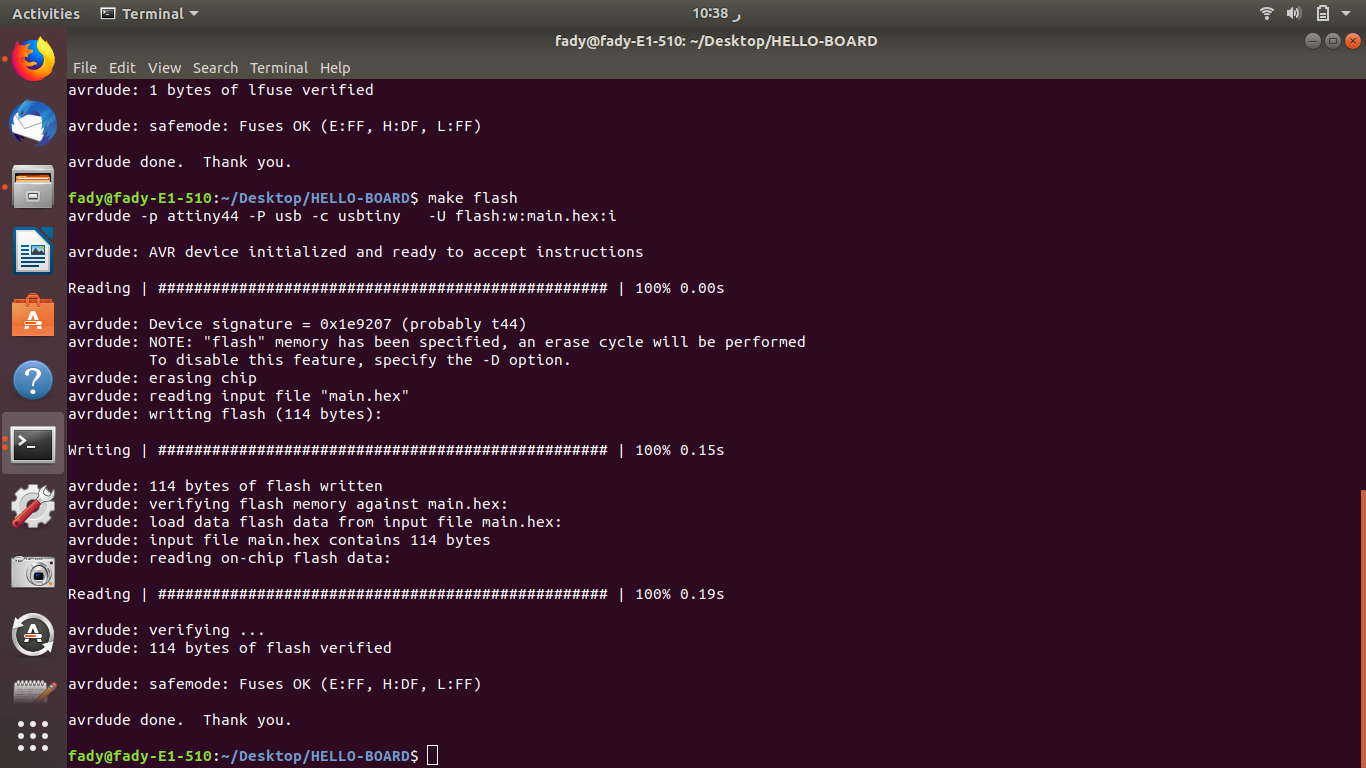
The first step is to connect the arduino board and to load select it in Tools, select the port, and upload the ArduinoISP sketch from examples. Then disconnect, connect the hello board to the Arduino board, reconnect to the PC, select Board and processor as Attiny44, select clock, select programmer as ArduinoISP, burn Bootloader, and finally upload the sketch.

To programme your Attiny44 with the Arduino board you'll need to install the Attiny44 plugin in the Arduino software. The steps to do this are:

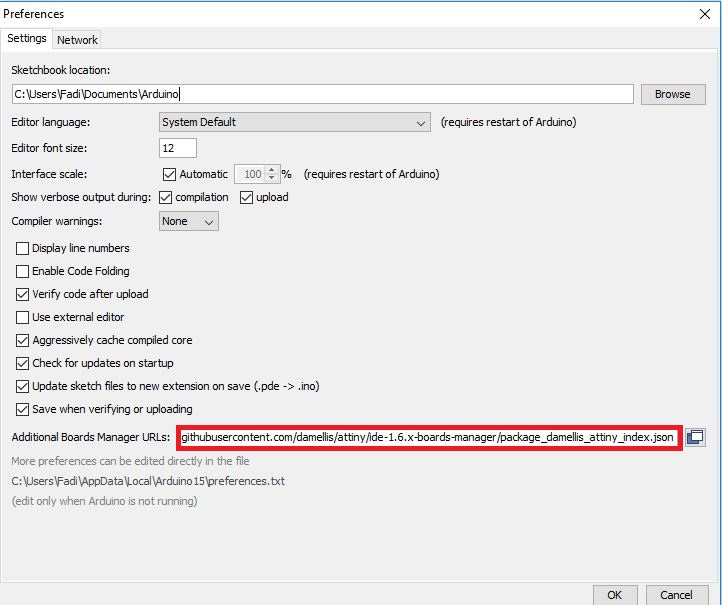
  1. Go to: File > Preferences : in the bottom of the window you will see "Additional Boards Manager URLs"
  2. Paste the following URL: link
  3. Clik OK and go to: Tools > Board > Board Manager
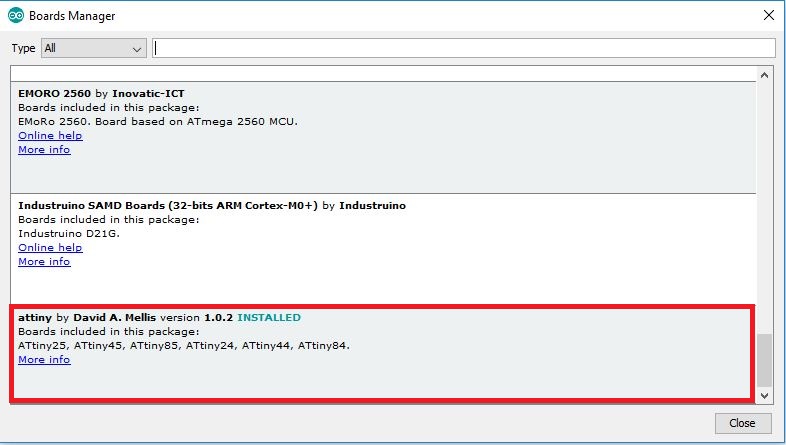
  4. In the Board Manager list find "attiny by David A. Mellis version 1.0.2" and click installed
  5. When the installation is finished INSTALLED will be written next to it.
  6. Now you will find the Attiny24/44/84 in the Board menu

Once that is done you can use the Arduino Board as a programmer for the Attiny 44. To programme the Hello board using Arduino follow these steps:

  1. Plug the Arduino board to your PC
  2. Select the Board type ours is: Tools > Board > Arduino/Genuiono Uno
  3. Select the port to which the Arduino board is connected: Tools > Port
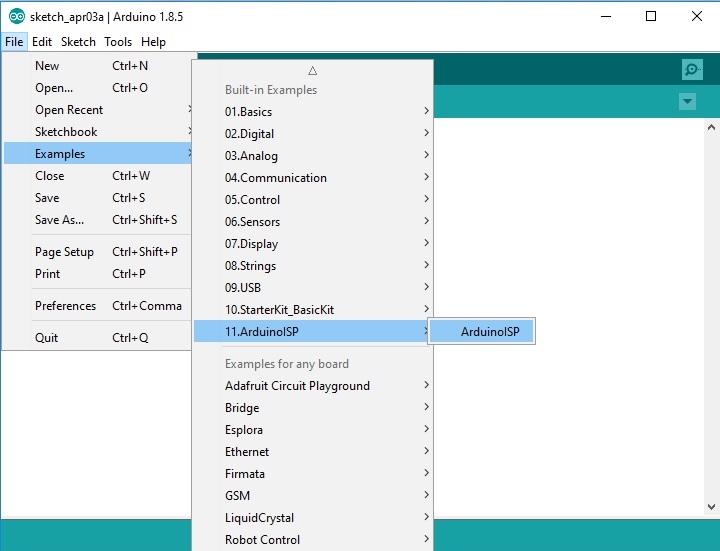
  4. Open the the ArduinoISP sketch: File > examples > Arduino ISP
  5. Upload the code to the Arduino Board: Arrow symbol on the top left
  6. Unplug the Arduino Board from your PC
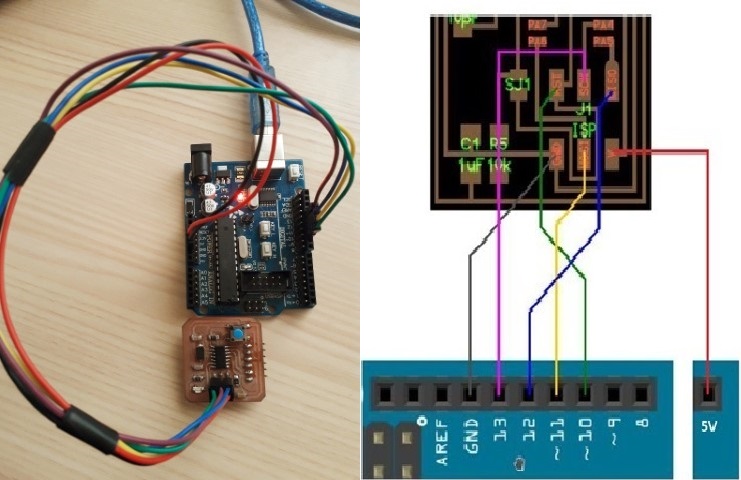
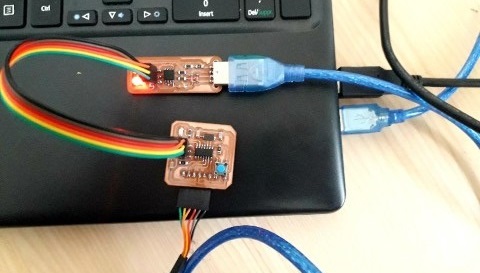
  7. Connect the Arduino board to the Hello Board according to the diagram
  8. photo
  9. Reconnect the Arduino board to your PC
  10. Select the Attiny board: Tools > Board > Attiny24/44/84
  11. Select the processor: Tools > Processor > Attiny44
  12. Select the clock frequency: Tools > clock > External 20MHz
  13. Select the programmer: Tools > Programmer > Arduino as ISP
  14. Burn Bootloader: Tools > Burn Bootloader
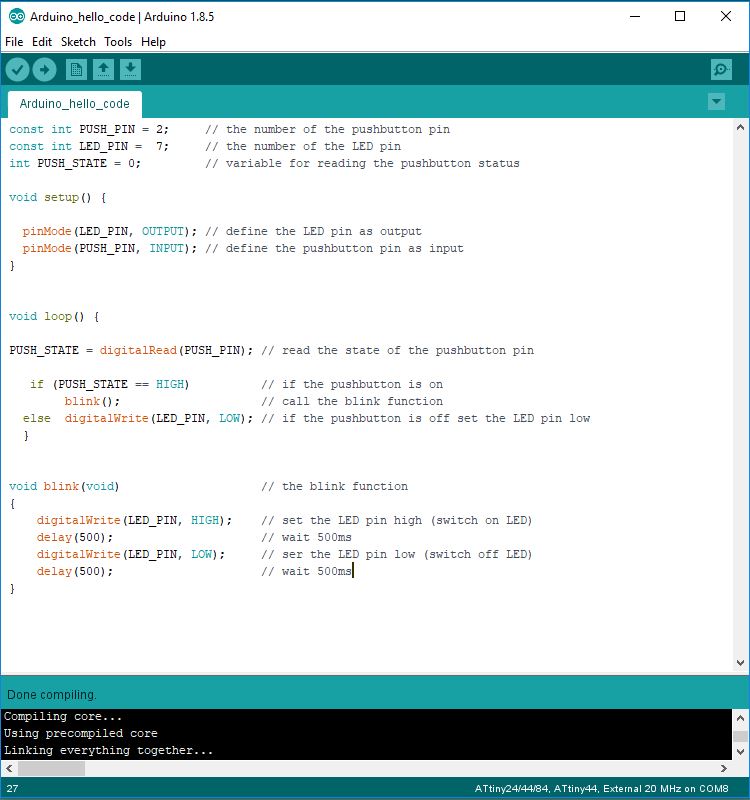
  15. Open your code or
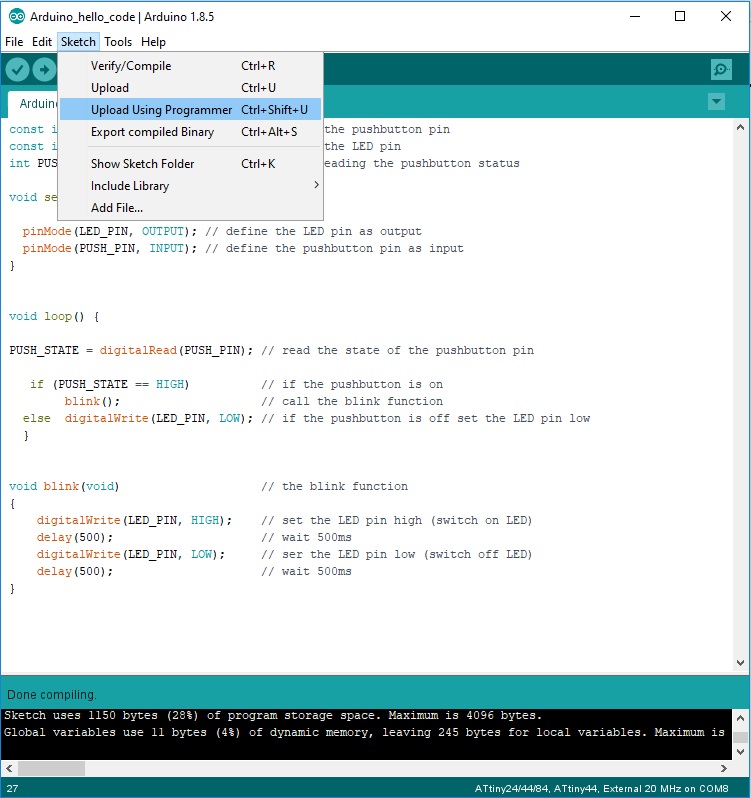
  16. Upload the code to the Hello board using the Arduino as a programmer: Sketch > Upload using programmer
  17. Disconnect the hello board from the Arduino Board leaving GND and Vcc to power it or power it with an FTDI cable
  18. Test the board to see it working
photo
photo
photo
photo
photo

Programming in C

Hello code in C language

This code does the same thing as the Arduino code. It calls a blink function to make the LED blink when the push button is pressed

#include "avr/io.h"
#include "util/delay.h"

#define LED_PIN PA7 // Define LED_PIN
#define PUSH_PIN PA2 // Define PUSH_PIN


int main(void) {

DDRA |= (1 << LED_PIN); // Configure LED_PIN (PA7) as output
DDRA &= ~(1 << PUSH_PIN); // button is input


while(1) // while infinit loop
{
if((PINA & (1 << PUSH_PIN))) // if the push button is on
blink(); // call blink function
else // else (if the push button is off
PORTA &= ~(1 << LED_PIN); // set LED_PIN low
}

}

void blink(void) // blink function subroutine (empty function)
{
PORTA |= (1 << LED_PIN); // set LED_PIN high
_delay_ms(200); // wait 500ms
PORTA &= ~(1 << LED_PIN); // set LED_PIN low
_delay_ms(200); // wait 500ms
}

Port registers

The code uses the DDRA registers to set the push-button pin as an input and the LED pin as output;
The PORTA register to set the value of the LED pin
The INA register to read the state of the push button pin

photo

Fuse bytes

The fuses can be calculated with an online calculator as Engbedded. Fuses bits are enable if set at 0 and disabled if set at 1.The Low byte fuse set the clock value. For an external clock all the bytes are disabled.In the High fuse byte SPIEN must be enabled to allow serial programing, and RSTDISBL must be disabled to allow reprograming.The value of the fuses are:

These values must be inserted in the makefile. The extended fuse is left unprogrammed as default


photo photo
photo photo photo

Programming with FabISP


First, connect the ISP programmer to the Hello board; to power the Hello board connect it to a FTDI cable

photo

Write or copy the c code in the text editor and save as main.c; copy the makefile in the same folder; open terminal in the folder containing the c file and the makefile

photo

Create the Hex file with the make Hex command

photo

Burn fuses with the Make fuse command

photo

Upload the firmware with the make flash command

photo

Test the result