16. Interface and application programming
-
This week our objective for individual assignment was to write an application that interfaces with an input &/or output device that we made
-
group assignment:compare as many tool options as possible
Getting Started
-
As i come from Software background i am pretty much familar with most of the programming languages Neil shared in his lecture. Like i aleady have worked on Cloud, various Javascript frameworks and Data science that covers Python. Sometimes i feel Fab Academy is far easier to complete if you are from software background.
-
In Networking week14 one of the key thing i tried out NodeMCU and controlled relays by web browser. Relays would help me control various devices like Pump, LED and other devices for food computer.
-
This week i also wanted to try out the Alexa integration to control relays. For this i found below tutorial quite good.

Voice Controlled Interface
In Networking week14 i already created a web browser to control relays using NodeMCU. You can refer to the code in Networking week14. This week i extended the same code base and integrated Alexa. Alexa is a Virtual assistant device developed by Amazon. Idea for my final project is to control food computer devices by Alexa. So this week i spent some time understanding how i can control relays by Alexa.
For this i tried out Sinric. Its an open source software and helps you to integrate your existing devices (such as RaspberryPi, ESP8226, ESP32 or Arduino) with Amazon Alexa or Google Home for FREE.
How to use Alexa with Sinric
- Register for an account if you do not have one (Use Chrome, FireFox)
- Login and create a smart home device (Dashboard -> Add smart home device)
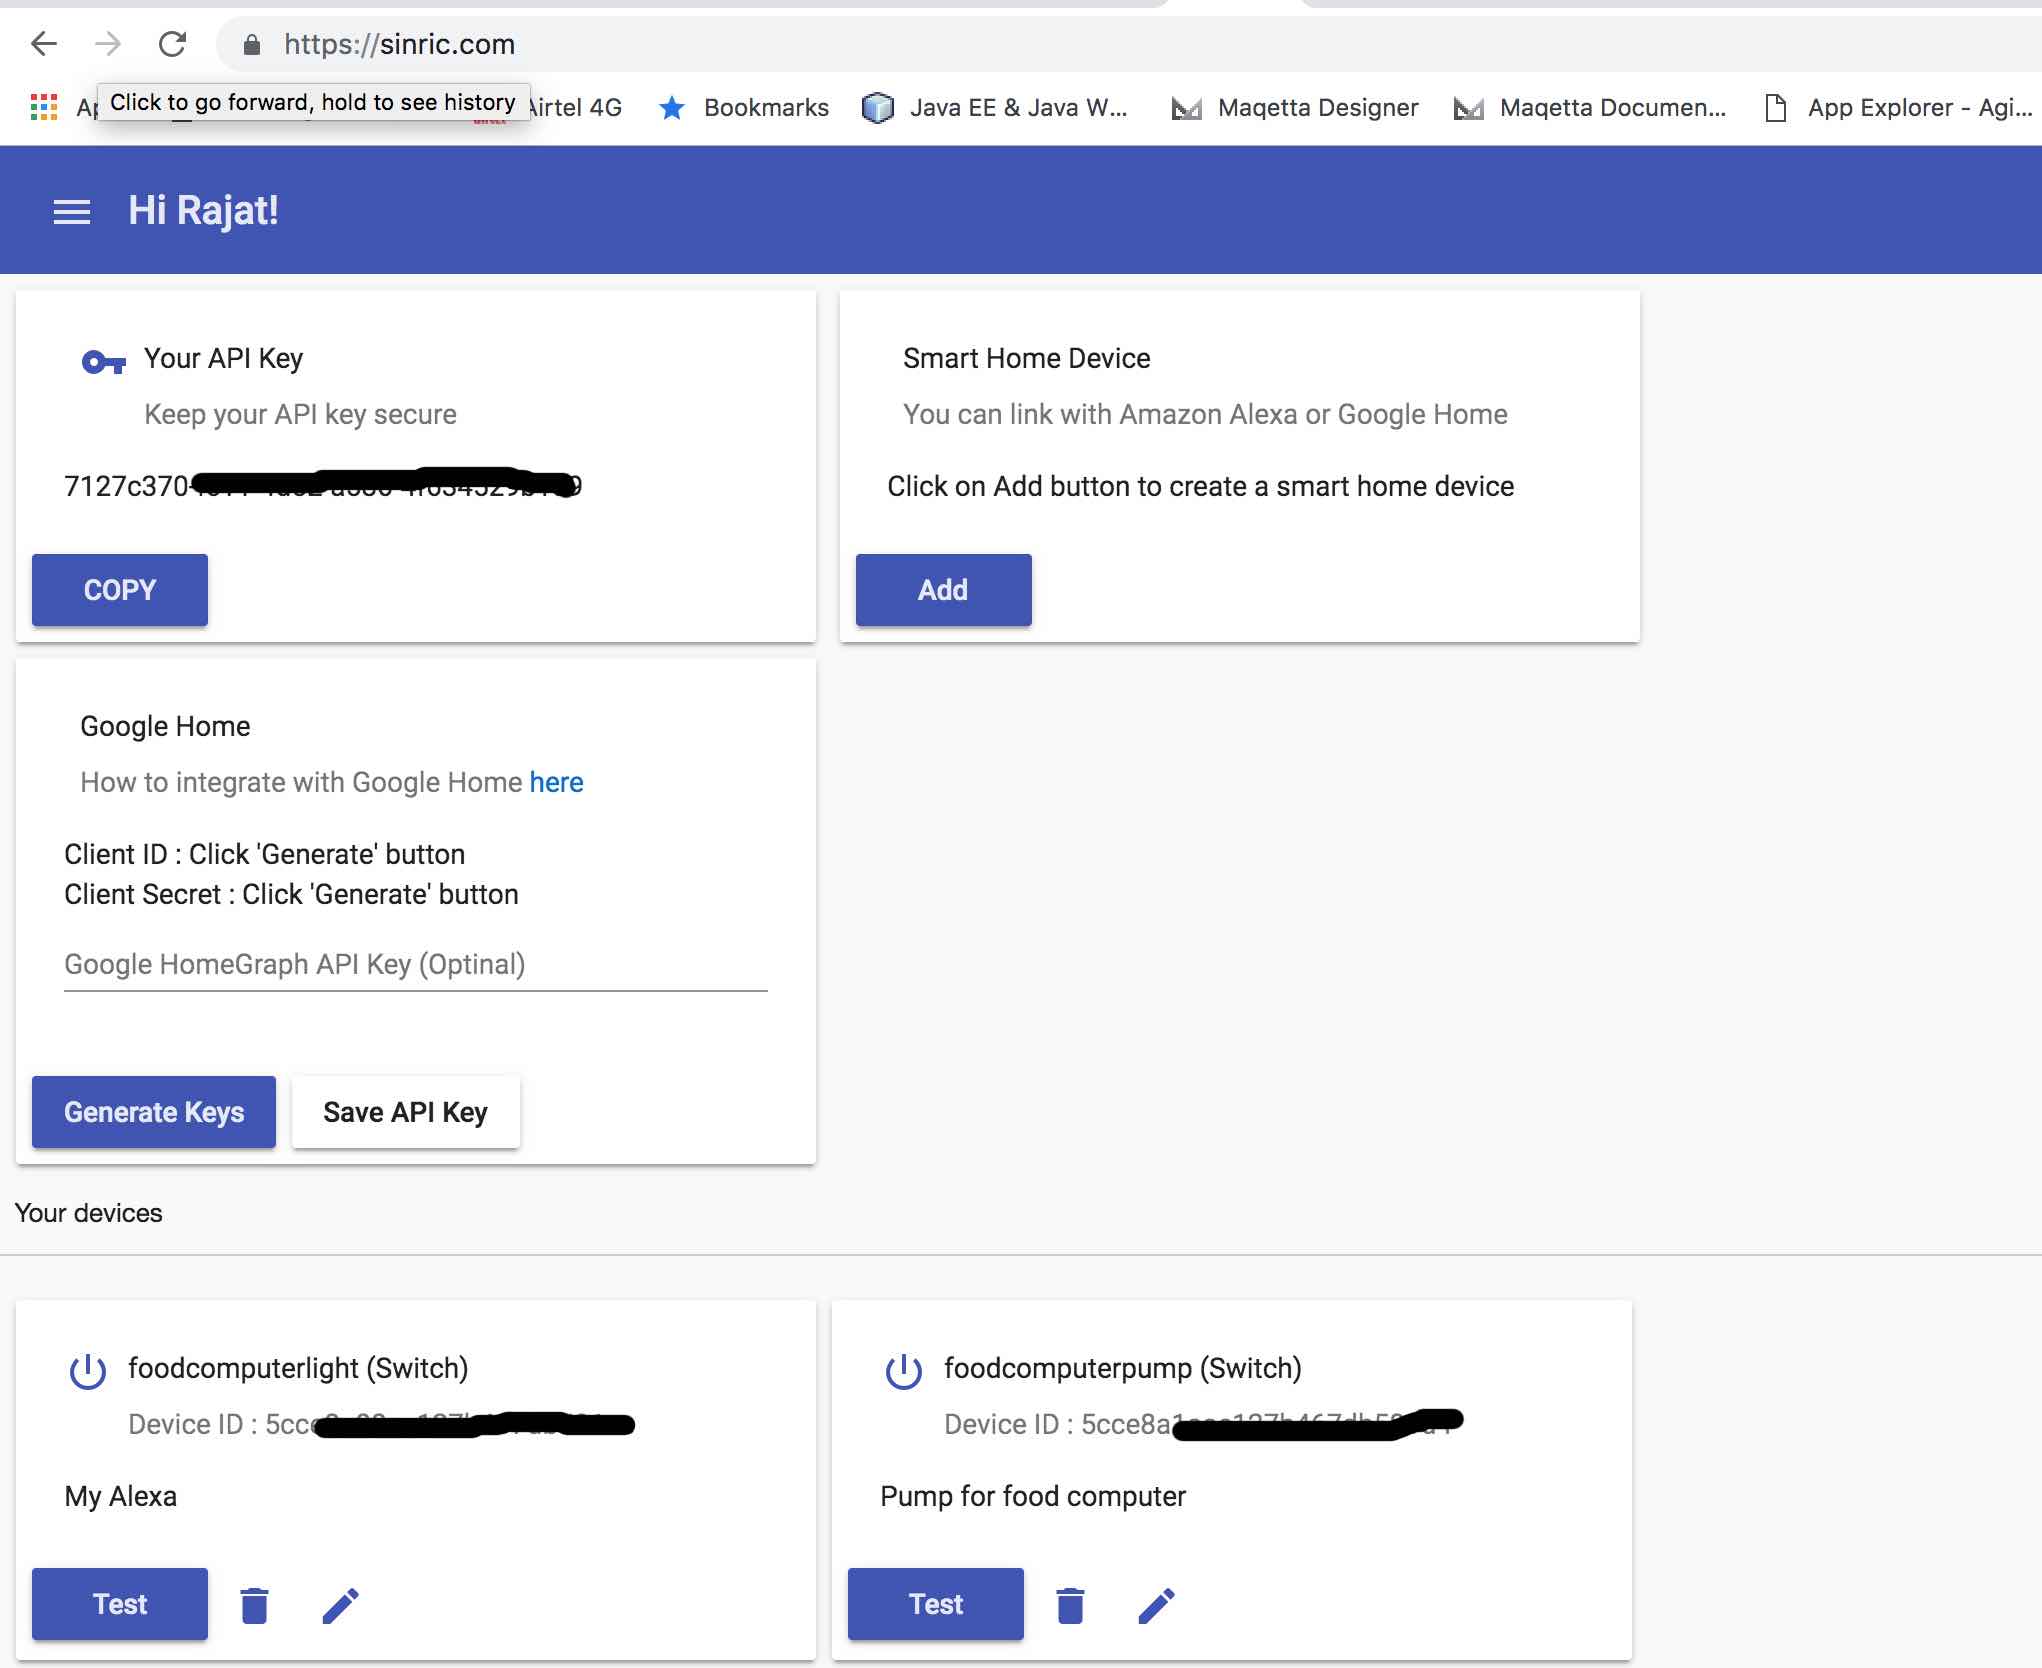
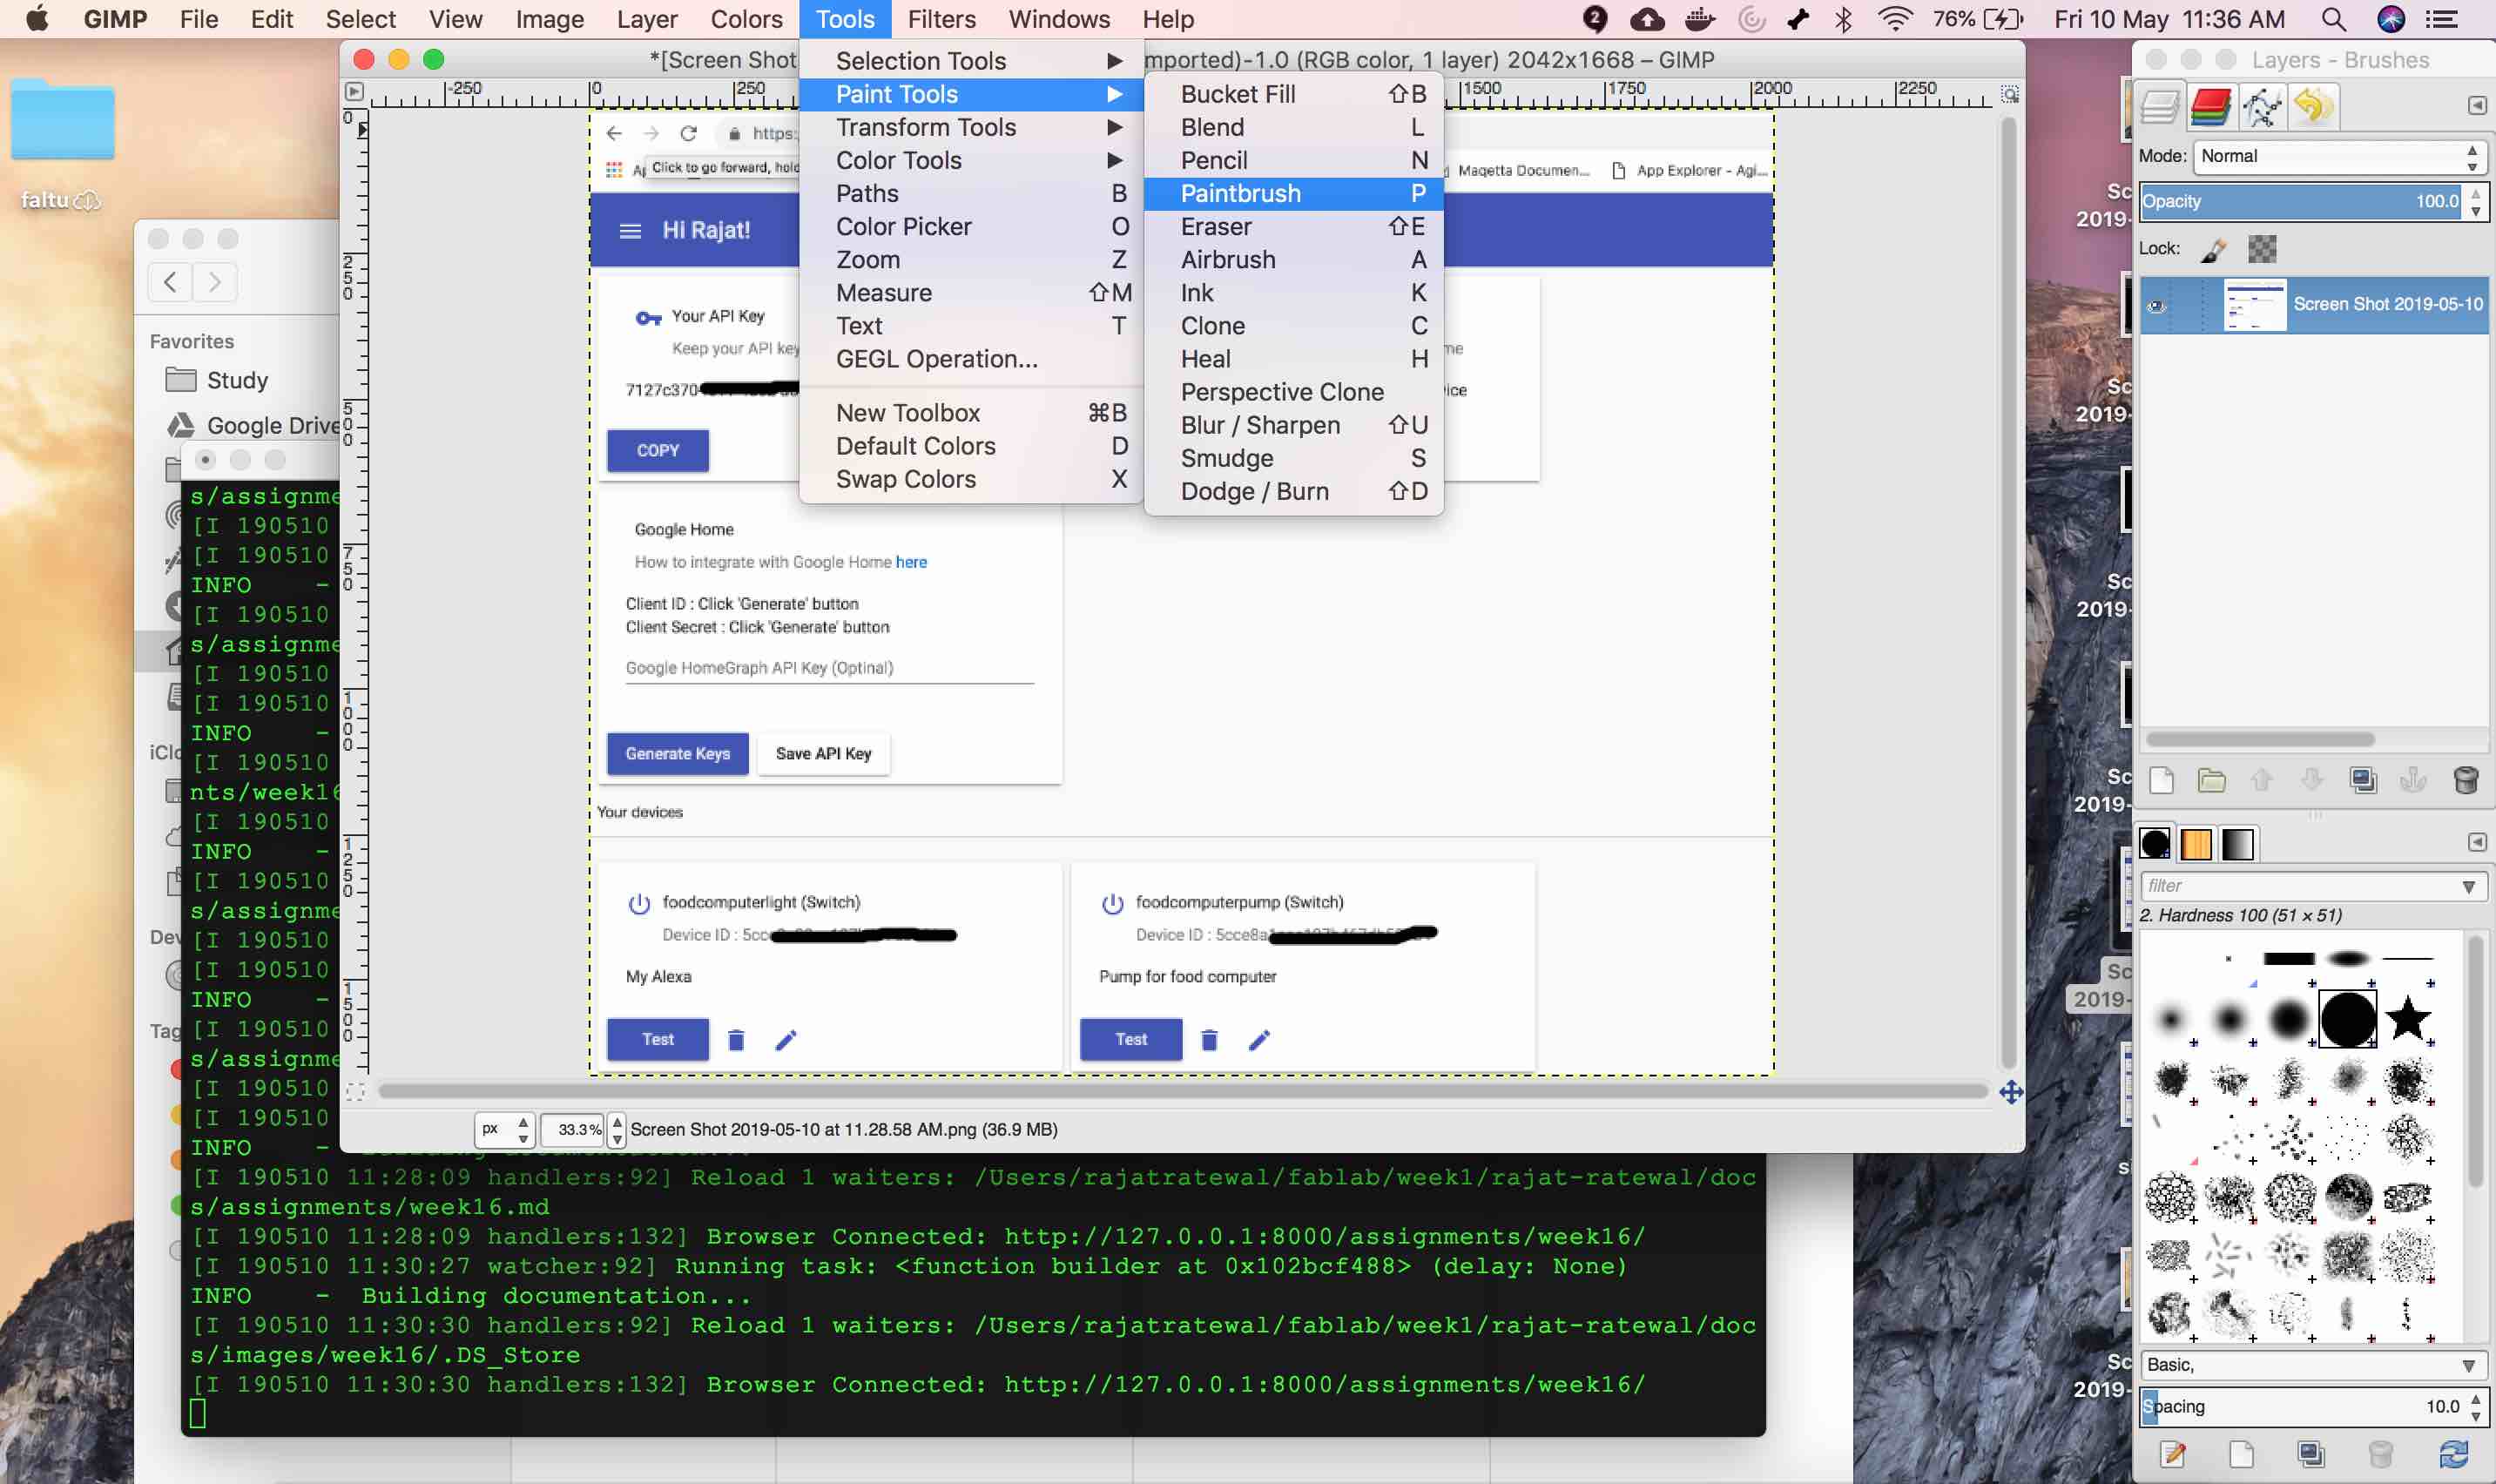
- I also used Gimp which i learnt in CAD Week to hide my API key and device ID using paintbrush feature. Make sure you do that to avoid online stealing of API keys
- Copy your API Key from dashboard
- Connect to Sinric IOT server. For an example use switch
- Change the Arduino Sketch. Replace the API Key, Wifi SSID and Password
- Install Amazon Alexa Smart Home Skill (Available in US, German, India, UK, Canada, Australia, New Zealand, Italy, Spanish (ES/MX) here and Link to your Sinric account
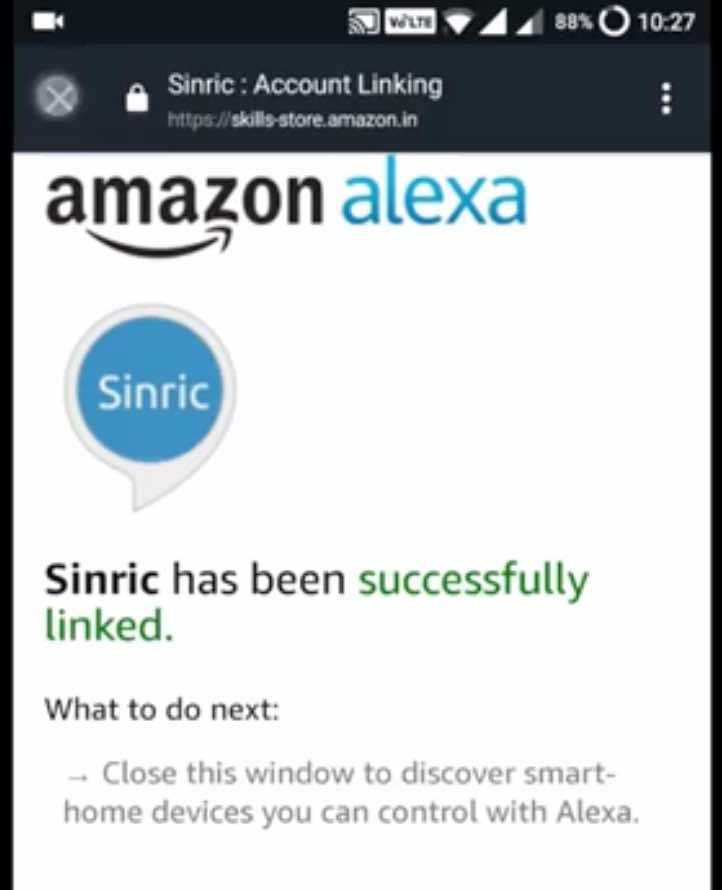
- If you cannot link the Skill, check
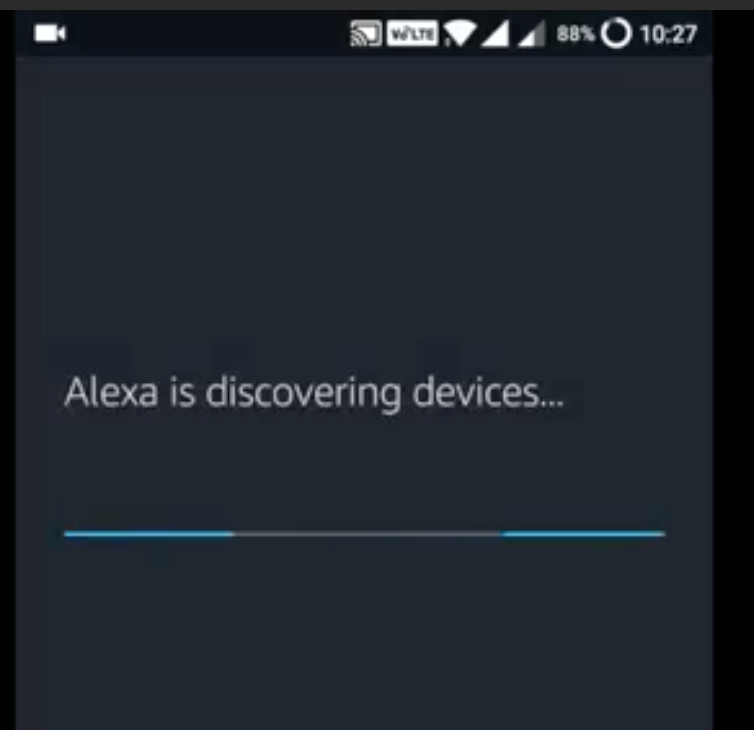
- Discover for new devices.
- This is the final outcome for switch integration

Code to Integrate Voice Command with NodeMCU
Integration of Sinric in NodeMCU allows me to have both a web interface and a Voice interface to control my devices. This is one of the final project outcome i have been looking into.
// Load Wi-Fi library
#include <ESP8266WiFi.h>
#include <ESP8266WiFiMulti.h>
#include <Wire.h>
#include <ArduinoJson.h>
#include <StreamString.h>
#include <WebSocketsClient.h> //  https://github.com/kakopappa/sinric/wiki/How-to-add-dependency-libraries


ESP8266WiFiMulti WiFiMulti;
WebSocketsClient webSocket;
WiFiClient client;

#define MyApiKey "7127cxxxxx"
#define HEARTBEAT_INTERVAL 300000 // 5 Minutes

uint64_t heartbeatTimestamp = 0;
bool isConnected = false;

// Replace with your network credentials
const char* ssid = "Airtelxxxxxx"; // Input your wifi network name
const char* password = "xxxxxx"; // Input your wifi password

// Set web server port number to 80
WiFiServer server(80);

// Variable to store the HTTP request
String header;

// Auxiliar variables to store the current output state
String relay1State = "off";
String relay2State = "off";
//String relay3State = "off";
//String relay4State = "off";

// Assign output variables to GPIO pins
//const int relay1 = 5; // GPIO5 D1
//const int relay2 = 4; // GPIO4 D2
//const int relay3 = 0; // GPIO0 D3
//const int relay4 = 2; // GPIO2 D4

void setup() {
  Serial.begin(115200);

  // Connect to Wi-Fi network with SSID and password
  Serial.print("Connecting to ");
  Serial.println(ssid);
  WiFi.begin(ssid, password);
  while (WiFi.status() != WL_CONNECTED) {
    delay(500);
    Serial.print(".");
  }
  // Print local IP address and start web server
  Serial.println("");
  Serial.println("WiFi connected.");
  Serial.println("IP address: ");
  Serial.println(WiFi.localIP());
  server.begin();
  Wire.begin(D2, D1); /* join i2c bus with SDA=D1 and SCL=D2 of NodeMCU */

   // server address, port and URL
  webSocket.begin("iot.sinric.com", 80, "/");

  // event handler
  webSocket.onEvent(webSocketEvent);
  webSocket.setAuthorization("apikey", MyApiKey);

  // try again every 5000ms if connection has failed
  webSocket.setReconnectInterval(5000);

}

// deviceId is the ID assgined to your smart-home-device in sinric.com dashboard. Copy it from dashboard and paste it here

void turnOn(String deviceId) {
  if (deviceId == "5cce8a08axxxxxxxx") // Device ID of first device
  {
    Serial.print("Turn on device id: ");
    Serial.println(deviceId);
     Wire.beginTransmission(8); /* begin with device address 8 */
     Wire.write("{\"gpio\":6,\"state\":0}");  /* sends hello string */
     Wire.endTransmission();    /* stop transmitting */
  }
  else if (deviceId == "5cce8axxxxxxxx") // Device ID of second device
  {
    Serial.print("Turn on device id: ");
    Serial.println(deviceId);
    Wire.beginTransmission(8); /* begin with device address 8 */
    Wire.write("{\"gpio\":7,\"state\":0}");  /* sends hello string */
    Wire.endTransmission();    /* stop transmitting */
  }
  else {
    Serial.print("Turn on for unknown device id: ");
    Serial.println(deviceId);
  }
}

void turnOff(String deviceId) {
   if (deviceId == "5cce8a08ac1xxxxxxx") // Device ID of first device
   {
     Serial.print("Turn off Device ID: ");
     Serial.println(deviceId);
     Wire.beginTransmission(8); /* begin with device address 8 */
     Wire.write("{\"gpio\":6,\"state\":1}");  /* sends hello string */
     Wire.endTransmission();
   }
   else if (deviceId == "5cce8a1aac1xxxxxx") // Device ID of second device
   {
     Serial.print("Turn off Device ID: ");
     Serial.println(deviceId);
     Wire.beginTransmission(8); /* begin with device address 8 */
     Wire.write("{\"gpio\":7,\"state\":1}");  /* sends hello string */
     Wire.endTransmission();    /* stop transmitting */
  }
  else {
     Serial.print("Turn off for unknown device id: ");
     Serial.println(deviceId);
  }
}

void webSocketEvent(WStype_t type, uint8_t * payload, size_t length) {
  switch(type) {
    case WStype_DISCONNECTED:
      isConnected = false;
      Serial.printf("[WSc] Webservice disconnected from sinric.com!\n");
      break;
    case WStype_CONNECTED: {
      isConnected = true;
      Serial.printf("[WSc] Service connected to sinric.com at url: %s\n", payload);
      Serial.printf("Waiting for commands from sinric.com ...\n");
      }
      break;
    case WStype_TEXT: {
        Serial.printf("[WSc] get text: %s\n", payload);
        // Example payloads

        // For Switch or Light device types
        // {"deviceId": xxxx, "action": "setPowerState", value: "ON"} // https://developer.amazon.com/docs/device-apis/alexa-powercontroller.html

        // For Light device type
        // Look at the light example in github

        DynamicJsonBuffer jsonBuffer;
        JsonObject& json = jsonBuffer.parseObject((char*)payload);
        String deviceId = json ["deviceId"];
        String action = json ["action"];

        if(action == "setPowerState") { // Switch or Light
            String value = json ["value"];
            if(value == "ON") {
                turnOn(deviceId);
            } else {
                turnOff(deviceId);
            }
        }
        else if (action == "SetTargetTemperature") {
            String deviceId = json ["deviceId"];
            String action = json ["action"];
            String value = json ["value"];
        }
        else if (action == "test") {
            Serial.println("[WSc] received test command from sinric.com");
        }
      }
      break;
    case WStype_BIN:
      Serial.printf("[WSc] get binary length: %u\n", length);
      break;
  }
}

void loop() {
  WiFiClient client = server.available();   // Listen for incoming clients

  if (client) {                             // If a new client connects,
    Serial.println("New Client.");          // print a message out in the serial port
    String currentLine = "";                // make a String to hold incoming data from the client
    while (client.connected()) {            // loop while the client's connected
      if (client.available()) {             // if there's bytes to read from the client,
        char c = client.read();             // read a byte, then
        Serial.write(c);                    // print it out the serial monitor
        header += c;
        if (c == '\n') {                    // if the byte is a newline character
          // if the current line is blank, you got two newline characters in a row.
          // that's the end of the client HTTP request, so send a response:
          if (currentLine.length() == 0) {
            // HTTP headers always start with a response code (e.g. HTTP/1.1 200 OK)
            // and a content-type so the client knows what's coming, then a blank line:
            client.println("HTTP/1.1 200 OK");
            client.println("Content-type:text/html");
            client.println("Connection: close");
            client.println();

            // turns the GPIOs on and off
            if (header.indexOf("GET /6/on") >= 0)
            {
              Serial.println("GPIO 6 on");
              relay1State = "on";
              //digitalWrite(relay1, LOW);
              Serial.print("Switch 1 turn off ...");
              Wire.beginTransmission(8); /* begin with device address 8 */
              Wire.write("{\"gpio\":6,\"state\":0}");  /* sends hello string */
              Wire.endTransmission();    /* stop transmitting */
            }
            else if (header.indexOf("GET /6/off") >= 0)
            {
              Serial.println("GPIO 6 off");
              relay1State = "off";
              //digitalWrite(relay1, HIGH);
              Serial.print("Switch 1 turn on ...");
              Wire.beginTransmission(8); /* begin with device address 8 */
              Wire.write("{\"gpio\":6,\"state\":1}");  /* sends hello string */
              Wire.endTransmission();    /* stop transmitting */
            }
            else if (header.indexOf("GET /7/on") >= 0) {
              Serial.println("GPIO 7 on");
               relay2State = "on";
                Serial.print("Switch 2 turn off ...");
                Wire.beginTransmission(8); /* begin with device address 8 */
                Wire.write("{\"gpio\":7,\"state\":0}");  /* sends hello string */
                Wire.endTransmission();    /* stop transmitting */
                //digitalWrite(relay2, LOW);
            }
            else if (header.indexOf("GET /7/off") >= 0) {
              Serial.println("GPIO 7 off");
              relay2State = "off";
               Serial.print("Switch 2 turn on ...");
                Wire.beginTransmission(8); /* begin with device address 8 */
                Wire.write("{\"gpio\":7,\"state\":1}");  /* sends hello string */
                Wire.endTransmission();    /* stop transmitting */
              //digitalWrite(relay2, HIGH);
            }
            /*else if (header.indexOf("GET /0/on") >= 0)
            {
              Serial.println("GPIO 0 on");
              relay3State = "on";
              digitalWrite(relay3, LOW);
            }
            else if (header.indexOf("GET /0/off") >= 0)
            {
              Serial.println("GPIO 0 off");
              relay3State = "off";
              digitalWrite(relay3, HIGH);
            }
            else if (header.indexOf("GET /2/on") >= 0) {
              Serial.println("GPIO 2 on");
              relay4State = "on";
              digitalWrite(relay4, LOW);
            }
            else if (header.indexOf("GET /2/off") >= 0) {
              Serial.println("GPIO 2 off");
              relay4State = "off";
              digitalWrite(relay4, HIGH);
            }*/

            // Display the HTML web page
            client.println("<!DOCTYPE html><html>");
            client.println("<head><meta name=\"viewport\" content=\"width=device-width, initial-scale=1\">");
            client.println("<link rel=\"icon\" href=\"data:,\">");
            // CSS to style the on/off buttons
            // Feel free to change the background-color and font-size attributes to fit your preferences
            client.println("<style>html { font-family: Helvetica; display: inline-block; margin: 0px auto; text-align: center;}");
            client.println(".button { background-color: #195B6A; border: none; color: white; padding: 12px 24px;");
            client.println("text-decoration: none; font-size: 20px; margin: 2px; cursor: pointer;}");
            client.println(".button2 {background-color: #77878A;}</style></head>");

            // Web Page Heading
            client.println("<body><h1>NodeMCU Web Server</h1>");

            // Display current state, and ON/OFF buttons for GPIO 6
            client.println("<p>Relay 1 - State " + relay1State + "</p>");
            // If the relay1State is off, it displays the ON button
            if (relay1State == "off") {
              client.println("<p><a href=\"/6/on\"><button class=\"button\">ON</button></a></p>");
            } else {
              client.println("<p><a href=\"/6/off\"><button class=\"button button2\">OFF</button></a></p>");
            }


            // Display current state, and ON/OFF buttons for GPIO 7
            client.println("<p>Relay 2 - State " + relay2State + "</p>");
            // If the relay2State is off, it displays the ON button
            if (relay2State == "off") {
              client.println("<p><a href=\"/7/on\"><button class=\"button\">ON</button></a></p>");
            } else {
              client.println("<p><a href=\"/7/off\"><button class=\"button button2\">OFF</button></a></p>");
            }

            client.println("</body></html>");

            // The HTTP response ends with another blank line
            client.println();
            // Break out of the while loop
            break;
          } else { // if you got a newline, then clear currentLine
            currentLine = "";
          }
        } else if (c != '\r') {  // if you got anything else but a carriage return character,
          currentLine += c;      // add it to the end of the currentLine
        }
      }
    }
    // Clear the header variable
    header = "";
    // Close the connection
    client.stop();
    Serial.println("Client disconnected.");
    Serial.println("");
  }

  webSocket.loop();

  if(isConnected) {
      uint64_t now = millis();

      // Send heartbeat in order to avoid disconnections during ISP resetting IPs over night. Thanks @MacSass
      if((now - heartbeatTimestamp) > HEARTBEAT_INTERVAL) {
          heartbeatTimestamp = now;
          webSocket.sendTXT("H");
      }
  }

}


}
Code to Control Relays using I2C Wire library
#include <Wire.h>
#include <ArduinoJson.h>

void setup() {
 Wire.begin(8);                /* join i2c bus with address 8 */
 Wire.onReceive(receiveEvent); /* register receive event */
 Serial.begin(115200);           /* start serial for debug */
 pinMode(6, OUTPUT); //Attached relay 1 to Pin 6
 pinMode(7, OUTPUT); //Attached relay 2 to Pin 7
}

void loop() {
 delay(100);
}

void processCall(String command){
      DynamicJsonBuffer jsonBuffer;
      JsonObject& root= jsonBuffer.parseObject(command); // NodeMCU send this in JSON format over I2C

       if (root.success()) {
          int gpio = atoi(root["gpio"]);
          Serial.println(gpio);
          int state = atoi(root["state"]);
          Serial.println(state);

          //set GPIO state
          digitalWrite(gpio, state); // This code line setup the pin high and low
       }
}


// function that executes when data is received from master
void receiveEvent(int howMany) {
  String data="";
 while (0 <Wire.available()) {
    char c = Wire.read();      /* receive byte as a character */
    data += c;

  }
    Serial.println(data);           /* print the request data */
    processCall(data);         /* to newline */
}
Understanding Code For Voice Control
The example is well explained in the video tutorial on how to proceed. I will explain how i have modified the code for my needs.
- We are using Wire.h library in arduino to communicate using I2C protocol.
- We have also imported libraries for ESP8266 that help us speak to ESP8266 wifi module
- WebSocketsClient is the library that help us integrate and communicate with Sinric using websocket protocol
- Setup function is called once and here we are setting up a web server and websocket connection with Sinric and Wifi
void setup() {
  Serial.begin(115200);

  // Connect to Wi-Fi network with SSID and password
  Serial.print("Connecting to ");
  Serial.println(ssid);
  WiFi.begin(ssid, password);
  while (WiFi.status() != WL_CONNECTED) {
    delay(500);
    Serial.print(".");
  }
  // Print local IP address and start web server
  Serial.println("");
  Serial.println("WiFi connected.");
  Serial.println("IP address: ");
  Serial.println(WiFi.localIP());
  server.begin();
  Wire.begin(D2, D1); /* join i2c bus with SDA=D1 and SCL=D2 of NodeMCU */

   // server address, port and URL
  webSocket.begin("iot.sinric.com", 80, "/");

  // event handler
  webSocket.onEvent(webSocketEvent);
  webSocket.setAuthorization("apikey", MyApiKey);

  // try again every 5000ms if connection has failed
  webSocket.setReconnectInterval(5000);

}
- Next in line codes are two functions that explains the turning on and off for devices. Here we use the device ID we have created in sinric dashboard. As webscoket we can speak to Sinric and thiis block uses the Device ID to communciate with our devices
void turnOn(String deviceId) {
  if (deviceId == "5cce8a08axxxxxxxx") // Device ID of first device
  {
    Serial.print("Turn on device id: ");
    Serial.println(deviceId);
     Wire.beginTransmission(8); /* begin with device address 8 */
     Wire.write("{\"gpio\":6,\"state\":0}");  /* sends hello string */
     Wire.endTransmission();    /* stop transmitting */
  }
  else if (deviceId == "5cce8axxxxxxxx") // Device ID of second device
  {
    Serial.print("Turn on device id: ");
    Serial.println(deviceId);
    Wire.beginTransmission(8); /* begin with device address 8 */
    Wire.write("{\"gpio\":7,\"state\":0}");  /* sends hello string */
    Wire.endTransmission();    /* stop transmitting */
  }
  else {
    Serial.print("Turn on for unknown device id: ");
    Serial.println(deviceId);
  }
}

void turnOff(String deviceId) {
   if (deviceId == "5cce8a08ac1xxxxxxx") // Device ID of first device
   {
     Serial.print("Turn off Device ID: ");
     Serial.println(deviceId);
     Wire.beginTransmission(8); /* begin with device address 8 */
     Wire.write("{\"gpio\":6,\"state\":1}");  /* sends hello string */
     Wire.endTransmission();
   }
   else if (deviceId == "5cce8a1aac1xxxxxx") // Device ID of second device
   {
     Serial.print("Turn off Device ID: ");
     Serial.println(deviceId);
     Wire.beginTransmission(8); /* begin with device address 8 */
     Wire.write("{\"gpio\":7,\"state\":1}");  /* sends hello string */
     Wire.endTransmission();    /* stop transmitting */
  }
  else {
     Serial.print("Turn off for unknown device id: ");
     Serial.println(deviceId);
  }
}
- Below part of the code is where all the magic happens for Sinric and communication using websocket
void webSocketEvent(WStype_t type, uint8_t * payload, size_t length) {
  switch(type) {
    case WStype_DISCONNECTED:
      isConnected = false;
      Serial.printf("[WSc] Webservice disconnected from sinric.com!\n");
      break;
    case WStype_CONNECTED: {
      isConnected = true;
      Serial.printf("[WSc] Service connected to sinric.com at url: %s\n", payload);
      Serial.printf("Waiting for commands from sinric.com ...\n");
      }
      break;
    case WStype_TEXT: {
        Serial.printf("[WSc] get text: %s\n", payload);
        // Example payloads

        // For Switch or Light device types
        // {"deviceId": xxxx, "action": "setPowerState", value: "ON"} // https://developer.amazon.com/docs/device-apis/alexa-powercontroller.html

        // For Light device type
        // Look at the light example in github

        DynamicJsonBuffer jsonBuffer;
        JsonObject& json = jsonBuffer.parseObject((char*)payload);
        String deviceId = json ["deviceId"];
        String action = json ["action"];

        if(action == "setPowerState") { // Switch or Light
            String value = json ["value"];
            if(value == "ON") {
                turnOn(deviceId);
            } else {
                turnOff(deviceId);
            }
        }
        else if (action == "SetTargetTemperature") {
            String deviceId = json ["deviceId"];
            String action = json ["action"];
            String value = json ["value"];
        }
        else if (action == "test") {
            Serial.println("[WSc] received test command from sinric.com");
        }
      }
      break;
    case WStype_BIN:
      Serial.printf("[WSc] get binary length: %u\n", length);
      break;
  }
}
- Last is loop function that get executed continuously and here we convert the output into I2C format to control relays which get sent to microcontroller to control relays
- In Relay sketch we decode the I2C message and setup the pins high and low for relays.
Final Demo Controlling Relays Using Alexa, NodeMCU and I2c
NodeMCU Based Web GUI
Another aspect i tried out in this week was the GUI interface to control relays for my final board. I already tested out the GUI on Arduino and my final board in Networking week14. I already created a web browser to control relays using NodeMCU. So above code has both Voice and Web interface embedded now. The way it works is that i have created a web browser and uploaded that in NodeMCU. From NodeMCU via I2c it goes back to Arduino which in turn set digital pin high or low on which relays are connected.
Understanding Code For Web GUI
In Loop function we have below line of codes lets try to understand how this works
- Using Client.println statements we write the html code and a web server i started as part of NodeMCU
- This code creates the screen layout as follows basically two buttons and some header text
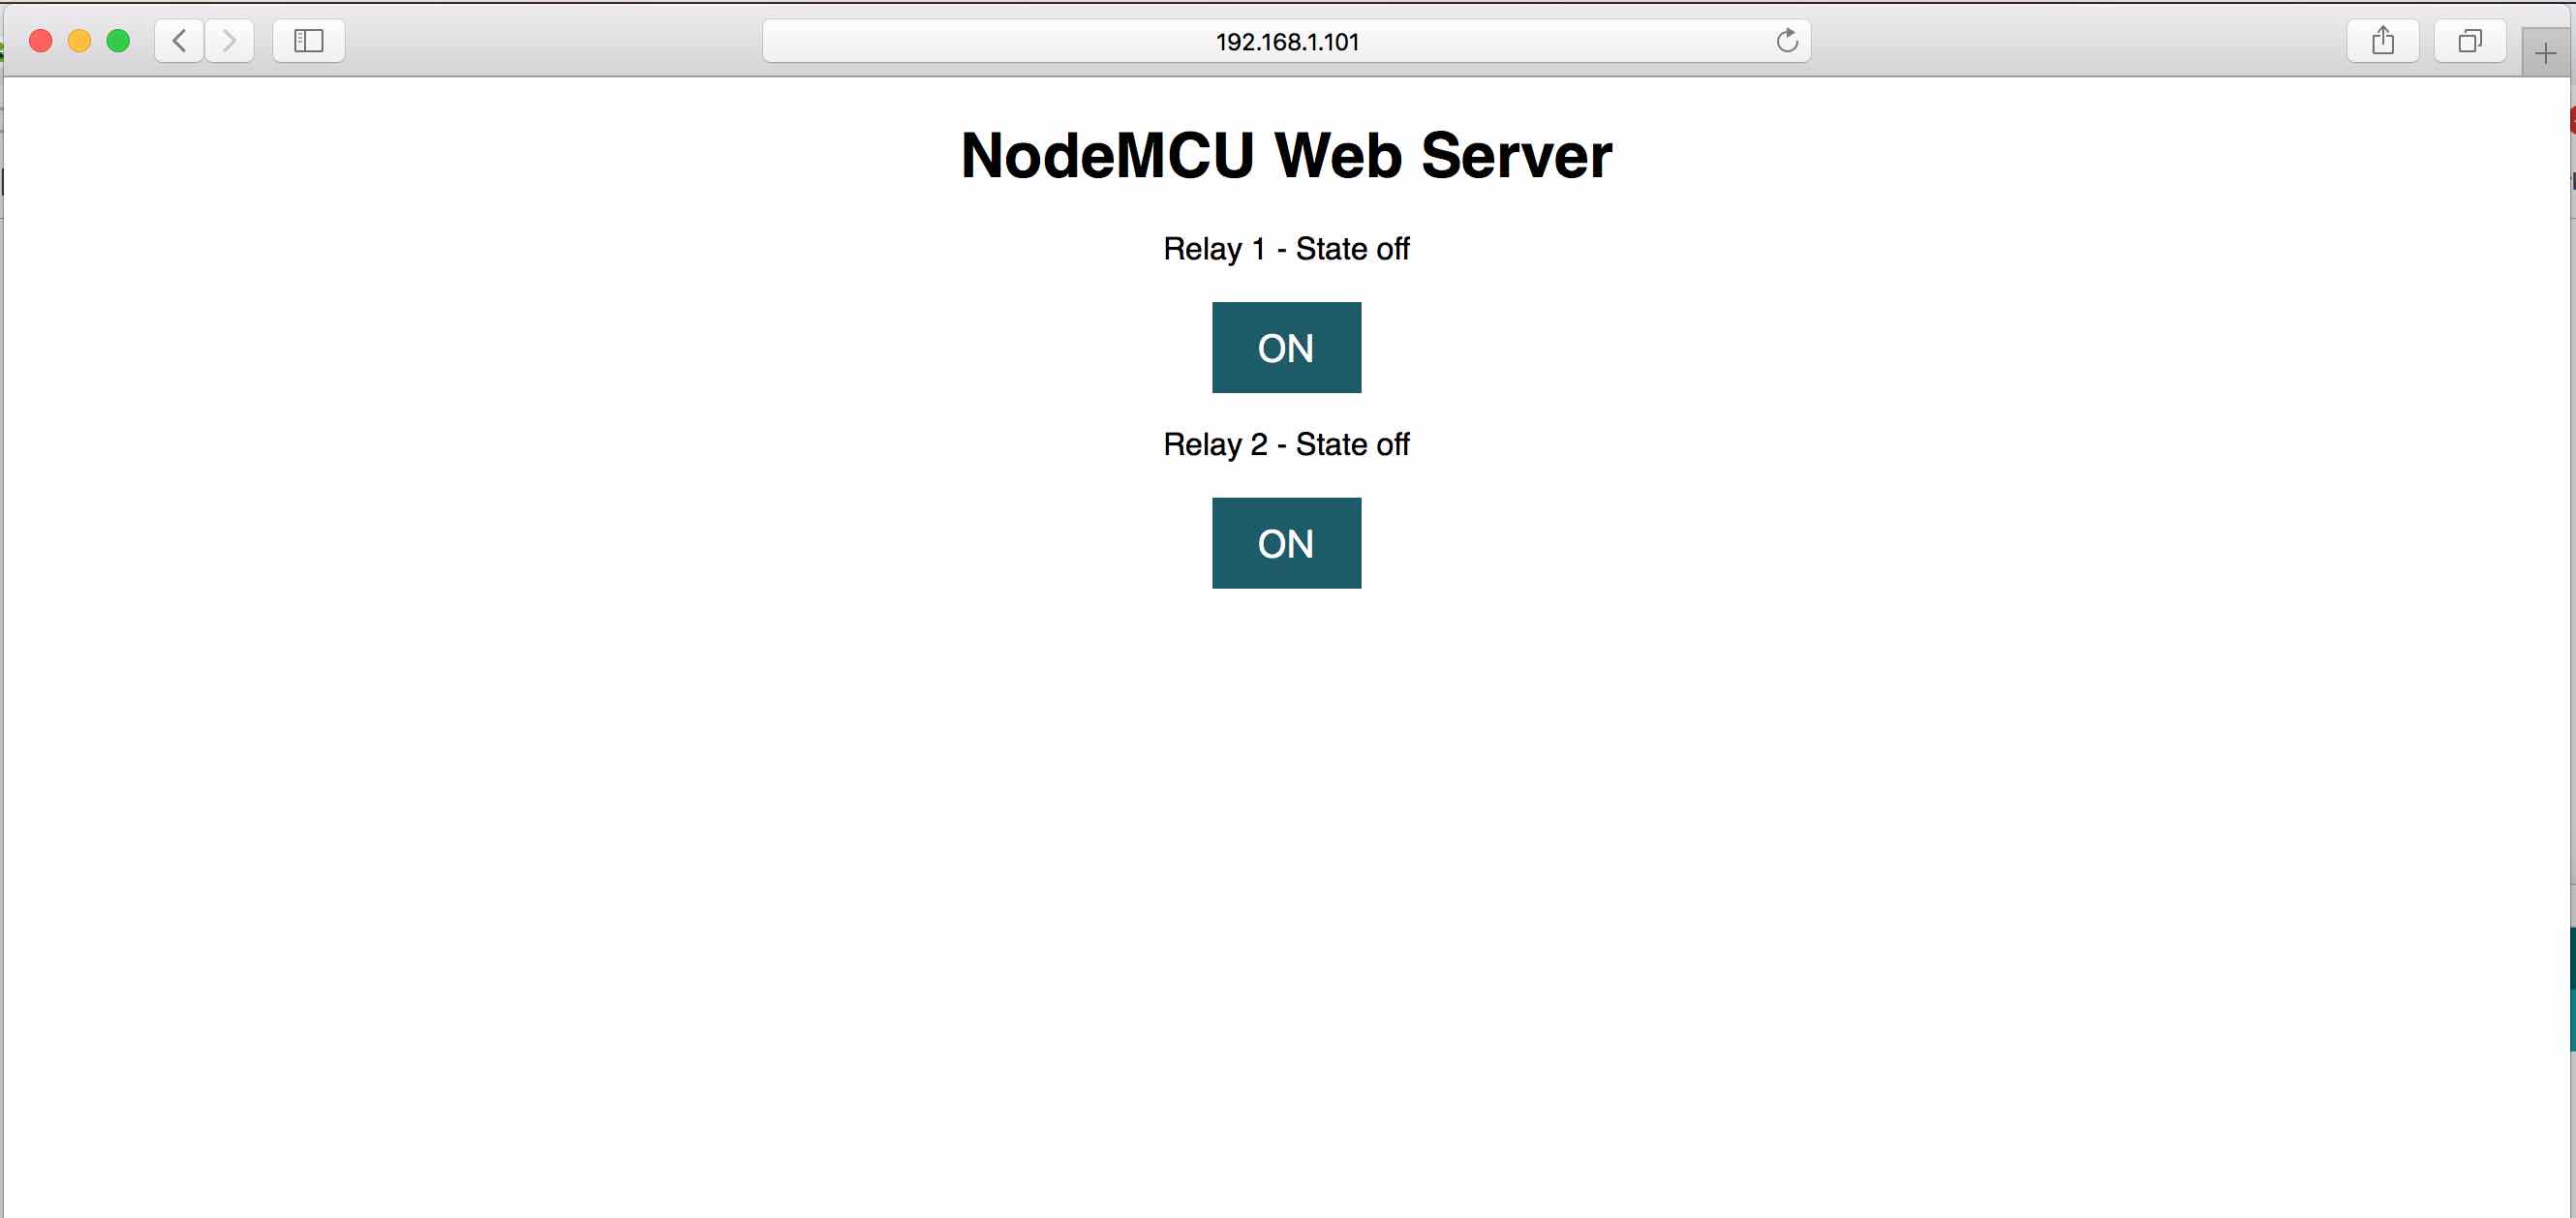
- These lines of code header.indexOf(“GET /6/off”) helps me get the request from web broswer on what user has clicked after pressing the button
- Once user request is captured we use I2c to send message to Arduino Atmega with status 0 or 1 which means 0 as digital pin 0 and 1 as digital pin +5v which than uses the information to switch on and off the relays
    Wire.beginTransmission(8); /* begin with device address 8 */
    Wire.write("{\"gpio\":14,\"state\":0}");  /* sends hello string */
    Wire.endTransmission();    /* stop transmitting */
void loop() {
  WiFiClient client = server.available();   // Listen for incoming clients

  if (client) {                             // If a new client connects,
    Serial.println("New Client.");          // print a message out in the serial port
    String currentLine = "";                // make a String to hold incoming data from the client
    while (client.connected()) {            // loop while the client's connected
      if (client.available()) {             // if there's bytes to read from the client,
        char c = client.read();             // read a byte, then
        Serial.write(c);                    // print it out the serial monitor
        header += c;
        if (c == '\n') {                    // if the byte is a newline character
          // if the current line is blank, you got two newline characters in a row.
          // that's the end of the client HTTP request, so send a response:
          if (currentLine.length() == 0) {
            // HTTP headers always start with a response code (e.g. HTTP/1.1 200 OK)
            // and a content-type so the client knows what's coming, then a blank line:
            client.println("HTTP/1.1 200 OK");
            client.println("Content-type:text/html");
            client.println("Connection: close");
            client.println();

            // turns the GPIOs on and off
            if (header.indexOf("GET /6/on") >= 0)
            {
              Serial.println("GPIO 6 on");
              relay1State = "on";
              //digitalWrite(relay1, LOW);
              Serial.print("Switch 1 turn off ...");
              Wire.beginTransmission(8); /* begin with device address 8 */
              Wire.write("{\"gpio\":14,\"state\":0}");  /* sends hello string */
              Wire.endTransmission();    /* stop transmitting */
            }
            else if (header.indexOf("GET /6/off") >= 0)
            {
              Serial.println("GPIO 6 off");
              relay1State = "off";
              //digitalWrite(relay1, HIGH);
              Serial.print("Switch 1 turn on ...");
              Wire.beginTransmission(8); /* begin with device address 8 */
              Wire.write("{\"gpio\":14,\"state\":1}");  /* sends hello string */
              Wire.endTransmission();    /* stop transmitting */
            }
            else if (header.indexOf("GET /7/on") >= 0) {
              Serial.println("GPIO 7 on");
               relay2State = "on";
                Serial.print("Switch 2 turn off ...");
                Wire.beginTransmission(8); /* begin with device address 8 */
                Wire.write("{\"gpio\":15,\"state\":0}");  /* sends hello string */
                Wire.endTransmission();    /* stop transmitting */
                //digitalWrite(relay2, LOW);
            }
            else if (header.indexOf("GET /7/off") >= 0) {
              Serial.println("GPIO 7 off");
              relay2State = "off";
               Serial.print("Switch 2 turn on ...");
                Wire.beginTransmission(8); /* begin with device address 8 */
                Wire.write("{\"gpio\":15,\"state\":1}");  /* sends hello string */
                Wire.endTransmission();    /* stop transmitting */
              //digitalWrite(relay2, HIGH);
            }
            /*else if (header.indexOf("GET /0/on") >= 0)
            {
              Serial.println("GPIO 0 on");
              relay3State = "on";
              digitalWrite(relay3, LOW);
            }
            else if (header.indexOf("GET /0/off") >= 0)
            {
              Serial.println("GPIO 0 off");
              relay3State = "off";
              digitalWrite(relay3, HIGH);
            }
            else if (header.indexOf("GET /2/on") >= 0) {
              Serial.println("GPIO 2 on");
              relay4State = "on";
              digitalWrite(relay4, LOW);
            }
            else if (header.indexOf("GET /2/off") >= 0) {
              Serial.println("GPIO 2 off");
              relay4State = "off";
              digitalWrite(relay4, HIGH);
            }*/

            // Display the HTML web page
            client.println("<!DOCTYPE html><html>");
            client.println("<head><meta name=\"viewport\" content=\"width=device-width, initial-scale=1\">");
            client.println("<link rel=\"icon\" href=\"data:,\">");
            // CSS to style the on/off buttons
            // Feel free to change the background-color and font-size attributes to fit your preferences
            client.println("<style>html { font-family: Helvetica; display: inline-block; margin: 0px auto; text-align: center;}");
            client.println(".button { background-color: #195B6A; border: none; color: white; padding: 12px 24px;");
            client.println("text-decoration: none; font-size: 20px; margin: 2px; cursor: pointer;}");
            client.println(".button2 {background-color: #77878A;}</style></head>");

            // Web Page Heading
            client.println("<body><h1>NodeMCU Web Server</h1>");

            // Display current state, and ON/OFF buttons for GPIO 6
            client.println("<p>Relay 1 - State " + relay1State + "</p>");
            // If the relay1State is off, it displays the ON button
            if (relay1State == "off") {
              client.println("<p><a href=\"/6/on\"><button class=\"button\">ON</button></a></p>");
            } else {
              client.println("<p><a href=\"/6/off\"><button class=\"button button2\">OFF</button></a></p>");
            }


            // Display current state, and ON/OFF buttons for GPIO 7
            client.println("<p>Relay 2 - State " + relay2State + "</p>");
            // If the relay2State is off, it displays the ON button
            if (relay2State == "off") {
              client.println("<p><a href=\"/7/on\"><button class=\"button\">ON</button></a></p>");
            } else {
              client.println("<p><a href=\"/7/off\"><button class=\"button button2\">OFF</button></a></p>");
            }

            client.println("</body></html>");

            // The HTTP response ends with another blank line
            client.println();
            // Break out of the while loop
            break;
          } else { // if you got a newline, then clear currentLine
            currentLine = "";
          }
        } else if (c != '\r') {  // if you got anything else but a carriage return character,
          currentLine += c;      // add it to the end of the currentLine
        }
      }
    }
    // Clear the header variable
    header = "";
    // Close the connection
    client.stop();
    Serial.println("Client disconnected.");
    Serial.println("");
  }
}
GUI Demo
I tested out the code on my final board. Here is the demo for same. Through this i am able to control the relays on my board. Next step is to connect the water pump, LED lights to my final board and do end to end integration.
Group assignment
This week group assignment was to Compare as many tool options as possible. Here is the snapshot of various interfaces, programming languages and tools we looked at as a group. You can refer to our group page for more details. Here i have attached a summary of what we have tried as a group.
| Tool/Language/Deploy | Options | Conclusion |
|---|---|---|
| Cloud | Various options available like AWS, Azure, Google | AWS is the market leader on Cloud and have wide varities of services available. |
| AR/VR | Various games engine, Unity, Cloud Options like AWS Sumerian | Need programming background like C# for Unity, good for creating immersive experineces. |
| Programming Languages | Python, Java, Scala, Node.JS | Python is most widely used programming language, Scala is quite difficult for a beginner level. Java is more object oriented and procedural language where Python is functional language. But now Node.js is widely framework for creating full stack applications |
| Processing | - | Processing is an open-source computer programming language and integrated development environment (IDE) built for the electronic arts, new media art, and visual design communities with the purpose of teaching non-programmers the fundamentals of computer programming in a visual context. The Processing language builds on the Java language, but uses a simplified syntax and a graphics user interface. |
| LabView | - | A bit difficult to learn but widely used in industrial applications.LabView does not interfaces directly with any other party hardwares such as Arduino, Raspberry Pi etc but since its a modular programming language it is able to program and read data from external party hardwares through VISA Modules. |
| MIT App Inventor | - | App Inventor has been very easy to use, just pick and place components and your done. |
Overall Learning
- Overall this week i have made significant progress on my project final interface
- I leart how to add a user Interface and Voice control to control food computer
- I was able to successfully test and control relays using GUI and Voice interface
- Overall prodctive week with lot of learning on Voice based interface and one step closer to my final project