Project management
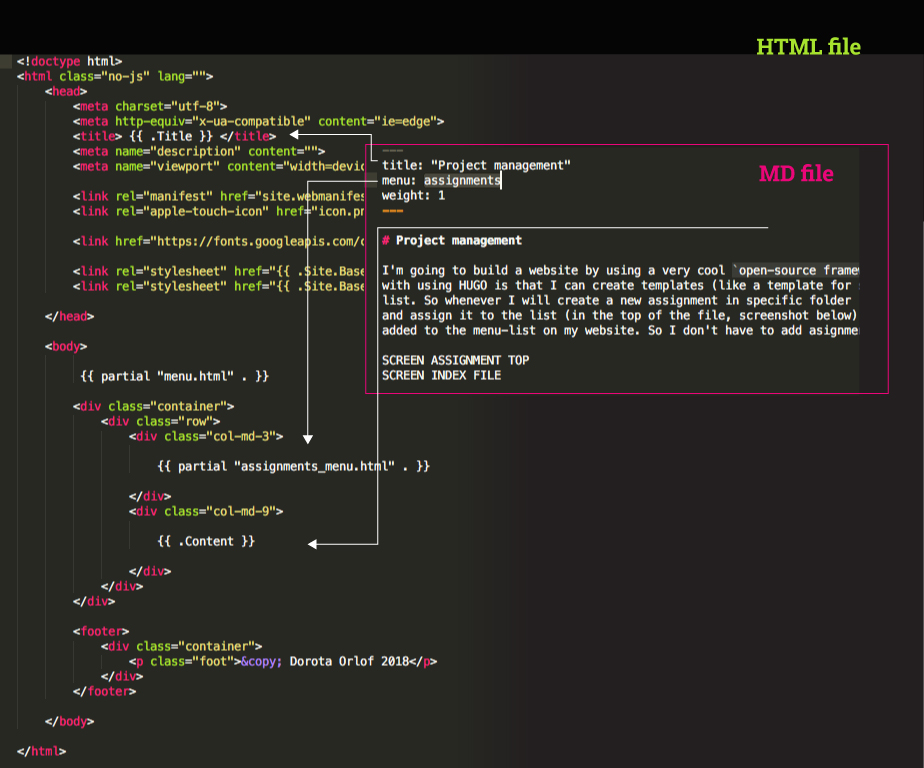
I’m going to build a website by using a very cool open-source framework HUGO. The cool thing with using HUGO is that I can create templates (like a template for single assignment) which will be linked to the list. So whenever I will create a new assignment in specific folder (content)
and assign it to the list (in the top of the file, screenshot below) the subpage of the assignment will be created and added to the menu-list on my website. So I don’t have to add asignments by hand in index.HTML file.
Among others Hugo is speeding up your workflow becouse now the files that you are going to create (assignments, about me etc) are going to be not .html files but Markdown files. Here essential commands: https://github.com/adam-p/markdown-here/wiki/Markdown-Cheatsheet
To create the Markdown files im going to use Sublime text editor.
Than I’m going to create a GitLab repository, and clone it to my local machine. GitLab is an open source web-based git repository (version control). It’s a platform for managing the process of developing the project (mostly used for code-based projects, butcan work for other computer files). In the pipeline it is storing the versions of your project (code) in a history line. You can access the previous versions, track and make changes, also cooperate with other people on one projectin non-linear way. You will see what was added, what was deleted, what was overwritten etc.
GitLab has an option of Contimuous Inregration (CI) which allows to easily cooperate and test the code (under the localhost address in the web)
During FabAcademy we aregoing to use GitLab. Each student has it’s own repository, which will be part (after pushing) of shared repository of FabAcademy 2018. It’s cool, each year there is a new FabAcademy website where yoy can find informations about all the projects, ideas, tipps if you need help or inspiration. You can also find there all files created during FabAcademy(s) since everything is under open source condition. It’s a puzzle in the big open-source-cooperatio-based-shared-knowledge-endlessly-developing world.
My personal GitLab repository is here: https://gitlab.fabcloud.org/academany/fabacademy/2018/labs/barcelona/students/dorota-orlof
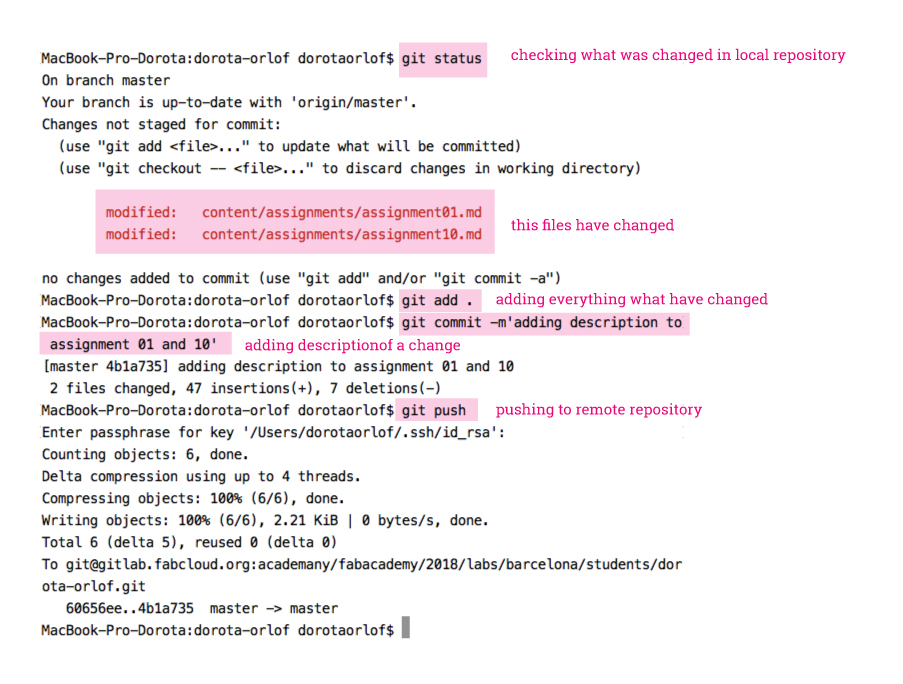
Now, any change I made in my local repsoitory can be uploaded to the remote repository (GitLab) by using terminal commands.
Underneath useful general command-lines, command lines for working with git-repo, instruction how to add a new git repository, how to installl hugo and make a website using it.
Command line
cd - change directory
cd / - goes to root directory
cd (drag the folder) - goes to the dragged folder
cd /Userd/dorotaorlof/Fabacedemy…- path to the folder
cd..- one folder back
cd../fabacademy/Desktop - few folders back
pwd - print working directory
touch - creating new file
open image.png - opening the image
subl . - open current directory in Sublime, you have to configure it before
. - represents the current folder
sudo dmesg - shows all the messages of the background action
sudo dmesg -c
GIT
git init
git status
git add - add files to staging area
git add . - adds everything in the folder, all the changes (mind the dot)
. - represents the current folder
git reset - undo git add, clear the staging area
git commit -m 'Your message' - register files in the version history
If you will forget to close the quotation, and enter the text editor hit ctrl c
git push - pushing the changes to remote repository (gitlab)
git pull - pulling the changes from remote repository
git log - shows you the version history
q - getting out from git log
git show - shows the details of the last commit
git diff
cat ~/.ssh/id_rsa.pub and place - getting the public key - copy it (carefully without spaces around) and place on Gitlab under SSH keys
git clone git@gitlab.fabcloud.org:academany/fabacademy/2018/labs/barcelona/students/dorota-orlof.git - cloning the remote repository to the local machine. Find the address git@gitlab… on gitlab. It’s SSH:…
Adding a new file on Gitlab (in root directory) : .gitlab-ci.yml
This file allows to build, test and monitor your code. It allows to use version control and configures the GitLab CI (Continuous Integration) on how to build the page. It comes together as a template with HUGO. One have to configure it for its use.
Here is a short tutorial from HUGO about adding .yml file: https://gohugo.io/hosting-and-deployment/hosting-on-gitlab/
gitlab-ci.yml/ html - linking the address with content, so the website will be displayed under the web address.
configure the global core editor to [nano]{https://www.nano-editor.org/} (this editor one seems simple, this is why I’m goingto use it).
Here nice tutorial: https://www.lifewire.com/beginners-guide-to-nano-editor-3859002
In nano you can edit e.g. commit messages:
git config --global core.editor nano
changing the commit message:
git commit --amend
In nano:
ctrlo - save, hit enter to confirm file name
ctrlx - quit
Adding the new project reopsitory (in this case for files that I’m going to link from my website)
After creating a new project on GitLab, and a folder with the same name on my computer. I have to link them via command-line:
1. Navigate to the folder (cd /Users/dorotaorlof/Desktop/fabacademy/interface )
2. From inside: git init (Initialized empty Git repository choosen location)
3. git remote add origin git@gitlab.fabcloud.org:dorota.orlof/interface.git (that’s SSH key from project GitLab website)
Changing the name of project repsoitory
1. (cd to the location) git remote -v (for listing the remote repositories and checking what’s the address)
2. git remote set-url origin git@gitlab.fabcloud.org:dorota.orlof/fab_academy_files.git (updated SSH key - after changing name on GitLab)s
HUGO
Hugo makes the website management much easier, when you have repeatable elements like on a blog. On each subpage (post) there are repeatable elements like menu, title, etc. Once you set up the structure in Hugo you can write the e.g. text of new posts in markdown.
https://gohugo.io/variables/site/ https://github.com/adam-p/markdown-here/wiki/Markdown-Cheatsheet
Installing Hugo:
- check if you have Hugo —> in terminal type
which hugo - if you don’t have it, go to Hugo website and download latest version (from releases), in this case for mac 64bit.
- unzip the file
- place .exe file in
/usr/local/bin<— to go there use Go from Finder menu - “go to file” - open terminal - type
hugo version- check if it’s there - create a new setup folder –> in terminal, go to destination folder and type:
hugo new site .(note the dot! - represents the path to the current directory) - from the files in created folder, open
config.tomlin text editor, here you can configure web address, language, title, and make your own prameters.
baseURL = "http://example.org/"
languageCode = "en-us"
title = "Dorota Orlof / Fab Academy 2018"

[params]
description = "This is the hugo test website"
subtitle = "To learn sooo much"
author = "Dorota Orlof"
- create anew file
index.htmlinlayoutsfolder - write
{{ .Site.Title }}- links the variable from config file with html {{}} - are hooking to Hugo configuration - go to terminal, go to the location of the config.toml file (in the Hugo project folder) start a server by typing:
hugo sever(ctrl c- to stop the server) Web Server is available at http://localhost:1313/ (bind address 127.0.0.1) Press Ctrl+C to stop - your website is launched under the address that you’ve typed in config file
- afterwards write the preconfigured Site Variables (https://gohugo.io/variables/site/) like
.Site.Title, and the parameters that you’ve specified inconfig.tomlfile (for example: description, subtitle, author)
<!DOCTYPE html>
<html>
<head>
	<title>{{ .Site.Title }}</title>
</head>
<body>

	{{ partial "home.html" . }}

	<h1>{{ .Site.Title }}</h1>
	<p>{{ .Site.Params.Description }}</p>
	<p>{{ .Site.Params.Subtitle }}</p>
	<p>{{ .Site.Params.Author }}</p>
	<hr>

	{{ partial "menu.html" . }}

</body>
</html>
- create
blogfolder incontentfolder - create a file there in markdown for example
welcome.md - in folder
layoutscreate subfolder_defaultand inside the filesingle.html— it’s for creating the template for group of subsites for ex. for blog post - create a subfolder
partialswhere you are going to build all the repeatible parts which should appear on every subside (menu, home etc.) - create a file
menu.htmlandhome.html- for building the menu part and home button - build
menu.html
<h2>Blog Menu</h2>
{{ range .Site.Menus.blog }}
	<a href="{{ .URL }}">{{ .Name }}</a><br>
{{ end }}
- build
home.html
{{ if .IsHome }}
	You are home already
{{ else }}
	<a href="{{ .Site.BaseURL }}">Go home</a>
{{ end }}
<hr>
- in
index.htmlfile insert the above parts (menu, home)
<!DOCTYPE html>
<html>
<head>
	<title>{{ .Site.Title }}</title>
</head>
<body>

	{{ partial "home.html" . }}

	<h1>{{ .Site.Title }}</h1>
	<p>{{ .Site.Params.Description }}</p>
	<p>{{ .Site.Params.Subtitle }}</p>
	<p>{{ .Site.Params.Author }}</p>
	<hr>

	{{ partial "menu.html" . }}

</body>
</html>
- in
single.html(template for post) insert them as well
<!DOCTYPE html>
<html>
<head>
	<title>{{ .Title }}</title>
	<meta name="description" content="{{ .Description }}">
</head>
<body>

	{{ partial "home.html" . }}
	{{ partial "menu.html" . }}

	{{ .Content }}

</body>
</html>
Migrating html to Hugo
- make hugo_site folder inside folder which contains index.html file linked to gitlab
- navigate there in terminal
- type:
hugo new site .- creates the new hugo setup folder - open
config.tomlin sublime -configure the title ect., add parameters [params] inconfig.toml - move
index.htmlto folder layouts (in hugo site folder)
Now we can test hugo:
-launch hugo server in terminal
- tells you under which address website is hosted locally (the link from config.toml): http://localhost:1313
- to add assets (images, css) we use static directory (folder static - in hugo_site)
- we move there all files (from foder where index.html file was) except html, readme and hidden files.
Now we create layout for the template page:
- create the folder
_defaultin layouts folder. Move one of html files there. Rename it tosingle.html - we create some partials, which will be on template page. E.g. menu.
- create folder
partialsin layouts folder - create
menu.htmlfile in partials folder - copy there menu part from index.html
<nav>....</nav>, and in index.html place instead{{ partial "menu.html" . }} - we have to add content to the content folder, in markdown:
- assignmets folder (in this folder we create files for each blog post.),about, final project
- replace the link in config.toml with the web address
Useful tools:
VLC - good also for recording your desktop
- File - open capture device - screen / 30 f/s
- Preferences - imput/codec - choose destination folder
Imagemagic
https://www.imagemagick.org/script/index.php To use through the terminal, good to rework many pictures in one go.
- for installing, go to file folder, type: du -sk, sort -n
- example action: resizing (cropping) an image ignoring aspect ratio: convert original_file.jpg -resize “160x160!” resized_file.jpg ( where 160x160 is the dimension in pixels…. )
Pixlr - online image optimizer
https://pixlr.com/ Also works through terminal.
Ffmpeg With codecs and many formats (for spcific use)
For compressing video - upload on youtube and download**