Week 15: Interface and Application Programming
XIAO ESP32S3 Sense portrait generator
 Face recognition app running on the XIAO
I made an app that runs on the tiny XIAO ESP32S3 Sense. It captures an image from the OV3660 camera, runs ESP-DL (Espressif’s on-device deep-learning library) right on the chip to find the face, and turns it into a portrait drawing made of lines — all at the edge, no cloud. The XIAO also acts as the web server, so I just open my browser, type its IP address, and the dashboard shows up. No PC in the middle. I still cannot quite believe this little chip does all of that.
Assignments
individual assignment:
- write an application that interfaces a user with an input &/or output device that you made
group assignment:
- compare as many tool options as possible
Group Assignment
Individual Assignment
What I wanted to make
My final project idea is a SCARA portrait robot that draws a person’s face. For week 15 I wanted to make the “brain” part work end to end:
- take a photo with the XIAO’s camera
- find a face in the photo
- turn the face into a list of strokes (the path the pen will follow)
- show all of this on a web page served by the XIAO itself
If this part works, I can later send the same strokes to the SCARA arm and let it draw.
The board
This week, I wanted to make the brain part of my final project, which is to create a portrait from a camera image.
I put the Seeed Studio XIAO ESP32S3 Sense on the board I designed and milled in week 8.
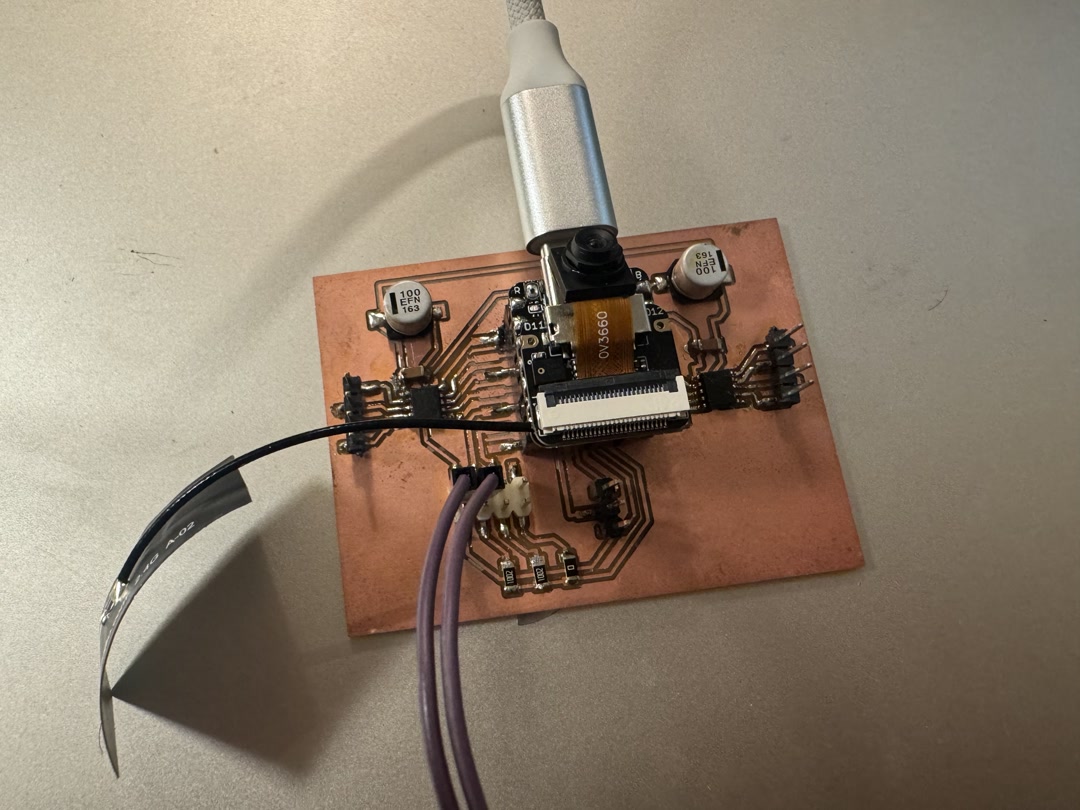
In week 11, I first got this board to capture images with the OV3660 camera and stream them over Wi-Fi to a browser, with a hardware button to freeze a frame. That gave me the camera + Wi-Fi + button basics. For week 15, I added face detection and portrait stroke generation.
Writing the app with Claude Code
I wrote the firmware with the help of Claude Code. I described what I wanted in plain words (“capture a frame, run face detection, then trace the outline into strokes, and serve a small dashboard over Wi-Fi”), and Claude Code helped me put together the ESP-IDF project, split it into small modules, and debug the parts that did not work the first time.
The project is structured into small files that each do one job:
camera.c— set up the OV3660 and grab a JPEG framewifi.c— connect to Wi-Fihttp_dashboard.c— serve the web page and the JSON of strokesportrait_engine.cpp— run face detection (usingesp-dl’sHumanFaceDetect) and turn the result into strokesservo_ctrl.c,button.c,led.c— the I/O pieces for latermain.c— boots everything up
The portrait engine detects the face, finds the bounding box and a few keypoints (eyes, nose, mouth), and then traces edges inside that box to make the strokes. There is a small simplification step (Ramer–Douglas–Peucker) that keeps the strokes from having too many points. The result is a list of polylines I can later feed to the robot.
The app running
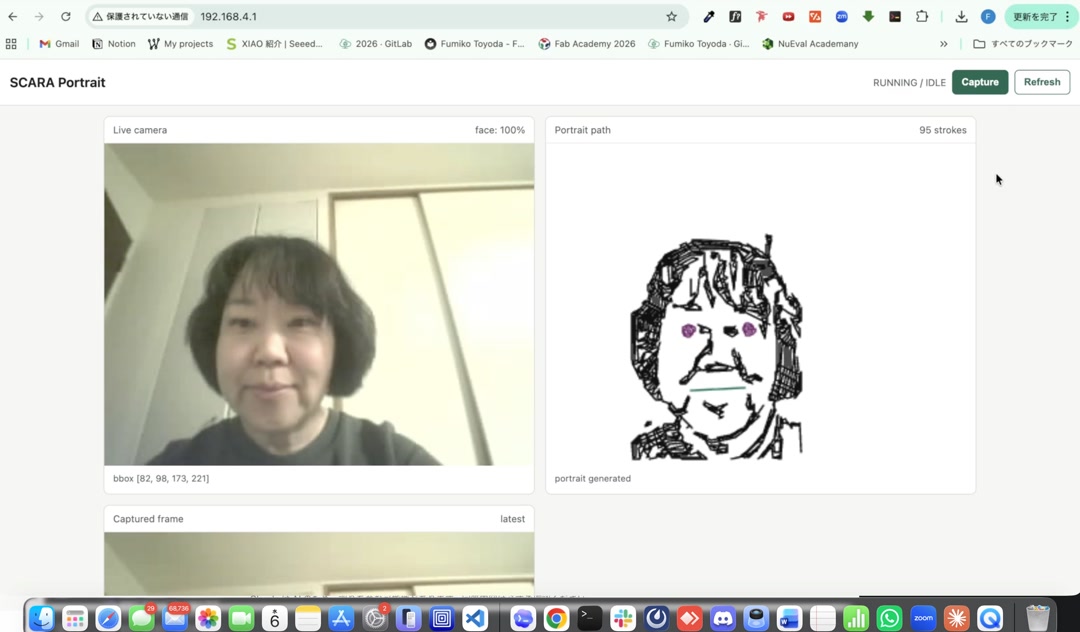
Once the XIAO is on Wi-Fi, it prints its IP address to the serial monitor. I type that IP in my browser and this is what I see:
- Live camera on the left, with a green box around the detected face and a confidence number
- Portrait path on the right, drawn from the strokes the XIAO just generated
- Captured frame below, showing the JPEG that was used
- A Capture button at the top right to take a new shot
When I pressed Capture, the little drawing of my face appeared on the right side. The XIAO is smaller than my thumb, and yet it took the picture, found my face, traced 95 strokes out of it, AND served the web page that shows me all of this. No cloud, no laptop doing the heavy lifting. Just the XIAO and my browser on the same Wi-Fi.
What I learned
- A tiny MCU like the XIAO ESP32S3 can really do a lot when you use the Sense version’s 8 MB PSRAM (Pseudo-Static RAM, an extra memory chip) together with the
esp-dlface detection model. - Working with Claude Code felt like pair programming.
Next step
Connect this portrait path to the SCARA arm so the robot can actually draw the face on paper. The strokes are already in the right format — now I just need to send them to the servos. I will also improve the aesthetics of the portrait generation logic.
For the SCARA mechanism itself, I am planning to design a dedicated serial servo board (driving serial-bus servos like Feetech ones over a single data line, instead of one PWM wire per servo, or using big NEMA 17 stepper motors as I had initially planned). That should let the SCARA arm stay small and cute while still being precise enough to draw a recognizable face.
AI Usage
I used Claude Code for code generation and polishing the report. I reviewed and edited the AI-generated output as necessary before submission.
Source code
The full firmware project is here: docs/source_code/week15/
Checklist
- [X] Linked to the group assignment page.
- [X] Documented your process.
- [X] Explained the UI that you made and how you did it.
- [X] Explained how your application communicates with your embedded microcontroller board.
- [X] Explained any problems you encountered and how you fixed them.
- [X] Included original source code (or a screenshot of the app code if that’s not possible).
- [X] Included a ‘hero shot’ of your application running & communicating with your board.
Reference
- Seeed Studio XIAO ESP32S3 Sense — Getting Started — the board I am using, with the OV3660 camera module and 8 MB PSRAM
- esp-dl (Espressif Deep Learning library) — provides the
HumanFaceDetectmodel that runs face detection on the ESP32S3