Week 15
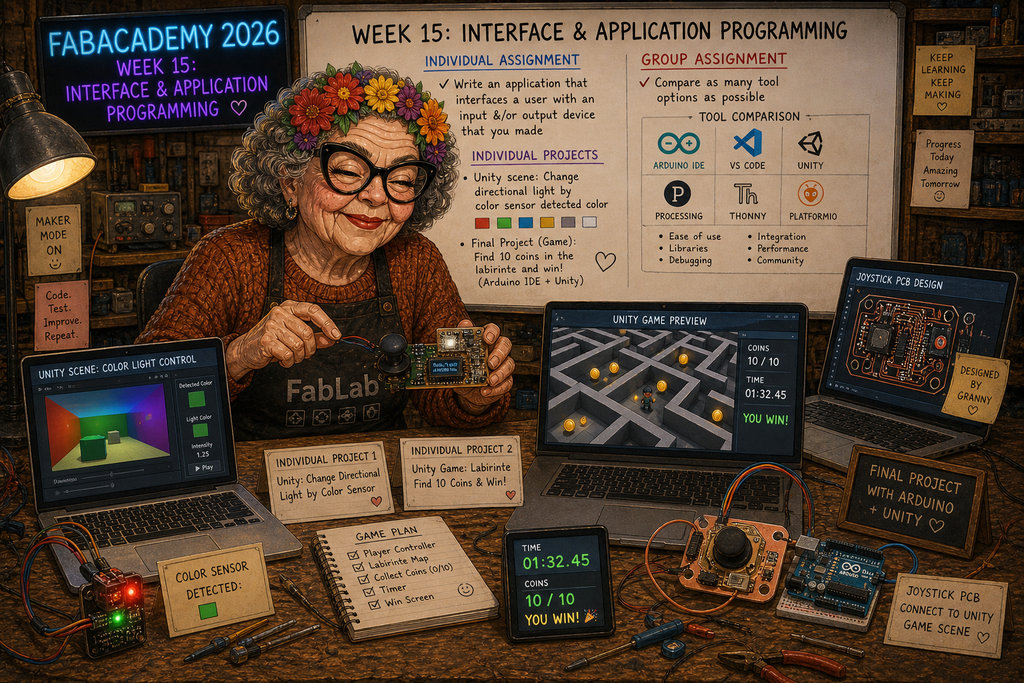
AI prompt:
“now generate image when she started week 15 "Interface and Application Programming" and this week needs to do these points: individual assignment: • Write an application that interfaces a user with an input &/or output device that you made group assignment: • Compare as many tool options as possible For the individual part, she does it in a Unity game scene where directional light is changed by coloure sensore finded color. And for the individual part, she do it her final project part, she generate Unity Game where the player needs to in labirinte finde 10 coins and wine when get all coins in separate time (With arduino IDE and Unity). She designed her Joystick PCB and now need to connect it with Unity Game scene.”
Interface and Application Programming
For the individual assignment, I decided to create a simulation of my final project in Unity, which will also be a good example of an interface.
The game will be a maze where I control a car using my joystick and collect coins within a certain time. But this time I decided to make it more like an open world, as if the game happens in a forest 😄
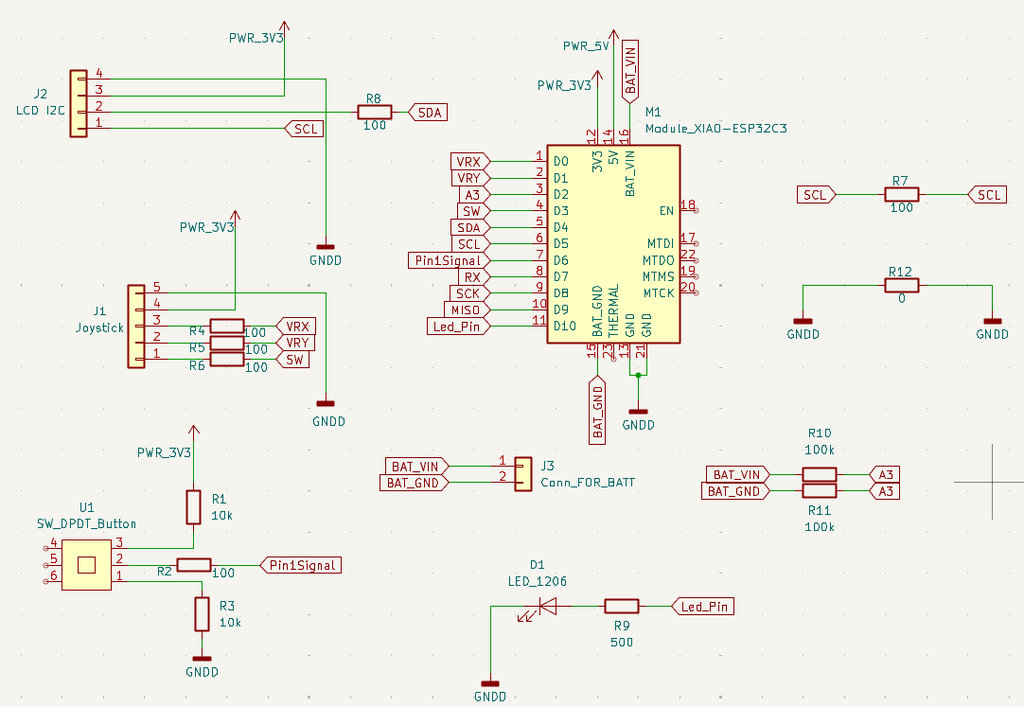
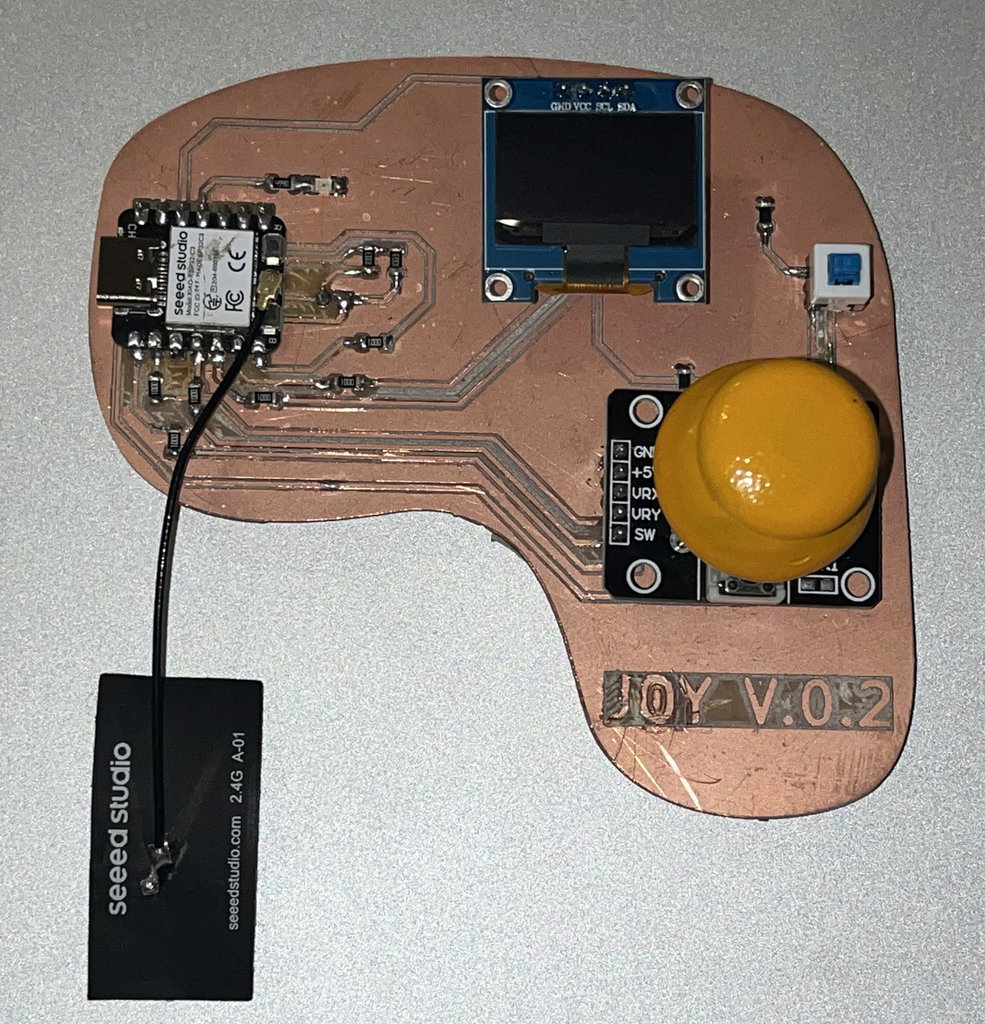
Here is the schematic of the joystick along with its final assembled appearance, which I use to control the Unity game. The complete design and development process of the joystick is documented in Week 11.
I asked Claude:
“Give me an Arduino code that connects to a Unity project, lets me move the Player using a joystick, and at the same time receives data back and prints it on an LCD.”
He gave me a base code, and I made several changes to match my exact needs. Honestly, I’m very thankful to Claude because he saved me a lot of time — without that help, I probably wouldn’t finish this in 4 days ❤️
Here is the full code, and below I’ll explain what I changed and why.
// ============================================================
//  JoystickCar.ino
//  Unity -> Maze Car Controller
//  Hardware: XIAO ESP32C3
//  GPIO2  (D0)  → KY-023 VRX
//  GPIO3  (D1)  → KY-023 VRY
//  GPIO4  (D2)  → Battery voltage divider
//  GPIO5  (D3)  → KY-023 SW
//  GPIO6  (D4)  → OLED SDA
//  GPIO7  (D5)  → OLED SCL
//  GPIO21 (D6)  → Switch Button
//  GPIO10 (D10) → LED
// ============================================================

#include <Wire.h>
#include <WiFi.h>
#include <WiFiUdp.h>
#include <Adafruit_GFX.h>
#include <Adafruit_SSD1306.h>

// ============================================================
//  SECTION 1 — WiFi
// ============================================================
const char* WIFI_SSID     = "iPhone";
const char* WIFI_PASSWORD = "Manuela27";

// ============================================================
//  SECTION 2 — Network
// ============================================================
const char* UNITY_IP    = "172.20.10.3";
const int   UNITY_PORT  = 7777;
const int   LISTEN_PORT = 7778;

// ============================================================
//  SECTION 3 — Pins
// ============================================================
#define PIN_VRX     2
#define PIN_VRY     3
#define PIN_BATT    4
#define PIN_JOY_SW  5
#define PIN_SDA     6
#define PIN_SCL     7
#define PIN_SWITCH  21
#define PIN_LED     10

// ============================================================
//  SECTION 4 — OLED
// ============================================================
#define OLED_W     128
#define OLED_H      64
#define OLED_ADDR  0x3C
Adafruit_SSD1306 oled(OLED_W, OLED_H, &Wire, -1);

// ============================================================
//  SECTION 5 — Joystick calibration
// ============================================================
const int ADC_CENTER = 2048;
const int DEADZONE   = 150;

// ============================================================
//  SECTION 6 — Timing
// ============================================================
const unsigned long SEND_MS    = 20;
const unsigned long DISPLAY_MS = 100;
const unsigned long LED_ON_MS  = 100;

// ======================== //
//  SECTION 7 — Game state  //
// ======================== //
enum State { S_CONNECTING, S_IDLE, S_RUNNING, S_PAUSED, S_WIN, S_GAMEOVER };
State state = S_CONNECTING;

int           coins       = 0;
unsigned long startTime   = 0;
unsigned long pausedTime  = 0;
unsigned long lastSend    = 0;
unsigned long lastDisplay = 0;
unsigned long ledOff      = 0;
bool          ledOn       = false;

bool          swLast      = HIGH;
unsigned long swDebounce  = 0;

String unityTime = "00:00.0";

WiFiUDP udp;

// ============================================================
//  SECTION 8 — Helpers
// ============================================================
float normalize(int raw) {
  if (abs(raw - ADC_CENTER) < DEADZONE) return 0.0f;
  if (raw < ADC_CENTER)
    return map(raw, 0, ADC_CENTER - DEADZONE, -1000, 0) / 1000.0f;
  return map(raw, ADC_CENTER + DEADZONE, 4095, 0, 1000) / 1000.0f;
}

int battPct() {
  float v = analogRead(PIN_BATT) * (3.3f / 4095.0f) * 2.0f;
  return constrain((int)((v - 3.0f) / 1.2f * 100.0f), 0, 100);
}

unsigned long elapsed() {
  if (state == S_RUNNING)
    return pausedTime + (millis() - startTime);
  return pausedTime;
}

void toUnity(const char* msg) {
  udp.beginPacket(UNITY_IP, UNITY_PORT);

  udp.write((uint8_t*)msg, strlen(msg));
  udp.endPacket();
}

// ============================================================
//  SECTION 9 — OLED screens
// ============================================================
void screenConnecting() {
  static uint8_t dots = 0;
  oled.clearDisplay();
  oled.setTextColor(SSD1306_WHITE);
  oled.setTextSize(1);
  oled.setCursor(4, 6);  oled.print("Connecting to WiFi");
  oled.setCursor(4, 20); oled.print(WIFI_SSID);
  oled.setCursor(4, 38);
  for (int i = 0; i < dots; i++) oled.print(". ");
  dots = (dots + 1) % 7;
  oled.display();
}

void screenIdle() {
  oled.clearDisplay();
  oled.setTextColor(SSD1306_WHITE);
  oled.setTextSize(1);
  oled.setCursor(0, 0);
  oled.print("IP: "); oled.print(WiFi.localIP());
  oled.drawLine(0, 11, 127, 11, SSD1306_WHITE);
  oled.setTextSize(2);
  oled.setCursor(22, 18); oled.print("READY!");
  oled.setTextSize(1);
  oled.setCursor(2, 54); oled.print("SWITCH = start");
  oled.display();
}

void screenRunning() {
  oled.clearDisplay();
  oled.setTextColor(SSD1306_WHITE);

  oled.setTextSize(1);
  oled.setCursor(0, 0); oled.print("TIME "); oled.print(unityTime);  // ← uses Unity time
  oled.setCursor(92, 0); oled.print(battPct()); oled.print("%");
  oled.drawLine(0, 11, 127, 11, SSD1306_WHITE);

  oled.setTextSize(1);
  oled.setCursor(0, 17); oled.print("COINS");
  char cbuf[8]; snprintf(cbuf, sizeof(cbuf), "%d/10", coins);
  oled.setTextSize(3);
  int16_t x1, y1; uint16_t w, h;
  oled.getTextBounds(cbuf, 0, 0, &x1, &y1, &w, &h);
  oled.setCursor((OLED_W - w) / 2, 26);
  oled.print(cbuf);

  oled.setTextSize(1);
  oled.setCursor(2, 56); oled.print("SWITCH = pause");
  oled.display();
}

void screenPaused() {
  oled.clearDisplay();
  oled.setTextColor(SSD1306_WHITE);
  oled.setTextSize(2);
  oled.setCursor(10, 2); oled.print("PAUSED");
  oled.drawLine(0, 18, 127, 18, SSD1306_WHITE);
  unsigned long ms = elapsed();
  int s = ms / 1000, m = s / 60;
  char tbuf[10]; snprintf(tbuf, sizeof(tbuf), "%02d:%02d", m, s % 60);
  oled.setTextSize(1);
  oled.setCursor(0, 28); oled.print("Coins : "); oled.print(coins); oled.print(" / 10");
  oled.setCursor(0, 40); oled.print("Time  : "); oled.print(unityTime);
  oled.setCursor(2, 54); oled.print("SWITCH = continue");
  oled.display();
}

void screenWin() {
  oled.clearDisplay();
  oled.setTextColor(SSD1306_WHITE);
  oled.setTextSize(2);
  oled.setCursor(14, 0); oled.print("YOU WIN!");
  oled.drawLine(0, 20, 127, 20, SSD1306_WHITE);
  unsigned long ms = elapsed();
  int s = ms / 1000, m = s / 60;
  char tbuf[14]; snprintf(tbuf, sizeof(tbuf), "%02d:%02d.%d", m, s % 60, (int)((ms % 1000) / 100));
  oled.setTextSize(1);
  oled.setCursor(0, 26); oled.print("All 10 coins!");
  oled.setCursor(0, 38); oled.print("Time: "); oled.print(unityTime);
  oled.setCursor(2, 54); oled.print("SWITCH = play again");
  oled.display();
}

// NEW: Game Over screen
void screenGameOver() {
  oled.clearDisplay();
  oled.setTextColor(SSD1306_WHITE);
  oled.setTextSize(2);
  oled.setCursor(4, 0); oled.print("GAME OVER");
  oled.drawLine(0, 20, 127, 20, SSD1306_WHITE);
  oled.setTextSize(1);
  oled.setCursor(0, 26); oled.print("Coins: "); oled.print(coins); oled.print(" / 10");
  unsigned long ms = elapsed();
  int s = ms / 1000, m = s / 60;
  char tbuf[10]; snprintf(tbuf, sizeof(tbuf), "%02d:%02d", m, s % 60);
  oled.setCursor(0, 38); oled.print("Time: "); oled.print(unityTime);
  oled.setCursor(2, 54); oled.print("SWITCH = try again");
  oled.display();
}

// ============================================================
//  SECTION 10 — Game control
// ============================================================
void startGame() {
  coins      = 0;
  pausedTime = 0;
  startTime  = millis();
  state      = S_RUNNING;
  toUnity("CMD:RESET");
  Serial.println("[GAME] Started");
}

void pauseGame() {
  pausedTime += millis() - startTime;
  state = S_PAUSED;
  toUnity("CMD:STOP");
  Serial.println("[GAME] Paused");
}

void resumeGame() {
  startTime = millis();
  state = S_RUNNING;
  toUnity("CMD:RESUME");
  Serial.println("[GAME] Resumed");
}

// ============================================================
//  SECTION 11 — setup()
// ============================================================
void setup() {
  Serial.begin(115200);
  delay(400);

  pinMode(PIN_VRX,    INPUT);
  pinMode(PIN_VRY,    INPUT);
  pinMode(PIN_BATT,   INPUT);
  pinMode(PIN_JOY_SW, INPUT_PULLUP);
  pinMode(PIN_SWITCH, INPUT_PULLUP);
  pinMode(PIN_LED,    OUTPUT);
  digitalWrite(PIN_LED, LOW);

  Wire.begin(PIN_SDA, PIN_SCL);
  delay(100);

  if (!oled.begin(SSD1306_SWITCHCAPVCC, OLED_ADDR)) {
    Serial.println("OLED not found! Check wiring.");
    while (true) { digitalWrite(PIN_LED, !digitalRead(PIN_LED)); delay(150); }
  }
  oled.clearDisplay(); oled.display();

  WiFi.begin(WIFI_SSID, WIFI_PASSWORD);
  Serial.print("Connecting WiFi");
  while (WiFi.status() != WL_CONNECTED) {
    screenConnecting(); delay(300); Serial.print(".");
  }
  delay(500);
  Serial.println(); Serial.print("IP: "); Serial.println(WiFi.localIP());

  udp.begin(LISTEN_PORT);
  state = S_IDLE;
  delay(500);
  swLast = HIGH;
  Serial.println("[READY] Press switch to start game");
}

// ============================================================
//  SECTION 12 — loop()
// ============================================================
void loop() {
  unsigned long now = millis();
// Serial.println(WiFi.localIP());
  // ── A) Switch button (debounced) ──────────────────────────
  bool sw = digitalRead(PIN_SWITCH);//digitalRead(PIN_JOY_SW); //digitalRead(PIN_SWITCH);
  //Serial.println(sw);
  if (sw == LOW && swLast == HIGH) {// && (now - swDebounce) > 50) {
    swDebounce = now;
    switch (state) {
      case S_IDLE:     startGame();  break;
      case S_RUNNING:  pauseGame();  break;
      case S_PAUSED:   resumeGame(); break;
      case S_WIN:      startGame();  break;
      case S_GAMEOVER: startGame();  break;  // try again
      default: break;
    }
  }
  swLast = sw;

  // ── B) Incoming UDP from Unity ─────────────────────────────
  int pkt = udp.parsePacket();
  //Serial.println(pkt);
  if (pkt > 0) {
    // Serial.print("Packet size: ");
     Serial.println(pkt);
    char buf[32] = {0};
    udp.read(buf, sizeof(buf) - 1);
    String msg = String(buf); msg.trim();
    Serial.print("[UNITY] "); Serial.println(msg);

    // "COIN:N" — parse actual count from Unity
    if (msg.startsWith("COIN:") && state == S_RUNNING) {
      int n = msg.substring(5).toInt();
      coins = n;
      Serial.print("Coins updated → ");
      Serial.println(coins);

      //if (n > coins) coins = n;   // only update forward
      digitalWrite(PIN_LED, HIGH);
      ledOn  = true;
      ledOff = now + LED_ON_MS;
    }

    if (msg == "WIN") { // && state == S_RUNNING) {
      pausedTime += millis() - startTime;
      state = S_WIN;
      coins = 10;
      digitalWrite(PIN_LED, HIGH);
      ledOn  = true;
      ledOff = now + 600;
    }

    if (msg.startsWith("GAMEOVER")) { //&& state == S_RUNNING) {
      pausedTime += millis() - startTime;
      state = S_GAMEOVER;
      // Three short LED flashes for game over
      for (int i = 0; i < 3; i++) {
        digitalWrite(PIN_LED, HIGH); delay(80);
        digitalWrite(PIN_LED, LOW);  delay(80);
      }
    }

    if (msg.startsWith("TIME:")) {
      unityTime = msg.substring(5);
    }
  }

  // ── C) LED off timer ──────────────────────────────────────
  if (ledOn && now >= ledOff) {
    digitalWrite(PIN_LED, LOW);
    ledOn = false;
  }

  // ── D) Send joystick to Unity ─────────────────────────────
  if (state == S_RUNNING && (now - lastSend) >= SEND_MS) {
    lastSend = now;
    float x =  normalize(analogRead(PIN_VRX));
    float y = -normalize(analogRead(PIN_VRY));
    int   b =  (digitalRead(PIN_JOY_SW) == LOW) ? 1 : 0;
    char pkt2[48];
    snprintf(pkt2, sizeof(pkt2), "X:%.2f,Y:%.2f,B:%d", x, y, b);
    toUnity(pkt2);
  }

  // ── E) Refresh OLED ───────────────────────────────────────
  if (now - lastDisplay >= DISPLAY_MS) {
    lastDisplay = now;
    switch (state) {
      case S_CONNECTING: screenConnecting(); break;
      case S_IDLE:       screenIdle();       break;
      case S_RUNNING:    screenRunning();    break;
      case S_PAUSED:     screenPaused();     break;
      case S_WIN:        screenWin();        break;
      case S_GAMEOVER:   screenGameOver();   break;
    }
  }
}
Overview
This project demonstrates bidirectional communication, where:
- The ESP32 sends input data (joystick movement and button states) to Unity
- Unity sends game state information (coins, time, win/lose states) back to the ESP32
WiFi and Network Communication
The ESP32 connects to a WiFi network and establishes UDP communication with Unity.
Two ports are used:
7777- One for sending joystick data to Unity7778- One for receiving game data from Unity
I chose UDP because it allows fast, lightweight, real-time communication, which is perfect for game interaction.
const char* WIFI_SSID     = "iPhone";
const char* WIFI_PASSWORD = "Manuela27";

const char* UNITY_IP    = "172.20.10.3";
const int   UNITY_PORT  = 7777;
const int   LISTEN_PORT = 7778;
Communication with Unity
Sending Data to Unity
The ESP32 continuously sends joystick data in this format:
float x =  normalize(analogRead(PIN_VRX));
float y = -normalize(analogRead(PIN_VRY));
int   b =  (digitalRead(PIN_JOY_SW) == LOW) ? 1 : 0;
char pkt2[48];
snprintf(pkt2, sizeof(pkt2), "X:%.2f,Y:%.2f,B:%d", x, y, b);
toUnity(pkt2);
This allows Unity to control the player movement in real time.
Receiving Data from Unity
The ESP32 listens for messages like:
COIN:N→ updates collected coinsTIME:MM:SS→ updates game timeWIN→ triggers win stateGAMEOVER→ triggers game over state
This creates synchronization between the physical controller and the game.
///// Incoming UDP from Unity
int pkt = udp.parsePacket();
......
String msg = String(buf); msg.trim();
..........
// "COIN:N" — parse actual count from Unity
if (msg.startsWith("COIN:") && state == S_RUNNING) {
  int n = msg.substring(5).toInt();
  coins = n;

  digitalWrite(PIN_LED, HIGH);
  ledOn  = true;
  ledOff = now + LED_ON_MS;
}

if (msg == "WIN") { // && state == S_RUNNING) {
  pausedTime += millis() - startTime;
  state = S_WIN;
  coins = 10;
  digitalWrite(PIN_LED, HIGH);
  ledOn  = true;
  ledOff = now + 600;
}

if (msg.startsWith("GAMEOVER")) { //&& state == S_RUNNING) {
  pausedTime += millis() - startTime;
  state = S_GAMEOVER;
  // Three short LED flashes for game over
  for (int i = 0; i < 3; i++) {
    digitalWrite(PIN_LED, HIGH); delay(80);
    digitalWrite(PIN_LED, LOW);  delay(80);
  }
}

if (msg.startsWith("TIME:")) {
  unityTime = msg.substring(5);
}
And print the time from Unity in LCD:
oled.setCursor(0, 0); oled.print("TIME "); oled.print(unityTime);And print the coin count from Unity in LCD:
oled.setCursor(0, 17); oled.print("COINS");
char cbuf[8]; snprintf(cbuf, sizeof(cbuf), "%d/10", coins);
oled.print(cbuf);Before creating the project, I installed Unity Hub from the official Unity website and used it to install the Unity Editor with the required modules. Unity Hub simplifies project management and version installation. You can find the official installation guide here: Unity Installation Guide
Now I moved to configuring and programming the Unity part.
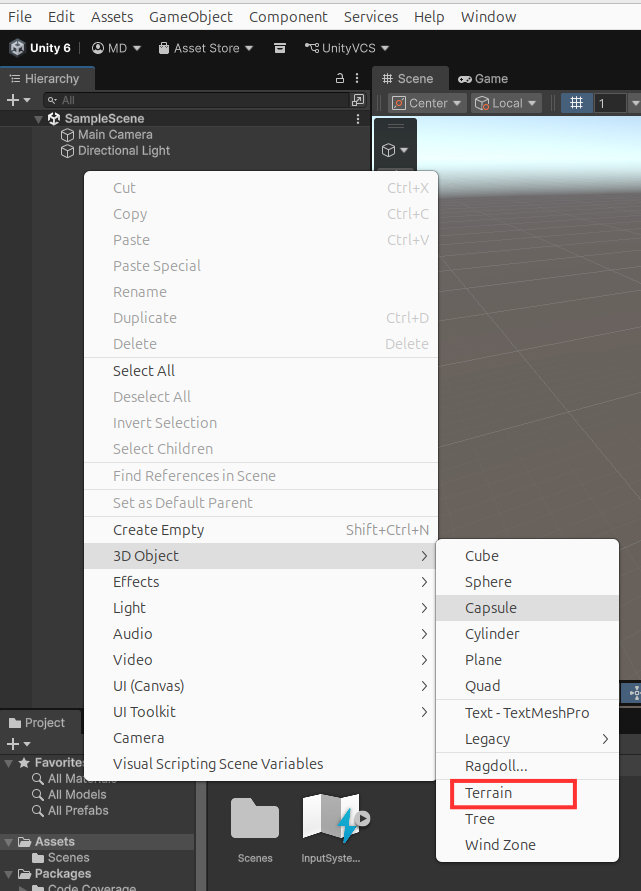
To create a better and larger environment, I go to 3D Object → Terrain, create a terrain, and in Terrain Settings set the size (for example 150x150).
Before painting the terrain, I will show how to create materials in Unity.
From polyhaven.com I download a texture.
Then I place the downloaded files inside my materials folder in Assets.
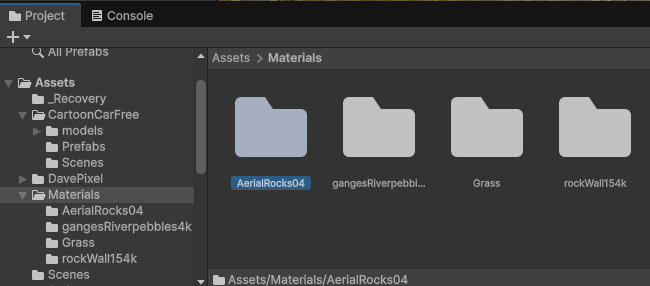
Inside it, I see files like .jpg, .png, and .exr.
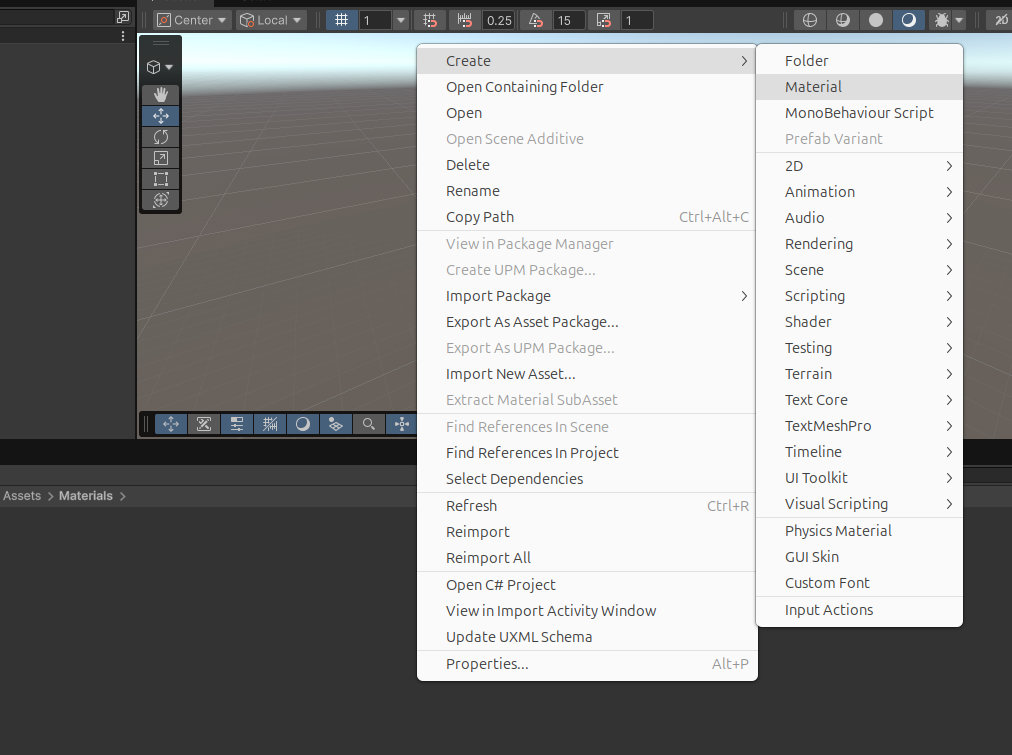
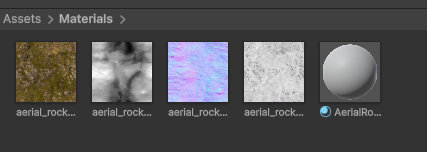
I create a new material (Right Click → Create → Material), give it a name, and in Inspector drag the files into:
- Albedo
- Normal Map
- Height Map
- Occlusion
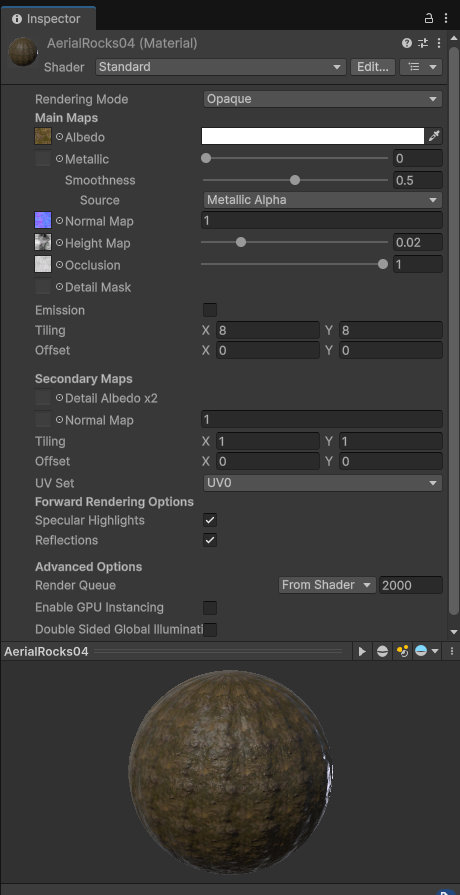
Here is a short video of that process.
Now using this method, I can create any material I want.
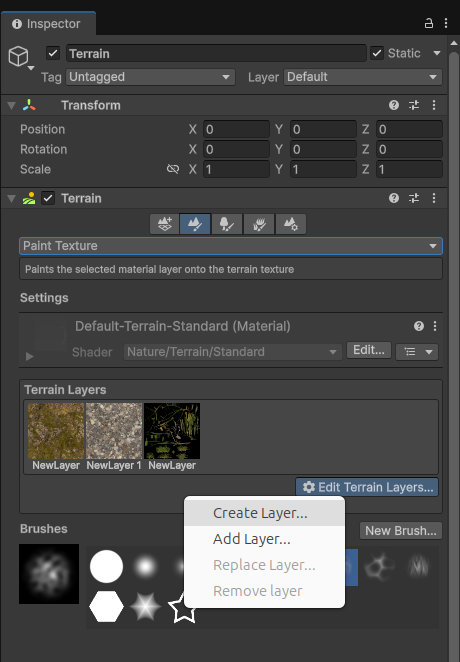
Then I go to Paint Terrain → Paint Texture, click Edit Terrain Layers → Create Layer, select my texture, and paint the terrain.
To create mountains on the edges, I switch to Raise or Lower Terrain and shape the terrain.
Here is a short video.
From the Unity Asset Store, I search for “Car”, choose one, click Add to My Assets, then go to Window → Package Manager → My Assets, download and import it.
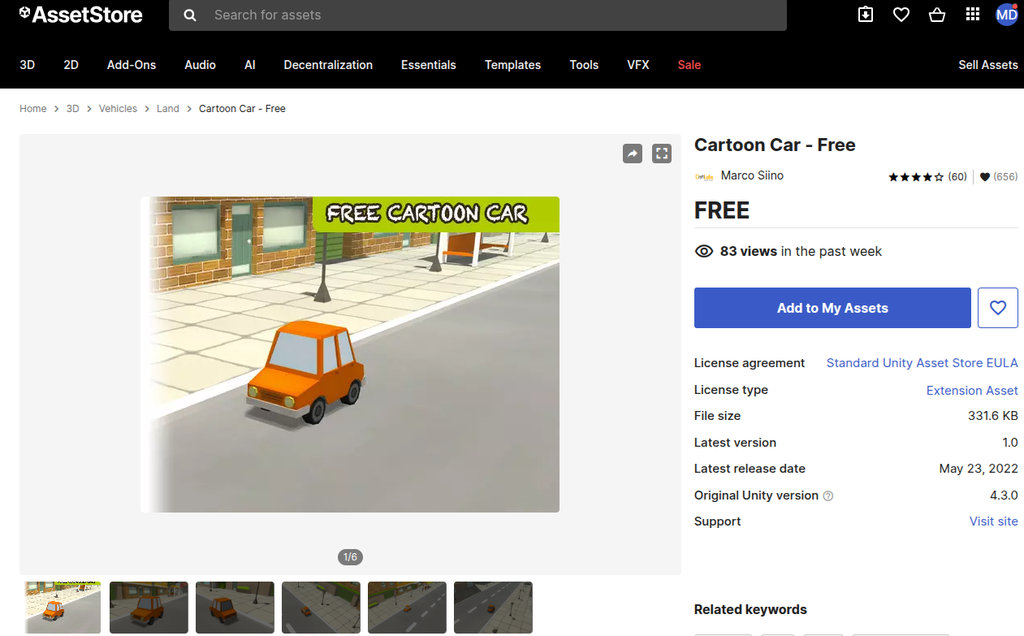
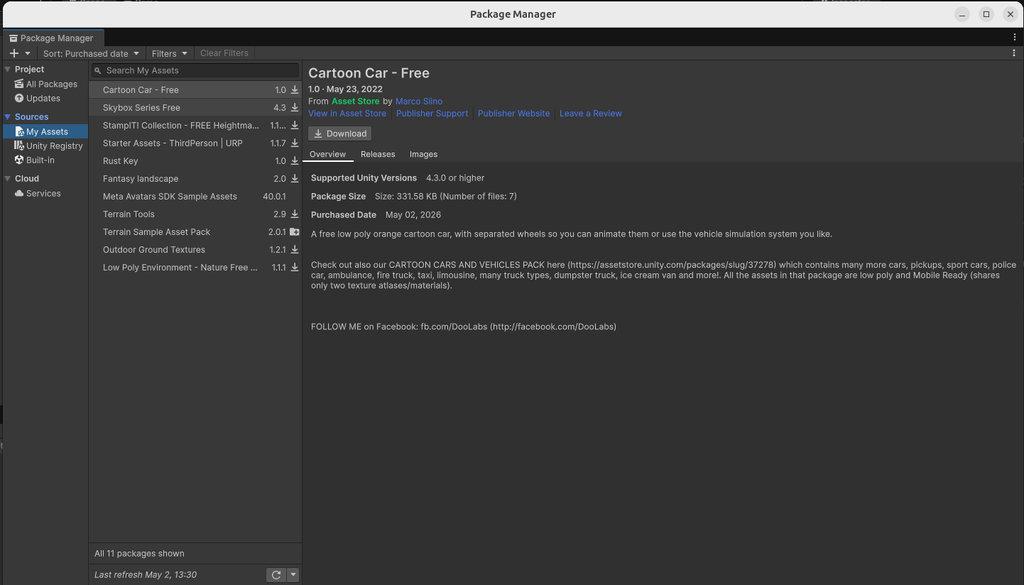
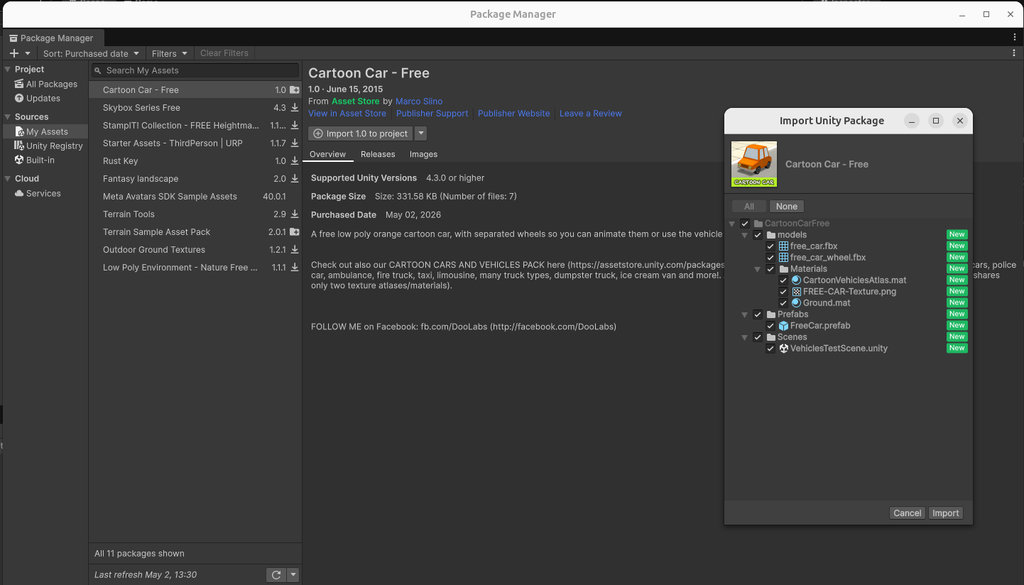
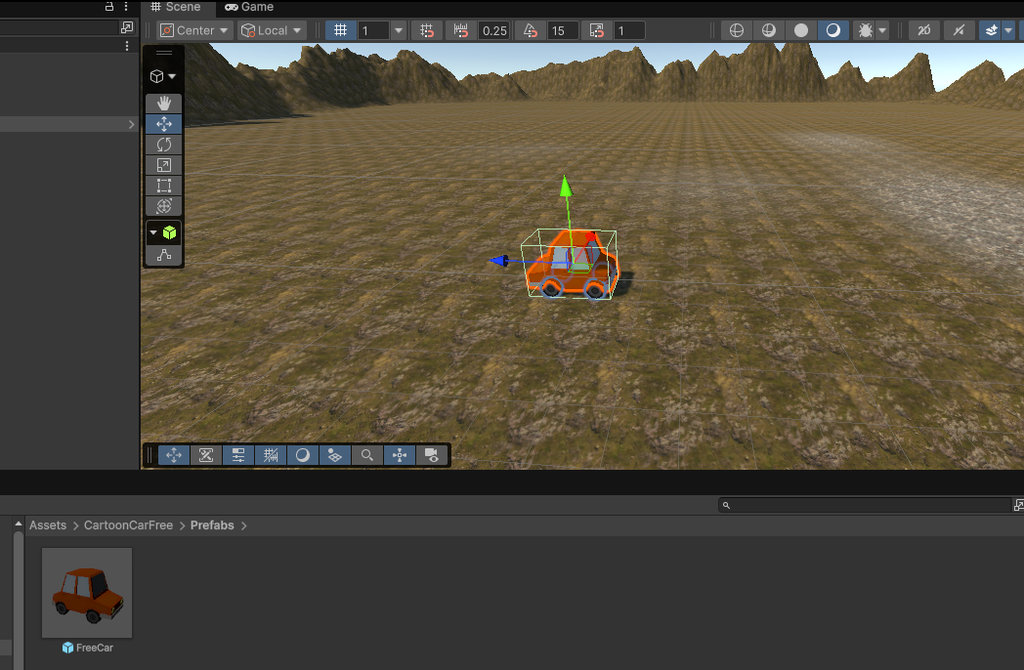
After that, the model appears in Assets, and I can drag it into the scene.
I repeat the same for coins and place them on the terrain.
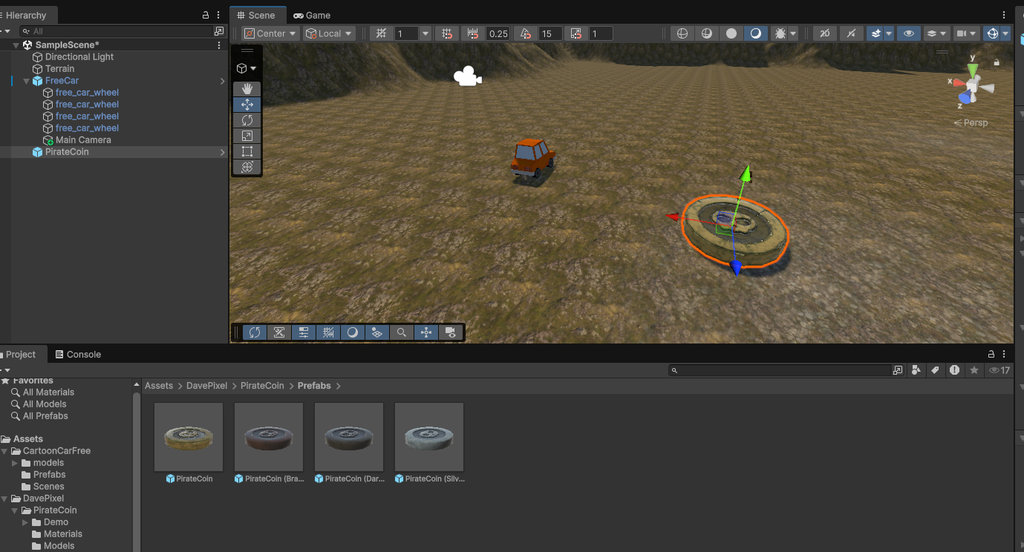
All objects appear in the Hierarchy, where I can also organize them by creating folders.
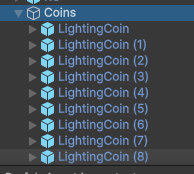
I created a Coins folder and placed 10 coin objects there.
I renamed the car to RC and placed the Main Camera inside it, so it moves together with the car.
Before programming, I also create a Canvas for a better interface.
In Hierarchy → Right Click → UI (Canvas)
Inside Canvas:
- Panels for events (
UI (Canvas)→Panel) - Text elements for default UI (
UI (Canvas)→Text – TextMeshPro)
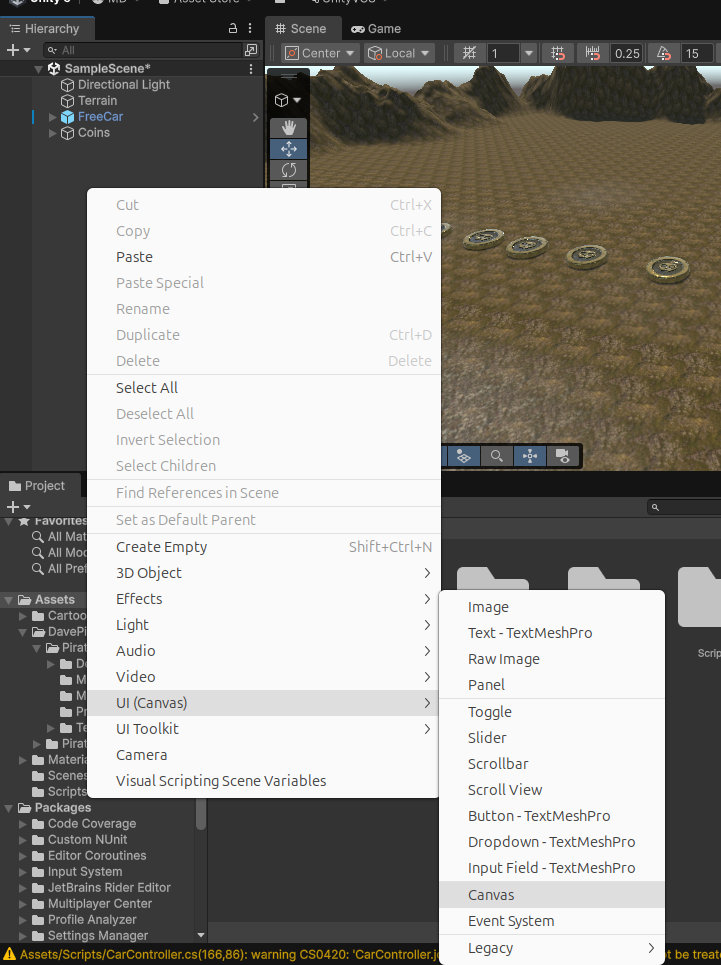
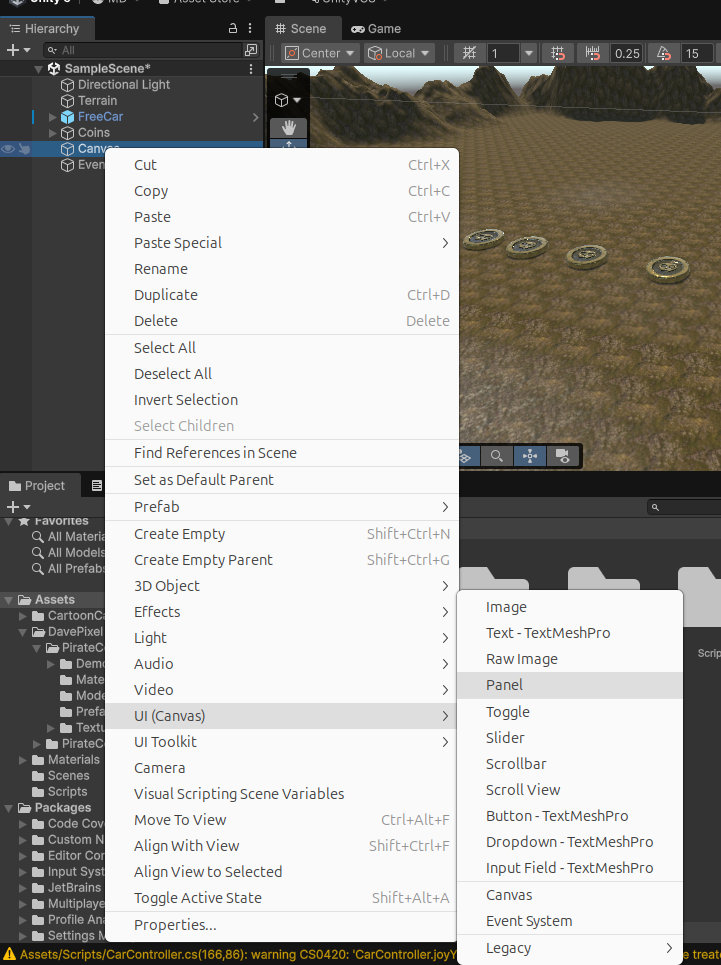
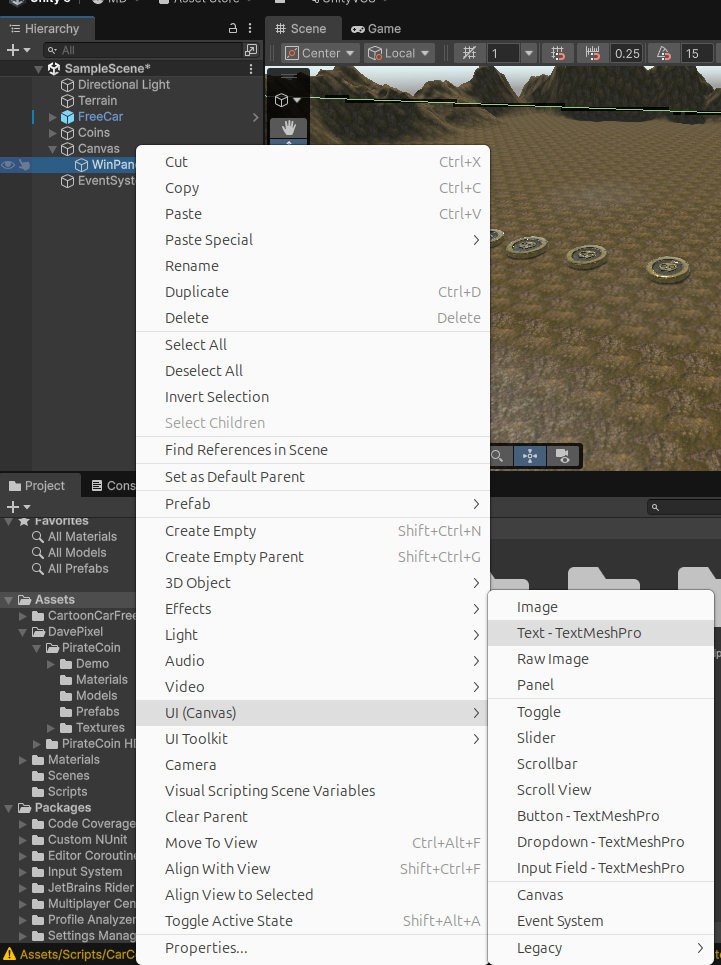
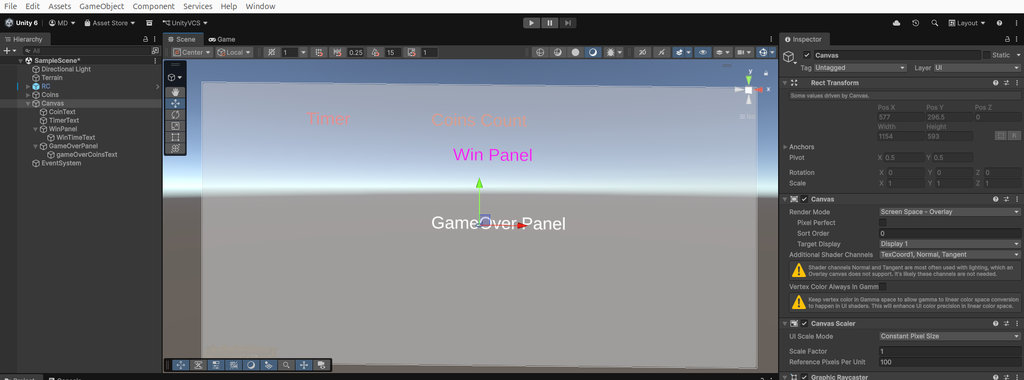
Canvas full view, and tehre can select each Text and change direction.
Again, I asked Claude using my already prepared Arduino code:
AI prompt:
“Please program my car object so I can drive it using my joystick and collect coins within a specific time.”
My favorite Claude gave me a working version of the code, and I adjusted and improved it based on my needs.
Finally, we reached the final version together.
Here is the result, and below I will explain what exactly I changed and why:
// ============================================================
//  CarController.cs  —  Updated Version
//  Attach this to your Car GameObject in Unity.
//
//  Changes from original:
//    - HUD (coins + timer) always visible on Canvas
//    - Win Panel shown only on win
//    - Game Over Panel shown when time runs out with < 10 coins
//    - Timer can count DOWN (set countDown = true in Inspector)
//    - Sends "COIN:N" instead of "COIN" so ESP32 can show count on OLED
//    - Sends "WIN" back when all 10 collected
//    - Handles CMD:RESET / CMD:STOP / CMD:RESUME from ESP32
// ============================================================

using System;
using System.Net;
using System.Net.Sockets;
using System.Text;
using System.Threading;
using System.Collections.Generic;
using UnityEngine;
using UnityEngine.UI;
using TMPro;

public class CarController : MonoBehaviour
{
    // ============================================================
    //  Inspector
    // ============================================================

    [Header("--- Network ---")]
    [Tooltip("Port Unity listens on. Must match UNITY_PORT in Arduino (7777)")]
    public int listenPort = 7777;

    [Tooltip("Port ESP32 listens on for replies. Must match LISTEN_PORT in Arduino (7778)")]
    public int esp32Port = 7778;

    [Tooltip("IP address shown on the OLED after ESP32 boots")]
    public string esp32IP = "172.20.10.3";

    [Header("--- Car Movement ---")]
    [Tooltip("How fast the car drives forward/backward (units per second)")]
    public float driveSpeed = 8f;

    [Tooltip("How fast the car rotates left/right (degrees per second)")]
    public float turnSpeed = 90f;

    [Header("--- Coins ---")]
    [Tooltip("Drag all 10 coin GameObjects here")]
    public List<GameObject> coins = new List<GameObject>();

    [Header("--- Timer ---")]
    [Tooltip("Time limit in seconds. If countDown = true, game over when it hits 0.")]
    public float gameOverTimeLimit = 60f;

    [Tooltip("If true, timer counts DOWN from gameOverTimeLimit. If false, counts UP.")]
    public bool countDown = false;

    [Header("--- UI ---")]
    [Tooltip("Text that shows  Coins: 3 / 10  — always visible on HUD")]
    public TextMeshProUGUI coinText;

    [Tooltip("Text that shows timer  00:12.4  — always visible on HUD")]
    public TextMeshProUGUI timerText;

    [Tooltip("The WIN panel (Canvas child). Leave inactive in scene.")]
    public GameObject winPanel;

    [Tooltip("Text inside win panel showing final time")]
    public TextMeshProUGUI winTimeText;

    [Tooltip("The GAME OVER panel (Canvas child). Leave inactive in scene.")]
    public GameObject gameOverPanel;

    [Tooltip("Text inside game over panel showing coins collected")]
    public TextMeshProUGUI gameOverCoinsText;

    [Header("--- Audio ---")]
    public AudioSource gameMusic;
    public AudioSource winSound;
    public AudioSource gameOverSound;

    // ============================================================
    //  Private
    // ============================================================
    private UdpClient receiveUDP;
    private UdpClient sendUDP;
    private Thread    receiveThread;
    private bool      threadRunning = false;

    private volatile float joyX = 0f;
    private volatile float joyY = 0f;
    private volatile bool  joyB = false;

    private readonly Queue<string> cmdQueue = new Queue<string>();
    private readonly object        cmdLock  = new object();

    private enum GState { Idle, Running, Paused, Won, GameOver }
    private GState gState = GState.Idle;

    private int   coinsGot  = 0;
    private float gameTime  = 0f;
    private bool  timerTick = false;

    private Rigidbody rb;

    // ============================================================
    //  Start
    // ============================================================
    void Start()
    {
        rb = GetComponent<Rigidbody>();
        if (rb == null)
            Debug.LogError("[Car] Rigidbody missing on " + gameObject.name +
                           ". Add Component → Physics → Rigidbody.");


        sendUDP = new UdpClient();
	sendUDP.EnableBroadcast = true;
        StartReceiveThread();

        // Ensure panels are hidden on start
        if (winPanel      != null) winPanel.SetActive(false);
        if (gameOverPanel != null) gameOverPanel.SetActive(false);

        UpdateCoinUI();
        UpdateTimerUI();

        Debug.Log("[Car] Ready. Waiting for ESP32 to send CMD:RESET");

        //if (gameMusic != null) gameMusic.Stop(); // don't play until game starts
    }

    // ============================================================
    //  Background UDP receive thread
    // ============================================================
    void StartReceiveThread()
    {
        threadRunning = true;
        receiveUDP    = new UdpClient(listenPort);

        receiveThread = new Thread(() =>
        {
            IPEndPoint ep = new IPEndPoint(IPAddress.Any, 0);
            while (threadRunning)
            {
                try
                {
                    byte[] data = receiveUDP.Receive(ref ep);
                    string msg  = Encoding.UTF8.GetString(data).Trim();

                    if (msg.StartsWith("CMD:"))
                        lock (cmdLock) { cmdQueue.Enqueue(msg); }
                    else
                        ParseJoystick(msg);
                }
                catch (SocketException) { break; }
                catch (Exception e) { Debug.LogWarning("[Car UDP] " + e.Message); }
            }
        });

        receiveThread.IsBackground = true;
        receiveThread.Start();
    }

    // ============================================================
    //  Parse  "X:0.75,Y:-0.50,B:0"
    // ============================================================
    void ParseJoystick(string msg)
    {
        foreach (string part in msg.Split(','))
        {
            string[] kv = part.Split(':');
            if (kv.Length != 2) continue;
            switch (kv[0].Trim())
            {
                case "X": float.TryParse(kv[1], System.Globalization.NumberStyles.Float,
                              System.Globalization.CultureInfo.InvariantCulture, out joyX); break;
                case "Y": float.TryParse(kv[1], System.Globalization.NumberStyles.Float,
                              System.Globalization.CultureInfo.InvariantCulture, out joyY); break;
                case "B": joyB = kv[1].Trim() == "1"; break;
            }
        }
    }

    // ============================================================
    //  Update — main thread
    // ============================================================
    void Update()
    {
        // Process commands from ESP32
        lock (cmdLock)
        {
            while (cmdQueue.Count > 0)
            {
                string cmd = cmdQueue.Dequeue();
                Debug.Log("[Car] CMD: " + cmd);
                if      (cmd == "CMD:RESET")  ResetGame();
                else if (cmd == "CMD:STOP")   { timerTick = false; gState = GState.Paused; }
                else if (cmd == "CMD:RESUME") { timerTick = true;  gState = GState.Running; }
            }
        }

        // Tick timer
        if (timerTick && gState == GState.Running)
        {
            gameTime += Time.deltaTime;

            // Game Over check (only when counting down)
            //if (countDown && gameTime >= gameOverTimeLimit && coinsGot < 10)
           // {
           //     TriggerGameOver();
           // }
	   if (countDown && GetDisplayTime() <= 0f && coinsGot < 10)
	   {
	      TriggerGameOver();
	   }
        }

        // Always update HUD — visible regardless of state
        UpdateCoinUI();
        UpdateTimerUI();

	if (gState == GState.Running && timerTick) {
    	   SendToESP32("TIME:" + FormatTime(GetDisplayTime()));
   	}
    }

    // ============================================================
    //  FixedUpdate — physics
    // ============================================================
    void FixedUpdate()
    {
        if (gState != GState.Running || rb == null) return;

        Vector3 move = transform.forward * joyY * driveSpeed * Time.fixedDeltaTime;
        rb.MovePosition(rb.position + move);

        if (Mathf.Abs(joyY) > 0.05f)
        {
            float turn = joyX * turnSpeed * Time.fixedDeltaTime;
            Quaternion rot = Quaternion.Euler(0f, turn, 0f);
            rb.MoveRotation(rb.rotation * rot);
        }
    }

    // ============================================================
    //  Coin collection
    // ============================================================
    void OnTriggerEnter(Collider other)
    {
        if (gState != GState.Running) return;
        if (!other.CompareTag("Coin")) return;

        other.gameObject.SetActive(false);
        coinsGot++;
        Debug.Log("[Car] Coin " + coinsGot + "/10");

        // Send coin count so ESP32 OLED can display it
        SendToESP32("COIN:" + coinsGot);
        UpdateCoinUI();

        if (coinsGot >= 10) WinGame();
    }

    // ============================================================
    //  Win
    // ============================================================
    void WinGame()
    {
        timerTick = false;
        gState    = GState.Won;
        SendToESP32("WIN");
        Debug.Log("[Car] YOU WON! Time: " + FormatTime(GetDisplayTime()));

        if (winPanel != null)
        {
            winPanel.SetActive(false); // make sure it's reset first
            winPanel.SetActive(true);
            if (winTimeText != null)
                winTimeText.text = "You Win!! \n Time: " + FormatTime(GetDisplayTime());
        }
        if (gameOverPanel != null) gameOverPanel.SetActive(false);

        if (gameMusic != null) gameMusic.Stop();
        if (winSound  != null) winSound.Play();
    }

    // ============================================================
    //  Game Over — time ran out
    // ============================================================
    void TriggerGameOver()
    {
        timerTick = false;
        gState    = GState.GameOver;
        if (rb != null) rb.linearVelocity = Vector3.zero;

        SendToESP32("GAMEOVER" + FormatTime(GetDisplayTime()));
        Debug.Log("[Car] GAME OVER! Coins: " + coinsGot + "/10");

        if (gameOverPanel != null)
        {
            gameOverPanel.SetActive(true);
            if (gameOverCoinsText != null)
                gameOverCoinsText.text = "Coins collected: " + coinsGot + " / 10 \n Time's up!";
        }
        if (winPanel != null) winPanel.SetActive(false);

        if (gameMusic    != null) gameMusic.Stop();
        if (gameOverSound != null) gameOverSound.Play();
    }

    // ============================================================
    //  Reset game — called by CMD:RESET from switch button
    // ============================================================
    void ResetGame()
    {
      coinsGot  = 0;
      gameTime  = 0f;
      timerTick = true;
      gState    = GState.Running;

      foreach (GameObject c in coins)
	if (c != null) c.SetActive(true);

      if (winPanel      != null) winPanel.SetActive(false);
      if (gameOverPanel != null) gameOverPanel.SetActive(false);

      // Reset car position and rotation
      transform.position = new Vector3(250f, transform.position.y, 100f);
      transform.rotation = Quaternion.identity;

      if (rb != null)
      {
	rb.linearVelocity        = Vector3.zero;
	rb.angularVelocity = Vector3.zero;
      }

      UpdateCoinUI();
      Debug.Log("[Car] Game reset — GO!");
      if (gameMusic != null)
      {
         gameMusic.Play();
      }

}

    // ============================================================
    //  Send to ESP32
    // ============================================================
    void SendToESP32(string msg)
    {
      try
      {
	byte[] data = Encoding.UTF8.GetBytes(msg);
	sendUDP.Send(data, data.Length, esp32IP, esp32Port);

	Debug.Log("SEND → " + msg + " to " + esp32IP + ":" + esp32Port);
      }
      catch (Exception e)
      {
	Debug.LogError("[Car] Send error: " + e.Message);
      }
    }

    // ============================================================
    //  UI helpers
    // ============================================================
    void UpdateCoinUI()
    {
        if (coinText != null)
            coinText.text = "Coins: " + coinsGot + " / 10";
    }

    void UpdateTimerUI()
    {
        if (timerText != null)
            timerText.text = "Time:" + FormatTime(GetDisplayTime()) + "";
    }

    // Returns the time value to DISPLAY
    // countDown = true  → show (limit - elapsed), clamped to 0
    // countDown = false → show elapsed
    float GetDisplayTime()
    {
        if (countDown)
            return Mathf.Max(0f, gameOverTimeLimit - gameTime);
        return gameTime;
    }

    string FormatTime(float t)
    {
        int total   = (int)t;
        int minutes = total / 60;
        int seconds = total % 60;
        int tenths  = (int)((t % 1f) * 10f);
        return string.Format("{0:D2}:{1:D2}.{2}", minutes, seconds, tenths);
    }

    // ============================================================
    //  Cleanup
    // ============================================================
    void OnDestroy()
    {
        threadRunning = false;
        receiveUDP?.Close();
        sendUDP?.Close();
        receiveThread?.Join(500);
    }
}
This Unity script controls the player’s car and manages communication with the ESP32 device. It receives joystick input from the hardware, applies movement to the car, and sends game state updates (coins, time, win/lose) back to the ESP32.
The script also manages the user interface (HUD, win screen, game over screen) and implements the core game logic.
Inspector Variables (User Configuration)
Defines network settings for communication with the ESP32. This enables two-way communication between Unity and hardware.
[Header("--- Network ---")]
[Tooltip("Port Unity listens on. Must match UNITY_PORT in Arduino (7777)")]
public int listenPort = 7777;

[Tooltip("Port ESP32 listens on for replies. Must match LISTEN_PORT in Arduino (7778)")]
public int esp32Port = 7778;

[Tooltip("IP address shown on the OLED after ESP32 boots")]
public string esp32IP = "172.20.10.3";
Controls timer behavior. Can switch between count up and count down and enables game-over condition
[Header("--- Timer ---")]
public float gameOverTimeLimit = 60f;
public bool countDown = false;
References UI elements. Separates logic from UI → clean design.
[Header("--- UI ---")]
public TextMeshProUGUI coinText;
public TextMeshProUGUI timerText;
public GameObject winPanel;
public GameObject gameOverPanel;
Handles game sounds.
[Header("--- Audio ---")]
public AudioSource gameMusic;
public AudioSource winSound;
public AudioSource gameOverSound;
Sending Data to ESP32
This updates OLED display on ESP32
COIN:N → coin count
TIME:MM:SS → timer
WIN / GAMEOVER → game result
UI System
HUD always shows: Coins, Timer
Separate panels for: Win, Game Over
There is also another widely used communication protocol called TCP. TCP is reliable because it ensures that all data is delivered correctly and in the proper order, but this reliability introduces additional latency. UDP is faster because it sends data without waiting for acknowledgments, making it more suitable for real-time applications such as games. Since my project requires fast communication and can tolerate the occasional lost packet, I chose UDP.
Now I will show the gameplay, when the player manages to collect all 10 coins within the given time limit, before moving to the final design. In this case, I set the maximum game time to 30 seconds to make sure I can collect all the coins.
And here is the Game Over case — here I set the time to 15 seconds.
Now comes my favorite part — bringing my own ideas and scenarios to life inside a small environment.
For the terrain, I created some color combinations for the mountains and also smoothed them a bit, so that later I could place decorations more easily and naturally.
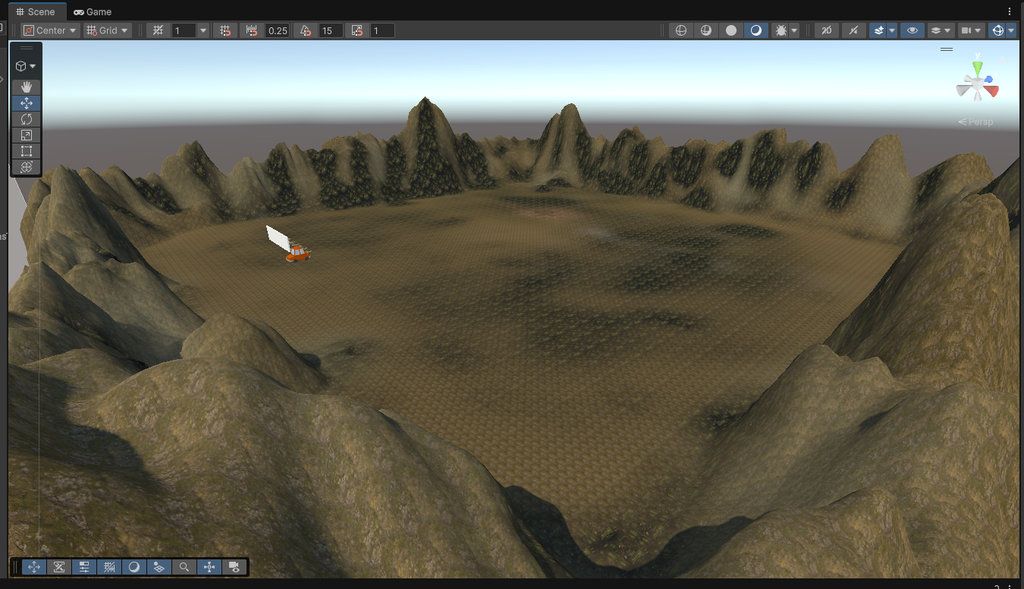
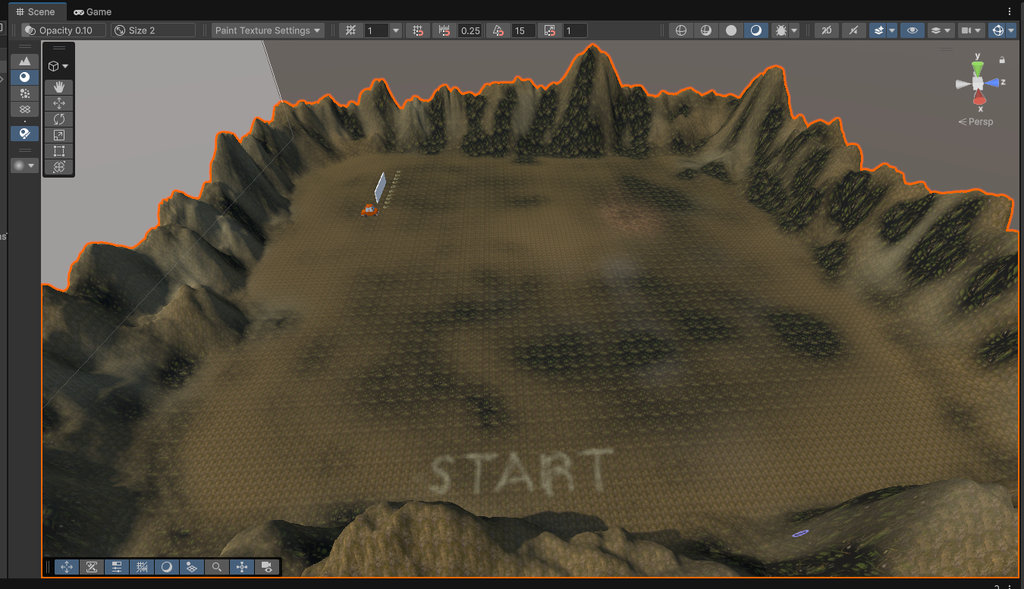
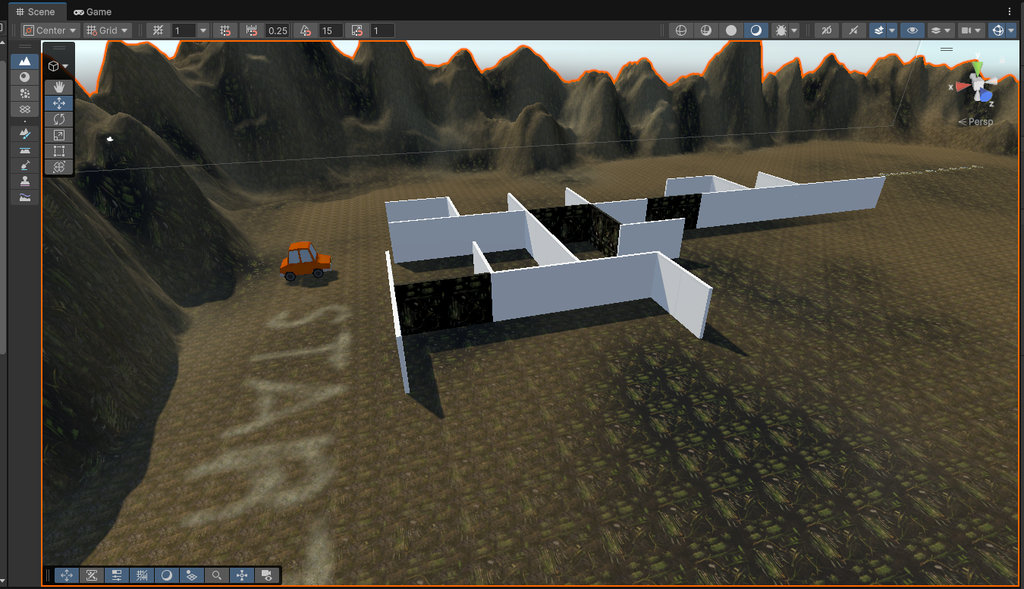
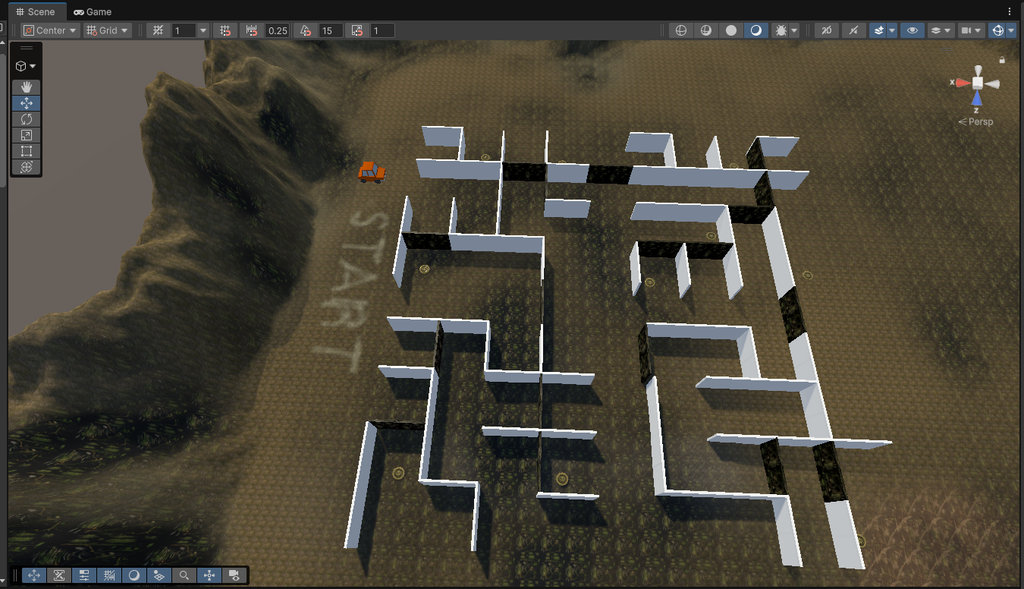
Then, by using simple cubes and turning them into thin walls, I arranged them similar to one of my random maze maps from week 2, just like I did in week 7 when building the real game board. I also used black walls to help align everything in straight lines, and later removed them.
I should mention that I made a small change regarding the coins. In the Assets folder, I created a new folder called Prefab, where I combined the coin and lamp objects into one object, including lighting. This is useful when you plan to reuse the same combination multiple times in the game.
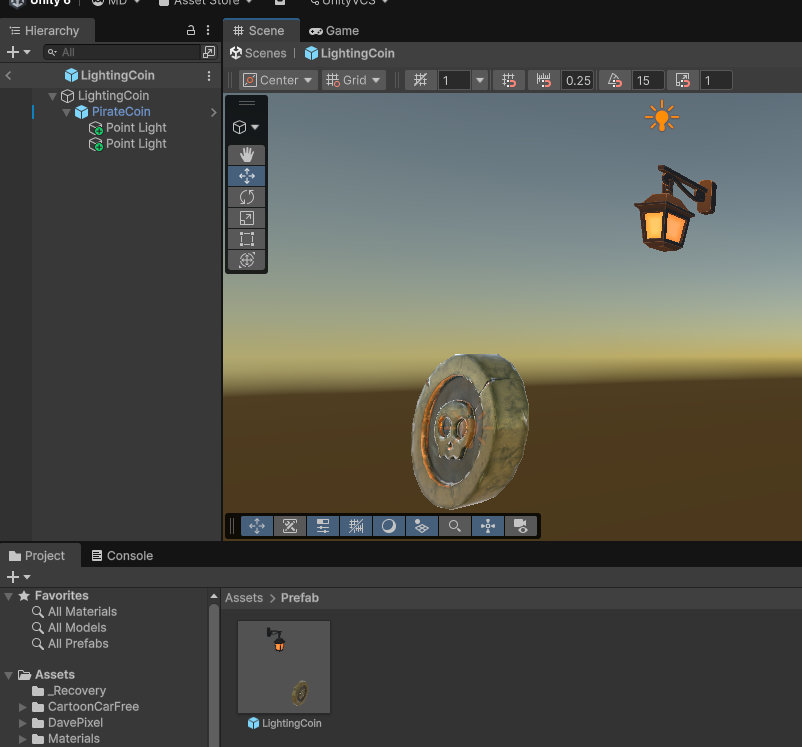
Since I decided that the light should turn off after collecting a coin, I used the initial lighting as a way to guide the player toward where coins might be — which is actually an important detail in game design. I created one example of this combination in the Hierarchy, then dragged it into the Prefab folder, and now I can reuse it as a single complete object in the scene. I removed all the old coins and replaced them with this new prefab.
Now about lighting. You can add lighting to any object. For that, I select the object, then go to Light, and from the options I chose Point Light, because it’s more suitable — it can be seen from a distance and doesn’t only light a small area directly underneath.
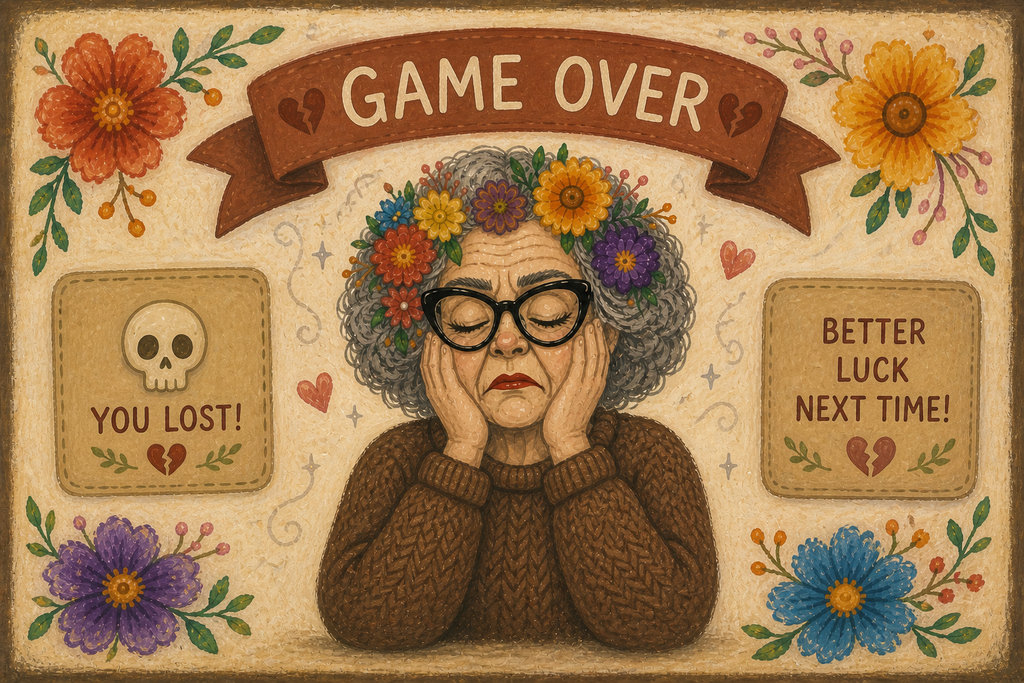
Now I will briefly show how I placed images on the UI Game Over and Win panels.
First, I wanted to use Grandma Manuela on these panels respectively for victory and defeat moments.

AI prompt:
"Can you Generate image for Canvas Win panel, to set that image in Win panel background, but please dont set there eny button.”
AI prompt:
“Another image for Game Over Panel, and again not needed there eny buttons, and not set there Time, and coin collected count.”
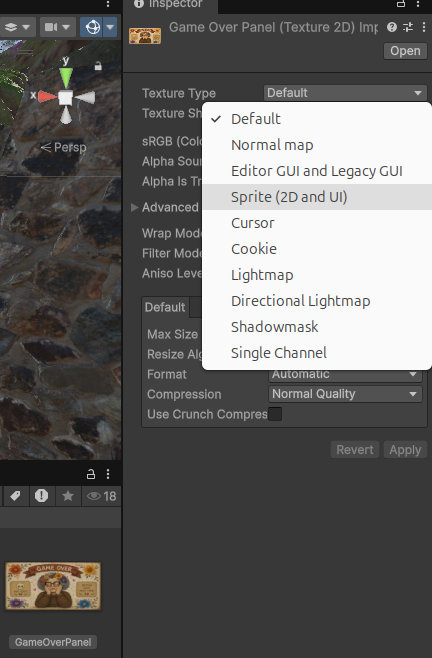
I imported the images into the Assets folder. Then I clicked on the image, and in the Inspector I changed the Texture Type to Sprite (2D and UI).
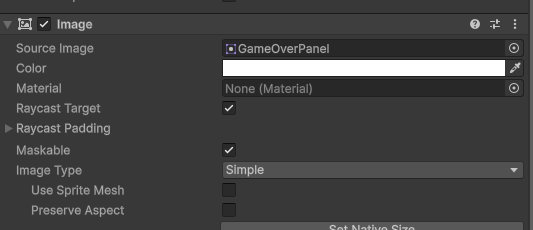
After that, I right-clicked on the corresponding panel and selected UI (Canvas) → Image. Then I took the created sprite and placed it inside the Source Image field of the Image component in the Inspector.
Then I also wanted to integrate sound effects into my game.
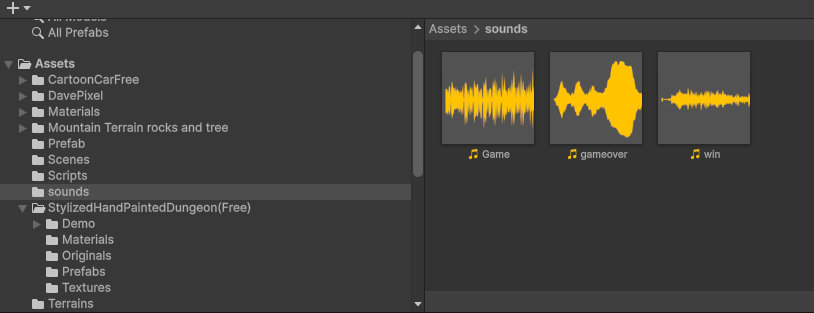
For that, I downloaded the 3 sounds I needed:
- one for the normal
gameplay, - another for the
Game Over panelactivation, - and another one for the
Win panelactivation.
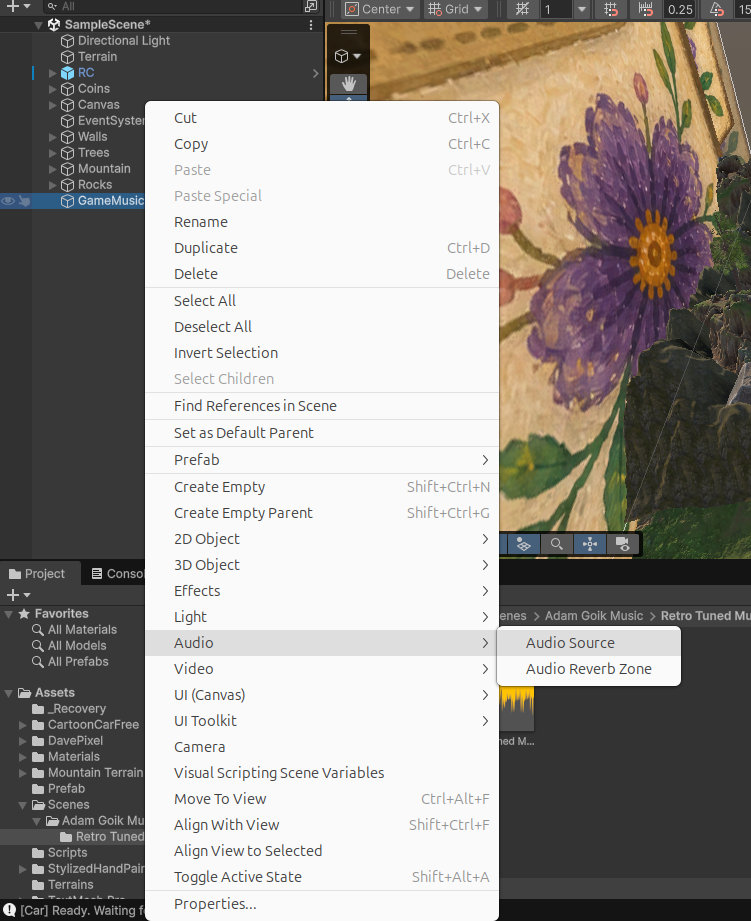
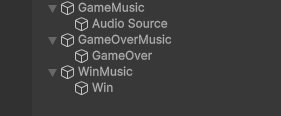
After that, I created 3 GameObjects:
- GameMusic
- GameOverMusic
- WinMusic
Inside each one, I added an Audio Source component and assigned the corresponding sounds inside the Audio Source → Audio Clip field in the Inspector.
And finally, when everything seemed correctly arranged inside my small and beautiful game world, I was ready to test everything.
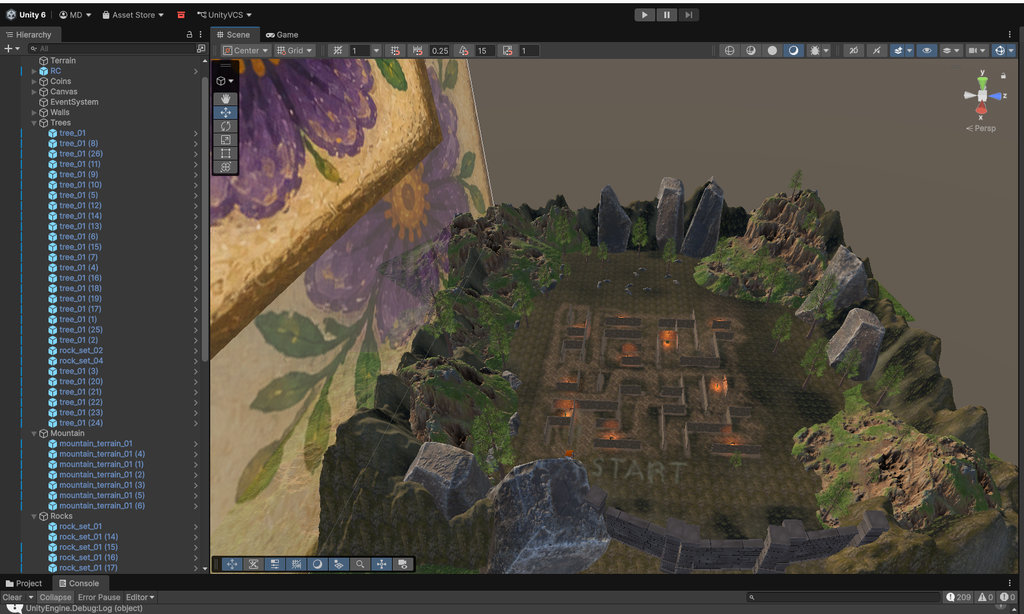
Here is the gameplay when the player wins.
And here is the case when the player cannot finish within the given time and loses the game.
After that, we can export the Unity package in the following way: Assets → Export Package.
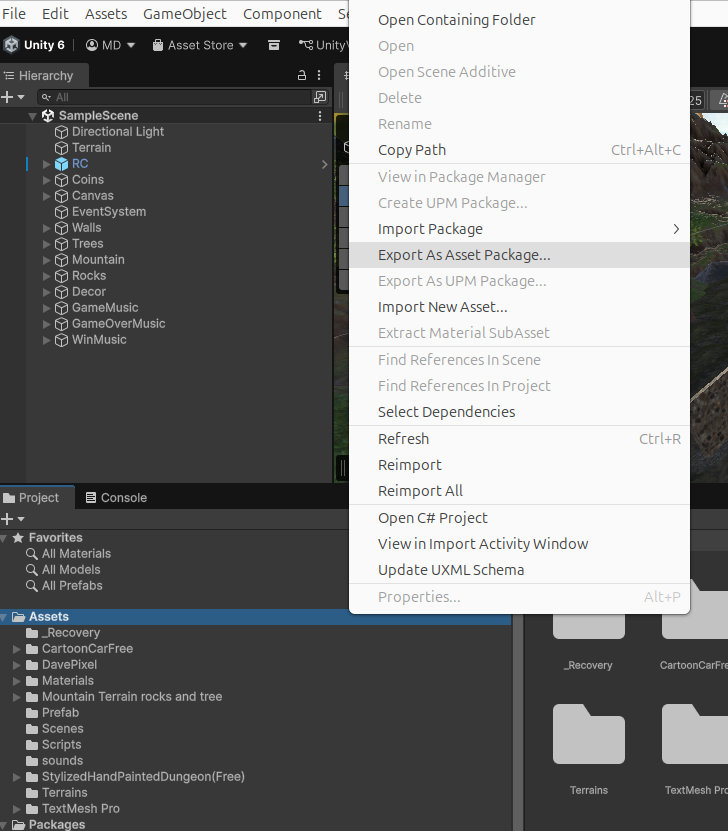
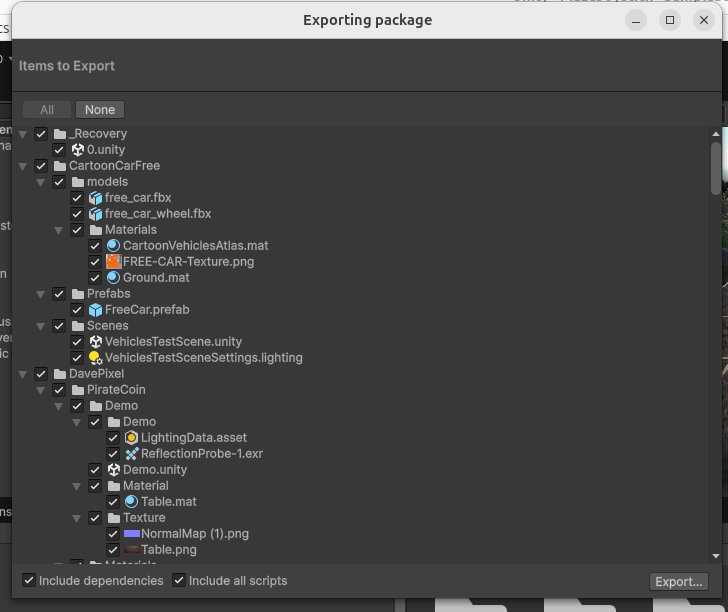
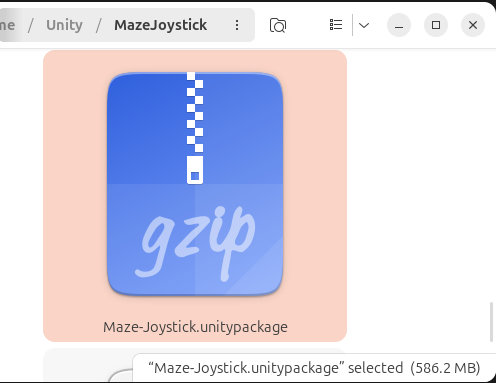
Since this file is almost 600 MB, I can't provide it, but I can post a drive link for download.
The full group assignment — comparing tool options for building a user interface with a microcontroller — is documented on our group assignment page (Week 14), since it was carried out and written up the week before this one. Here I'm just sharing my own reflection on it.
Since I had already built web interfaces in Week 11 (controlling motor speed from a mini web page) and in Week 12 (three different web interfaces), doing yet another plain web page for this comparison felt repetitive, so for my part I pushed the same color sensor interface further, into a Unity game scene, instead of stopping at a browser page.
What stood out to me from comparing these approaches:
- A simple
WiFi web interface(ESP32-C3 + TCS34725 color sensor, live HTML/JS page) is by far the fastest way to see sensor data with almost no extra tooling — just a browser. - Bringing the same sensor data into
Unityis a completely different kind of interface: instead of reading numbers on a page, the color physically changes objects and lighting in a 3D scene in real time, which felt far moreimmersive. - The trade-off is complexity — Serial threading, JSON parsing, and Color.Lerp smoothing in Unity took much longer to get right than the browser version, which only needed a simple
fetch()poll. - Working with
Claudeto scaffold both the ESP32 firmware and the Unity C# scripts saved a lot of time, but I still had to understand and adjust the code myself to fit my pins, my scene objects, and my serial port.
Overall, this comparison confirmed for me that the "best" interface really depends on the goal: a web page is enough when you just need to monitor a value, while a game engine like Unity is worth the extra setup when the interface needs to feel like part of an actual experience — which is exactly the direction my individual assignment above took it.
This week was one of the most enjoyable weeks for me because I managed to connect many different worlds together at the same time: electronics, networking, programming, game development, UI design, and even sound design.
I learned how to create interfaces not only as simple web pages, but also inside a real Unity game environment. I used ESP32C3, WiFi communication, UDP networking, Unity, Arduino, sensors, LCDs, audio systems, and UI panels together in one workflow. I also better understood how physical hardware and digital applications can communicate with each other in real time.
Another important thing I learned is that creating a game interface is not only about programming mechanics. Small details like lights, sounds, win/lose screens, timers, and even object placement completely change the feeling of the experience.
The funniest part of this week is probably the fact that my handmade joystick was controlling a Unity car inside a forest world while Grandma Manuela was judging the player from the Win and Game Over panels 😆. Also, every time something finally worked after hours of debugging, I felt like I unlocked a secret level in real life.
Honestly, this week made me realize again how much I enjoy combining game development with electronics, because it feels like giving life to my own ideas.
Individual assignment
- Maze Game - Drive Link
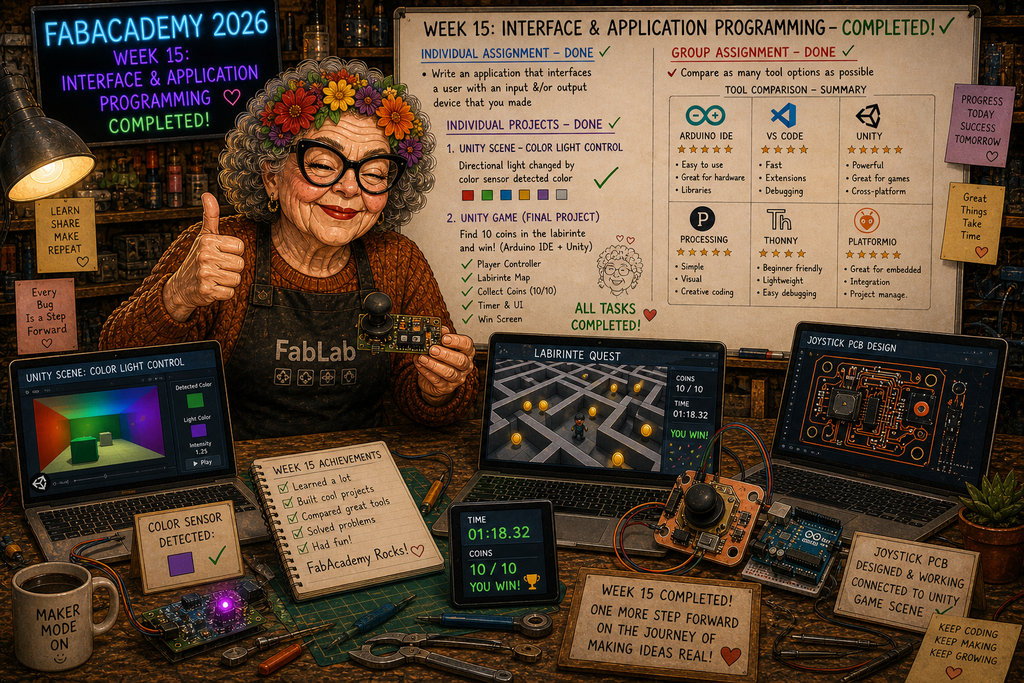
AI prompt:
“And Generate image when she fineshed Week 15”