Week 03: Computer Controlled Cutting
Weekly Assignment:
Group assignment:
- Do your lab's safety training
- Characterize your lasercutter's focus, power, speed, rate, kerf, joint clearance and types
Individual assignment:
- Cut something on the vinyl cutter
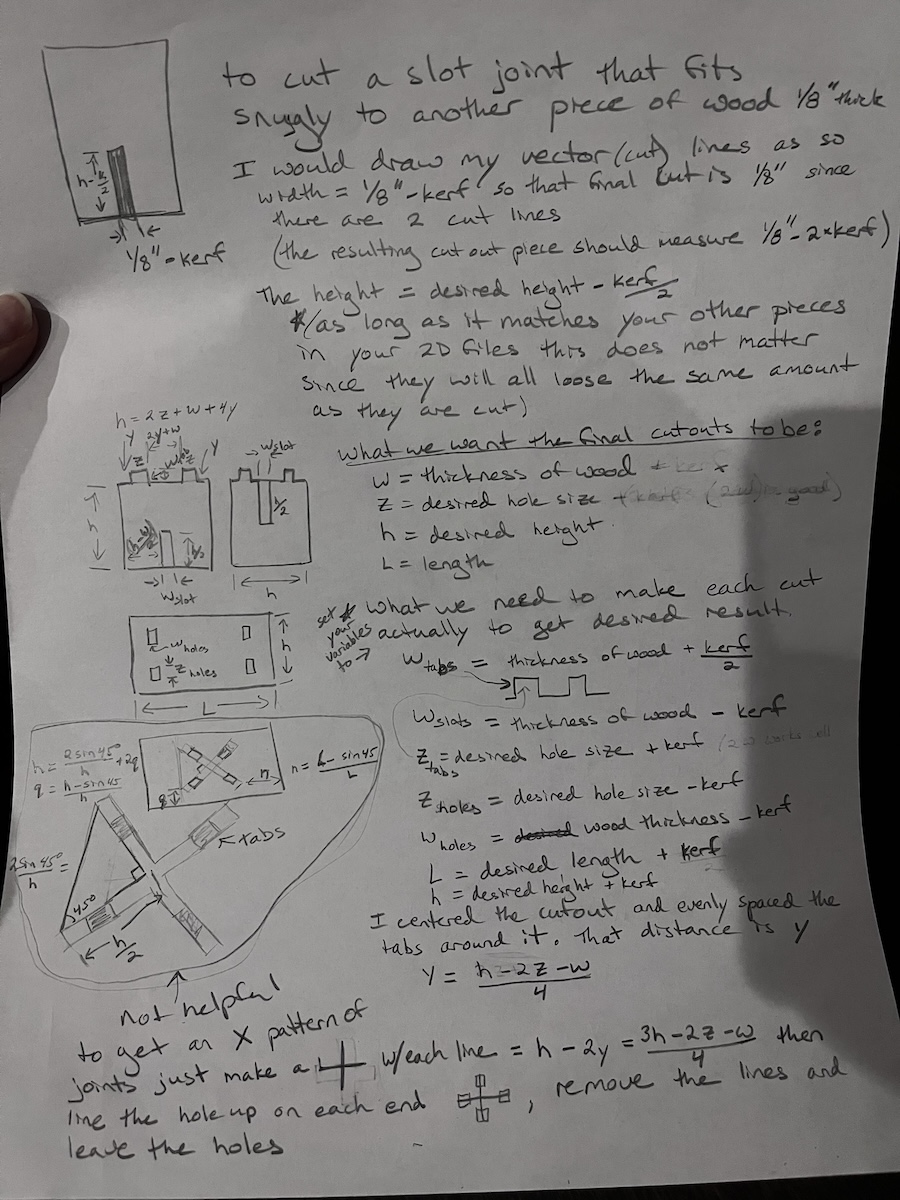
- Design, lasercut, and document a parametric construction kit, accounting for the lasercutter kerf, which can be assembled in multiple ways
- For extra credit, include elements that aren't flat
Start with a 2d file like an .svg for both.
Blade Cutters
- Use a blade to cut material
- Can also use a pen to draw
- Make sure settings are set to your material type
- Great for paper projects
Cricut
Software is not user friendly unless you are using premade projects. Upgraded software package is needed or each cut must be uploaded separately. I have the Cricut Explore Air - uses a sticky mat to hold material - easily changeable blades - pen holder for drawing in addition to cutting
Silhouette
Can do some modifications in software included, also has an upgrade option. The school has the Cameo 4 cutting machine. - uses a sticky mat to hold material
Vinyl Idea Sticker
Idea Sticker cdr file This file includes tabs for the different cut layers.
For my journey from sketch to sticker using CorelDraw and my Cricut vinyl cutter click here: Idea Sticker - CorelDraw Design
Laser Cutters
- Uses a laser to cut material
- More dangerous
- More costly
- More upkeep
- More versatility: material, size, engraving
Epilog Laser Engraver
Safety!
-
hair back
-
turn vents on, located to the left of the corner computer.
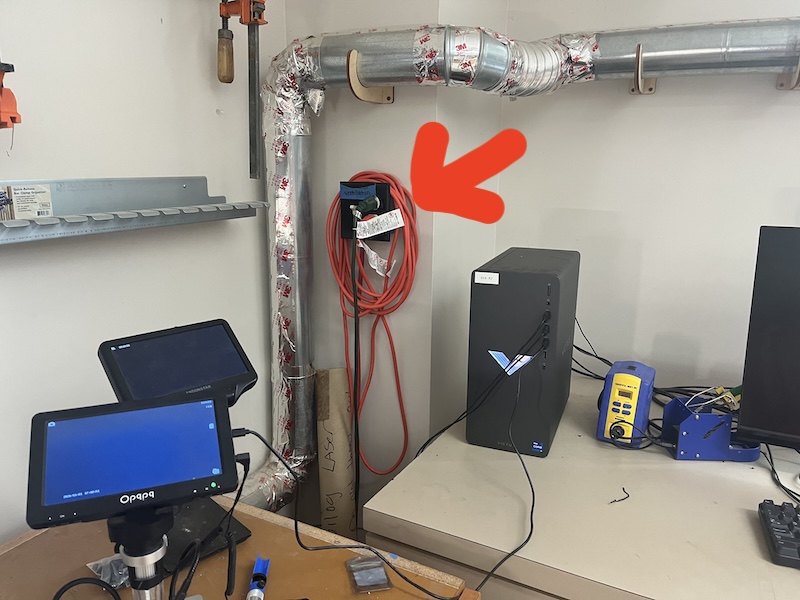
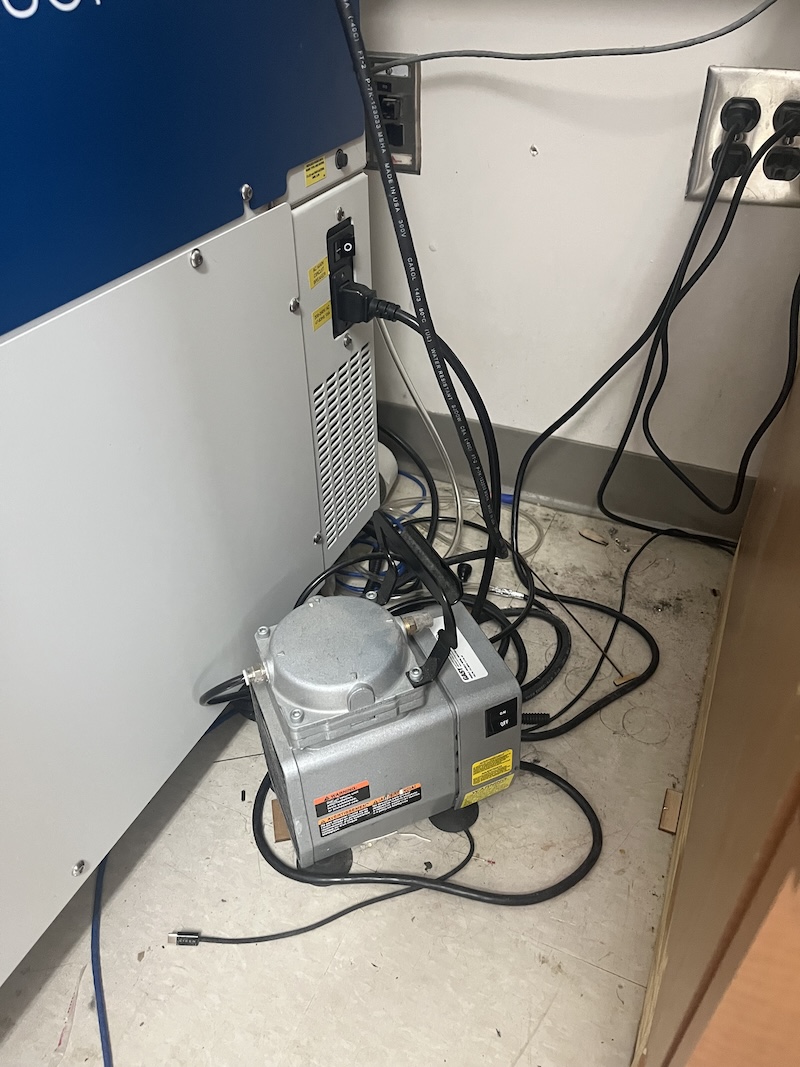
- turn on compressor, located to the right of the machine.
- fire blanket and/or appropriate extinguisher close by
- Never leave the area!
For detailed safety protocol see our group assignment page. Week 03 Group Assignment - Adult
Epilog Laser
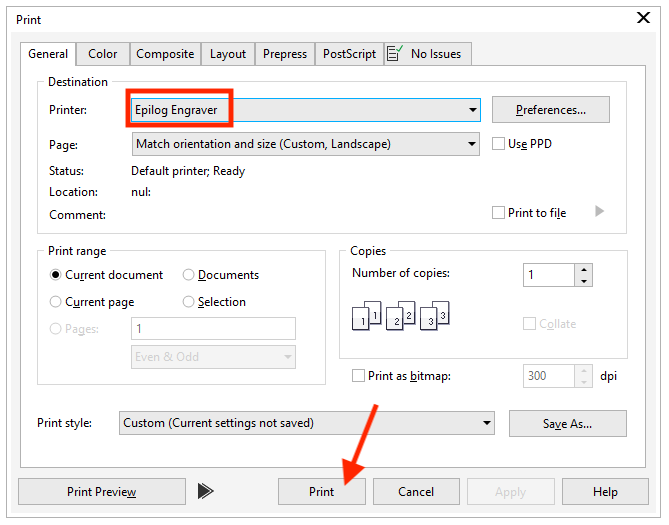
After making sure your hair is tied back, and the compressor and the vent fans are on, open your file in CorelDraw.
Print your file to the Epilog Laser.

Load your material, and secure it with clamps so that it lays flat. Close the lid!
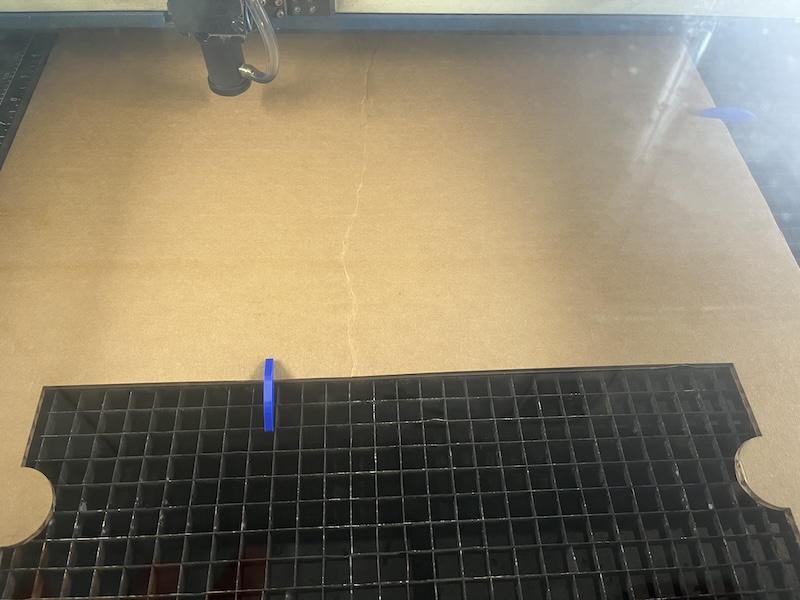
start with cardboard to check cut
make sure claps are not in the path of the laser!
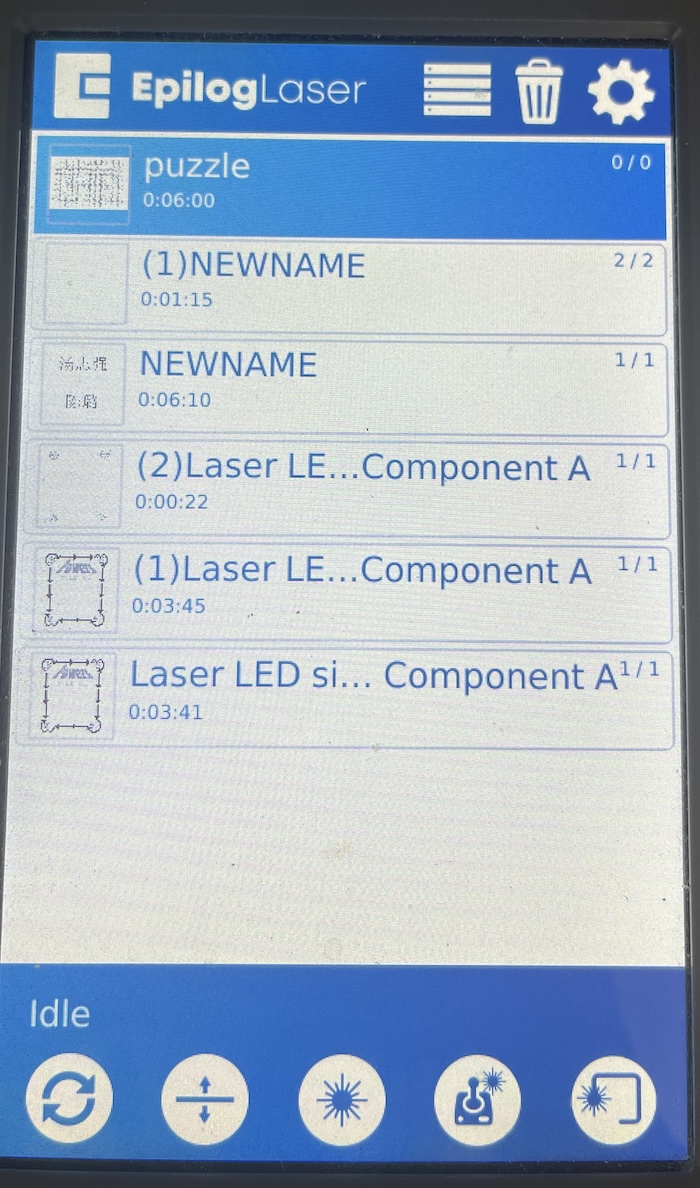
Your file will appear on in the Epilog program. Move it to your desired location on your material. The image below is with 1/8" plywood from the cut after the cardboard. My daughter wanted to make a state puzzle for her teacher as a gift since they learned all the states and capitals in school this year. We made it special with a picture of the class dressed up from their big State Fair presentation that we used AI to replace the background with a map of the USA. It was incredibly difficult to get the map, as AI kept making up nonsence state names!
If you see people moving on the screen, you forgot to close the lid!
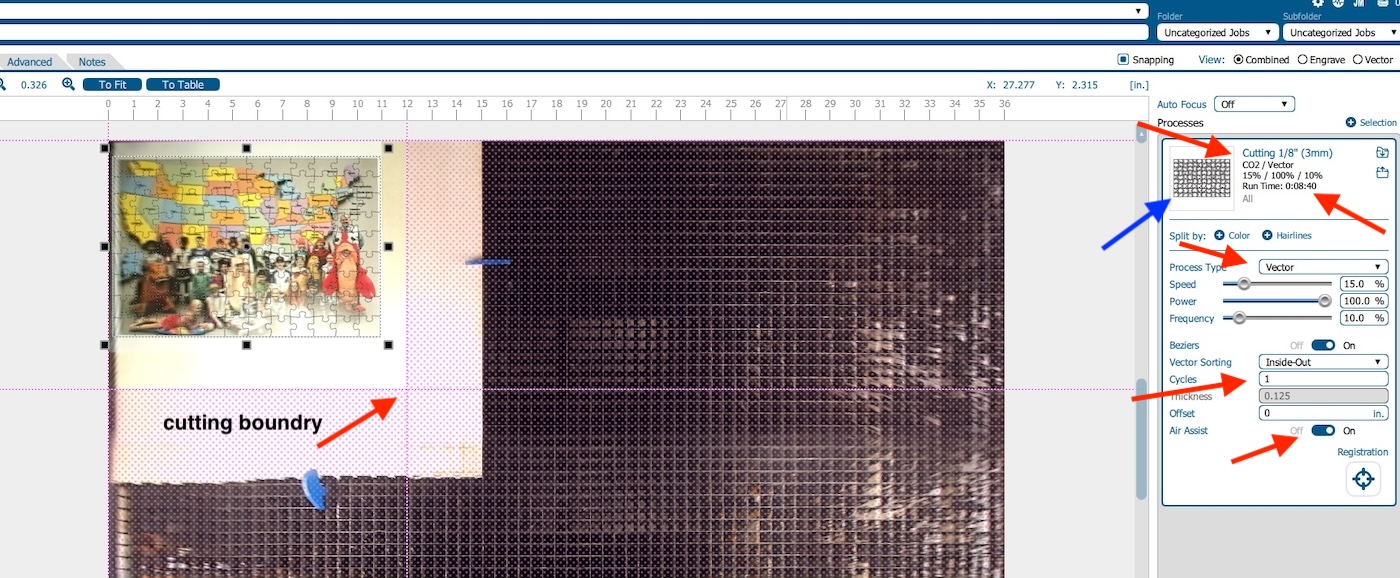
The pink lines are the cutting boundry. You can move them. Nothing will be engraved outside the boarder.
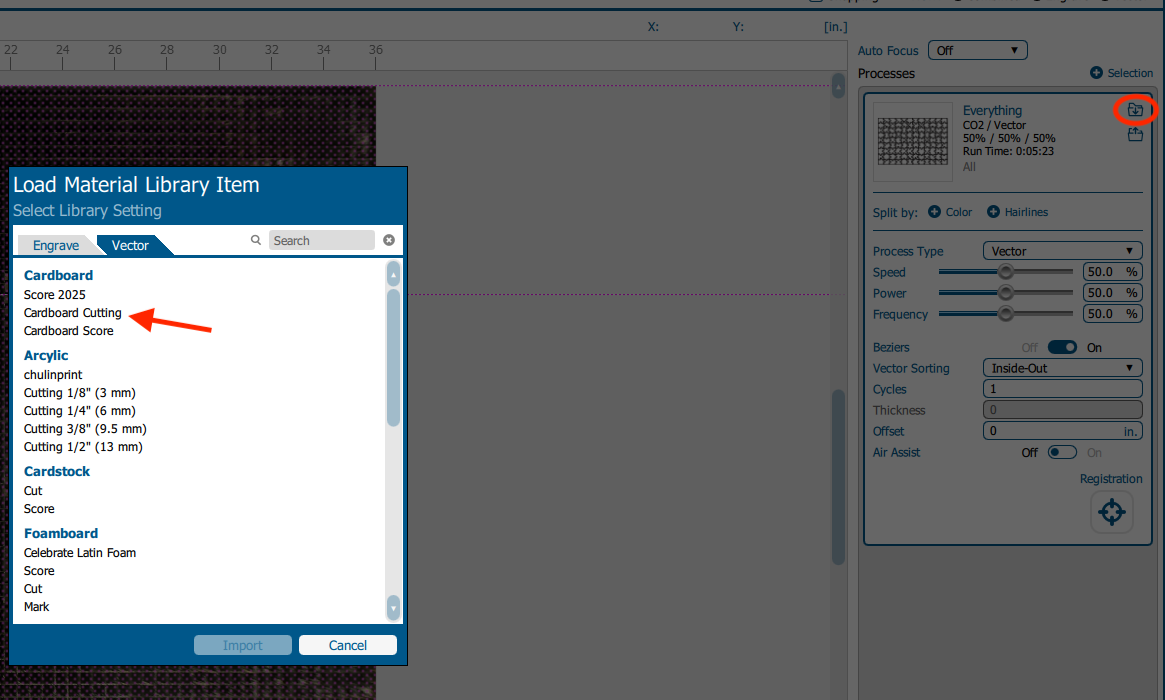
Click on the folder with the arrow on the right of the screen to choose the preprogrammed process for your material. Our FabLab has tested each material to find the ideal setting for the machine. We can alter them as needed, but the preprogrammed processes are recomended.
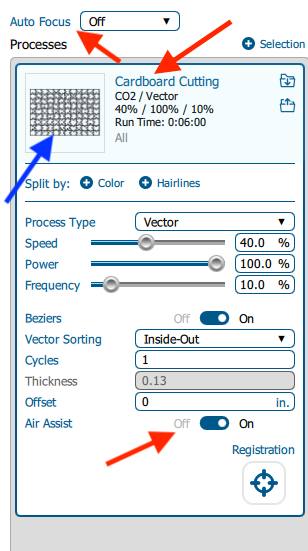
Check the Run Time! For cardboard cutting the Run Time is 6 minutes, where as in the image with the wood the run time is 8 minutes 40 seconds. You can see the settings for speed change with the material. cardboard has a speed of 40%, and 1/8" plywood's speed is 15%. This is because wood is more dense, and needs more time to burn through.
If my wood cut showed a few seconds or nothing, then your file is not going to run. If the time were ~3 min, you may have part of your image over the cutting boundry. You can see what is being cut on the right side of the screen under Processes. (see blue arrow).
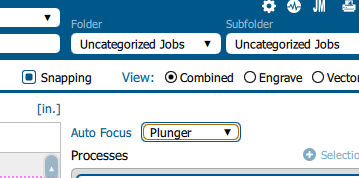
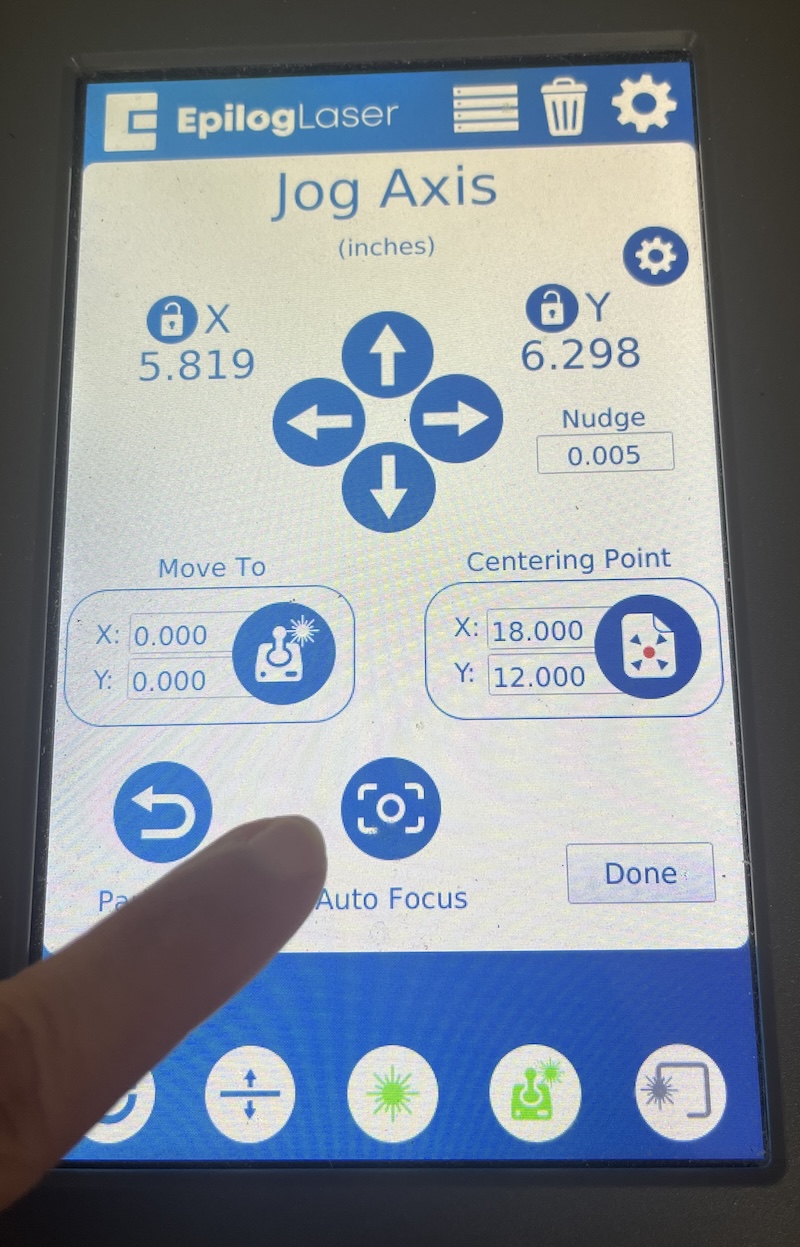
There is a setting for Auto Focusing. Set this to "Plunger" to run the auto focus within the print file.
Press print at the bottom right of the screen to send to Epilog Laser.
On the machine, choose your project file. Check the time again!
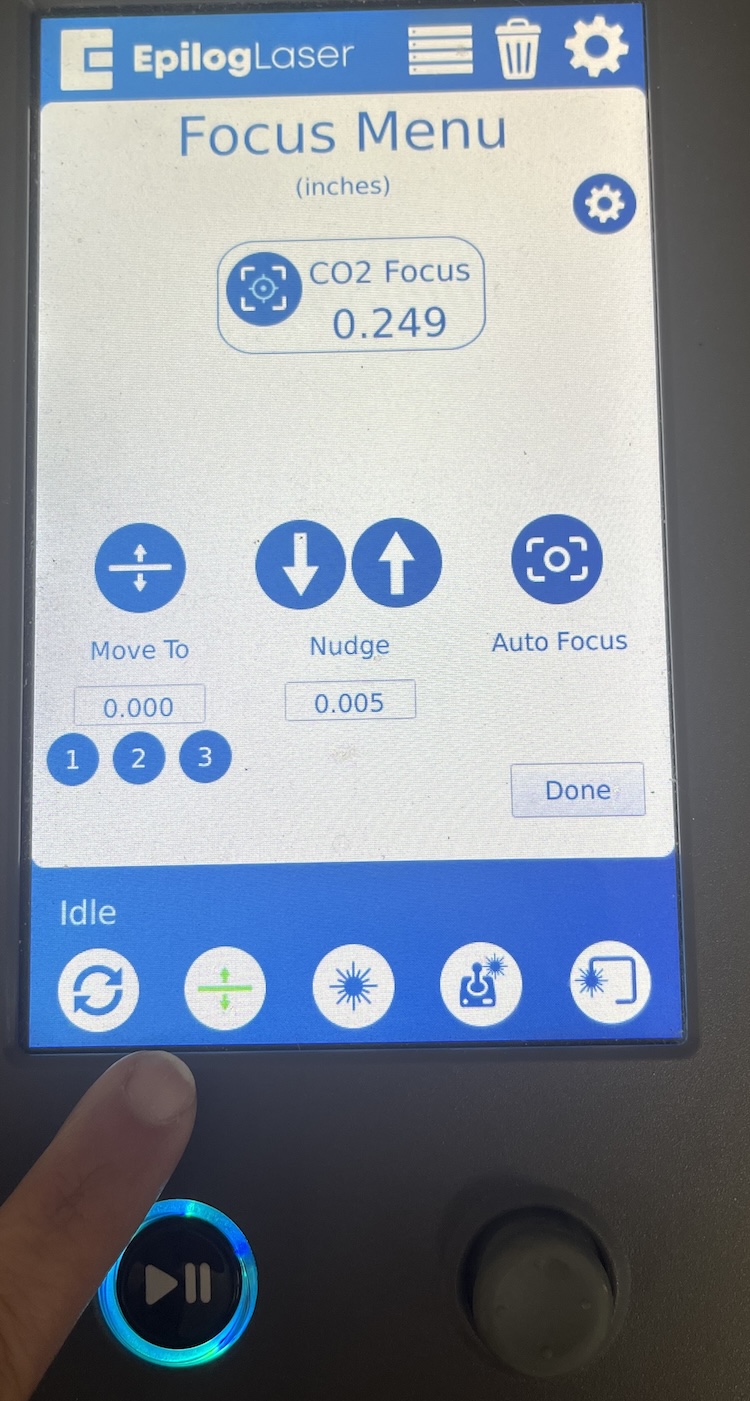
Focus the laser by first lowering the bed! You do not want to hit any material or clamps. Select the focus button on the menu. It is a horizonatal line with arrows above and below representing the bed moving up and down. Use the joy stick controller to move the bed down.
Next use the jog feature. It looks like a joystick.
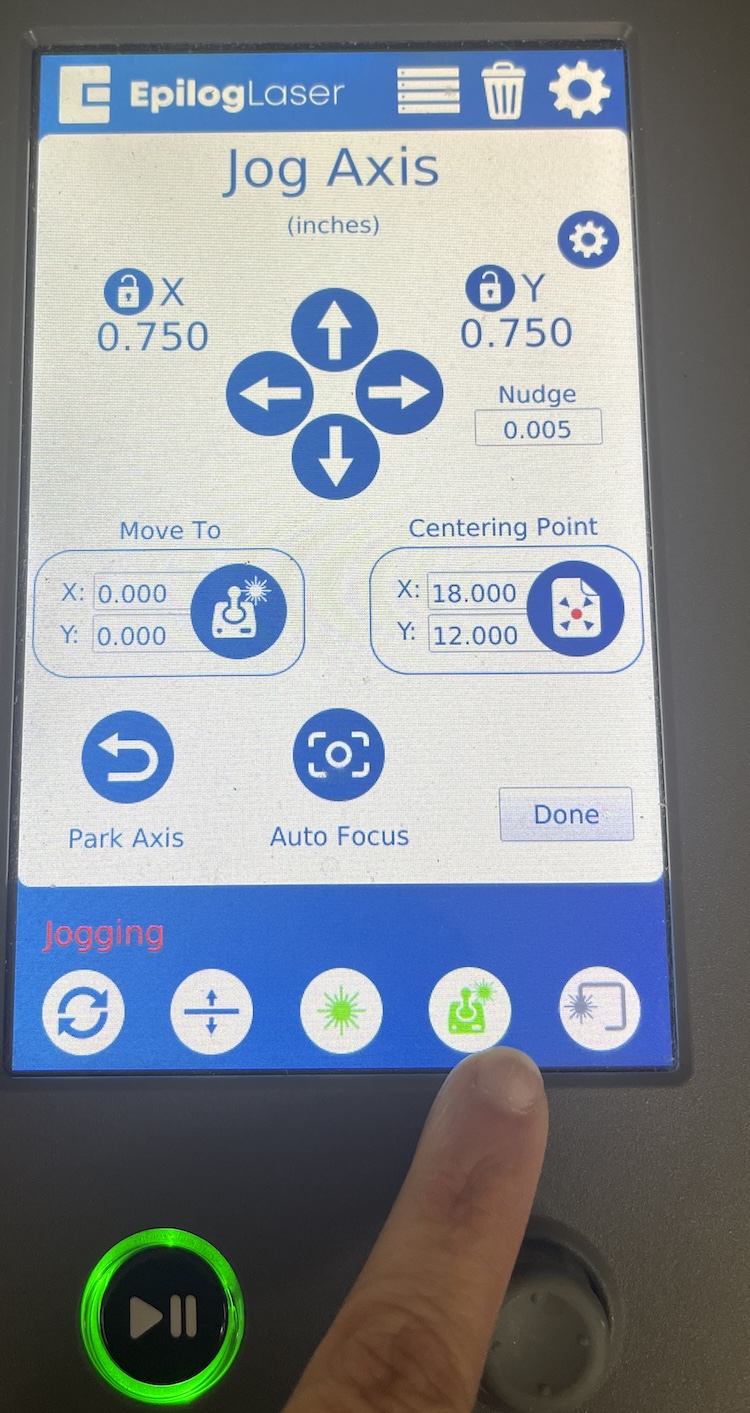
Use the joystick to move the laser to where the center of your cut will be. Then press the auto focus button.
When I first learned how to use the laser cutter at school the machine did not have autofocus. To focus the laser we had to use a triagular tool that rested on the laser. The tip of the triangle was the focal distance of the laser beam. You would slowly raise the bed until the tip of the triangle just touched the material. Then remove the trangular tool. The machines all have autofocus now.
After autofocusing, press "Done" then check that your file is chosen, and press the play button.
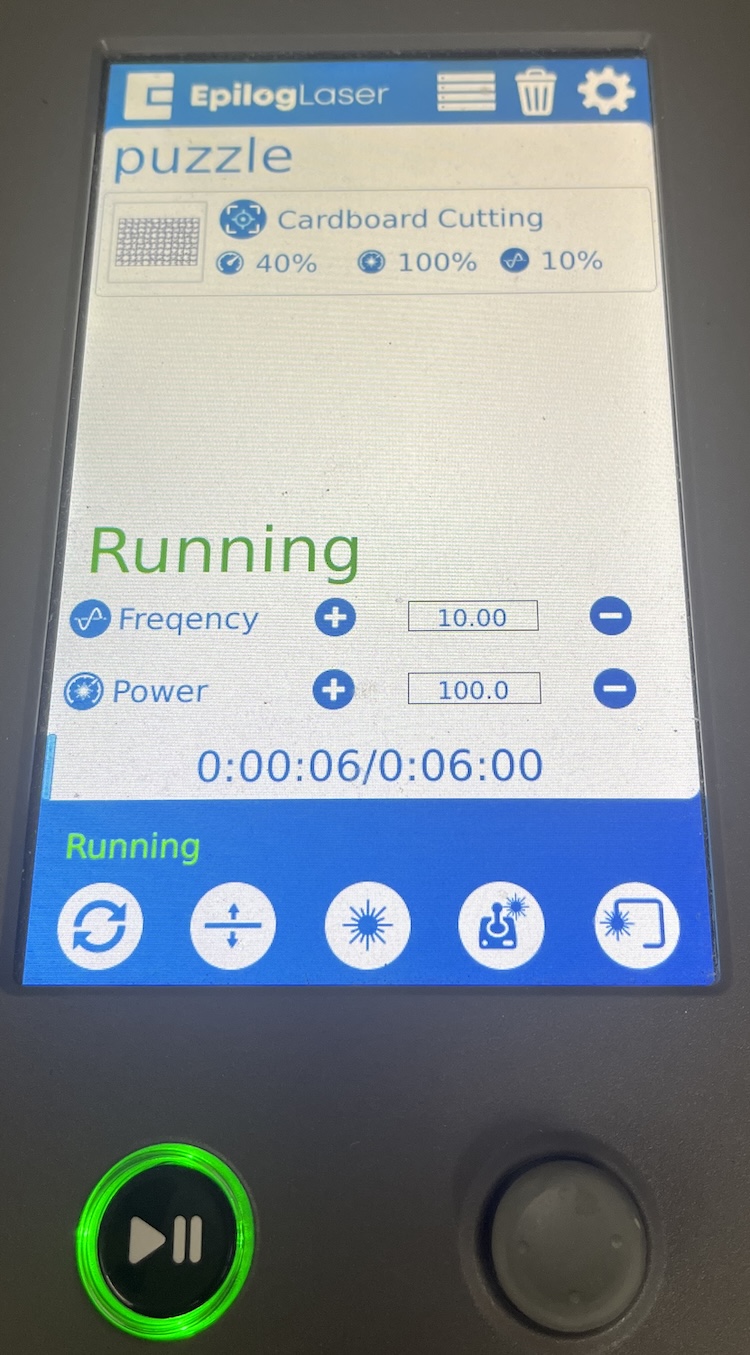
The menu now reads "Running," and has the time displayed.
Watch your cut, but do not lean on the lid There are sensors in the lid that will not let the laser run unless the lid is closed. If they are damaged, the laser will not run.
Should you need to stop the machine, and it is not an emergency, press the play/pause button. The laser will finish its current cut, then stop. You can then restart your file.
Group work kerf test
This is our group site page for this week where we created, and executed a kerf test. We also compared the image quality of photo engraving settings.
Week 03 Group Assignment - Adult
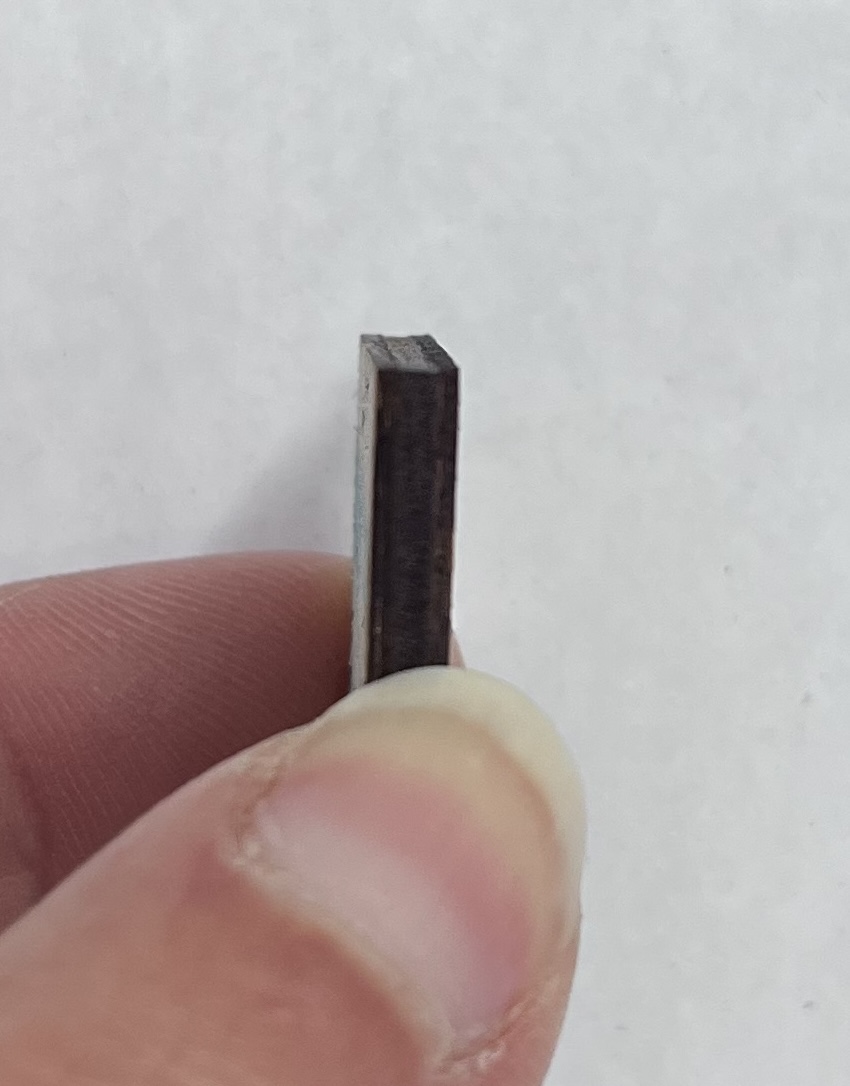
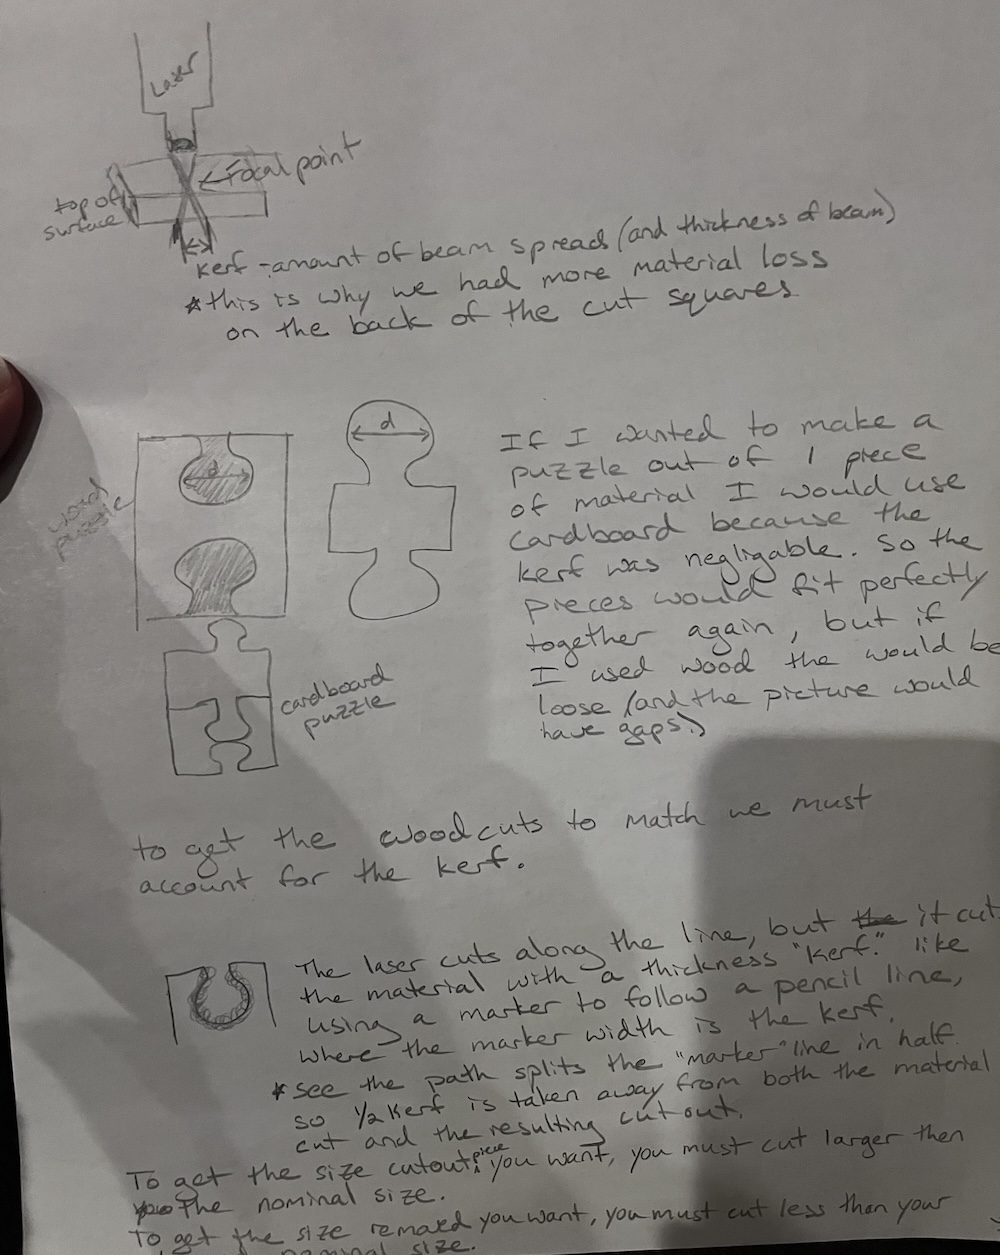
An interesting observation from the kerf test was that in 75% of the cuts one side of the square varied from the other. Looking at the side of a cut square you can see there is a curve to the cut. The bottom of the square was .01inch less than the top, which is to be expected as the beam of the laser expands before and after the focal point. This curve did not match the expected angle however, since the smallest measurement was actually in the center of the material. Furthermore, this curve was seen on the side against the grain of the top vanier. This may be because of the internal grain pattern or glue. (On a related note, standard kerf pattern live hinges are more flexible along the grain. I wonder if that is because of additional material being cut?)
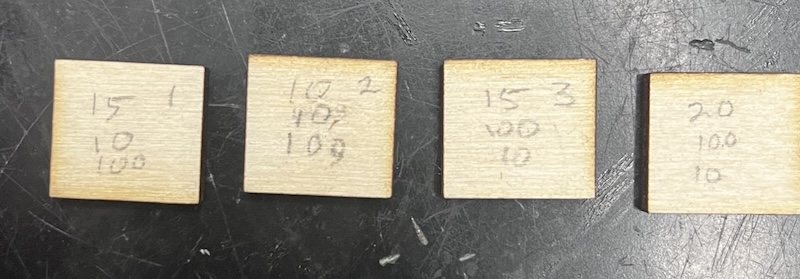
This image shows the cuts from our speed change test, where we changed the speed settings to see what the optimal setting was for a vector cut. Our results matched the lab recommended settings.
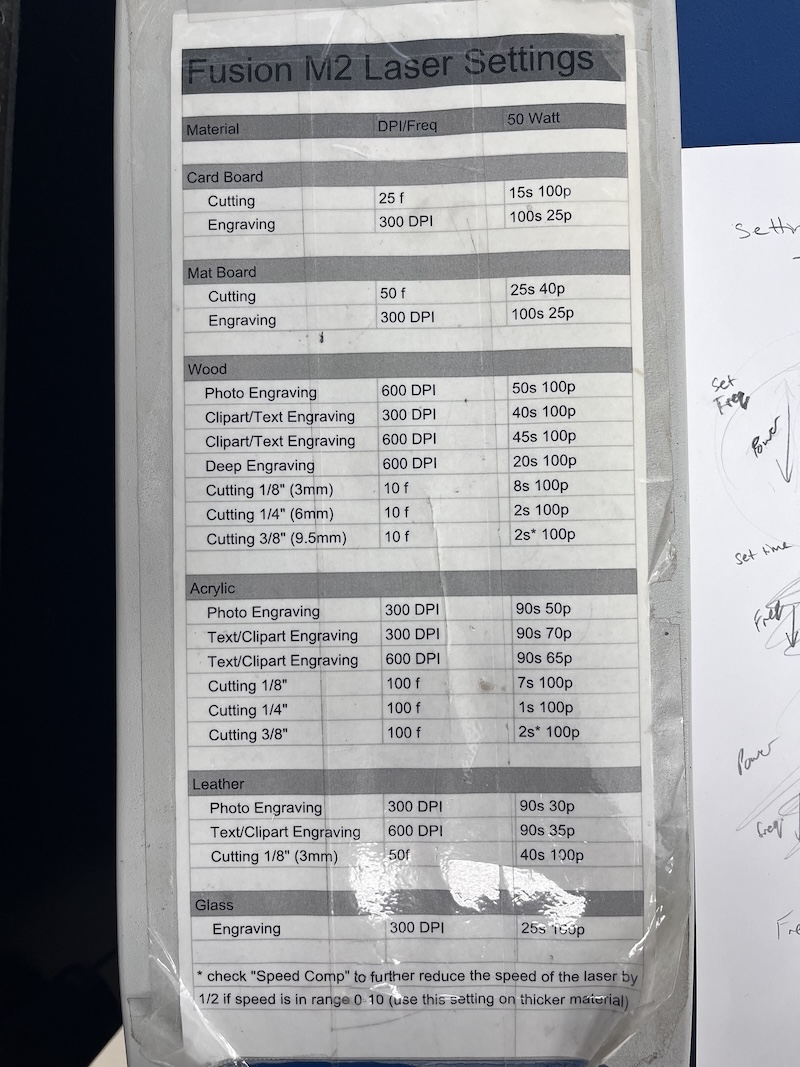
Lab tested laser settings by material:
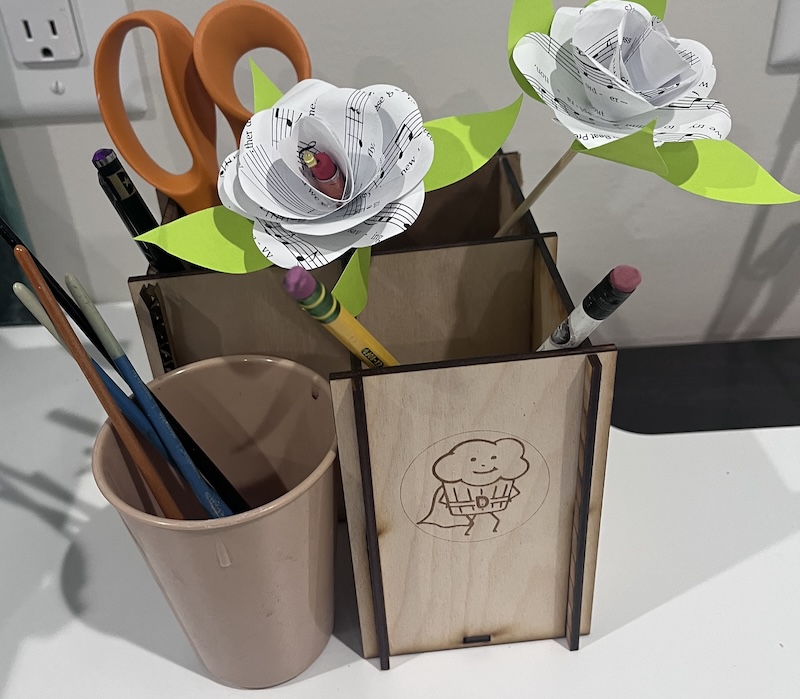
Parametric Construction Kit
What is a parametric construction kit?
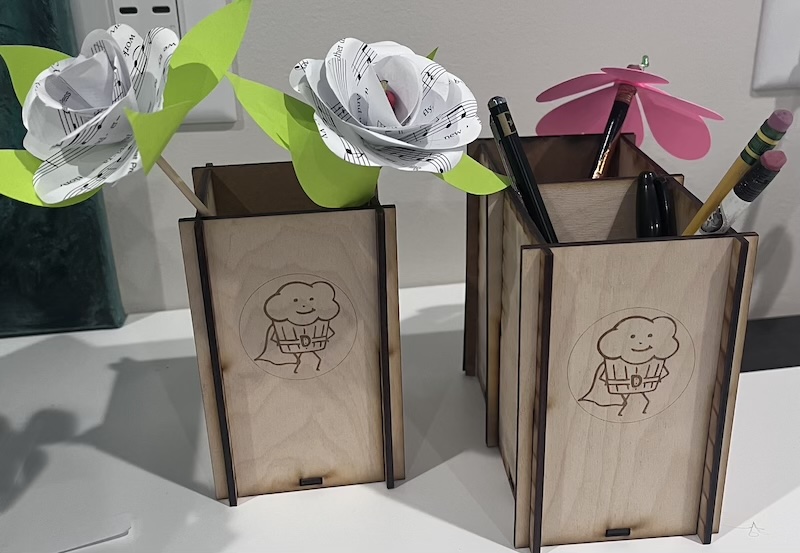
This document follows the journey from a sketch, through a GitLab disaster, a pivot based on a healthy evaluation of realistic goals, to a simple parametric desktop organizer.
Parametric Construction Kit procedure
Cutting a Sweet Potato
A good friend of mine from Branding Agency SPARK Strategic Ideas wanted to create a memorable direct mail piece for their client, Bruce's Yams, and came to me with the hopes of laser engraving sweet potatoes to ship through the mail.
We spent many hours making it work. My lessons learned from engraving a sweet potato:
-
Use a tub of rice to level out the potato as best you can.
-
Mark your starting point with a tape grid, and line up each potato to that mark for that print file. Then switch to the next print file. Each potato had 4 prints in different locations that depended on the shape of the potato. Lining up the potato each time was very difficult because the camera's image would not line up with the cut file since the bed was set so low in order to accommodate the setup.
-
A small flat potato is better than a huge lumpy one.
-
Clean the machine, the steam makes the smoke stick to the laser.
I am pleased to say that SPARK Strategic Design received a Gold Addy, and "Best in Show" from the American Advertising Federation (2026) for this sweet potato project!