18. Wildcard week
Jig Design for Brazing a Dodecahedron
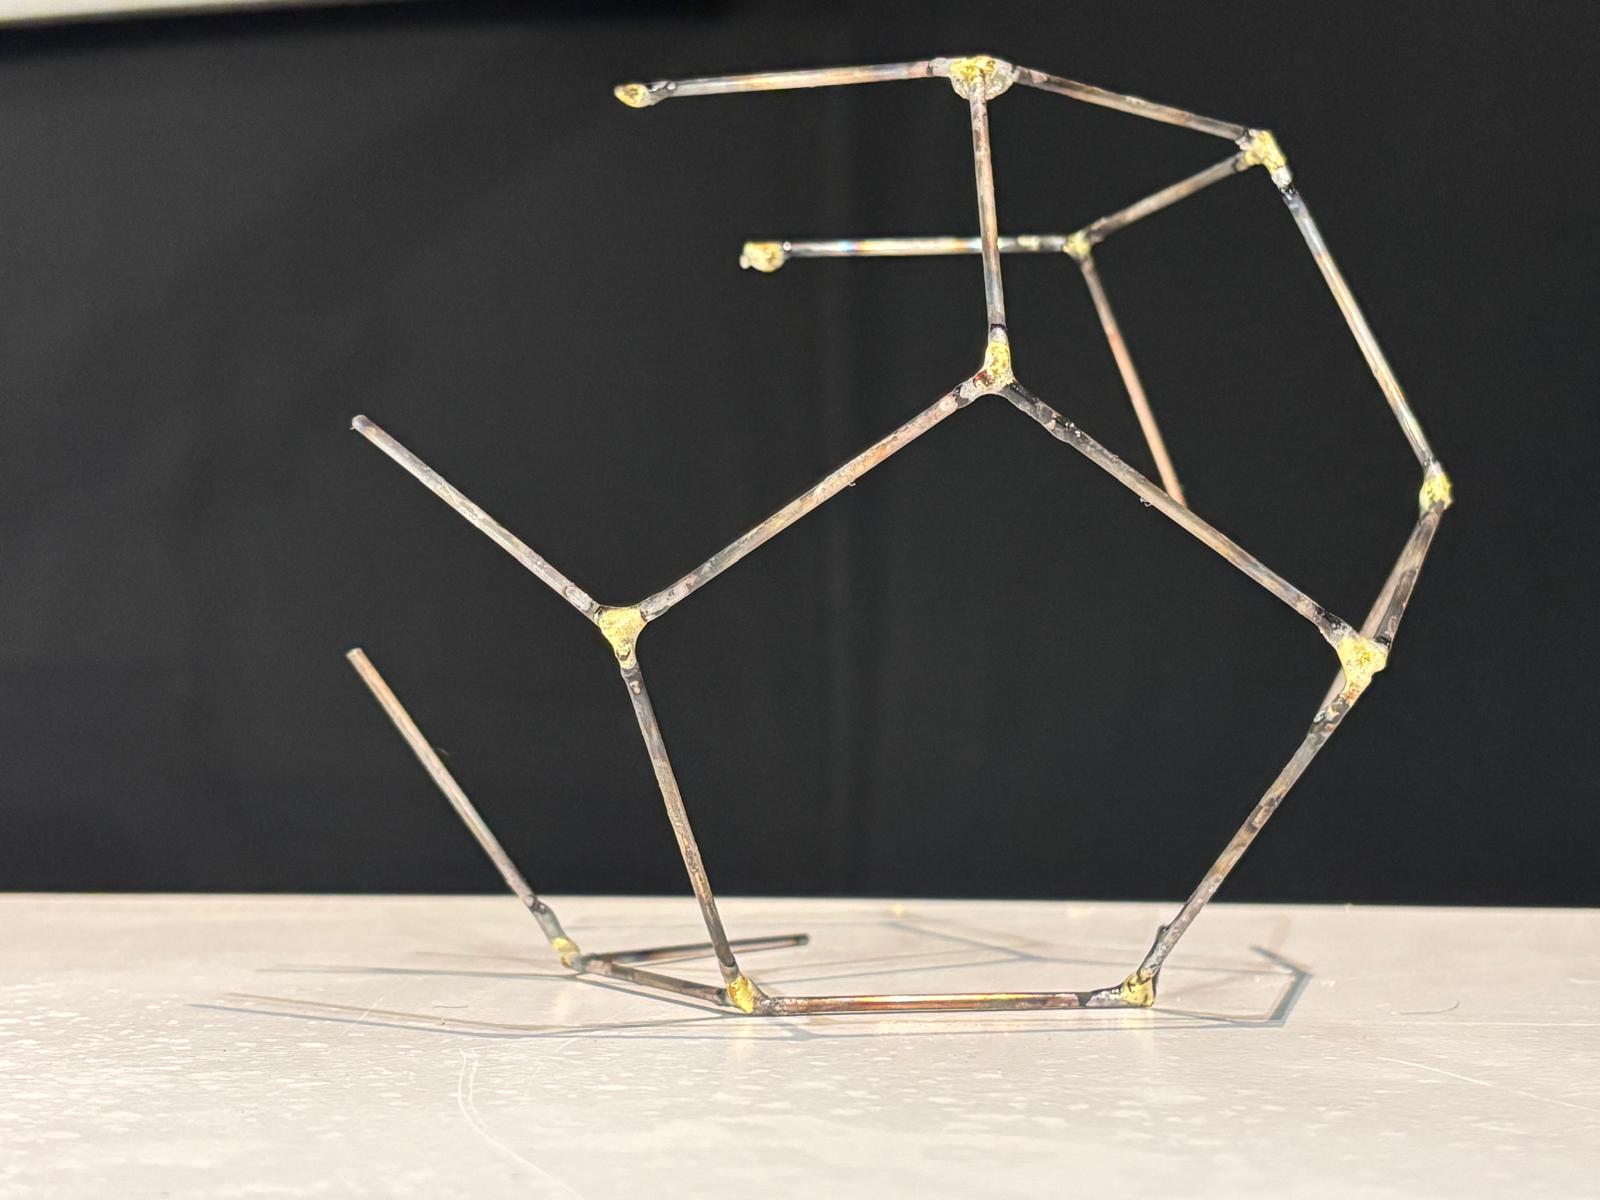
This week I wanted to explore a fabrication process I hadn’t touched in the course yet — metal joining through brazing. The goal was to build the dodecahedron geometry I had been working with throughout the semester, this time in steel. The structure is made of 2.5mm steel rods meeting at precise three-way intersections, joined by a brass filler metal under heat. The challenge is deceptively simple to state: how do you hold three metal rods at exactly the right three-dimensional angle while applying a flame, and how do you do that thirty times over without accumulating error? The answer, I found, is that you can’t improvise it — geometry at this level of precision demands a jig. Getting to that conclusion was the real work of the week.
My first attempt was to CNC mill the full dodecahedron shape from board material, fix the rods in place with superglue and an instant fixer — leaving holes at the angles so the flame wouldn’t burn through. In principle it was a sound idea. In practice, I wasn’t careful enough when assembling the boards, and misalignments accumulated. The superglue itself took up space in the joints, pushing the rods fractionally out of position. Fractionally at one joint becomes significantly at the next. The rods were no longer meeting cleanly. That failure pointed clearly toward a different approach — rather than fixing the whole geometry at once, design a jig for the angle itself.
.jpeg)
There is something that excites me deeply about this kind of problem — using advanced digital fabrication not to replace craft, but to enable it. Brazing is an ancient, entirely hand-made process. The flame, the filler metal, the timing — all of it is feel and judgment. But the geometry it needs to serve is unforgiving. A jig designed in Rhino, printed in resin, holding rods at a mathematically precise three-dimensional angle — that is digital fabrication in the service of the hand. This is one of the reasons I wanted to do this course in the first place. Not to choose between artisanal making and digital tools, but to find the places where they can work together and make each other better.
The Jig — Design Considerations
Since every intersection in a dodecahedron is identical — three rods meeting at the same three-dimensional angle — a single jig repeated at every joint was the logical solution. The plan was to braze partial assemblies and gradually connect them, one intersection at a time. It was hard to fully visualise how the process would unfold before trying it, so the approach was to design, print, and learn by doing.
The design had to meet several specific constraints:
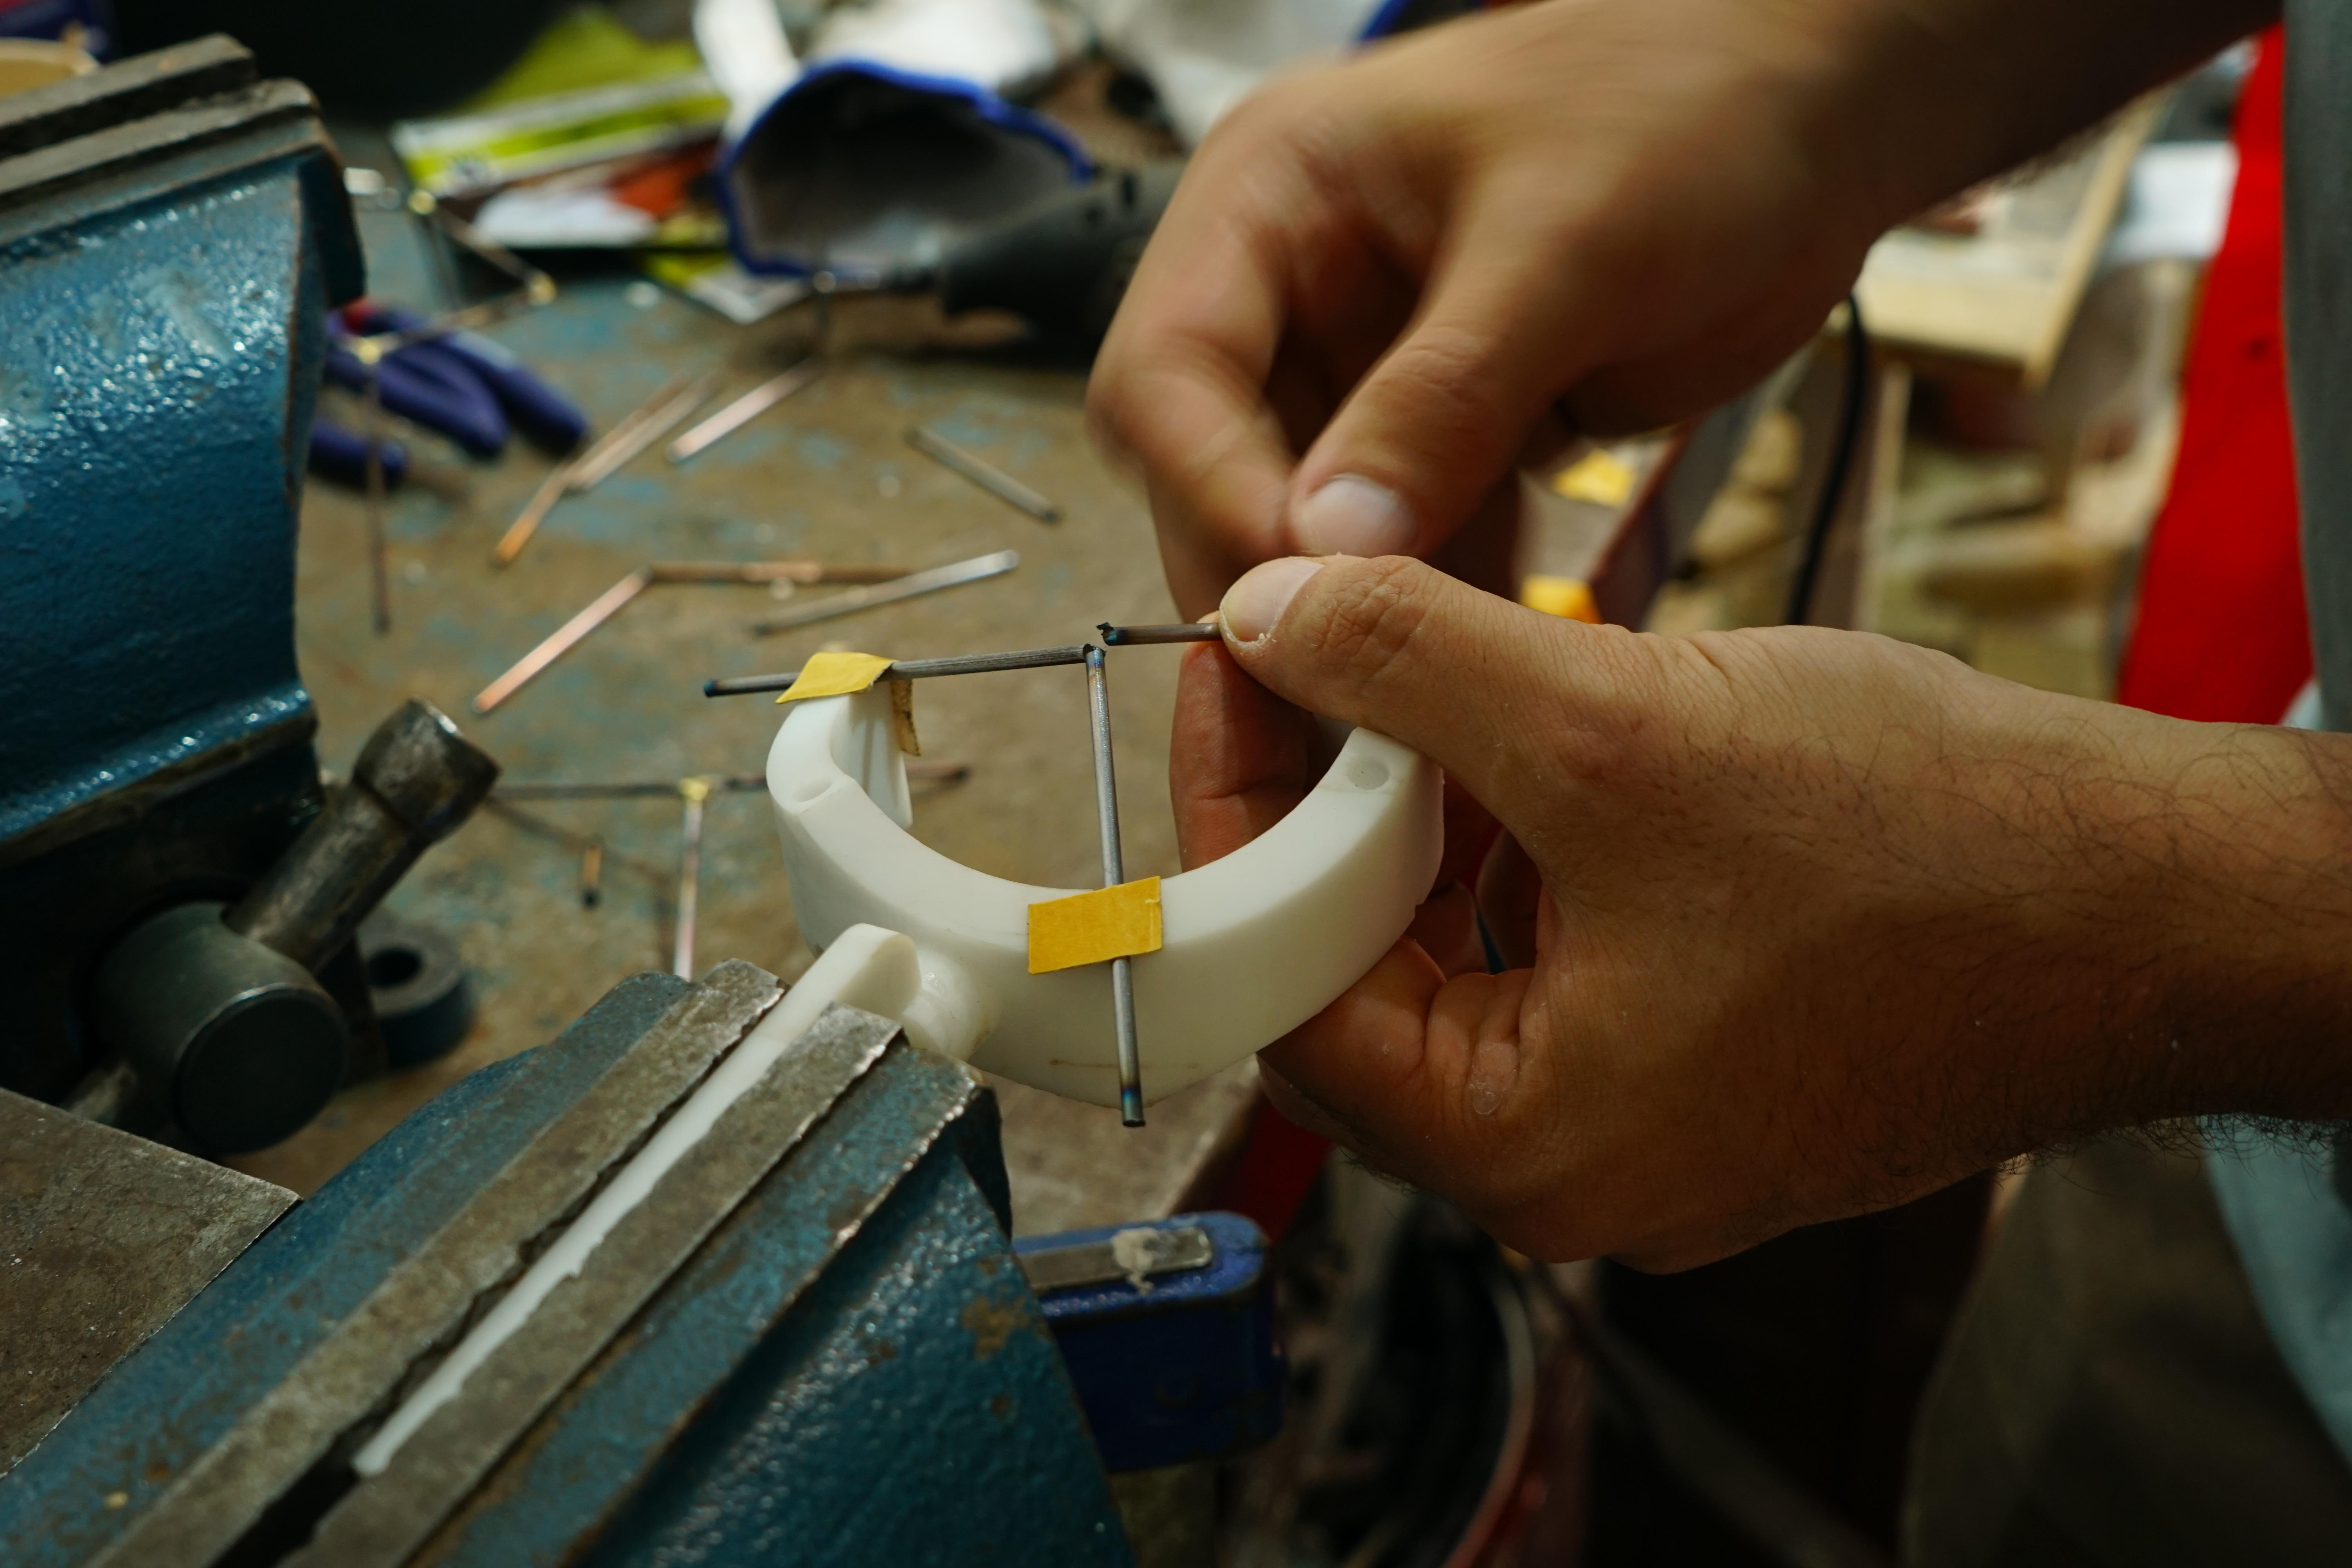
- Precise angle holding — the jig needed to locate three rods at the exact dihedral angle of a dodecahedron intersection, repeatably and without drift
- Heat resistance — brazing reaches temperatures that would destroy FDM plastic; resin was chosen for its significantly higher thermal deflection temperature, giving it a working tolerance for brief, indirect heat exposure without deforming
- Flame clearance — a donut form was used so the joint sits in the center void, keeping the flame away from the jig body and preventing direct contact with the resin
- Rod retention — a snap-fit channel holds each rod in position; a retaining ring and small embedded magnets lock everything in place during brazing without requiring clamps or hands
- Extended flame access — during testing it became clear that the donut opening was still too restrictive; a significant section of the donut body was removed to open up more clearance around the joint, allowing the flame to reach the metal from multiple angles without interference
.jpeg)
Brazing — The Process
Brazing is one of the oldest metal joining methods there is. At its core it is simple: you heat two base metals and introduce a filler metal with a lower melting point. The filler flows into the gap between them by capillary action — drawn in by the heat, not pushed. When it cools, the joint is made. No melting of the base metal, no welding, no mechanical fastening. Just heat, flow, and adhesion at the molecular level.
In my case the base metal is 2.5mm steel rod and the filler is brass brazing rod — an alloy of copper and zinc with a melting point well below that of steel. The brass flows into the intersection of the rods and locks them together once cooled. That capillary action felt immediately familiar — it is exactly the same satisfying moment as soldering a component onto a PCB, watching the filler spread and disappear into the joint on its own. Just at a much larger scale, with a much bigger flame.
The role of flux is something I had to understand before touching the torch. When metal is heated, it oxidises — a layer forms on the surface that prevents the filler from bonding properly. Flux is a chemical paste applied to the joint before heating. It melts at a lower temperature than the brazing rod and forms a protective barrier over the metal surface, preventing oxidisation as the temperature rises. Without it the filler beads up and rolls off rather than flowing cleanly into the joint. With it the brass spreads smoothly and bonds properly. It is the difference between a clean joint and a failed one.
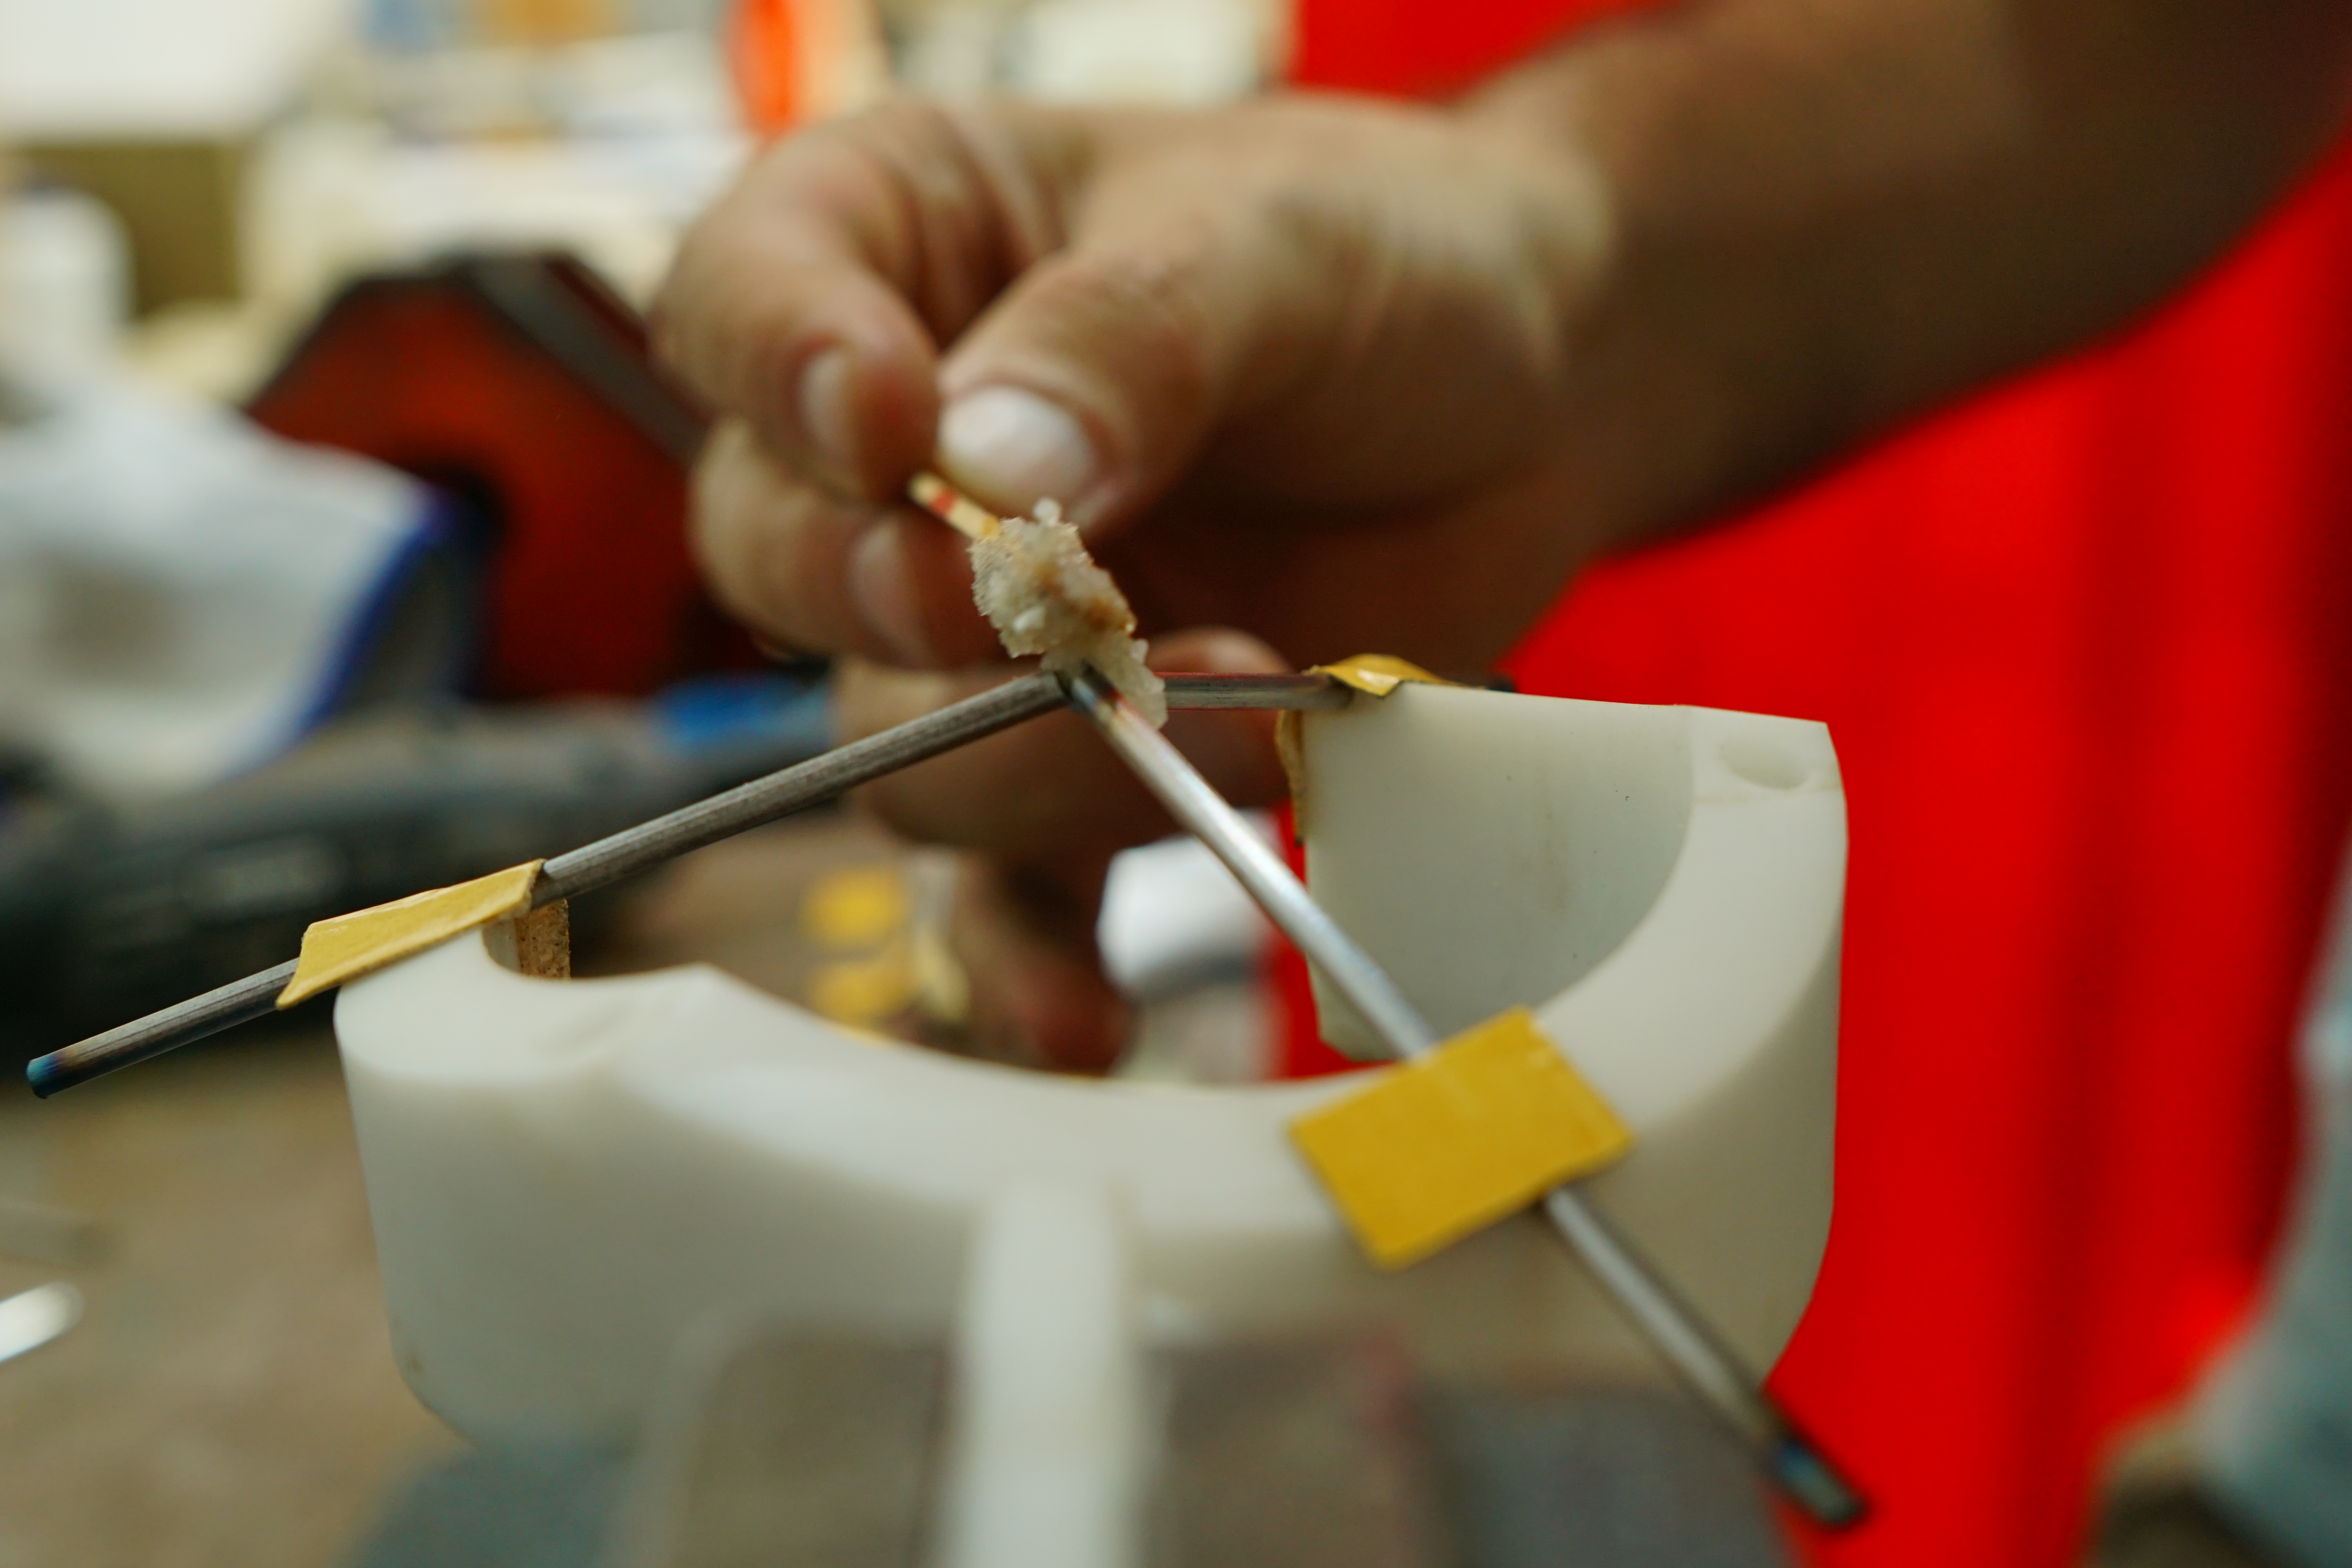
One practical discovery worth noting: I ended up using tape to hold the rods in position at the joint before applying the jig and flame. It proved surprisingly effective — keeping everything aligned during setup without interfering with the brazing itself, and burning away cleanly once the heat reached it.
The part that took the most practice — and where the craft really lives — is reading the heat. The base metal needs to reach the right temperature before introducing the filler. Too cold and the brass won’t flow — it just sits on the surface without bonding. Too hot and the flux burns off, oxidisation sets in, and the joint is compromised. The sweet spot is visible if you know what to look for: the flux turns glassy and starts to bubble slightly, the metal develops a faint orange glow, and when the brazing rod is touched to the joint it flows immediately and cleanly, pulled in by the heat of the metal rather than the direct flame. That moment — when the filler moves on its own — is the sign that everything is right it feels effortless…
Images

.jpeg)
Results & Reflection — The Jig in Practice
For a first iteration the jig performed well. The snap-fit channels held up better than expected under the heat — there was some cracking at the edges and minor surface deformation, but not enough to alter the angle at the joint. The geometry was being held correctly, which was the whole point.
The main practical challenge was ensuring the full underside of each rod sat flush against the jig channel. Any gap — even a small one — would introduce an angular error that carries through to the rest of the structure. Tape solved this at the single-joint stage, pressing the rods down into contact and holding them there while the flame did its work.
One thing I noticed — though I may be imagining it — is that brushing flux along the full length of the rod seemed to slow down the rate at which it heated up, buying a little more working time before the joint reached critical temperature. Whether that is the flux acting as a mild thermal barrier or just a placebo effect, I’m not sure. Worth testing more deliberately next time. The harder challenge emerged at the assembly stage — when individual brazed intersections needed to be joined into larger sections of the geometry. Two problems compound each other here:
- Spatial interference — as the structure grows, the geometry itself starts to hit the clamp or the table, making it increasingly difficult to position the jig at the next joint
- **Balance and weight distribution — a partial assembly is asymmetrical and heavy on one side. Holding it steady while simultaneously positioning the next rod and applying heat is genuinely difficult. Tape alone is not enough at this scale.
The solution for future iterations is a tighter, more positive retention system — something that grips the rod mechanically rather than relying on tape and friction. The jig design is right. The holding force just needs to be stronger as the assembly grows. Despite these challenges, I was able to build significant sections of the dodecahedron using the jig. The process left me with two large partial assemblies. The final step — joining them into a complete form — will need to be done by hand, reading the geometry carefully and brazing the last connections without the jig. That is where the craft takes over entirely from the tool.Overall great experiece, Happy I was able to experiement with this.
.jpeg)