

Overview
Background
It is a requirement to complete a final project in order to graduate from fab academy. AT the beginning i had three potential project ideas and i was hoping to work on one of the as my final project. All my ideas are based on their potential market available in Nigeria and the feasibilty of making more of them after my FabAcademy training. the projects are
- Waste bin seperator
- Thumb print control locker (TouchGuard)
- Art carving of map of Nigeria
At the end of The day i decided to work on TouchGuard which is a biometric/password based locker system and i am really looking forward to making it come to reality.
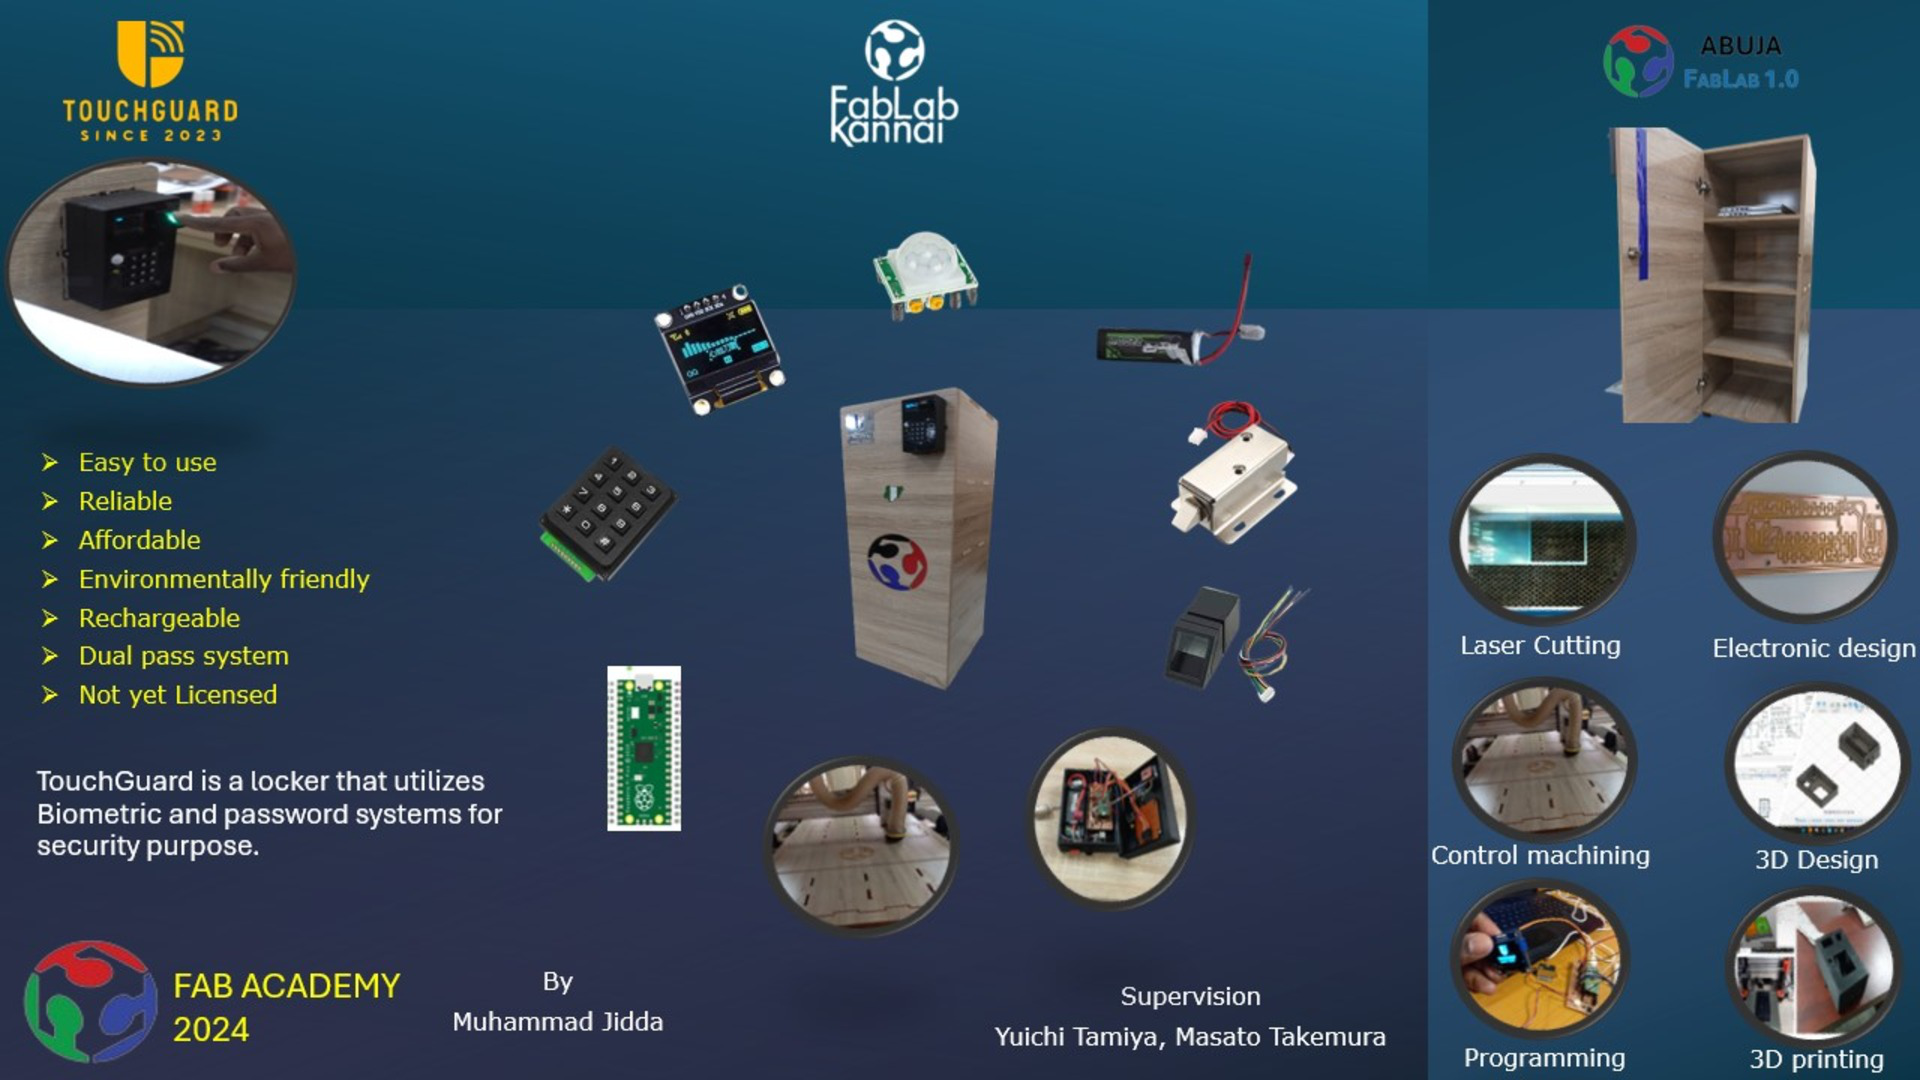
TouchGuard
|
A locker or small cupboard is often used to keep/store possessions. In various labs, a locker is used to keep some useful files or components for safety. Most of the time, the key to the locker is shared between a few selected individuals for accessing it. However, two problems arise from such a situation:
|
|
To solve these issues, a digitalized locking system can be made with a biometric sensor that can only allow registered users access to contents and also solve the issue of missing keys or cylinder replacements.
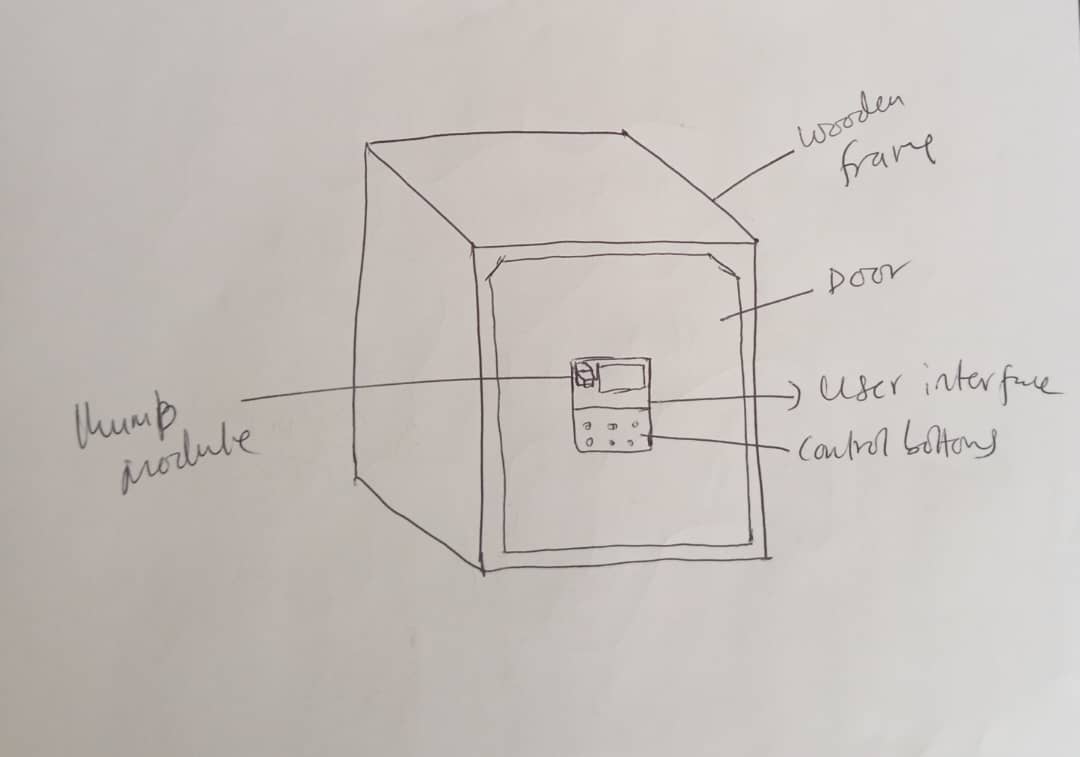
The locker will be made of a wooden frame and will have the following functions:
- A password access.
- A biometric access.
Review
Here in Nigeria, due to low productivity in making technological gadgets, There is hardly any locally made biometric safe made. However, The followings are projects similar to TouchGuard made by various group around the world.
- FINGERPRINT DOOR LOCK USING ARDUINO by Md. Khayrul Islam and Alimul Rajee affiliated to comilla university published at research gate publications.
- FINGERPRINT DOOR LOCK SYSTEM USING ARDUINO by Sharmin Yasmin from Vaasan Ammattikorkeakoulu university of applied sciences 2023.
- Fingerprint based locking system by Ajinkya Kawale International Journal of Scientific & Engineering Research, Volume 4, Issue 5, May-2013 899 ISSN 2229-5518
Materials to be used
The following materials are expectged to be used for the construction of the locker.
- Wood probably MDF
- Microcontroller
- Finger print sensor
- Keypad
- pir sensor
- 3D parts
- display
- Locking device
All materials can be source from local stores in Nigeria and can also be imported online. In depth regarding the materials for the project can be found Here at the BOM section.
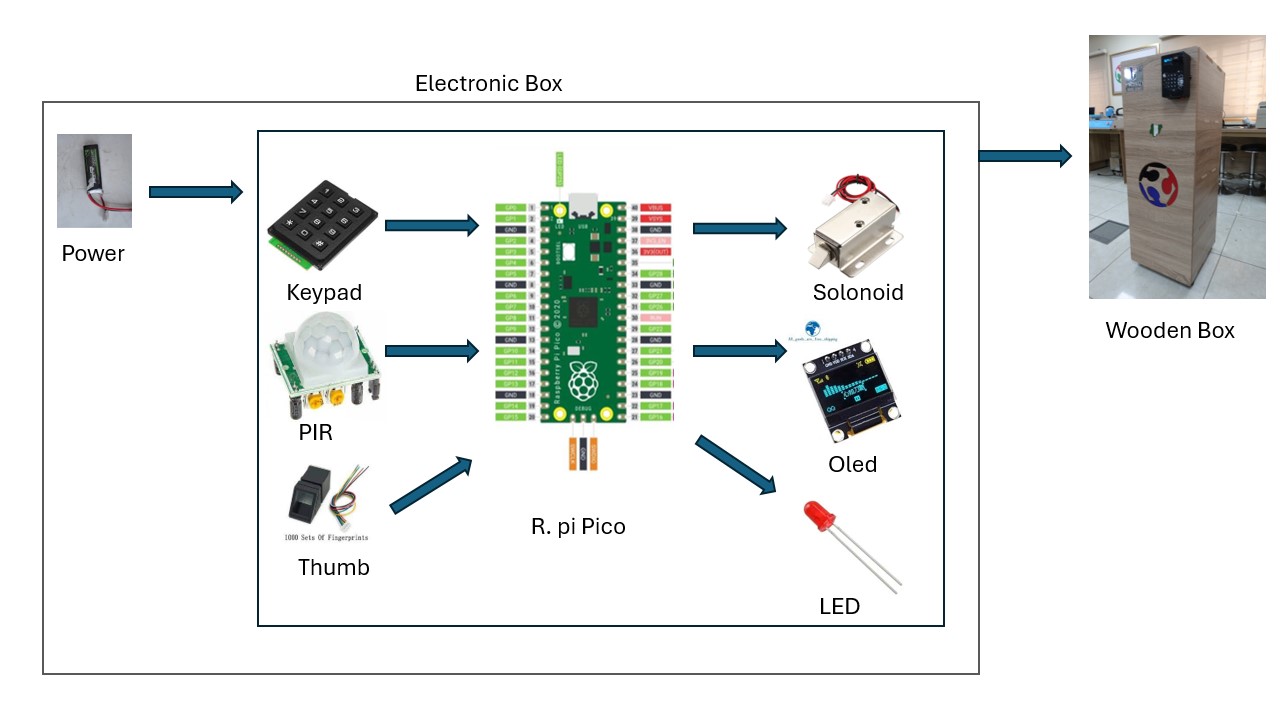
SYSTEM DIAGRAM
Target success and evaluation
The project will be considered a success if it reaches the operational Milestone where by the locker is fully constructed with the security system functional
Task to be completed
| s/n | Task | Duration | Status |
|---|---|---|---|
| 1 | PCB board design and production | two weeks | Completed |
| 2 | Embedded Programming of sensors | one week | Completed |
| 3 | 3D Design and Printing of electronic board casing | One week | Completed |
| 4 | Incorporation of electronics into 3D casing | One Day | Completed |
| 5 | 3D Design,cutting, and assembly of main wooden box | One week | Completed |
| 6 | Laser cutting, vinyl cutting and attachment of logo | One week | Completed |
| 7 | Integration of all parts | One week | Completed |
Design and Fabrications
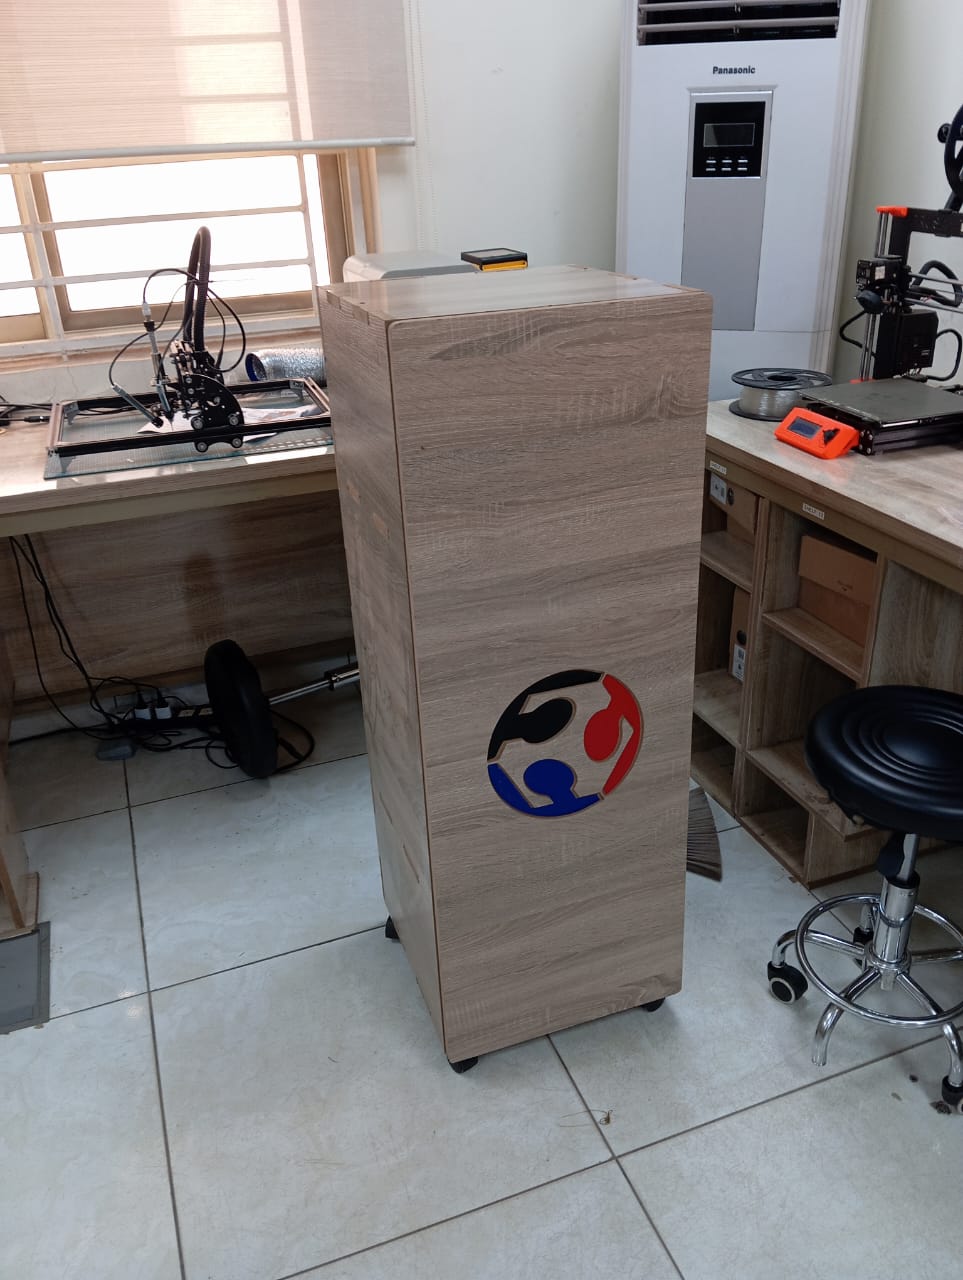
I did two versions of my final project, both similar in operation and design but different size. One is to be kept at fablab kannai and the other at Abuja Fablab 1.0. The other version can be found at Version 1 site
I will be discussing the different aspect of this project under the following headings:
- Box (body) design
- Control box design
- Electronic design
- Programming
- Other finishing attachments
- Integration into finished project
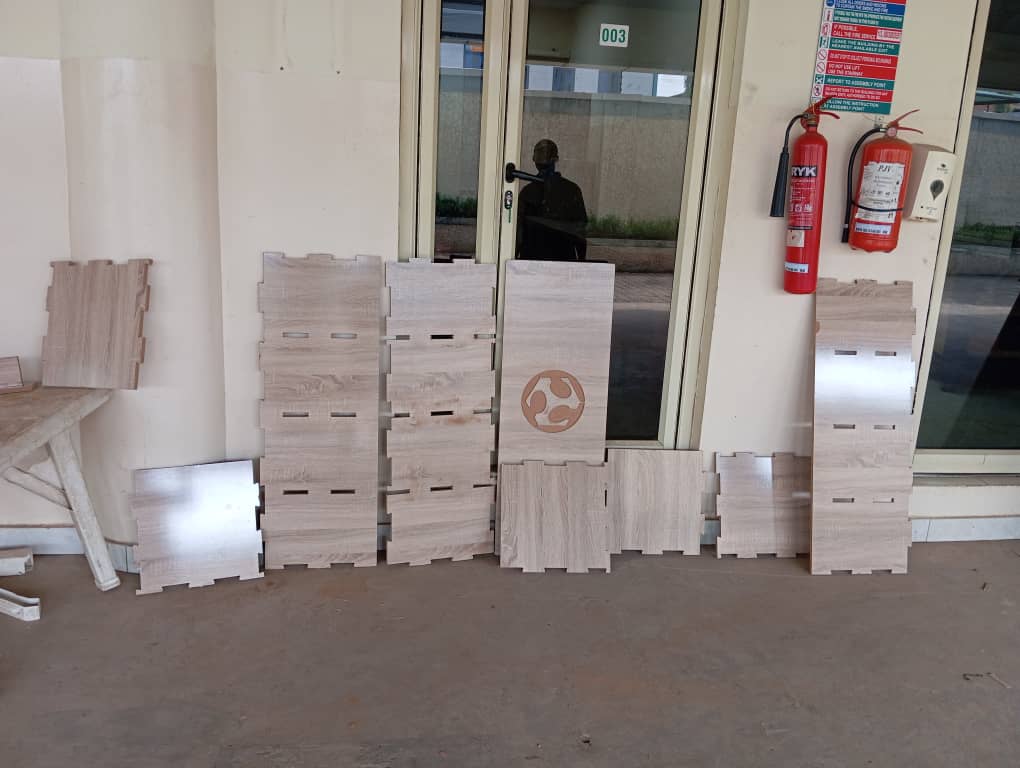
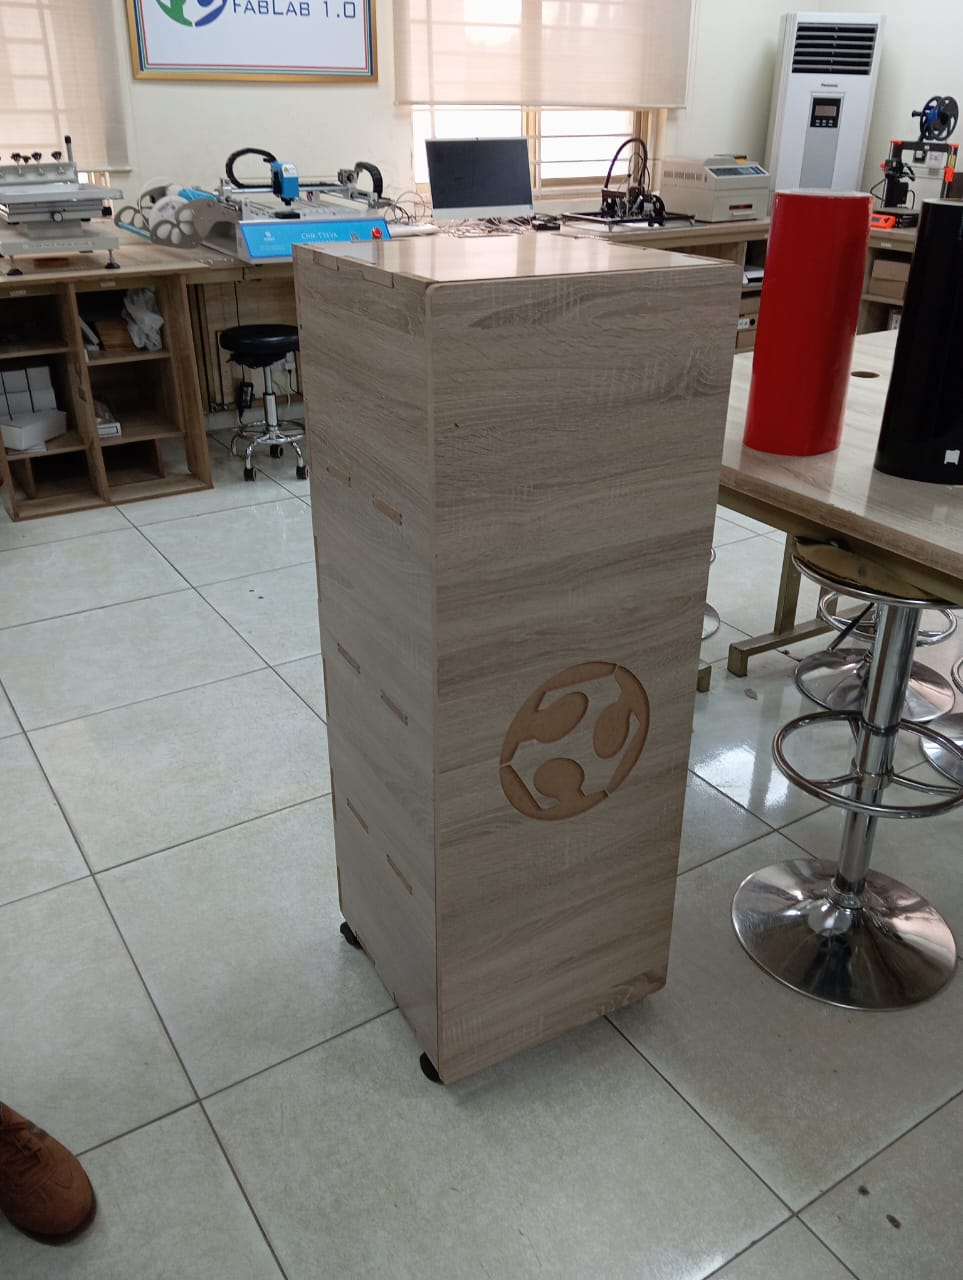
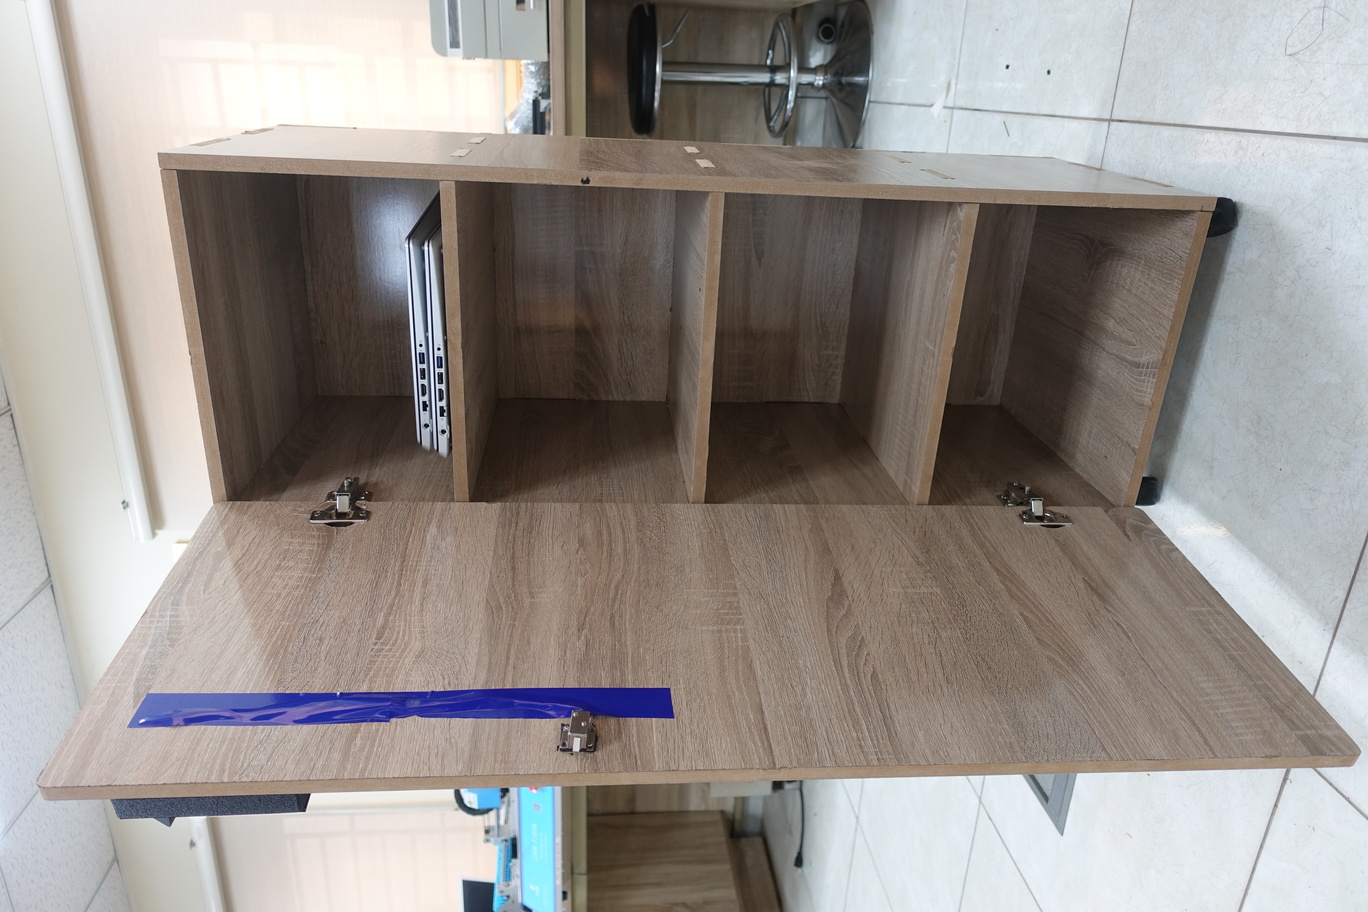
Box (Body) Design
I cut my box (body) using the shopbot tools machine and more information about it can be found in my week7 assignment page. The following were used:
- wood (MDF)
- Wood size (2440mm by 1220mm)
- Thickness(16mm)
- Machine used(Shopbot)
- size of design (1100mm x 400mm x 400mm)
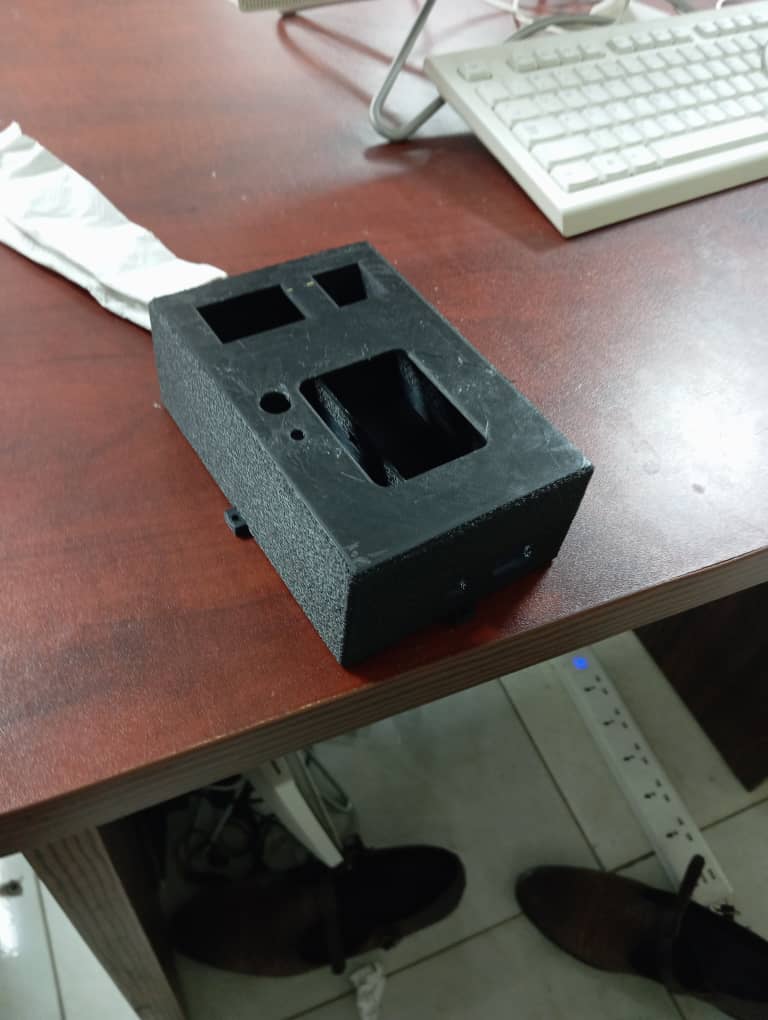
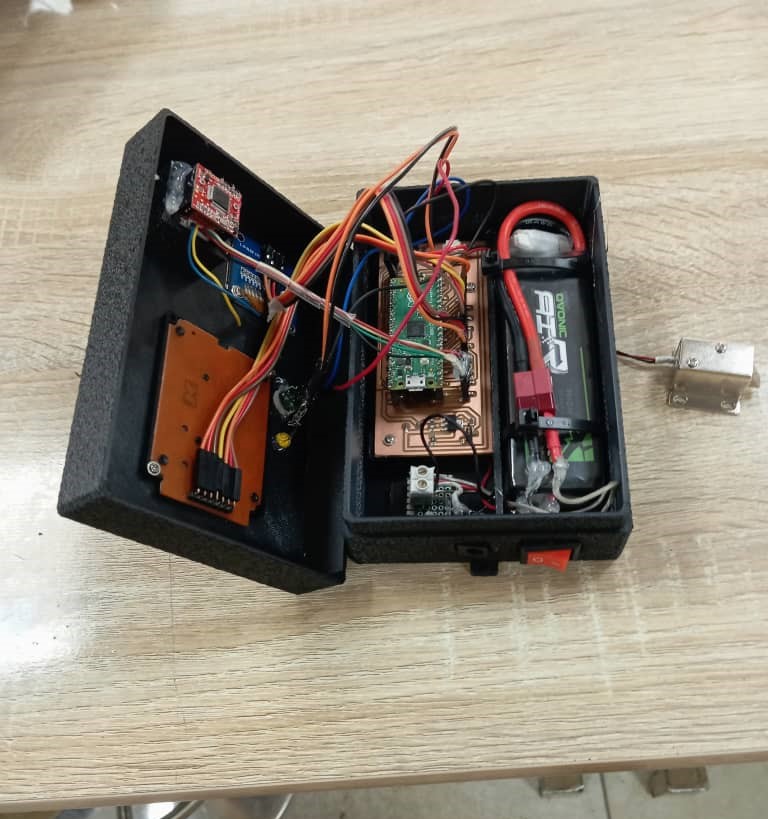
Control box design
The control box consists of electronics for system control in a 3D printed casing. Details about the process can be found on my 3D printing assignment week
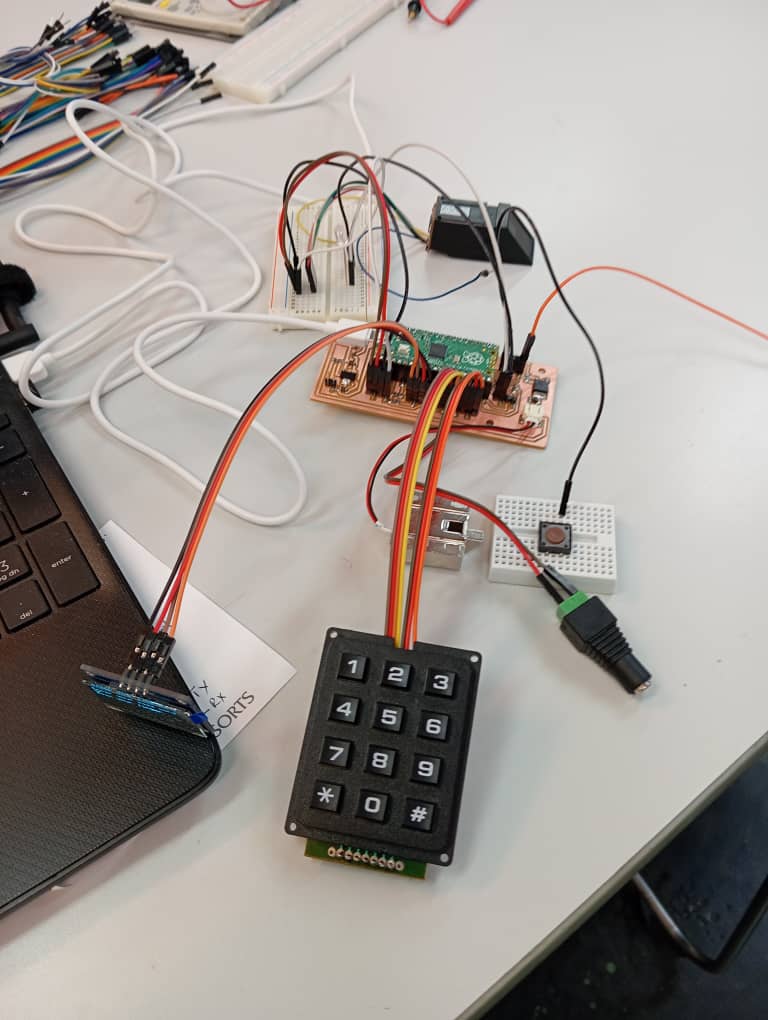
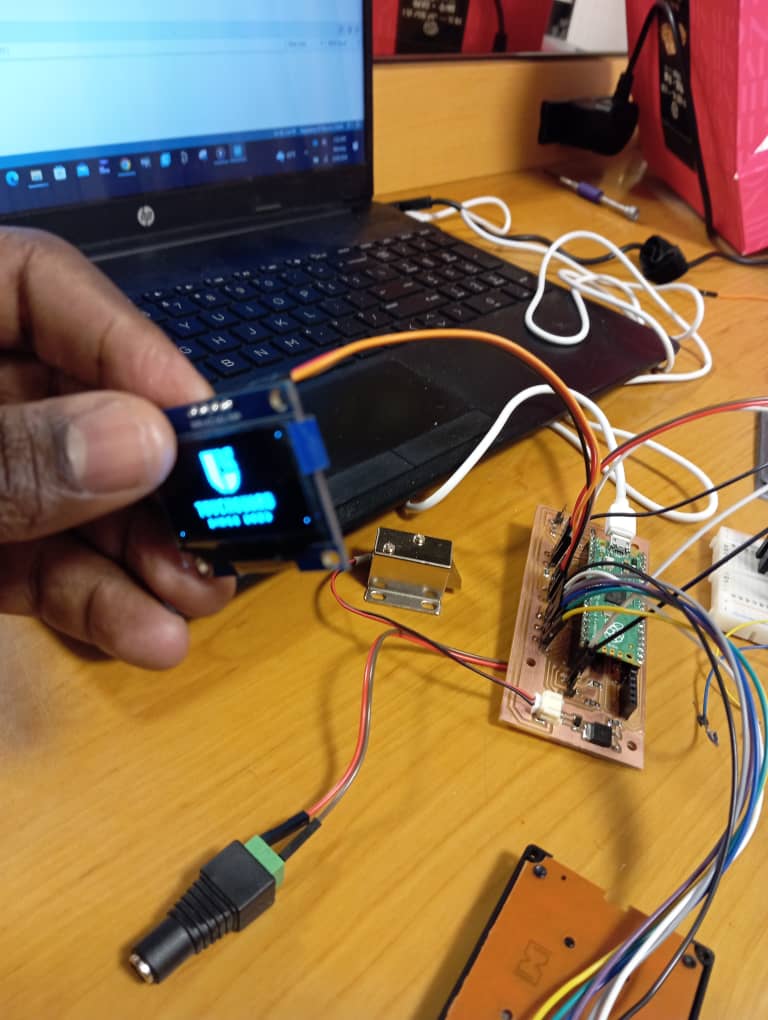
Electronic board design
For my electronic circuit board. I made a board that includes pin connections for all the input and output devices i needed for my final project. These are:
- Keypad (Input device)
- Fingerprint sensor (Input device)
- Oled display (output device)
- pico board
- led
- PIR sensor (Input device)
- Power supply
- required resistors and capacitors
- Solonoid Lock (output device)
I made my board as part of my week8 assignment (circuit Design and Production) and details on it can be found Here
Programming
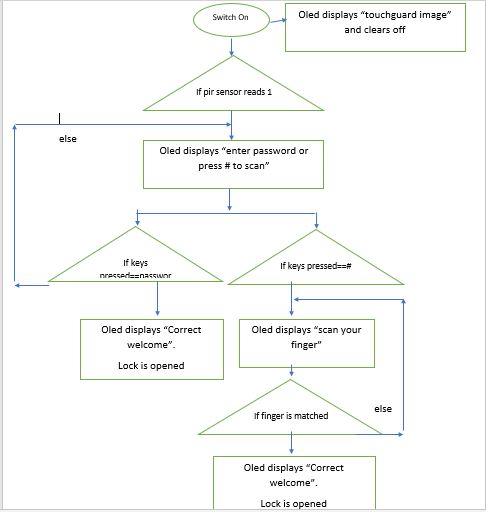
I made my programme according to the flowchart below.
I did the programming for my system using the arduino IDE plattform.
The following references shows details on how i did the programming for individual sensors before combining into a single script/code .
I connected all the input and output devices together on the board and then write a general code for the whole system.
I assembled the components in the electronic box and tested it.
Finishing attachments
I added some designs and parts to beautify my product. The followings are what i added!
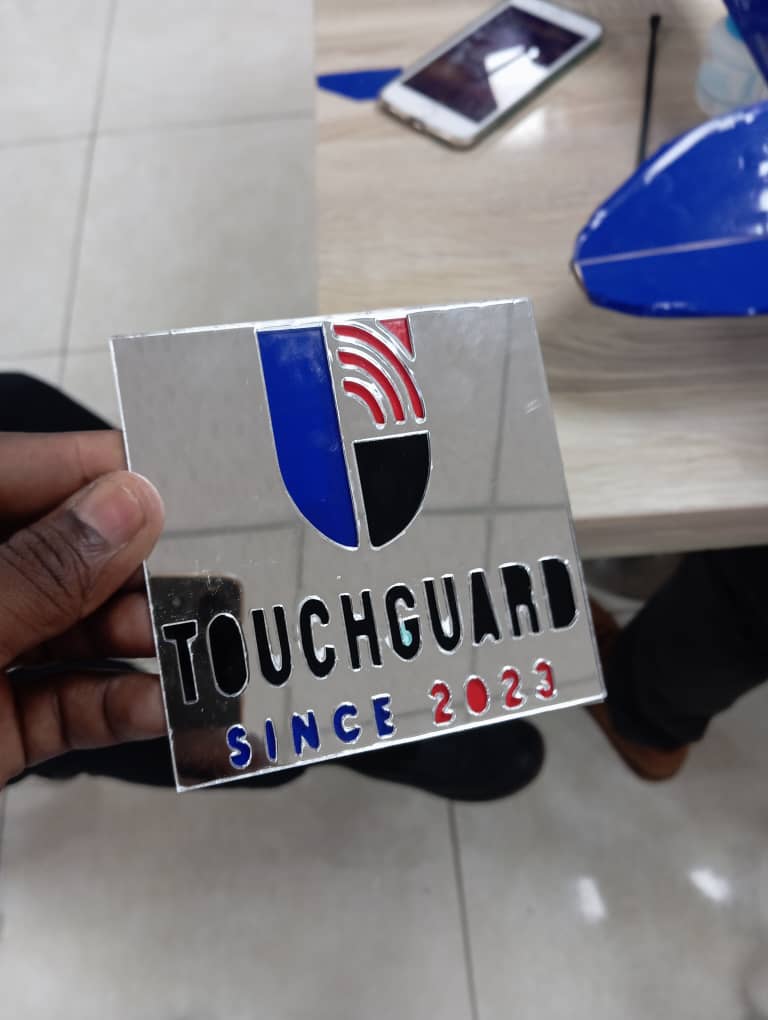
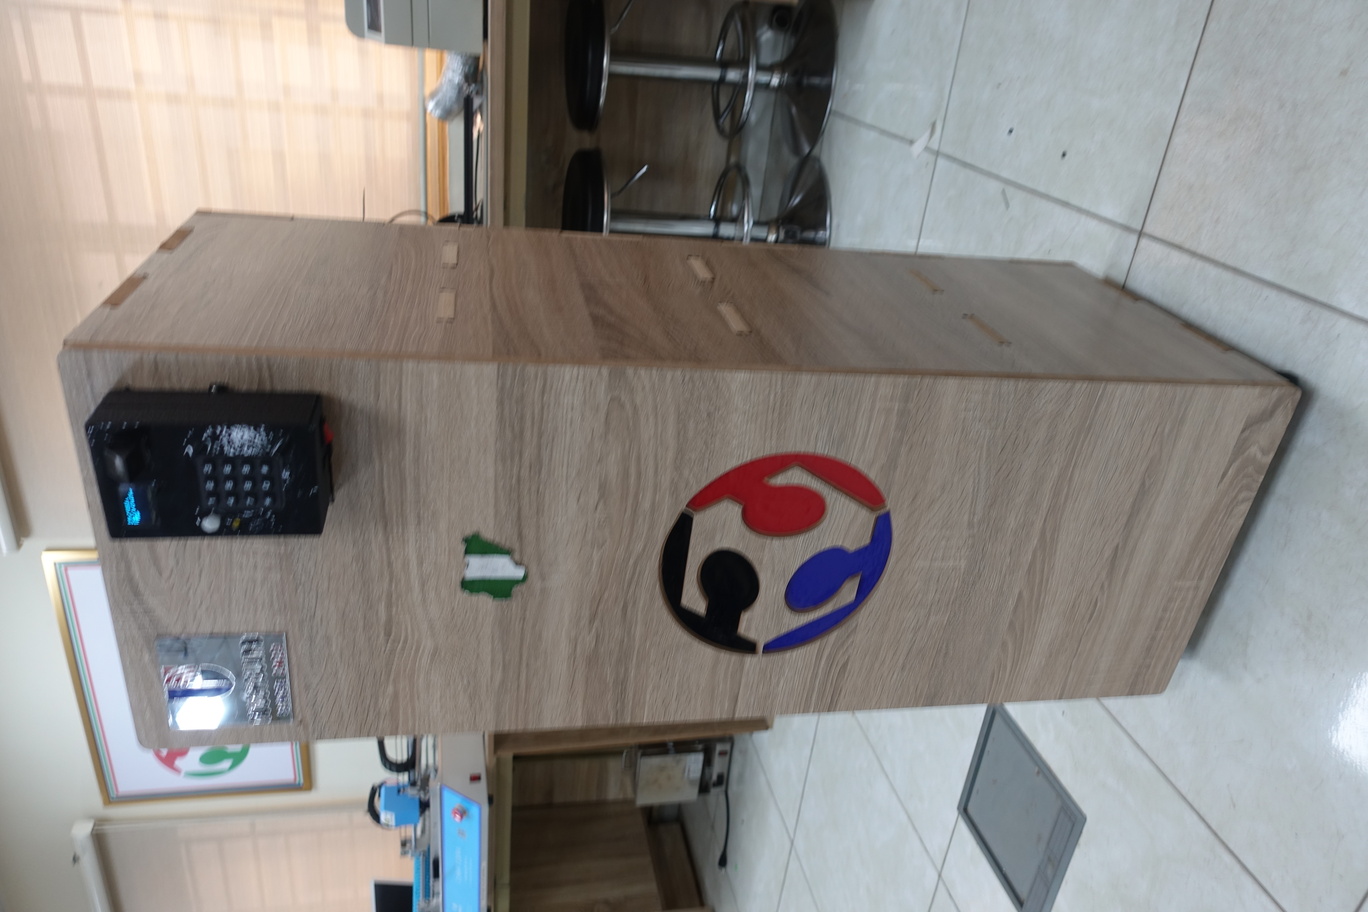
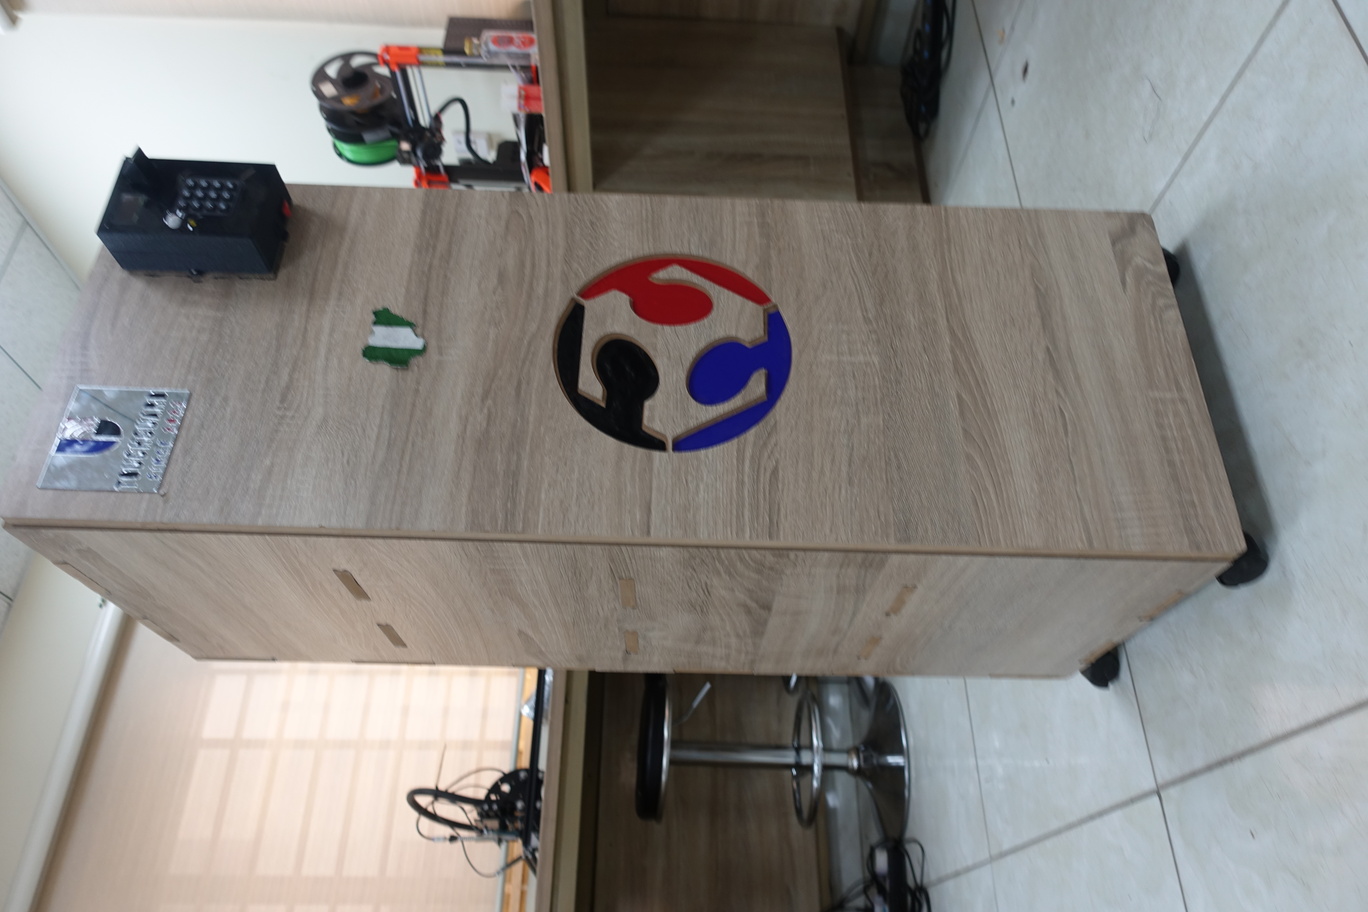
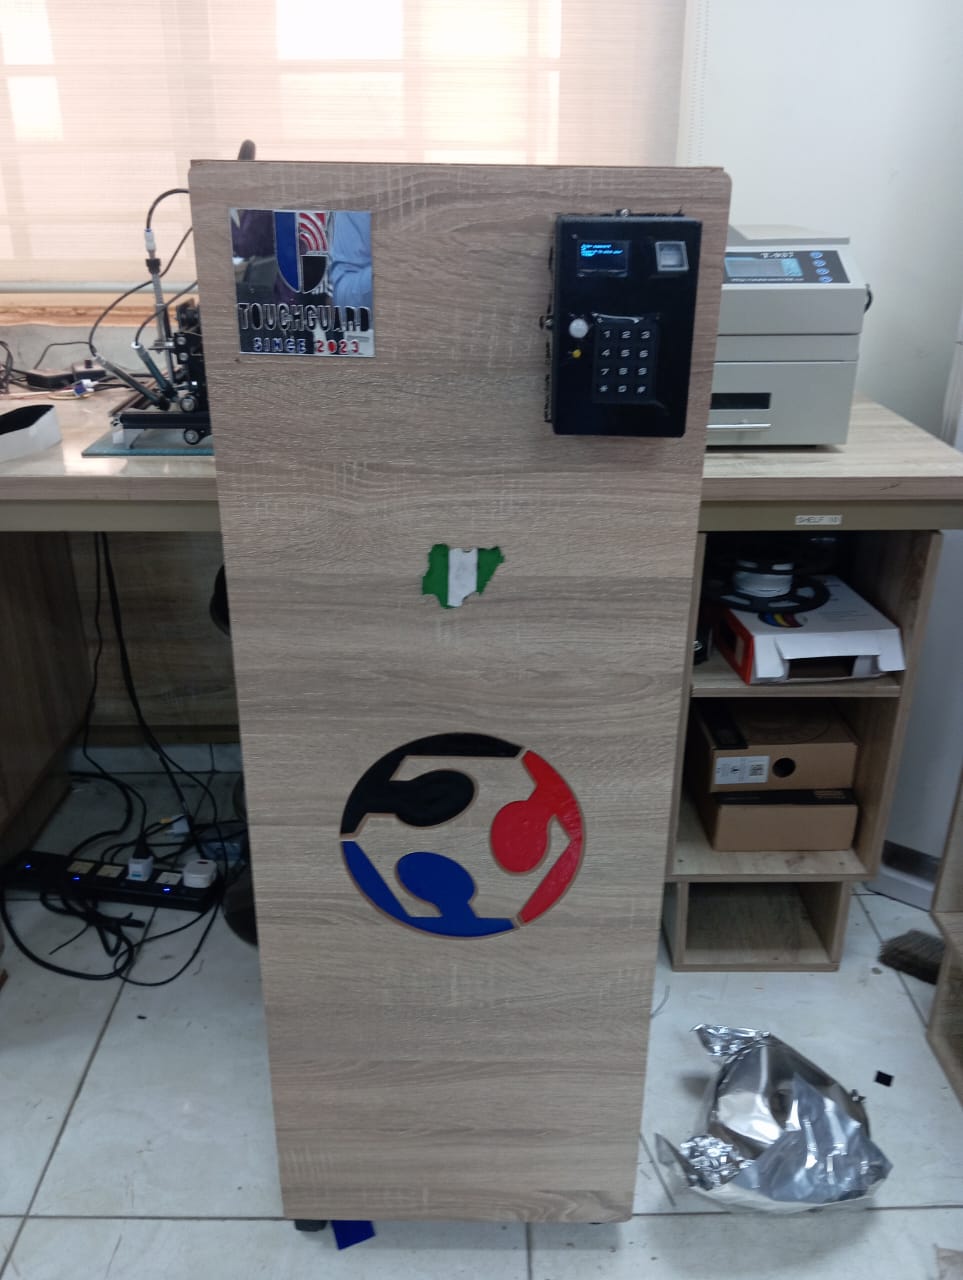
- TouchGuard Logo (Laser Cut)
- Fabacademy Logo (Vinyl cut)
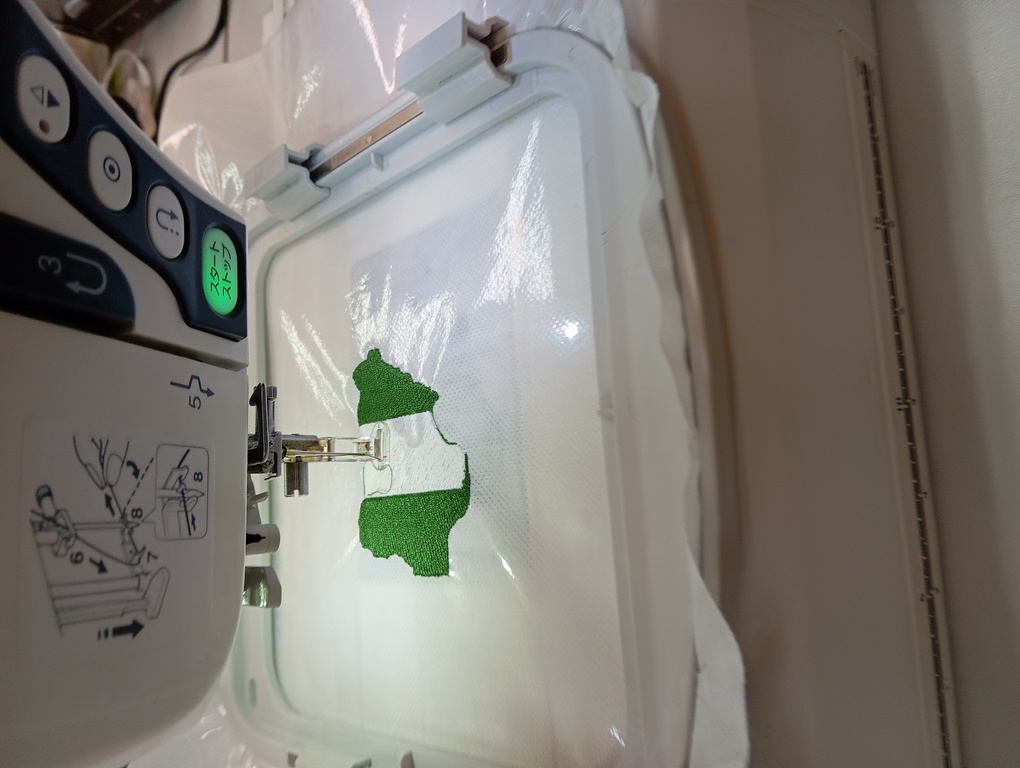
- Nigerian Map (Embroidery)
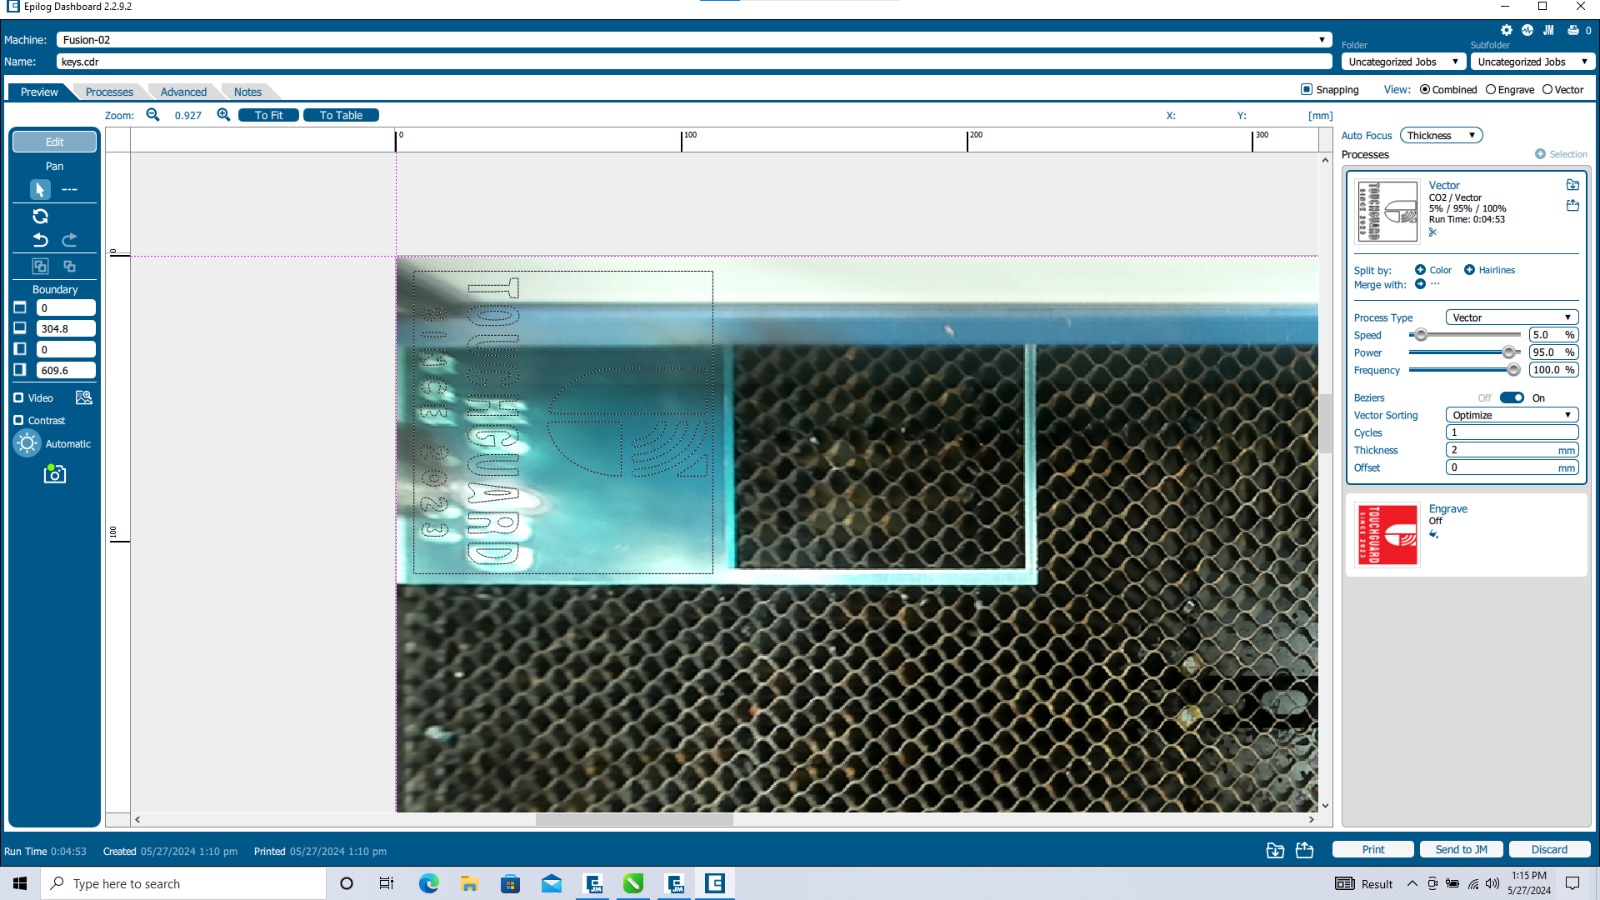
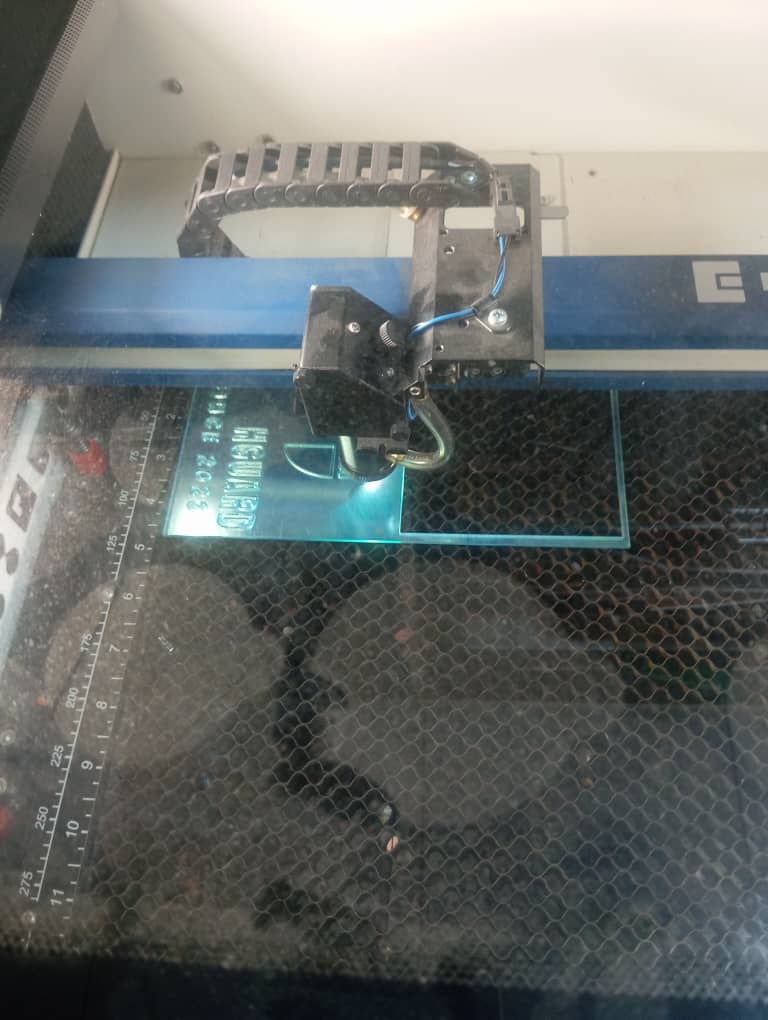
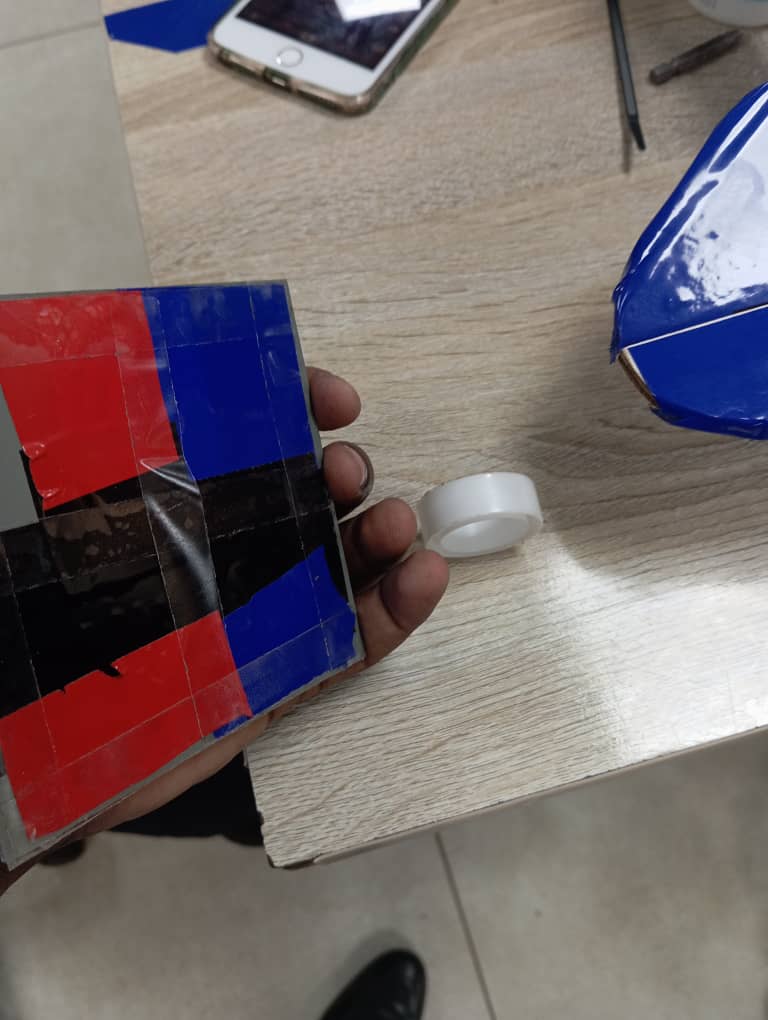
I cut my Touchguard Logo using the epilog laser cutter and i used corel draw to prepare my data. I used the following:
- material = Mirror Acrylic
- thickness = 5mm
- power = 95
- speed = 5
- Frequency = 100
- Focus = 6.8
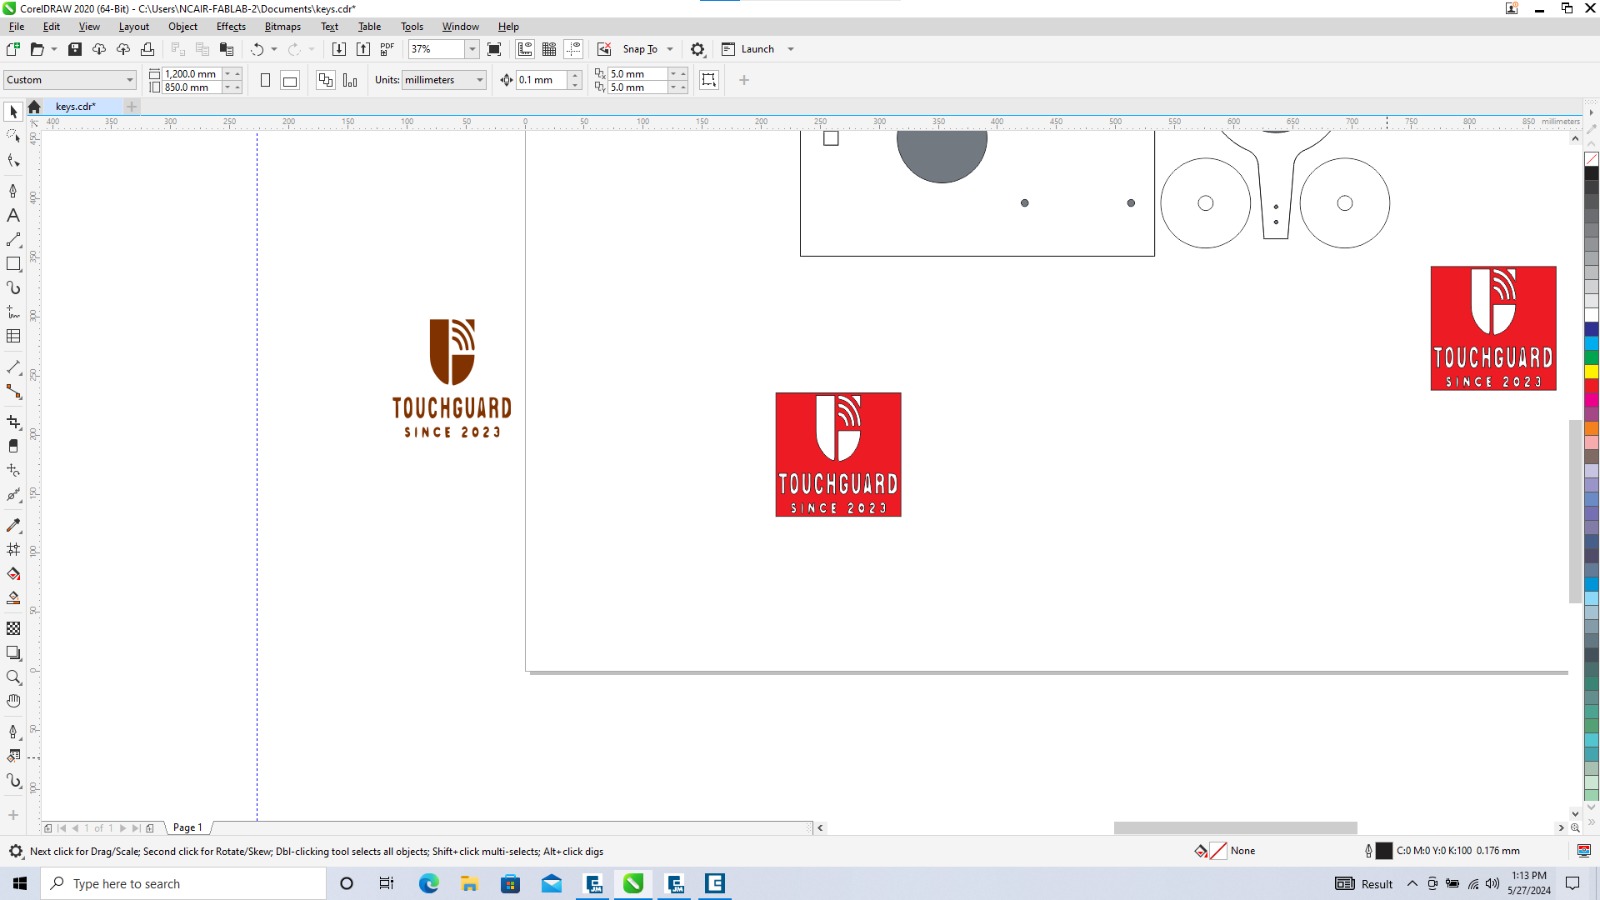
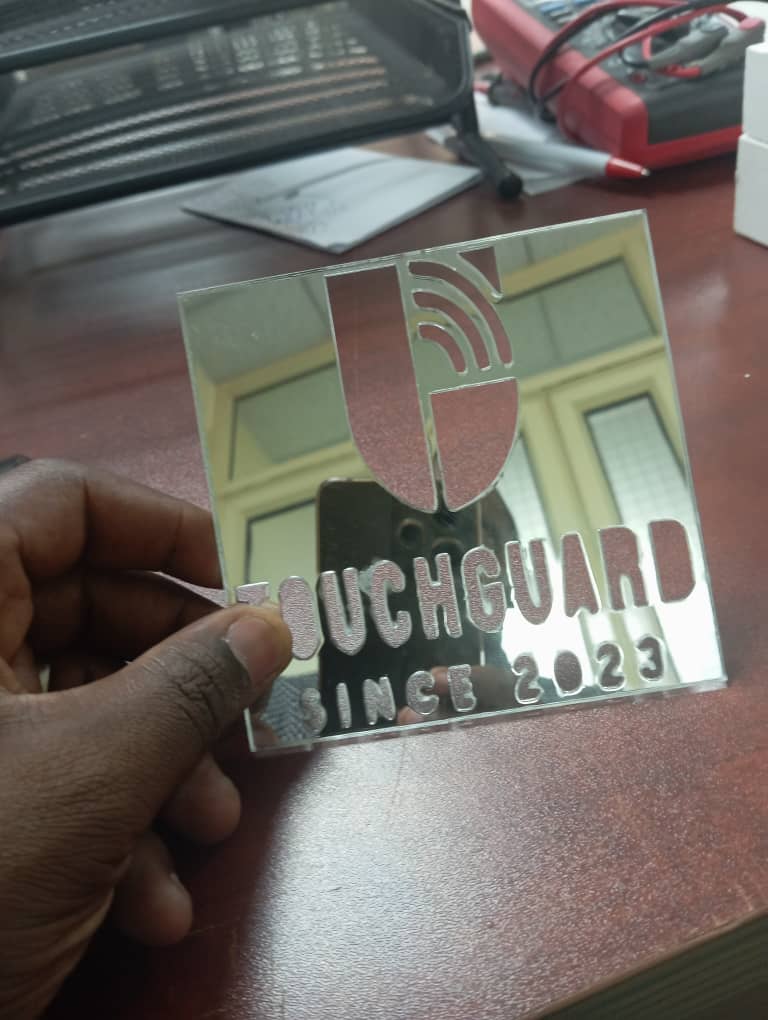
I added some coloured sticker at the back of the newly cut logo to make it more beautiful
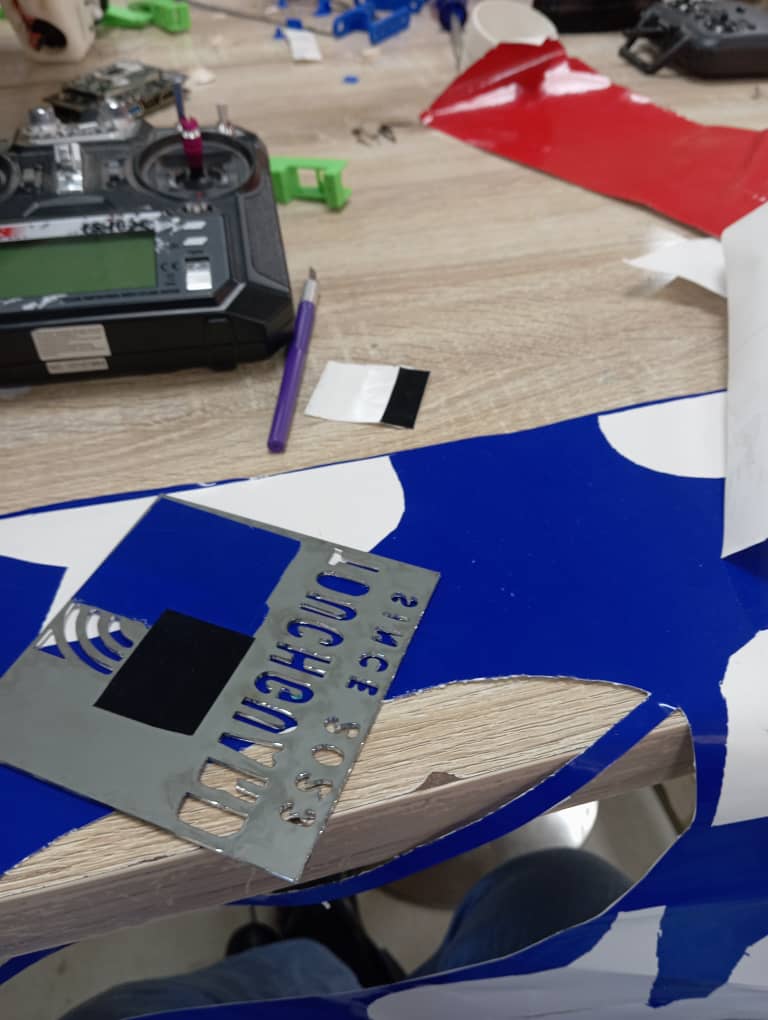
As for the fabacademy logo i cut it using the roland vinyl cutter maching. I downloaded the logo from online. Then i used corel draw to prepare the data for vinyl cut. I cut each arm of the logo using a different color and then attached to the wooden box.
The last part of attachments is the Nigerian Logo. I made it during the wildcard week, i did embroidery and made a jica logo and Nigerian map. for processes i follow in making it my wild card week documentation
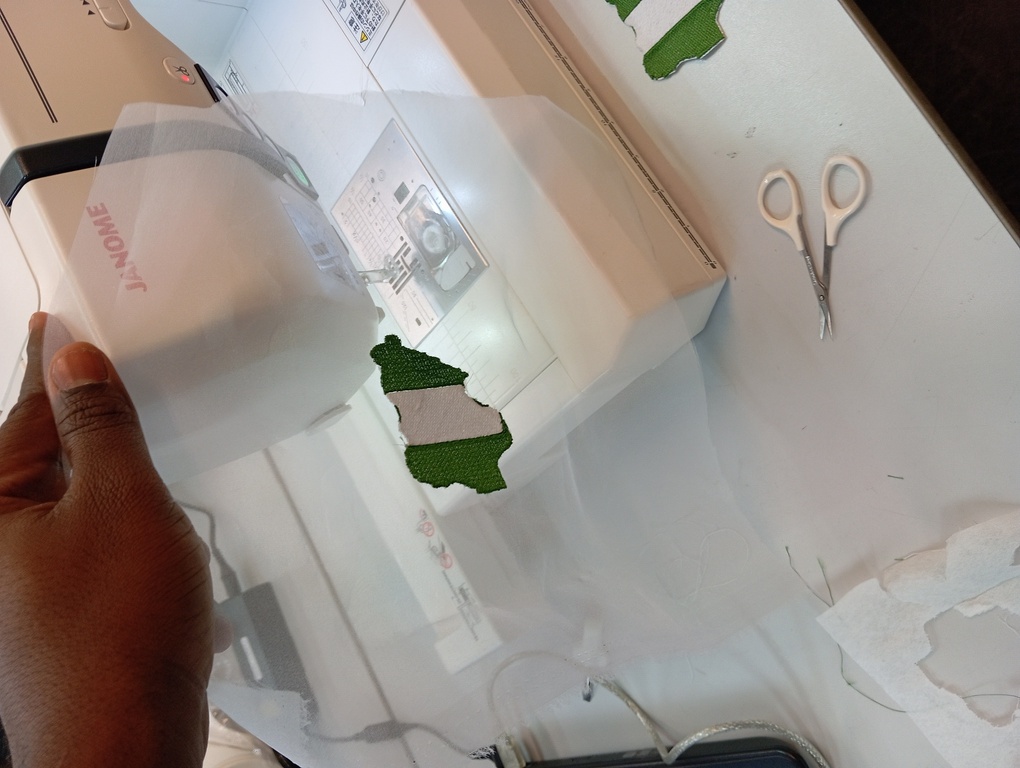
Integration
In this section i integrated all parts into a single project. i did the following:
- I attached the vinyl cut fabacademy logo onto the wooden box as shown in the images below
- I attached the laser cut TouchGuard logo to the wooden box using thin double sided tape
- I attached the Nigerian map on to the box using the double sided tape
- i attached the control box to the wooden box
When attaching the contol box:
- I used double sided tape and screws
- I bore a hole on the door of the box and passed the solonoid lock inside the box
- I hold the solonoid lock with screws

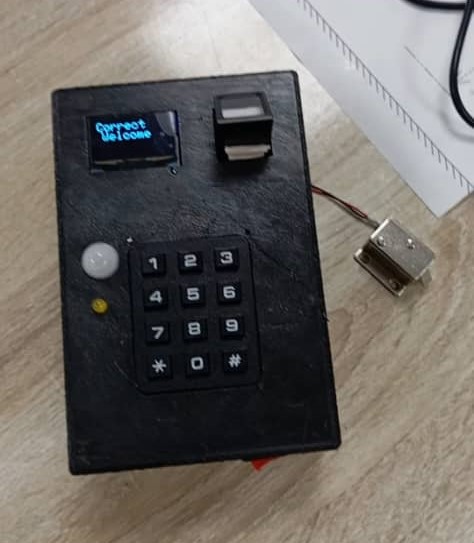
Result
working principle
The project works as follows:
- When the device is switched on it displays the Touchguard logo
- Then the oled displays the wordings "enter password or press # to scan your finger"
- once the correct key combinations for the password is enetred, the LED is switched on and the solonoid is excited which opens the door otherwise if the key is wrong it continues the previous display
- If the user decides to scan finger, he presses the # key and the oled displays the wordings "scan your finger"
- if the finger image is found and matched, the led turn on and the solonoid lock is excited which opens the door
- for either of the scenarious the lock is unexcited after few seconds
- once the user is done keeping, checking or taking something from the locker he/she can close the door
- The pir sensor is used to detect if a user is present. in the advent that the user has gone the display on the oled is blank
The project was quite a success as it was able to provide security to the contents of the locker.
Conclusions and Recommendations
The project had a significant success. It works as expected and turn out to be great product, yet the following aspect needs improvement in the next version and possibly for commercialisation purpose.
| S/N | Issue/Problem | Improvement/solution |
|---|---|---|
| 1 | Change of password: As of date the systems password can only be changed via programming and not through the interface (keypad and screen). This is a programming issue | The code would be upgraded to allow for authorised password change via the interface. |
| 2 | Registering of new biometrics for new users: As of date new finger prints can only be registered via programming and not through the interface (finger sensor and screen). This is a programming issue | The code would be upgraded to enable authorised registeration of new finger prints via the interface without having to programme |
| 3 | High performance sensor: The biometric sensor sometimes takes time to read some finger prints. This is a sensor quality issue | The sensor would be replaced with a better quality and higher performing sensor |
| 4 | Lock Length: The length of the solonoid lock extrusion is quite small. Though it locks well but a locking device having much longer extrusion will be better. | A new solonoid lock with longer tip wouled be used or a different locking mechanism would be employed like the servo system |
Bill of Material (BOM)
The following table list the materials used in developing the project up to the current status.
| S/N | Part/ Device/ Material | Qty | Unit Price dollar | Total Price dollar |
|---|---|---|---|---|
| 1 | 16mm MDF Wood: For wooden box | 1 Sht | 11 | 11 |
| 2 | Fingerprint Sensor: For electronics | 1 | 7 | 7 |
| 3 | 4 x 3 Keypad: For electronics | 1 | 2 | 2 |
| 4 | Oled sh1106 128 x 64: For electronics | 1 | 3 | 3 |
| 5 | 12v Solonoid Lock: For electronics | 1 | 4 | 4 |
| 6 | Raspberry pi pico: For electronics | 1 | 5 | 5 |
| 7 | Pir sensor: For electronics | 1 | 1 | 1 |
| 8 | LED : For electronics | 1 | 20 | 20 |
| 9 | Embroidery Thread and yard: for Embroidery | 3 | ~ | ~ |
| 10 | PLA fillament For 3D printing | 1 | ~ | ~ |
| 11 | Resistors: For electronics, 1K 3, 10k 3 | 6 | ~ | ~ |
| 12 | Capacitors:For electronics 10uf | 2 | ~ | ~ |
| 13 | MOSFET NTO252: For electronics | 1 | ~ | ~ |
| 14 | DIODE SCHOTTKY CDBM1100 G: For electronics | 1 | ~ | ~ |
| 15 | Voltage REGULATOR LM1117: For electronics | 1 | ~ | ~ |
| 16 | PCB board : For electronics | 1 | ~ | ~ |
| 17 | Headers Headers: For electronics | Mpl | ~ | ~ |
| 18 | Tires: For Wooden Box | 4 | ~ | ~ |
| 19 | screws:For Integration of parts | Mpl | ~ | ~ |
| 20 | Double sided tape: For Integration of parts | 1 | ~ | ~ |
| 21 | Mirror Acrylic 2mm: For TouchGuard Logo | 1 | ~ | ~ |
| 22 | sticker paper: Fabacademy logo design, blue,black and red | Mpl | ~ | ~ |
| 23 | S2B PH SM4 TB: Plug for solonoid | 1 | ~ | ~ |
| 24 | Total | aprx 60$ |
Source Files
- Box (body) design
- Fusion 360 design file
- Generated cutting pattern/g-codes 1
- Generated cutting pattern/g-codes 2
- Generated cutting pattern/g-codes 3
- Aspire (v-carve) file
- Back Frame SVG
- Side (left and Right) Frame SVG
- Top Frame SVG
- Middle Frame SVG
- Door Frame SVG
- Exported pdf of all designs
- Fabacademylogo pdf
- Dogbone design reference.
- Control box design
- Electronic design
- Programming
- Laser Cutting
- Vynil Cutting
Take away
I have learnt alot from the project development, The system has helped me alot to strugle and remain determined when trying to achieve a goal. The followings are list of what i learnt:
- With Fablab one can construct almost everything
- With adequate timing and plan it is easy to achive your goal
- Great products can be made locally with necessary determination
- Some expensive sensor are worth buying when precission is needed as cheap once tends to take or give false reasons at times. my Finger sensor sometimes takes time before reading a print
- It is possible to make wooden boxes without the use of nail or fastners
- A good finish can upgrade the status of a product
- I also learnt all forms of skills as seen in each of my weekly assignmente eg 3D design, printing etc
Future plan
Once the projects is accepted and cleared i plan to do the following
- I will register my brand and make a patent of my product
- I will publish It
- I will make necessary upgrade needed
- Then i will commercialise the product and make necessary advertisements
Future Possibilitites
I hope my product becomes the starting point to a prosperouse company known for making mechatronics product. I shall start first with the future plan To see how far my initiative goes. I also plan to go for Incubation training to help me achieve my goal.