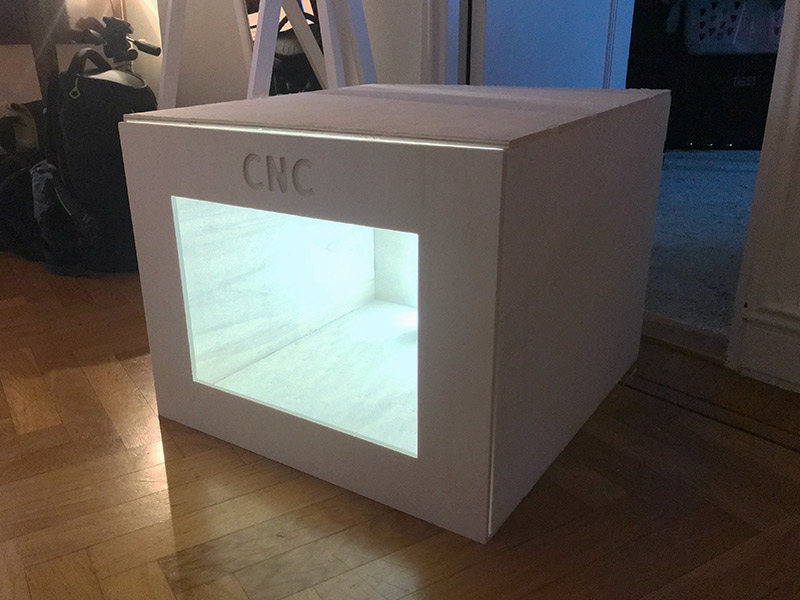
Summary
Quite a condensed week, due to my timetable and available time-slot with the Shopbot. I wouldn’t advise anyone to try and learn how to operate big machinery (and all the theory behind it) with only 12 hours (including sleep) before you use it by yourself with a design made from scratch, on 2 pieces of software you know little or nothing about. It’s an ambitious undertaking, with a high risk of getting something wrong, or forgetting to do something. Which happened a lot in the end.
It was an exercise in finding and solving problems on the fly, with the pressure of time and safety hanging over your head.
What I thought I knew before
Taking what I learnt from the small milling machine / laser cutter, I thought it would be just a matter of scale.
Learning Outcomes
Theory and use of things I learnt from this assignment:
- Demonstrate 2D design development for CNC production
- Describe workflows for CNC production
Lessons to take away
SAFETY, SAFETY, SAFETY! The size and forces used by these types of machines can be fatal!
DON’T RUSH! There will be pressure factors that put on you under stress when doing these scaled projects. You will need to keep calm and stay focused. Otherwise you will forget important steps and likely have an accident.
THE MACHINE IS ONLY AS CLEVER AS ITS OPERATOR.
Don’t try to learn so much in a short time frame. Learning takes time to process and absorb.
Include in your ‘Machine time slot’ enough time for cleaning up afterwards.
ShopBot Machine
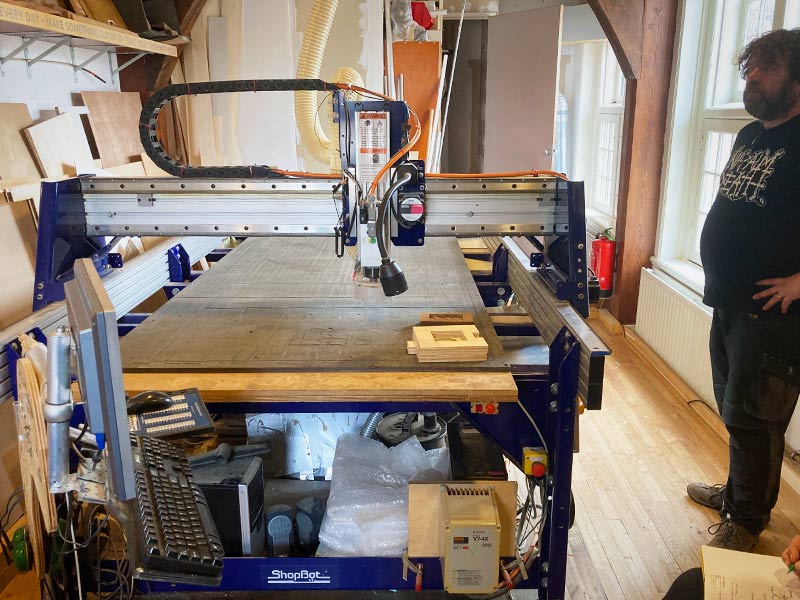 (image from Erwin)
The Shopbot is a CNC (computer numeric control) tool used in prototyping and full production for cutting, carving, machining and milling in a variety of materials including wood, mdf, plastics, foams and aluminum.
Risk Assessment
Due to the scale and size of the forces used by the machine, ALL risks are HIGH. CAUTION needs to be taken at all times when operating this piece of machinery. NOTHING should be taken for granted at anytime and your FOCUS must be complete and unwavering.
| RISK | WHO IS AFFECTED | CONTROL MEASURES | RATING | DEFENSIVE MEASURES |
|---|---|---|---|---|
| FIRE IN DUST COLLECTING BAG | YOU, OTHERS | SMOKE ALARM (too late if you hear this) | HIGH | Never leave the machine whilst running. Turn off vacuum system. Turn off the machine. DON’T USE A FIRE EXTINGUISHER (Makes the fire worse!). |
| PERSONAL INJURY | YOU | NONE | HIGH | Stay away from the machine whilst its running. Wear protective eye wear and ear defenders. Secure long hair, loose clothing and jewelry. Hold hands behind back when viewing the machine’s operation. |
| DEATH | YOU | NONE | HIGH | See above. |
| MACHINE DAMAGE | MACHINE | NONE | HIGH | Make sure all areas around the moving parts of the machine are clear of obstructions. Any securing screws in the material are as low as possible. |
EMERGENCY SITUATIONS
Familiarise yourself with the SAFETY checklists below before operating the machine.
The machine is equipped with a BIG red emergency stop button. This is to be pressed if for any reason the spindle and machine needs to be stopped to negate further risks from moving parts.
IN CASE OF (OR POSSIBLE) FIRE
The following protocol is to be used in cases where there is (or is a suspected) case of fire in the collection bag of sawdust and excess material. Possible reasons for a possible fire can be from extended cutting in one area where the heat generated from the friction of the milling bit causes the excess material to smoulder. Or should the milling bit make contact with a securing screw head, sending hot sparks through the vacuum system to collection bag.
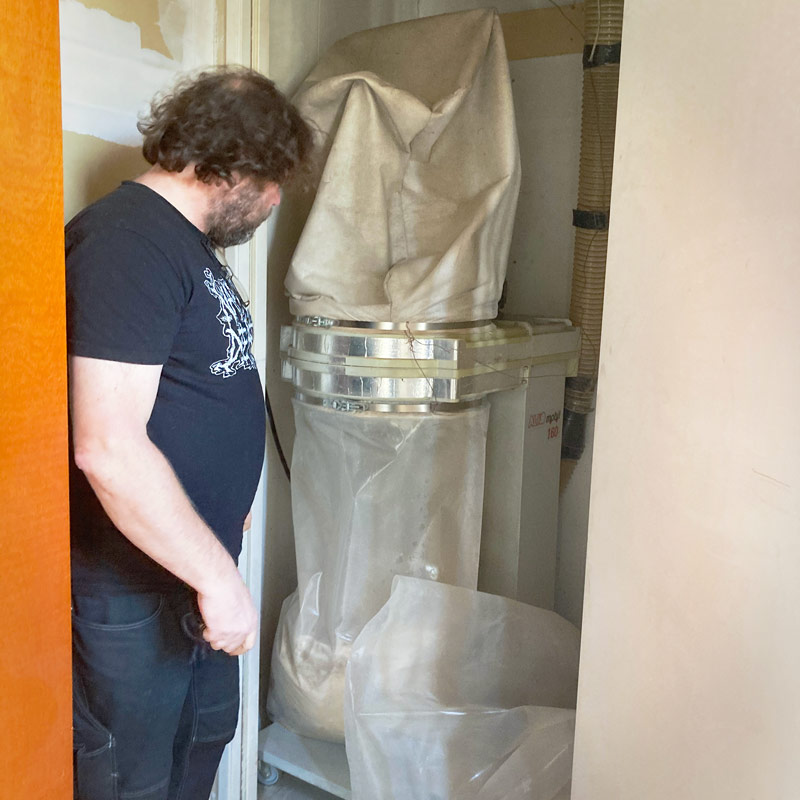 (image from Douwe)
| ACTION | WHERE | REASON |
|---|---|---|
| HIT THE EMERGENCY BUTTON. | On the machine (1). | Stops the machine and spindle moving further and causing (more or)possible damage. |
| STOP THE VACUUM SYSTEM. | On the machine (2). | Stops the system feeding the collector bag extra oxygen. |
| UNCLIP THE COLLECTOR BAG FROM THE VACUUM SYSTEM. | In the vacuum pump room. | Ready the (possibly) smouldering bag for quick removal from the premises. |
| TIGHTLY CLOSE THE NECK OF THE COLLECTOR BAG. | In the vacuum pump room. | Limit any extra oxygen from getting into the collector bag. |
| CHECK THE BAG FOR SIGNS OF FIRE | In your hands. | To dictate what your next actions should be. |
| IF THE BAG IS NOT ON FIRE, TAKE OUTSIDE FOR A CLOSER INSPECTION. | In your hands. | To be sure the fire is not slow to ignite. |
| IF THE BAG IS ON FIRE, THROW IT OUT THE NEAREST WINDOW, OR, EXIT THE BUILDING WITH THE BAG VIA THE EMERGENCY EXIT | In your hands. | The quickest way to minimise further damage from the fire. |
DO NOT USE A FIRE EXTINGUISHER!!. THIS WILL BOTH ADD OXYGEN (THROUGH AIR TURBULENCE) AND SPREAD THE FLAMING MATERIAL OVER A WIDE AREA.
SAFETY
| PERSONAL SAFETY CHECKS |
|---|
| Long hair tied back. |
| Loose clothing secured. |
| Jewelry secured. |
| Eye protection. |
| Hearing protection. |
| No silly footwear. |
| ROOM SAFETY CHECKS |
|---|
| EMERGENCY EXITS ARE UNLOCKED. |
| Window is unlocked. |
| Routes to the EMERGENCY EXITS are clear of obstacles. |
| Door to the Vacuum system is open. |
| MACHINE SAFETY CHECKS |
|---|
| Areas around the machine are clear of obstacles. |
| The routes of the moving parts of the machine take are clear of obstacles. |
| Nothing external to the machine is touching it. |
| The spindle and mill bit are safely attached to the machine. |
| The working bed is clear of any loose objects e.g. screws or tools. |
| Notify the supervisor you are about to start the machining job. |
| Follow the operating protocol for turning on the machine and its systems. |
Limitations (2D)
| SPEC | VALUE |
|---|---|
| MATERIAL | MDF, Plywood, High density foam, Hard Wax etc |
| MATERIAL THICKNESS | Dependent on length of milling bit. |
| MAX Width | 1220 mm |
| MAX Length | 2500 mm |
| MAX dia mill bit | ? mm |
| MIN dia mill bit | ? mm |
Guide / Workflow
-
Design 2D sketches in Fusion360. Export as a .DWG file.
-
Clean up in Adobe Illustrator. Export as a .EPS (version CS2) file.
-
(WINDOWS 7) Import into vCurve Pro (Shopbot edition).
- Make tool paths.
- Export the Drill holes tool path separately into a Shopbot file.
- Export the other tool paths together into Shopbot file(s).
-
Import drill holes tool path file into the Shopbot and machine.
-
Screw your material to the work bed.
-
Import other tool path file(s) into the Shopbot and machine.
Operating instructions
PREPARE THE WORK BED FOR RECEIVING THE MATERIAL
Clean and check the work bed surface for raised points (from removal of previous screws), and loose excess material left over from the last job. Use sandpaper or other tools to make the work bed as flat as possible and limit the chance of raising the material.
Place material onto the work bed and check its positioning.
MACHINE ACTIVATION PROTOCOL
ALL steps below are needed to be followed before you start the machining job. Step [2] is not necessarily needed to setup the machine before milling. BUT step [4] should ONLY be activated when the machine setup is finished, the tool path file is imported and has been calculated, ready to [START] the job.
 (image from Douwe)
| ACTION | WHERE |
|---|---|
| Activate the Mains Electricity to the vacuum system and machine. | [1] At back of room, next to the vacuum system room. |
| Turn on the vacuum system on the machine. | [2] Square red button switch, next to the Emergency Stop button on the front of the machine. |
| Turn on the Shopbot machine. | [3] Twist the large red dial to the ON position. Positioned on the side of the machine. |
| Turn on the Spindle and wait till it spins up to cutting speed. | [4] Positioned next to the machine switch, place the key into the key lock switch and turn. |
SHOPBOT SOFTWARE & MACHINE
The Shopbot software will try and communicate automatically with the machine once the software is open. If there is an error, it is highly likely that the Shopbot machine is turned off. Turn it on and restart the software.
The “K” keyboard shortcut will open a small window in the program. This will allow you to use the number pad of the computer keyboard to directly control the movements of the Shopbot.
| SHORTCUT | ACTION |
|---|---|
| K | Open virtual keypad. |
| Arrow keys | Move Shopbot X and Y axis |
| Pg UP | Z axis UP |
| Pg DN | Z Axis DOWN |
-
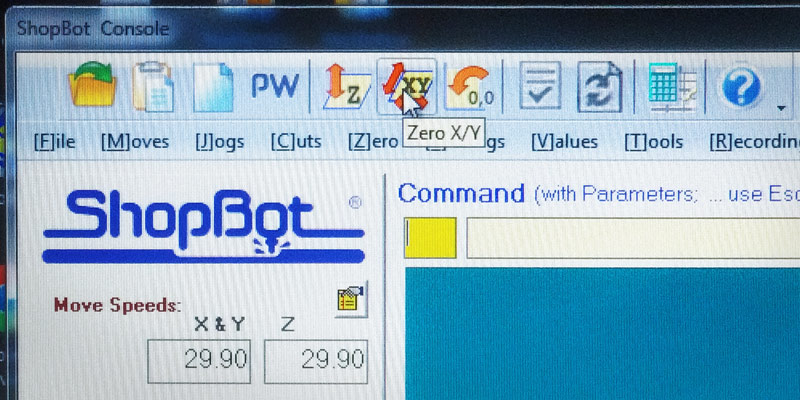
‘Global’ ZERO X + Y Axis
 (image from Erwin)
Making sure that the Spindle wont hit anything on the bed, press the ‘X Y Zero’ button in the software. This will bring the spindle home and sync the ‘X + Y’ Zero-origin of the software and machine.
-
Attach Milling bit
If needed, adjust the height of the vacuum skirt to allow easy access to the spindle. There is a securing wing nut behind the skirt for this.
Using the special spanners, insert the milling bit and colette into the spindle (at least 4 mm greater than the job needs) and tighten securely. Bare in mind you will have to be able to undo it afterwards.
-
‘Local’ ZERO X + Y Axis
Using the keyboard shortcut move the spindle to the X, Y origin of the material. Making sure that the mill bit is at least 1/2 diameter of the mill bit within the X and Y axes. (TIP - take a picture of the co-ordinates incase the job is stopped and needs to be restarted at the same position.)
Press MENU > ZERO > ZERO [Z] X+Y to set the local origin of the material on the work bed.
-
DRY RUN (OPTIONAL)
If you wish to do a dry run of the tool path file, add an extra layer of material and follow the Zero Z axis procedure. This will set the Z axis above the level of the working material. You will NOT need to activate the spindle for this procedure. Remove the extra material after this procedure, and if happy with the results of the dry run, re-Zero the Z axis again to that of the working material.
-
Zero Z Axis (for material + drill holes)
Using the grounding tool (flat metal strip with a grounding cable attached to the spindle), touch the mill bit with the end and check to see if a light flashes on the Virtual keypad window. This indicates there is an good electrical connection, ready for the Z zeroing procedure.
Place the grounding tool further inside the material’s boundary and move the mill bit to match, so that it will touch when the Z axis is moved down.
When ready press the [Z Zero] button. The Shopbot will lower the Z axis until it touches the grounding tool. The virtual keypad window will indicate a Z axis value equivalent to the thickness of the grounding tool. The Z axis is now set.
Import the drill holes tool path and ready the file to start the job. Check you have followed ALL the safety checks above, and the Machine Activation Protocol, before you press [START].
-
Fix material
Once the mill bit has finished milling the drill holes and returned to the material’s origin, turn the key to the off position (and remove it from the key lock switch). Wait for the spindle to run down.
Attach the material to the work bed (to the sacrificial layer) with ‘Woodies’ screws. Taking care to firmly press on the material to ensure it doesn’t lift from the sacrificial layer as you fix the screws. The screw heads should be as close to the level of the material as possible.
-
DRY RUN (OPTIONAL)
If you wish to do a dry run of the tool path file, add an extra layer of material and follow the Zero Z axis procedure. This will set the Z axis above the level of the working material. You will NOT need to activate the spindle for this procedure. Remove the extra material after this procedure, and if happy with the results of the dry run, re-Zero the Z axis again to that of the working material.
-
Re-Zero the new Z Axis level
Now the material has been secured to the table, its Z axis value could have changed. You will need to go through the procedure of Zeroing the Z axis again.
Using the grounding tool (flat metal strip with a grounding cable attached to the spindle), touch the mill bit with the end and check to see if a light flashes on the Virtual keypad window. This indicates there is an good electrical connection, ready for the Z zeroing procedure.
Place the grounding tool further inside the material’s boundary and move the mill bit to match, so that it will touch when the Z axis is moved down.
When ready press the [Z Zero] button. The Shopbot will lower the Z axis until it touches the grounding tool. The virtual keypad window will indicate a Z axis value equivalent to the thickness of the grounding tool. The Z axis is now set.
Import the other tool paths and ready the file to start the job. Check you have followed ALL the safety checks above, and the Machine Activation Protocol, before you press [START].
When the milling job finishes, reverse the Operating protocol to turn off the machine and its systems.
Post Milling
Remove the fixing screws from the bed and then remove your work pieces from the excess material. Dispose of the excess material (saving any unused larger pieces for other jobs), and vacuum up any material not already cleared from the bed.
Your work pieces may need some finishing work such as removal of tabs and cleaning up of the dog bones for a clean press fit joint.
Most used settings
| SPEC | VALUE |
|---|---|
| Spindle speed | 18,000 RPM |
| Tabs | diameter of the mill bit. |
| Offset | -0.3mm |
Group Assignment
 (image from Erwin)
- Test runout, alignment, speeds, feeds, and tool paths for your machine.
- Document your work (in a group or individually).
What we did
The group was split into 2 students each due to COVID rules and the difficulty of crowding around a computer in the small workshop. My partner and me we assigned the task of setting up the Shopbot ready to accept the file made by the 1st pair in vCurve.
Working through 2 sets of hastily scribbled notes, we worked through the setup of the machine. Zeroing the Global X-Y axis, the X-Y axis of the material and the Z Axis of the machine.
We drilled and fixed the material to the sacrificial board. To double check the milling job would work we did a ‘dry run’, zeroing the Z axis of the mill bit with an extra piece of material on top of the final material.
Once the machine was happy with the new Z axis, we removed the extra piece of material, and the mill bit was going to stay in mid-air when it ran.
It finished without any issues, and we re-Zero’d the Z axis to meet the material we wished to mill. Going through the procedure to check the Z axis with the grounded tool.
We ran the proper job and it worked fine, and the pieces fitted together nicely.
Mistakes & Issues
After zeroing the Z axis of the machine on a part of our material that wasn’t at X+Y 0. We tried to find a way to return it to the 0 ‘local X-Y axis’ and start the milling job from there. We ended up returning the mill head to the Global X-Y 0 instead. We didn’t manage to find out if there is a button, but the job doesn’t need to be started from the Materials X-Y 0 axis. Once set, it doesn’t forget it if you need to 0 the Z Axis.
Individual Assignment
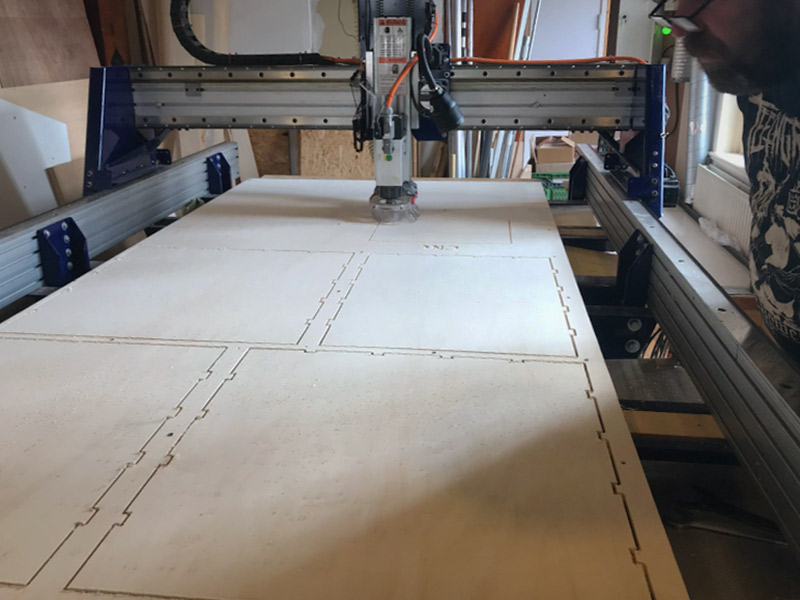
- Make (design+mill+assemble) something big.
What I did
I had BIG plans, to design some piece of art-deco type furniture with flowing curves, with joints that required no need for gluing together. I’m interested in the concept of joints that do not need glue or mechanical fixation, like those used in Japanese joinery. And also I like the idea that you could deliver a standard sized, pre-milled board of material that had all the parts to make a piece of furniture. Much like the way ‘Airfix’ type plastic models are delivered. Except you could have for example a complete set of office furniture in 2-3 sheets of standard material. It would save on delivery and environmental costs. Taking this a step further, it would be possible to just sell the designs and have a standard size sheet of material milled locally.
Alas, due to a lack of space to do something with a ‘Big’ creative design, I decided to go with ‘boring yet practical’. Designing an enclosure for my new little milling machine, on top of which I can place my 3D printer and save some space.
The front side would have a piano hinge attached and open downwards, with chains to help support it when open, clips to keep it closed when in use. It would have an acrylic plate embedded in the front as a window to see inside, and a light fitting inside to illuminate the machine.
Fusion
I had tried to prepare as much of the design as I could before the teaching lesson, but there would be design rules we would need to use based on what we learnt. This left me very little time after the teaching day to complete the design. I had no extra time to experiment with addons like the rest of my fellow students and would have to do them in vCurve during the workshop time.
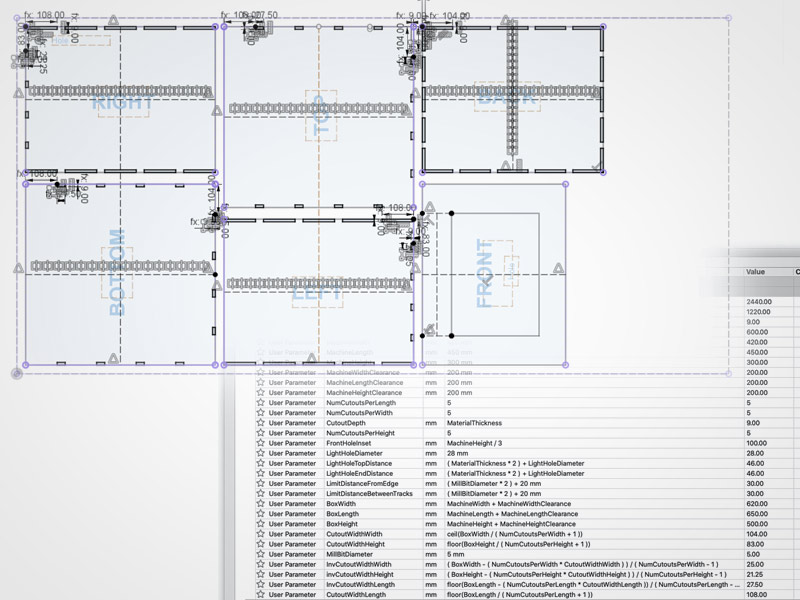
Creating 2D sketches, and not using any 3D techniques, I made all the measurements for my design into a list of parameters. This allowed me to change them based on new information I learnt on the day. As I tried to make relationships between the various measurements, it became more like programming than visually designing. I could easily change the amount of slots and tabs I needed on each side and still have them automatically fit. I used the ‘Ceil’ and ‘Floor’ functions to round up/down the measurements to the nearest .025 mm.
Once I had set up the list of parameters, I used the ‘pattern’ and ‘mirror’ features to replicate parts and save time. I created a different sketch for the different ‘tool paths’ I would be making in vCurve, much like working with layers in Photoshop.
In parts, the design was parametric, but combining parts of the sketch and trimming away unwanted parts broke this. With time i’m sure I could get the lines black again, but I didn’t have time for that.
I finally exported the basic design as a .DWG to be imported into Illustrator for clean up.
Illustrator
I checked the file imported and that the different sketches I made in Fusion were assigned to different layers automatically. I added the ‘CNC’ text and adjusted all the parameters as it was easier to do this in Illustrator than in Fusion. When happy, I converted the type to ‘Outlines’, so the machine would mill the insides of the text shapes.
All lines looked like they were present and correct so I exported as a .EPS (CS2 version)., to make sure the old PC could understand the file.
Windoze 7 Workshop PC
First of all I tried to transfer my incomplete design file into the workshop machine. There was a problem with this old windows machine recognising my USB stick even after re-formatting it in a Windows format.
With another media card I opened up my file in vCurve. When placing the design into area defined by the ‘Job settings’, the design was a tenth of what it should be. Checking the Illustrator file, I noticed I had left out a 0 at the end of my measurements (244mm instead of 2440 mm). I fixed this and re-imported it into vCurve.
Double checking the measurements for the job settings with the our material, I found out that they were different from what everyone had been originally lead to expected. It was longer at 2500mm.
vCurve Pro (Shopbot Edition)
Using the ‘Scaling’ and ‘move’ buttons I positioned my design inside the job area.

The ‘Tool paths’ area was positioned on the right hand side of the screen. And starting from right to left, I started to create the different tool paths needed for the different features in the design.
- Drill hole Tool path
 Images from Nadieh
I packed my design quite tightly into the material sheet. I placed 5mm diameter vector circles in between the outer edge and what would be waste material. As the structural rigidity of the material sheet would weaken as the pieces are cut out, this can mean that the left over material can vibrate and ruin the rest of the cutting. So in areas that had enough room between the cutting paths i placed screw points at the centre point where the different pieces came together.
The purpose of this first layer is to be able to fix the material to the work bed and secure it as it works through the other toolpaths and potentially move the material.
I packed my design quite tightly into the material sheet. I placed 5mm diameter vector circles in between the outer edge and what would be waste material. As the structural rigidity of the material sheet would weaken as the pieces are cut out, this can mean that the left over material can vibrate and ruin the rest of the cutting. So in areas that had enough room between the cutting paths i placed screw points at the centre point where the different pieces came together.
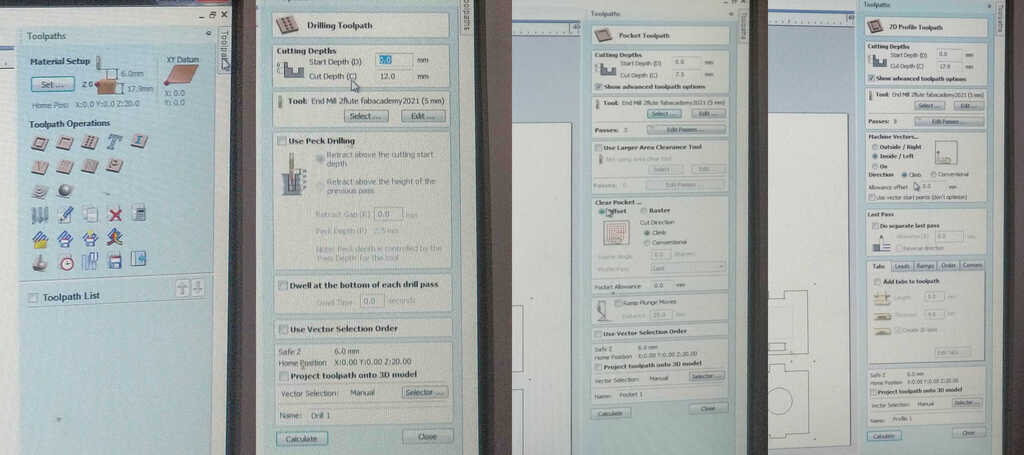
Having selected all the drill holes from the design, click on the Toolpath tab and next click on the Create Drilling Toolpaths icon.
The only settings needed are :
    - Start depth = 0
    - Cut depth = 9.15 mm (basically the material thickness)
    - Tool Setting = Endmill Fab 2021 preset
Select the vectors and [CALCULATE].
- Inlay toolPath
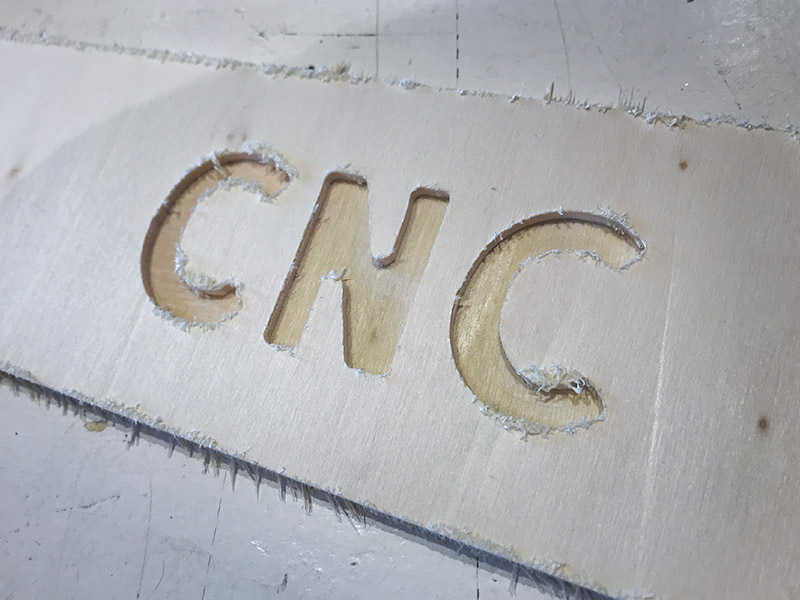
This tool path would mill an inlay of ‘CNC’ into the front of my design. I added this to show a bit of variety in my design, instead of just a boring perimeter lines. With hindsight, I realaise I shouldn’t have been thinking that I was looking at the design from front finished face. Instead, if I had been thinking I was looking from the back of the ‘Front’ side, I would have realised I could’ve created an inlay around the edge of the ‘front window’ (like a with using a router) and insert a piece of clear acrylic.
- 'Female' inlay
  - Pocket
    - Start depth = 0
    - Cut depth = 4mm (basically 1/2 the material thickness)
    - Tool Setting = Endmill Fab 2021 preset
      - 5mm
      - 2.5 pass depth
      - 3mm stepover
      - 18k RPM spindle speed.
    - Clear Pocket
      - Offset
      - Climb
Select the vectors (‘CNC’) and [CALCULATE].
- Pocket Tool path #1
 Images from Erwin
This was the same tool path button as before, however it did give the option to create a hole instead of just a pocket. I started to make a tool path for the Front ‘hole’ and the 9mm diameter hole for the light fitting. The settings were the same as before apart from the ‘cut depth’ needing to be the thickness of the material. This was definitely the wrong tool to use for such a big hole as that in the front, as it would mill all the unwanted material away instead of cutting it out like in a Profile toolpath. So I created a new one (profile toolpath, see below) for the Front hole (i forgot to include the hole for the lighting fitting in this new layer - in the end changing it would take more time than it would mill it such a small area away so I left it).
  Pocket settings:
  - 'Female' inlay
    - Pocket
      - Start depth = 0
      - Cut depth = 4mm (basically 1/2 the material thickness)
      - Tool Setting = Endmill Fab 2021 preset
        - 5mm
        - 2.5 pass depth
        - 3mm stepover
        - 18k RPM spindle speed.
      - Clear Pocket
        - Offset
        - Climb
- Whilst making this extra profile path
One line of the hole in the ‘Front’ wasn’t quite straight and I had to find away to fix it in vCurve instead of wasting time going back and forth between Illustrator.
EDIT OBJECTS > MOVE NODE button allowed me to move the vector points into line. I pressed [CALCULATE] and got a pleasant rely from the computer “unsuitable… ignored!'. I had to work out that the program was allergic to open vectors, so that meant the ‘hole’ wasn’t a closed vector. So I searched the interface to find an option for me to stick the lines together.
EDIT OJBECTS > JOIN OPEN VECTORS > select the vectors to join.
[CALCULATE] = Success!!
See below for Profile Toolpath settings.
- Profile Tool path
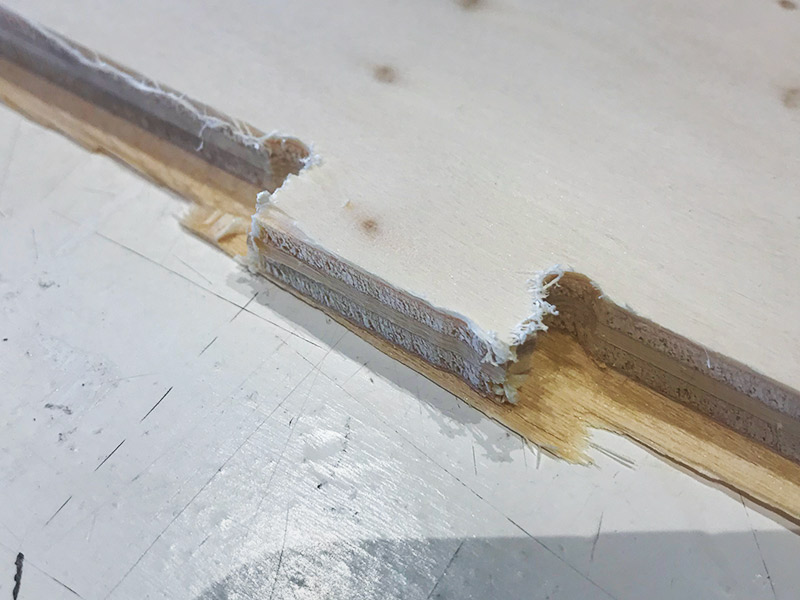
This tool path was to cut out the boundary lines of the large pieces. Taking the most of the same settings as the pocket tool path, the only differences needed:
    - Cut depth = 9.15 mm
    - Outside / Right  (cut from which side)
    - Allowance Offset = -0.3mm (give some clearance between the joints)
- Tabs:
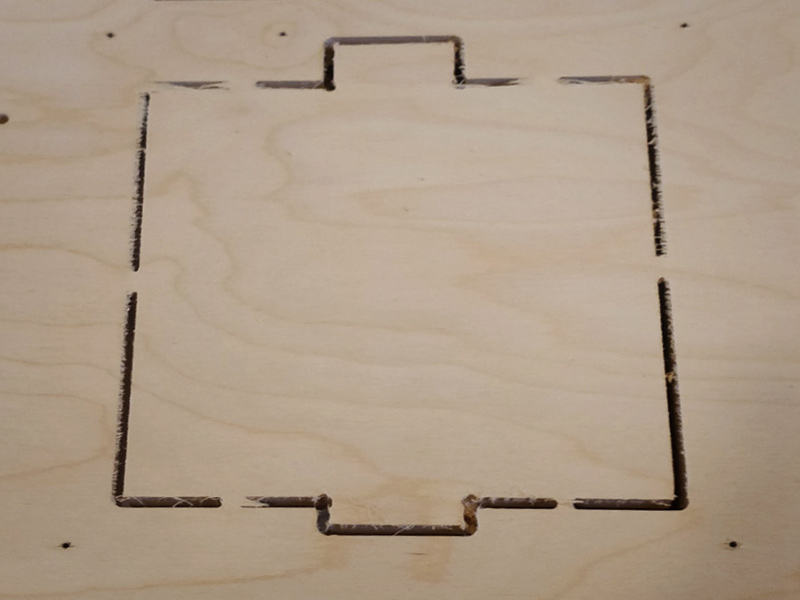
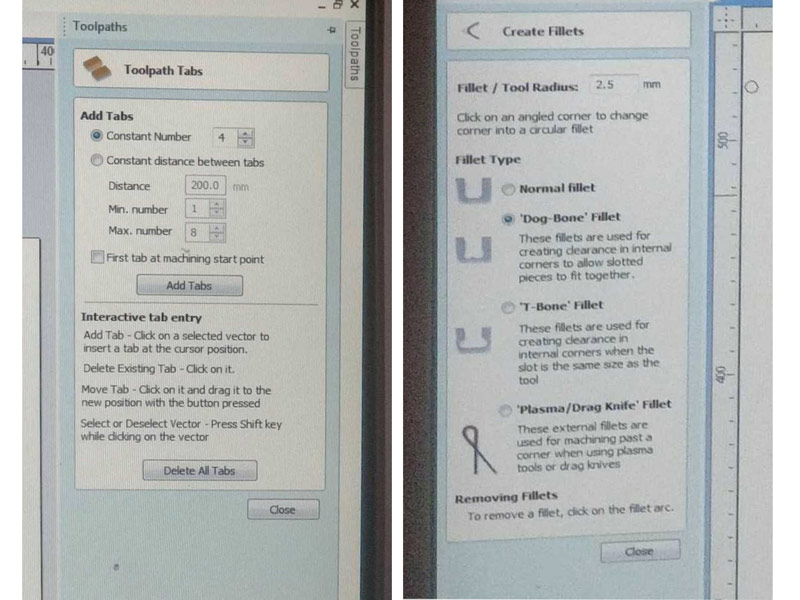 Image from Erwin
Tabs are small connections between the desired cut piece and the material its being cut out from. The help to secure the piece from vibrating loose when it is cut out and causing damage to itself or the machine. It helps to keep some integral structure to the overall material and minimises the chance of any factors influencing the quality of the cutting out of other pieces. Tabs are an extra option in the settings when creating the Profile toolpath.
  - Add Tabs

    - 3mm x 3mm (should be diameter of mill bit)
    - 3D
- Dogbones:
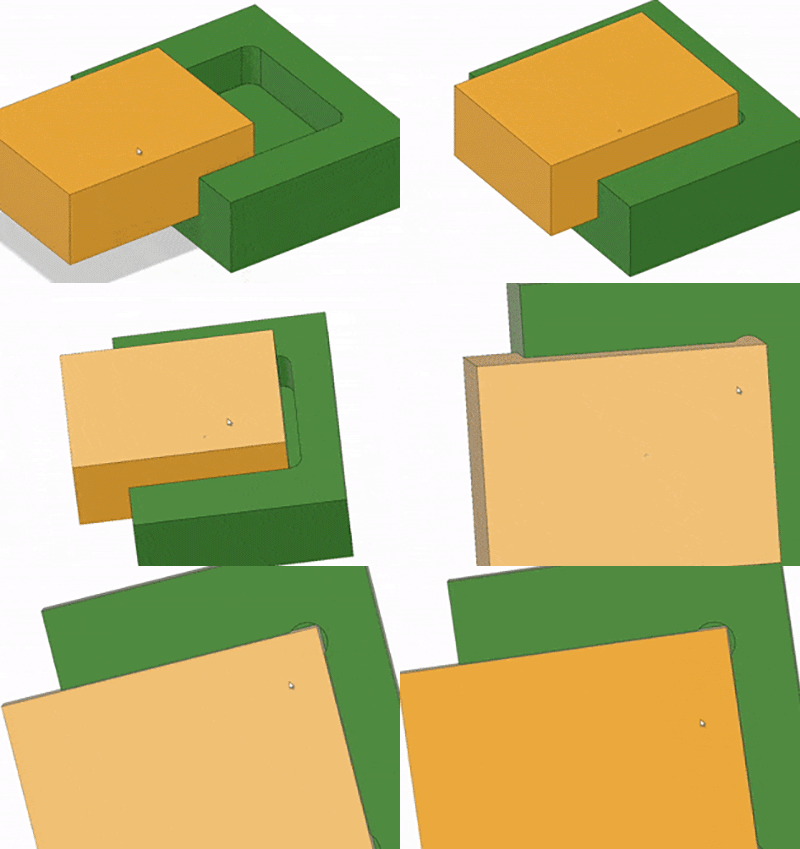
‘Dog bones’ is the term used for an extra fillet cut at the inside corners of press fit joints. Round mill bits are unable to cut 90' degree inside corners. So a little extra material is needed to be removed to allow the opposing joint piece to fit well.
Since i hadn’t added these already to the design in Fusion, I used the [FILLET] button on each corner of the design that required it.
Once the additions to the tool path were finished I pressed [CALCULATE].
- EXPORT the drill path separately
The work in vCurve was exported as 2 files, one with just the drill holes, and one with all the other tool paths. These are saved as .SBP Shopbot file formats.
ShopBot
I followed the Machine Operation Protocol, but leaving the spindle turned off until the job was ready to start. I raised the skirt of the vacuum on the spindle and checked that the mill bit was secure (it was already in the machine). I replaced the skirt.
I then followed the operating instructions to set up the machine (see above). I imported the drill holes file and followed the safety checks. Once satisfied everything was correct I started the job.
After Fixing the material to the work bed, I continued with the operating instructions ready for the next tool path file. Again I followed the safety checks. Once satisfied everything was correct I started the job.
Once the job finished, I followed the Machine Operation Protocol in reverse to turn everything off.
Post Milling Work
I removed the fixing screws of the base material and broke the cut pieces out. I broke the excess material into manageable pieces and disposed of them, leaving the large pieces in the scrap pile to be used in other projects.
I vacuumed the work bed of any dust and chips that hadn’t been picked up by the machine’s system.
Using sandpaper, a file and a Stanley knife I cleaned up the edges of the cut pieces of excess material that hadn’t been cut entirely through. Removing the remnants of the tabs and cleaning the dog bone areas so they would fit well.
What I should’ve done
The biggest things I should’ve done was had more time to better design what I was going to make. Time to double check measurements and check I included all required features such as a hole for the power cable to reach the CNC machine inside.
Most of all include as much of the needed design elements as needed such as drill holes and dog bones, before you get into the workshop.
I should’ve got more familiar with the vCurve and Shopbot software before started work in the workshop. Less time wouldn’t have therefore been wasted (and reduced the amount of stress) fixing problems.
What I would change if I did it again
Visualise the design in 3D, and create a scale model of the design before taking it to the Shopbot, Perhaps on the laser cutter first to check the proportions of the design.
The proportions of the entire box is bigger than needed. Due to the thickness of the material, the top piece of the box is beginning to flex when my 3D printer is placed on top, as I had envisioned it. This could be solved by reducing the amount of offset clearance from the height of the milling machine I had added. This offset is too much as it stands anyway at the moment. It would also mean I wouldn’t need a step to reach the 3D printer would mean I wouldn’t need a step to on top.
I would add an extra hole to allow the power cable for the CNC machine out of the box, as I had forgotten to include this.
I would probably change the front door attachment system. Having the front “door” open down towards you on a piano hinge, secured by chains on the sides and latch clips on top, isn’t the most practical. Having to lean over the chain and the front ‘door” to access the machine, may look more sophisticated, but increases the chance of damage due to putting weight on the opened ‘door’. A completely separate ‘door’ that you would detach and then re-attach with clips, would mean more effort to open and close the ‘door’, but benefit from easier access to the CNC machine inside.
Creating a ‘Inlay’ tool path around the edge of the hole in the front would allow me to neatly fit a piece of acrylic as a window.
Mistakes & Issues
Material: As the first in the queue for using the Shopbot, I was the one to discover that the material ordered for the project came at a non-standard size of 2500mm by 1220mm, instead of the 2440 mm by 1220 we all expected. This had the unexpected consequence of the material being longer than the sacrificial bed, and a couple of drill holes in the design being rendered useless.
Measuring the thickness of the material in several places to use in the settings of VCurve and Shopbot programs, there was a large variation from the 9mm value that we were given. Checking the thickness at the start I averaged a value at 9.15 mm, which I thought would cut through most of the lines completely, and not cut any material from the sacrificial layer. This was the result I found at the end, however upon re-checking the thickness in other places I couldn’t reach at the start, the measurements ranged from 9.1 to 9.4mm.
Fusion: The design I had made was rushed!. With a fraction of the time to complete a design as my fellow students, there was not time for reflection or checking details. I also didn’t have the luxury of having time to experiment with plugins would’ve saved me some time in the workshop.
Illustrator: Here I accidentally got the dimensions wrong when creating the file to import the Fusion .DWG into. I created a file of 244mm x 122mm - missing the 0 at the end of each. I only realised this when I exported this illustrator file as an .EPS (CS2 version), and opened it in VCurve, where it was 10 times too small.
Fixing the design size properties in Illustrator, I scaled up the .EPS export from Fusion. Having included a sketch of the material’s boundary in the design, it made it easy to scale the small design to the edges of the new file boundary.
Windoze 7 PC: Let me be transparent - Windows was bad back when Windows 7 was new, and it still is. It didn’t recognise my specially prepared USB stick, even when I re-formatted into MS-Dos FAT. I had to run around looking for another form of removable media and an adapter that did work.
VCurvePro: Learning the software as you go with a time pressure weighing down heavy on you isn’t the best approach to success. My experience of the software was watching someone else use it, mixed up with all the other instruction on the teaching day. My part of the group assignment didn’t involve using vCurve. I only had time at the end of the instruction day to do a workflow test; making sure that I knew how I could take a file beginning in Fusion, through Illustrator and be sure that it would be accepted in vCurve - All in an old Windoze 7 operating system (I’m a Mac person).

Anything problems I found on the day like vCurve refusing to calculate because of open vectors or lines sticking out I had to search the program for buttons and fixes, as these were beyond the scope of the teaching we had. I fixed any wonky lines or the parts sticking out where they shouldn’t by EDIT OBJECTS > MOVE NODE.
‘Unsuitable’ and ‘Ignored’ vectors I fixed by selecting all the separate lines that were needed to create an closed shape by EDIT OBJECTS > JOIN OPEN VECTORS.
Adding dog bones with the Fillet tool in vCurve meant a tedious job of scaling up each ‘Tab’ on the design with the mouse wheel and clicking on almost every corner in the design. This took forever with all the scrolling and scaling up and down between areas of the design, and I still managed to miss one corner.
One thing that couldn’t be done in Fusion was the addition of ‘Tabs’ to the design. This was initially simple to do in vCurve. I chose to go with the default settings of 3mm x 3mm and 3D. This was wrong as they were too small compared to the diameter of the milling bit.
For speed I allowed the program to automatically generate the tabs on the design. This wasn’t the best option as it turned out, as the program chose mostly to add the tabs in the ‘corners’ of ‘dog bones’, which were difficult to clean up.
Again when making or adjusting vectors on a [Tool Path] you need to select all of them and [Calculate] them to be included. You need to be careful you don’t accidentally de-select any vectors while you are scaling up and moving around the design with the mouse.
Even though the [Pocket Tool Path] has the option to make a Hole, this is not the correct Tool Path to do this function. I accidentally forgot to change one ‘Hole’, but due to the time pressure and the small size of the hole it was quicker to leave it in, even though it would take a little longer than cutting a perimeter.
Where a few fixation points arranged at the corners and edges of the material would be enough to hold it in the laser cutter, the scale and forces used in the Shopbot meant this wasn’t enough. Adding just these would only fix the edges down and probably bow the material in the middle. My first thought was to try and keep the fixation points out of the centre of the material to mitigate any chance of the mill hitting any screws. But as the pieces are cut from the material the structural strength of the overall piece changes, meaning that cut parts will now vibrate and could affect the quality of cutting other new parts. So strategically placing fixation points in areas that will be waste material will help to keep things as flat as possible.
I started to be very careful with placing the drill points half way between the edges of the material and the cutting lines, this was important job to do and took a lot of time and effort as it had stuffed my design to fit on the large board. Due to time pressure, I gave up manually adding the coordinates of them and instead just left them by eye on the design. This wasn’t so accurate as one of the drill holes was very close to the edge.
Fixing the screws to the material I was conscious of fixing the material to the sacrificial board with no gap between the two. As well as getting the screws to sit flat so they don’t present an obstruction for the mill to hit whilst travelling across the material.
I used the electric screw driver on the settings already set from the day before (max torque). This was fine for the first few screws, however a couple started to shear and break off leaving part stuck deep in the sacrificial board. I tried other lower settings, but this wasn’t able to go deep enough. So I changed back to the higher setting and tried to ease the screw into the board in short bursts. I found out later that the screws don’t need to be flush with the material.
Shopbot:
Time was flying by and once I had the material fixed to the bed of the machine, I raced to get the next tool path file into the Shopbot and get it running. After doing all the safety checks before running the machine, Henk had to intervene as I forgot to Z level the mill after fixing the material to the bed. Rushing too much!
With most of the stress now gone from getting the job going, I still had a small heart attack each time the mill travelled near a screw. I even had my hand hover over the Big red emergency stop button each time.
The Shopbot returned to home to finish 2 minutes over time. So, I obviously ‘rushed’ to remove my cut pieces and clean up. As I found that a lot of the lines I milled didn’t go through all the way on some pieces they needed some ‘quick’ persuading to release them from the waste material.
I remove the screws that I could and pull off the waste material. A well placed stamp of the foot broke the waste into manageable disposable pieces.
Conscious of eating into another’s workshop time, I rushed to vacuum the bed and surrounding areas to leave a clean working area for the next student.
What I had forgotten to do was dig out the buried ends of the broken screws. If the mill would go deep enough it could potentially cause an accident! Unfortunately someone else was then left had to clear up my mistake for me.
Assembly:
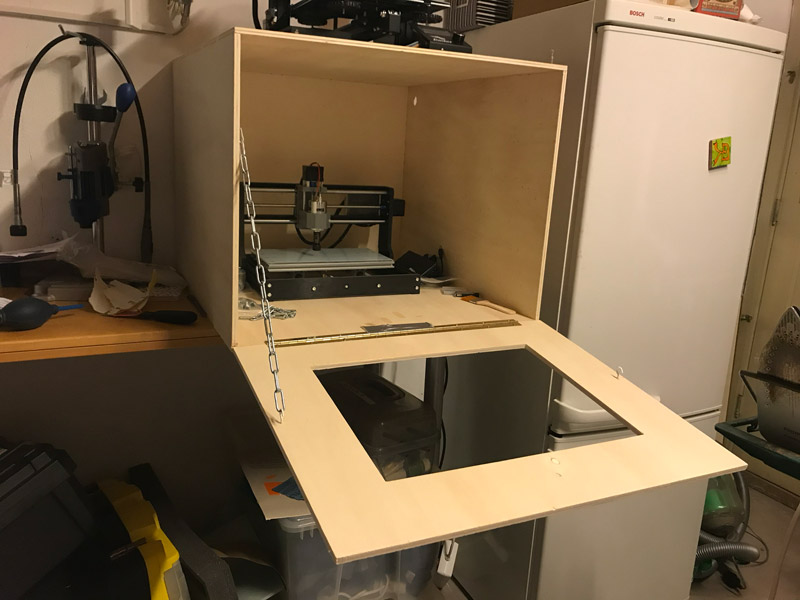
Gluing the sides, top and back together were fine. Only when I placed it on my bench to think about attaching the door on the front did I realise something was wrong in the design. It was supposed to fit flush with the edge of the bench and have no overhang, which it did have :( . In the parameters i used in the design file I had added some clearance to the dimensions to give the milling machine plenty of room. Not only was this a little over generous (100mm each side), I had also accidentally applied it to all the dimensions, meaning the box now hung over the edge of the bench. It would also meant I needed a step to reach the 3D printer, that was going to live on top of the box.
WHen placing the new milling machine inside of the box, I noticed something else. The recycled light fitting fit perfectly - plenty of room for the lightbulb and the cable went through the hole just as i had expected. But there was no hole for the power cable of the milling machine to fit through to the outside ‘doh!’.
The door to the box; As this was meant to contain the sound of the machine, the big ‘window’ cut-out in the door wasn’t going to help. I would have to laser cut some acrylic and fit it to the door to act as a window. What I realised was that i should’ve milled an ‘inlay’ around the edge of the window’s hole on the backside. This would make the a flush fitting for the acrylic and easy to fix to the wood. My visualizing of the design on the sheet of wood had all the pieces facing upwards. Since the milling is 2D, any side of the piece could be the inside or outside facing side.
Attaching the ‘door’ to the box i had the idea to have a ‘sophisticated’ draw-bridge system that would open down and be held in place by attached chains. Only 2 clips would then be needed to hold the door closed. This differed form the housing of the milling machine in the lab which had 4 clips and you had to remove the whole door each time - which was annoying if you spent lots of time trying to mill boards correctly like i had to.
I first noticed this wouldn’t work well when I tried to attach the second half of the piano hinge to the box. I was leaning over the door a lot and putting weight on it, which wouldn’t work very well once completed when trying to take out work or get to the milling machine.
The most flexible solution would be the one used by the lab. Annoying as it might be, taking the whole door off at a time would give access from any angle and no strain on any of the parts of the box.
CONCLUSION
‘We learn more from our failures, than we do from our successes.'
The success rate of projects depends on having an appropriate amount of time to plan, design, develop, make and return everything to its initial situation.
With that in mind, this project was about 75% successful. The design ended up being bigger than expected, raising some issues and requiring extra modifications needed for it to work properly. It would be a better idea to make a scaled model to test the design before creating it full size.
In the end, the time and effort needed to modify its dimensions to fit better and for it to work as intended, meant it would be time-wise and financially more efficient to start again.