Mechanical design, machine design
-
design a machine that includes mechanism+actuation+automation
- build the mechanical parts and operate it manually
- document the group project and your individual contribution
Our group
John is based in Wales and therefor we decided to do two different machines, his is in work-in-progress so isn’t quite ready to be shown.
Jonny and I are both based in Brighton so together we are going to be a making a marble run…
Making of the Marble Run
Explaing how it will work
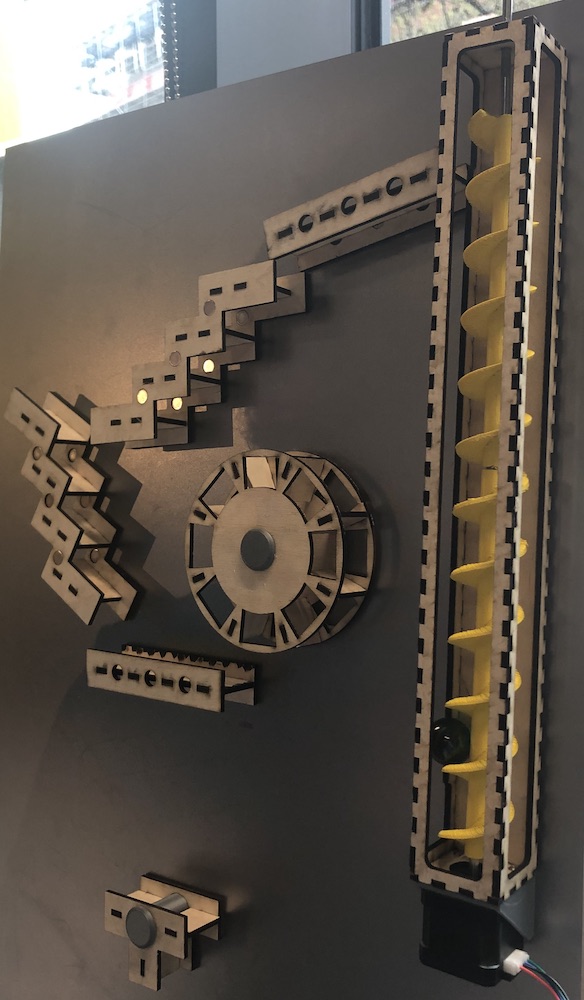
Our marble run has a screw on one side in a box so that the marble can glide up it smoothly whilst being controlled by a motor. There would then be different types of runs that the marble would move down to, to get to the bottom of the screw.
We split our time up and as Jonny had more experience in motors and how they come together with a machine we decided it was a good place to start. He would also be the one getting the archimedes screw ready and printed so that the whole piece would come together. He would also do the programming unless we had time to do it together as we went along.
Katie was getting the pieces for the marble run to work together. We had different types of mechanisms which would move, roll, and help the marble get down to the bottom of the marble run.
Beginning talks and design
We decided to make a marble run as Katie found this video (seen below) on reddit of a marble run attached to a fridge which was very interesting and fun.
We went through what would be fun to make and find out what we could actually make and who would do what?
We thought as Jonny had more knowledge about the mechanics of the machine he would be the best bet for get this sorted and I would design and make the marble run itself.
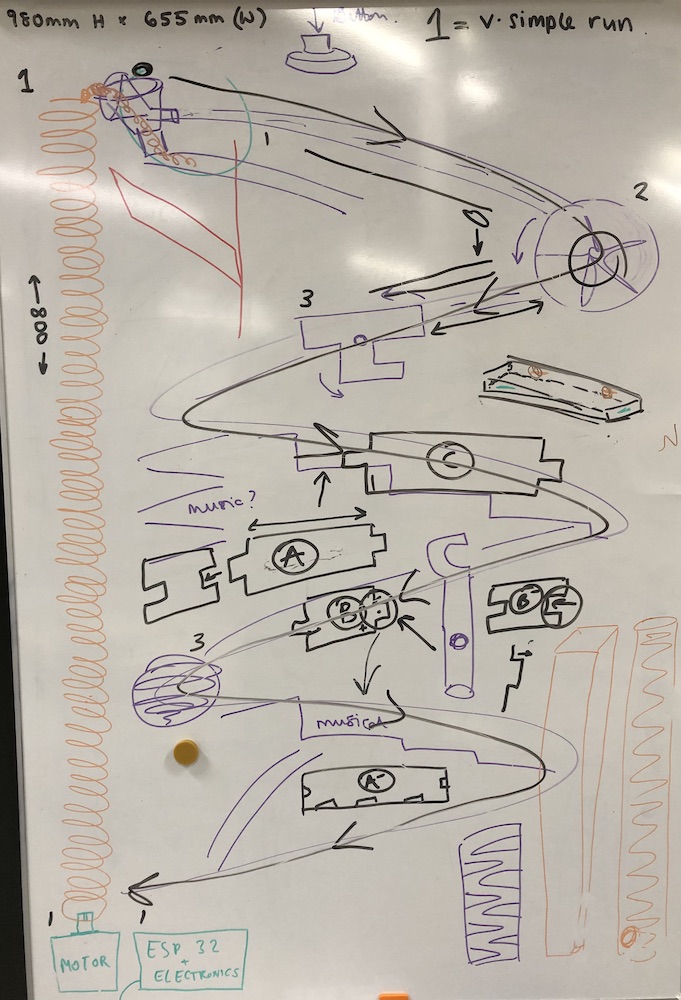
We had a white baron which found very very useful during this whole assignment as I would change drawings about and Jonny could add or subtracted ideas as we went along.
In the image you can see our initial drawing of what we thought we could make our marble run work and how it would get from the top to the bottom and back into the spiral.
Once everything had been cut and placed onto the metal board we realised that actually the marble was a little too heavy for the parts I had made, this meant that we didn’t have a large and light enough marble. Andrew then suggested that we 3d print some marbles.
Electronics
The circuit for this project is a simple one. We’ll be using a toggle switch to turn the power on and off and a potentiometer to adjust the speed of the motor. Our project will be powered by an Arduino Nano and we will use the internal pull-up resistor with the toggle switch. This pull-up resistor is useful because it ensures the input reading is always high, unless the switch is used in which case, it recieves a clean ground signal.
Code
Here is our Arduino code. I’ve chosen not to use a library to move the motor. Instead I’ve created a function which turns the step pin on and off. This will move the motor 1 step. We only want our motor to move clockwise and so this function includes a line that sets the direction pin low.
We read the value on the potentiometer (between 0 and 1023), then add 300 and use this as our motor speed. This gives a range of 300 to 1323 microseconds as our delay between motor steps.
The main loop is inside an ‘if’ statement which makes sure nothing happens unless the toggle switch is reading as high.
const int dirPin = 6;
const int stepPin = 7;
const int potPin = 5;
const int buttonPin = 4;
int motorSpeed = 500;

void setup()
{
  Serial.begin(115200);
  pinMode(stepPin, OUTPUT);
  pinMode(dirPin, OUTPUT);
}

void loop()
{
  if (buttonPin==1){
    motorSpeed = analogRead(potPin)+300;
    moveMotor(1, motorSpeed);
  }
}

void moveMotor(int numberOfSteps, motorSpeed){

  digitalWrite(dirPin, LOW);
  for(int x = 0; x < numberOfSteps; x++){
    digitalWrite(stepPin, HIGH);
    delayMicroseconds(motorSpeed);
    digitalWrite(stepPin, LOW);
    delayMicroseconds(motorSpeed);
}
}
Issues
Jonny was in charge of the spiral and the mechanics of how this would all work, but needed help on the framing as we were going to use our large laser cutter the Trotec Q500 with a bed of 1300 mm x 900 mm we could cut the casing of the spiral on this.
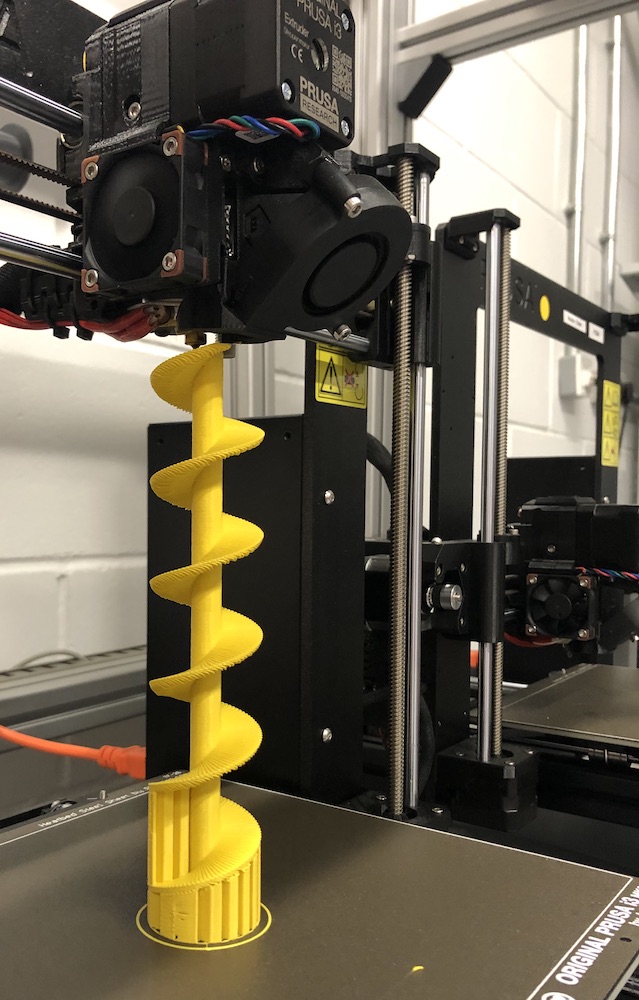
He was also printing off the spiral which was very exciting to watch as you could see it growing up and up with supports on on the bottom which was holding it to the bed very well. We also had a lot of yellow filament so made this a running theme.
Just before we went onto cutting the frame we thought it would be bet to see what needed to be altered or adjusted, Jonny would make the changes but we discussed the issues and solutions on the whiteboard as shown below.

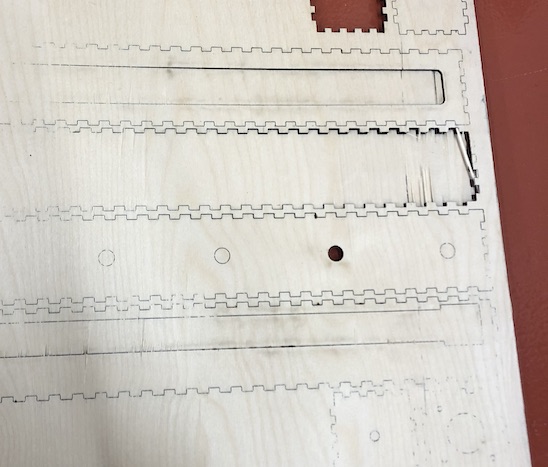
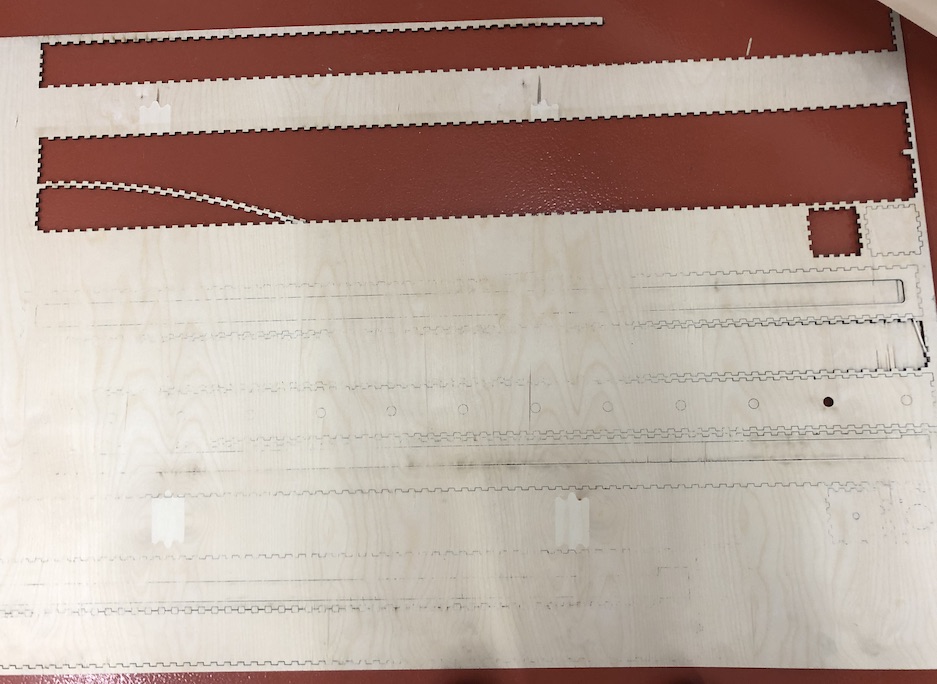
Cutting the plywood on the laser cutter was much harder than we both thought as it would cut some of it very well but other parts it barely would cut through. This was both our first time properly using it, I had been shown but hadn’t had a play around with it yet, Jonny did find the kerf and then we carried on with the making of the framing.
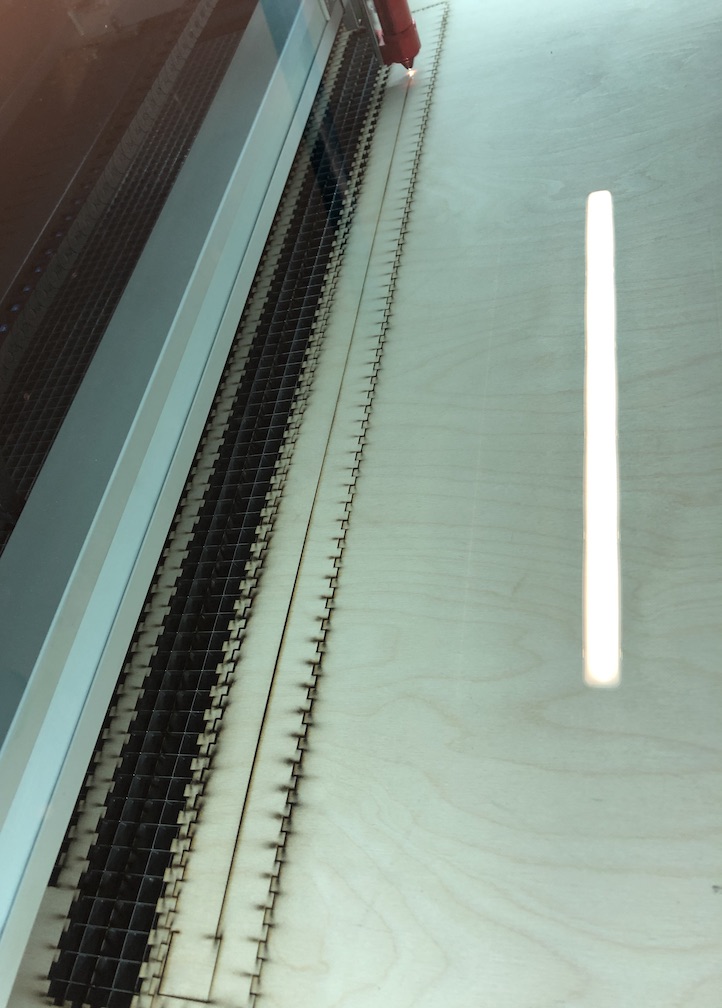
As you can see we had to force some of them when we were cutting them at the end which was not what we were looking for.
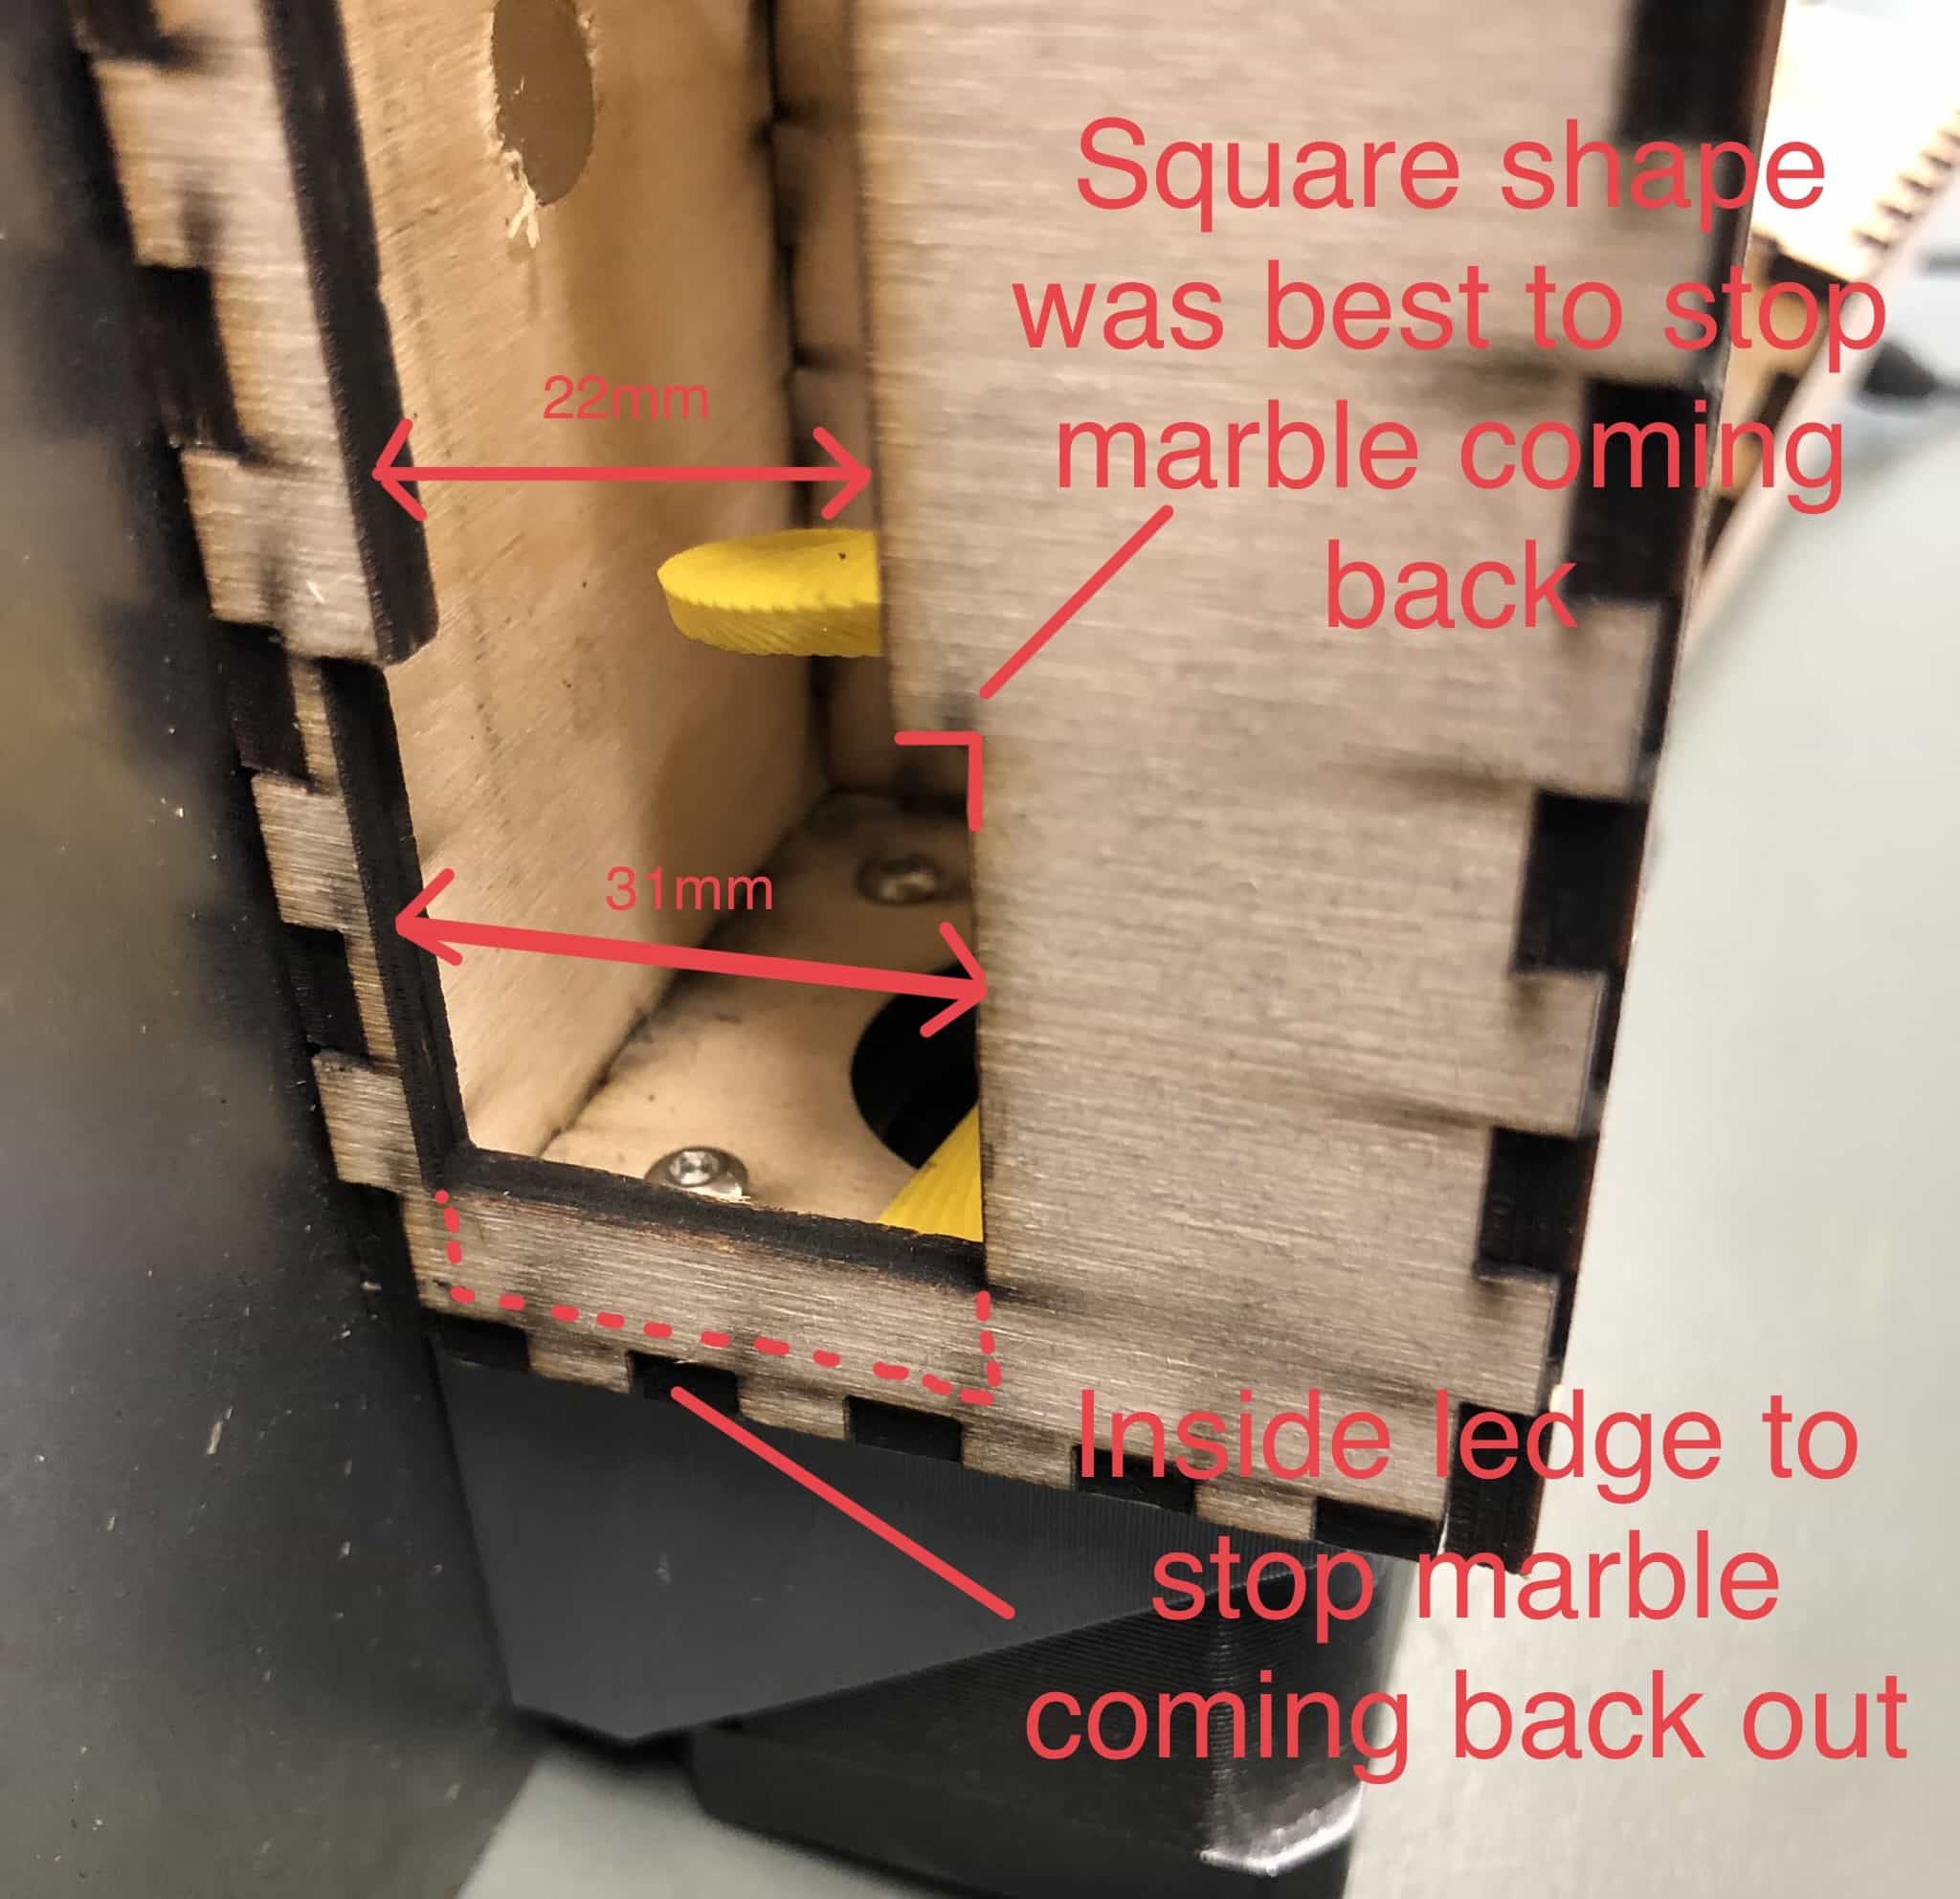
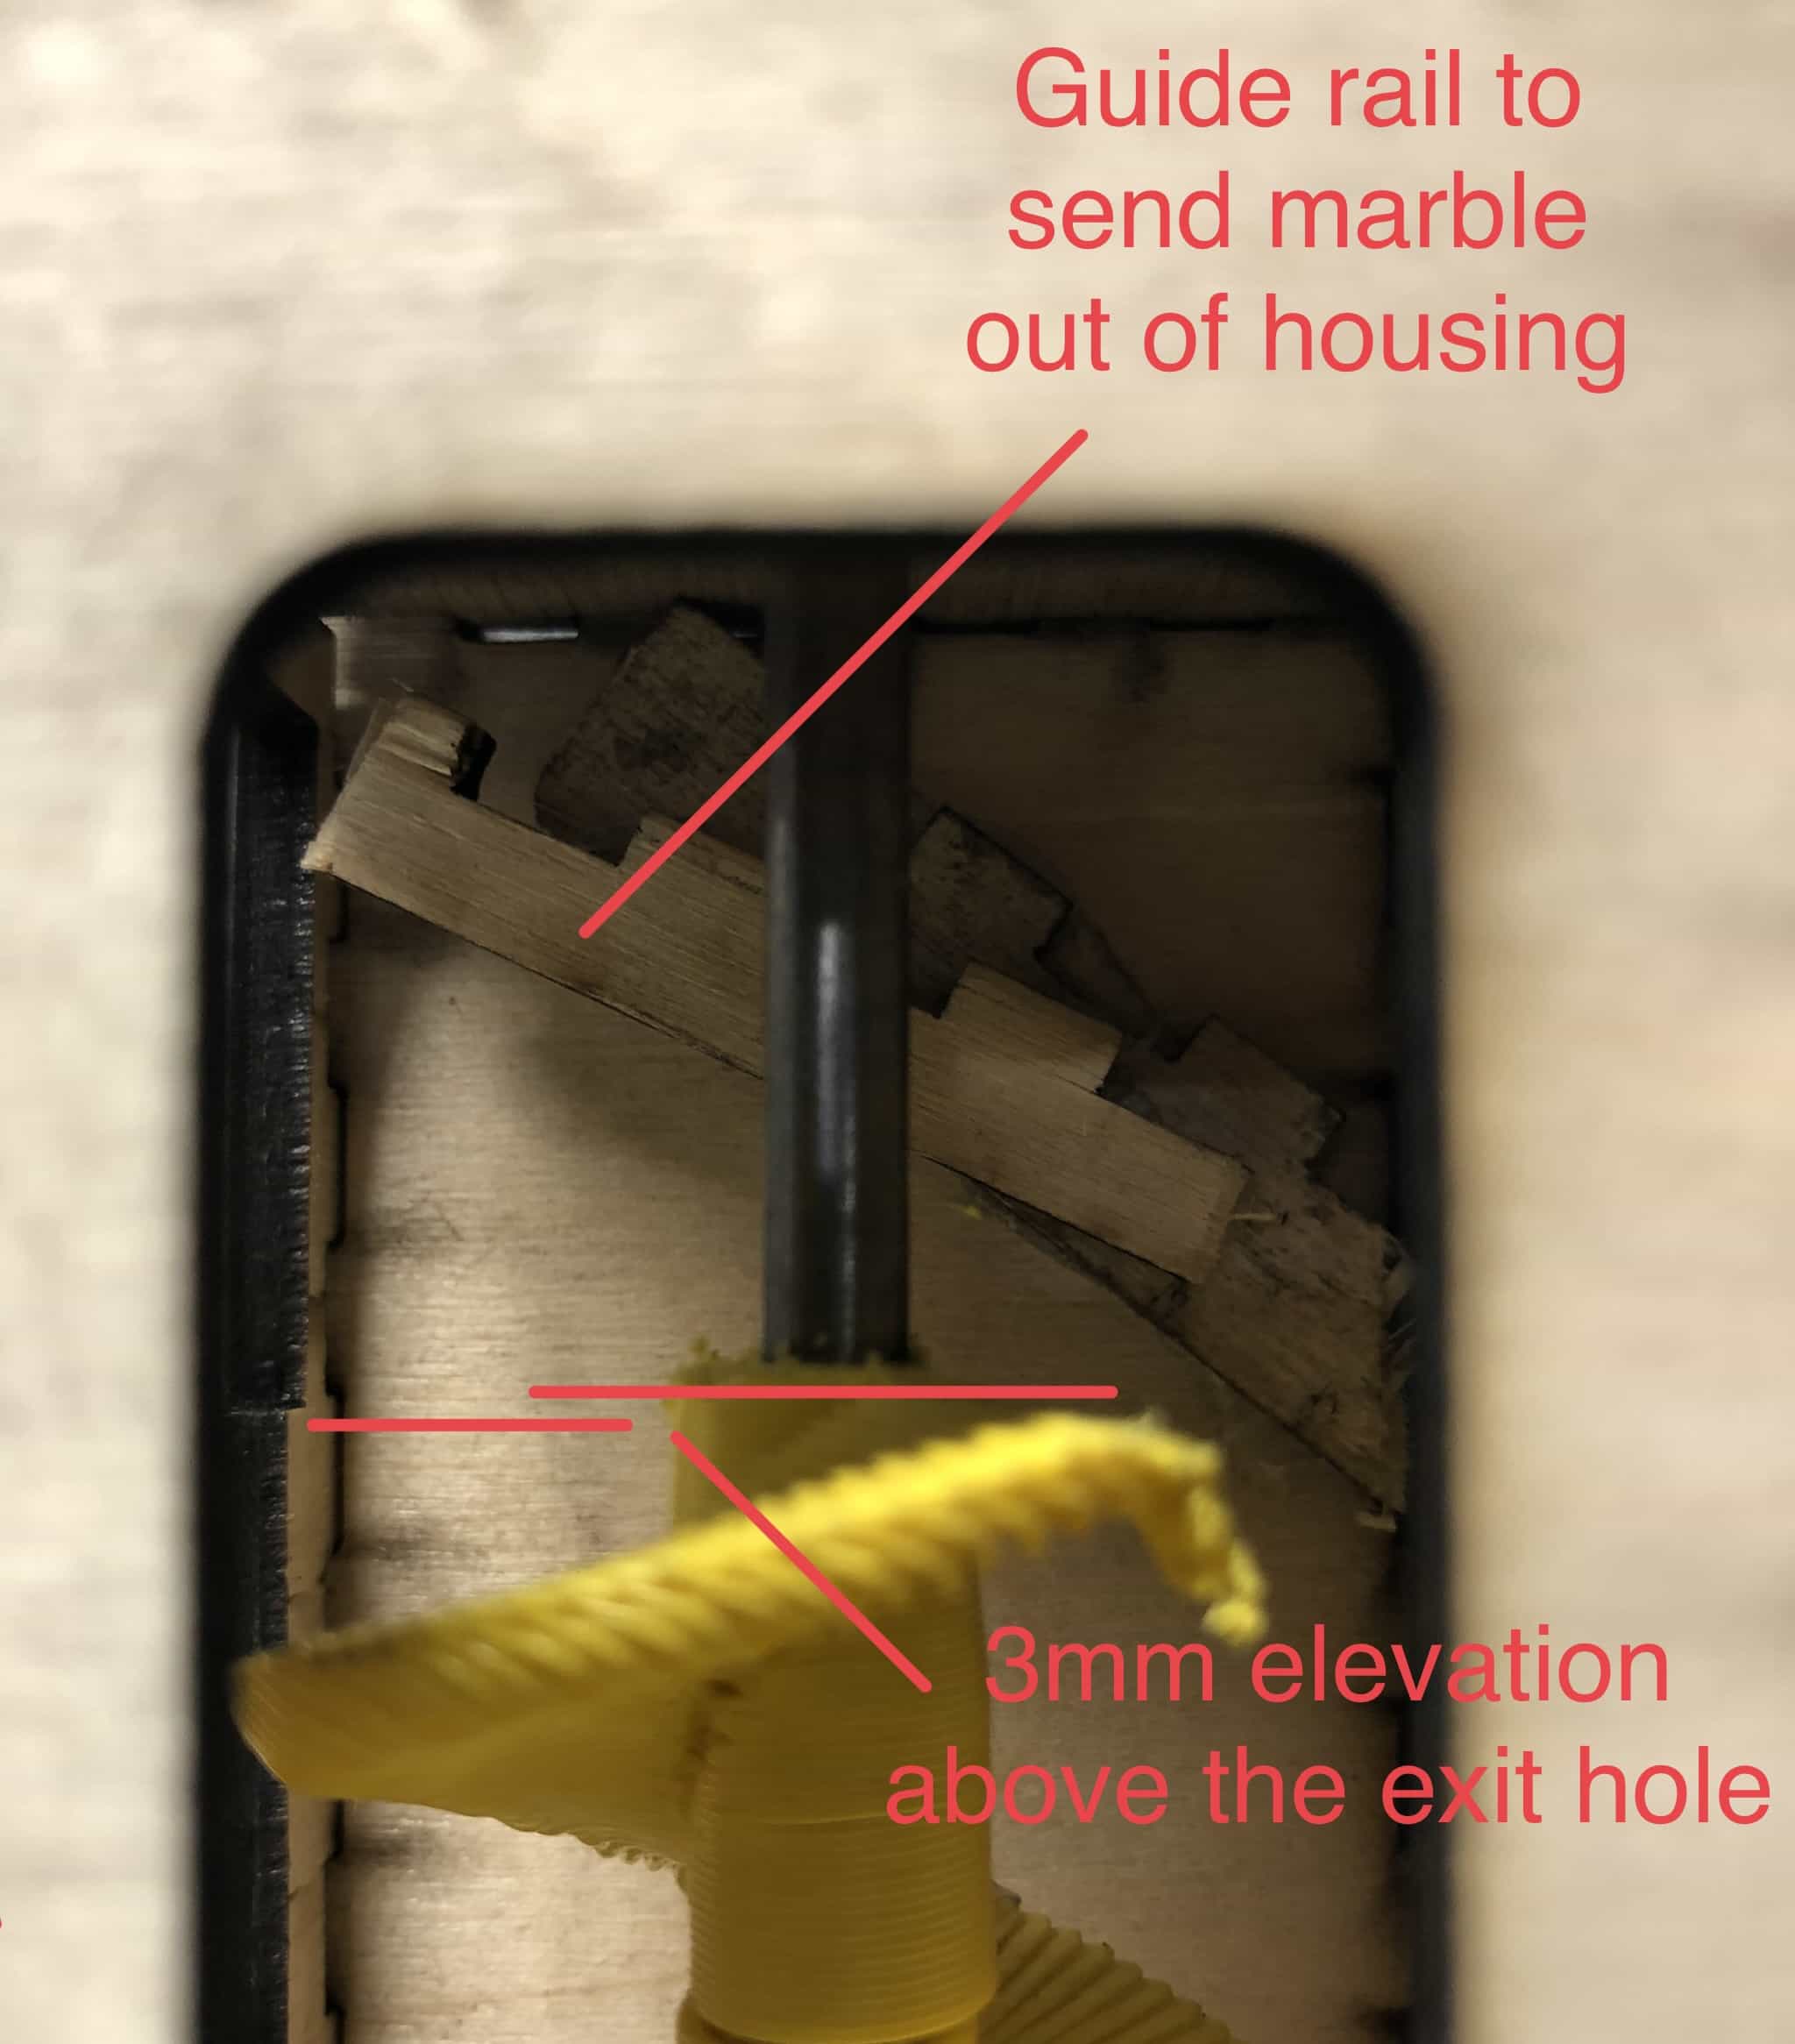
The shape, size and position of the entrance and exit holes, relative to the spiral drive, were key to successful operation.
Overall we have a machine that does get the marble from the bottom to the top of the machine which then guides the marble down. It does only works say 2 out of 10 times but it is very fun and making it was a huge learning curve for both Jonny and I !
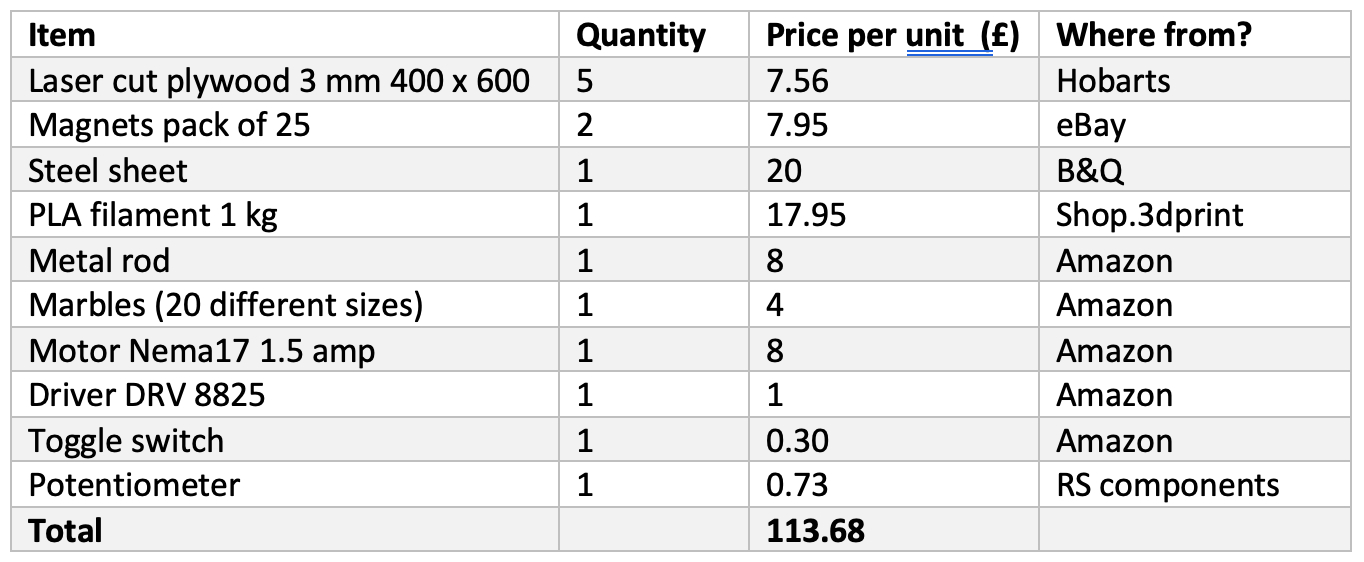
Bill of Materials (BOM)
Here is the list of the materials that we purchased throughout these two weeks for the marble run. Overall it was more expensive that we thought but because we have several items that haven’t ended being used such as all of the marble because we ended up 3d printing them they would not be used in the future but think it is important to add them for the future.
Future thoughts
As an assignment this was very fun, we thought that this could be a great idea in Plus X for people to play with when they come into the space. As it is also so thin it can be used in most places, we tried to make it out of the yellow 3d filament so that it matches with the Plus X colours.
Final Marble Run video
design files for marble run
- dowel_20x42.stl
- livehindge.f3d
- marblerun_parts.f3d
- marbles.f3d
- wheely_peely.f3d
- spiral_enclosure_95cm.svg