Incubator Modules for the Home Bio Lab
Abstract
Home DIY Bio Labs have become commonplace, basic DIY Bio Hardware and Tools can be made in FabLab or sourced on the second-hand market.
Biological experiments often require environmental controls, usually laboratory incubators are fridge-sized appliances, incubators are usually set at at target temperature. The size of laboratory incubators make them impractical for a home setup, requiring both a high space and energy commitment. Maintaining a range of incubators with different temperatures in a Home Lab environment is therefore not practical.
This project proposes small, configurable, networked incubator modules that can be configured for a range of Home Lab requirements. Existing home infrastructure like lightening rails and existing shelving systems are used to integrated and blend the incubators into the home environment.
Monitoring and Control of the incubators is done through a dedicated website/app.
Motivation
Doing DIY Bio at home is becoming both feasibly and necessary, as lab access to universities and bio-hacker spaces can be affected by restrictions and lockdown.
DIY Bio tools and equipment, like PCR machines, Clean-benches, Centrifuges, Microscopes can either be made DIY style or bought through second-hand. See Bento Bio, Amino Labs, etc for low-cost lab equipment and Hackteria, BioHack Academy, GoSH, etc for open source lab devices and tools.
While mini incubators can had for around ¥10,000 ($100), they are too big and don't have networking and observation capabilities.
My project is to make small incubators for DIY bio experiments, that blend and fit into the home.
- Small Size, Capacity, between 1 - 10 standard petri dishes.
- Integrate seamlessly into home environment
- Multiples
- Take advantage of temperate variations within rooms (top hotter, bottom cooler)
- Move Incubators vertically for optimal temperature
- Network devices for remote observation
Questions
- Peltier Device for Heating/Cooling? Alternatives?
- Temperature Sensors? How to make them Water-proof? Coat with PDMS?
- How to move vertically? Worm-gear?
Extensions
- C02 Incubator for Mammalian Cells? Which CO2 Source in a Home Setting? Food Cartridges? SodaStream, iSi Soda Cartridge?
Spiraling & Scaling
An incubator is quite a common and basic tool for working and collaborating with micro-organisms. I choose it, because:
- I found myself in situations I could not keep micro-organisms and plants alive, because of the lack of suitable incubator
- It it spiralable and scalable.
Spiraling Opportunities
- Temperature Control
- Light Control
- Camera, Visual Monitoring
- Data Logging, WiFi, Monitoring/Controlling via Internet
- Scale of Incubator (Nano, Micro Incubators?)
- Feeding Mechanism
- Turbidity Sensing
- CO2 Control
Background
Climate in Japan
The climate in around Tokyo and Kamakura is not a extreme as in the north, winters can get below 0ºC, summers can be around 40ºC - with high levels of humidity. Houses are following strict earthquake-proofing regulations, mostly fabricated from wood, not much isolation - I assume because of the humidity, and its effect on isolation material. Heating cooling is done with air-conditioners, which have the disadvantage, that as soon as you turn them off, the inside temperature aligns with the outside temperature rather quickly.
Access to Incubators and DIY Bio/BioHacking
Access to incubators in universities and bio-hackers spaces can be difficult during the pandemic. A range of tools, equipment and tactics for and from the BioHacking community exists:
- DIY approaches to Magnetic Stirrers, DIY PCR Machines, Centrifuges, etc
- Affordable Lab equipment like the Bento Lab or Amino Labs
- Second-hand Lab Equipment


Cheap, affordable Incubators are also on the market, cheap ones can be had for ca ~¥10,000 (~$100, ~€85), giving you a basic temperature-controllable environment.
Sometimes these cheap, affordable options are not suitable, after all, it depends on the collaborating organism - and which environment, or milieu, it needs.
Organisms have their own specific environments, here are some common - and more extreme - examples.
- 37ºC, 5% CO2
- 24ºC, Photo-period of 16h
- 1ºC, High Humidity
- ...
The Incubator(s)
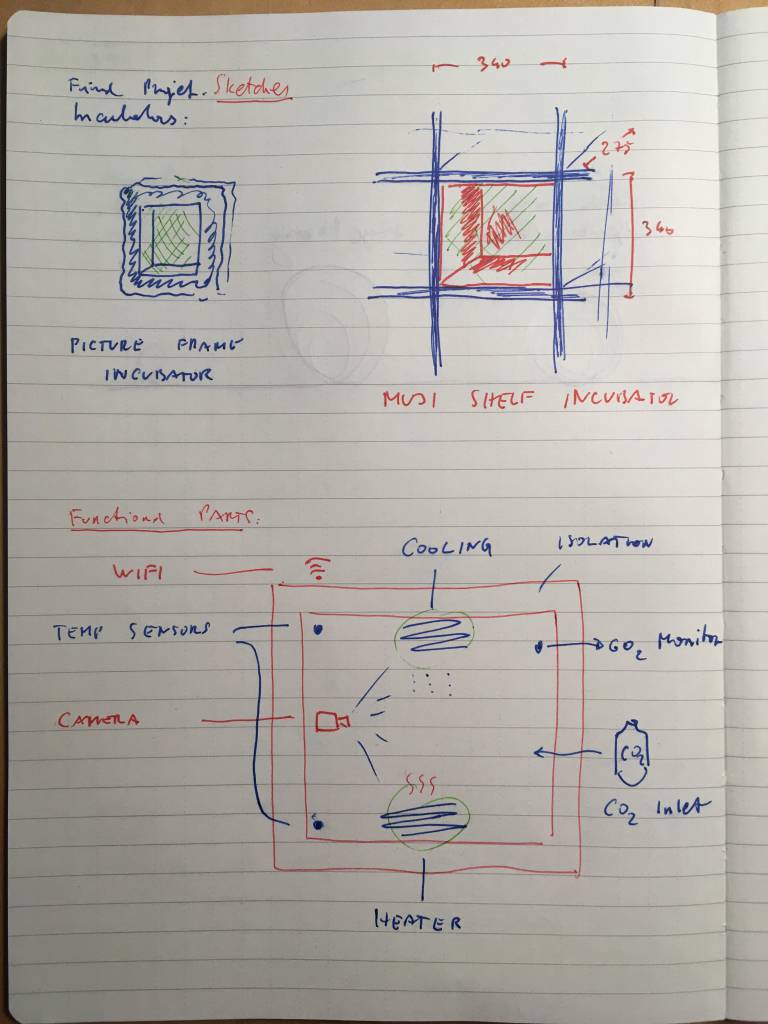
While I am very clear on the functionality of the incubator, I am less clear about the shape and form of it. Most incubators have fridge-like designs - which take up a lot of space - I would like to explore possible design and sizes.
-
Picture Frame Incubator
Hang your incubator on the wall. -
(Muji) Shelf Incubator
Incubator that fits in standard Muji Shelves. 340mm x 340mm x 275mm. -
Mini/Micro Incubators
How small can the incubator be? Smaller Incubators can scale in number, which in turn enables parallel parameter search for the most suitable growing parameters. -
Parasite/Parasitic Incubators
Repurpose and re-function already existing boxes and containers. Natural incubators situations within the house/room. -
Suspended Ceiling Incubators
Use a common light rail, and 100V supply to suspend micro-incubators from the ceiling. Use distance sensors and work-gear-motor(?) to vertically move the micro-incubators to hotter or colder zones within the room.
Planned Technical Setup
- ESP32
- Peltier Device for Heating/Cooling
- Laser ToF for Distance Sensing Top/Bottom
- Temperature Sensors (Onewire) for measuring inside/outside
- Double Wall for Isolation
- Light Source for Plants/Photosynthesis
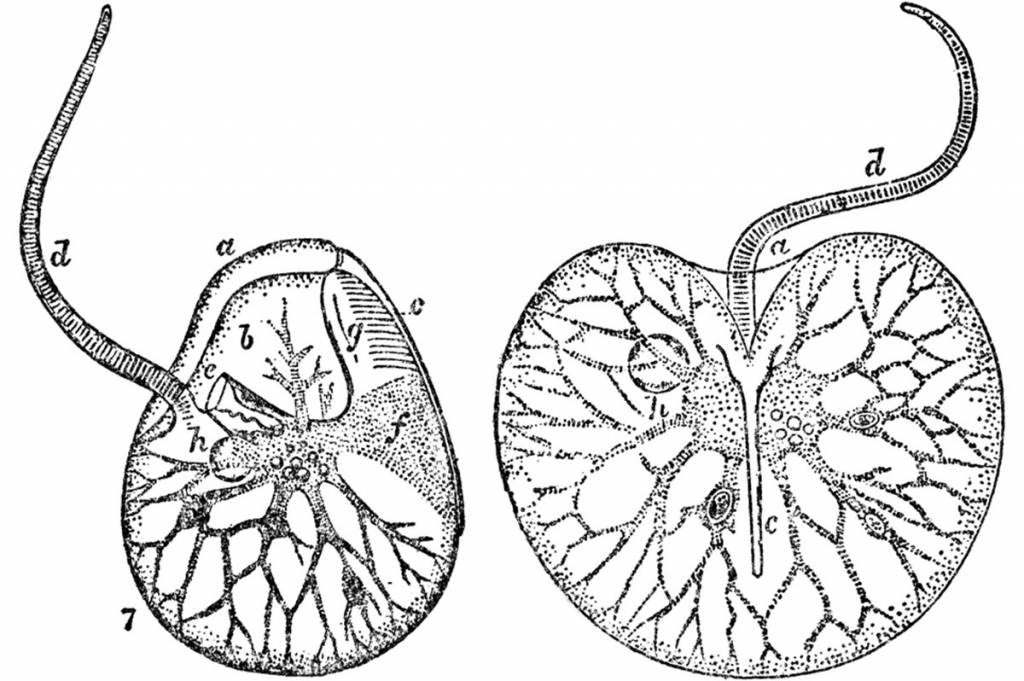
Incubator for Sea Sparkle?
- Make an incubator* for N. scintillans (Sea Sparkle, ヤコウチュウ, 夜光虫)
- Catch N. scintillans at Kamakura's Yuigahama Beach
- Grow and multiply N. scintillans in the incubator
- Mechanically and selectively agitate/excite the water and N. scintillans
- Create a volumetric bioluminescence display
Catching N. scintillans at Yuigahama Beach in Kamakura

The FabLab Kamakura is about 500m from the beach, that's where I observed (for the first time) the amazing and magically spectacle of glowing Sea Sparkle. The picture above was taken in May. Need to observe the most suitable weather conditions of the last blooms and find suitable weather forecasts for upcoming blooms. (Side Project: Make Forecast Site for Sea Sparkle Bloom, can it be seen from satellites?)
Growing N. scintillans
Sea Sparkle grow in Artificial Seawater Medium, with Guillard's (F/2) Marine Water Enrichment Solution, which is for growing Micro-algae, which in turn are consumed by N. scintillans. Suitable temperature are from ca. 10ºC - 24ºC, N. scintillans also has a funky diplontic life cycle, the incubator(s) can also help in finding the right growth conditions for the different life cycle stage.
Many Opportunities for Failing
Ok, now we are getting to the really interesting part. I am aware that this is quite a large and long project, with one big uncontrollable parameters (what if there is no Sea Sparkle bloom in Kamakura this year?) I could try to obtain Sea Sparkle from other sources, but I like the fact that the beach with the organisms and the FabLab are in close, hyper-local distance. Even if I can not obtain and grow the Sea Sparkle, the incubator will functioning and ready. Which is a also a success in itself.
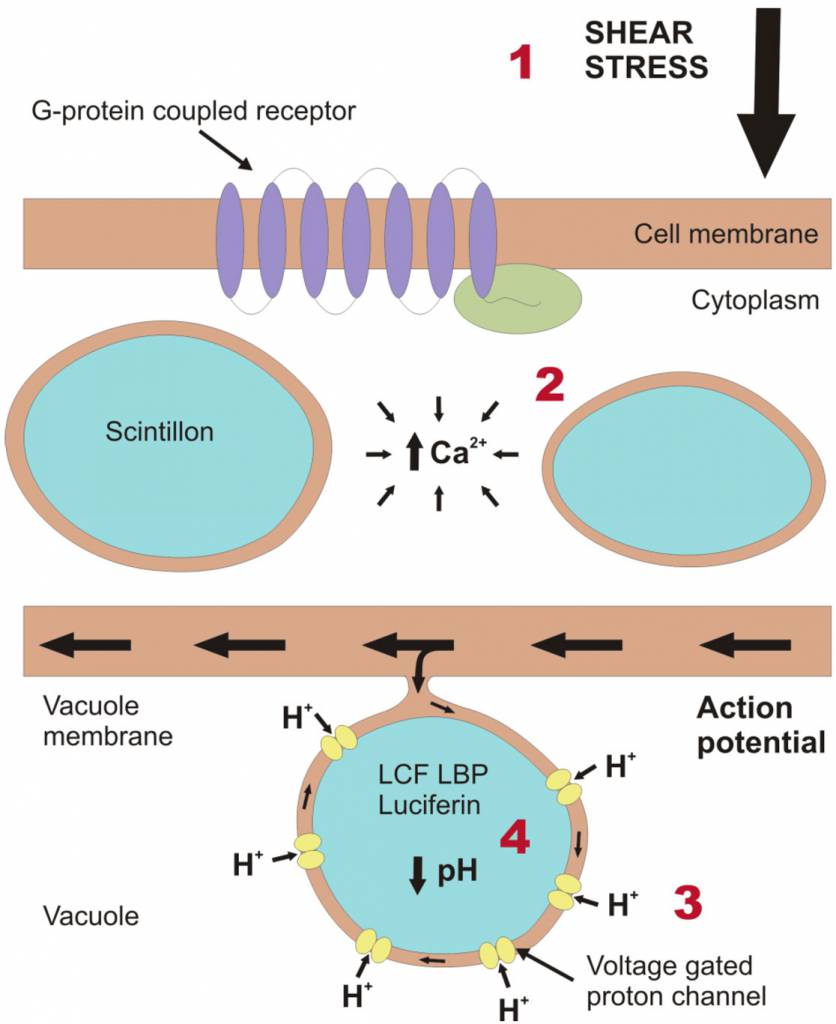
Volumetric Bioluminescence Display
In the best-case scenario, I have the Sea Sparkle, they are growing abundantly, we are now ready for the final experiments. Mechanically disturbing a container of Sea Sparkle light up the container. How can we selectively excise the Sea Sparkle? How can we selectively shake the water? Transparent Nylon wires? Ultra-sound? What is the exact activation energy that Sea Sparkle need to bioluminescent? These questions and experiments can only be done once we can stably and reliably grow and cultivate the organisms.
Schematic Sketches


UI Sketch

Pre-Visualisation


Ceiling Lights
Ceiling Lights (天井照明) in Japan 100V, 50Hz in Eastern Japan, 60Hz in Western Japan - depending from where the first power stations got imported back in the day. The need to care for both 50Hz and 60Hz for the national market might also be a reason, why Japan was so successful in exporting their electronic products to different foreign markets. (Analog TVs relied on the frequency to sync their image. That's why PAL was 50Hz, and NTSC 60Hz, and that's why we still have these frame rates in modern cameras.)
Lighting Rails
Lighting rails are systems for mounting one or more lights (or power adaptors) on a rail usually suspended from the ceiling. Lighting rails allow for the flexible and individual position of lights, and with their integrated mechanical and electrical connector they make it easier to place multiple lights.


Universal Ceiling Sockets in Japan
Japanese houses and apartments are equipped with universal, non-grounded twist lock sockets, which not only provider power but also allow for the suspension of lamp shades etc.

The socket can support up to 5kg and up to 10kg if a hook is used to distribute the weight.
Provisional Bill-of-Materials
Electroncics Vendors in Japan
Offline AND Online, (all Akihabara):
Online only:
- https://www.switch-science.com
- https://www.digikey.jp
- https://www.mouser.jp-
- https://www.robotshop.com/jp/en/
Bill of Materials
| Amout | Name | Link | Price | Remarks |
|---|---|---|---|---|
| 1 | Expressif ESP32-WROOM-32E 16MB | https://akizukidenshi.com/catalog/g/gM-15675/ | ¥360 | |
| 1 | Peltier Device, 30 x 30mm | https://akizukidenshi.com/catalog/g/gI-14751/ | ¥770 | 4.6A (max), 16V (max) |
| 1 | Heat Sink | Sengoku | ¥250 | |
| 1 | 5V 30mm Fan | https://akizukidenshi.com/catalog/g/gP-14183/ | ¥250 | 30 x 30 x 10, 0.36A |
| 1 | OLED 128 x 64, I2C | https://akizukidenshi.com/catalog/g/gP-12031/ | ¥580 | |
| 1 | 3mm Acrylic | Royal Home Center | ¥1000 | A3, Side Panels |
| 1 | 5mm Acrylic | Royal Home Center | ¥1200 | A4, Top Panels |
| 2 | DS18B20+ 1-Wire Temperature Sensor | https://akizukidenshi.com/catalog/g/gI-05276/ | ¥320 | |
| 1 | A4953 Driver | https://akizukidenshi.com/catalog/g/gI-12317/ | ||
| 1 | BD6211F Driver | https://akizukidenshi.com/catalog/g/gI-05087/ | ¥100 | |
| 3 | 1W 1 Power Resistor | Sengoku | ¥25 | |
| 1 | DC-DC Variable Buck Converter | Amazon | ¥110 / unit | Variable |
Possible Modules
- Temperature Module
- Lightening Rail Suspension Module
- Light Socket Suspension Module
- CO2 / Temperature Module
- Growth Light Module
- Growth Light & Camera Module
- UV Light Module
Module Configurations
Why the need for independent modules? Why not integrate everything into one system? Incubators haves different requirements, depending on the use-case. To allow for a
Example 1: Suspended Incubator with Room Temperature Adjustment
- Incubator Module x2
- Suspension Module
- Payload: Petri dishes x10
- Target Temperature: 25ºC
- Organism: xxx
Example 2: Shelf Incubator
Use existing shelf infrastructure (Muji, Ikea, etc) for incubation.
- Incubator Module
- Payload: Petri dishes x40
- Target Temperature: 25ºC
- Organism: xxx
Biopolar Stepping Motor Driver: https://akizukidenshi.com/catalog/g/gI-07408/
https://maker.pro/custom/tutorial/how-to-select-the-best-motor-driver-for-your-project
https://www.digikey.jp/product-detail/en/rohm-semiconductor/BD6222HFP-TR/BD6222HFPTR-ND/1936306
Fan Controller
https://pdfserv.maximintegrated.com/en/ds/MAX31790.pdf
6-Channel PWM-Output Fan RPM Controller, I2C
Peltier Drivers
I am still confused about how to efficiently drive a Peltier Device. There seem to be 3 choices:
- PWM
- Class D Audio Amplifiers
- Dedicated Peltier Driver
PWM - Bad or not?
Using PWM to drive a Peltier works, but it is not efficient and will decreased the life-span of the device.
https://forum.allaboutcircuits.com/threads/driving-a-peltier-with-power-op-amp-pi-control.138587/
Class D Audio Amplifiers for driving Peltier
https://www.infineon.com/dgdl/an-1071.pdf?fileId=5546d462533600a40153559538eb0ff1 https://www.ti.com/lit/an/snaa092/snaa092.pdf
Dedicated Peltier Driver
- MAX1968 ~¥1,700

Application Reports
- Power Drivers for Peltier TEC Modules
- How to Control and Compensate a Thermoelectric Cooler
- TI SLVA677–December 2014: Low-Power TEC Driver
- Designing a High Performance TEC Controller
Buck-Booster Converter?
Examples from FabAcademy Archive
Nciri Mejdi:
...high-current DC motor driver + a low-pass LC filter... http://archive.fabacademy.org/2018/labs/fablabdigiscope/students/nciri-mejdi/Final_Project.html
Tomasero:
Therefore, I had to implement a low-pass filter to keep the instantaneous current closer to the average current. However, I didn't want to add more hardware, so he suggested decreasing the PWM frequency to a low range of 1 to 100Hz https://fab.cba.mit.edu/classes/863.17/CBA/people/tomasero/
Daisuke Doyo:
... using SSR to drive Cartridge Heater http://archive.fabacademy.org/2018/labs/fablabkamakura/students/daisuke-doyo/assignments/week12.html
Driving the Peltier
After some discussion and advice from both the Global Open Time Sessions and from our local electronics guru Yamamoto-san, BD6231F-E2
Power Supply & H-Bridges
Settled on using a DC-DC Convertor board to supply power to the project
-
Input 12V
-
PWM 12V to Fan
-
PWN 6V to Peltier
-
Step down to 3.3V to power ESP32
-
A4953 to drive Fan with 12V. The A4953 needs VBB from 8-40V
-
BD6231F-E2 to drive Peltier with 6V.
Ceiling Modules
- Suspend Ceiling Module
- Which Stepper Motor?
- Which Driver?
- Shaft-mount winding disc?
- Which suspension wire? Fish Line?
- Ball-bearing for Stepper Motor Shaft to distribute weight?
- Power Adapter? How much for downstream Peltier devices?

Temperature Modules
- remove excess heat from cooling Peltier? Fan? Sink? Both?
- PWM for Peltier Devices.
Task List
List of atomic tasks. Task go into the schedule.
Module
Module Designs


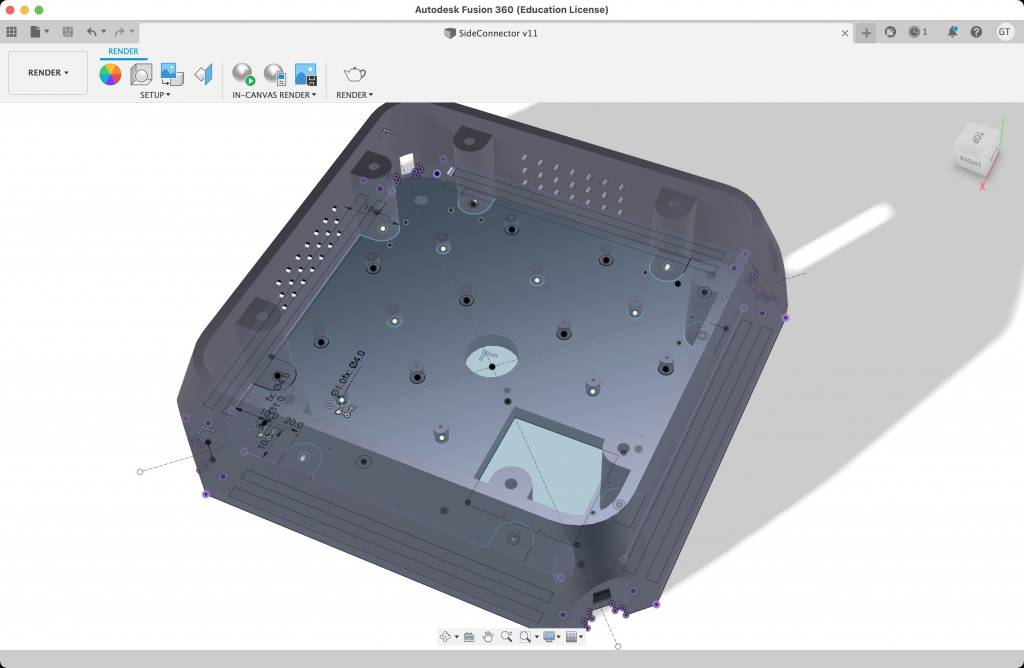
3D Printing Module
Starting a (small) Print Farm


First Print Results: Printing Time: 7h 06m

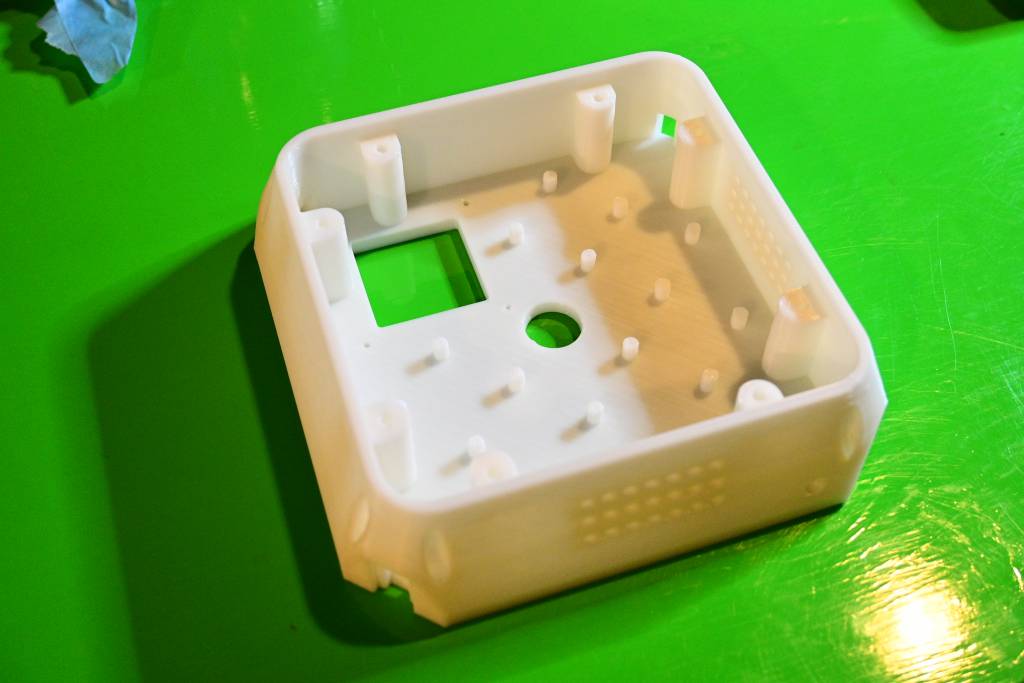

Improvements for next prints:
- Bigger Holes for Connecting Screws
- Space for Power Button
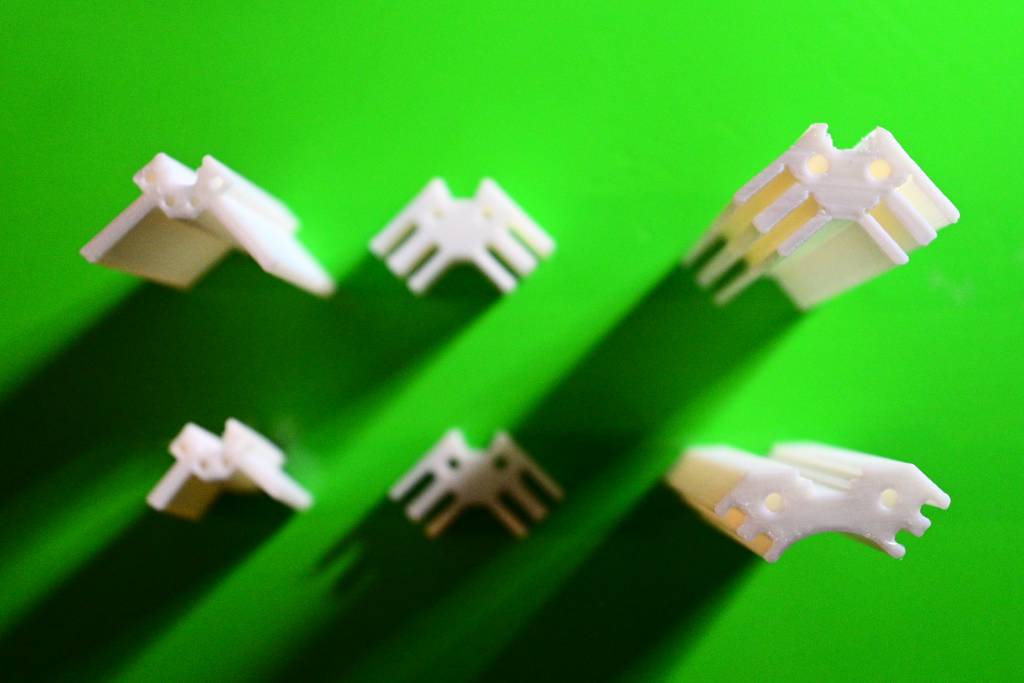
Side Connectors
Side Connectors and Tests


Door Connectors
One thing I nearly forgot, when getting carried away with the modular aspects of the design - is a door:


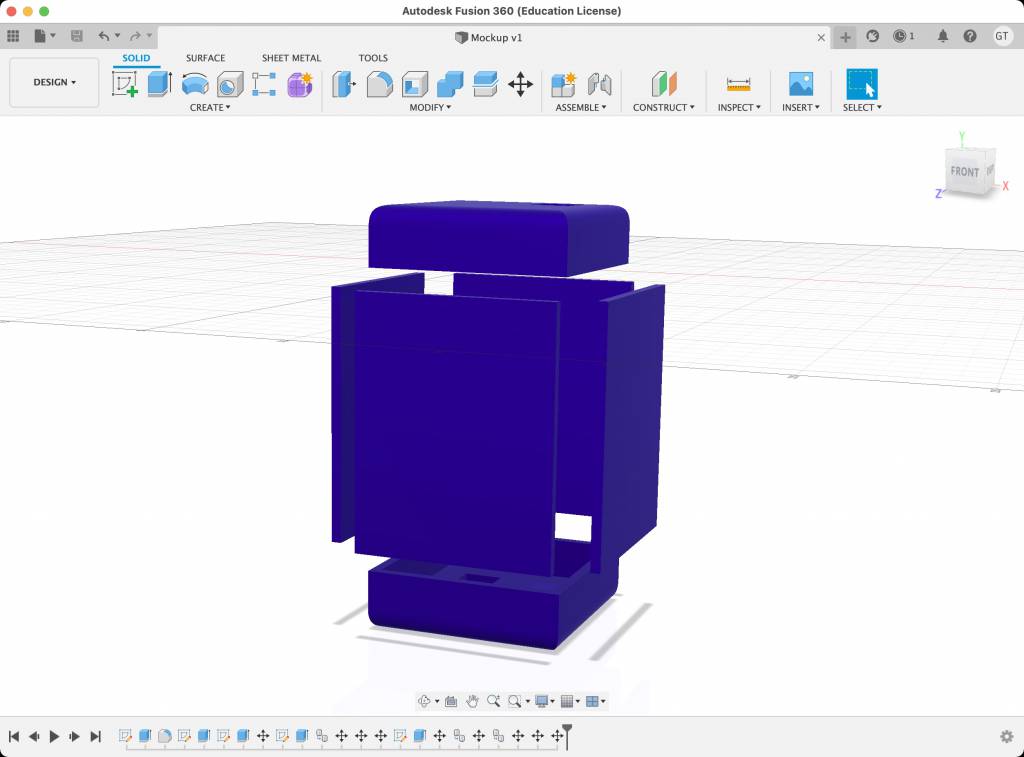
Test Assemble of Suspension Module
Top and Bottom Housing, and Side Connectors are 3D printed, the Side Walls and Cable Channel Covers and Module Covers are laser-cut.


Gram & Lasercutting
A last week Global Open Time session Leo McElroy was presenting his amazing Gram Language. Gram is parametric line drawings language for digital fabrication technologies like laser cutters and CNC mills.
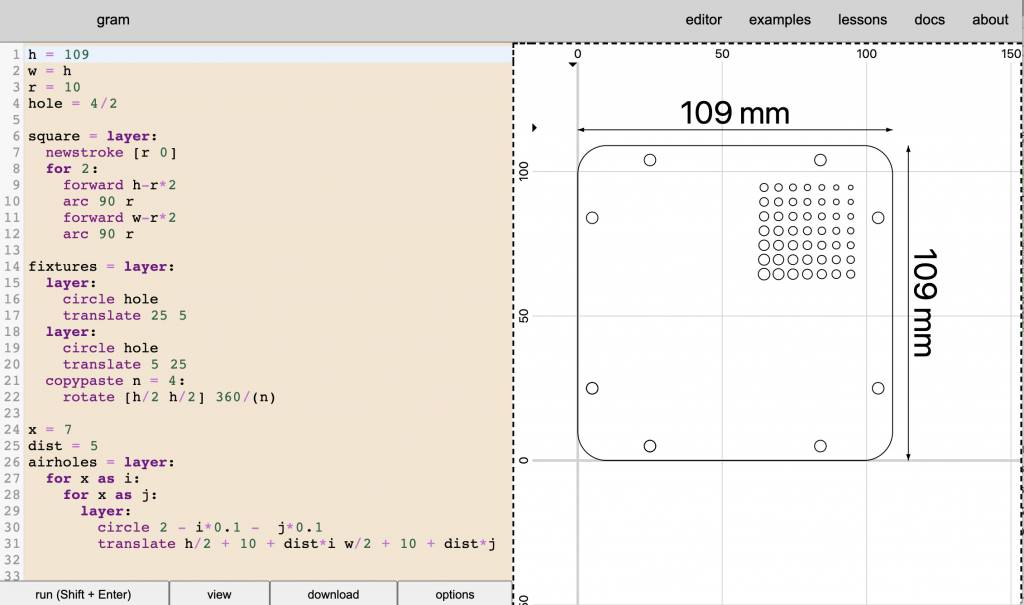
h = 109
w = h
r = 10
hole = 4/2

square = layer:
  newstroke [r 0]
  for 2:
    forward h-r*2
    arc 90 r
    forward w-r*2
    arc 90 r

fixtures = layer:
  layer:
    circle hole
    translate 25 5
  layer:
    circle hole
    translate 5 25
  copypaste n = 4:
    rotate [h/2 h/2] 360/(n)

x = 7
dist = 5
airholes = layer:
  for x as i:
    for x as j:
      layer:
        circle 2 - i*0.1 -  j*0.1
        translate h/2 + 10 + dist*i w/2 + 10 + dist*j
OK, it's not a heroic program, it does not do anything unexpected, but what it does, it does very well.
- A square cover with rounded edges
- Holes for fixing the cover to the module
- Air holes for the Peltier/Fan exhaust air
Saving as SVG and importing to Inkscape to prepare for laser cutting went without drama.
Laser-cutting


Circuit Board Design
Logic Board
- ESP32
- WiFi Communication
- I2C Bus to ToF and OLED
- 1-Wire Bus to Temperature Sensors
- FX230 for USB/Serial Communication
- 3.3V Voltage Regulator
JST Connector Zoo
I want to make the connections to sensors and boards clean and flexible, the different-sized JST connectors let themselves to different connective functions.
| Name | Pitch | A max | V max | Wire |
|---|---|---|---|---|
| XH | 2.50mm | 3 | 250 | 32 - 22 |
| PH | 2.00mm | 2 | 100 | 32 - 24 |
| ZH | 1.50mm | 1 | 50 | 32 - 26 |
- Power: XH 2 Pin
- Fan, Pelter: PH 2 Pin
- 1-Wire: ZH 3 Pin
- I2C: ZH 4 Pin

JST Eagle Libraries
JST is the name of the company, the different names (XH, PH, ZH, etc) describe a range of standards. Because of the variety of the connectors, it can be both confusing and difficult to find working and correct libraries for Eagle.
Searching for JST on eagle.autodesk.com shows a number of results. These are working for me:
ZH (Library Name: jst.lbr)
http://eagle.autodesk.com/eagle/download/505
XH (Library Name: jst_xh_connectors_v1-0.zip )
http://eagle.autodesk.com/eagle/download/51
I could not get the PH Library from the Eagle site to show up in Eagle, but I found an alternative one here:
PH (Library Name: con-jst-ph.lbr)
https://github.com/robertstarr/lbr_user/blob/master/con-jst-ph.lbr
Adventures in Crimping
- Crimping XH
- Crimping PH
- Crimping ZH
Board Milling Images


Boards


System Integration


License
Incubicles is shared under the Creative Commons Attribution-NonCommercial-ShareAlike 4.0 International (CC BY-NC-SA 4.0) license.
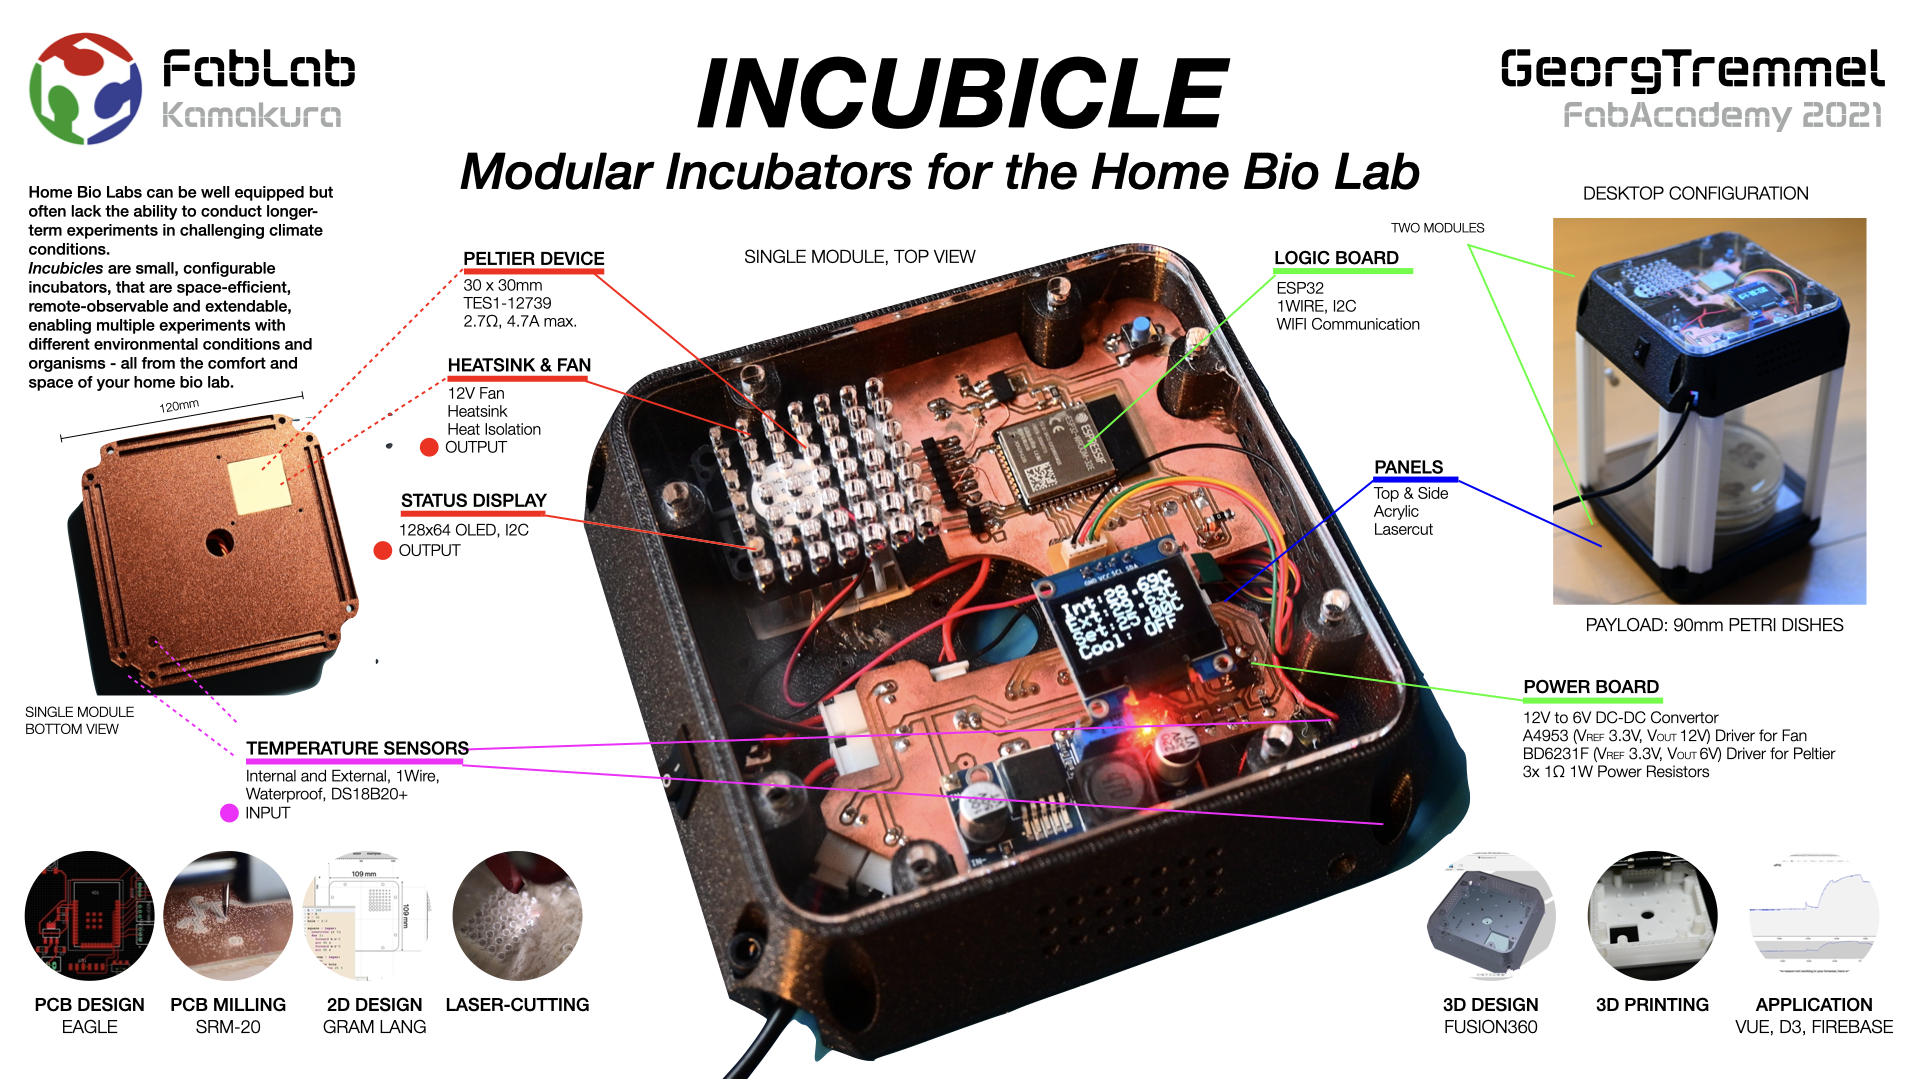
Hero Image

Presentation Image