5. Electronics production
Group assignement
The device

The SRM-20 portable milling machine is capable of milling a wide range of materials, including modelling wax, composite wood, foam, acrylic, polyacetate, PCB boards.
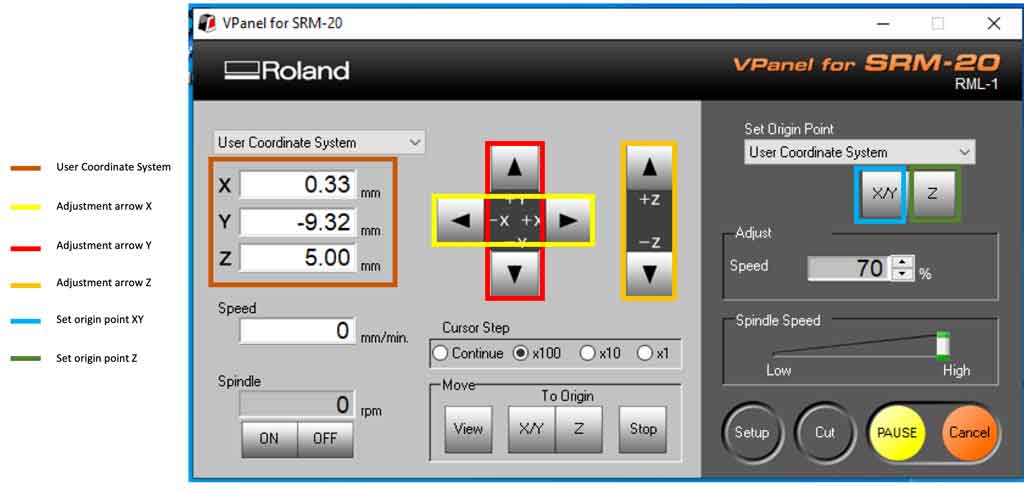
The VPanel controller of the SRM-20 provides a simple interface for adjusting the tool position and moving the cursor to set the milling origin point. VPanel also provides easy control of travel speed and spindle speed, with a pause/resume function, and monitoring of milling in the X, Y, and Z axes using digital indicators in millimeters or inches.
Characteristic table of the machine
| Template | SRM20 |
|---|---|
| Machinable materials | Acrylic resin, wood composite, modelling wax, PCB FR1 board |
| Distance between tool collet and table | 130.75 mm max. |
| Distance in X, Y and Z | 203,2 x 152,4 x 60,5 mm |
| Table size | 232,2 x 156,6 mm |
| Machining speed | 6 à 1800 mm/min |
| Maximum spindle rotation | 7 000 rpm |
| Steering Language | ML-1, NC code |
| Power consumption | 55W |
| Dimensions | 451 (L) x 426,6 (D) x 426,2 (H) mm |
| Weight | 19,6 kg |
| Installation environment | Temperature: 5 to 40°C. Humidity: 35 to 80% (non-condensing) |
Check list:
- Allen key to replace bits.
- Aligned and flat sacrificial plate.
- Vacuum cleaner.
- Multimeter for continuity test.
- Bits of good quality.
- VPanel software.
- Working computer.
- FR1 PCB.
- Double face tape.
Security assessment:
They are a few rules for the usage of the Roland milling machine.
Check list:
- Check for any obstacle that can collide with the cart.
- Clean thoughtfully using a mask and the vacuum cleaner any dust that can cause pollution.
- Use properly the machine, the spindle reaches nearly 8000 RPM so any fragment of the bit can cause damage if it’s projected.
- Use eye protection like googles.
- Don’t over-tight the holder’s bolt.
- Don’t try to cut any hard material like steel or hard aluminum.
- Check electrical connections and electricity reliability.
- Be careful to not hit any part of the machine while moving the XYZ cart.
Maintenance:
Check list:
- Cleaning dust every end of work.
- Change the sacrificial bed periodically.
- Don’t over-tight the holder’s bolt.
- Check periodically electrical reliability.
Vpanel configuration:
Vpanel is the software made by Roland Inc. to control the milling machine.
Main functions:
- Axis displacement and relative location.
- Axis Origin setup.
- Axis go to home.
- Spindle RPM indicator.
- Spindle speed control.
- Global job speed control.
- File list job.
- Cancel job.
Calibration process:
Steps:
- Calibrate X and Y axis by moving the cart using the arrows in the VPanel software. to increase the precision chnge between continue, x100, x10 and x1.
- Once you’re in the exact desired position you should press the X/Y button under “set origin point” in Vpanel.
- To calibrate the Z axis it’s a more complex process, first because we need to be able to precisely set the bit in touch of the PCB board. For this we need to use the continuity test in the multimeter, clamp the bit and move the Z axis carefully using the down arrow and changing the precision in this order: x100, x10 and x1, to prevent hitting the sacrificial bed with the bit, so you avoid breaking it.
- Check continuity until the indicator beeps or indicates that there’s current continuity between the clamp in the bit and the PCB board.
- Remove the clamp, and everything else that’s not required to stay inside the machine and close the lid.
Start cutting process:
- Close the machine’s lid.
- Click on the cut button on Vpanel.
- Select a .rml file.
- Press output button.
- Start the milling process.
Mods, the steps for uploading a file
Open the mods on your web browser and follow the instructions below.
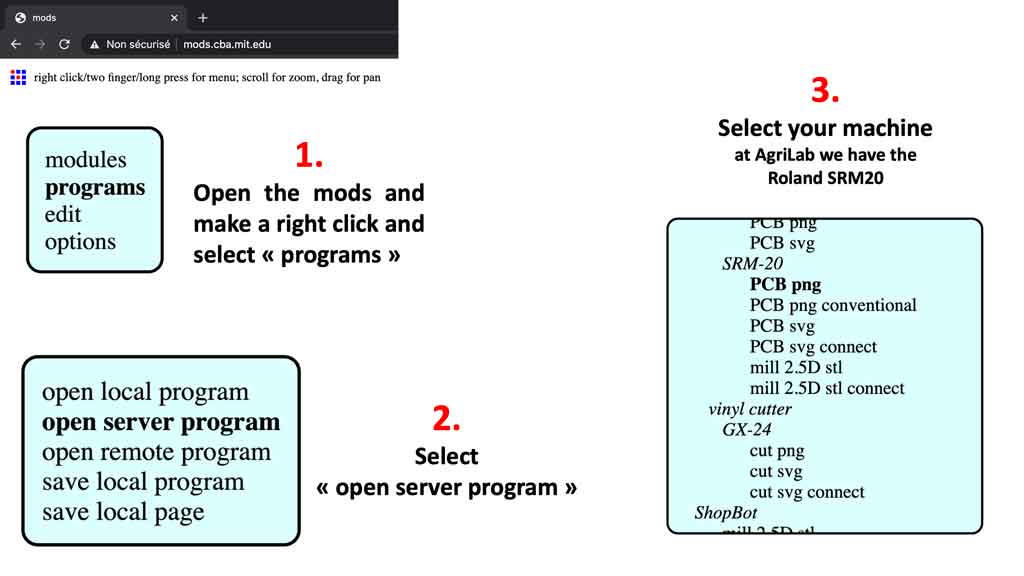
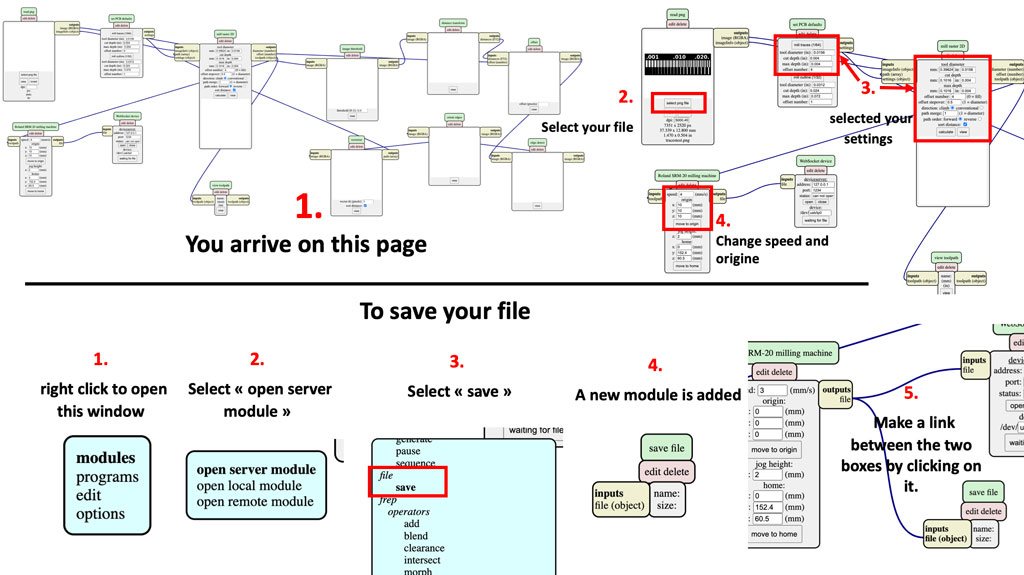
Your file downloads itself is in your “download” folder. Then simply import it into your software. For us Vpanel.
Results
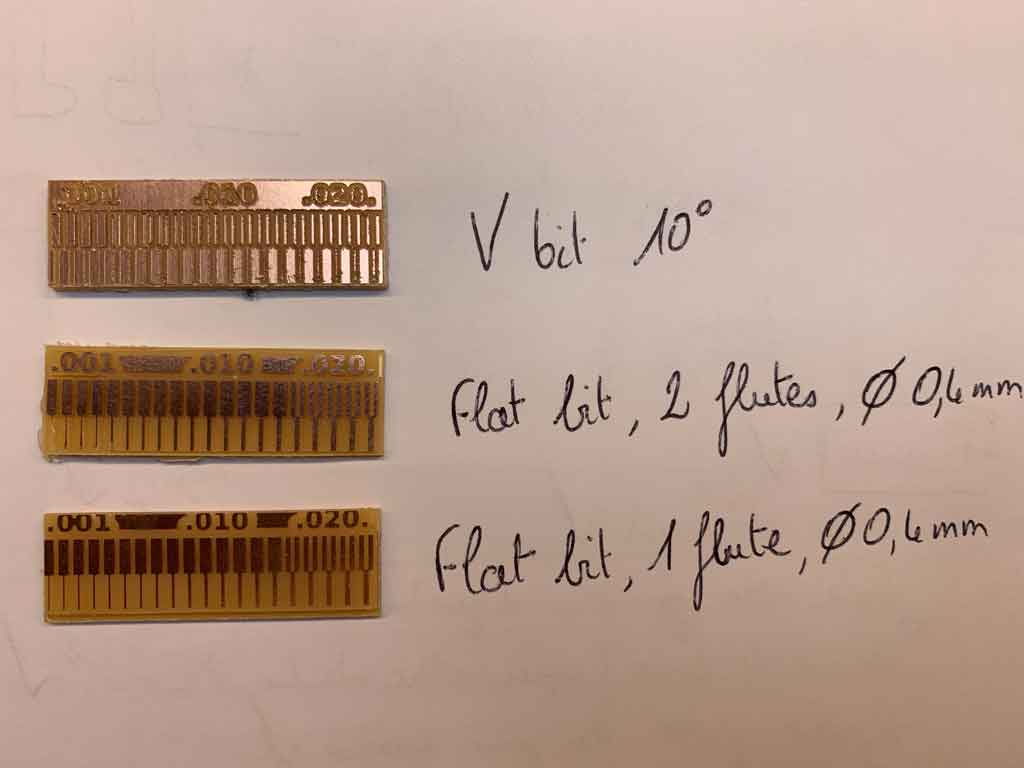
In order to test our machine we have carried out 3 tests with different bits. We tested a V bit 10°, a 0.4 diameter flat bit 2 flutes and a 0.4 diameter flat bit 1 flute. We can easily see a significant difference between the different bits.
We can see that with the V bit 10° the result is very approximate and the finishes are poor. However we have a precision up to 0.09 mm.
For the 0.4 diameter flat bit 2 flutes, the result seems clean and precise but we can see that the very fine lines (0.001 inch to 0.004 inch) did not withstand the machining, probably due to too much aggressiveness of the bit. Moreover, with a bit of 0.4 mm diameter we cannot go into a part smaller than 0.016 inch (=0.015748mm).
For the 0.4 diameter flat bit 1 flute, the results seem similar to the 0.4 diameter flat bit 2 flutes however it can be seen that this one did not damage the wires from 0.001 to 0.004 inch unlike the other one. This bit can therefore be considered less aggressive and a little more precise.