Index
Disclaimer : This is still an experimental board…
Cowduino board for FabAcademy student bootcamp 2022
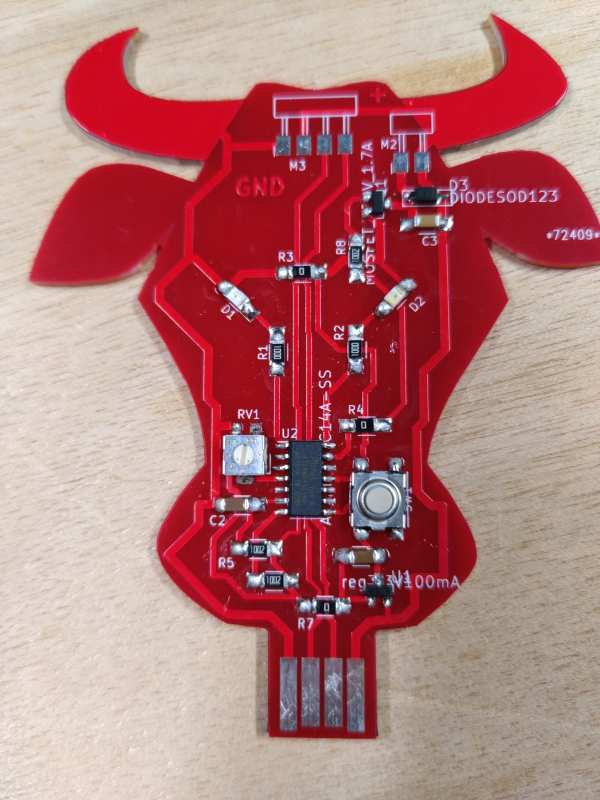
A really simple board Soldering level 0 - Cow Board was designed for student bootcamp 2021, it was focusing on SMT basic soldering. The 2022 version is more focused on learning to code. Ask for help from your instructor, you will need it. Later you should be able to produce and understand the board all by yourself. Before soldering read carefully the disclaimer part concerning bootloader.

A board using the SAMD11c for teaching coding and electronics.
I do many introducing workshop to cover those basics. People are used to arduino, this is a more dedicated board for those workshops. It also shows that not everything needs to be square like and that some function can be more creative :)
The board is composed of the SAMD11c as the microcontroller.

Some components like condensator and resistor here are to delay and filter the current. At this stage it is not necessary to understand why they are there.
The regulator transform the 5V from USB to 3.3V , the voltage needed by the SAMD11C microcontroller

An USB connector

This is one of the advantages of the SAMD11c, you can directly connect it to USB. You need other components and adaptors for most of the other microcontrollers.
2 LEDs as output. The first workshop is to try to control them in different ways.

A button as a digital output

First try to read the status of the button when pressing or not. Then try to interact with the LED.
A potentiometer to learn the AD analog part. First try to read some values and turn the potentiometer. Then try to interact with the LED.

A mosfet connected to an output.

Microcontroller can only output a few milliamp. Mosfet in this design enables control different voltage and current. You can connect a small motor, more powerful LED, a speaker. If connected to the USB, it will take current from the USB. To control more voltage and current please and to avoid electrical problems : disconnect the USB and use alligator clips on the cow horn to power the board.
For example : - try to modify the brightness of an LED strip with the potentiometer. - try to output sound with a speaker and tune it with the potentiometer …
Connector 4 pins

You can go really further with a 4 pin connector, it has 5V, GND and 2 pins. If you code it, you can play with I2C modules, like sensors, screens …
Powering the board. You can power the board without USB. By using an alligator/crocodile clip on the GND cow horn and another alligator clip on the other cow horn.
Disclaimer
You need an already flashed SAMD11C as this design avoid a part of the complexity of the SAMD11C bootloader flash. You can use Quentin’s non-solder breakout board and a programmer or some of Neils board and just position precisely the microcontroller on the footprint without soldering.
Use latest bootloarder, Quentin’s version : https://github.com/qbolsee/ArduinoCore-fab-sam/tree/master/bootloaders/zero/binaries

BOM
| Id | Designator | Package | Quantity | Designation | Supplier and ref | FIELD7 | FIELD8 |
|---|---|---|---|---|---|---|---|
| 1 | R7,R4,R3 | R_1206 | 3 | R | |||
| 2 | C1 | C_1206 | 1 | 1uF | |||
| 3 | C2 | C_1206 | 1 | 1 uF | |||
| 4 | C3 | C_1206 | 1 | 0.1 uF | |||
| 5 | D1,D2 | LED_1206 | 2 | LED | |||
| 6 | D3 | fab-SOD123 | 1 | DIODESOD123 | |||
| 7 | J1 | fab-USB_A_male_plug | 1 | USB_A_PLUG | |||
| 8 | M2 | Header_SMD_01x02_P2.54mm_Horizontal_Male | 1 | PINHD-1x02-SMD-HEADER | |||
| 9 | M3 | Header_SMD_01x04_P2.54mm_Horizontal_Male | 1 | PINHD-1x04-SMD-HEADER | |||
| 10 | Q1 | fab-SOT23 | 1 | MOSFET_N-CH_30V_1.7A | |||
| 11 | R1,R2 | R_1206 | 2 | 100 Ohms | |||
| 12 | R5,R6 | R_1206 | 2 | 10 KOhms | |||
| 13 | R8 | R_1206 | 1 | 10k | |||
| 14 | RV1 | Potentiometer_TT_Model-23_4.5x5.0x3.0mm | 1 | R_POT_10K_Trimmer | |||
| 15 | SW1 | Button_Omron_B3SN_6x6mm | 1 | BUTTON_B3SN | |||
| 16 | U1 | fab-SOT23 | 1 | Regulator_Linear_LM3480-3.3V-100mA | |||
| 17 | U2 | SOIC-14_3.9x8.7mm_P1.27mm | 1 | ATSAMD11C14A-SS | Already programmed with a bootloader |
Production and soldering

Milling production of the board take a long time about 2 hours as it is a big size board. You could greatly reduce the time by removing the cow design, but this is the nice part of it :)
Remove the small copper part next to the usb connector.
Then begin by soldering an already programmed SAMD11C (DISCLAIMER) .

Ftuffed and connected to a usb extension cable.

Kicad design files
SVG files
Credit
CC BY NC 4.0 Attribution , Author, conception, design, realisation & documentation. Luc Hanneuse .