Individual Assignments:
- Write an application that interfaces a user with an input &/or output device that you made. Group Assignment:
- Compare as many tool options as possible.
Group Work
I did all of this week’s group work on my own.
I have some experience in creating interfaces in Qt and MATLAB GUI, using C++,
Python and MATLAB languages. So, I’m going to compare these platforms and languages
for this week’s group assignment.
Qt vs. MATLAB GUI
Qt: Qt is a free and open-source widget toolkit for creating GUIs and apps.
It is cross-platform and covers a wide range of operating systems
(including Linux, Windows, macOS, Android or embedded systems). The development
and improvements of this platform has been going very fast during the recent years.
It has a very capable IDE (Qt Creator), which is very user-friendly,
and has a great documentation and tutorials. It supports many languages including C++
(with powerful inter-object communication and flexibility features),
QML (declarative, JavaScript-based language) and Python
(Qt for Python, allowing users to develop Qt and QML application easily from Python).
There are some mature plotting libraries (e.g. QCustomPlot and QWT)
and test libraries (e.g. QTestLib) developed for Qt. On top of all,
it provides internationalization support
(Qt translation system), which enables you to have a multilingual apps.
MATLAB GUI:
MATLAB supports developing applications with graphical user interface (GUI) features.
MATLAB includes GUIDE (GUI development environment) for graphically designing GUIs.
It also has tightly integrated graph-plotting features. It is neither open source nor free,
but almost all research institutions provide their employees with rights for MATLAB use,
since it is a very versatile and extremely well stablished toolkit. After the GUI design,
with the help of MATLAB Compiler,
you can create programs only as standalone desktop or web apps.
C++ vs. MATLAB vs. Python
C++: C++ is an object-oriented language based on the C language.
It is developed to optimize performance is key while keeping the code organized.
Potentially very high performance can be reached, but your code needs to be good,
and writing a good C++ code can be harder than other languages.
So, using C++ gives you the benefit of running your app at high speed. With C++,
you have access to lots of libraries (many Python libraries are just wrappers around C++ libraries).
It has extensive documentation and tutorials, and a vast user community.
It is a lower-level programming language compare to others.
So, it takes more time to learn and even longer to learn to code properly.
Programming with C++ usually requires lots of debugging and takes a long time.
MATLAB: MATLAB
(matrix laboratory) is a multi-paradigm numerical computing environment
and programming language developed by MathWorks.
Interfacing with programs written
in other languages, including C, C++, Java and Python is straightforward.
Coding with MATLAB is easy, since it is a higher-level language
(basic functionality are already embedded), and writing code, visualizing results,
and debugging happens in one integrated environment.
It has extensive documentation and tutorials, and a vast user community.
Working with multi-dimensional matrixes is efficient in MATLAB (as its name suggests!)
and it has a large set of toolboxes. That said, generally,
a typical MATLAB program runs around 1.5-2x slower than a C++ program.
Often times people end up coding computationally intensive parts in C
and integrating it with MATLAB code. Plus, you need to code MATLAB style,
which is different from general-purpose programming languages
like C++ or Python. Otherwise, you will end up with a very slow code.
Python: Python was developed with the aim of creating a code that is easy to learn
and read and simple rather than complicated. It supports multiple programming paradigms,
including procedural, object-oriented, and functional programming.
Python has comprehensive and powerful standard libraries.
Writing code in Python is quick, and the written code is easily reusable
(for many functions just copy paste free code from internet).
Like MATLAB and C++, Python community is also strong.
Code written in Python can easily become messy for big projects,
and since it is an interpreted language, sometimes finding the errors in the code can be difficult.
Compared to C++, your programs in Python will typically run slower.
My Application
In conclusion of last section, as a rule of thumb, use MATLAB/Python
for prototyping new algorithms and C++ in production.
Since my app was only a prototype and I needed it to be capable of running on Windows and Android devices,
I used a combination Python and Qt, namely PyQt5!
For this week’s assignment, I designed and coded a user interface that
I can later use in preliminary phase of my final project. In my final project,
I have a temperature and current sensor as the inputs,
and a DC motor, a relay and an LED strip as the outputs.
In my final project, I will have an ATTiny44 microcontroller is used as the brain of the embedded system,
and two communication options, a wired serial one (FTDI-USB) and a wireless one through WiFi.
In the development process of my project, my plan is to test the basic functionalities of my project
through the serial connection in the beginning. Therefore, here, I created a desktop user interface
application using PyQt5 that communicates with a microcontroller board,
and incorporates some of the functionalities that I intend to implement in my project design.
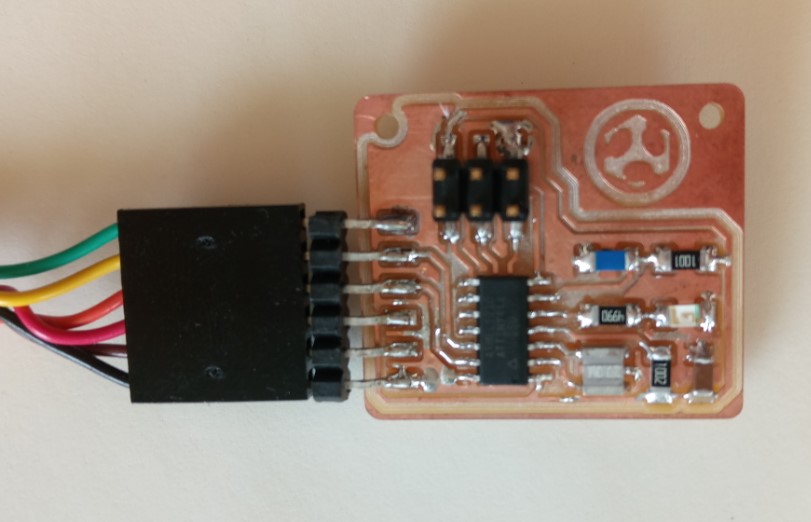
The microcontroller board that I used was the one,
which was designed and implemented in the Input Devices week.
This board had an ATTiny44 microcontroller and an RTD 1k ohm 1206 temperature sensor,
which was tested during that week’s assignment (through serial monitor).
The board also has a LED on it that I targeted as an output.
Fig. 1 shows the hardware of this assignment.
Figure 1. Microcontroller board with temperature sensor and on-board LED.
My final project is a smart block heater. In the UI, the user sets a time, at which he/she wants
the engine to be warm and ready. The UI sends the user-set time and the current time to the microcontroller.
The microcontroller then calculates the optimized time at which the heating should start.
It does so with the help of measured temperature from the embedded sensor. When the start time comes,
it connects the heater to power source and displays the timer state with RGB LEDs.
Here, instead of the relay and RGB LEDs, I use the onboard LED for simplicity.
When the job is done, the LED turns off and the UI displays a message.
The UI also shows the reading result of temperature value.
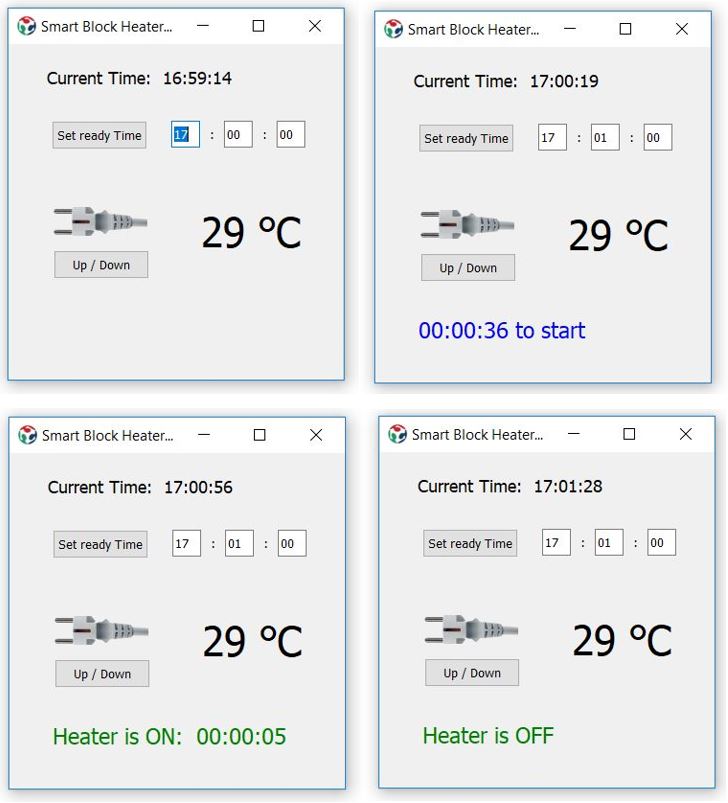
Fig. 2 shows some snapshots of the interface that I wrote as this week’s assignment.
The UI shows the current time as a digital clock in the upper part of the UI.
The user types in a ready time and pushes the ‘Set Ready Time’ button (upper left snapshot of Fig. 2).
The heater start time is calculated (here it is fixed to 5 seconds before the ready time),
and a countdown to the start time is displayed in the UI (upper right snapshot if Fig. 2).
When countdown runs out, the LED is turned on for 5 seconds, and another countdown displayed
(lower left snapshot of Fig. 2), and finally, when the user-set time is reached,
the LED turns off and a message
(Heater is OFF) is displayed (lower right snapshot of Fig. 2).
Two graphical designs for the final project are implemented in the UI,
but the code for their functionality was not completed at this point.
These two features can be seen in the snapshots.
One is the temperature display and the second one is control of block heater cord reel form the UI.
Figure 2. UI snapshots.
Here is a video of the test routine, which was explained above.
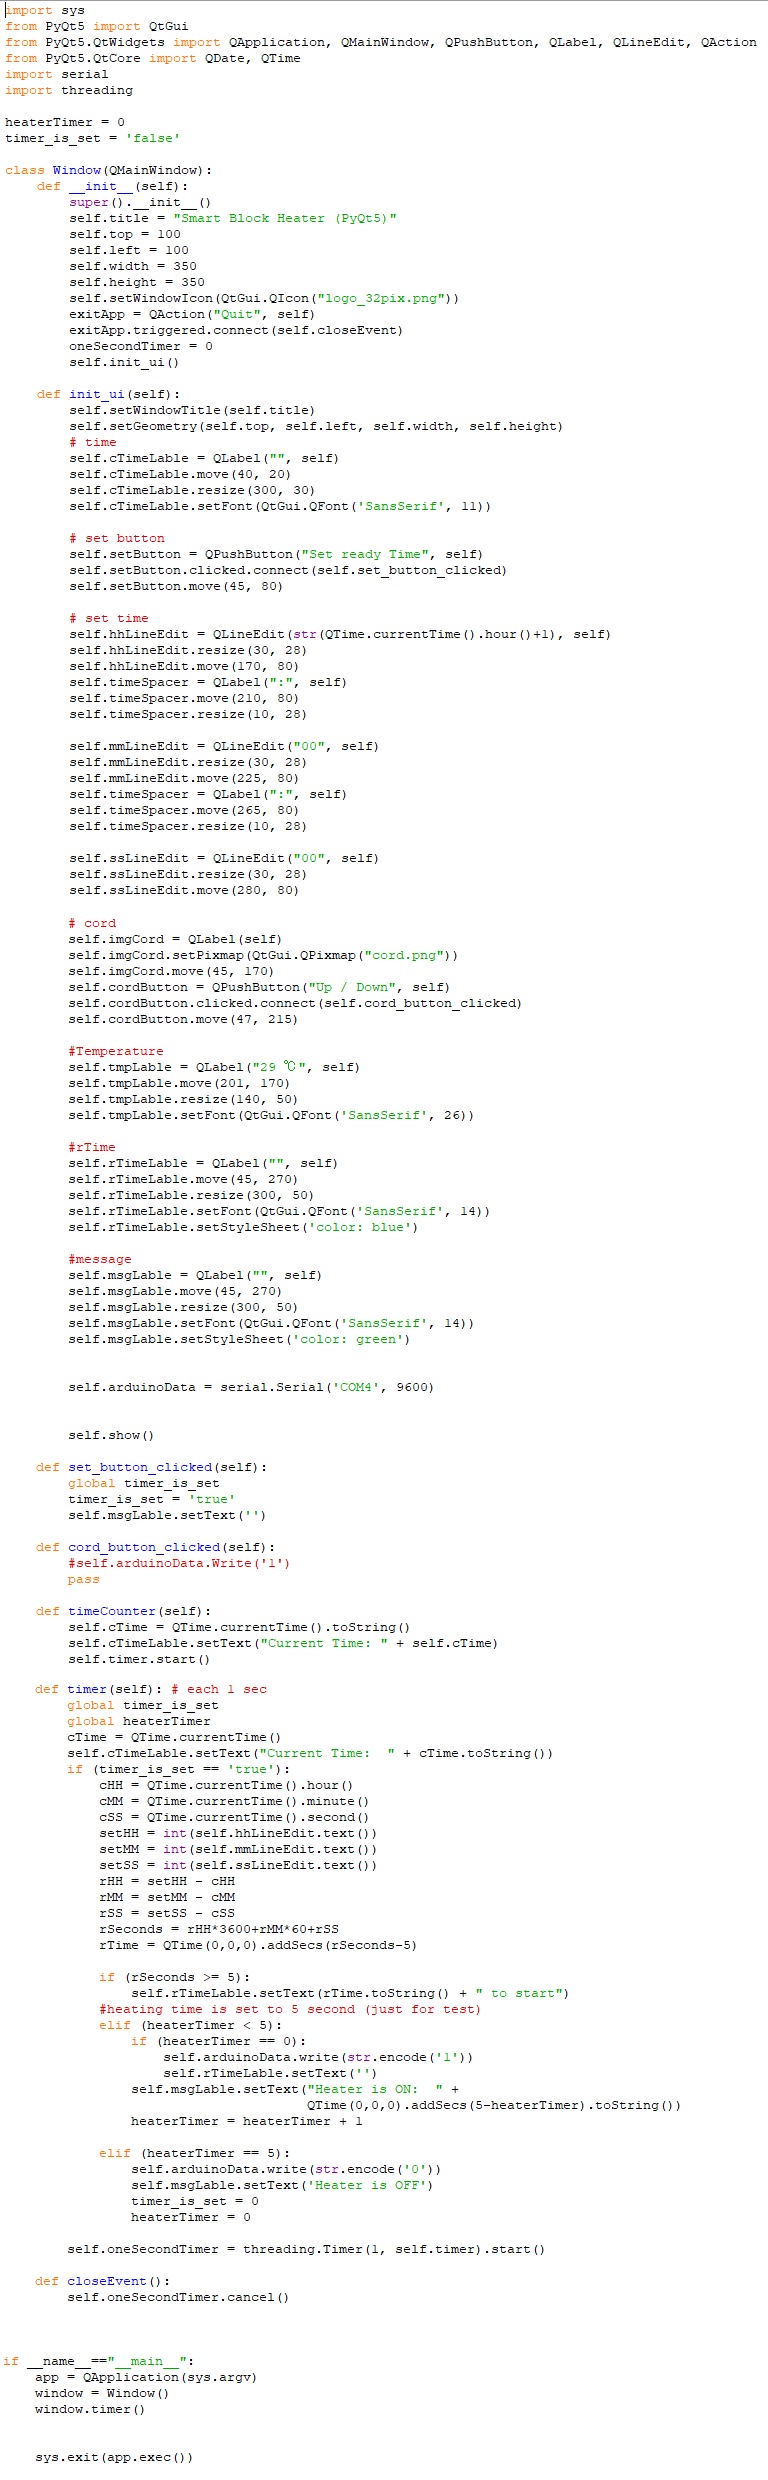
Here is a screenshot of the GUI code.
Figure 3. GUI code.
It was my first time that using PyQt5 to build a GUI. I found a helpful series of short
tutorial videos on YouTube to get start with PyQt5.
To create and show a basic window, first we need to import PyQt5 and PyQt5.QtWidgets to have access to the graphical user interface. Next, we need to
create an application object to have access to the event loop. Then, we create a QtWidgets on the window, show the window and start the event loop by
using the app.exec().
As can be seen in the code snapshot, I wrote the code object oriented. I created a class and named it Window, which is inherited from QtGUi.QMainWindow.
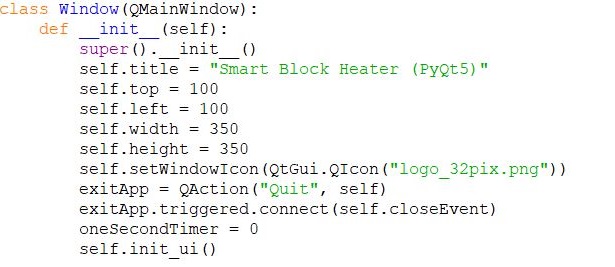
Next, I create an __init__ method (Fig. 4) and set the geometry parameters inside it, and also call the init_ui() method, which creates widgets on the window.
Figure 4. __init__ method code.
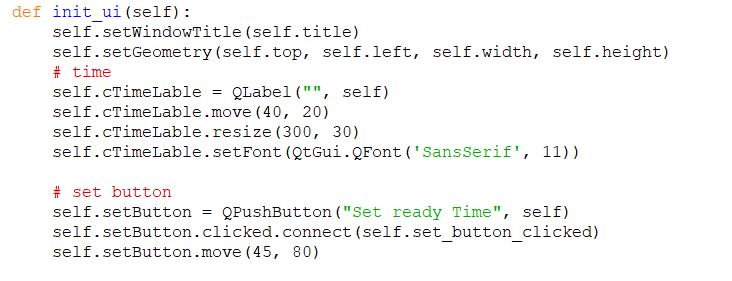
Figure 5 shows a part of init_ui method that makes a QLable to show the current time, and a QPushButton, which set the time for heating.
When the button is clicked, it passes through the set_button_clicked method.
Figure 5. Creating a QLable and QPushButton.
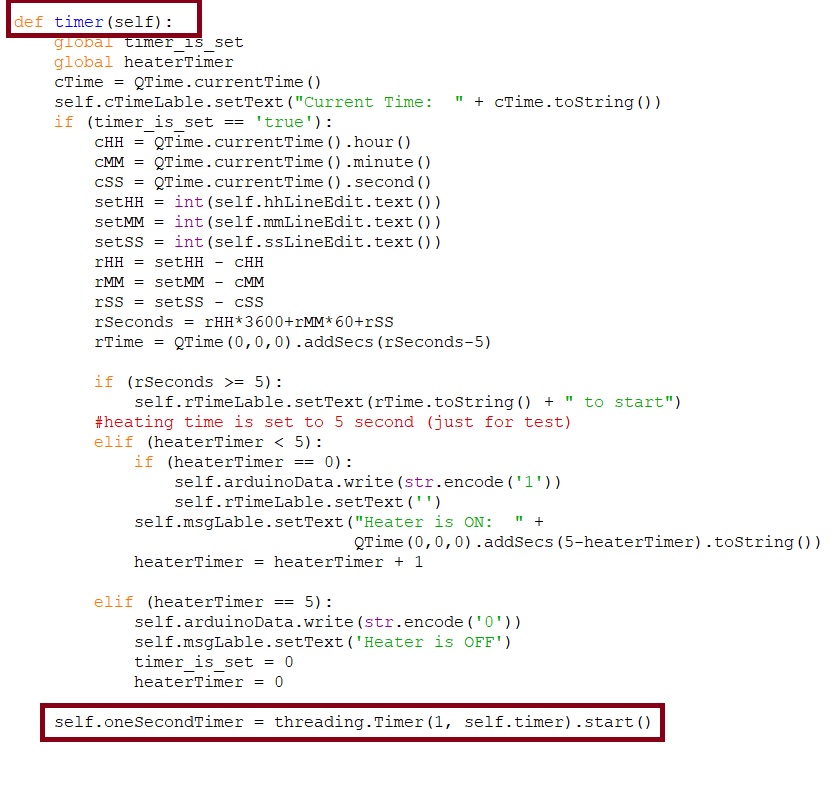
To track the times (e.g. the current time, remaining time to start heating, etc.), I created a timer using threading.Timer, which runs periodically every second (Fig. 6).
Figure 6. Periodical Timer.
I used pySerial to send commands over the serial port. The messages are sent to turn on and off the heater (in this case, the existing LED on the board)
and are simple, we send ‘1’ as the turn on command and ‘0’ for turn off. Here are the part of codes for sending a turn on command by the GUI to ATtiny44.