This week's material was done during Week 4. Access to resources were not available for Week 4 and you can check that post for more info.
For this week we are tasked with 3D printing a small object that could not be made subtractively as well as 3D scanning an object to make it into a 3D model.

3D Printing
3D printing is called an additive modeling technique unlike a Computer Numerical Control (CNC) machine that uses subtractive modeling. In additive modeling the machine, or artist, adds material to the model to build it up. In subtractive modeling the machine, or artist, subtracts e.g. carves material away from a mass of material.
In review of subtractive modelers, I needed to come up with something where a milling bit (on left) could not access a surface to mill it. Making something hollow seemed without challenge. Making something static also seemed without challenge.
Building off of Week 3 and the theme of toys and puzzles, I have designed a puzzle that can only be made through additive modeling. To be clear, you could assemble the puzzle from parts that were created subtractively, but this puzzle is created in one 3D print and has moving parts. I call it Hells Balls. The puzzle is constructed out of a double helix that is then copied and inverted below itself. This construct creates a cage for the puzzle balls to operate in. The balls will be printed inside the cage. It would probably be sufficent to create just the two double helices, but I wanted to have something fun to engage with, not just look at.
Hells Balls v 0.5 (only one ball)
hells_balls_v05 from mpearson on Sketchfab.
The object of the puzzle is to get two balls into cups at different locations. This version has just one ball and one cup. I am soliciting user input today to see where success lies in a design. Hopefully there will be time to play test and iterate this design. I would like to have easy, medium and hard difficulty and may number the balls and cups to that end. Ideally, colors would be added for the parts so numbers are not needed. The 3D printers I have access to do not easily support multiple colors.
As I dive deeper into design that necessitates parametric capacity, I continue to look for digital tools that are both intuitive, main stream, well documented and supported, and above all else, can output designs that I am after. To that end, I have landed on Autodesk's Inventor. Unfortunately, I am not sufficiently skilled in this tool to use it for this week, nor do I have a PC at home capable of running the software (Inventor requires a Microsoft Windows operating system). While I remedy these shortfalls, I continue my use of Tinkercad to design 3D models. Tinkercad, recently acquired by Autodesk, is far and away the easiest 3D modeler to use in my experience.

Tinkercad is an online tool and no installation is necessary since it runs entirely from a web browser. All models are saved in the cloud, are private or public, easily downloadable in many formats, has tutorials, and is easy to work with. You can also code custom design tools and/or build off of other custom design tools. I started with a helix tool and then modifed the parameters to stretch. My goal was to create a sphere and as you can see, there is work to be done. Click on image to enlarge.
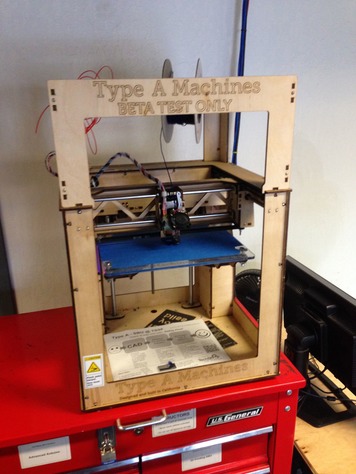
March 1, 2014 - Update from the 3D printing trenches at TechShop San Francisco.
Since the Richmond Fab Lab is still coming online we are doing much of our work at the TechShop in SF. Our 3D Printer choices are the MakerBot and a machine called the Type A. The Type A came highly recommended and there are two at the TechShop. I went with the Type A. The machine on their website is the newer one. The version I used is on the left. The printer is very similar to the Makerbot, but manipulates the Z axis by moving the printing deck. It also has a very good printhead and filament feed system. The print deck is not heated, but since I am using PLA that was not a problem. After spending time with the Printrbot and the original Makerbot, this machine is golden.
I decided to design an alternate creation than the one above as Hells Balls would have taken all night to print and would have been tough to iterate given my limited knowledge of the printer. I decided to create a box with a sphere inside. This design also included cut outs on each side. I used TinkerCad to design this in about ten minutes.

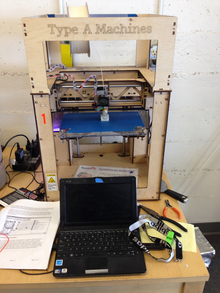
Create in TinkerCad, then download the STL file and put it on a thumb drive. Now, it is off to the very small sub-notebook that is hooked up to the Type A.On this small computer we have the two pieces of software necessary to create the piece: Pronterface and Keep It Simple Slicer aka KISSlicer. Pronterface controls ther printer and KISSlicer takes the STL file from TinkerCad and creates the GCODE file you feed into Pronterface.
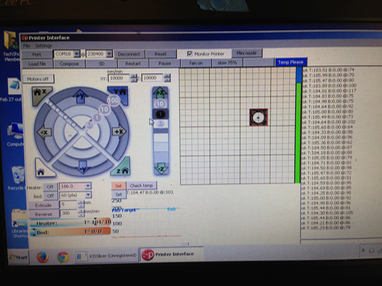
Picture of Pronterface to the left. This tool allows you to control the printhead, zero to a home position, set temperatures and more. This is the same tool that the Printrbot used when I built that although the version I had caused quite a bit of cutting edge bleeding if you know what I mean.
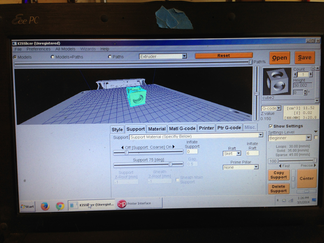
KISSlicer makes a GCODE file of the small piece I will refer to as BoxBall.
Ok, time to print! Unfortunately, the first print did not have adequate infill or a raft to build pillar supports for the ball that was suspended inside the box. What does all that mean? Infill is how solid the piece is. KISSlicer can put air pockets inside to save both time and material. It works great when you have the right amount. A raft is a little later of plastic, like a raft in the water, to build upon. This allows layers of plastic to adhere more easily. In my first try, KISSlicer made a pillar to support the floating ball. It was working great till the printhead tipped it over on its side. In the second attempt, I added a raft in TinkerCad and increased the infill from 33.3% to 50%. As you can see, the arches of the side cutouts were given a pillar to support them. This was done because I had enabled this option in KISSlicer.

Box Ball final print with movies below.
3D scanning was an adventure into Autodesk's 123D Catch. I loaded the application on to my iPhone 5 and searched for something to scan. This application is free and relies on a server farm to process images you feed it from your phone. The process can take from minutes to hours and is a quick way to get some interesting results. It should be noted that this system can be inaccurate in the details, but gives some amazing and startling captures. The application walks you through the process and uses the phones sensors to detect which orientations you need and are on as you circle the subject. I used about 35 photos for this dragon.


Step 1: Start a scan. The software is becoming more and more social as it incorporates other users scans and an interface for you to share your scans.
Step 2: Take a series of pictures as you circle the subject. The subject should be uniformly lit and have a contrasting background. In this picture you can see that I do not have a contrasting background. I added white paper all over the place in a subsequent attempt.
Step 3: Review your photos and delete or retake any that did not work out. It is unclear to me what qualifies as a bad shot other than poor lighting or angle.
Step 4: Then submit your photos to the server farm and await your results!
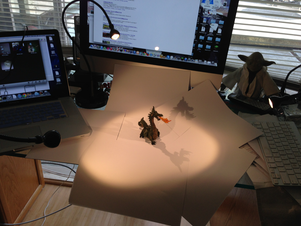
Here is my "stage" for taking the dragon photos. Quick and dirty and Yoda did not bother me.
Here are two scans, the dragon and my hand. Pretty cool stuff!
Dragon
The Dragon bombed…not sure what went wrong. It blended the entire stage. I think placing the dragon on an outside table in the sun would be better…at noon! Wait! As it turns out…there is lots of scatter pickup from the paper "stage" and i was looking at it from the bottom. Ta da! You will have to maneuver the model to flip it over if you click on the 3D manipulate box.
Handy Tools