"Design, make and document a 'press-fit construction kit"
The press fit construction kit is taking shape. Not having ready access to a laser cutter makes things difficult. Iterative design is more my style and I will be enabled in that realm tomorrow when we have 2 two-hour sessions at the TechShop with the laser cutter. This morning at a coffee shop some napkin design happened, you need to always be ready to capture inspiration OR little moments of time left to dream.

I realize now, that I left out the flex holes at the base of each slot on the triangle vertices. As it turns out, the slot was quite a bit thicker to accommodate the corrugated cardboard used. I used Inkscape to develop the design from the napkin and then imported into Adobe Illustrator (AI).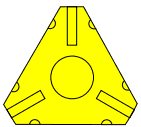
I wanted to make sure the design came up in AI before I started the Laser cutter time at the TechShop. We only get two hours on the cutter and I didn't want to spend it on the initial design. As it turns out, Inkscape is useable, but AI seems more robust. I am new to both tools and feel I should have started in a CAD program and then brought it over to AI. I was able to clone parts for the parametric build, but my design is built off of geometric shapes that should be much easier to specify and input. I started the download and install of the Fab Mod tools and hope to explore those in future weeks.
The design has evolved to include pressure points for insertion into the center circle as well as squared tips to allow for stronger “prongs”. I call it a Tring short for Triangle. It came out "Twing" in the wee hours of the night and others overheard me…it stuck.
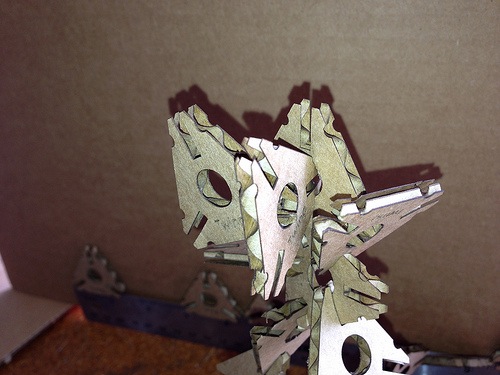
The Twings may or may not be the only piece. What I would like to include is an articulated system that can have additional pieces constructed under a standardized form ala LEGO style. While LEGO is complex in its scale and ratio system, and difficult to deduce from the user perspective, the LEGO go together intuitively. Intuitive plus a basic system that is easily understood, while both visual and tactile in nature, is the goal.
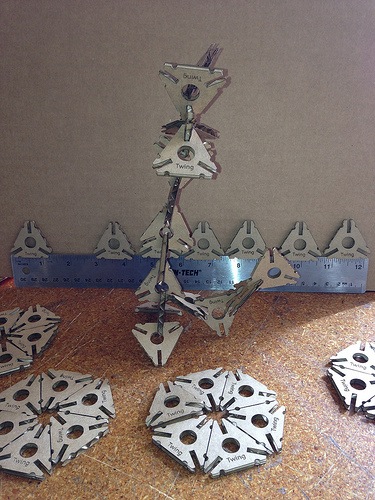
The Twings will allow the build out of a model in four directions, but lacks a system that is structurally strong while also easily fit into our world of rectangles.
Any educational modeling system needs to have both. I hope to try a press board and an acrylic in the weeks ahead when I have time to return to the project.
Work flow
- I started with a sketch that ended up on a napkin in a restaurant.
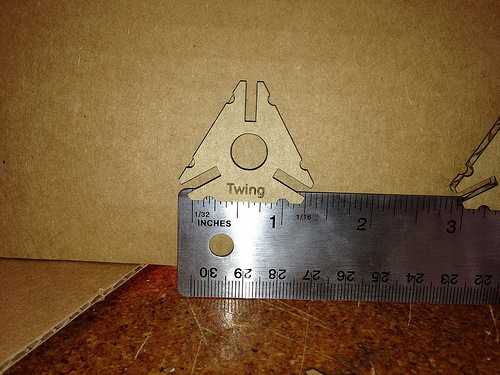
- I took this sketch and modeled it in Adobe Illustrator, a vector based drawing program where the drawing is represented by formulas rather than pixels as in a paint program. My experience with Illustrator is limited, but I worked extensively with Corel Draw 6 years ago and it is similar. Once the learning curve was conquered the initial Twing was born. Six iterations later Twing was ready! Here is the AI file of a Twing: http://bit.ly/1tK3Nh3
- I made the design a quad image so I could printout multiples.
- I needed to take a two hour class at the TechShop to use the Epilog Laser Cutter. I would need to come back to do the cutting of the Twing at a later date. The class was thorough and moved through all the settings, setup and materials you could use. We finished with creating a little dog tag engraving.
- In a few days I reserved the machine to make my cuts. I moved the file to the control machine and realized I should be making a whole lot more than four at a time. The laser cutter is setup as a printer and you send your print directly from Corel Draw using a the settings of the printer driver to control what happens on teh laser cutter. First I needed to setup the machine:
- Use a USB drive to take your finished work to the computer connected to the laser cutter.
- Prepare the computer:
- The computer is normally on and should be left on. Make sure the monitor is also on. If in doubt, reboot the computer to start fresh.
- Prepare the laser cutter:
- Make sure the fan is on. A fire may start if the fan is not running. Never leave the area of the cutter when in operation.
- Turn on the laser cutter. The On/Off switch for the laser cutters is on the left side of the machine.
- Check the lens. A dirty lens can affect your power settings significantly and can also be a source of fire. If dirty, alert the TechShop staff so they may clean it.
- Check the metal bay for debris.
- Set the material in the bed of the laser cutter and set the home position.
- Set the focus by using the metal guide to come down on the material to be cut. This will set the distance and focus.
- Open the project (convert from AI if necessary in Corel Draw) and setup the print and print settings:
- There was not a setting for corrugated cardboard or fiberboard, but there was a set of settings in the documentation for mat board with a 45watt CO2 laser: http://bit.ly/1nTXEBu I started there and used the following settings:
- Speed = 50
- Power = 50
- Frequency = 500
- The above settings turned out to work almost perfect and I landed at a power of 40 with speed and frequence unchanged.
- There was not a setting for corrugated cardboard or fiberboard, but there was a set of settings in the documentation for mat board with a 45watt CO2 laser: http://bit.ly/1nTXEBu I started there and used the following settings:
The Design
The design was planned to be used with cardboard that I had collected from the packaging of laptops. It is corrugated fiberboard with two walls. The same stuff used in packing boxes typically sent in the mail. These particular sheets were neatly cut for laptops and fit nicely in the laser cutters 18"X24" bed. This is the type of cardboard used: http://en.wikipedia.org/wiki/Corrugated_fiberboard
What I learned and would do differently
It was my hope that the cardboard would flex. It does flex, but will not flex more than a few times. The cardboard will also pinch and not retake it's shape. I would like to try using a wood board and/or some tougher acrylic. This will require a thinning of the design so the legs flex.