
Juan Ranera
Fab Academy 2013 Participant
Interface and application programming
The assignment in the last week was write an application that interfaces with an input &/or output device.
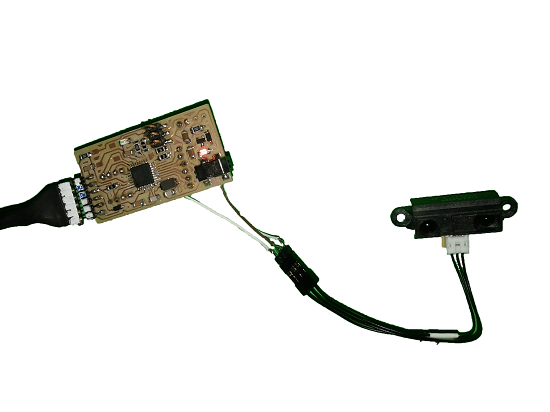
I used a sensor measurement distance (SHARP 2Y0A21 )
to modify the time flashing led 2 weeks ago.
Now I decided to show the data of the sensor in a screen.
I've worked with different programs to show data (Matlab, Visual, Wonderware...) but I have never worked with
"Processing"
and I thought it was a good idea to test it and learn a little bit. I did a first test with Arduino UNO board, and then fabricated the
Barduino board.
The two boards have Atmega328P microprocessor and operation is exactly the same.
"Processing" allows you to communicate easily through the USB port and there are a lot of tutorials about it.
I followed the tutorial: Arduino and Processing. Once I programed the Barduino with a "StandardFirmata", run Processing and open Examples -> Libraries -> arduino -> arduino_input
I modified the program and this is the final code...
import processing.serial.*;

import cc.arduino.*;

Arduino arduino;
PImage img;
PFont font;

color off = color(4, 79, 111);
color on = color(84, 145, 158);
float max_distance;

void setup() {
  size(470, 470);
  arduino = new Arduino(this, Arduino.list()[0], 57600);

  font = createFont("SansSerif",1);
  textFont(font,20);

  for (int i = 0; i <= 13; i++)
    arduino.pinMode(i, Arduino.INPUT);

  smooth();
  noStroke();

  max_distance = dist(0, 0, width, height);
  img = loadImage("logo.png");
}


void array_buttons(){
  if (arduino.analogRead(0)>100){
    rect(420 - 13 * 30, 30, 20, 20);
  }
  if (arduino.analogRead(0)>120){
    rect(420 - 12 * 30, 30, 20, 20);
  }
  if (arduino.analogRead(0)>140){
    rect(420 - 11 * 30, 30, 20, 20);
  }
  if (arduino.analogRead(0)>160){
    rect(420 - 10 * 30, 30, 20, 20);
  }
  if (arduino.analogRead(0)>180){
    rect(420 - 9 * 30, 30, 20, 20);
  }
  if (arduino.analogRead(0)>200){
    rect(420 - 8 * 30, 30, 20, 20);
  }
  if (arduino.analogRead(0)>220){
    rect(420 - 7 * 30, 30, 20, 20);
  }
  if (arduino.analogRead(0)>240){
    rect(420 - 6 * 30, 30, 20, 20);
  }
  if (arduino.analogRead(0)>260){
    rect(420 - 5 * 30, 30, 20, 20);
  }
  if (arduino.analogRead(0)>280){
    rect(420 - 4 * 30, 30, 20, 20);
  }
  if (arduino.analogRead(0)>300){
    rect(420 - 3 * 30, 30, 20, 20);
  }
  if (arduino.analogRead(0)>320){
    rect(420 - 2 * 30, 30, 20, 20);
  }
  if (arduino.analogRead(0)>340){
    rect(420 - 1 * 30, 30, 20, 20);
  }
  if (arduino.analogRead(0)>360){
    rect(420 - 0 * 30, 30, 20, 20);
  }
}

void array_circles(){
  for (int i = 0; i <= 13; i++) {
    ellipse(85 + i * 60, 400, arduino.analogRead(i) / 16, arduino.analogRead(i) / 16);
  }
}


void draw() {
  background(0);
  stroke(on);
  fill(off);

  array_buttons();
  array_circles();

  //Print data analog input 0
  textFont(font,30);
  String myText = "A0: " + arduino.analogRead(0);
  text(myText,190,450 );

  //Print my name
  textFont(font,20);
  text("Juan Ranera",330,438);
  textFont(font,20);
  text("FabLab 2013",330,458);

  // Draw the image to the screen at coordinate (0,0)
  image(img,80,80);
  //Apply transparency without changing color
  tint(255, arduino.analogRead(0)/2);

}
I looked several examples and I tried different compositions of screens. The screen shows an array of squares that appear and disappear and an array of circles that resized according to the distance.
Finally I added a transparency effect in the logo of Fablab and showed the data reads trough the analog input in the screen.