Final Project
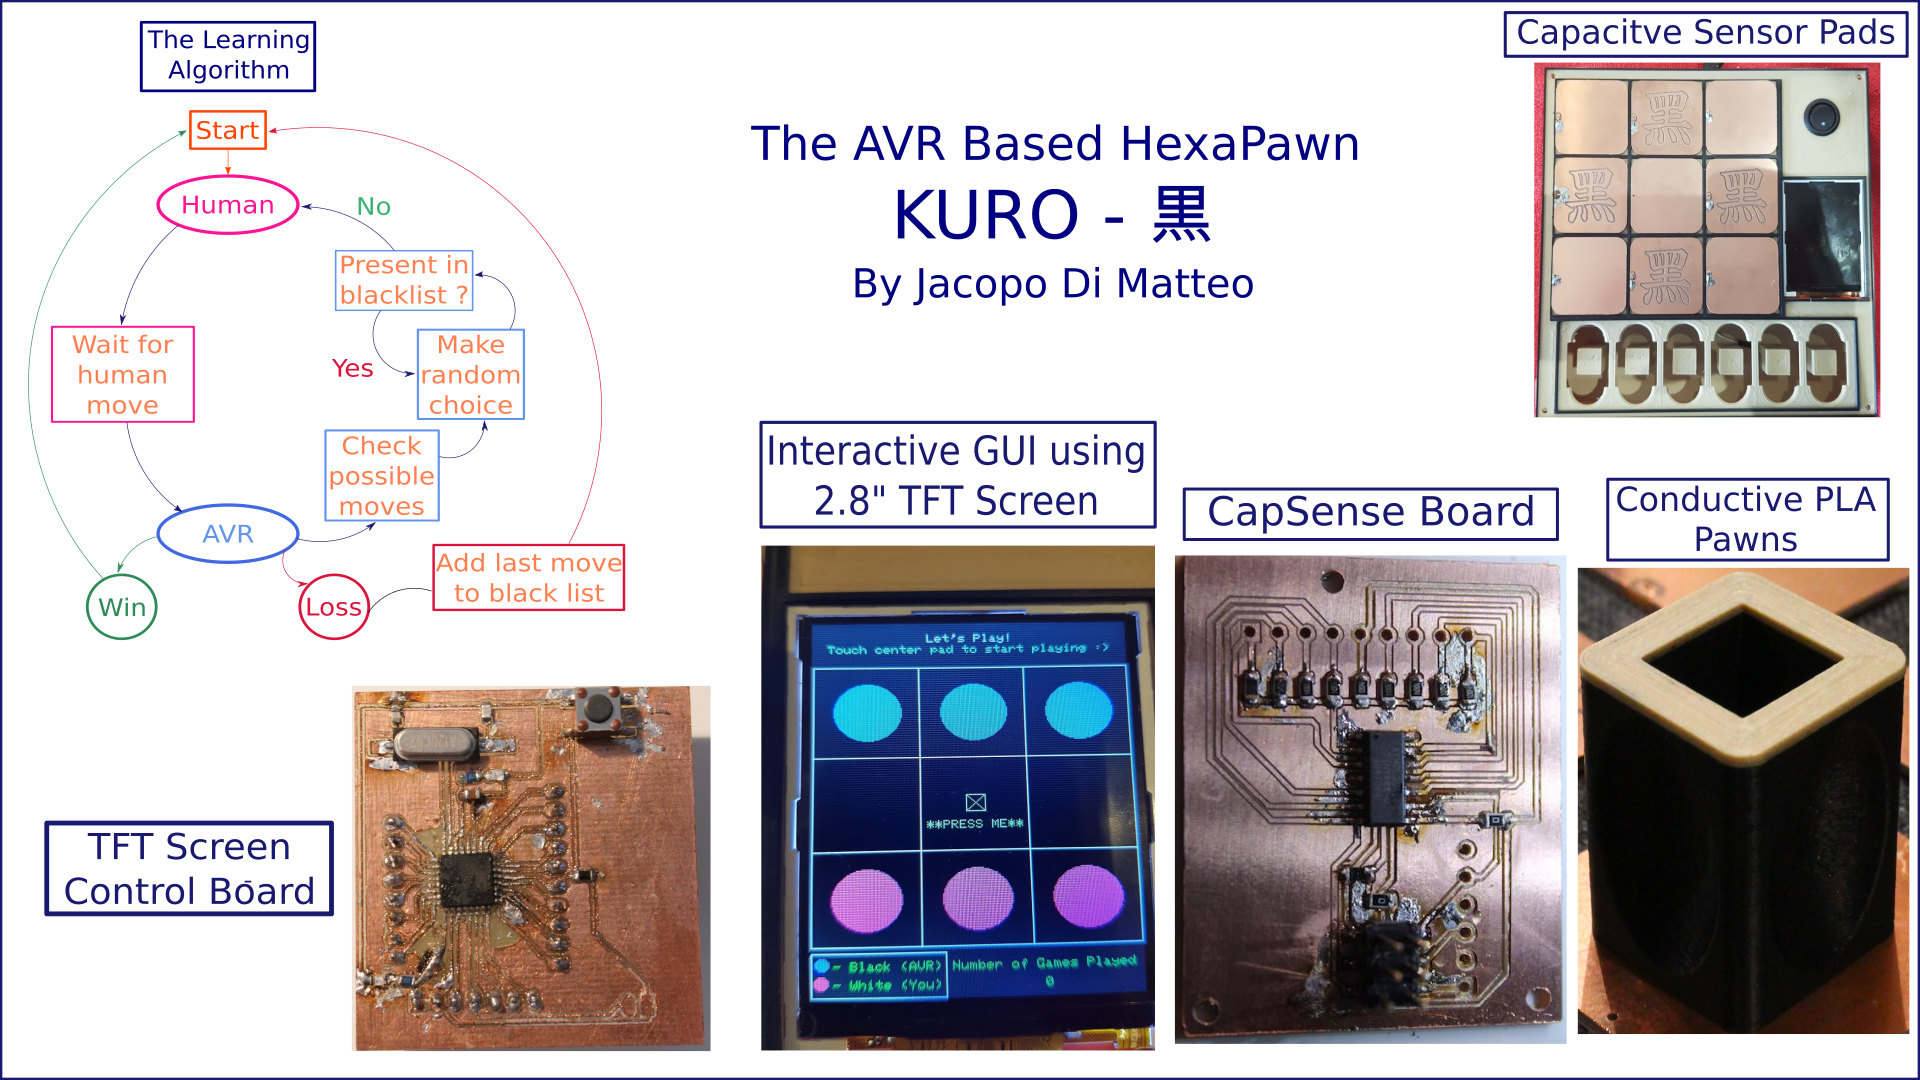
The AVR Based Hexapawn
Tools & Assignment
 Updated for 2019 evaluation standards!
Learning Outcomes
- Create your own integrated design
- Demonstrate 2D & 3D modelling capabilities applied to your own designs
- Select and apply appropriate additive and subtractive techniques
- Demonstrate competence in design, fabrication and programming of your own fabbed microcontroller PCB, including an input & output device
Have you?
- Made your slide: 1920 x 1080 pixels with your name, project name, Fab Lab name, a photo/render/sketch of your project, a brief description of what your project is/does
- Made a ~1 minute (10MB/1080p) video of you explaining your project
- Made a separate Final Project page that briefly summarizes your project and
- Included the BOM (Bill of Materials) for your project
- Linked from this page to any weeks that you worked on your final project
- Linked to your presentation.png and presentation.mp4
- Included all of your original design files in the archive (2D & 3D, board files & code) No external hosting of final project files - discuss file sizes with your instructor
- Included the license you chose
- Acknowledged work done by others
Finding Inspiration
As I mentioned earlier somewhere, I think, I study and work in the area of Artificial Intelligence (AI), which is my passion.
Additionally, as hobbies,I love pocket watches & watchmaking, birds of pray, fountain pens, video games, anime and manga.
I’ve paid homage to many of these topics in my weeks, by using these as inspiration on several of my designs.
My original project, the self-assembling modular cubes, was a reference to my interest in robotics (Ai subfield).
I wanted to do the same when I thought up the idea of modular clocks, reflecting my passion for time pieces, and as a spiritual successor to my cubes.
Once I realized that creating modular clocks was likely out of my reach, due to the time constraints placed on me from having to work full time, I had to change my plan for a final project.
Doing a watch was not really an option since Joey had already settled on that (by the way your work is amazing if you’re reading this.)
As I floated around in the sea of my indecision, I came across this video:
And I knew, that’s what I was going to make.
HexaPawn Explained
Hexapawn is a simplified version of chess, It’s played on a 3x3 board/grid with only 6 pawns (3 black, 3 white).
This game is meant to be played against an imaginary adversary (the computer), and in the original configuration of the game he makes the 2nd move, which is what I will be making
Game Play
Like in classical chess, pawns can move one square forward into an empty square. Pawns can capture the opponent’s pawns by moving (forwards) diagonally.
Win Condition
Get one of your pawns to the other side of the board OR be the last person to move (aka prevent the other player from moving) OR there are no pawns left for that player (aka they have all been eaten)
The Learning Algorithm
This game is meant to be played against an imaginary adversary (the computer), therefore the learning algorithm is implicit in the rules of the game.
Because of it’s simplified rules, the game has a small number of possible states, which is further decreased if we include identical, yet mirrored, moves.
The exact number seems to vary on online sources, from 33 to 24, the reason for this is having more or less matchboxes (less matchboxes == faster learning, and takes time to decode, for the human user, which box applies to the current state).
(In my case I won’t be using matchboxes, so I count the number of states to be 19, my counting won’t matter, as long as we have a reliable way of finding equivalent states.)
At first, the computer knows all possible states of the game, and the moves it can make at each one. When the white (human) player makes a move, it matches the current state of the board to one that is stored in it’s memory (normally this is the humans task, in my case it’s the AVR) and randomly selects one of the possible moves it can make, with equal probability.
If the computer looses, it (admits defeat and) removes the move that led to a loss (only the last one), never repeating it again.
It takes around 50 games for the machine to gain pro-level status.
Design
There are several design stages involved to create the final version of the game
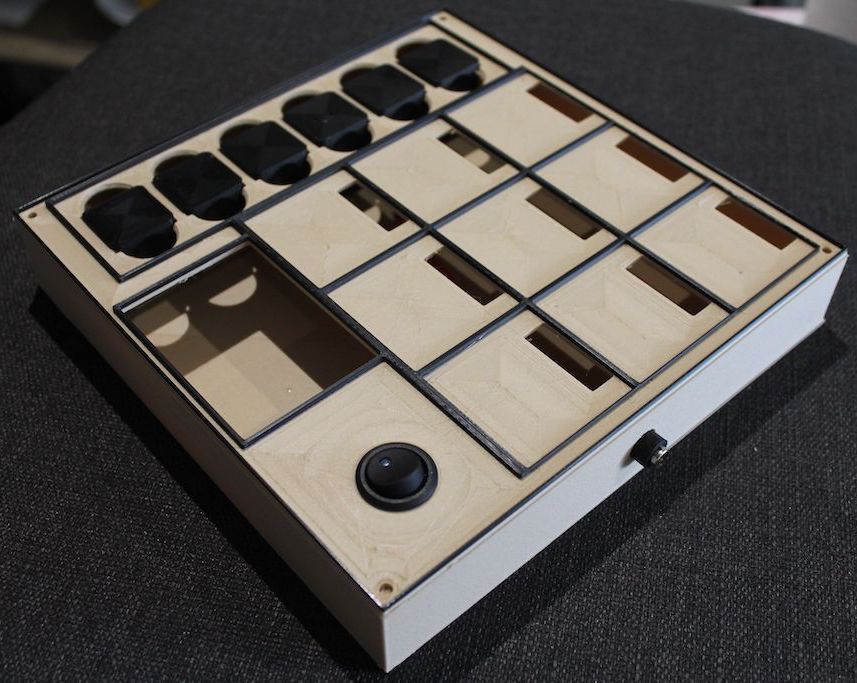
Container
This is what contains the entire design, it’s composed of two parts, the lid & the body.
Both were designed in Antimony:
Lid
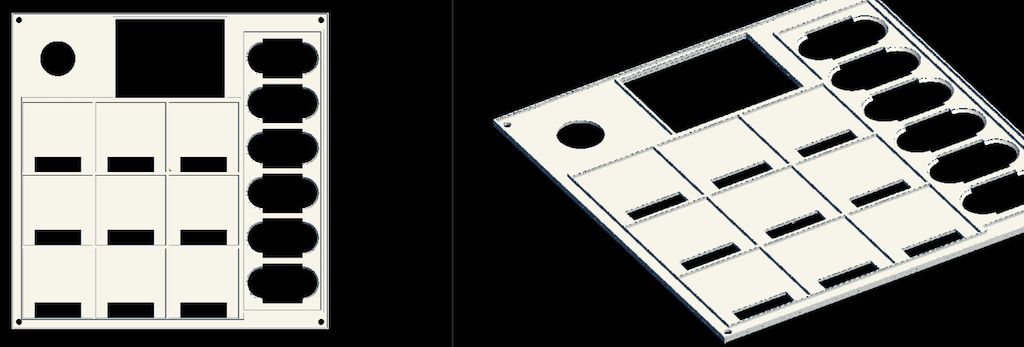
Body

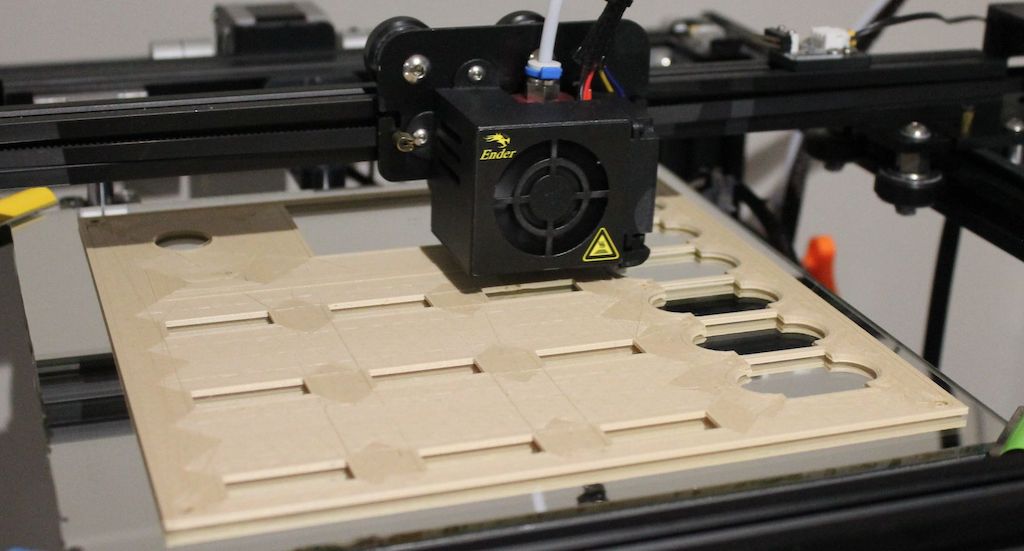
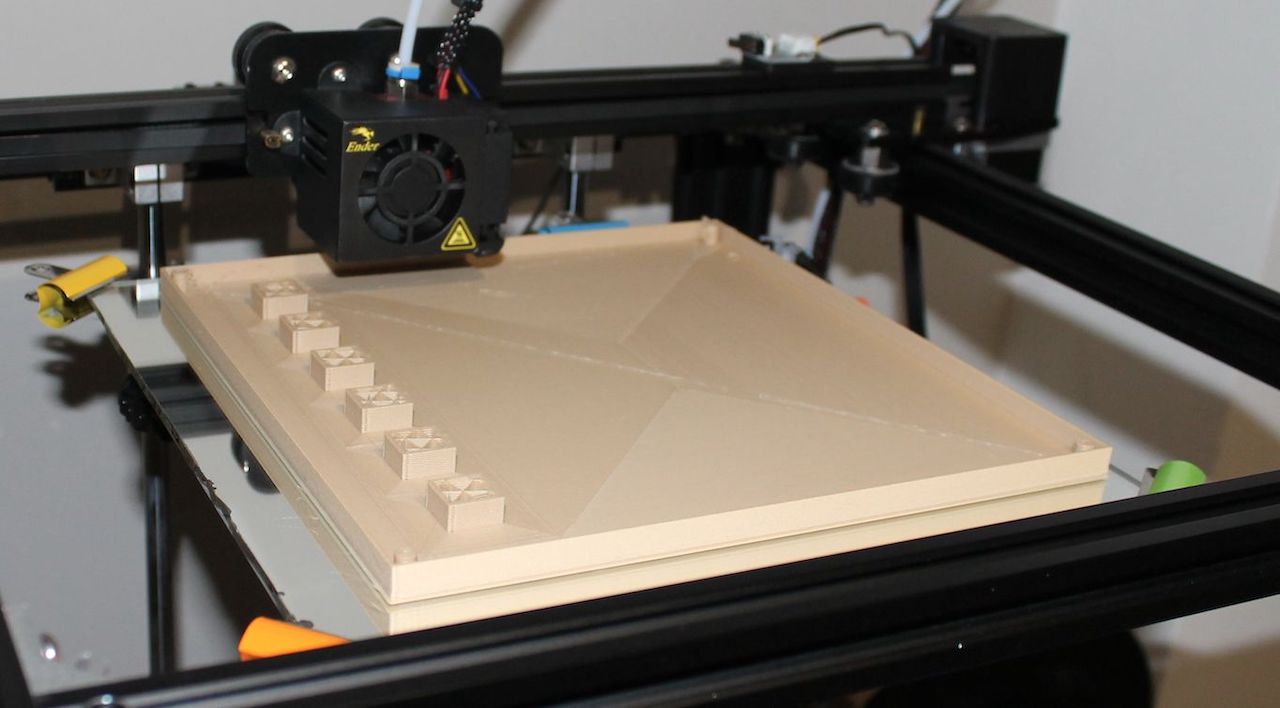
They were 3D printed, using Cura:
In the case of the lid the settings of interest are:
- Layer height:
0.2 - Infill:
25% - No support
- No bed adhesion
- Pause at layer 7 (to change filament to black for dual color)
In the case of the body the settings of interest are:
- Layer height:
0.3 - Infill:
25% - No support
- No bed adhesion
Lid
Body
Pawns
The pawns that will control the flow of the game
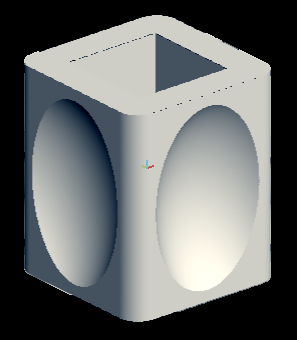
They were 3D printed, using Cura:
Conductive Filament
The majority of the body of the pawn must be made of conductive filament, in my case protopasta PLA, otherwise the pads will not be triggered.
Black pawns:
- Layer height:
0.2 - Infill:
25% - No support
- 5 brim lines
White pawns:
- Same as black plus …
- Pause at layer 145 (to change filament to wood for dual color)
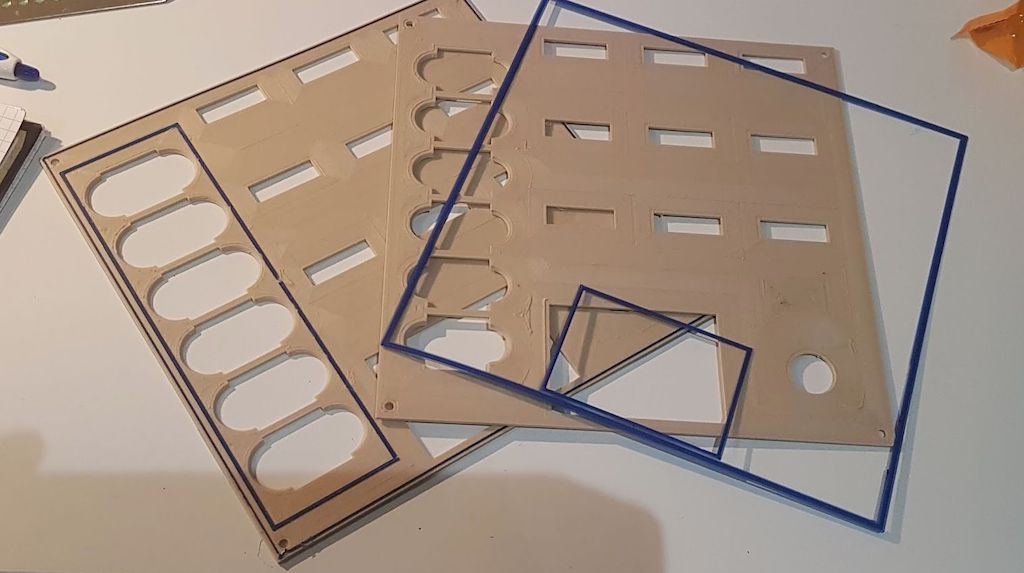
Pads
The pads were designed in week11, I only had to cut out 9 of them.
Pawns & Pads

Box Final
TFT Board
The board itself was created in week12, so for the final project the only thing left to do was the communication between the two boards & design a proper GUI, which is outlined in the, which are both outlined in the programming section.
CapSense Board
The board itself was created in week11, so for the final project the only thing left to do was interface multiple sensors and sending out the readings, these are outlined in the programming section.
Code & Explenation
The entire code for the gui program is too long to copy paste in it’s entirety, as such I only show the essential parts of the code and minimize having multiple times the same code printed when I’m explaining different sections of the same functions.
Programming - Communication
For the communication with the other board, I extended my work from Week14.
Multiple Sensor Readings
I had left off in week11 with code which was easily extendable to multiple sensors, so the only thing left to do was figure out the right pins and add multiple sensing inputs.
// Left
CapacitiveSensor cap1(8,9); // 8 sender, 9 sense
CapacitiveSensor cap2(8,10);
CapacitiveSensor cap3(8,7);
CapacitiveSensor cap4(8,6);

// Right
CapacitiveSensor cap5(8,0);
CapacitiveSensor cap6(8,1);
CapacitiveSensor cap7(8,2);
CapacitiveSensor cap8(8,3);
CapacitiveSensor cap9(8,5);
From week11 I added a discretizing step so that the receiver board gets only a string of 1 and 0 in accordance to the active and inactive sensors.
void check_state(CapacitiveSensor &cap)
{
  float read_val = cap.capacitiveSensor(5);

  if (read_val > 1900)
  {
    mySerial.print('1');
  }
  else
  {
    mySerial.print('0');
  }
}
SendOnlySoftwareSerial, the same as in week11, therefore the communication from the CapSensing side is done
void loop()
{
  // CapSensors alternate to minimize interference
  check_state(cap5);
  check_state(cap1);
  check_state(cap6);
  check_state(cap2);
  check_state(cap7);
  check_state(cap3);
  check_state(cap8);
  check_state(cap4);
  check_state(cap9);

  mySerial.print("\n");
  delay (100);
}
TFT Board Side - Serial Receive
The pins of the TFT board dedicate to serial communication are IC pins 31 (TX) & 30 (RX), therefore the only thing required for us to do is set up for the board to do a serial read, and set that so that the GUI interface can read it:
void setup() {
  Serial.begin(9600);
  lcd.begin();
  lcd.fillScreen(BLACK); // clear screen
}

void readSerialData(){
  if (Serial.available() > 0) {
    incomingData = Serial.read();
    for (int i; i < 9; i++) {
      if(incomingData.charAt(i) == '1'){
        touched_state = touched_state | activation_states[i];
      }
    }
  }
}
The above code relies on the following constants
int touched_state = 0b000000; //  000 Row, 000 Columns, 00 empty (1 byte)

#define A1 B100100
#define A2 B100010
#define A3 B100001
#define B1 B010100
#define B2 B010010
#define B3 B010001
#define C1 B001100
#define C2 B001010
#define C3 B001001

int activation_states[9] = {
  A1, A2, A3, B1, B2, B3, C1, C2, C3
};
Programming - The GUI & Responses
The game has two basic states Start State where it’s waiting for the user to begin the game, and Game State.
void loop(void) {
  drawChessArea(); // Set start state
  touchStateUpdater();
  if (touched_state == C_TOUCH) { // center press -> move to game state
    drawFillCenteredSquare(x1c, y1c, lenSide + 12, BLACK);
    while (gameFinished == false){
      playTurn();
    }
  }
}
Start State
After turning on the machine, the human is greeted with a start screen, the begin the game, the player must touch the center pad:
void drawChessArea() {
    .
    .
    .
    // Draw Pawns
    draw_board();
    .
    .
    .
    // Greeting
    String greeting = "Let's Play!";
    String command = "Touch center pad to start playing :)";
    header_write(greeting, command);
    .
    .
    .
}
This will commence the game.
Game State
There are two distinct states in which the AVR is in, human turn and AVR turn
int turn_state = 1; // 1 = you, 0 = avr - human always starts

void playTurn() {
  .
  .
  .
    if (turn_state == 1) { // Your turn
        turnText = "Show Me What You Got!";
        command = "Please Make A Move";
        header_write(turnText, command);
        .
        .
        .
        turn_state = 0; // Set turn to Avr
    }
    else if (turn_state == 0) {
        turnText = "Good move, let me retort ;)";
        command = "Please Move Pawn As Shown Below";
        header_write(turnText, command);
        .
        .
        .
         turn_state = 1; // Set turn to human
    }
    turn_number += 1 // Count turns
}
The majority of the interface is based around these two modes.
Rule Checking
The player is free to do any move he wants, but obviously we need to check for illegal moves.
The move rules are straightforward:
1. A pawn can only move 1 up…
2. or 1 diagonally if there is an enemy pawn
Anything else is illegal, we can check that the player follows this rules by:
boolean lock_resources(int pad){ // Return true if move succeeded, false if not
  int pawn_color = board_state[pad][1];
  int activation = board_state[pad][4];
    .
    .
    .
    if(pawn_color == B_PAWN && turn_state != 0) { // Black Pawn
    if (activation == 1) {
      turnText = "That's My Pawn!";
      command = "Human Moves, Not AVR.";
      header_write(turnText, command);

      while (activation == 1){
        touchStateUpdater();
        activation = board_state[pad][4];
      } // LOCKED
      return false;
    }
  }
  else if(pawn_color == N_PAWN) { // No Pawn
    .
    . // Check cases
    .
  }
  else if(pawn_color == W_PAWN && turn_state == 1) { // WHITE Pawn
    .
    . //Check cases
    .
  }
}
Touch Feedback
When the board is in play mode, it regularly checks for touch input, if it discovers a touch input, it updates it’s global state to inform of the touch, and draws a smaller yellow box around the currently touched pad.
void touchStateUpdater() {
  for (int i; i < 9; i++) {
    int xc = board_state[i][2];
    int yc = board_state[i][3];

    int on = 1;
    int off = 0;

    if (activation_states[i] == (activation_states[i] & touched_state)) {
      board_state[i][4] = on;
      drawCenteredSquare(xc, yc, lenSide+2, YELLOW);
    }
    else {
      board_state[i][4] = off;
      drawCenteredSquare(xc, yc, lenSide+2, BLACK);
    }
  }
}
Implementing The Learning Algorithm
I explained the algorithm earlier, but something is the theory, else is the practice.
Mirrored Moves
The first thing to do was figure out how to identify mirrored moves, which sounds but tricky to figure out. Normally the human player would be left to do this, in my case the AVR has to figure it out.
After some thinking, the simplest approach I could come up with was was to scan the current state of the board in normal order, and after that order row-wise but in reverse column wise, this is because we assume secularity in the vertical axis but not in the horizontal one:
boolean checkIfSame(in_state, cmp_state) {
  if (in_state == cmp_state){
    return True;
  }

  state_string_mirror = "";
  for (int j = 0; j < 7; j+=3) {
    for (int j = 2; j > -2; j--) {
      current_char = in_state.charAt(state_by_row+state_by_column;
      state_string_mirror += current_char;
    }
  }

  if (in_state == state_string_mirror){
    return True;
  }
  else{
    return False;
  }
}
0, - and 1, which is achieved with:
String readStateAsString(){
  state_string_norm = "";
  for (int i = 0; i < 9; i++) {
    if(board_state[i][1] == B_PAWN){
      state_string_mirror += "0";
    }
    else if(board_state[i][1] == N_PAWN){
      state_string_mirror += "-";
    }
    else{
      state_string_mirror += "1";
    }
  }
  return state_string_norm;
}
Making a Move
I figured pretty early one that saving every single state and it’s possible move would have been a waste of my time and also prone to error if I missed anything, so the best approach (in my option) was not to have “saved states” per se, but a more flexible idea of “what are my available moves currently”:
This mimics closely the rule checking, but instead of checking if the move is allowed, we add to the list of possible move combos the ones that follow our aforementioned criteria.
So, we check every pad, if it’s a black_pawn, check if there is any pad to which it can move. Encode and add any possible move.
int moves[][2] = {};
int counter_of_moves = 0;

void checkGameState(){
  counter_of_moves = 0;
    for (int i = 0; i < 9; i++) {
      if(board_state[i][1] == B_PAWN){
        for (int j = 0; j < 9; j++) {
          .
          .
          .
          if(diff_xc == 0 && diff_yc == 80){
            if (board_state[j][1] == N_PAWN){
              moves[counter_of_moves][0] = i
              moves[counter_of_moves][1] = j
              counter_of_moves += 1;
            }
          }
          if(diff_xc == 80 && diff_yc == 80){
            if (board_state[j][1] == W_PAWN){
              moves[counter_of_moves][0] = i
              moves[counter_of_moves][1] = j
              counter_of_moves += 1;
            }
          }
        }
      }
    }
}
Once the scanning for moves is done, we can randomly select one of the choices in the list:
void playTurn() {
    .
    .
    .
    checkGameState();

    int choice = 0;
    int rdm = 0;

    while(choice == 0){
        rdm = random(0, counter_of_moves);
        choice_x = moves[rdm][0];
        choice_y = moves[rdm][1];
    .
    .
    .
    }
    .
    .
    .
}
This is where the learning aspect comes in, once the choice is made, we can check the current state, mirror it, and check if the current state (or the mirrored state) is in the black list, and if it is, whether the picked move is black listed or not (in our case present in the set or not):
String black_listed[][3] = {}; // <state, black_listed_move_x, black_listed_move_y>
String state_current = "";

void playTurn() {
    .
    .
    .
    while(choice == 0){
        .
        .
        .
        int len_of_list = sizeof(black_listed) / (sizeof(String) * 2);
        for (int i = 0; i > len_of_list; i++) {
            state_current = readStateAsString();
            if(checkIfSame(state_current, black_listed[i][1]){
                if(black_listed[i][1] != (String)choice_x){
                    if(black_listed[i][2] != (String)choice_y){
                        choice == 1;
                    }
            }
        }
    }
  }
    .
    .
    .
}
If it’s not, then we move on, and ask the player to make the move that the AVR picked, otherwise we try again (since there are only 4 moves that can be made at most, even if the system is fully trained, we expect to come across a viable move within 3 tries):
void playTurn() {
    .
    .
    .
    x0c = board_state[choice_x][2];
    y0c = board_state[choice_x][3];

    x1c = board_state[choice_y][2];
    y1c = board_state[choice_y][3];

    drawCrossHair(x0c, y0c, x1c, y1c);
    .
    .
    .
Utility Functions
Many functions I wrote serve a general purpose during the game, the most important are:
header_write
Write at the top of the screen two lines text and command, text indicates casual (funny) talk, the command are instructions to the player.
void header_clear(){
    int start_x = 10;
    lcd.fillRect(start_x+30, 0, width-30, padding/2, BLACK);
    lcd.fillRect(start_x, padding/2, width, padding/2, BLACK);
}

void header_write(String turnText, String command){
    header_clear();

    // Text
    lcd.setTextColor(WHITE);
    lcd.setCursor(width / 2 - turnText.length() * 3, 10);
    lcd.print(turnText);

    // Command
    lcd.setTextColor(GREEN);
    lcd.setCursor(width / 2 - command.length() * 3, 20);
    lcd.print(command);
}
drawCrossHair
Draws a line (with a cross hair at the end) indicate to the player the source and destination of a pawn he has to move.
void drawCrossHair(int xSource, int ySource, int x, int y)
{
  int lenSize = 15;
  int x0 = x - (lenSize / 2);
  int y0 = y - (lenSize / 2);

  int x1 = x + (lenSize / 2);
  int y1 = y + (lenSize / 2);

  int xMid = (x1 + x0) / 2;
  int yMid = (y1 + y0) / 2;

  lcd.drawRect(x0, y0, lenSize, lenSize, GREEN);

  lcd.drawLine(x0, y0, x1, y1, GREEN);
  lcd.drawLine(x1, y0, x0, y1, GREEN);

  lcd.drawLine(xSource, ySource, xMid, yMid, GREEN); // 0x6FEB
}
draw_board
Draws the board as define in board_state.
int board_state[9][5] = { // <Pawn present (0:no, 1:yes), Pawn color (0: black, 1:white, -1:none), xCenter, yCenter, touched_state (0:untouched, 1:touched)>
  {1, B_PAWN, x0c, y0c, 0}, {1, B_PAWN, x1c, y0c, 0}, {1, B_PAWN, x2c, y0c, 0},
  {0, N_PAWN, x0c, y1c, 0}, {0, N_PAWN, x1c, y1c, 0}, {0, N_PAWN, x2c, y1c, 0},
  {1, W_PAWN, x0c, y2c, 0}, {1, W_PAWN, x1c, y2c, 0}, {1, W_PAWN, x2c, y2c, 0}
};

void draw_pawns() {
  for (int i = 0; i < 9; i++) {
    int xc = board_state[i][2];
    int yc = board_state[i][3];

    if (board_state[i][1] == B_PAWN) {
      lcd.fillCircle(xc, yc, 25, BLACK_PAWN_COLOR);
    }
    else if (board_state[i][1] == W_PAWN) {
      lcd.fillCircle(xc, yc, 25, WHITE_PAWN_COLOR);
    }
    else if (board_state[i][1] == N_PAWN) {
       lcd.fillCircle(xc, yc, 25, BLACK);
    }
  }
}

void draw_board() {
  lcd.fillRect(2, padding + 1, min_dim - 4, min_dim - 4, BLACK);

  // Vertical
  lcd.drawLine(width / 3, padding + 1, width / 3, height - padding - 3, WHITE);
  lcd.drawLine((width / 3) * 2, padding + 1, (width / 3) * 2, height - padding - 3, WHITE);

  // Horizontal
  lcd.drawLine(2, width / 3 + padding, width - 1, width / 3 + padding, WHITE);
  lcd.drawLine(2, (width / 3) * 2 + padding, width - 1, (width / 3) * 2 + padding, WHITE);

  draw_pawns();
}
inconsistant Naming
As you may have noticed, I tried sticking to the C naming convention (camelCase) but very often I forgot and wrote in the Python style (snake_case). I got to fix it, bare with me for now.
Bill Of Materials
Created using markdown tables generator.
Currency is pounds.
PCB Design
| Name | Quantity | Unit price | Purchase cost* | Actual cost | Vendor |
|---|---|---|---|---|---|
| Copper Clad Board | 12 | 0.768 | 15.36 | 9.216 | Amazon UK |
| AtMega328p | 1 | 1.42 | 4.26 | 1.42 | Farnell UK |
| ATtiny44a | 1 | 0.558 | 2.79 | 0.558 | Farnell UK |
| 0805 resistors | 26 | 0.00447 | 37.99 | 0.11622 | Amazon UK |
| 0805 capacitors | 3 | 0.0047 | 39.99 | 0.0141 | Amazon UK |
| 0805 led | 1 | 0.1198 | 11.98 | 0.1198 | Amazon UK |
| Crystal 12MHz SMD (11.4x4.65mm) | 1 | 0.276 | 2.76 | 0.276 | Farnell UK |
| Switch SPST-NO | 1 | 0.612 | 3.06 | 0.612 | Farnell UK |
3D Design
| Name | Quantity | Unit price | Purchase cost | Actual cost | Vendor |
|---|---|---|---|---|---|
| Protopasta Conductive PLA 1.75mm | 39g | 0.1056 £/g | 52.80 | 4.12 | 3D Filaprint UK |
| Wood hatchbox PLA filament 1.75mm | 220g | 0.021 £/g | 20.98 | 4.62 | Amazon UK |
Technical
| Name | Quantity | Unit price | Purchase cost | Actual cost | Vendor |
|---|---|---|---|---|---|
| 3.175x0.1mm 20° v-bit | 1 (if you don’t break any) | 0.5326 | 7.99 | 0.5326 | Amazon UK |
| 3.175x0.8mm mill-bit | 1 (if you don’t break any) | 0.759 | 7.59 | 0.759 | Amazon UK |
| USBtoUART | 1 | 5.99 | 5.99 | 5.99 | Amazon UK |
| 2.8 TFT LCD screen | 1 | 13.51 | 13.51 | 13.51 | Amazon UK |
| Toggle Switch with LED Light | 1 | 0.599 | 5.99 | 0.599 | Amazon UK |
| 2.54mm Breakable 40 Pin Header | 2 | 0.138 | 8.29 | 0.276 | Amazon UK |
| 10uF capacitor | 1 (if you don’t break any) | 0.0418 | 8.99 | 0.0418 | Amazon UK |
Contributing Weeks
Many of the assignment weeks contributed to the final project design, below I outline the important ones (primary) and the ones with a less important role (secondary).
Primary
-> Week11
-> Week12
-> Week14
Secondary
-> Week03
-> Week05
-> Week09
-> Week16
Failures
Several things failed / didn’t work.
-
I had to try several pad designs, and even then I had a huge design mistake (which was the disconnected pad).
-
I never managed to make the touch functions work on the TFT screen.
-
Printing the lid in 2 colors took a few tries, then first there were alignment and then size issues (the hole for the switch & power was too small)
Body
- Failed milled jobs and …
Body
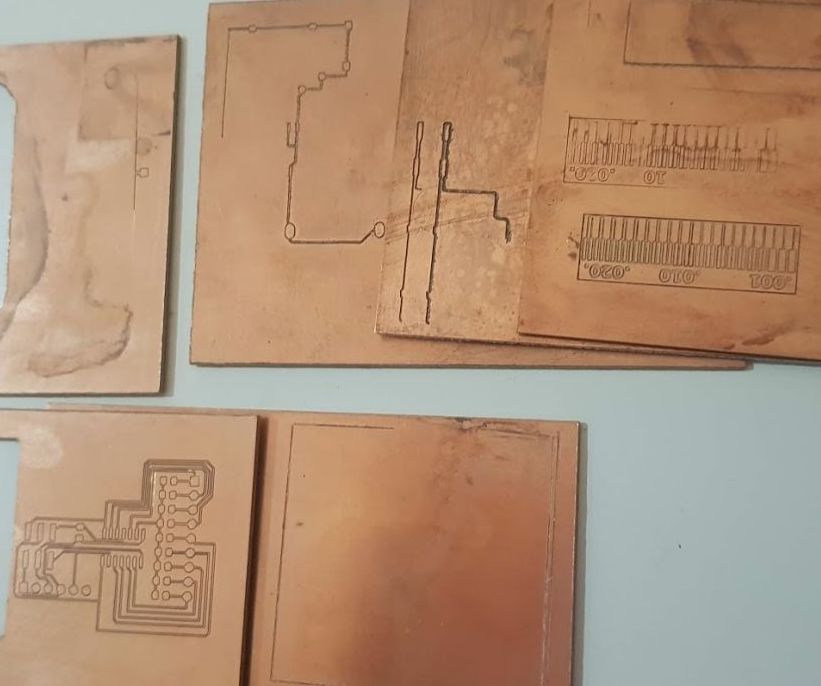
- … Broken mills
Body
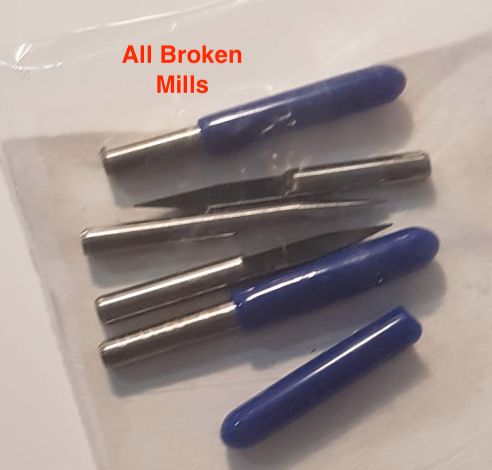
Most errors where attributed to auto-levelling problems and failing to have enough space in the z-axis to plunge, which are issues I addressed in week11.
Finals Notes
Oh man, was getting here harder then I thought it was going to be!
It feels like yesterday when I uploaded on my about me page the Simpsons image and claiming:
Cite
“As you might have guessed this never came to pass, partly due to bad planning (back then I was only 18!), but majorly because the project was way too complex.”
“Well, now I’m back. I’m sure I’ve become a cautionary tale at De Waag for new Fab Academy students, so I intend to redeem myself :)”
“As I work through re-uploading my past assignments, and making sure they are up-to-date with the latest requirements, I will add some extra-explanations and spelling corrections.”
Turns out 3 years don’t do much on the planning side…
But this time the project wasn’t too complex, it’s just turned out the amount of work left was far greater then what I thought initially, partially because of the new standard, partially because I didn’t look good enough.
Also aside from Antimony, I changed all the software tools, which was lots of fun (because they were the easy ones) but still had their own learning curve.
Lastly, I always aimed for the best possible outcome, and often lost myself in perfectionism that lost me time, there was always something to improve (at least my documentation is pretty now).
I’m fairly certain I’ve also created a new tale, from “Remember to plan well kids” to “Remember, even returning students must make a plan, and shouldn’t take it easy!”
A lesson to future returning students:
- When looking back, don’t underestimate how long documentation will take you!!!
It’s not all negatives for me though, it feels like I’ve learned just as much as in the original run of FabAcademy, almost like I took it twice, and learned to use and love new machines (like my 3D printer).
I’ve also worked really really hard, the last month has been grueling, and as I pushed myself to my physical (stay up all night) and mental limits, with fear, stress, anxiety when things didn’t work, and exhilaration, happiness and excitement when they did work; I felt myself growing to become more time aware and hard working, and I’m very proud of myself for that.
Thanks to that, this time (it looks like) I will be able to finish.
My Thanks
The list of people that have helped me through this has been long over the past 3 years, I recall thinking of writing a thank you note to all the people back in 2016, now it feels like my list doubled.
-
- Eva Korae: for having been my friend when I had none (and from her perspective .probably a nanny)
- Sander van Vliet: for having been my inspiration and source of approval.
- Sebastiaan Moes: teaching me that even if something is inefficient, it can bring joy to people.
- Paul Groneveld: that I should focus on outcome, not design.
- Marije Kanis: telling me that the best design is sometimes made by a single mind.
- Shunichi Mizugaki: that even infront of a language barrier, one can still succeed.
-
- Anne Vlaanderen: showing me that “simple” is key (and is beautiful).
- Heidi Hansen: reminding me I’m not alone.
- Mick van Zeijl: for being a virtuoso artist, and wowing me with beauty.
- Josephus van der Bie: having a kickass website and project!
- Rutger Oomkes: for having the same template as me and not making me feel bad for it.
-
Zaerc: for having the patience of teaching me about the details of electronics, encouraging my work, and blowing up LED’s together.
-
Emma: for being my first instructor, and teaching me to fail gracefully.
-
My Dad: for helping me solve design issues and always understanding my thoughts.
-
Skeatz (for fear of misspelling his real name): for reviewing my work and enjoying my (bad) jokes.
-
Henk : who deserves an highlight because, if it wasn’t for his help and support I wouldn’t have made it, and teaching me to help even those who seem unsavable. He deserves my deepest gratitude.
My Mum
She deserves a special quote, because it has been her journey as much as it’s been mine.
(If) I finish, it wouldn’t be absurd to say it was by her request.
It’s thanks to her that I’ve pulled thorough the hardest moments, and it’s thanks to her that I’ve come so far. She motivated me when I had no hope or strength left, and always saw more in me, my vision and my skills, then I did myself.
Link To “Final” Video & Slide
License
To be honest, if someone even wants to use this that’s more then good enough for me. I didn’t invent the game, nor the algorithm to solve it. The design I made for the box and pawns are probably going to end up on Thingiverse. The code is average at best, if people want it, I’ll be darned.
So the best license for me is WTFPL
Download The Files
![]()