Final Project Development

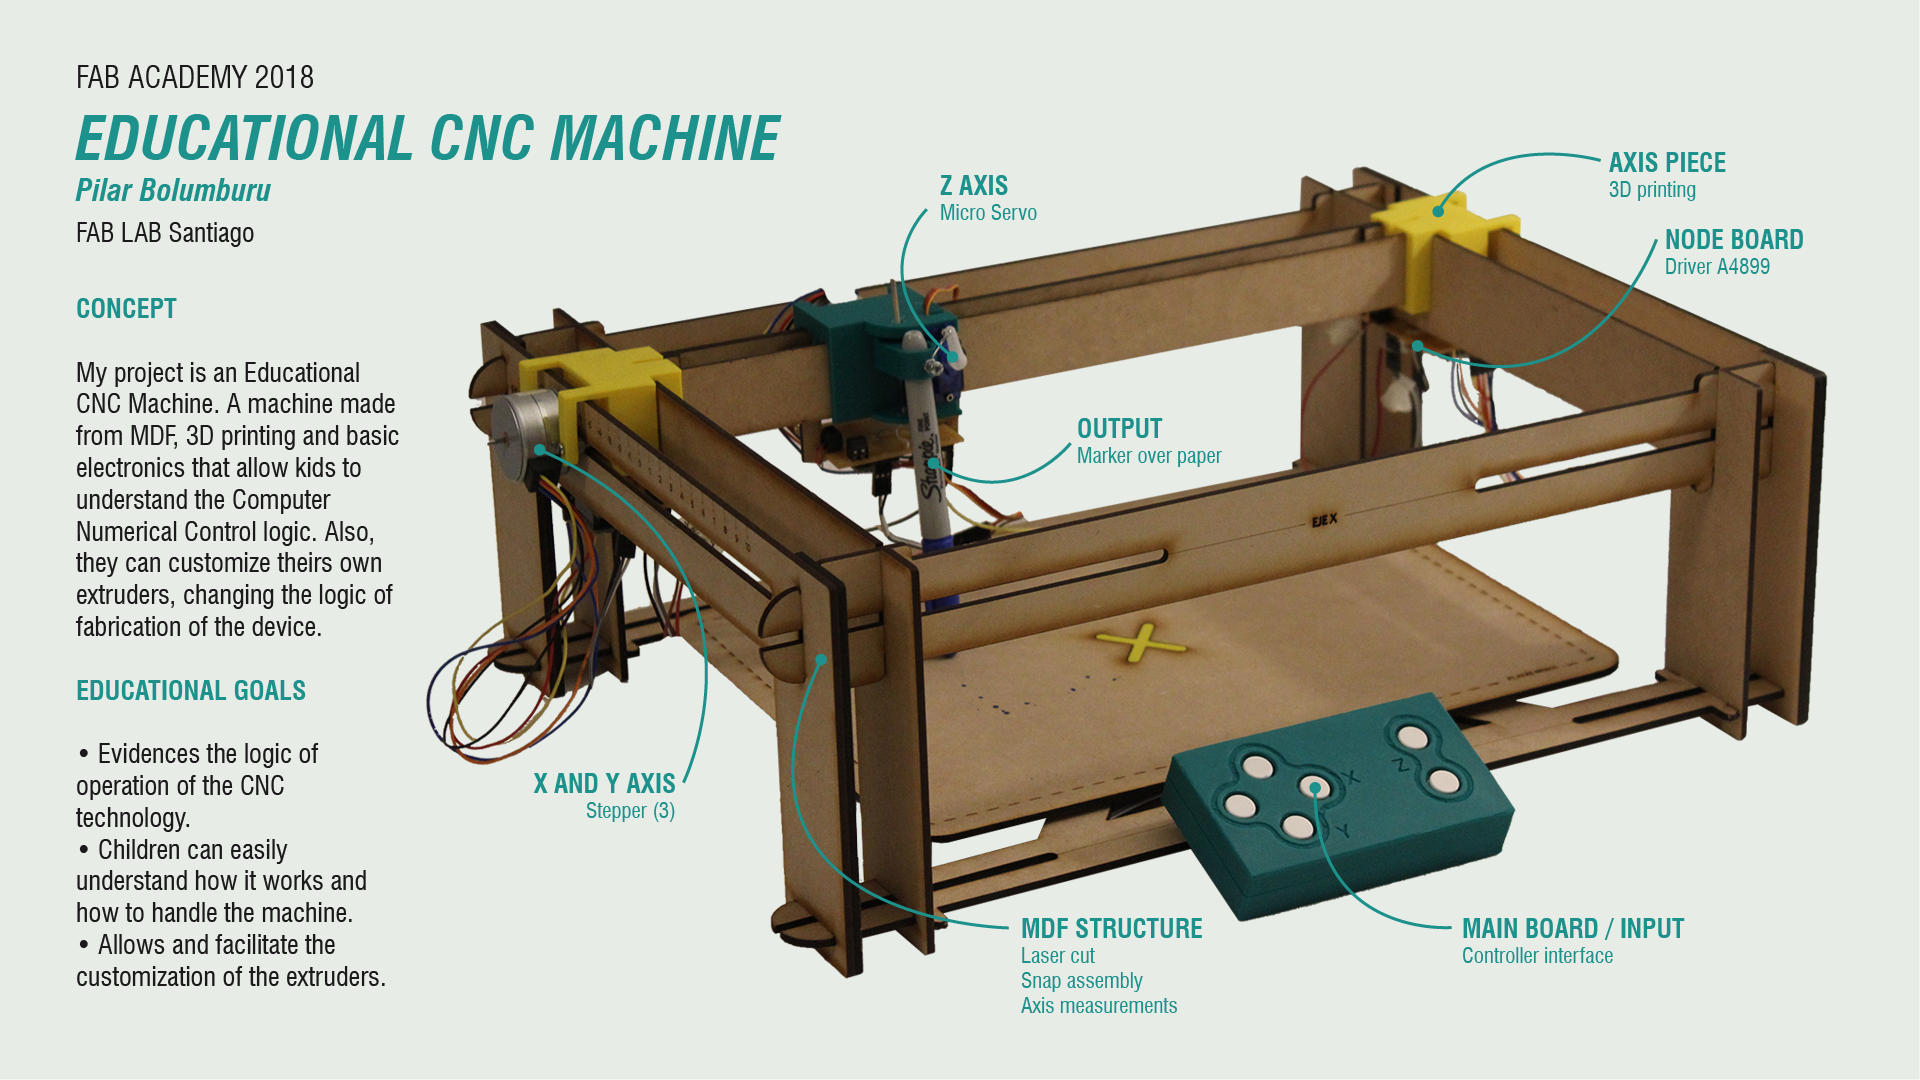
EDUCATIONAL CNC MACHINE
What tasks have been completed, and what tasks remain? What has worked? What hasn't? What questions need to be resolved?
My TECHNICAL GOALS for the final project were:
- Automatize the X and Y axis with steppers controlled by buttons. ACHIEVED.
- Also Automatize the Z axis, but with a Micro Servo controlled by buttons. ACHIEVED
- The extruder is interchangeable: you can change and create a new piece for the Z-axis very easily. STILL TO IMPROVE. You can change it for another, but the final idea is to change just the fabrication logic, but maintain the movement of Z-axis.
- Also, I wanted that the machine was affordable and easy to fabricate, to be affordable for schools or educational spaces. STILL TO IMPROVE. This prototype of the machine cost $140 one hundred forty dollars, but I want to keep working to make it more affordable.
PROBLEMS
Power Supply: One of the main problems that I had were the power supply of the machine, which makes me realize that is very important to think since the beginning of the project the power needs of every component.
I have a real hard time trying to understand why the micro servo wasn't working, and at the end was that the 5V regulator that I add in the boards deliver less current than the micro servo need it. (micro servo need 550 mA, and the resistor deliver 100mA*SOT 23-3 5V)
That's why, for this version, I connect the micro servo individually to a 5V power supply. I power the steppers through the main board with 3 batteries of 9V in parallel (to triple the capacity but not the voltage).
What will hapen when?
Week 28-3 junio
W | Schedule & Who's done what beforehand
T | Mechanical Z Axis Design - Prototype
F | Programing Steppers & Drivers (control drivers)
S | Boards design & Power of steppers
S | Soldering boards (main and two nodes)
Week 4-10
M | Fabricate and solder node board with the servo
T | Hack steppers and Programing Servo
W | Redesign of frame and fabrication
T | Interface of buttons (main board)
F | Intellectual property & Fabricate final axis
S | Integrate all the system and power it
S | Record video & Upload all the documentation
Week 11-17
M | Prepare disertation and last minutes changes
T | Upload all the little changes - Last Push
W | Presentation starts!!
T | Update global corrections
F | Update global corrections
S | Update global corrections
S | Update global corrections
Week 18-24
M | Prepare disertation
T | Prepare disertation
W | Presentation!! at 9.40 am
T | Update global corrections
F | Update global corrections
S | Update global corrections
S | Update global corrections
What have you learned?
I had learned A LOT.
Technically, I had especially learned about design and production of electronics, and programming. To understand the basics, and to know where and how to look for new questions.
Also, I had learned about the importance of documentation in the developing of the project. I needed a lot to review my first assignments for the new assignments, and also I am very thankful to people that document very well their assignments because they help me a lot in my projects.
I already had a good knowledge of digital fabrication but was very interesting to deepen this understanding and explore new ways to fabricate.
Improvements for the future
- Improve the control of the movement of the axis, and replace the buttons with potentiometers for a more accurate control of the device. Also, add "end stops" to the machine.
- I want to improve the mechanism of rack and pinion. Now both are on MDF, but maybe if the pinion is cut in acrylic or 3D printed or could be more accurate if this mechanism is fabricated in different materials.
- Finally, Improve the interface to be more kid-friendly. I already work on that for this project. That's why, for example, every 3D piece is yellow except the Z-axis (that is green), I also add the measurements on centimetres in the frame of the machine..and the name of the parts of the machine (platform, axis, etc.). but now I want to test it with children and improve it.
summary slide

Este obra está bajo una licencia de Creative Commons Reconocimiento-NoComercial-CompartirIgual 4.0 Internacional.