embedded programming
.
lecture / slide: Fabacademy 2015 03.11D Lesson07: Embedded Programming MIT CBA Embedded Programming.
topics: architectures, memory, peripherals, word size, families, vendors, AVR processors, tutorials, data sheets, packages, clocks, in-system development, programmers, assembly language, C, host communication, IDE, boards, Interpreters, debugging, STM32.
assignment: read a microcontroller data sheet and program your board with as many languages/environments as possible!.
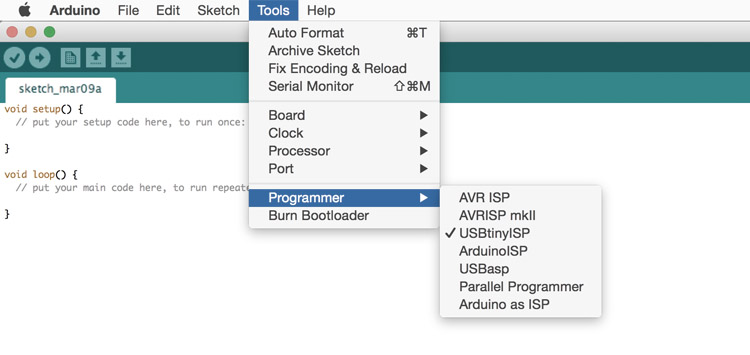
experimentation: I removed the board from the gripper, attached the FTDI-to-USB cable to my computer, my FabISP programmer from three weeks ago (via USB to computer) and then both the boards with the IDC connectors (2X3P) + the 6pin cable. Once the circuit is closed and nothing smoked, we're good to go: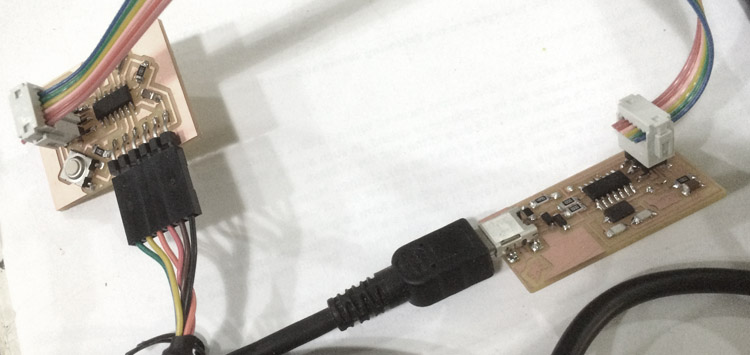 Thanks to my friend Kalil I was able to find the tutorial by HighLowTech on how to programme the ATtiny from the FabISP. First we had to install the Arduino Software and the corresponding (attiny) library in the right folder. We use the Arduino Software (free and open-source) due to its user friendly interface and the prebuilt sketches, libraries and active user group Checking in the Tools-tab the board to ATtiny, the clock to 20 MHz, the correct serial port and finally the proper programmer. Then burn bootloader:
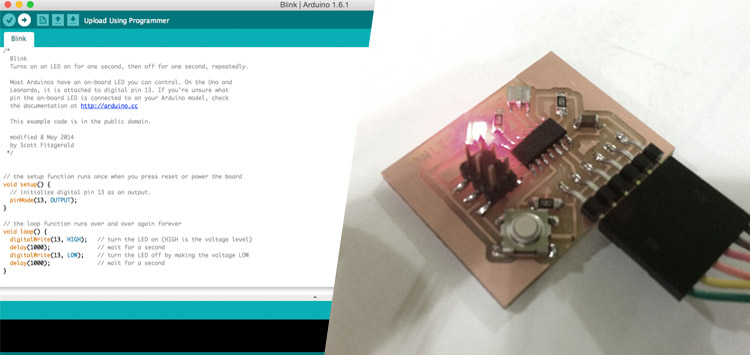
 Following the Arduino Basic Sketch Example "Blink" we made the board blinking, basically just changing the Pins to the according one (in doubt just go to Eagle and check your schemata!). We can set the time of the LED on and off in millisecond steps and upload the sketch by clicking the arrow in the top after compiling it. The Board now turns on its LED when the button is pressed once and turns it off when pressed another time. There is space to play around with different behaviours, for example to have the LED blinking faster when pressed or else:
 Of course the LED can do more than simply turn on or off. Running the "Fade" sketch (dont forget to put according pins and times to modify the behaviour) we can command the LED to slowly fade in and out; for example five times when the button is pressed. In the video I could have already disconnected the 6pin cable:
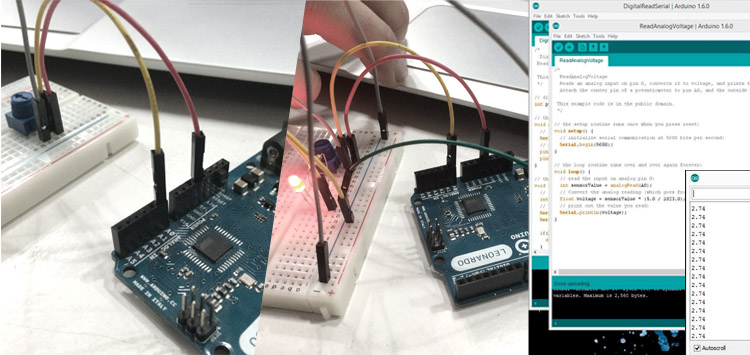
Since our hello-world Board is not yet working with in- and outputs we decided to use Arduino boards. Together with Josefina I took a Leonardo board and followed the tutorial of how to read an Analogue Voltage. The serial read window of the Arduino Interface will show you the Voltage it is currently reading, maximum 5V, at least 0V (in steps of 0,02V because of the 1024 steps sequence it is able to operate with). This "AnalogRead" can be used also to read the voltage of a battery or to control another components! We connected a potentiometer (variable resistor) into the circuit and controlled its brightness according to the value set by hand with the potentiometer:
Of course the LED can do more than simply turn on or off. Running the "Fade" sketch (dont forget to put according pins and times to modify the behaviour) we can command the LED to slowly fade in and out; for example five times when the button is pressed. In the video I could have already disconnected the 6pin cable:
Since our hello-world Board is not yet working with in- and outputs we decided to use Arduino boards. Together with Josefina I took a Leonardo board and followed the tutorial of how to read an Analogue Voltage. The serial read window of the Arduino Interface will show you the Voltage it is currently reading, maximum 5V, at least 0V (in steps of 0,02V because of the 1024 steps sequence it is able to operate with). This "AnalogRead" can be used also to read the voltage of a battery or to control another components! We connected a potentiometer (variable resistor) into the circuit and controlled its brightness according to the value set by hand with the potentiometer:
 We checked online the specifications of the photocell (a light sensitive resistor) and implemented it into our circuit. Now the light is controlling the speed of the LED blinking. Just watch out to use the right resistors and learn to read them:
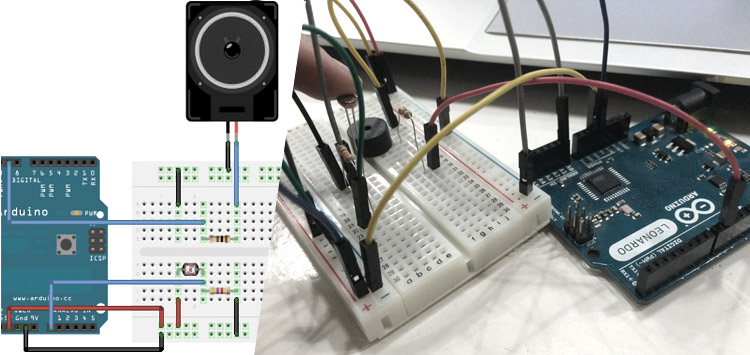
Fab Lab Barcelona gave us a nice kit to start working on and it also included a (8 ohm) speaker. We found a nice sketch that was done in Fritzing (a free and open-source software to draw electric circuits) and tried to redo it. The cooking ended up in having the photocell's analog read values changing the sound of the speaker (using pulse-width modulation or PWM):
We checked online the specifications of the photocell (a light sensitive resistor) and implemented it into our circuit. Now the light is controlling the speed of the LED blinking. Just watch out to use the right resistors and learn to read them:
Fab Lab Barcelona gave us a nice kit to start working on and it also included a (8 ohm) speaker. We found a nice sketch that was done in Fritzing (a free and open-source software to draw electric circuits) and tried to redo it. The cooking ended up in having the photocell's analog read values changing the sound of the speaker (using pulse-width modulation or PWM):
.
files: Files wlzr Fab Academy '15 // w07.
bookmarks / links: High-Low Tech Programming an ATtiny w/ Arduino 1.6 (or 1.0) Arduino Examples Josefina Petrini Arduino Read Analog Voltage Adafruit Tutorial Using a Photocell Fritzing Software - Electronics Made Easy Sparkfun Tutorial Pulse-width Modulation (PWM).
review: Fabacademy 2015 03.18B Review07: Embedded Programming.
topical talk: Fab Academy 2015 03.17 Topical02: Hacking the Common Denominator-

Any content on these pages by Alexander Nikolas Walzeris licensed under a Creative Commons
Attribution-NonCommercial-ShareAlike 4.0 International License