Week 17: Wildcard Week
Our assignment:
Individual Assignment: _1. Design and produce something with a digital process (incorporating computer-aided design and manufacturing) not covered in another assignment, documenting the requirements that your assignment meets, and including everything necessary to reproduce it. Possibilities include (but are not limited to)__
My assignment:
This week, I will go deeper into embedded programming through machine learning and machine vision. My task: write and test a program for an embedded ML using machine vision on a microcontroller to interact inputs/outputs
In lab, we have the XIAO ESP32-S3 Sense board which has the computing power of a Xiao with added camera sensor/digital microphone/SD card capabilities.
How this process is not covered in other assignments:
Though mentioned during Embedded Programming week, this takes it a step further by embedding a tiny language model fully onto the XIAO board itself! I'll be learning about TinyML applications -- this is an entirely different approach to solving problems than traditional programming.
Resources
XIAO: Big Power, Small Board Mastering Arduino and TinyML is the guidebook I will use to walk through TinyML workflow on a XIAO ESP32-S3 board. Some quick notes from reading:
- breaks down common terms >> embedded systems i.e. built into system >> edge computing / Internet of Things (IoT) i.e. network of billions of connected devices we have across the world >> artificial intelligence (AI) i.e. ...hard one to really define 😅 >> machine learning (ML) i.e. designing and analyzing algorithms for computers to learn automatically from patterns in data to be used to predict unknown data >> edge AI i.e. combining edge devices and artificial intelligence (aim: use less power with higher efficiency so like smartwatches) >> embedded machine learning i.e. taking input and making a prediction >> tiny machine learning (TinyML) i.e. implementing this machine learning process on tiny embedded hardware

Image from XIAO: Big Power, Small Board Mastering Arduino and TinyML
- training a machine learning model typically requires three steps: 1) Model (doing math to generalize data) 2) Training (automatically updating parameters from data so it's like learning) 3) Inference (when you provide completely new data for making predictions)
- example use cases I wanted to note: environmental monitoring and protection, agricultural automation, voice activation word detection,
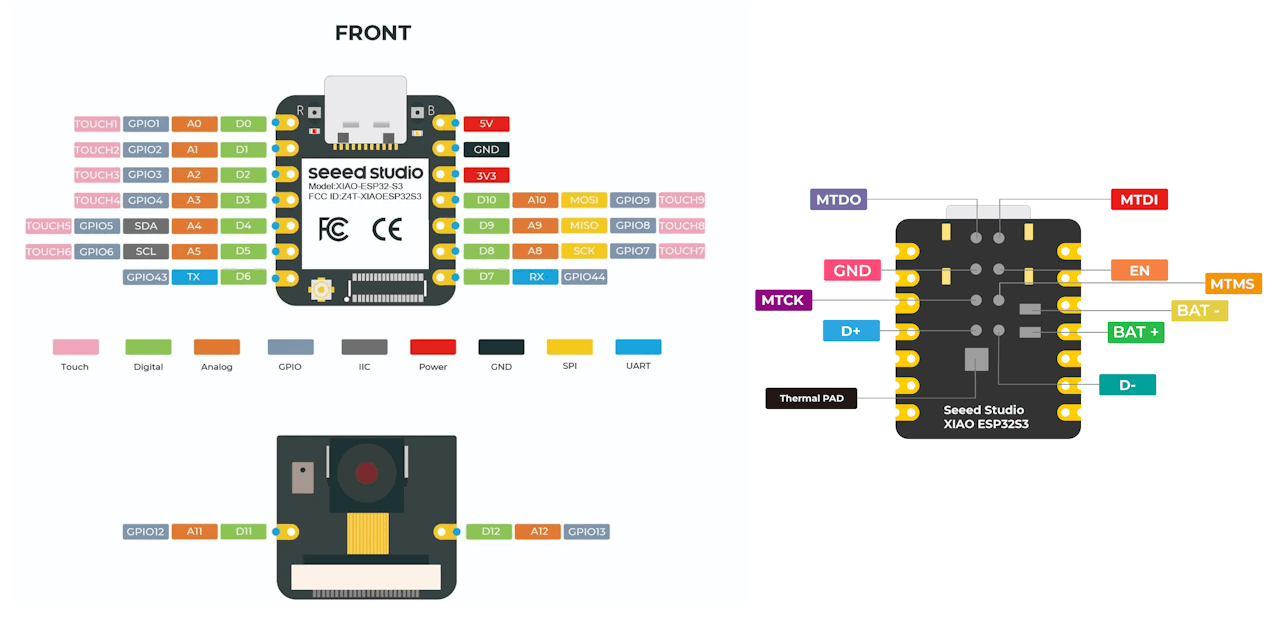
General board pinout from the XIAO-ESP32-S3 Sense. Image from XIAO: Big Power, Small Board Mastering Arduino and TinyML
Another resource: this github page which has code for XIAO-ESP32S3-Sense
Workflow and Processes
To start, I will work on a basic demonstration of a working program with embedded ML on the XIAO board. I am walking through Chapter 4 Section 4 "Image Classification. Image classification is apparently the "Hello, World!" for machine learning so I'll start here. Once I soldered pins to the XIAO ESP32S3 board and connected the sense module expansion board I was ready to go.
Set-up and Testing Board Functions
Set-up
As to be expected, the first step is to add the XIAO board to the Arduino IDE. I already had the board package from using other XIAO ESP32 boards previously, but I uninstalled and reinstalled version 2.0.11 as advised in the guide because the newer version I had didn't work properly.
For this project, I will also need the Edge Impulse Studio software which I could create a free personal account for on their website.
Test Code
Started running test code....
blinked the onboard LED (GPIO21)...check
Next up: microphone test. Did this using this github code After some troubleshooting with set-up issues, it appears that the microphone is working but let's test this by using the SD card feature to record audio....
This code provided on GitHub is what I used. I inserted an SD card into the reader (ensuring it was formatted to FAT32). Next, I needed to ensure the PSRAM function is turned on in order to be able to use it on the chip for recording. To enable this, I went to Tools >> PSRAM: "OPI PSRAM" >> OPI PSRAM. Next, I uploaded the code and opened the serial monitor to start the recording. After reading the SD card on my computer, I found the audio file with the recording there in the folder!
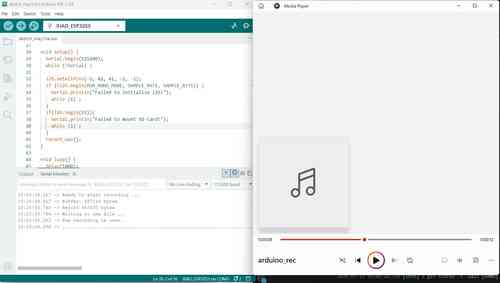
Here's what the serial monitor looks like after recording. The code simply records audio for 20 seconds then saves that recording to the SD card. On the right, I've opened up the file and can hear the test mic check.
Up next: camera test
Used this code from GitHub. I downloaded the two files of code referenced in the main code and uploaded them to Arduino by going to Sketch >> Add file and selecting the files.
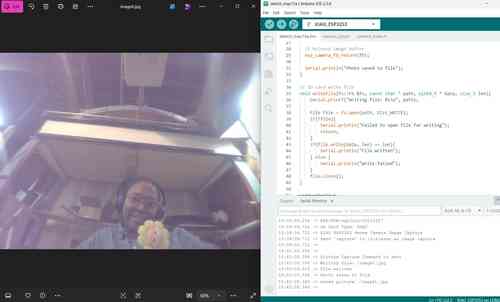
The camera works! The quality is better than expected
Now on to testing WiFi and streaming video to Web.
Did quick test code on connecting to WiFi server that is available on Arduino's example code under "WiFIScan." The code worked and demonstrated the XIAO board is capable of detecting the WiFi networks within range. So then I used this code making sure to insert my Wifi login credentials where indicated. Once I got that up and running, the function to switch the on-board LED via the Web Server worked just fine. From our BirdPeck machine during machine week, I had already had experience using a Web server interface with the XIAO board.
Then I used this code on GitHub to stream video.
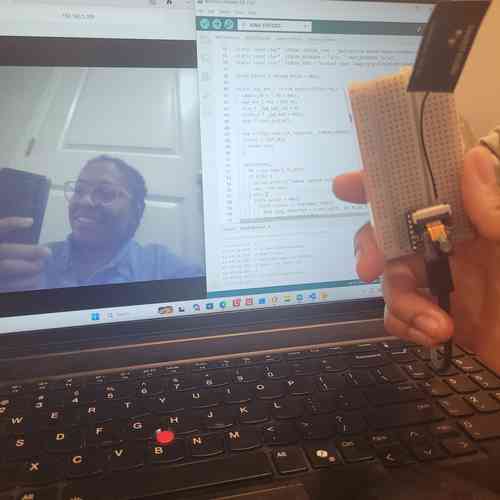
Here the camera is streaming!
TinyML Image Classification
Fruits v Veggies
For my first test of using embedded TinyML to classify images I will train the model on a dataset of fruit images linked here using Edge Impulse Studio.
In Edge Impulse Software, I uploaded three different folders of images for testing, training, validation under the Data acquisition tab. Then under that Impulse tab, I click Create impulse set image width and height both at 96. Then I click add "learning block" and hit image. At first I couldn't find the Transfer Learning block but after a while I realized it filtered this out from the options.
In the next tab, I changed the images to grayscale (reduces the amount of final memory needed for inference) and hit "Save parameters" followed by "Generate features."
Next I followed along with the flow of the software's interface -- it helpfully shows a green dot when each step is completed. This was a helpful guide because there are some differences between the current website and the guide I am following. Under the Transfer Learning Tab I selected MobileNetV1 96x96 0.25 (it's less accurate but requires less memory). At this stage I had to troubleshoot LOTS because I ended up getting only very small accuracy (like 0.6%, 1%, etc.) so I started over by re-uploading the data and trying different techniques til I found a solution. Ultimately, I needed to correct the labelling and also choose a smaller dataset (i.e. choose apples, bananas, and potatoes as the specific examples(see more troubleshooting details in section below).
Zooming out to explain to myself whats happening...I am using Edge Impulse Studio to train the model using transfer learning and data augmentation. Transfer learning allows for training a generic machine model with a relative small data sets (like 110 images).Data augmentation works by making small random changes like flipping cropping or rotating images which creates additional artificial data to improve the accuracy of machine learning models.
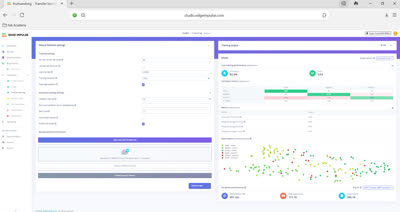
Had to redo this whole process at least 5 times. Here is the training output for the first one that worked.
I have trained a model with 82.4% accuracy and a peak ram usage of 117.1 K. Based on these results it looks like it will ID apples and bananas fairly well but the potatoes not so much. To improve this I could add more potato images and try RGB instead of grayscale. But for now I will proceed.
From here, I go to the deployment tab to configure the deployment and select Arduino library as Deployment target. I selected "TensorFlow Lite" as the Inference engine. Then I installed the downloaded zip to my Arduino library.
Static Buffer Test
Now, I could upload an example from the installed library. To begin, I started with the "static_buffer" example. Back in the Edge Impulse web browser, I navigate to "Live classification," select a random existing test sample to classify, and copy the raw features to paste where indicated in the code in Arduino. The steps can be someone lacking in the guide but Edge Impulse's direct documentation on running Arduino library provided another helpful resource for cross referencing.
In the serial monitor, it output the predictions. My first image of a banana wasn't a strong prediction but it did guess the banana. My second image of an apple did have a strong prediction of apple.
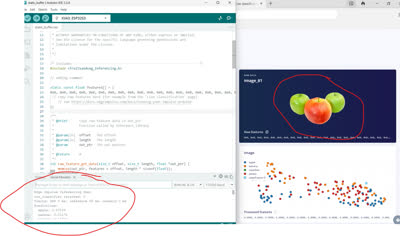
Here the serial monitor shows the apple prediction "0.87109"
Camera Test
I used this code to run a test of the camera to see if the XIAO board could correctly identify apples, bananas, and potatoes (well..more often than not). NOTE: remember to enable PSRAM!!
Overall, it could relatively accurately predict bananas and apples, but it never predicted a high chance of potato.
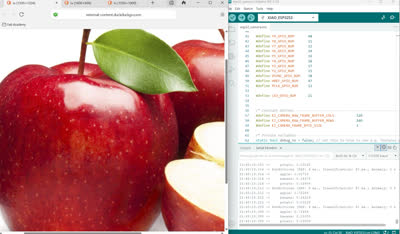
I have my XIAO camera pointed at the screen. In the serial monitor, it indicates favor towards apple.
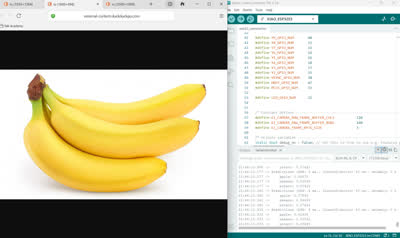
Now, I have the camera pointed at an image of a banana. It now favors banana prediction (though not as much)
Testing with a Bigger Model
Now that I've gotten basic functionality, I wanted to test with a bigger model and work on improving the accuracy. Now I selected MobilnetV2 96x96 0.35 and to use RGB images (hopefully this will help resolve the potato issue!). After training the new model the results yielded a 91.2% accuracy. The peak RAM at 228.0K -- I'm hoping this will not be too much for the XIAO. I ran a quick static buffer test again to see...it did not work. As it turns out, it would require more RAM than the XIAO's total available RAM of 512KB. As displayed in Serial Monitor, its asking for 716,800 bytes which is about 700 KB. So, I redid it and went back to Grayscale but still selected the bigger model MobilinetV2. Interestingly, after running it again, the accuracy went up to 94%! Some troubleshooting later, it does accurately predict the banana image. I THOUGHT I was in the clear until I realized it thinks everything is a banana now....more lengthy troubleshooting later...I ultimately found that for deploying the impulse to my device if I select "Unoptimized(float32)" NOT "Quantized(int8)" this made the model much more accurate and strong in its predictions when used with the XIAO board.
Ultimately, it's slow, but it will predict bananas and apples pretty well. Still struggling with the potatoes but its much better than before!
Adding in Grove-LCD Screen
To have more of a visual indicator, I will wire in a Grove-LCD screen since I getting familiar with using this for my final project. My goal is to have the screen turn red when it confidently detects and apple, yellow when it confidently detects a banana, and orange when it confidently detects a potato.
I already know how to set up within the code so I went ahead and included Wire and rgb lcd library and initiated the LCD with white light and a initial display message. I assumed I could simply set up a condition within the loop to where once the prediction exceeded a certain level (say, .75) then I could set the color accordingly and add a word. However, there's a lot happening under the hood in this code within the included libraries so I can't tell where I can pull the prediction readouts. So I shared my existing code with Deepseek and prompted "Can you update this image detection code for my XIAO ESP32-S3 Sense to incorporate using the Grove-LCD to indicate when it makes confident predictions? With a confident apple prediction the screen turns read, with a confident banana prediction the screen turns yellow, with a confident potato prediction the screen turns orange. Otherwise, the screen is white." With the output code, I made adjustments I wanted for fun and uploaded!
After some testing with this, I decided to work on getting the camera to stream to a webserver so i could see the frame. I referred back to the Rui Santos code from earlier and attempted plugging it in but ran into issues. I shared the full code with Deepseek and prompted to identify issues with code and make edits. Once I could see the screen it helped a lot to actually create a frame of sight. Then I had an issue where the web server and Edge impulse code were competing for camera frames so it stopped working after a couple rounds of predictions. So again shared the code with Deepseek which provided new code where Edge Impulse reuses the last frame from the web server instead of capturing its own. But then I still wasn't getting accurate predictions as before so I ended up using a camera web server code from earlier to set up the frame and draw out best positions for set up and then run JUST the code for image classification.
Hero Shots
Below are some pics + a video demonstration.
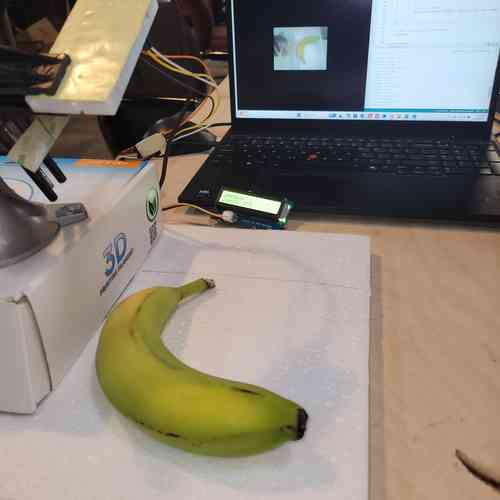
Strong prediction for banana turns the screen yellow. My Xiao board is held up in the left hand corner. The LCD display is sitting in front of the computer and displays "BANANA Conf: 97%" It correctly identifies banana very reliably
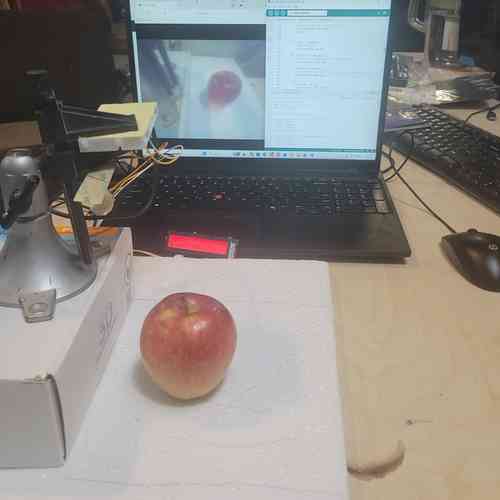
Strong prediction for apple turns the screen red. It is not as good at predicting the apple. Here, the screen displays "APPLE Conf: 78%". It would vacillate between about 50-90% in confidence. I found if I add better lighting that does help.

It thinks potatoes are bananas! Here is the set up for the potato I used. I couldn't get it to accurately predict potatoes. If I had time, I would use RGB and train it on more potato images to address this
Video demonstration of using the XIAO ESP32-S3 Sense to run image classification of apples, bananas, and potatoes using embedded TinyML. You will notice it takes some time (about 5-15 seconds) for it to update its prediction and begin to stabilize.
Troubleshooting
Even though the documentation was solid and the software user friendly, this was an incredibly challenging process for me. Every little thing is an opportunity for error so I had to take my time, make many mistakes, and get in the weeds of how this works. Below are some things noted:
I found I actually needed to uninstall the latest version of the esp32 by Espressif Systems board for the XIAO and Edge Impulse + code to work. I reinstalled version 2.0.11 which as the documentation suggested. I will plan to reinstall the latest version after completing this week.
One error I run into time and time again is receiving the uploading error: "exit status 2" or something similar indicating an issue with connecting with the serial port. Usually, restarting my computer helps. Also, double-checking to make sure the right board is selected. Also, I can enter bootloader mode by holding down BOOT, press and releasing RESET, releasing BOOT, and immediately clicking upload in ARduino IDE. I can also hold down BOOT while plugging the USB cable in. See more tips from seeedstudio.
When trying to ran into Wifi I ran into issues connecting. Eventually, I realized I was missing the antenna. Once I added that the device connected!
Using Edge Impulse Studio
I experience lots of challenges when using Edge Impulse Studio! And doesn't help that all of this data processing takes a good chunk of time to go through.
Got this error message when using Edge Impulse trying to run the training job:
Failed to start job: Your labeling method is set to "Bounding boxes (Object detection)", but you're trying to train a non-object detection model. Either change the labeling method (on **Dashboard**), or remove this learn block and add an 'Object detection' block under **Create impulse**.
Application exited with code 1
Job failed (see above)
I resolved this by going to the dashboard >> project info page. Then scrolling down to the project info box and changed the labelling method from "Bounding boxes (object detection)" to "one label per data item."
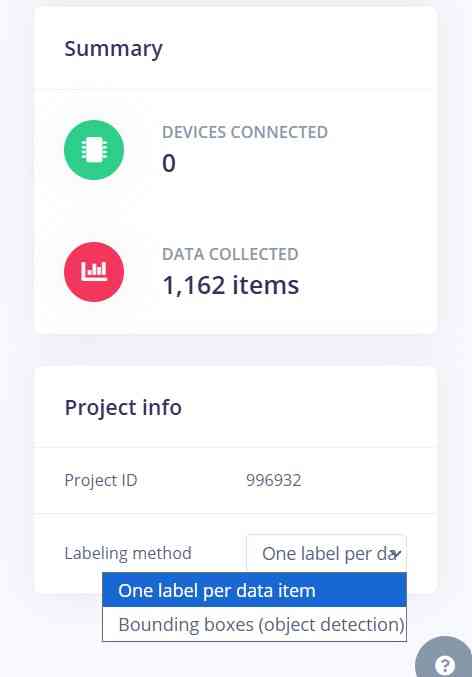
Fixing the error! I had erroneously clicked this at some point during the set up
Then, training job finally ran successfully but the accuracy reported was only 0.6%! When uploading my dataset earlier I manually split them between train/test/split but I when I checked back the Data acquisition tab I noticed a warning message that I had a poor dataset split. I decided to redo the data upload entirely and select the entire archive folder which houses the train, testing, and validation folders and just have Edge Impulse automatically split them. It took a while, but I was able to upload way more images this way too.
Once I'd fixed these issues I still didn't land an accurate dataset. I then learned that my labelling wasn't correct for the images (so "image_1" rather than specifying "apple," "banana" etc.). So I had to relabel those accordingly which I did by entering label manually typing it into "enter label" box. Also, I realized that the guide actually only has three different categories so I could actually start way smaller.
After this I got a warning about having a poor train/test split ration with the recommendation to add or move samples to the training or testing data.
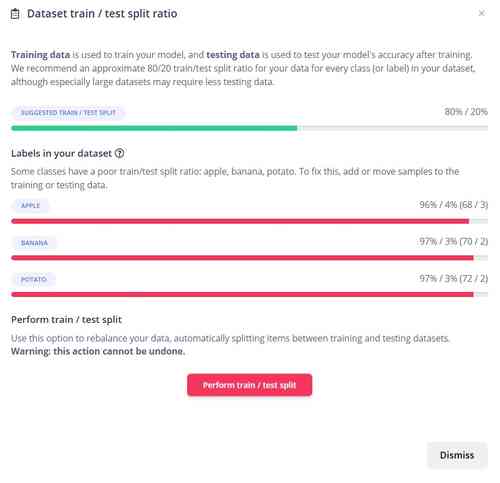
Warning in Edge Impulse
I moved some of the images from training to test until I was in the green around 80/20 train/test split ratio.
Exceeding allocated RAM for XIAO When first running the static buffer tests, the serial monitor displayed the error message: "Edge Impulse Inferencing Demo. AllocateTensors() failed ERR: Failed to run classifier (-3)..." I prompted Deepseek: "I have a XIAO ESP32S3 Sense board. Using Edge Impulse for getting a tiny language model on the board for image detection. The static buffer example gives "AllocateTensors() failed ERR: Failed to run classifier (-3)". Can you help troubleshoot?"
Deepseek identified the issue that the TensorFlow Lite arena size is too small. I followed its instructions to increase the tensor arena size. I would need to go in the code within the files to change that size. Ultimately (accounting for the larger models later), within the library folder I changed:
1) The code in the file model_metadata.h
//this line below changed the size to (700*1024)

#define EI_CLASSIFIER_TFLITE_LARGEST_ARENA_SIZE     (700 * 1024)
2) The code if file tflite_learn_996932_14.h
// this lines below also changed the size


#define EI_CLASSIFIER_TFLITE_LEARN_996932_14_ARENA_SIZE     (700 * 1024)


const size_t tflite_learn_996932_14_arena_size = (700 * 1024);
Then I added a line in the Arduino code like "//adding a comment" just to make sure it redid the upload properly. As a last note, I made sure to enable PSRAM (external memory option for this XIAO).
General Noticings
In general, besides some of the tedious nature of figuring this out the first go round, I found the most challenging part was the time it takes to really process all the data it requires, even for such a small scale use case.
I also noticed that the XIAO board and the camera itself were definitely running hot when running the program continuously. It is important to be mindful of safety.
Design Files
Find my code used for this week here