Week 13 - Molding and Casting
Brainstorming
Mold Making Methods
- Design and 3D printing a mold out of PLA
- Use Carvera to mill a mold out of wax
- Vacuum forming around an object
- Shape Play-Doh into a mold
- Squish an object into dense sand to make a sand mold
- Create a squishy silicone mold
Casting Materials
- Chocolate
- Isomalt sugar
- Molten metal/aluminum
- Resin
- Epoxy
- UV cure resin
- Metal clay
Mold Types
- One-part molds
- Two-part molds
- Multi-part molds
Materials Reference Table
| Material | Mold Making Properties | Casting Properties | Average Curing Times | PPE Needs |
|---|---|---|---|---|
| Silicone | Flexible, durable, reusable mold ideal for detailed designs. Easy to use / good for beginners. Can be used for one-part and two-part molds. | Heat resistant material | 12–48 hours | |
| Latex | Flexible, longer curing times. Best for small batches. Reusable mold. | 2–24 hrs | ||
| Polyurethane Rubber | Tough/strong, elastic, good for medium to large molds. Durable. Can make high quality molds. | 24 hrs to several days | ||
| Plaster of Paris | Good for simple shapes. Not good with undercuts. Best for small batches. Low cost. Works well with open molds. Great beginner material. | Good for beginners. Easy to use. Hard. Cost effective. Fast drying. Printable when dried. Easy to sand when dried. | 30–60 min | Clean and safe to use. Water based. Low to no odor. Wear a face mask. |
| Epoxy Resin | Good for simple shapes. Not good with undercuts. Works well with open molds. | Good for beginners. Easy to medium use. Hard and strong. Glossy, glass-like finish. | 24–72 hours | Good ventilation, gloves, eye protection, face mask. |
| Polyurethane Resin | Not as clear as epoxy. Fast curing. Tough/strong. | 12 hrs to several days | Good ventilation, gloves, eye protection, face mask. | |
| UV Resin | Best for small, shallow molds. Easy to use. Comes in lots of colors. Cures in minutes with a UV light or sunlight. | 1–5 minutes | ||
| Fiberglass | Strong, durable, good for complex shapes. | 24–72 hours | ||
| Concrete | Hard / high strength. Heavy. Weather proof. | 24–72 hours | Face mask. | |
| Clay | Cost effective. Easy to use. Can be hard or squishy when cured. Can be painted when cured. Air cured or heat cured. | 15 minutes to 48 hours | Safe to handle. Low to no odor. | |
| Jesmonite | Eco friendly. Has a look of stone. Hard/strong. | 24–48 hrs | Safe material. Low to no odors. | |
| Metal | Can be expensive. High melting points. | 10–30 min | Heat resistant gear, good ventilation, eye protection. | |
| Wax | Easy to carve and mill. | Soft, durable. Can be melted for lost-wax casting. | 5 min – 48 hrs | Generally safe to handle. Heat protectant while melting. |
Common Casting Problems and How to Fix Them
- Cracks
- Result from rapid drying, incorrect ratio, or stress
- Be accurate when mixing
- Bubbles
- Can result from curing too quickly / heat, shaking the mold, unfinished materials, pouring too fast
- Go slower; pop small bubbles with a heat gun
- Sticky surface
- Incorrect ratio, not fully cured
- Be accurate when mixing; let sit for full recommended curing time
Resources from Angela’s 9th Grade Class
- Machinable Wax Carvey and Fusion 360 CAM (Autodesk University)
- Fusion 360 Workflows: Basic CAM Templates (Bantam Tools)
Group Assignment
- Review the safety data sheets for each of your molding and casting materials
- Make and compare test casts with each of them
- Compare printing vs. milling molds
File Format Explanations
- STL – the file (geometry only)
- OBJ – the file plus color
- 3MF – the file plus color plus texture
- STEP – needed for Makera; use AnyConv to convert STL to STEP
Workflow Overview
- Step 1 – Print the 3D models to mold
- Step 2 – Get the safety sheets on your materials
- Step 2a – Use different materials to mold
- Step 2b – Compare to a milled 3D mold
- Step 3 – Cast in the different molds
- Step 4 – Compare
As a group we decided to 3D print gears for the mold. Dorian mentioned that nail polish remover would help smooth the prints out.
Step 1 — Print the 3D Model
Angela’s Explanation of Layer Height in 3D Printing
Angela made pictures in Blender simulating layer lines and how the lines get smaller with smaller layer height. The more lines (and the smaller the gaps between them), the less visible the layering when you print at a small layer height.

Change the layer height (this is dependent on the nozzle size). In our lab, our nozzle is 0.4 mm diameter, so the smallest layer height we can do is 0.08 mm for the A-1 mini. 0.10 to 0.12 mm is standard.
Typically 0.04–0.08 mm according to Gemini.
After printing the models, we glued the parts to the bottom of the Dixie cup.
Step 2 — Materials and Safety Data Sheets
We chose 3 different types of Smooth-On products that we had in the lab to make 3 different molds. We got data sheets and read instructions.
ReoFlex™ 30 ‘Next Generation’ Urethane Rubber
- Product page: ReoFlex™ 30
- SDS: 10007784-10007941.pdf
Directions for Use:
- A release agent is necessary to facilitate demolding when casting into or over most surfaces. Use a release agent made specifically for mold making.
- Pre-mix Part B for at least 3 minutes
- Mix A and B at 1:1 ratio
- Mix Ratio By Volume: 1A:1B
- Mix Ratio By Weight: 1A:1B
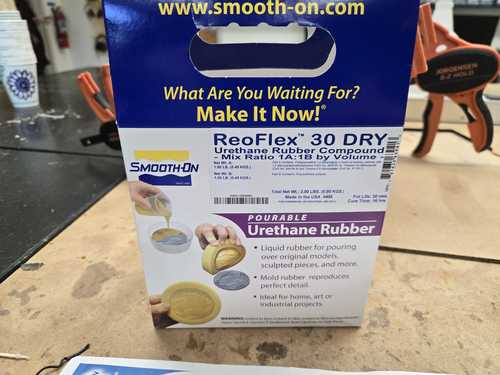
Pot Life: 30 minutes
Curing Time: 16 hours. Allow rubber to cure overnight (at least 16 hours) at room temperature (73°F / 23°C) before demolding. Cure time can be reduced with mild heat or by adding Smooth-On Kick-It™ Cure Accelerator. Do not cure rubber where the temperature is less than 65°F / 18°C.
MSDS Notes
Part A:
- Safety Precautions:
- H317 — May cause an allergic skin reaction
- H332 — Harmful if inhaled
- H334 — May cause allergy or asthma symptoms or breathing difficulties if inhaled
- H351 — Suspected of causing cancer
- Handle in accordance with good industrial hygiene and safety practice. Avoid contact with skin, eyes or clothing. Ensure adequate ventilation. In case of insufficient ventilation, wear suitable respiratory equipment. Do not eat, drink or smoke when using this product. Take off contaminated clothing and wash before reuse. Avoid breathing vapors or mists.
- Environmental precautions (if applicable)
Part B:
- Safety Precautions:
- H361 — Suspected of damaging fertility or the unborn child
- H373 — May cause damage to organs through prolonged or repeated exposure
- Avoid contact with skin, eyes or clothing. Do not eat, drink or smoke when using this product. Remove contaminated clothing and shoes.
- Environmental precautions (if applicable)
General Notes:
- ReoFlex™ mold rubbers are used for a variety of applications including making molds to reproduce sculpture and architectural elements, as well as for making special effects, toys and prototypes.
- They have negligible shrinkage.
- ReoFlex™ urethanes are available in 20A, 30A, 40A, 50A and 60A Shore hardnesses — ours was 30A.
Mold Star™ 30
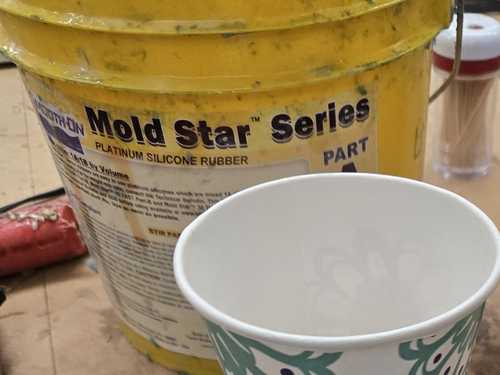
- Product page: Mold Star 30
- MSDS: 10001211-10001314.pdf
Directions for Use:
- Use in a properly ventilated area (“room size” ventilation). Wear safety glasses, long sleeves and rubber gloves to minimize contamination risk. Wear vinyl gloves only — latex gloves will inhibit the cure of the rubber.
- Although not usually necessary, a release agent will make demolding easier when casting into most surfaces.
- Before you begin, pre-mix Part A and Part B separately.
- Dispense required amounts of Parts A and B into mixing container (1A:1B by volume).
- Mix thoroughly making sure that you scrape the sides and bottom of the mixing container several times. The rubber should be a uniform color with no streaks.
- Optional — Vacuum Degassing: Although not necessary, vacuum degassing helps eliminate any entrapped air in pourable silicone rubber. After mixing parts A and B, vacuum material for 2–3 minutes at 29 inches of mercury, making sure that you leave enough room in container for product expansion.
Pot Life: 45 minutes
Curing Time: 6 hours at room temperature (73°F / 23°C) before demolding. (Time to demold can be reduced by applying mild heat.)
MSDS Notes
Part A:
- Safety Precautions:
- This product, as supplied, does not contain any hazardous materials with occupational exposure limits established by the region-specific regulatory bodies.
- Ensure adequate ventilation.
- Environmental precautions (if applicable):
- The environmental impact of this product has not been fully investigated.
Part B:
- Safety Precautions:
- This product is not considered hazardous by the US OSHA Hazard Communication Standard 2024 (29 CFR 1910.1200).
- Ensure adequate ventilation.
- Environmental precautions (if applicable):
- The environmental impact of this product has not been fully investigated.
General Notes:
- Mold Star™ mold rubbers are easy-to-use platinum silicones which are mixed 1A:1B by volume (no weighing scale necessary). Mold Star™ silicones feature relatively low viscosities and vacuum degassing is not required for most applications. Mold Star™ 30 is a harder material, with a 30A Shore hardness.
- Mold Star™ silicones cure to soft, strong rubbers which are tear resistant and exhibit very low long-term shrinkage. Molds made with Mold Star™ will last a long time in your mold library and are good for casting wax, gypsum, resins, and other materials. Cured Mold Star™ rubber is heat resistant up to 450°F (232°C) and is suitable for casting low-temperature melt metal alloys. Note: Mold Star™ rubbers are not intended for brush-on moldmaking.
Ecoflex™ 00-30

- Product page: Ecoflex 00-30
- SDS: 10000517-10000536.pdf
Directions for Use: Use in a properly ventilated area (“room size” ventilation). Wear safety glasses, long sleeves and rubber gloves to minimize contamination risk. Wear vinyl gloves only — latex gloves will inhibit the cure of the rubber.
- Although not usually necessary, a release agent will make demolding easier when casting into most surfaces.
- Before you begin, pre-mix Part A and Part B separately.
- Dispense required amounts of Parts A and B into mixing container (1A:1B by volume).
- Mix thoroughly making sure that you scrape the sides and bottom of the mixing container several times. The rubber should be a uniform color with no streaks.
- Pouring: For best results, pour your mixture in a single spot at the lowest point of the containment field. Let the rubber seek its level up and over the model. A uniform flow will help minimize entrapped air. The liquid rubber should level off at least 1/2” (1.3 cm) over the highest point of the model surface.
- Optional — Vacuum Degassing: Although not necessary, vacuum degassing helps eliminate any entrapped air in pourable silicone rubber. After mixing parts A and B, vacuum material for 2–3 minutes at 29 inches of mercury, making sure that you leave enough room in container for product expansion.
Pot Life: 45 minutes
Curing Time: 4 hours
MSDS Notes
Part A:
- Safety Precautions:
- This chemical is not considered hazardous by the 2012 OSHA Hazard Communication Standard.
- Ensure adequate ventilation.
- Environmental precautions (if applicable)
Part B:
- Safety Precautions:
- This product is not considered hazardous by the US OSHA Hazard Communication Standard 2024 (29 CFR 1910.1200).
- Ensure adequate ventilation.
- Environmental precautions (if applicable):
- The environmental impact of this product has not been fully investigated.
General Notes:
- Ecoflex™ rubbers are water-white translucent and can be color pigmented with Silc Pig™ pigments for creating a variety of color effects. You can also add Smooth-On’s Silicone Thinner™ to further lower the viscosity. THI-VEX™ silicone thickener can be added by weight to Ecoflex™ silicones for brushable applications.
- Ecoflex™ rubbers are suitable for a variety of applications including making prosthetic appliances, cushioning for orthotics and special effects applications (especially in animatronics where repetitive motion is required).
Smooth-Sil™ 940
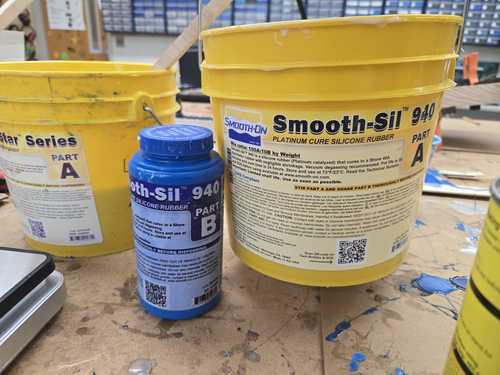
Angela’s mold.
- Product page: Smooth-Sil 940
- MSDS: 10001744-10001761.pdf
Directions for Use:
- Premix Part B to mix any settled pigments.
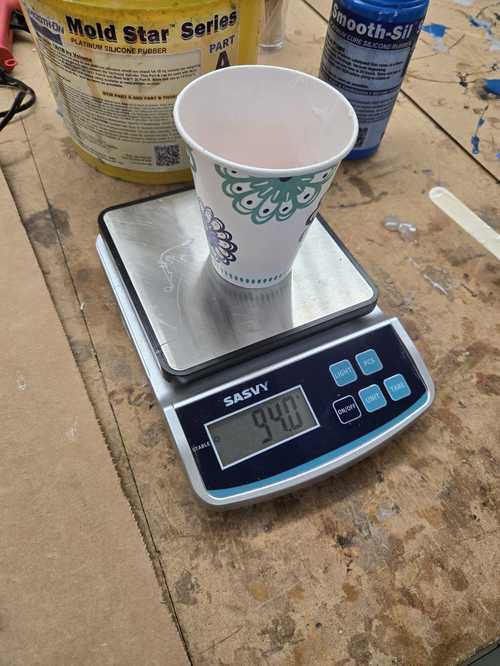
- Use a scale to mix parts A and B in a 100:10 ratio by weight. Angela’s mixture was approximately 94 g of Part A and 9.4 g of Part B for a total weight of approximately 104 g.
- Stir the mixture thoroughly for 3 minutes. Angela’s mixture turned a light pink color when the two parts were thoroughly mixed.
- Scoop or pour your mixture over your casting object.
- Wait until cured.
Pot Life: 30 min
Curing Time: ~24 hrs
Cure at room temperature, which is approximately 73°F. You should not cure the silicone with a temperature below 65°F.
MSDS Notes
Part A:
- Safety Precautions:
- Wear gloves and long sleeves to avoid contact with skin
- Use soapy water to wash hands after use
- Only use vinyl gloves; latex will affect the curing process
- Don’t eat it
- Don’t get it in your eyes
- Safety glasses or safety goggles suggested for eye protection
- Use in a well-ventilated space
Part B:
- Safety Precautions:
- Wear gloves to avoid contact with skin
- Use soapy water to wash hands after use
- Don’t eat it
- Don’t get it in your eyes
- Goggles suggested for eye protection
General Notes:
- There was more detailed material safety information on the product page than in the MSDS.
- This material is safe to handle once fully cured.
- This material can be used for food applications once cured.
- The Part B data sheet was essentially the same as the Part A MSDS.
- The finished silicone has a Shore hardness of A 40, which is medium-soft and is closely equivalent to a pencil eraser.
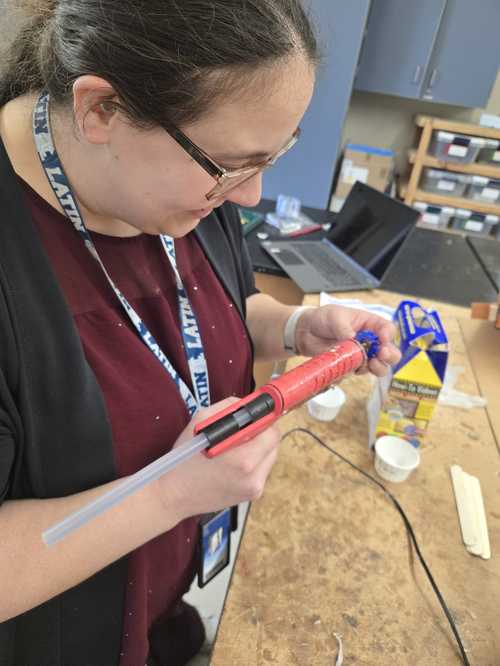
Step 2a — Making the Molds
We got gloves. We stirred up the materials in the buckets and shook the ones in smaller vessels.
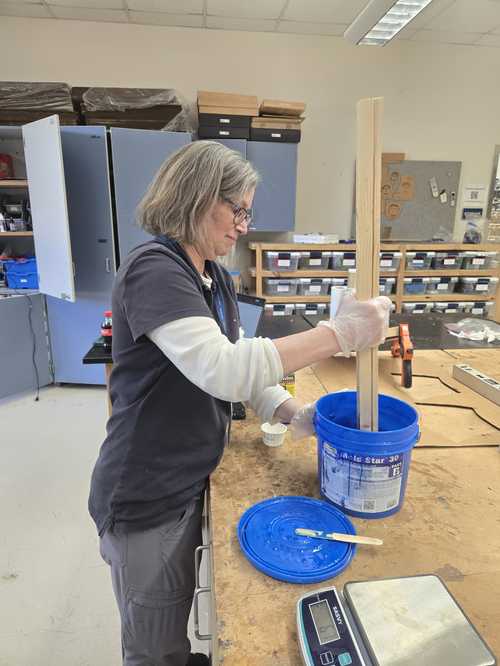
Then we measured the ratio amounts of each product, as indicated on the containers or in the data sheets.
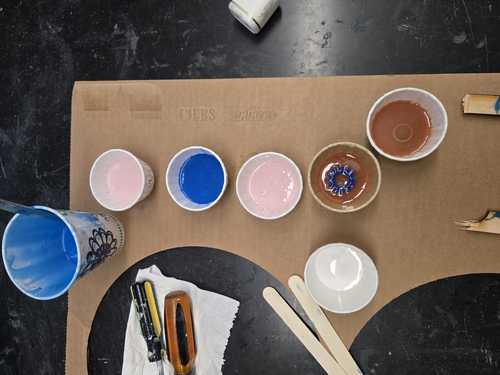
We poured our different materials into our cups that had the pieces glued to the bottom. Then we left them to cure in the lab overnight.
On one we tried tapping to get some bubbles out, but the gear came dislodged from the bottom and floated up.
Step 2b — Comparing Milling and 3D Printing for Making Molds
3D printing is much, much easier, and the lines can be smoothed out using fillers and/or sanding. It is also easier to make multiple-part molds quickly, allowing for molds that have indented parts or that can be poured into to make other shapes.
Dr. Taylor showed us his milled mold of Batman, and we could see how the lines were showing from the milled passes. We could see how you could sand those down to make a pretty smooth mold. However, the shape was still shallow and would take a longer drill bit or a ramping edge to make it as deep as we could make it with a 3D printed part — which is quickly and easily printed.
Step 3 — Cast in the Different Molds
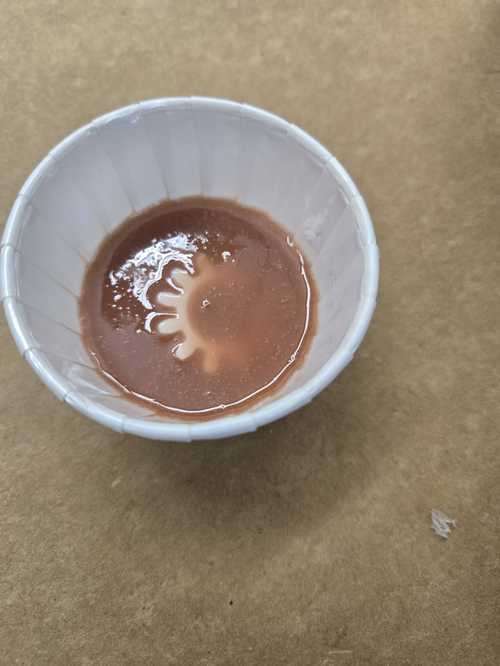
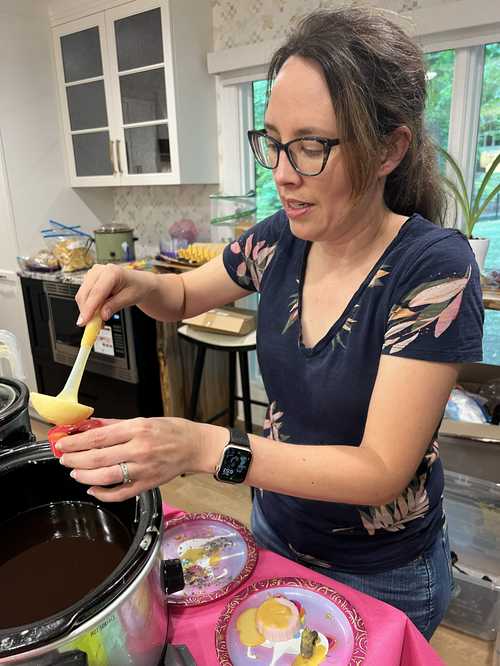
We cast using beeswax at Dorian’s house and we cast using Mix and Mold ceramic resin back at the lab. Dorian has an amazing setup with beeswax and chocolate and all things wonderful at her home. We made candles and cast all sorts of things at her home.
The ceramic resin was called Mix and Mold.
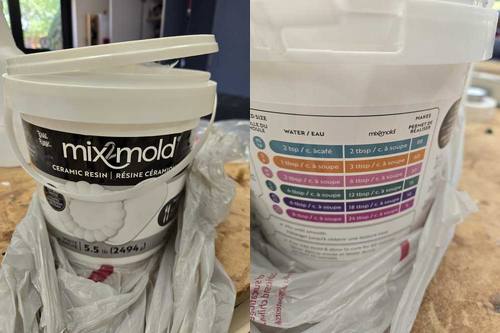
The instructions were on an insert in the bucket.
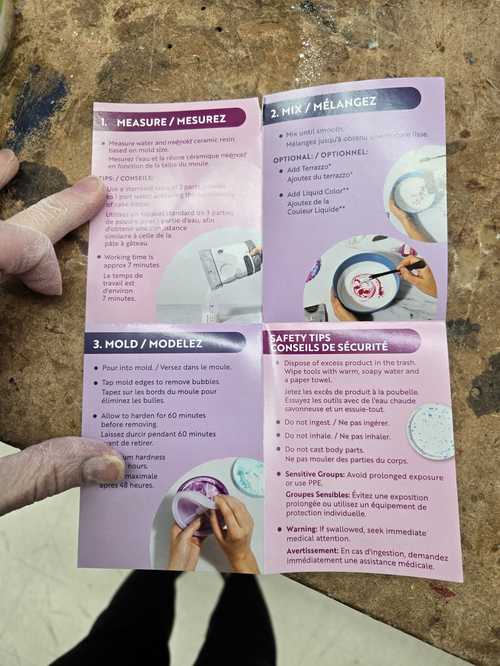
We followed the directions using the safety equipment recommended with the other materials (ventilation, vinyl gloves, long sleeves), and filled the molds.
Step 4 — Compare
We made molds of our gear using 4 different soft molding materials (Mold Star 30, Mold Star 15, ReoFlex, Smooth-Sil 940).
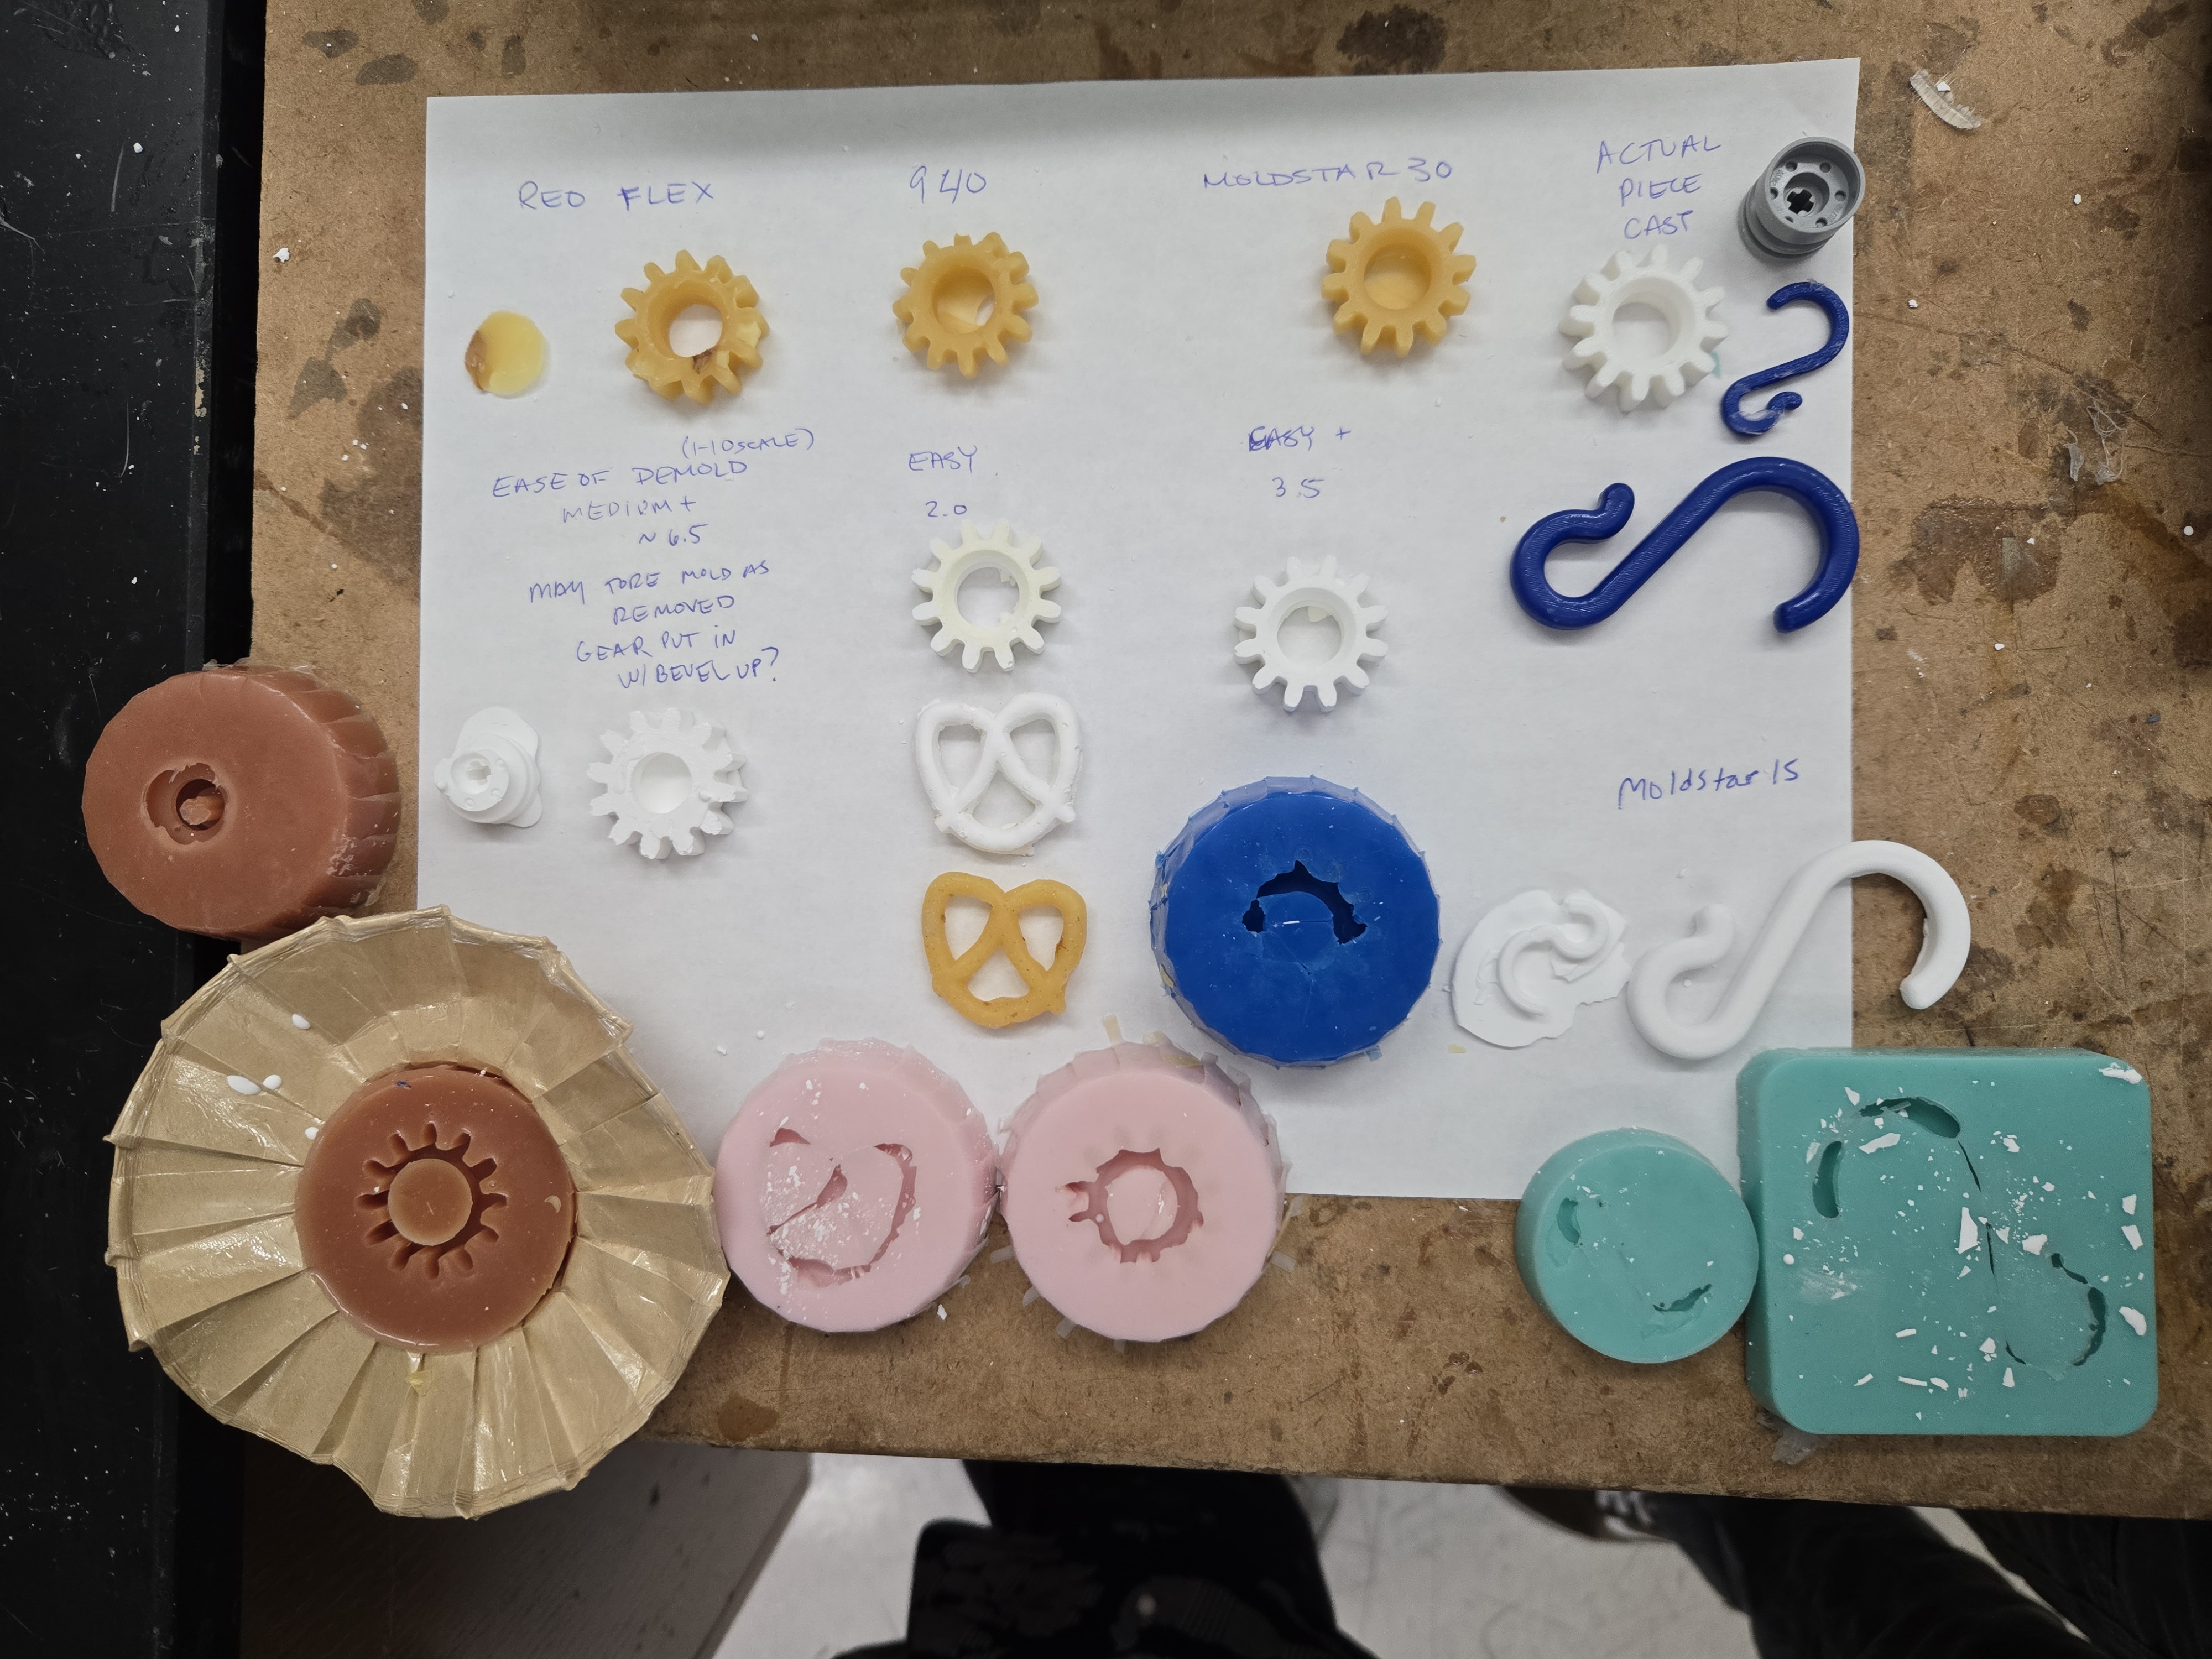
We cast the molds in both beeswax and ceramic resin. Looking at the picture you can tell that the detail is better in the harder rubbers. The best was the Mold Star 30 — it seemed to have the right combination of flexibility for demolding and hardness for catching the details. ReoFlex may have been even better if we had put the gear in with the beveled side down.
Dorian’s House — Chocolate Extravaganza
At Dorian’s house, we had an amazing lesson in all things chocolate and the chemistry of chocolate, and what tempering does to the materials. We learned about how to fill the molds and the temperatures and timing of curing the chocolates to make them amazing.
Milling and Wax Molding
Our wax piece size: 70.8 × 48.2 × 24 mm wax mold size.
Our Carvera machines have a 16 mm × 16 mm wax mold drilling jig offset.
We had to rotate the gear in the YZ plane in Carvera so the flat part of the gear would be on the top and the beveled part on the bottom.
We set the stock to 70.8.
Dr. Taylor shared a resource for milling in Fusion 360.
Camille started using this flow but ended with an error from Fusion that she couldn’t get rid of and would stop the generation of the path. A restart of the program cleared that. However, the tool paths still seemed to not include the rest of the box. I brought in a model that had the wax block already and used the generic machine to make the tool paths with a 1/8” ball nose (roughing and contour). Then I followed the instructions to post-process into G-code. When I went to check the G-code, this is what I got:
##########
THIS POSTPROCESSOR IS A SAMPLE FOR MACHINE SIMULATION USAGE,
IT DOES NOT OUTPUT ANY NC PROGRAM.

For more information on how to update your post processor with
machine simulation support please visit:

https://knowledge.autodesk.com/community/article/356406
##########
That referenced article leads you to:
An error occurred while processing your request.

Reference #30.ee680117.1777205978.1db9fe5d
https://errors.edgesuite.net/30.ee680117.1777205978.1db9fe5d
Maybe we need to load some kind of Carvera module into Fusion? Maybe better to try again in MakeraCAM.
Mrs. Morrow made us instructions on milling the wax mold — but unfortunately, those were also in Fusion and reference a post-processor for the Carvera which doesn’t appear when I look for the machine.
Getting the Carvera Post Processor for Fusion 360
To get the post processor for Carvera that works with Fusion 360, you need the CPS file.
Source: Carvera Community Profiles — Fusion 360
- Download the CPS file
- Upload it into the post-processor library in Fusion 360
- Add the post library using the Manage area
- When you do the post-processing step, choose the local area, and the Carvera post processor that you imported
Resources from Angela and Latin for Molding
Fusion 360 — adding the Makera CAM to be able to make CNC paths from Fusion: MakeraInc/CarveraProfiles
Video for doing molds in Fusion 360: Machinable Wax — Carvey and Fusion 360 CAM (Autodesk University)
Fusion 360 Workflows — Basic CAM templates: Bantam Tools
Milling About — CNC milling, laser cutting, and chocolate molds (PDF for students)
Makera CAM — 3D Mode Settings
- 3D path: pocket cut
- 3D pocket: starting
- Offset path strategy: inside out
- Save position
- Calculate
(Kim’s pictures of Makera settings to be added.)
We downloaded the gear STEP file from Printables, but it came in as one solid mesh. Angela used Blender to separate the parts and exported as STL. We brought it into Carvera, and once we edited the settings and calculated, we received the message “Error: no 3D Model Mesh selected.” It turns out we need a STEP file instead of an STL file (need to find out why).
Aspire post-processor: Makera.
Garrett and Angela worked on creating a STEP file while Dorian converted the original STL file to STEP.