Week 11
Embedded Networking and Communications
Week Overview
This week, I worked on designing and connecting two embedded nodes capable of communicating over a network using addressing. The goal was to send messages between devices and trigger a local output based on received instructions. I used my custom-designed board ANDRU (based on ESP32-C3), along with a second ESP32 development board to establish wireless communication using the MQTT protocol.
Individual Assignment
Hardware Used
- Sender:ESP32-S3
- Receiver: ANDRU board (custom ESP32-C3 board) – visit the Week 08 page to see its design and fabrication details.
- Servo Motor
Communication Protocol
I chose to implement MQTT, a lightweight messaging protocol based on the publish/subscribe model. It is commonly used in IoT applications due to its simplicity and efficiency. Both ESP32 boards connect to a public MQTT broker, where one acts as a publisher and the other as a subscriber. Each device identifies itself using a unique topic, which acts as its address in the network.
Interacting with MQTT
For the completion of this assignment, Professor Ulises delivered a master class that can be reviewed at the following link: https://www.youtube.com/watch?v=ZcFDnd0amsk. In the session, he covered the basic principles of MQTT and demonstrated practical examples that were extremely useful as a guide throughout this assignment.
MQTT Configuration
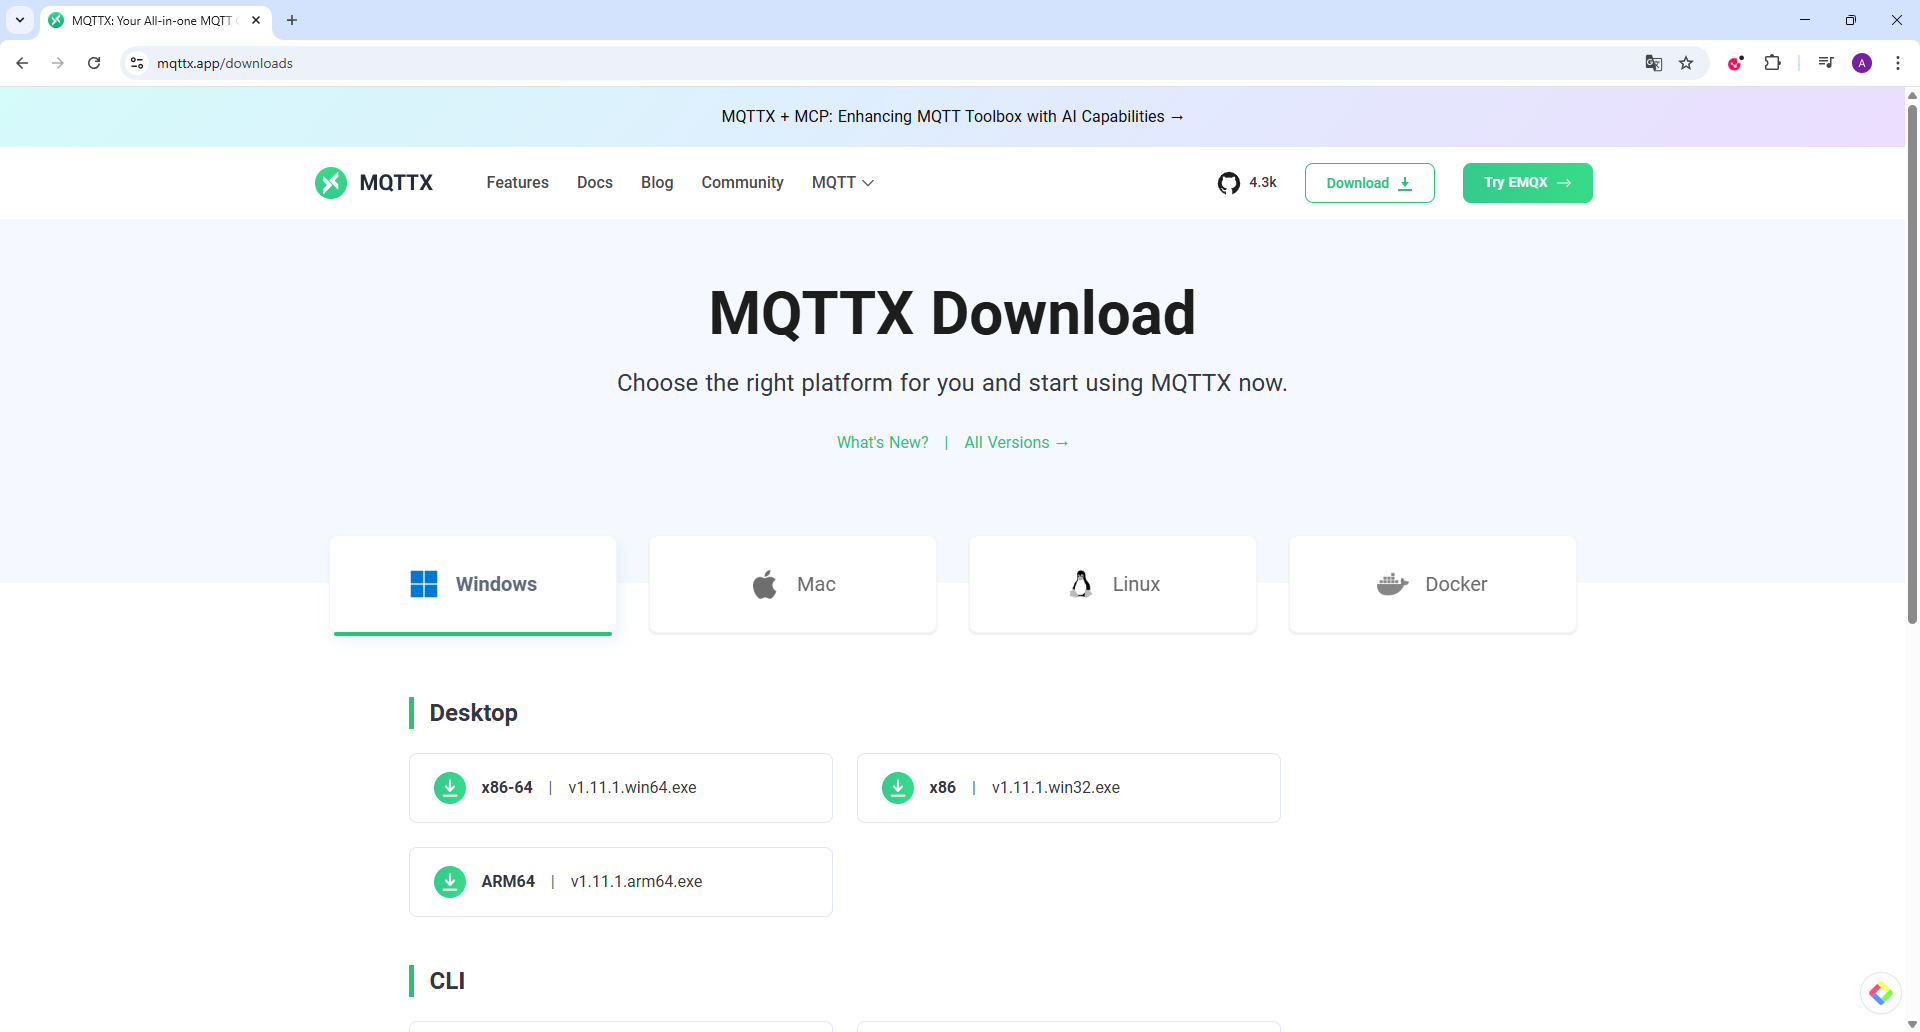
To visualize and test MQTT messages between devices, I installed MQTTX, a cross-platform MQTT client that allows real-time monitoring of topics and messages. The application can be downloaded for Windows from the official site: https://mqttx.app/downloads. This tool will be helpful to verify that the ESP32 boards are correctly sending and receiving MQTT messages.
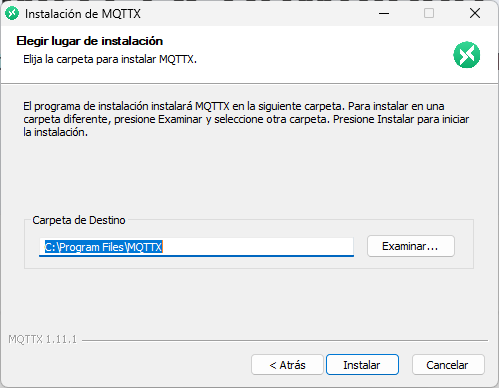
Create a New Connection
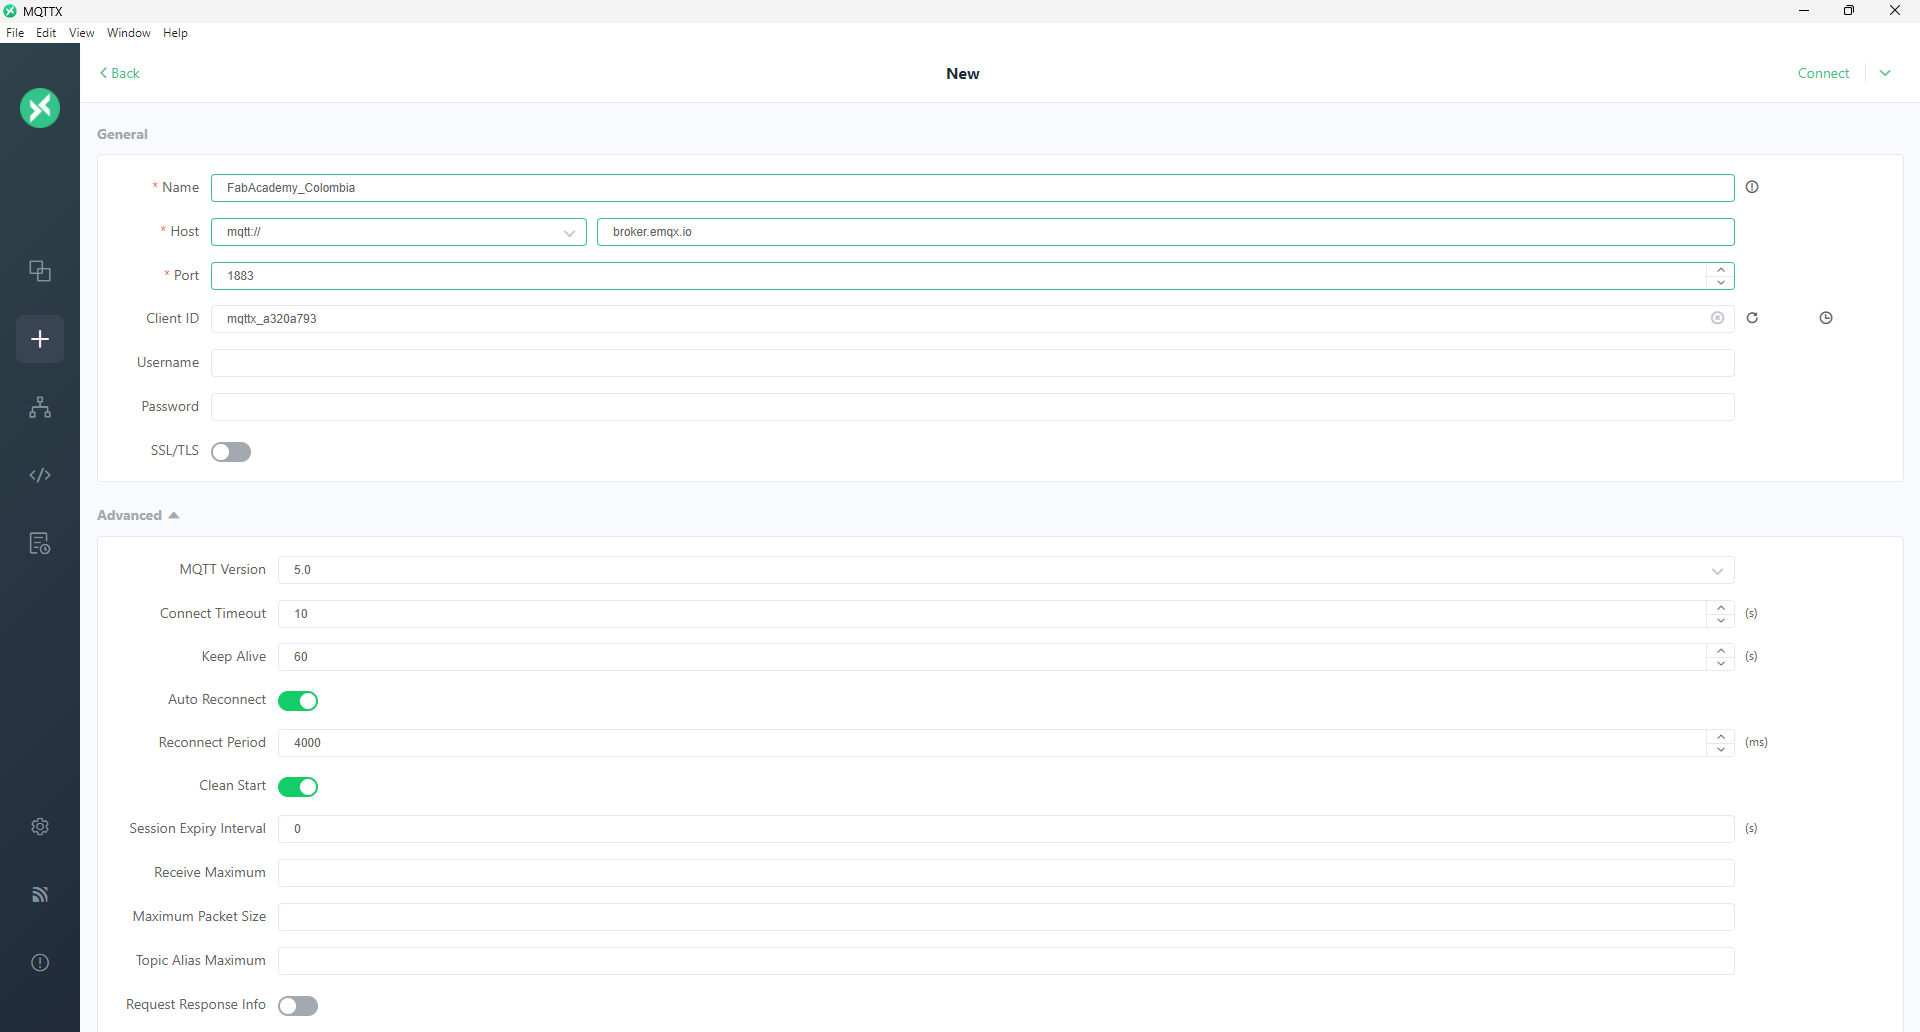
Opened MQTTX and clicked “New Connection”.
- Connection Name:
FabAcademy_Colombia - Broker Address:
broker.emqx.io - Port:
1883
Subscribe to Topic
In the “Subscriptions” panel, added the topic:FabAcademy/week11
so I could see every message published by my sender node.
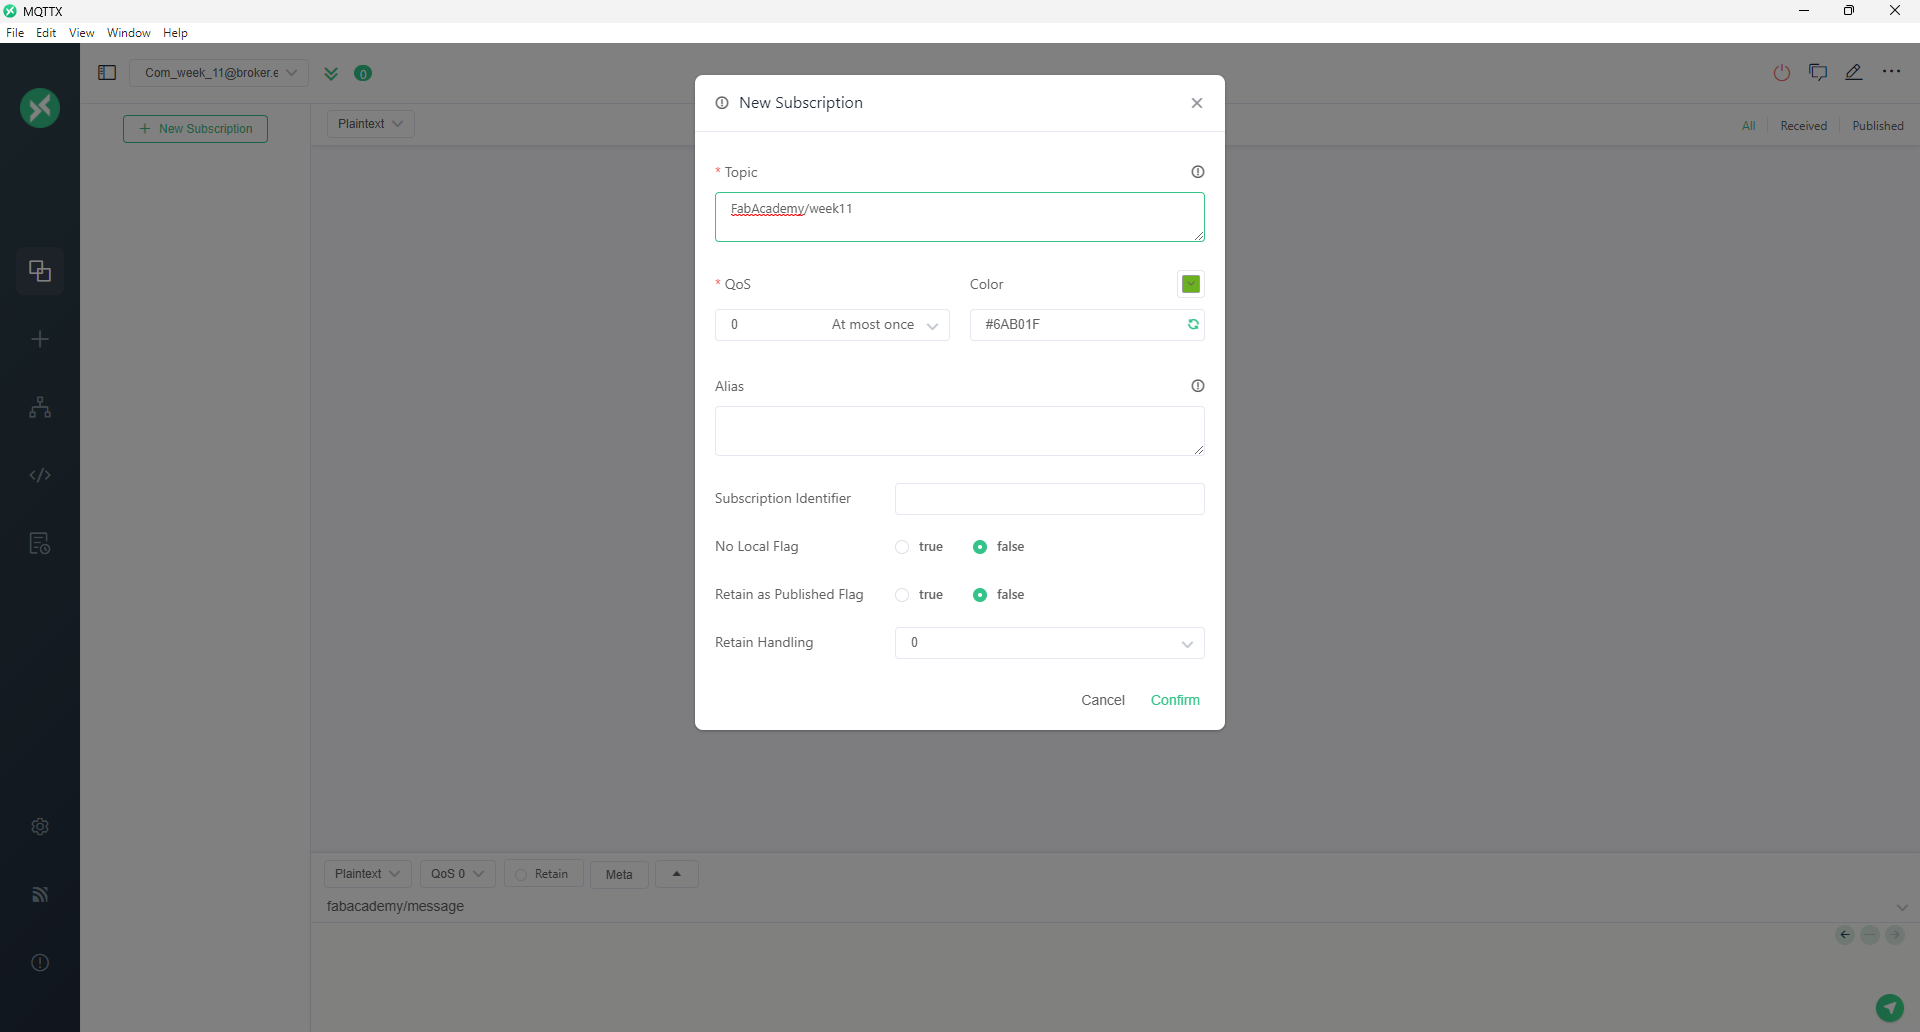
MQTTX connection dialog configured for broker.emqx.io:1883 and subscription to FabAcademy_Colombia.
Using Publish & Subscribe Services
After clicking the Connect button in the top-right corner of MQTTX, you can switch between the Publish and Subscribe tabs to send messages to, or receive messages from, the configured topic. This allows real-time testing of your MQTT workflow.
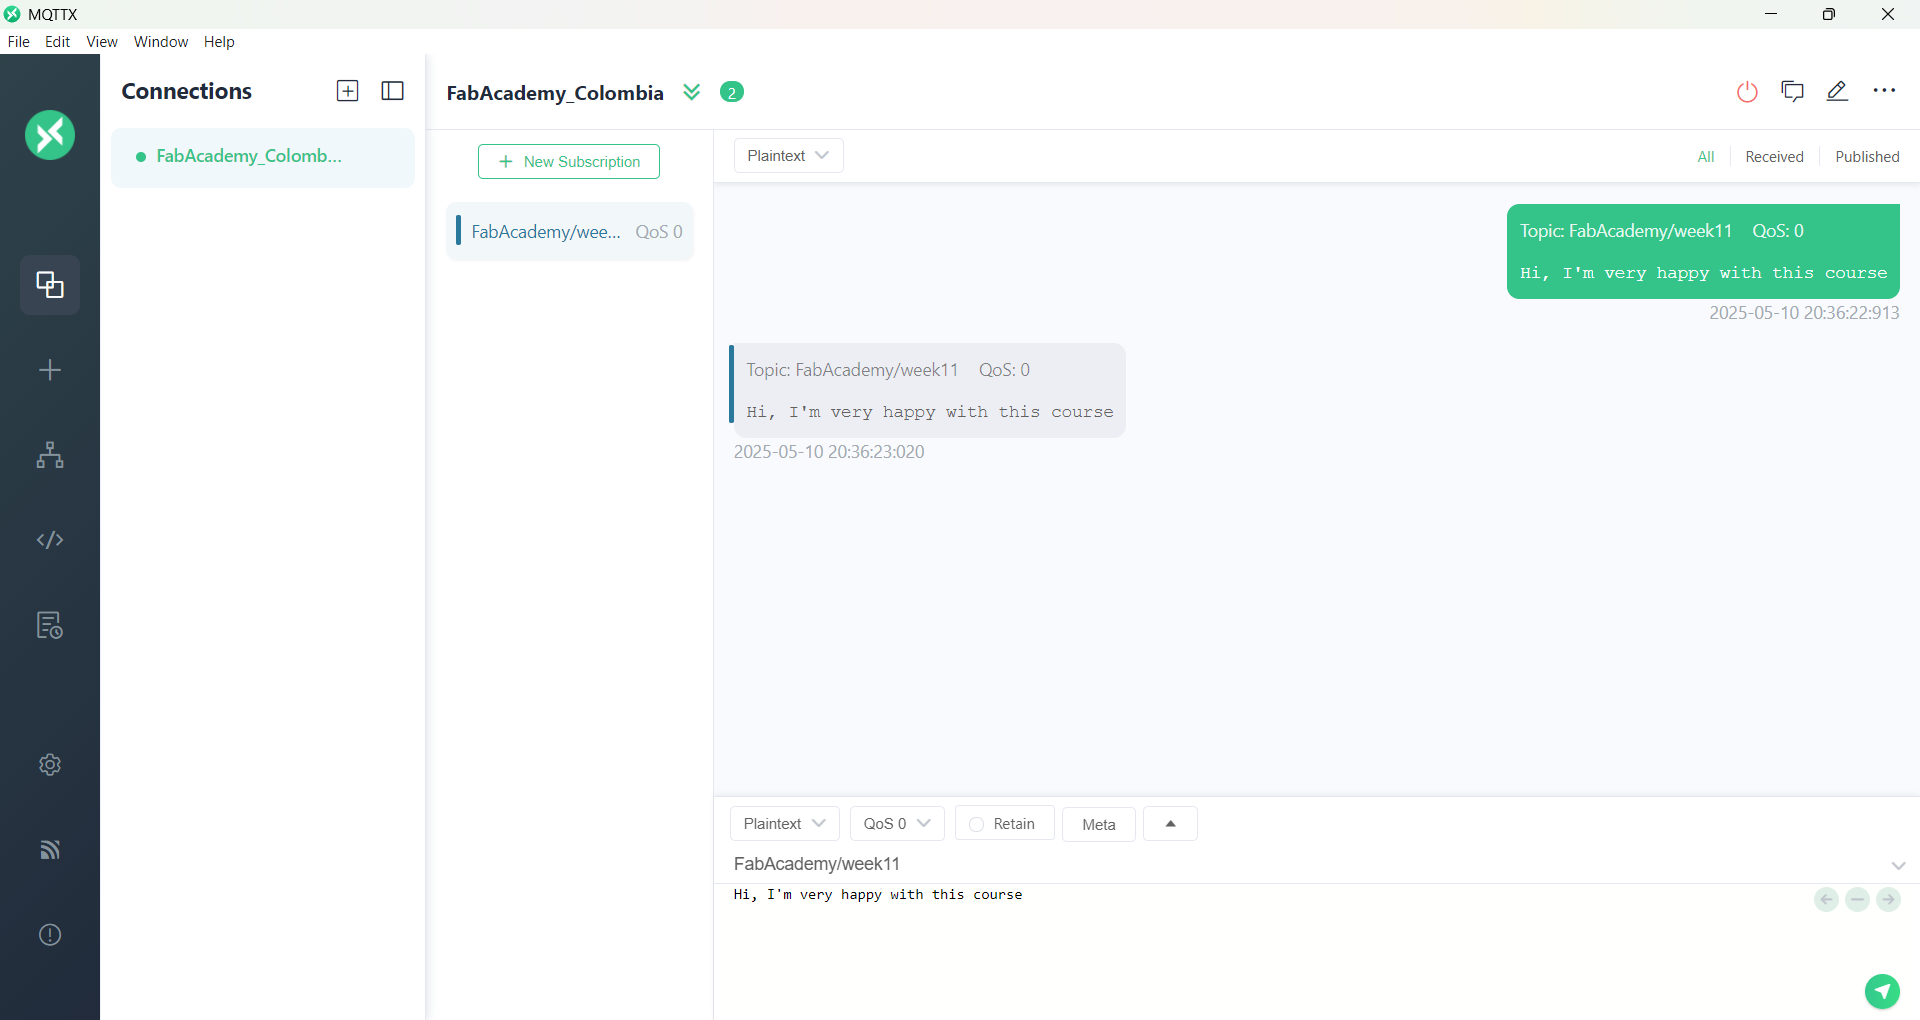
MQTTX showing both Publish and Subscribe panels after connecting to broker.emqx.io:1883.
MQTT Publish/Subscribe Workflow
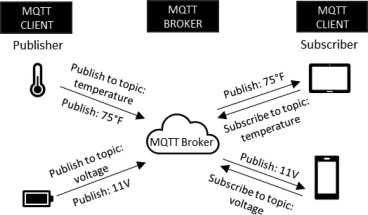
temperature and voltage. Adapted from Saha et al. (2024).
Source: N. Saha, P. Paul, K. Ji & R. Harik, “Performance evaluation framework of MQTT client libraries for IoT applications in manufacturing,” Manufacturing Letters, vol. 41, pp. 1237–1245, 2024. doi: 10.1016/j.mfglet.2024.09.150.
Angle Control via Serial → MQTT → ANDRU
The ESP32 reads an angle (0–180) from the Serial Monitor and publishes it to FabAcademy/week11 on broker.emqx.io. ANDRU subscribes to that topic and moves its servo to the specified angle.
ESP32 Publisher Sketch
              // ESP32: Serial to MQTT angle publisher

              #include <WiFi.h>
              #include <PubSubClient.h>

              const char* ssid = "ANLI";
              const char* password = "Actua1455";

              const char* mqtt_server = "broker.emqx.io";
              const char* mqtt_Client = "FabAcademy_Colombia";
              const char* mqtt_Topic_Pub = "FabAcademy/week11";

              WiFiClient espClient;
              PubSubClient client(espClient);


              void setup() {
                // put your setup code here, to run once:
                Serial.begin(115200);
                setup_wifi();

                client.setServer(mqtt_server, 1883);
              }

              void setup_wifi() {
                delay(10);
                // We start by connecting to a WiFi network
                Serial.println();
                Serial.print("Connecting to ");
                Serial.println(ssid);

                WiFi.begin(ssid, password);

                while (WiFi.status() != WL_CONNECTED) {
                  delay(500);
                  Serial.print(".");
                }

                Serial.println("");
                Serial.println("WiFi connected");
                Serial.println("IP address: ");
                Serial.println(WiFi.localIP());
              }


              void reconnect() {
                // Loop until we're reconnected
                while (!client.connected()) {
                  Serial.print("Attempting MQTT connection...");
                  // Attempt to connect
                  if (client.connect(mqtt_Client)) {
                    Serial.println("connected");
                  } else {
                    Serial.print("failed, rc=");
                    Serial.print(client.state());
                    Serial.println(" try again in 5 seconds");
                    // Wait 5 seconds before retrying
                    delay(5000);
                  }
                }
              }

              void loop() {
                // put your main code here, to run repeatedly:

                if (!client.connected()) {
                  reconnect();
                }
                client.loop();

                if (Serial.available()) {
                  int angle = Serial.parseInt();
                  Serial.println(angle);
                  if (angle >= 0 && angle <= 180) {
                    char buf[4];
                    itoa(angle, buf, 10);
                    client.publish(mqtt_Topic_Pub, buf);
                  }
                  Serial.read();  // clear newline
                }
ANDRU Subscriber Sketch
              #include <WiFi.h>
              #include <PubSubClient.h>
              #include <ESP32Servo.h>

              const char* ssid     = "ANLI";
              const char* password = "Actua1455";

              const char* mqtt_server = "broker.emqx.io";
              const char* mqtt_Client = "ANDRUClient2025";
              const char* mqtt_Topic_Sub ="FabAcademy/week11";

              WiFiClient espClient;
              PubSubClient client(espClient);

              // Servo setup
              Servo myServo;
              const int servoPin = D5;


              void setup() {
                // put your setup code here, to run once:
                Serial.begin(115200);
                setup_wifi();

                client.setServer(mqtt_server, 1883);
                client.setCallback(callback);

                myServo.attach(servoPin);

              }

              void setup_wifi() {
                delay(10);
                // We start by connecting to a WiFi network
                Serial.println();
                Serial.print("Connecting to ");
                Serial.println(ssid);

                WiFi.begin(ssid, password);

                while (WiFi.status() != WL_CONNECTED) {
                  delay(500);
                  Serial.print(".");
                }

                Serial.println("");
                Serial.println("WiFi connected");
                Serial.println("IP address: ");
                Serial.println(WiFi.localIP());
              }

              void callback(char* topic, byte* message, unsigned int length) {
                Serial.print("Message arrived on topic: ");
                Serial.print(topic);
                Serial.print(". Message: ");
                String messageTemp;

                for (int i = 0; i < length; i++) {
                  Serial.print((char)message[i]);
                  messageTemp += (char)message[i];
                }
                Serial.println();

                if (String(topic) == mqtt_Topic_Sub) {
                  int angle = messageTemp.toInt();
                  angle = constrain(angle, 0, 180);
                  Serial.print("Moving servo to ");
                  Serial.print(angle);
                  Serial.println(" degrees");
                  myServo.write(angle);
                }
              }

              void reconnect() {
                // Loop until we're reconnected
                while (!client.connected()) {
                  Serial.print("Attempting MQTT connection...");
                  // Attempt to connect
                  if (client.connect(mqtt_Client)) {
                    Serial.println("connected");
                    // Subscribe
                    client.subscribe(mqtt_Topic_Sub);
                  } else {
                    Serial.print("failed, rc=");
                    Serial.print(client.state());
                    Serial.println(" try again in 5 seconds");
                    // Wait 5 seconds before retrying
                    delay(5000);
                  }
                }
              }

              void loop() {
                // put your main code here, to run repeatedly:

                if (!client.connected()) {
                  reconnect();
                }
                client.loop();

              }
Servo Motor Connection
The servo is connected to the ANDRU board’s PWM pin (GPIO 5), with its signal wire on GPIO5, power on 5V, and ground on GND. This setup allows precise angle control via the ESP32-C3’s PWM output.
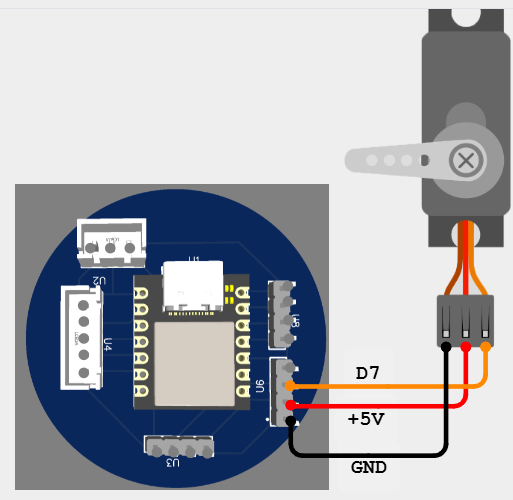
ANDRU board (XIAO ESP32-C3) wired to the servo motor: signal on GPIO5, VCC on 5 V, GND on GND.
Evidence of Operation
The following video demonstrates the full workflow: the ESP32 reads an angle value from the Serial Monitor, publishes it to the MQTT broker, and the ANDRU board (as subscriber) moves the servo to the corresponding position.
Demo: Serial → MQTT publish → ANDRU subscribes → Servo moves.
Below is a screenshot from the MQTT broker interface showing the angle values as they are published:
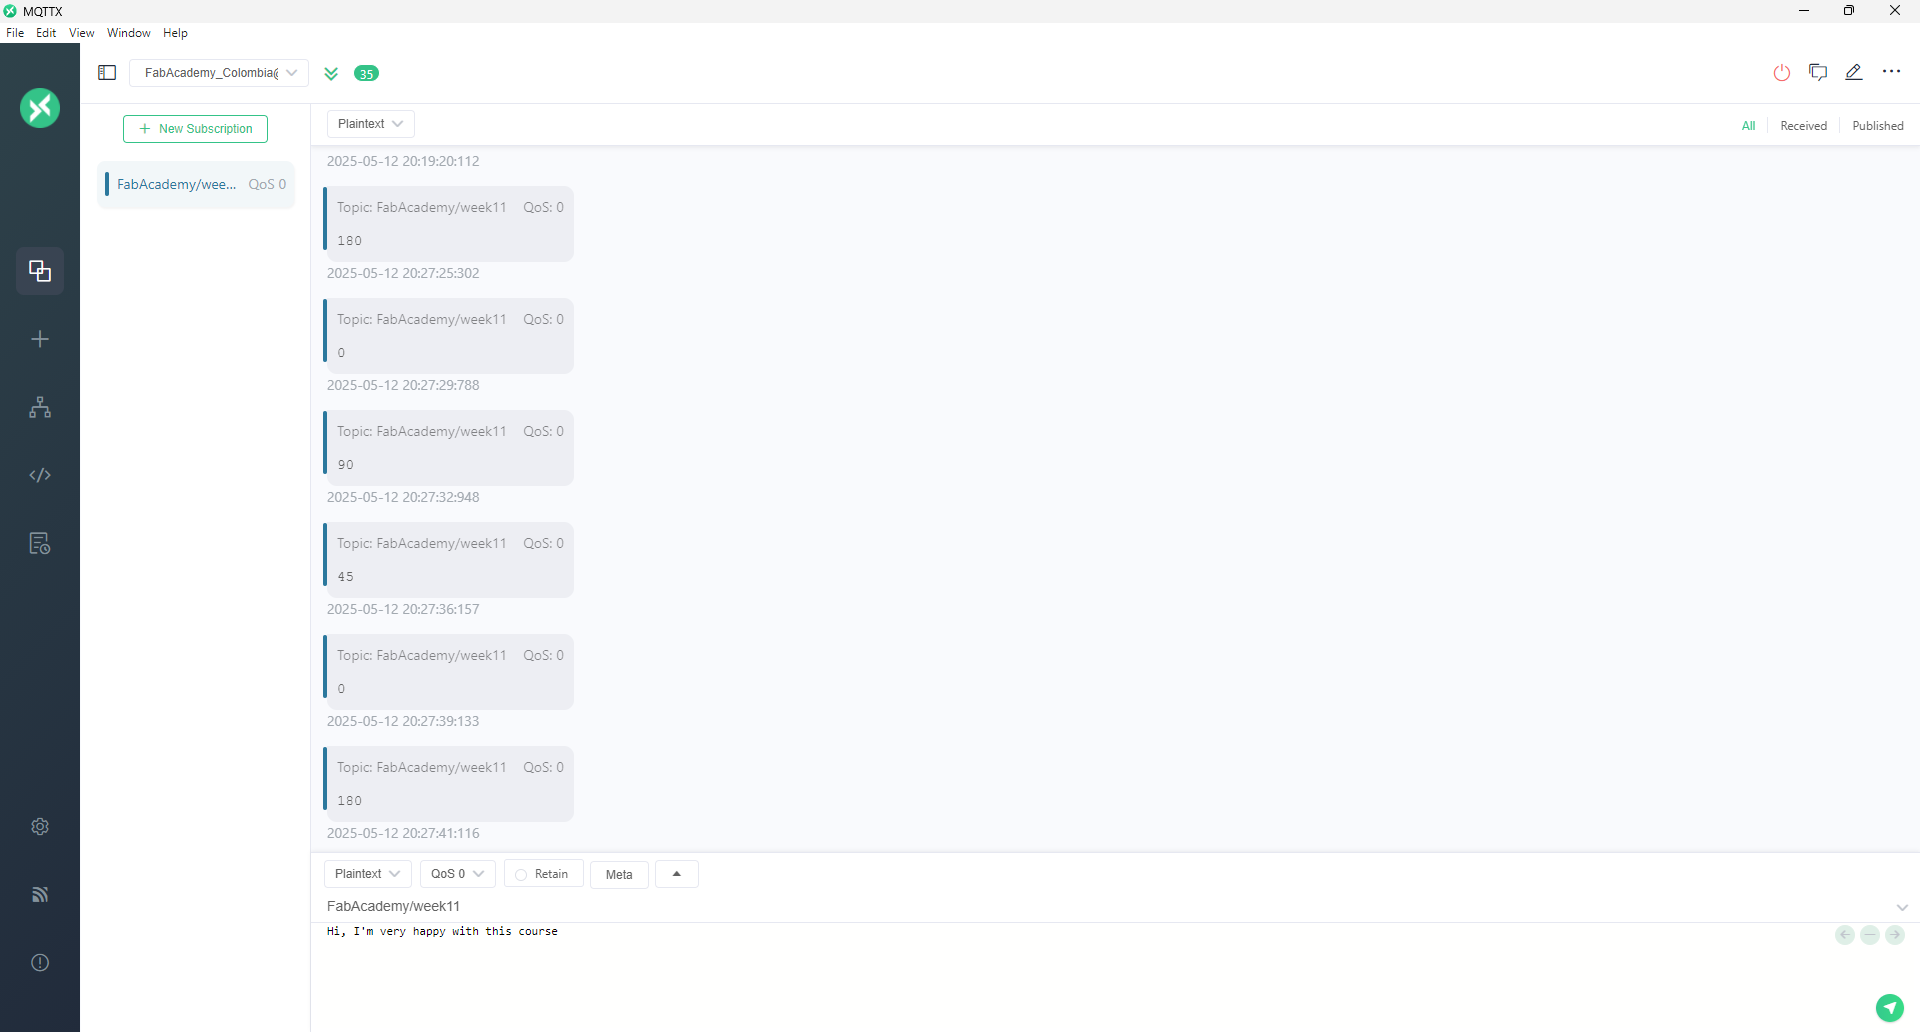
MQTT broker dashboard with received messages on topic FabAcademy/week11.
Conclusions & Learnings
- I gained hands-on experience integrating serial input, MQTT communication, and embedded actuation, reinforcing the end-to-end IoT workflow.
- Using a standard ESP32 as a serial-to-MQTT publisher and my custom ANDRU board as a subscriber demonstrated the power of decoupled architectures and publish/subscribe patterns.
- I learned to parse and constrain numeric payloads reliably, ensuring safe servo operation within its mechanical limits.
Downloads
You can download the sketches developed during this week: