18. Applications and Implications, Project Development
Assignments
Assignments and learning outcomes
Here you can find a recording of the lecture from the 21st of May.
This week's assignments and learning outcomes, see here:
Applications and Implications:
- Propose a final project masterpiece that integrates the range of units covered. Your project should incorporate: 2D and 3D design, additive and subtractive fabrication processes, electronics design and production, embedded microcontroller interfacing and programming and system integration and packaging. Where possible, you should make rather than buy the parts of your project. Projects can be separate or joint, but need to show individual mastery of the skills, and be independently operable.
Project Development:
- Complete your final project tracking your progress.
What, who and how?
Final project proposal
This week I will propose my final project by answering the questions below.
- What will it do?
- Who has done what beforehand?
- What will you design?
- What sources will you use?
- What materials and components will be used?
- Where will they come from?
- How much will they cost?
- What parts and systems will be made?
- What processes will be used?
- What questions need to be answered?
- How will it be evaluated?
- What tasks have been completed?
- What tasks remain?
- What has worked? what hasn't?
- What questions need to be resolved?
- What will happen when?
- What have you learned?
What will it do?
What will it do?
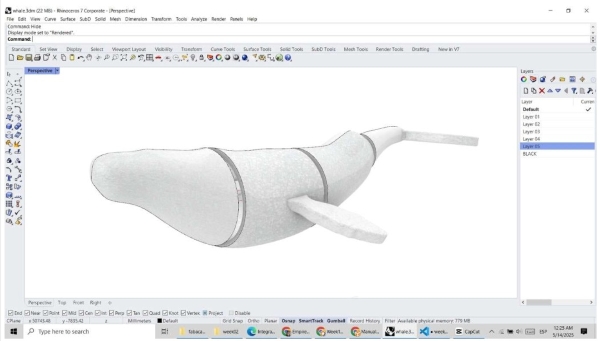
Clay model
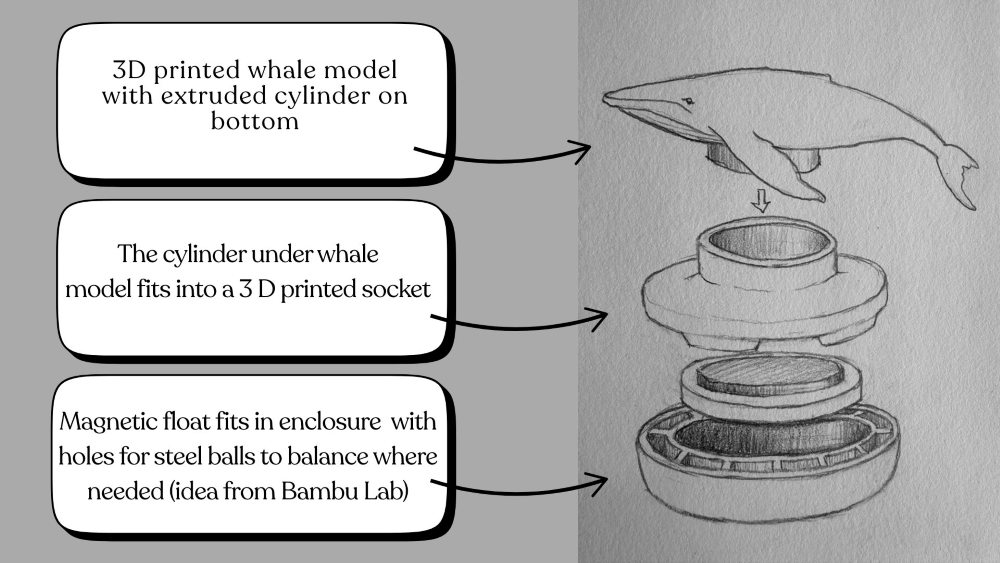
The final project be a 3D printed whale model that hovers in mid air over a map that shows how Humpback whales can travel from Iceland to the Caribbean ocean. The map will be made of rasterized and cut plexiglass and it will be placed at the top of an enclosure (3D printed box). Under the plexiglass map there will be Neopixel LEDs that will light up one by one and show the path that the whale travels. In the enclosure there will be a magnetic levitation module, generating a magnetic field that makes a magnetic float hover in the air. The whale model will be placed on top of it and the float will be hidden in a 3D printed enclosure.
I have worked as an art teacher in an elementary school for many years and I have also taught other subjects like nature science and math. As a part of the team of teachers in elementary schools in Iceland, we were often encouraged to work with STEM, which is an acronym and it combines the subjects of Science, Technology, Engineering and Math. When the A is added to STEAM, Arts are included. Since I love working with Art and my impression is that when you combine Art with other subjects, it can spark interest and creativity with students and magic can happen.
This project can be used in STEM or STEAM education to spark students interest in many fields. By what I have experienced when teaching, just by catching the students attention with something that inspires them, it can create an interest in them that can make them want to learn and experiment. I think it can be used when teaching elementary students and even older students in highschool.
Ideas for STEM or STEAM
This project can be used as an introduction to lessons and the possibilites are so many. Here are a few examples that might be interesting to work with:
- Study how whales migrate and why they do it.
- Compare the migration routes of different whale species.
- Create an artwork featuring a whale while studying how Humpback whales can be identified by their different looking tails.
- Study and calculate distances travelled.
- Study and calculate travelling speed.
- Study what kind of technology is used to track whales/or other animals, for example with a tracking device.
- Study how GPS tracking devices are made.
- Study what whales feed on and compare what they can feed on near Iceland and in the Caribbean ocean.
- Study and create drawings that show food chains. Compare food chains between different whale species.
- Study sizes and the weight of whales. Compare sizes and weight between different whale species.
- Sculpt a whale and study how it moves.
- Study and compare the depth of the ocean at certain points.
- Compaire how deep a whale can dive and how deep a human being can go.
- Study what the maximum depth of the ocean is that humans have been able to study. What kind of technology have we been able to use to investigate the deep ocean? How much of the ocean is still unexplored?
What sources will you use?
Sources
I will use everything I have learned in Fab Academy to create my final project. Everything I do is documented with information about sources.
Who has done what beforehand?
Magnetic levitation
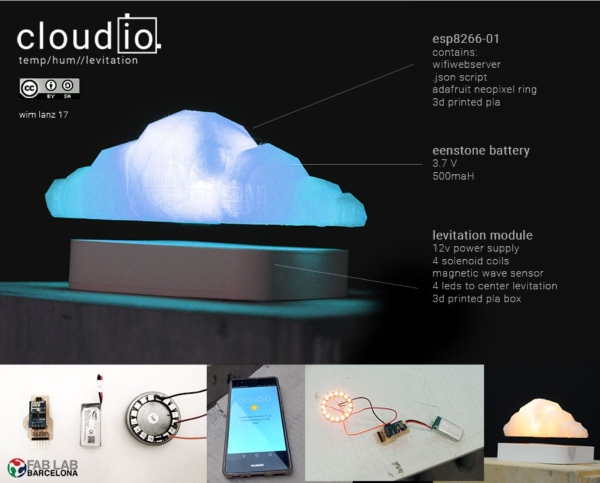
Wim Lance did a final project with a magnetic levitation module called Cloudio and I think it is amazing. This project sparked the idea of my final project.
Magnetic levitation
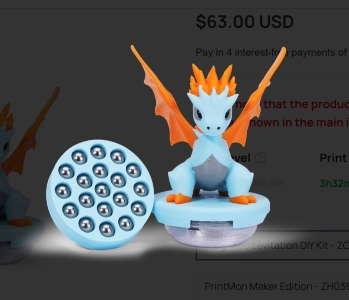
Bambu Lab sells Magnetic levitation modules and they seem to be a better quality than the one that I bought. In this video the Magnetic levitation module is moved around and the Float does not fall down. I find it hard to balance my Float and it can easily fall down, which is a problem, so I would have liked this module better.
Bambu Lab shows different types of 3D models levitated with the Magnetic levitation module. One of them is a figure which sits on an enclosure around the Float that hovers in the air. In this enclosure there are holes for steel balls. These balls are used to adjust the balance of the model and I want to create something similar. The only thing I don't like about this enclosure is that you can see the Float. I want to hide my Float in my enclosure and I think it is enough for me to create holes for the steel balls around the float and not in the middle.
Magnetic levitation
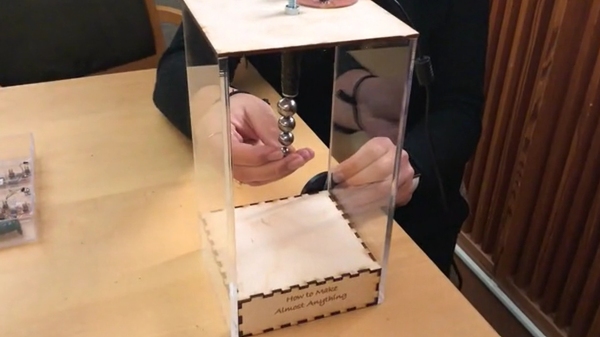
April Johnsons worked with magnetic levitation in her final project when taking the "How to make [almost] anything" but she was not using a 3D model, only steel balls.
Magnetic levitation
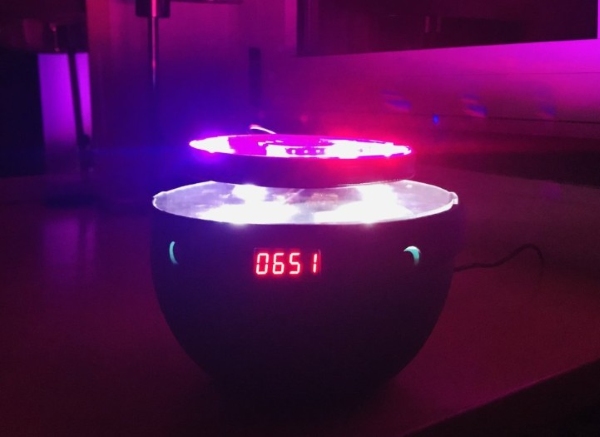
Michele Serpico worked with magnetic levitation in the final project and made a levitating RGB lamp and clock. A cool project but nothing similar to what I was working with.
Magnetic levitation
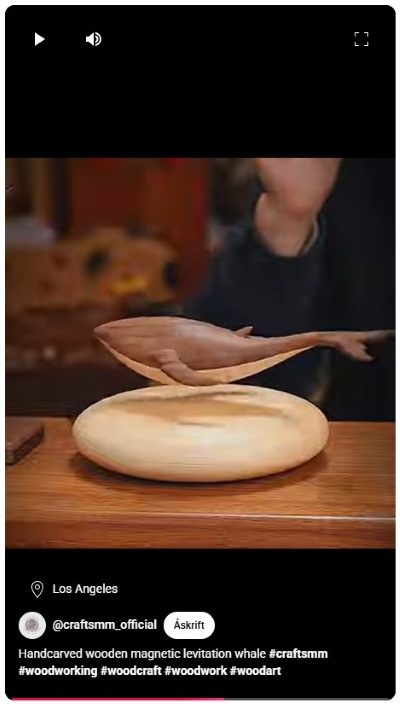
I searched on YouTube for magnetic levitation and found many videos, so many people have tried different things with magnetic levitation. The only video I found with both magnetic levitation and a whale was this one by @craftsmm_official.
Magnetic levitation
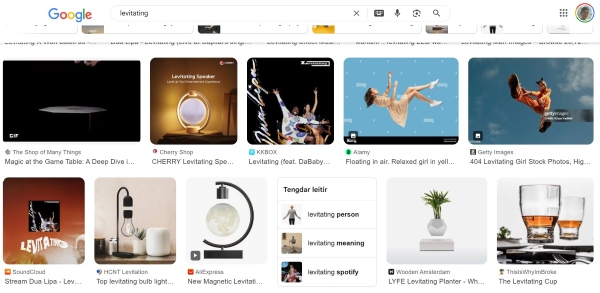
When I used the word "Levitation" to do a Google search, I saw that many companies sell levitating objects. Amongst those are levitating flower pots, planets and more but when I searched for levitating whale, magnetic levitating whale and magnetic levitating whale model, nothing seemed to come up. See image below for example of search results when using the word "Levitation".
Whale model
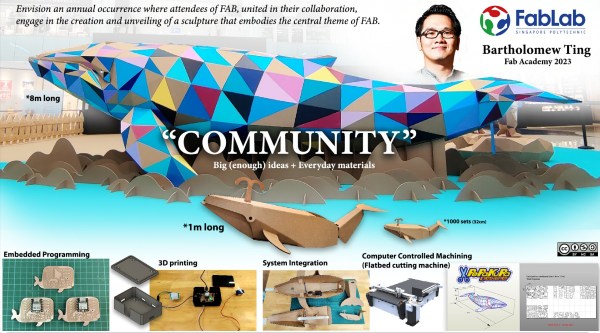
Bartholomew Ting made a whale model in his final project. His whale was made out of cardboard, unlike mine which is modelled out of clay, 3D scanned and then 3D printed. I like his whale and how it moves.
Model of whale
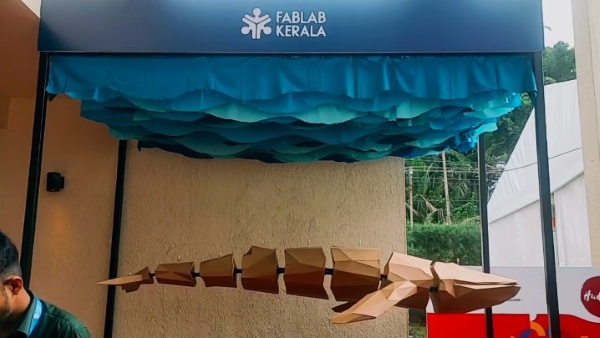
Revisankar S works as a Coordinator at Super Fablab Kerala and he was involved in a project with a moving whale. The mobility in it is different from what I will do. There will not be any joints in my model but it will float in mid air. The model that Revisankar S and Super Fab Lab Kerala made is amazing. I think this whale model is absolutely beautiful.
Who is doing what simultaneously?
Model of whale
I just had to add a section about people who are working with something similar to what I am doing in Fab Academy 2025, because in recitation I saw another one who was also working with a whale model like me in their final project. Her project is quite different but still, her focus is on whales and I like what she is doing.
Model of whale
Evelyn Cuadrado is working on a crib mobile with a whale model for children and I like her idea.
Model of whale
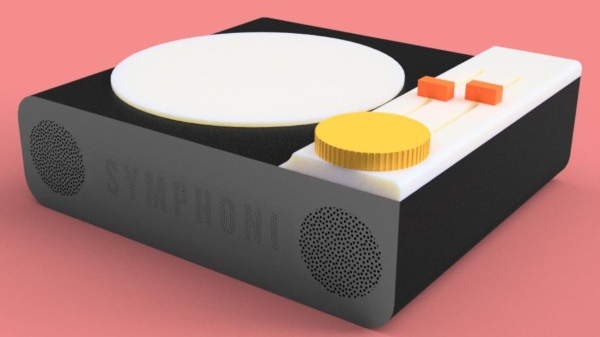
Ashish Joy is working on a retro-futuristic levitating turntable that he will use to play music from Spotify. He is working with levitation like me. This is a very interesting design with levitation.
What will you design?
Model of whale
-
The whale model and the enclosure around the magnetic float.
-
The enclosure/base.
-
The plexiglass map.
-
The plexiglass plate that will serve as a PCB plate with vinylcut copper traces and Neopixel LEDs.
-
The PCB with the embedded Raspberry Pi Pico W microcontroller.
-
The PCB with the button.
-
The silicone button.
What materials and components will be used?
The enclosure
- Magnetic levitation module
- Power outlet adapter
- 5V, 3A Step-Up/Step-Down Voltage Regulator
- PLA Bambu Lab basic
- PLA Greentech pro
- Plexiglass (upper plate)
- Heat inserts
- M3 Screws and bolts
The PCB with Neopixels
- Black plexiglass
- Copper foil
- Neopixels
- Resistor
- Capacitors
- Pin header male_01x03 P2.54 horizontal SMD
The plexiglass map
- Blue plexiglass
The PCB with microcontroller:
- Raspberry Pi Pico W
- PCB board
- Pin header male_01x03 P2.54 horizontal SMD x2
- Pin header male_01x02 P2.54 horizontal SMD
The PCB with Doppler radar
- Doppler radar
- PCB board
- Pin header male_01x03 P2.54 horizontal SMD
- M1 bolts and screws
The whale model and the enclosure around the float
- The float
- PLA
- Acrylic pain
- Steel balls
The silicone button
- Tooling board
- Zhermack HT 33 Transparent silicone
Where will they come from?
The enclosure/base
- Magnetic levitation module: Amazon
- Power outlet adapter: Verslunin Pan (a local store in Neskaupstaður, Iceland)
- 5V, 3A Step-Up/Step-Down Voltage Regulator: Pololu
- PLA Bambu Lab basic: 3D verk (a store in Iceland)
- PLA Greentech pro: 3D verk (a store in Iceland)
- Plexiglass/upper plate: Signa (a store in Iceland)
- Heat inserts: Ali Express
- M3 Screws and bolts: Ali Express
The PCB with Neopixels
- Plexiglass: Signa (a store in Iceland)
- Copper foil: Digikey
- Neopixels: Adafruit
- Resistor: In stock (Bought many years ago but was most likely bought from Digikey)
- Capacitors: (Bought many years ago but was most likely bought from Digikey)
- Pin header male_01x03 P2.54 horizontal SMD: Digikey
The PCB with microcontroller:
- Raspberry Pi Pico W: Digikey
- PCB board: In stock (Bought many years ago but was most likely bought from Digikey)
- Pin header male_01x03 P2.54 horizontal SMD x2: Digikey
- Pin header male_01x02 P2.54 horizontal SMD: Digikey
The PCB with Doppler radar
- Doppler radar: Digikey
- PCB board: In stock (Bought many years ago but was most likely bought from Digikey)
- Pin header male_01x03 P2.54 horizontal SMD: Digikey
- M1 bolts and screws: Ali Express
The whale model and the enclosure around the float
- The float that came with the magnetic levitation module: Amazon
- PLA, Bambu Lab basic: 3D verk (a store in Iceland)
- Steel balls: Taken from old bearings.
The silicone button
- Renshape tooling board:
- Zhermack HT 33 Transparent silicone: Kísill (a store in Iceland)
How much will they cost?
Bill of materials by Ólöf Þóranna Hannesdóttir - VA
What parts and systems will be made?
Model of whale
I will design the following:
- The enclosure/base
- The plexiglass map that will be on top of the enclosure
- The whale model and the enclosure around the magnetic float
- The plexiglass plate that will serve as a PCB for the Neopixels
- The PCB with the embedded microcontroller (Raspberry Pi Pico W)
- The PCB with the SMD push button
- The silicone button
What processes will be used?
Processes
This is a summary of the main processes that will be used:
- 3D design in Fusion and 3D printing in Bambu Lab X1 Carbon.
- 3D design in Fusion, 2D design in Inkscape, cut out and rasterized in Epilog mini 24.
- Sculpting out of clay, 3D scanning with Kiri engine app, fixing and adding to model in Blender, adding to model in Fusion and designing enclosure, 3D printing in Bambu Lab X1 Carbon.
- PCB design in Kicad, milling in SRM-20 and soldering with soldering iron.
- PCB design in Fusion, Kicad and Inkscape, cutting copperfoil traces in Roland GX-20, then soldering with a soldering iron.
- A mould 3D designed in Fusion, prepaired for milling in VCarve, model milled out of Renshape tooling board in the Shopbot PRS-alpha, a button casted out of silicone.
Processes in more detail
The enclosure/base
I will design the enclosure in Fusion and 3D print it in a Bambu Lab X1 Carbon printer. I will use the heat tolerant GreenTech pro PLA from Extrudr.
The plexiglass map
I will design the outline of the plexiglass map in Fusion, export it as .dxf and import the file into Inkscape. Then I will design the map in Inkscape. The map will be rasterized and the outlines cut in the Epilog Mini 24 laser.
The plexiglass plate that will serve as a PCB with Neopixels
I will design the outline of the plexiglass plate in Fusion, export it as .dxf and import the file into Inkscape. Then I will add the map and export it from Inkscape as .dxf. Then I will import the .dxf file as graphics into Kicad, where it will be used as a reference when placing the Neopixels at the right places. The design will be exported (plotted) from Kicad as a .svg file. The .svg file will be imported into Inkscape. When the design is ready in Inkscape it will be exported as .pdf.
Finally, a Roland GX-20 vinylcutter will be used to cut the traces out of a copper foil. Then the copper foil traces can be fastened on the plexiglass and the Neopixels and pins can be soldered onto them.
The whale model
I will mold the whale out of clay and scan it with the Kiri Engine 3D scanning app and export it as .obj model. Then I will import the .obj model into Blender and fix holes. Then I will import it into Fusion and add a cylinder that will extrude from the bottom. Then I will design an enclosure around the magnetic float and the whale model will fit on top of it. The model will be 3D printed in Bambu Lab X1 Carbon using Bambu Lab basic PLA.
The silicone button
The mould for the silicone button is designed in Fusion, milled out of Renshape Tooling board in the Shopbot PRS-alpha. Then the button will be cast with Zhermack HT 33 Transparent silicone.
The PCBs
The PCB with the embedded microcontroller (Raspberry Pi Pico W) and the PCB with the SMD push button will be designed in Kicad, milled in the Roland SRM-20 and soldered with a soldering iron.
What questions need to be answered?
Questions that need to be answered
- Can the project be useful in STEM or STEAM education?
- Will viewers visualize the whale travelling in the ocean between Iceland and the Caribbean ocean?
How will it be evaluated?
How can the final project be evaluated?
These are the main aspects that I think should be kept in mind when evaluating the project:
- Can the project be useful in STEM or STEAM education?
- Does the project give a visual representation of how whales can migrate?
- Do all parts of the project function together?
- Does the whale model hover in the air?
- Is the system integration and packaging well designed and produced with care?
- Does the project include 2D and 3D design with additive and subtractive processes?
- Does the project include electronics design and production with an embedded microcontroller design, interfacing and programming?
What tasks have been completed?
What has been completed
- The design of the enclosure/base is mostly done but needs some changes.
- The plexiglass map is ready.
- The whale model has been modelled out of clay.
- The whale model has been 3D scanned.
- The PCB with the embedded microcontroller (Raspberry Pi Pico W) is ready.
- The PCB with the SMD button is ready.
- The silicone button is ready.
- The Doppler radar is fastened on a PCB board.
- The code is in good progress but I have to finish it.
What tasks remain?
What tasks remain
- To make changes to the design of the enclosure/base.
- To fix small holes in the 3D scanned whale model in Blender.
- To add an extruded cylinder to the whale model in Fusion
- To design an enclosure around the magnetic float and create holes for steel balls around it, also a socket for the whale model to sit on top of it.
- To cut the copper traces for the Neopixels in the vinyl cutter.
- To solder the Neopixels and the other components to the copper traces on the plexiglass plate. Also to find a way to fasten the pins securely.
- To check if the silicone button works.
- To finish writing the code.
- Add a plexiglass in front of the Doppler radar to hide it.
- Design sockets for the heat inserts.
What has worked? what hasn't
What has worked
There are many things that have been acomplished:
-
The PCB with the embedded microcontroller (Raspberry Pi Pico W) and the PCB with the SMD push button are ready.
-
The silicone button that I casted in the moulding and casting week week 14 is nice and it fits well in the enclosure.
-
The whale model has been molded out of clay and 3D scanned.
-
Writing the code has been going well step by step and I hope that it will work out to solve the rest of the coding.
What has not worked
I 3D printed the enclosure and realized that there were a few things that needed to be fixed:
- The enclosure is too high and the lower brackets have a small, unnecessary space under them.
    It would be better to resize the enclosure and get rid of this space, so that the brackets
    will come straight up from the bottom.

- The brackets need to be moved from the left side closer to the middle because it is not possible
    to add screws and bolts on the left side of them. Another possibility is to use only two holes
    instead of four. That might work for all the PCBs except the one with the button.

- The plexiglass plate which will serve as a PCB for the Neopixels is too close to the upper
    plexiglass. When the Neopixels are laid in its place, the upper plexiglass does not fall
    into place.

- I had designed brackets for the power cord in the bottom. The placement is not good and there
    isn't enough space. I need to change them.

- I am not sure if the silicon button works well enough. When it is pushed it does not go all the
    way back again because of the resistance from the 3D printed walls. The walls are not
    slippery enough. maybe I should put something on them so that the silicone button slides
    easily back and forth.
What questions need to be resolved?
Still questions that have not been resolved
There are still some things that are unclear, either because I haven't gotten to finish them and don't know if they will work, or things that did not work and need resolving:
- Can I cut the traces for the Neopixels out of copper? Will I find a solution to fasten the pins under the plate?
- Can I fix the whale model that was 3D scanned in Blender?
- Can I design an enclosure around the magnetic float? I feel like it is complicated.
- Can I change the design of the enclosure/base so that everything fits perfectly?
- Should I paint the whale model or not?
What will happen when?
What will happen when
These last days will be difficult and I have not been able to follow my project plan made with the Gantt chart. Here below you can see how I updated the Gantt chart.
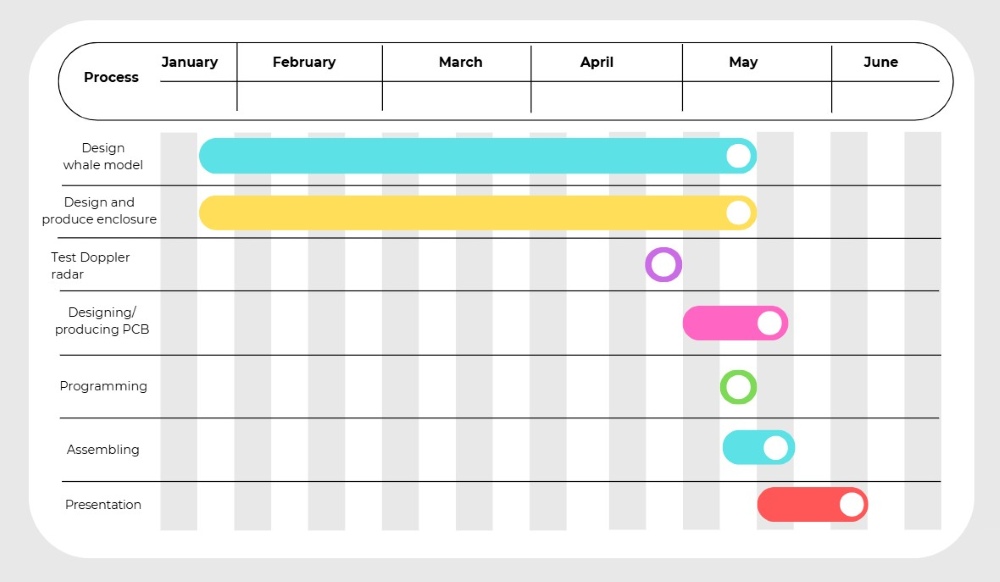
Project management - Final project by Ólöf Þóranna Hannesdóttir - VA
Daily plan for the final days
What will happen when
I am running late in all aspects, so I need a more accurate plan to make sure that everything will go as planned. I decided to create a detailed daily plan to monitor whether my plan was working.
Project management day by day by Ólöf Þóranna Hannesdóttir - VA
What have you learned?
Learnings
I have learned so much in Fusion. Here are some examples:
- I learned how to design a complicated model in Fusion.
- I learned how to use pattern.
- I learned how to use project to use elements from one sketch and use them in another sketch.
- I learned how to export a step file from Kicad and import it into Fusion.
- I learned more about making new components and making them fit toghether in a model.
- I learned that to join a new component and a main structure, you have to make the new component rigid before joining.
- I learned how to change physical materials and appearance.
-
I learned how to use section analyzis.
-
I learned how to use the Shopbot to mill a mould and to make casts with silicone.
- I learned how to use Neopixels.
- I learned how to use Doppler radar.
- I learned how to 3D scan a model.
- I learned how to use a 5V, 3A Step-Up/Step-Down Voltage Regulator.
-
I learned how to design and produce a PCB board with traces cut out of a copper foil in a vinyl cutter.
-
I have learned the importance of project management ....and so much more..