This is my
Final Project - Symphoni
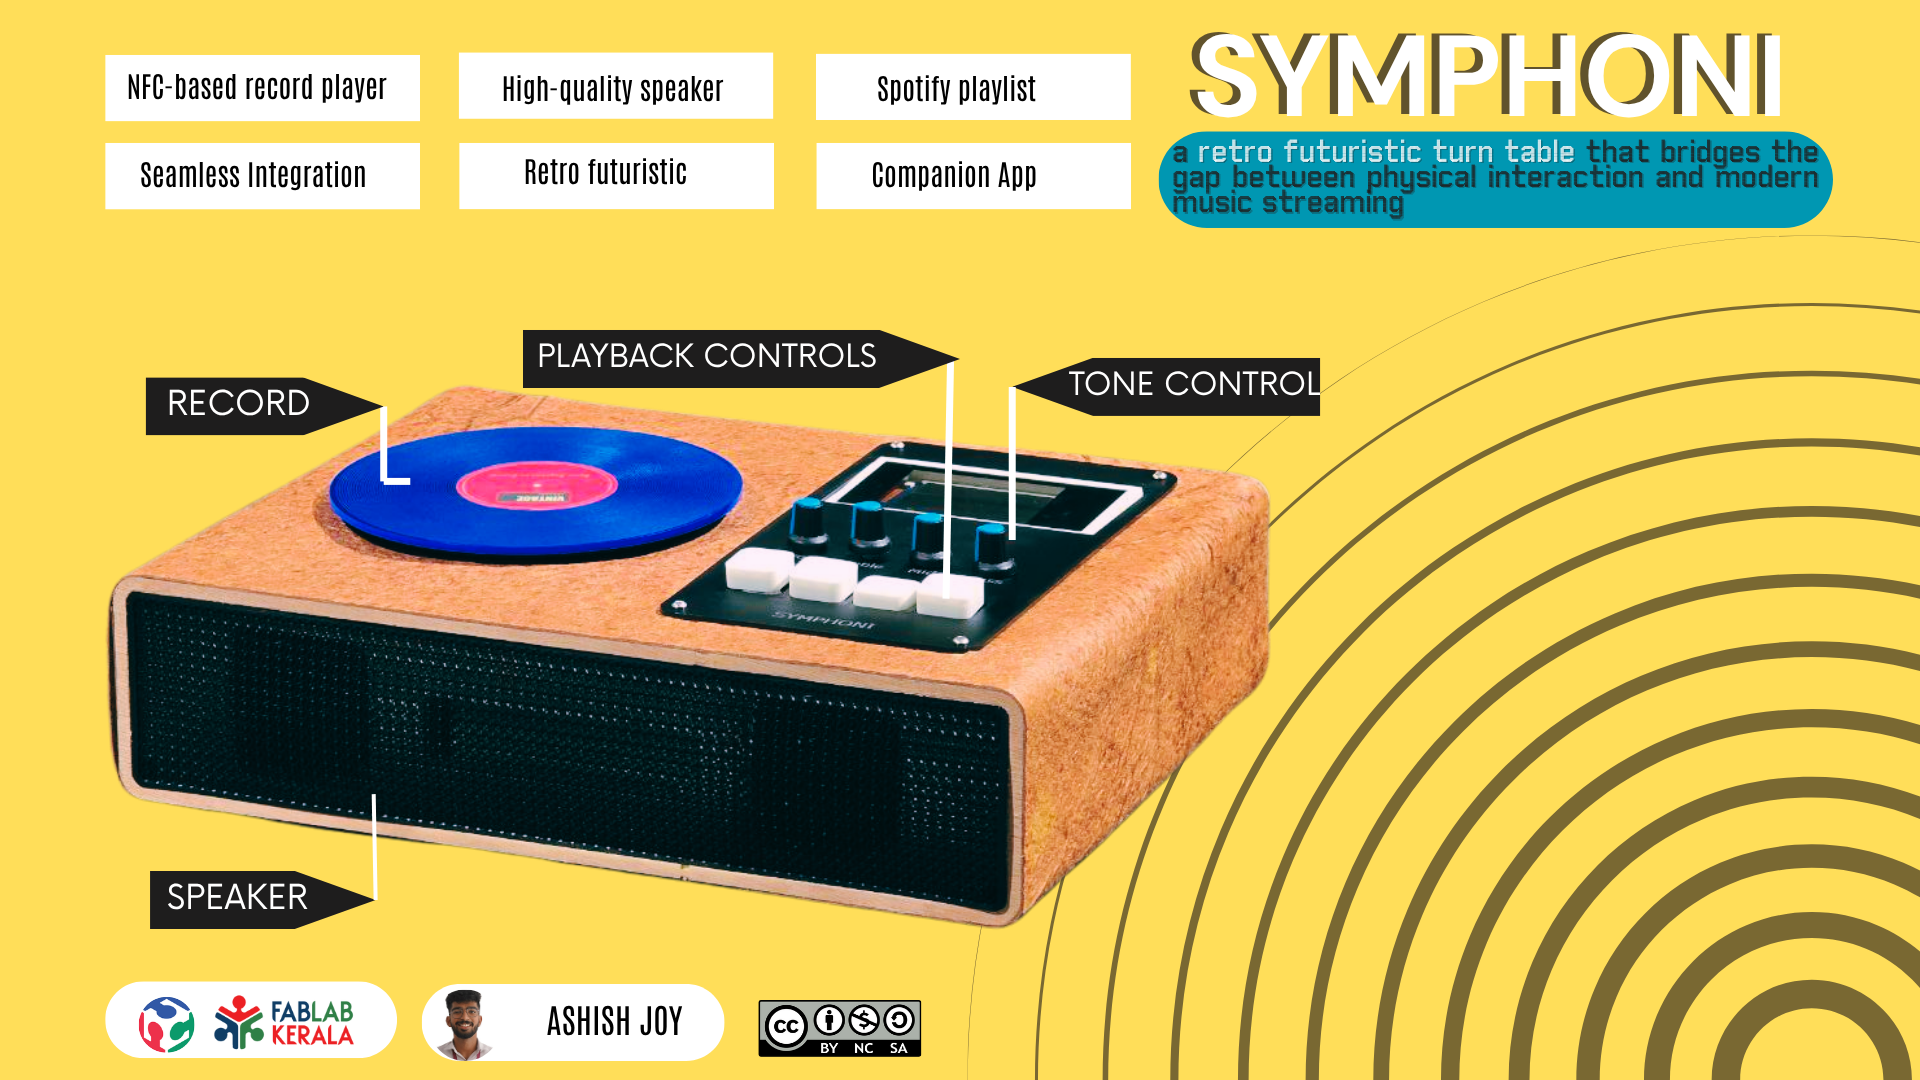
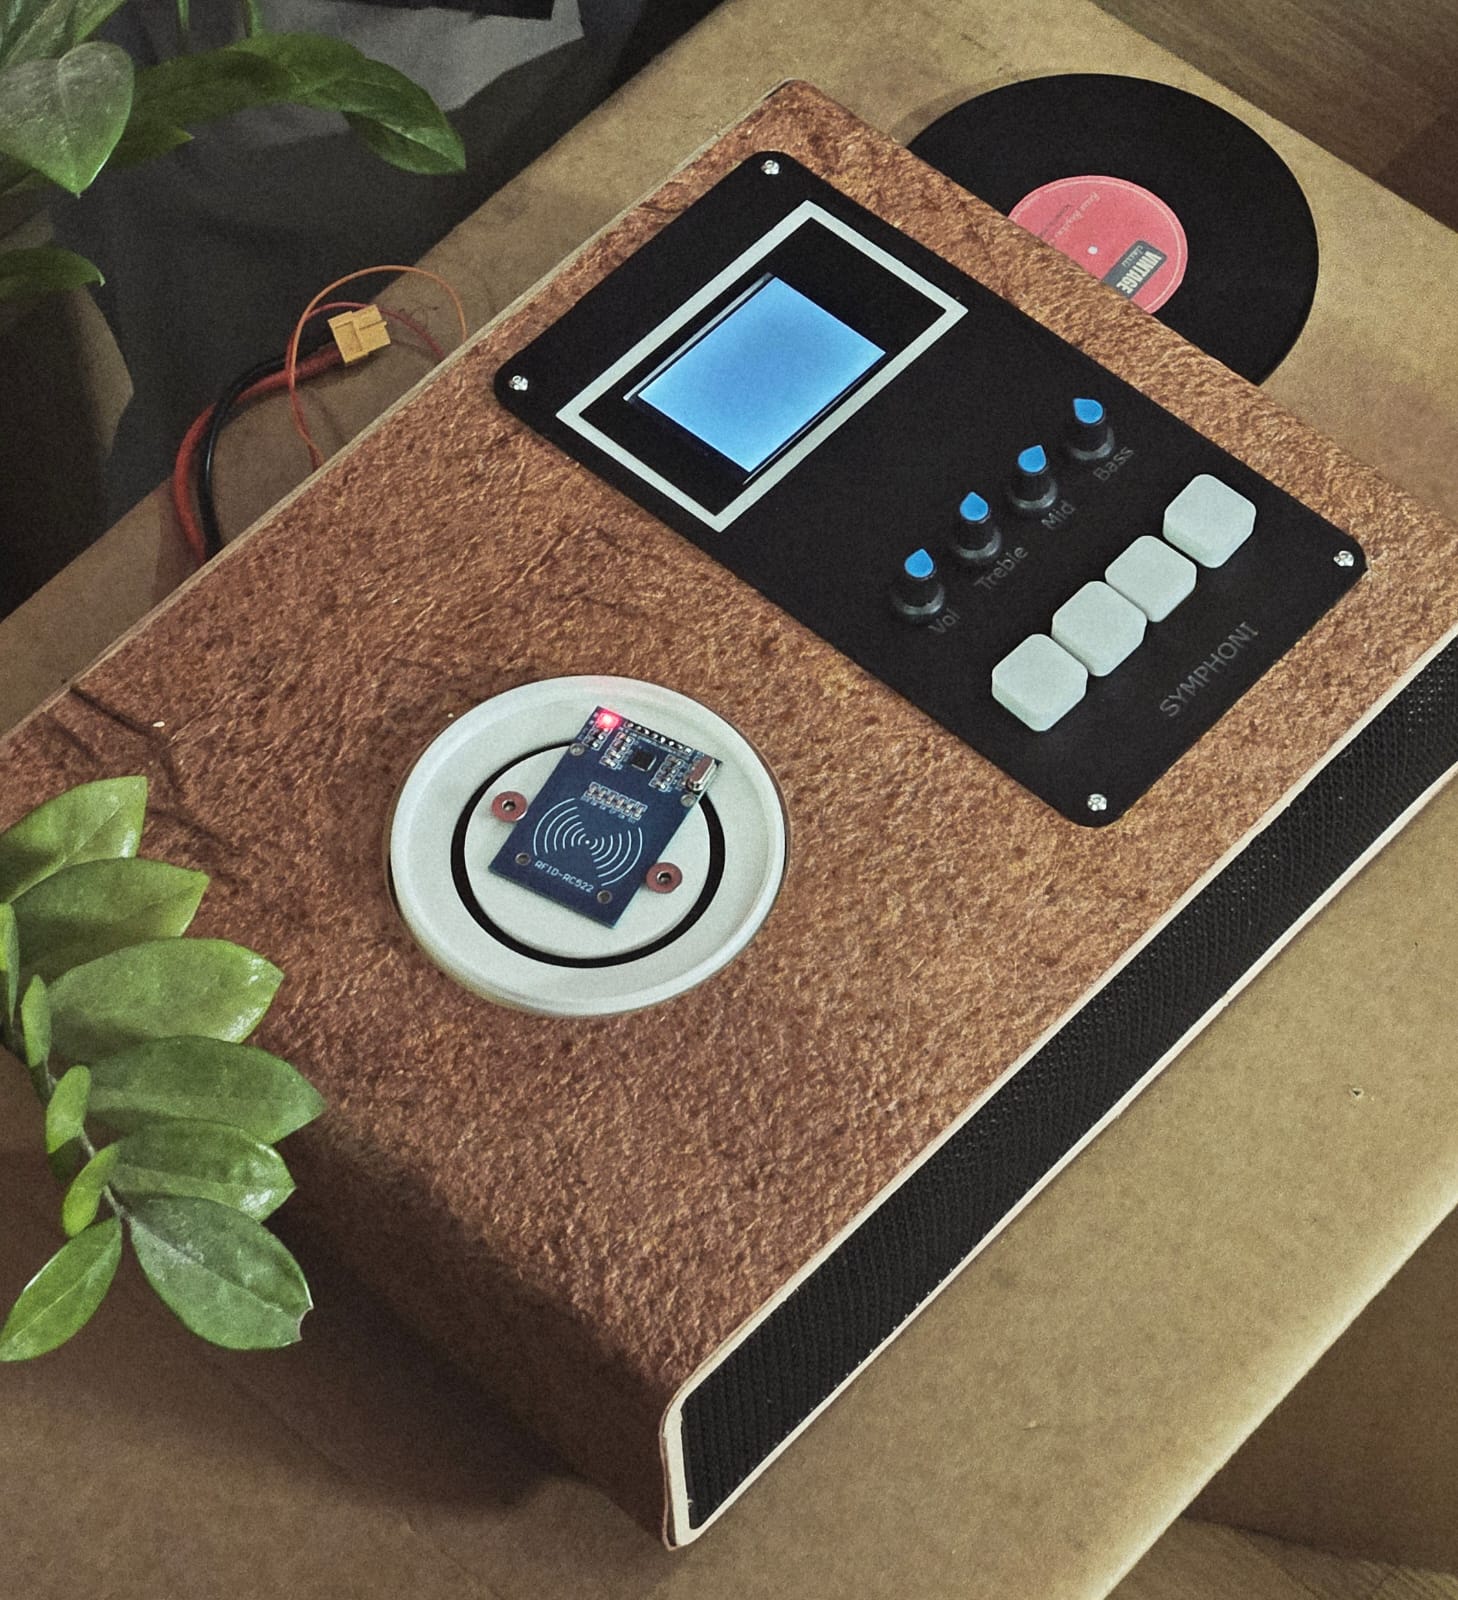
Symphoni is a retro-futuristic turntable that reimagines the way we interact with digital music. Instead of vinyl, Symphoni uses custom NFC “records” that can store a Spotify playlist, album, song, or artist. Users can write their music data onto these records using a custom Flutter app, then simply place the record on the turntable to bring the music to life.
- The rotating platform spins, simulating the nostalgic motion of a vinyl record player.
- An RFID scanner inside reads the record's data and fetches the music through the Spotify API.
- A built-in LCD display shows song details in real time.
- Playback buttons (play/pause, next, previous, mode) allow for intuitive control.
- Integrated speakers stream the music directly from the connected Spotify device.
Symphoni is a retro-futuristic Spotify-connected turntable that transforms the way we interact with digital music. Unlike traditional streaming devices, Symphoni brings back the physical experience of records by allowing users to create and use NFC “records”. Each record can be programmed—using a custom Android app—to link to a Spotify playlist, album, song, artist, or even a radio station.
🎶 Symphoni Features
- 📀 NFC-Controlled Music Place a vinyl-style record with an NFC tag to instantly trigger your Spotify playlist.
- 🎧 Spotify Integration Stream music seamlessly from your playlists with a single tap.
- 📱 Companion App Manage setup and playlists easily through the Symphoni mobile app.
- 🔊 Built-in Hi-Fi Speaker Delivers clear, room-filling audio from inside the enclosure.
- 🖥 Interactive Display Shows track info, album art, and engaging media visuals.
- ✨ Retro-Futuristic Design Vintage turntable aesthetics combined with modern IoT tech.
- ⚡ All-in-One System NFC reader, display, and speaker neatly integrated in one enclosure.
I am passionate about music, displays, and creating products that blend aesthetics with functionality. Symphoni is an opportunity for me to explore various technologies—NFC communication, Spotify integration, audio systems, displays, and levitation—while building something visually captivating. Beyond just a Fab Academy project, I see potential in refining Symphoni into a marketable product, offering a unique and artistic way to experience digital music with a retro-futuristic touch.
Target Users:Symphoni is designed for music lovers, vinyl enthusiasts, and tech-savvy individuals who appreciate the fusion of retro aesthetics and modern convenience. It appeals to those who enjoy physical interactions with music and want a unique way to experience digital streaming. Ideal users include home decor enthusiasts, audiophiles, and creative professionals who seek a stylish, interactive music player that enhances their living or workspace.
User Flow
The user flow for Symphoni is designed to be intuitive and seamless, allowing users to easily interact with their music through physical NFC records. Here's a breakdown of the user journey through a user Flow diagram.

System Architecture
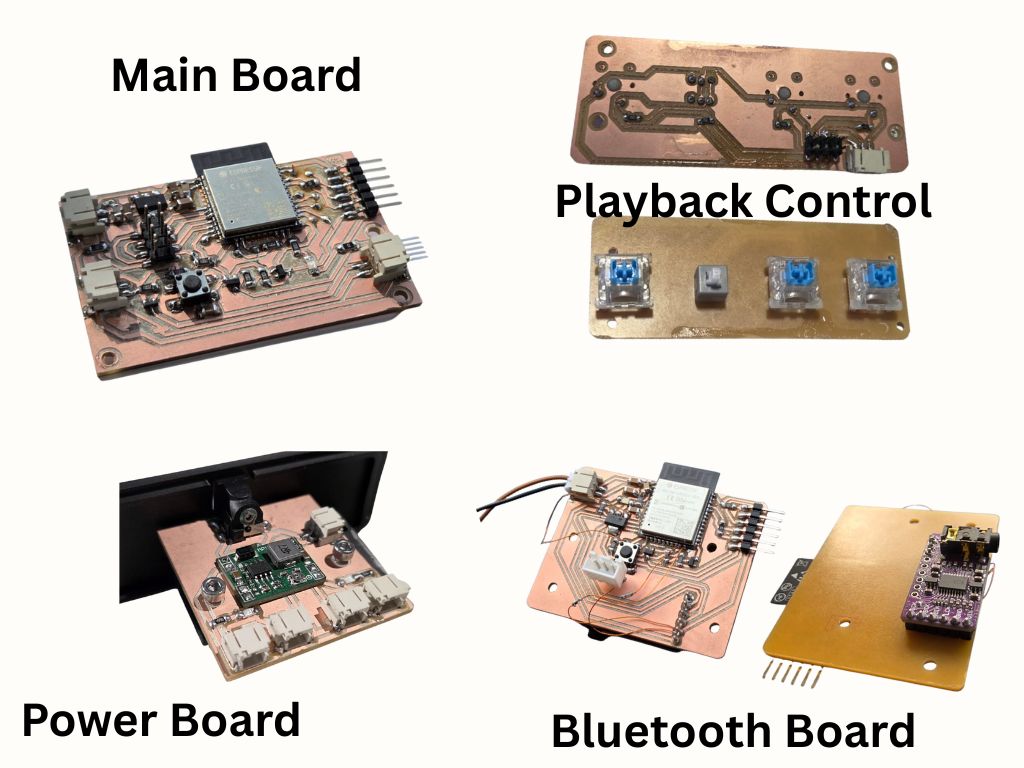
Symphoni is built around a modular four-board architecture, where each PCB is responsible for a specific task. The system comes together through carefully designed interconnections using IDC connectors and a shared power distribution network.
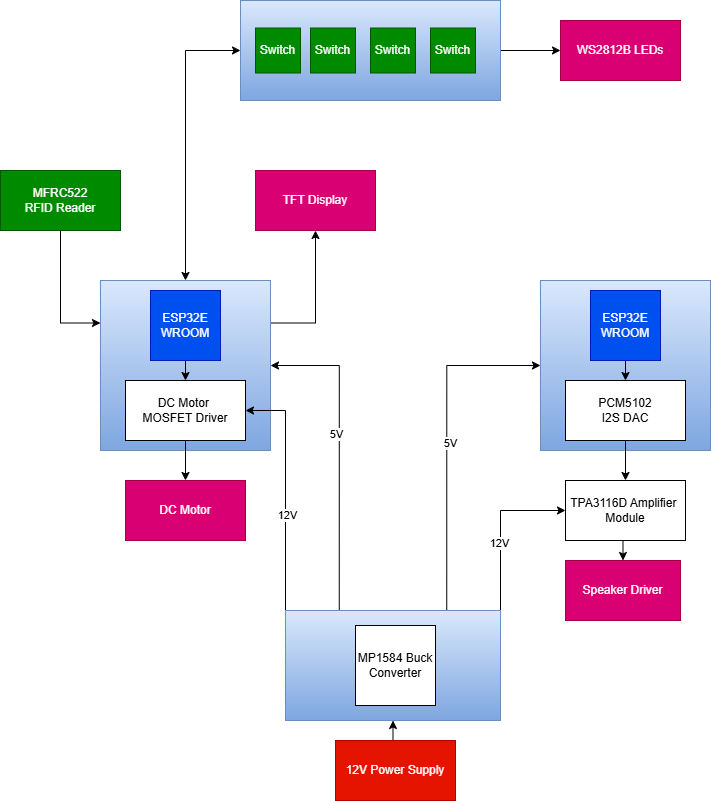
- Main Control Board (ESP32-WROOM)
- Central processing unit.
- Handles Spotify API integration, NFC record scanning, and system coordination.
- Interfaces with:
- DC Motor (for platter rotation).
- LCD Display (via SPI).
- RFID Reader (via IDC connector).
- Playback Control Board.
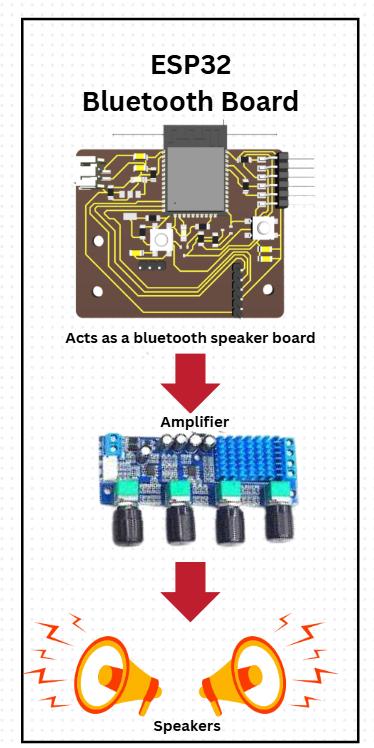
- Bluetooth Speaker Board (ESP32)
- Dedicated ESP32 for audio streaming.
- PCM5102 I2S DAC → TPA3116D amplifier → 5W, 8Ω stereo speakers.
- Functions as a standalone Bluetooth audio node.
- Power Management Board
- Buck converters provide regulated 12V and 5V rails.
- Supplies stable power to all boards and peripherals.
- Playback Control Board
- Mechanical Switch Buttons and Self Latching Button.
- Connects to Main Control Board via IDC interface.
Learning Objectives
🔹 Electronics & Hardware
- ESP32 GPIO, I2C, SPI, UART
- NFC module (PN532/RC522) with ESP32 (SPI/I2C)
- Wi-Fi connectivity & HTTP requests
- Spotify API (OAuth authentication, REST API calls)
- Bluetooth A2DP for external speaker playback
- I2S DAC/amplifier for built-in speakers
- TFT/OLED/e-paper display (SPI/I2C)
- Button input handling
- Electromagnetic levitation (power control, stabilization)
🔹 Software Development (C for ESP32)
- ESP-IDF (Espressif IoT Development Framework)
- HTTP GET/POST requests with ESP32
- JSON parsing in C
- MP3/AAC streaming on ESP32 via I2S
- Storing NFC tag data in flash memory/SD card
- GUI development with LVGL (LittleVGL)
- Power optimization (deep sleep, low-power modes)
🔹 Mechanical & Enclosure Design
- Fusion 360 / 3D CAD modeling
- 3D printing & finishing
- Acoustic enclosure design
- Button & rotary encoder integration
- NFC tag embedding into custom records
Electronics
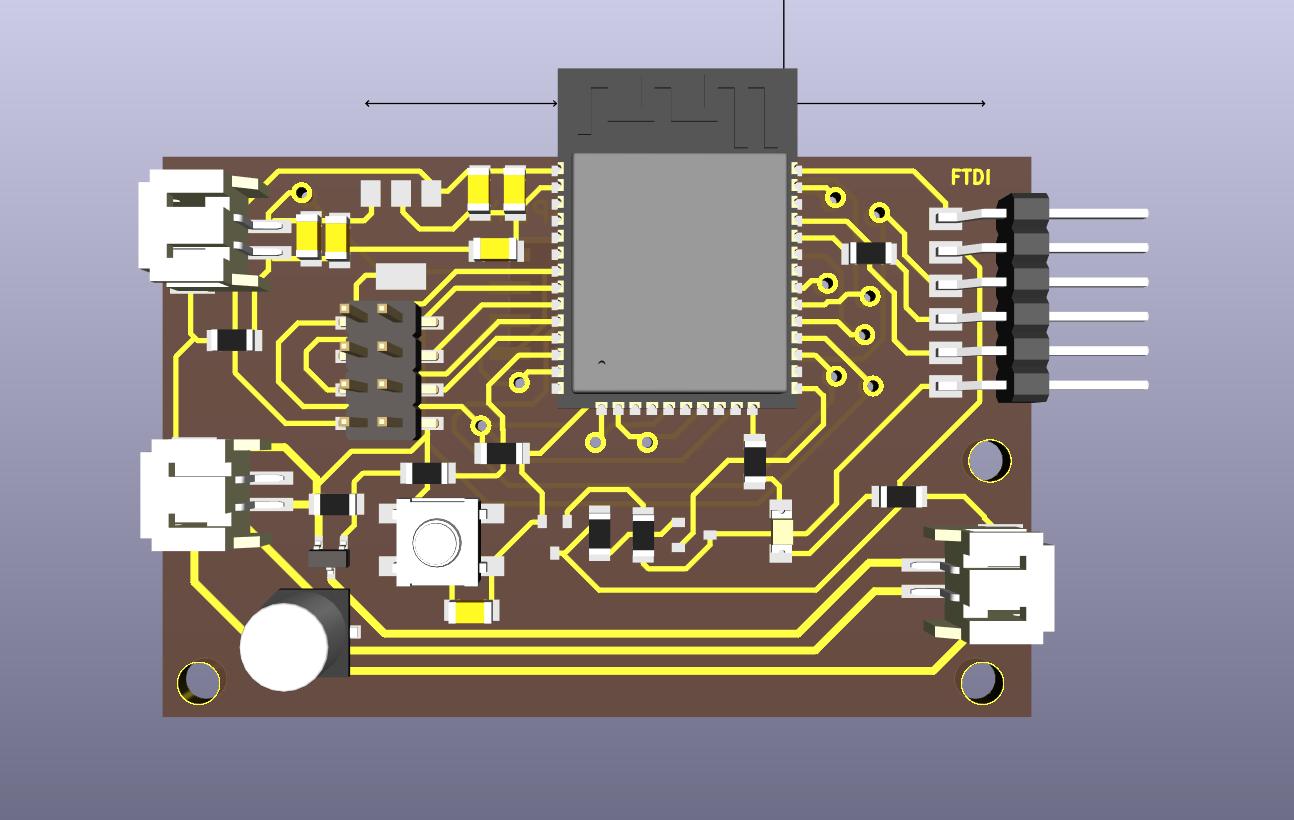
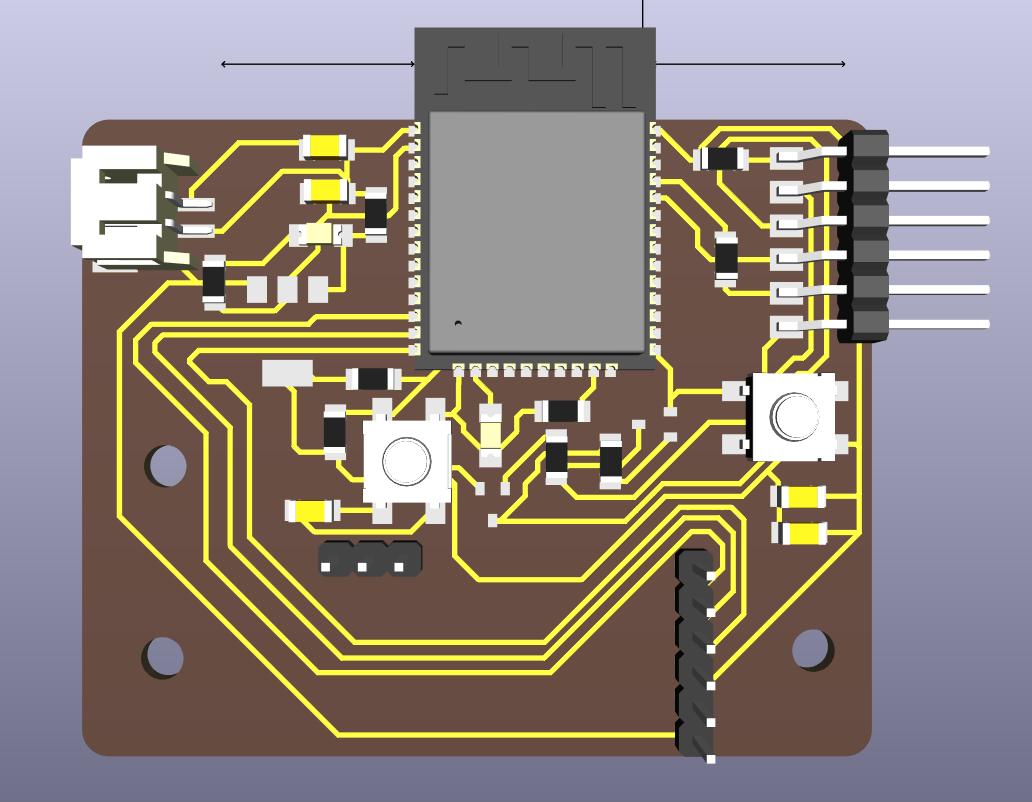
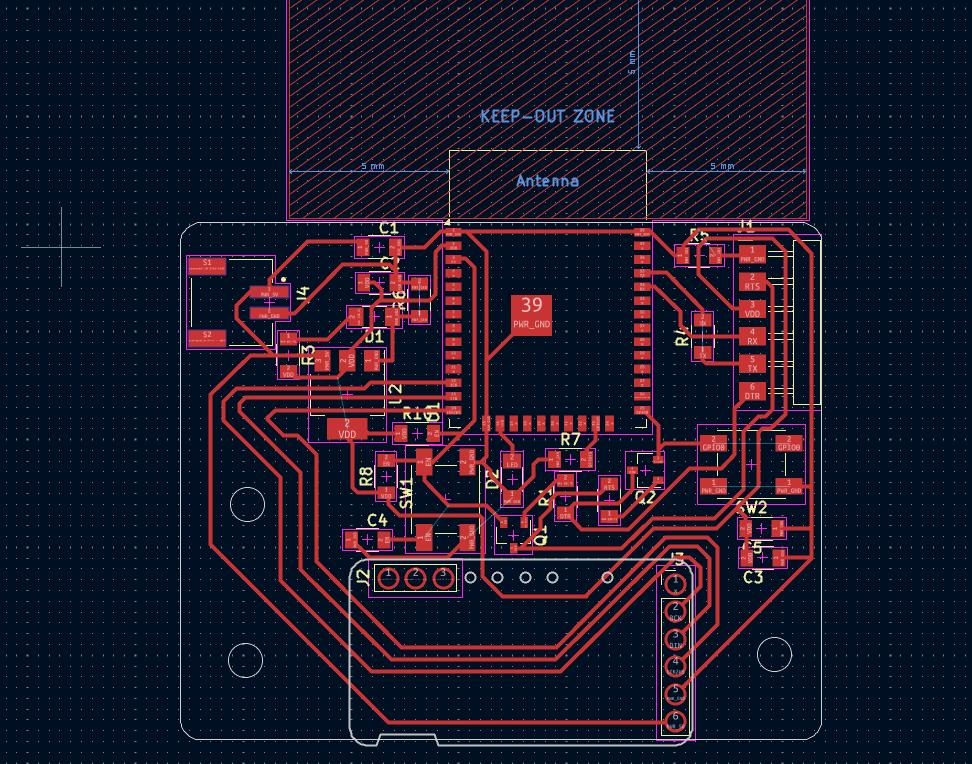
Symphoni main Board
This is the central brain of Symphoni. Built around the ESP32-WROOM module, it manages all high-level processing and connectivity.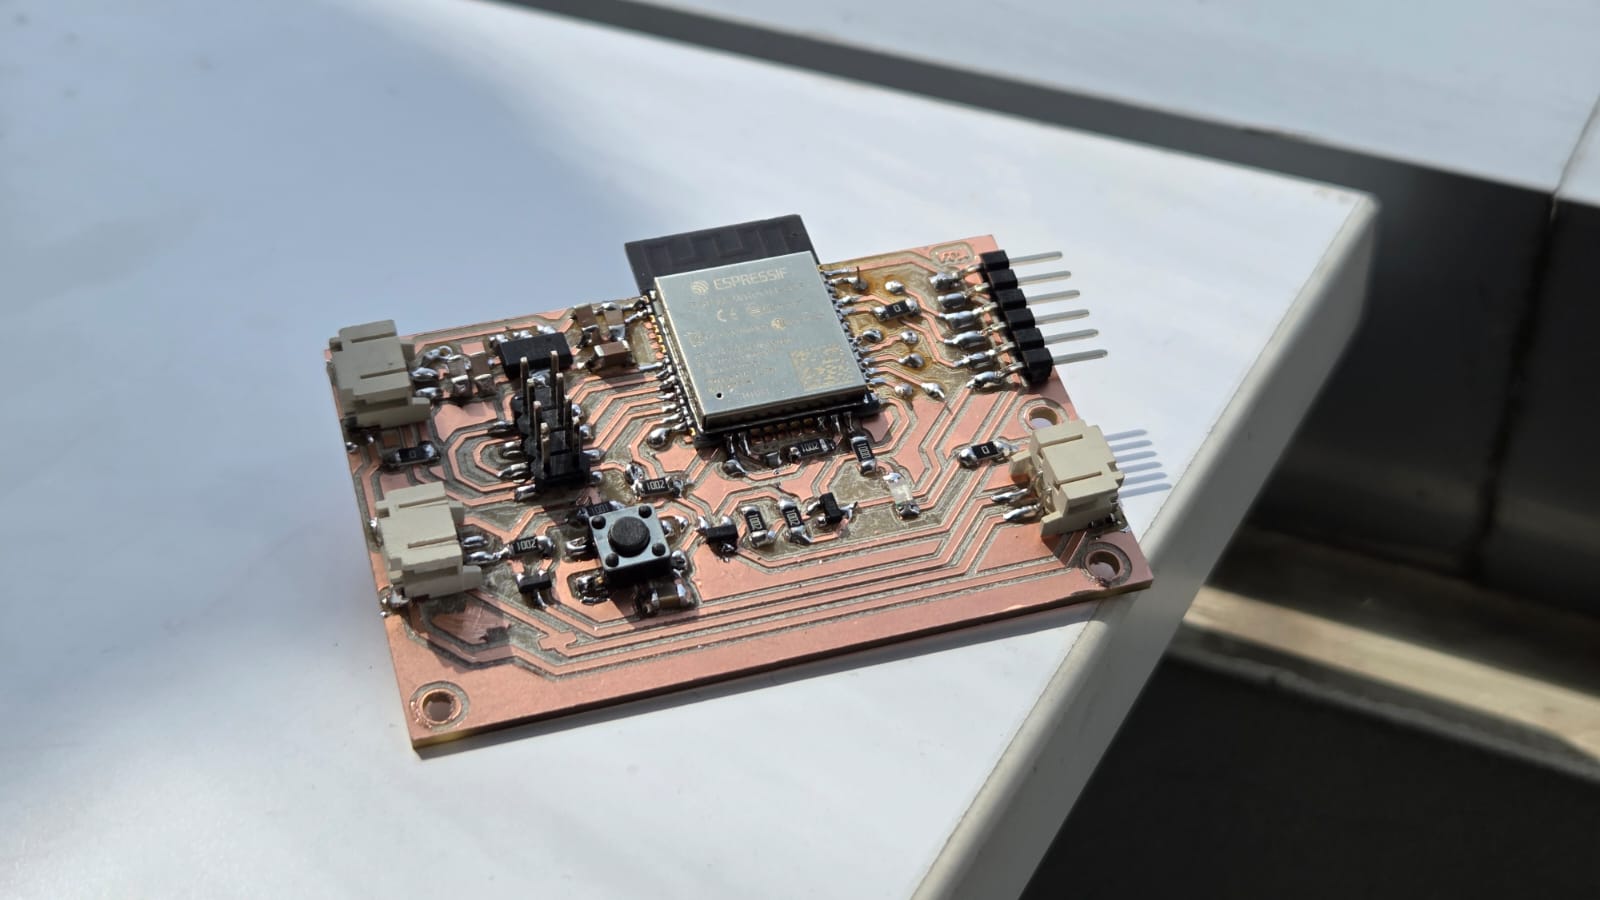
- Functions:
- Runs the firmware that communicates with the Spotify Web API to fetch playlists, track details, and playback control.
- Interfaces with an RFID reader that detects NFC-tagged records, mapping them to Spotify playlists.
- Controls the LCD display via SPI to show track details, album art placeholders, and system status.
- Drives the DC motor that enables record-like physical motion, reinforcing the turntable aesthetic.
| Peripheral | Signal | GPIO |
|---|---|---|
| SPI | MISO | GPIO19 |
| MOSI | GPIO23 | |
| SCK | GPIO18 | |
| RFID | SS | GPIO5 |
| RST | GPIO13 | |
| Display | SS | GPIO14 |
| RST | GPIO16 | |
| DC | GPIO17 | |
| Motor | — | GPIO27 |
| LED | — | GPIO26 |
| Buttons | Button 1 | GPIO32 |
| Button 2 | GPIO25 | |
| Button 3 | GPIO33 | |
| Button 4 | GPIO35 |
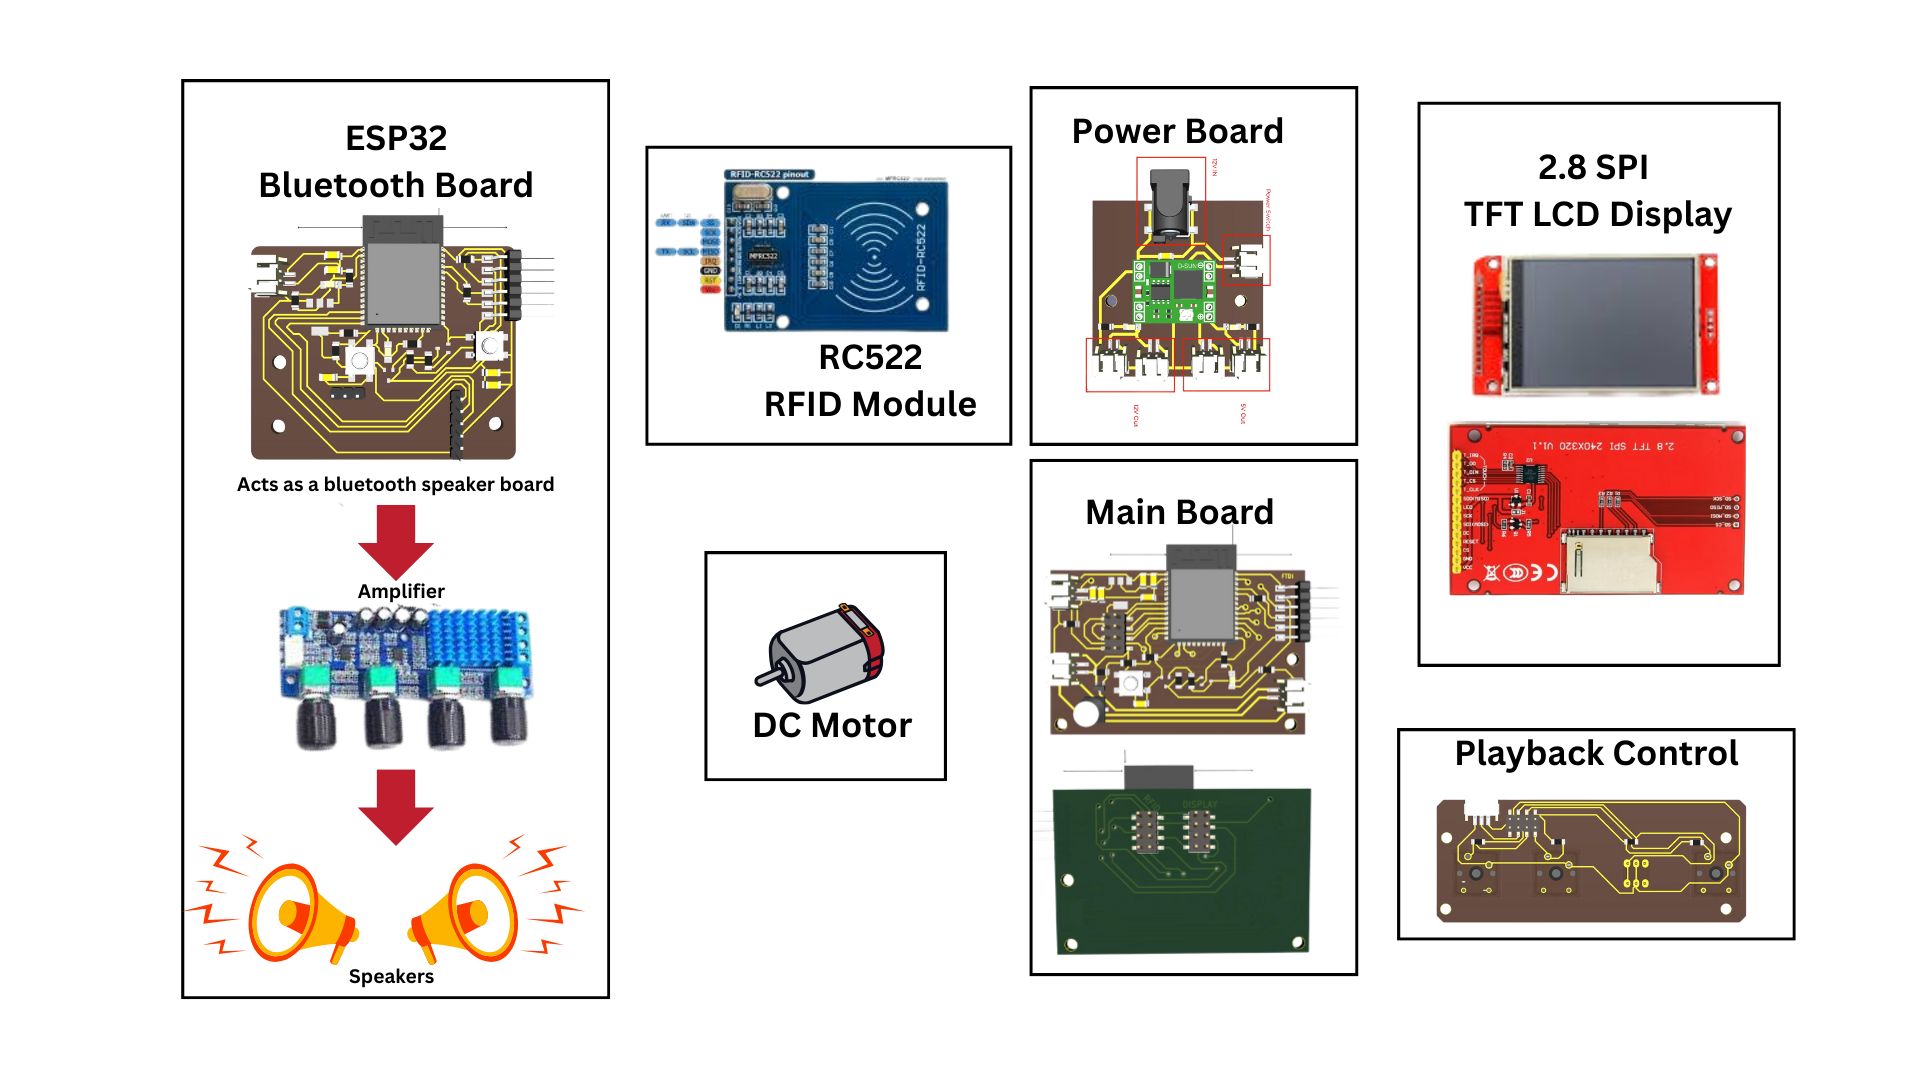
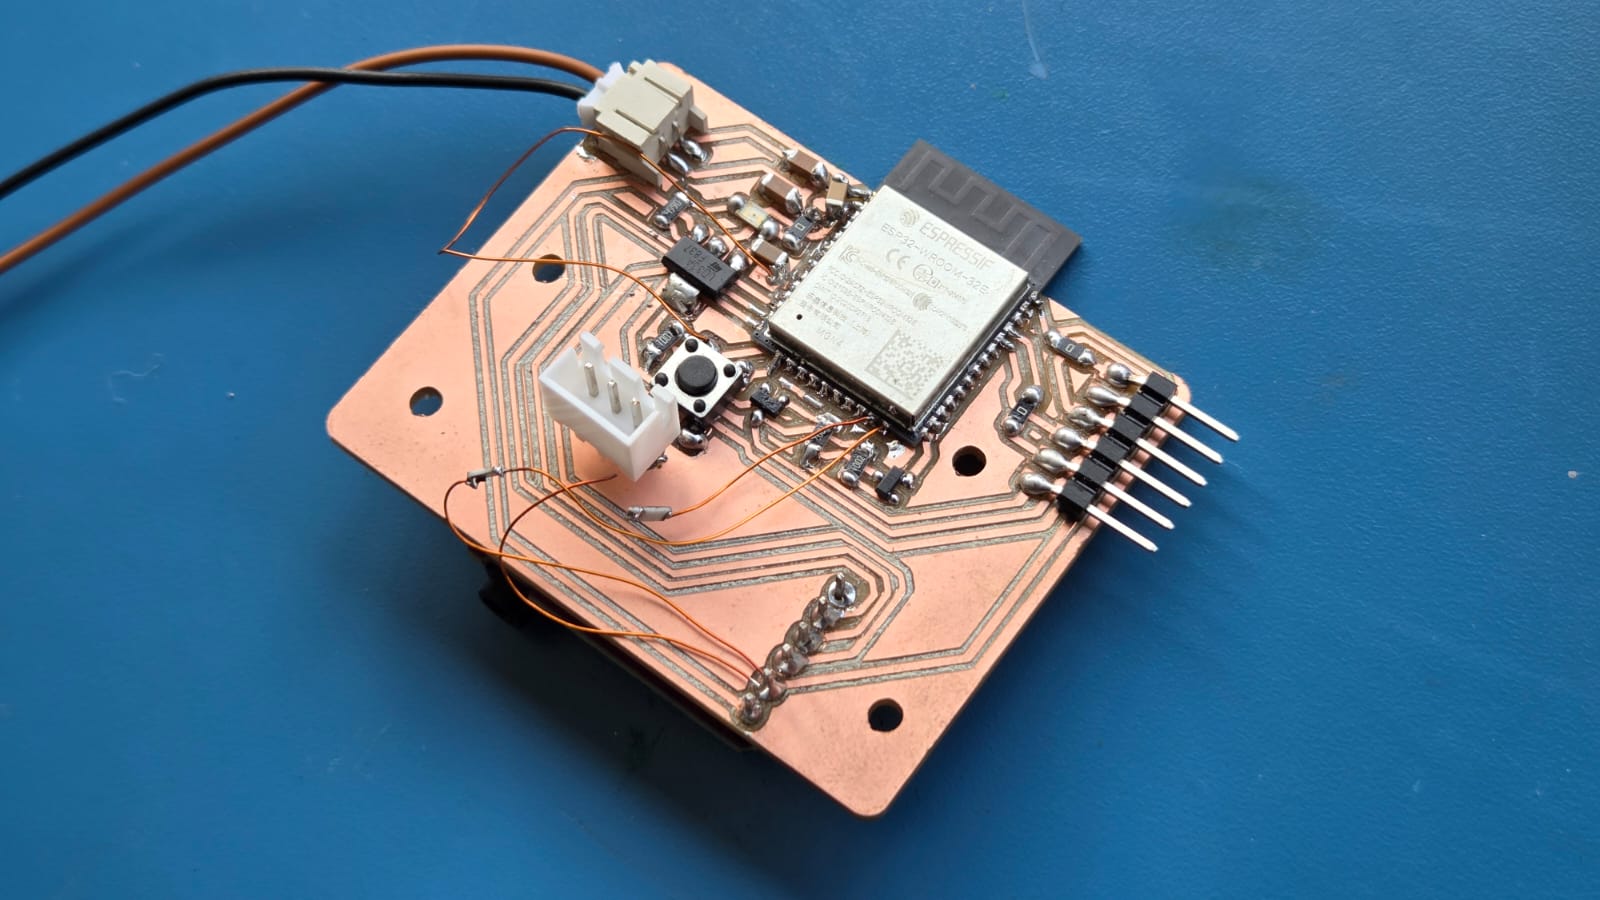
RC522 RFID Module
The RC522 RFID module is used to read NFC tags that are programmed with Spotify playlists. It communicates with the ESP32 via SPI, allowing Symphoni to detect which record is placed on the turntable. The RFID module is connected using a IDC Connector for neat wiring.
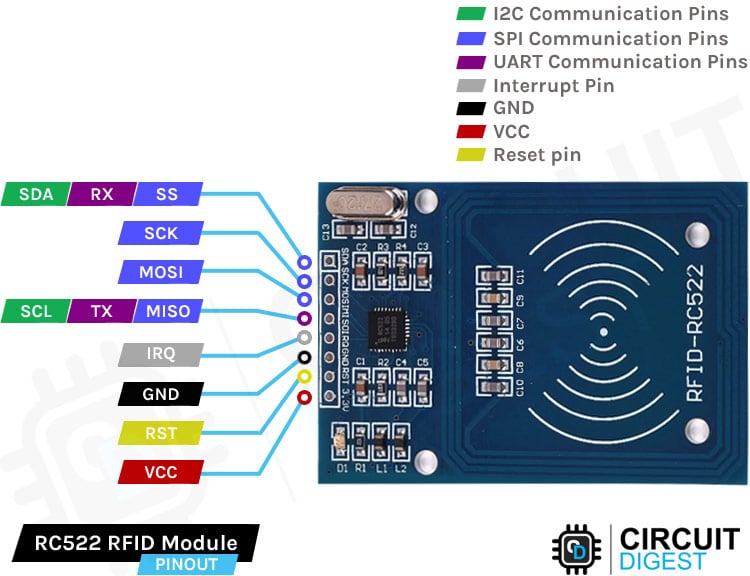
Photo credit: Circuit Digest
Symphoni Bluetooth Speaker Pinout
The audio board is a dedicated wireless audio playback system, optimized for high-quality sound output. It also uses an ESP32 module, but this board focuses on Bluetooth audio streaming and digital-to-analog conversion.
- Key Components & Functions:
- ESP32 Module - Acts as a Bluetooth receiver, enabling Symphoni to function as a wireless speaker system.
- PCM5102 I2S DAC - A high-fidelity digital-to-analog converter that translates the ESP32's I2S audio output into rich, noise-free analog sound.
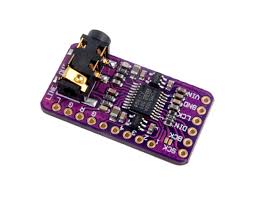
| Peripheral | Signal | GPIO |
|---|---|---|
| I2S | WS | GPIO12 |
| DIN | GPIO14 | |
| CLK | GPIO27 |
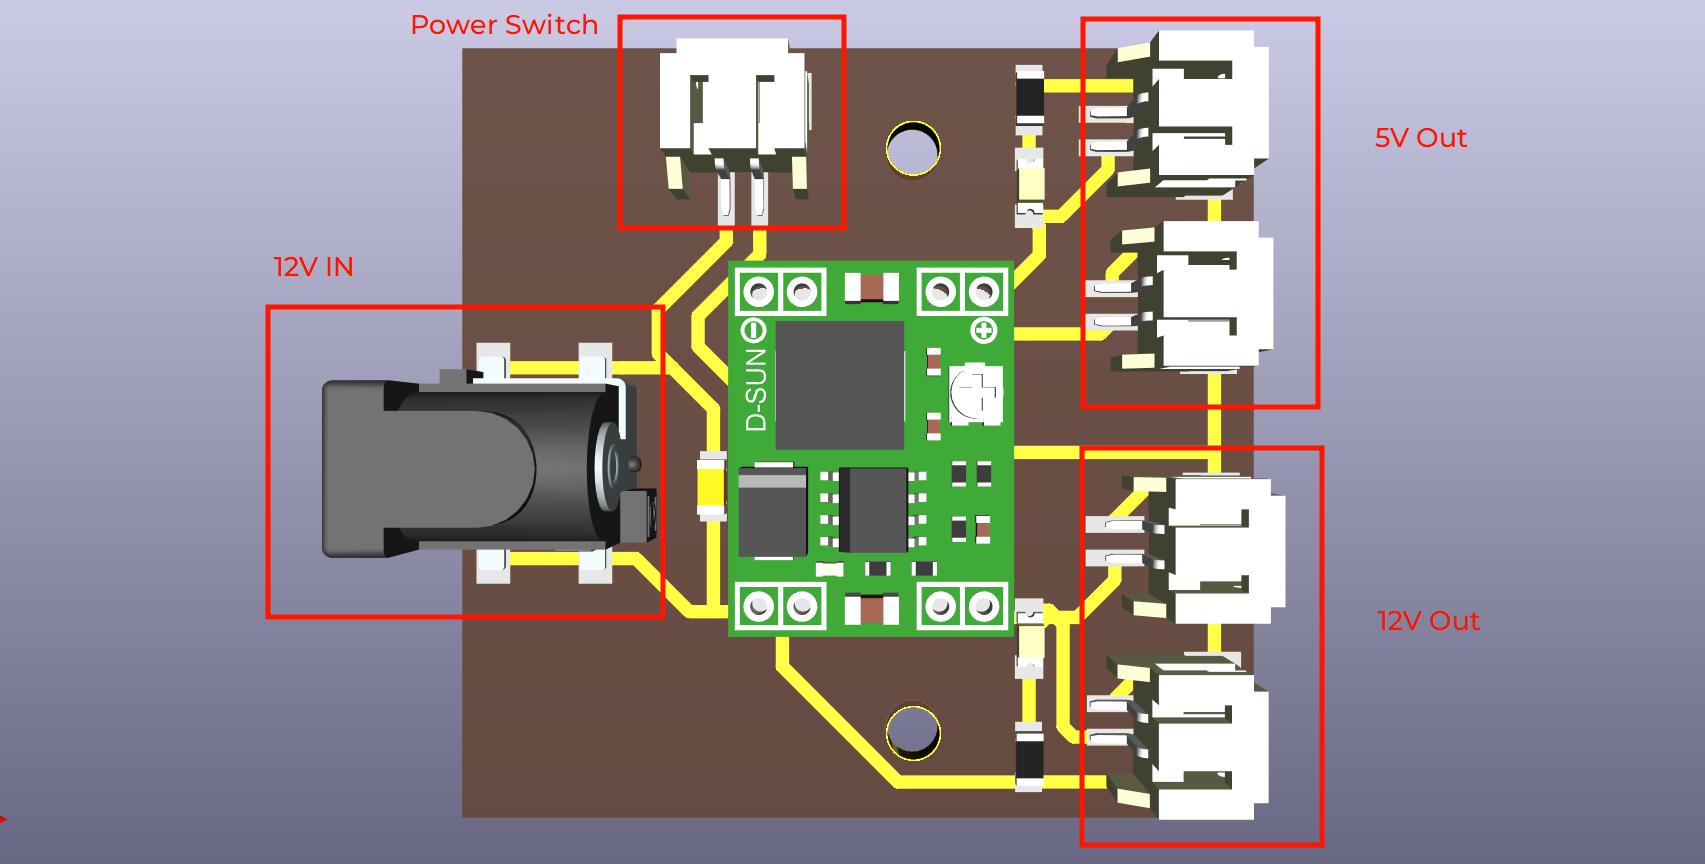
Power Board
The power management board ensures that all subsystems in Symphoni receive stable and efficient power. Since the project requires components operating at different voltages and current levels, this board acts as the backbone of the electrical system.

- Mini MP1684 Buck Converter - Provides regulated 12V and 5V outputs, supplying both the amplifier (high-power rail) and the control boards (logic rail).
- Power Distribution - Routes power to the main board, audio board, DC Motor, Speakers through JST Terminals
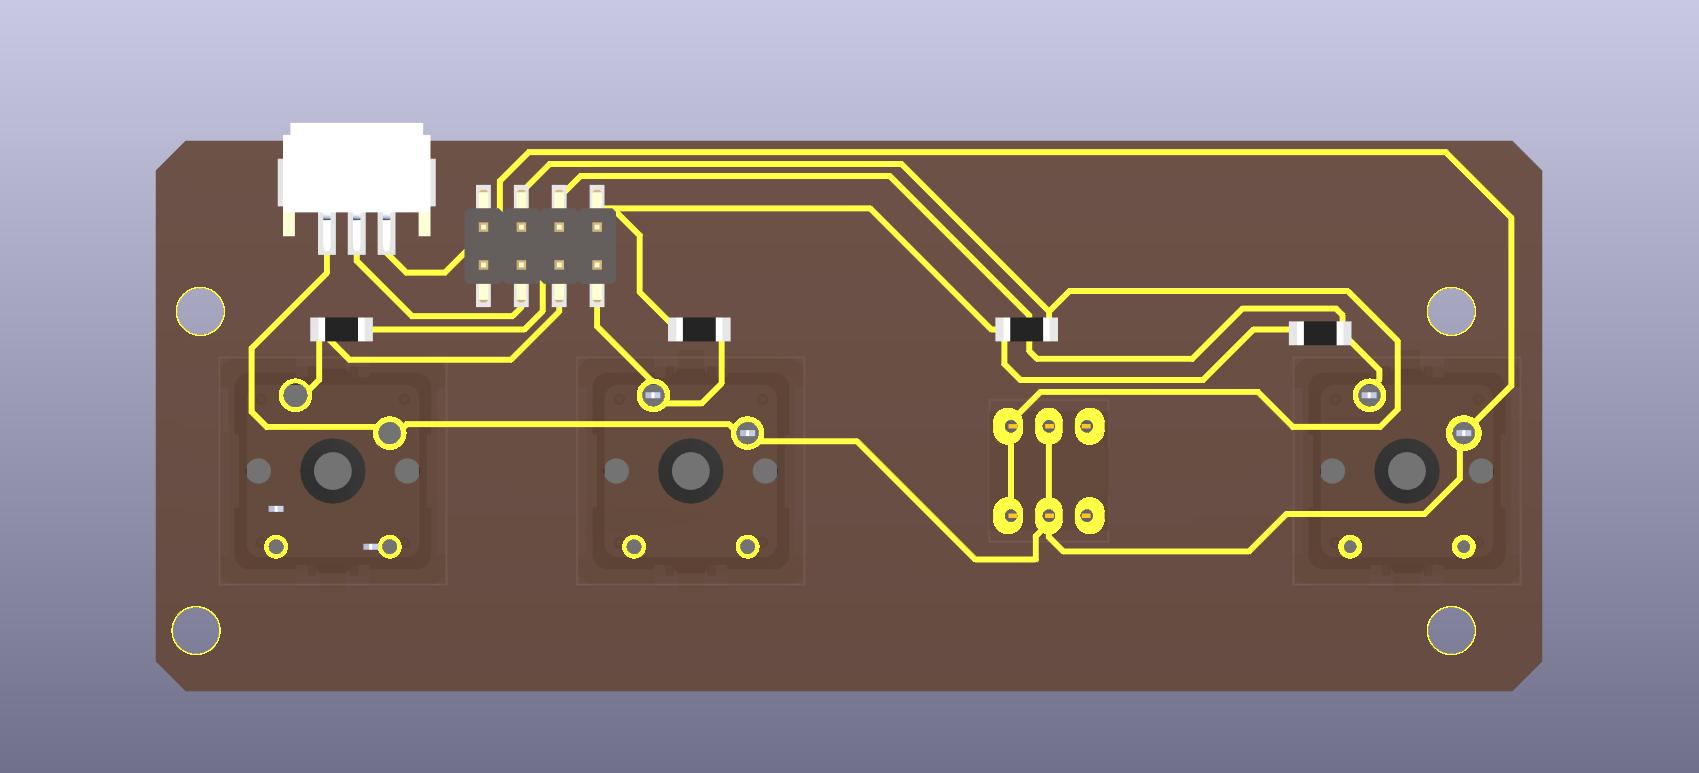
Playback Control Board
The playback control board provides the tactile interface for user interaction. It is connected directly to the main control board via an IDC connector and allows users to manually control playback.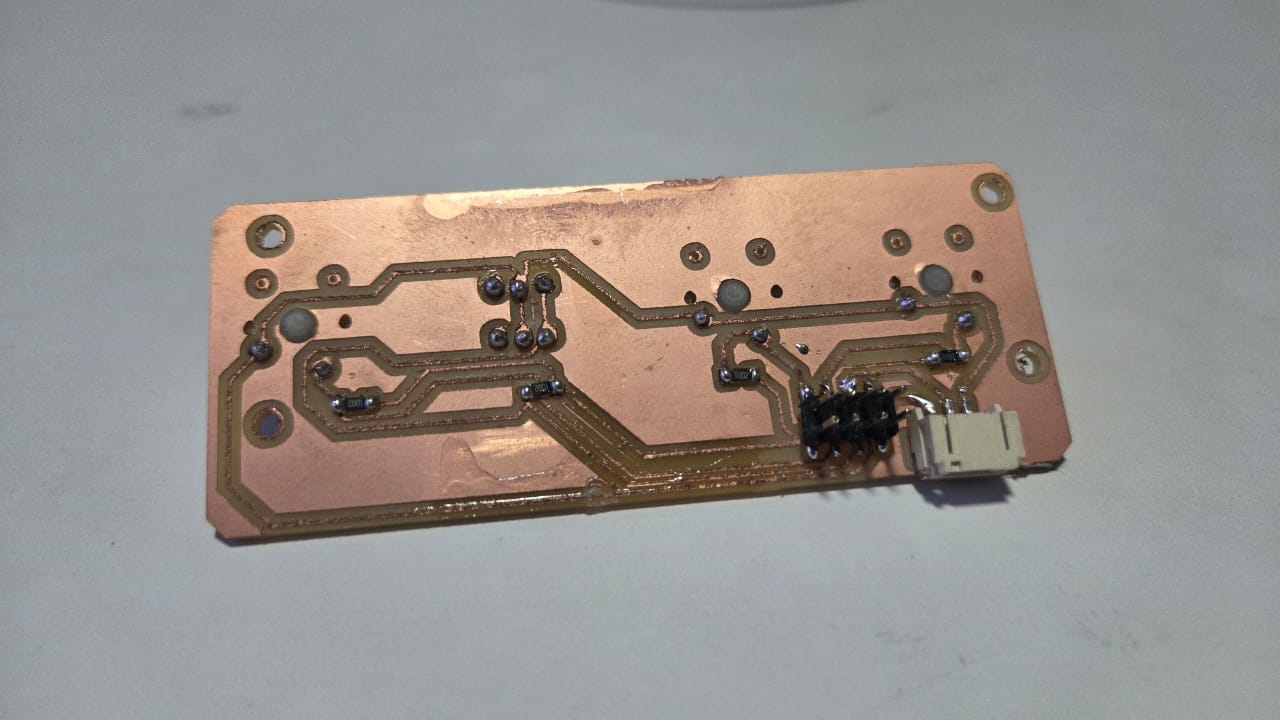
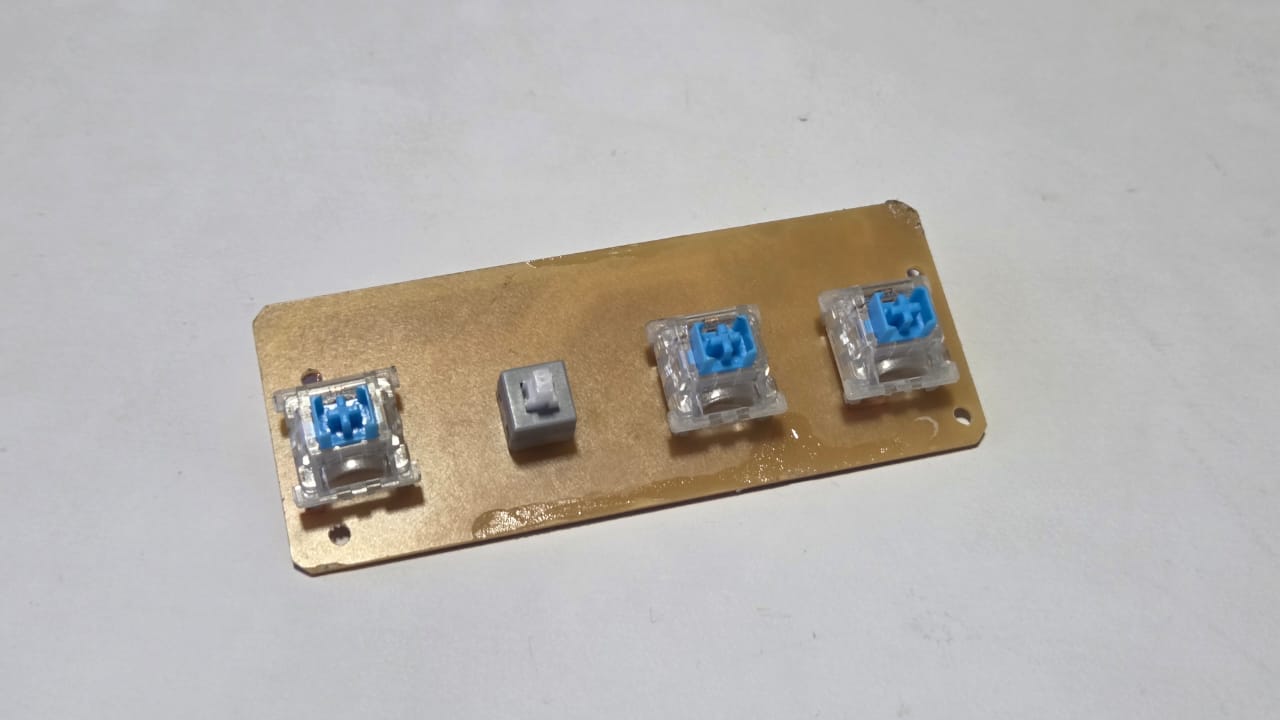
Physical Buttons - Dedicated buttons for Play/Pause, Next Track, Previous Track, and Mode .
Speaker Connection
The speakers are primarily controlled by the Symphoni Bluetooth Board, which has the PCM5102 I2S DAC. The I2S DAC converts the digital signals from the ESP32 into Stereo Analog Signals. This signal is then amplified by the external TPA3116D Stereo Amplifier. The amplifier is connected to 5W 8Ohm Speakers.
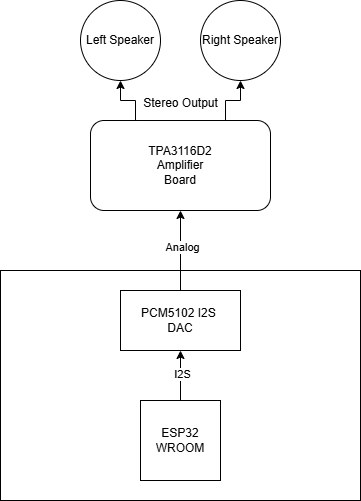
The PCM5102 I2S DAC is part of the Symphoni Bluetooth Speaker Board, while the Amplifier and Speakers are externally connected through screw terminals. The TPA3116D Amplifier Board operates on 12-24V, this power is provided by the Power Management Board.
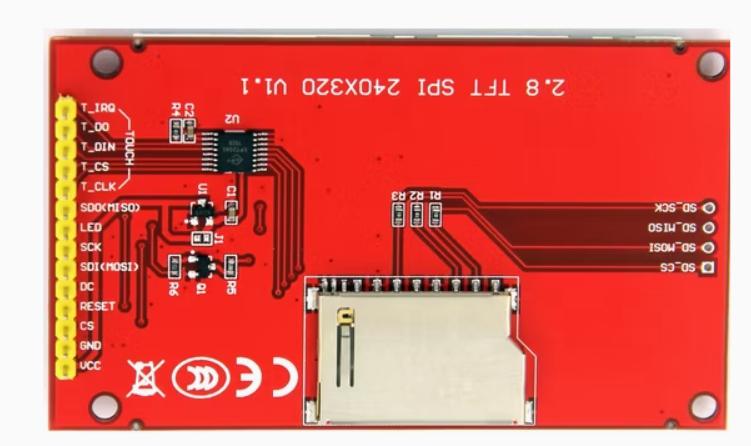
2.8 Inch SPI TFT LCD Display
The display is a 2.8 inch SPI TFT LCD, which is used to show the current track information, album art, and playback status. It is connected to the main control board via SPI interface using a 2x4 IDC Connector.
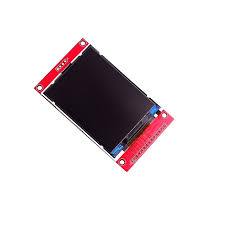
I soldered one end of the IDC Connector Cable directly onto the the SPI TFT Display, accorrding to the pinout of the LCD Display.
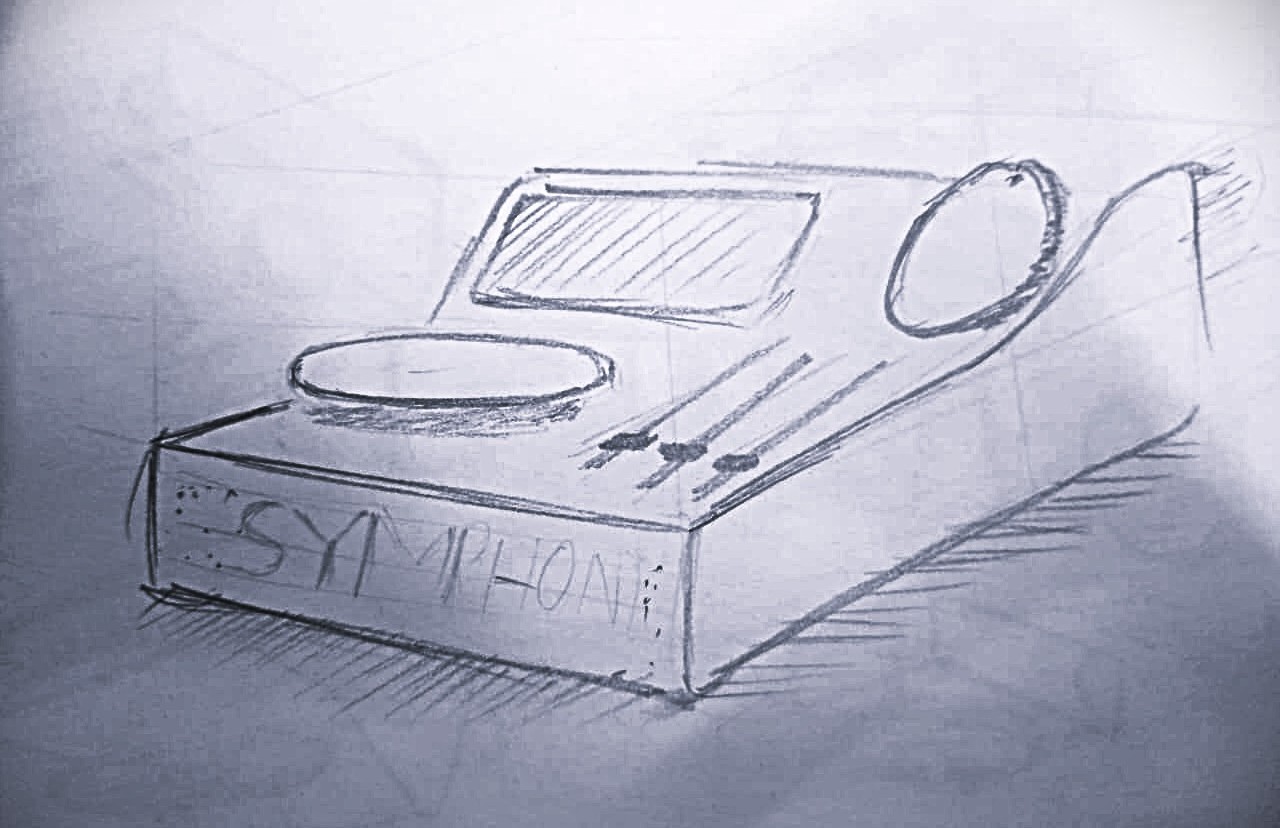
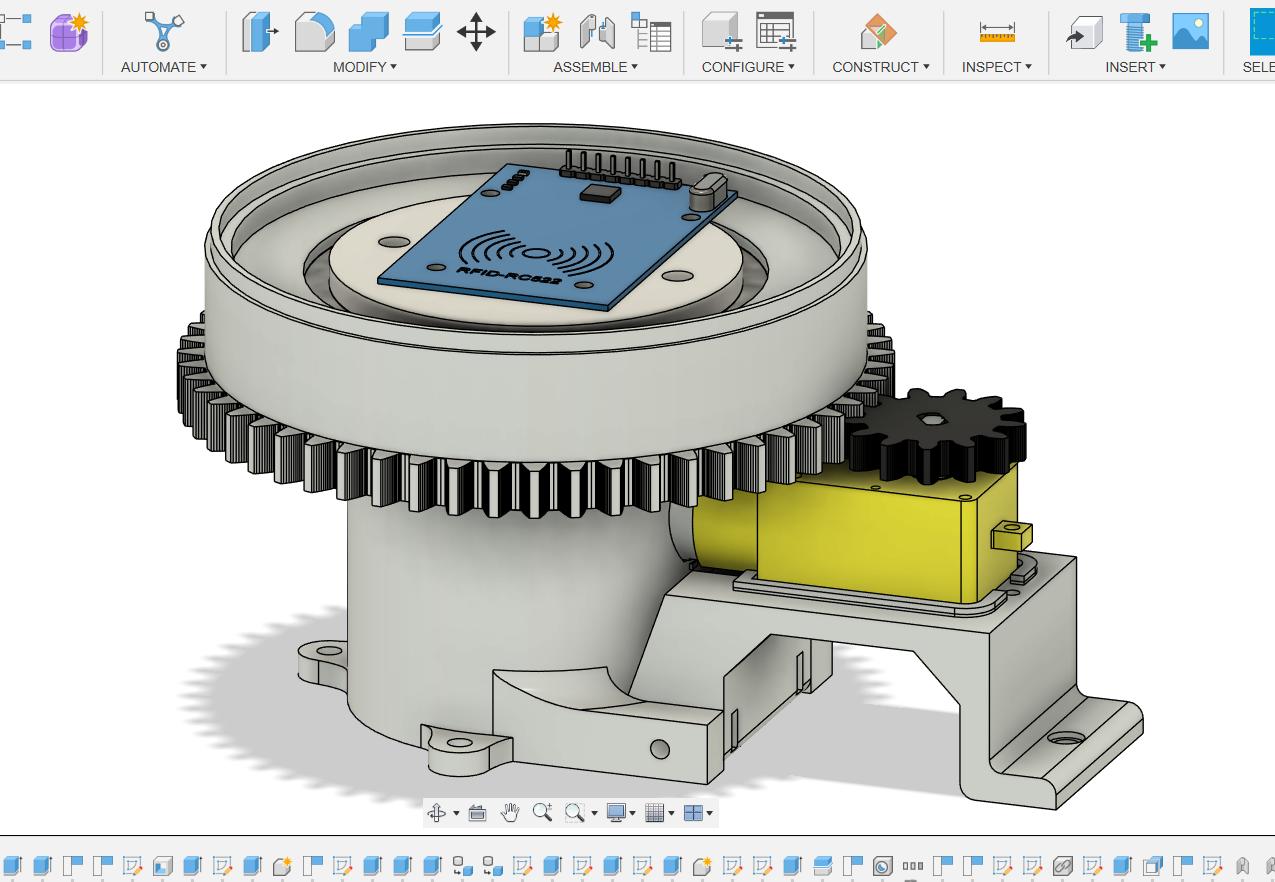
CAD Design
The CAD for Symphoni was done in Autodesk Fusion 360.
The major components to be designed were:
-
Turntable Base - The main body of the turntable, designed to house all electronics and provide a stable platform for the rotating platter.
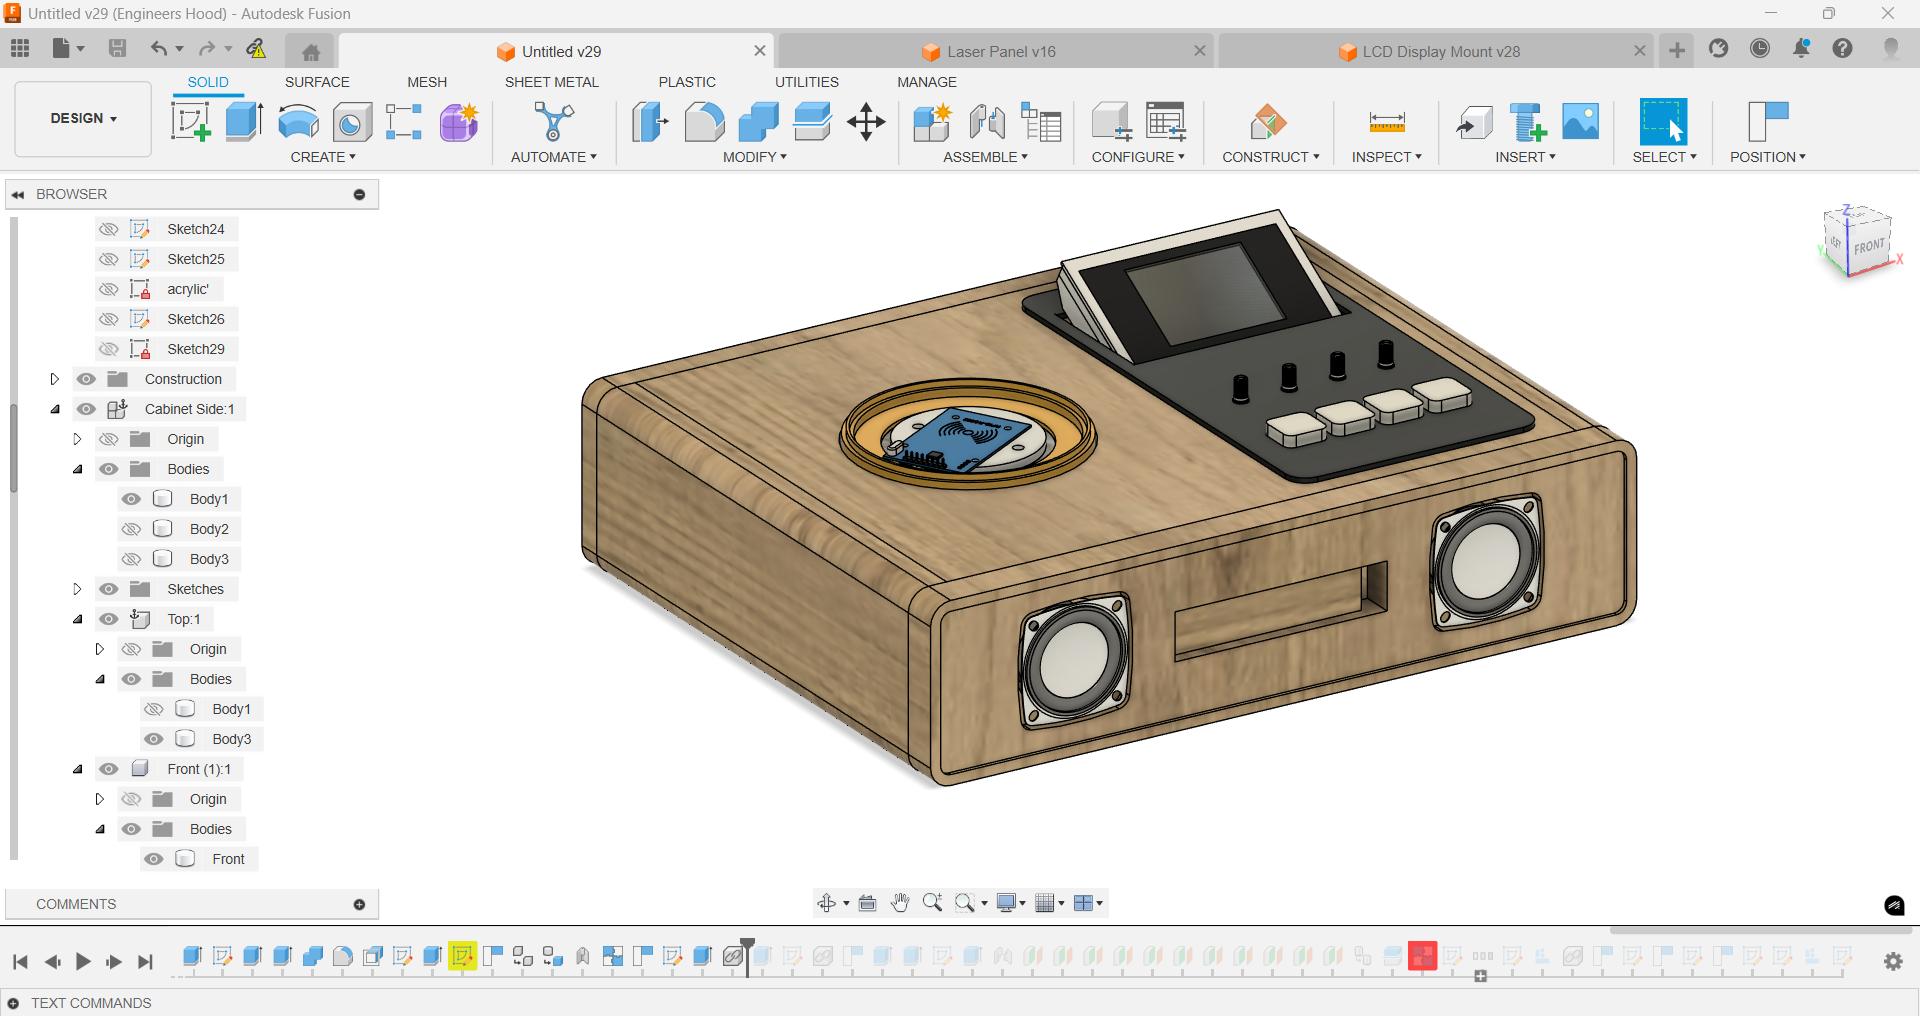
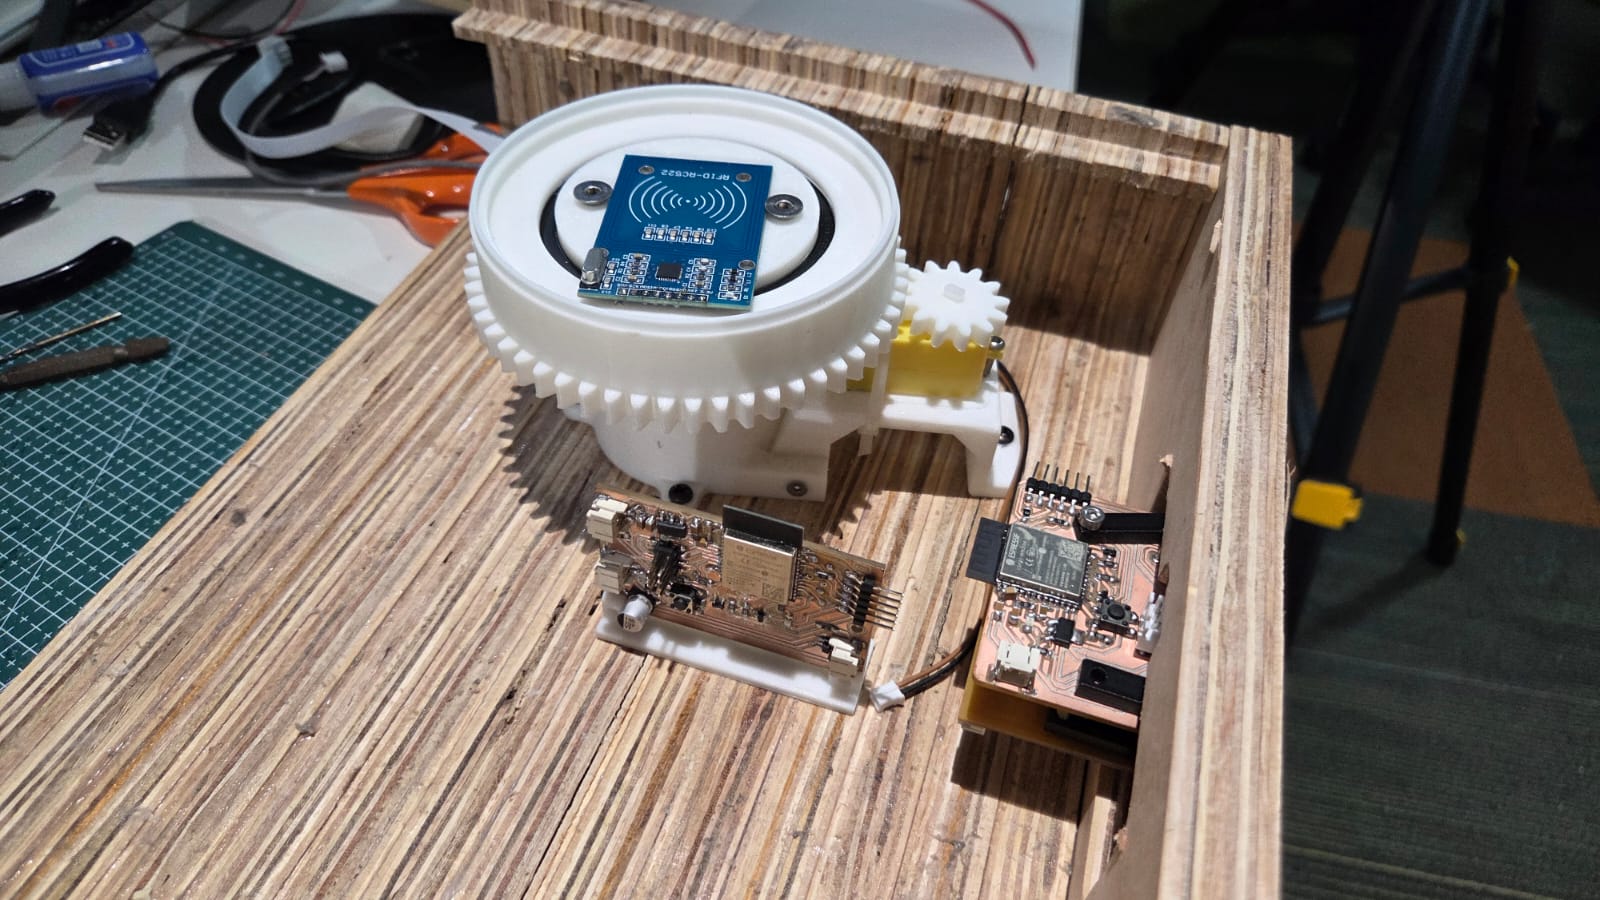
The Inner View -
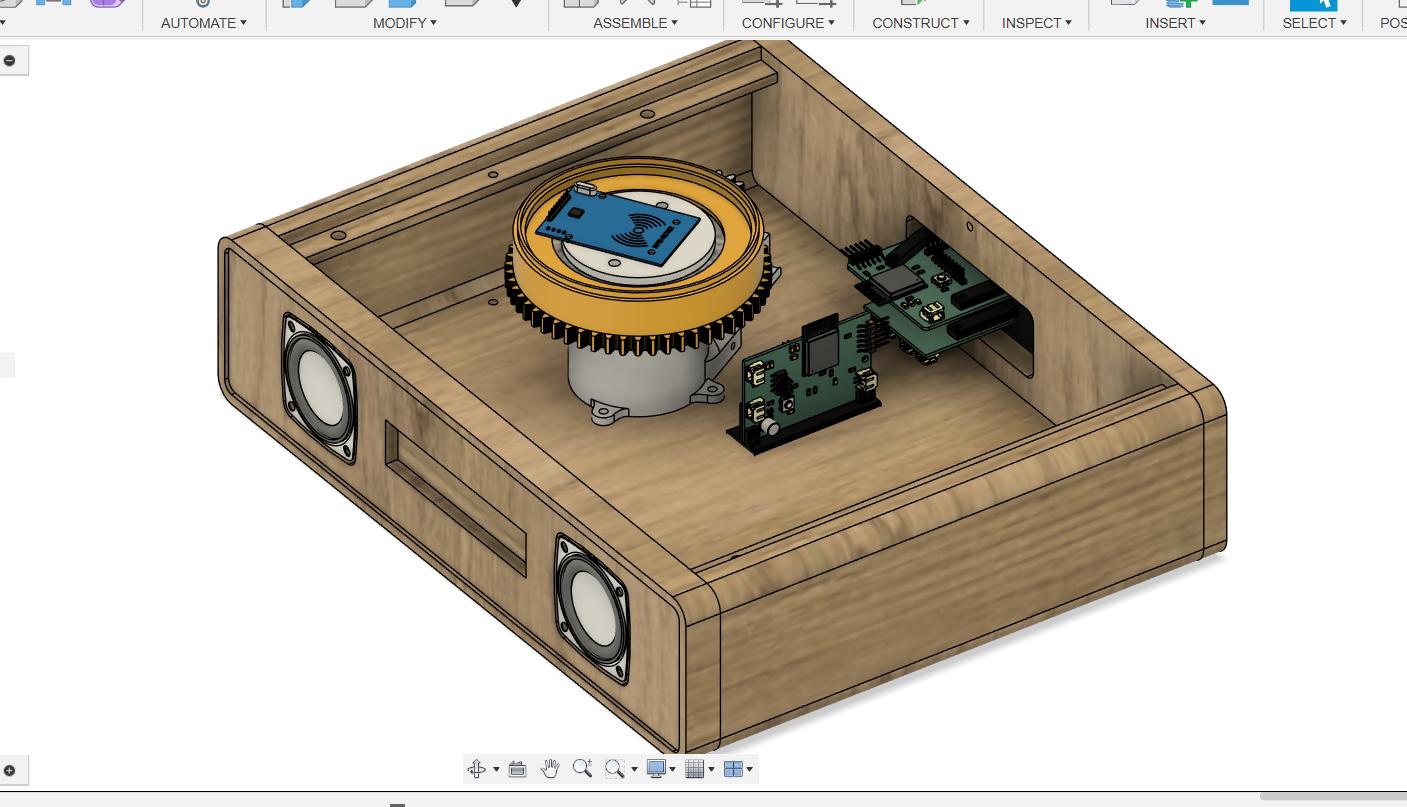
Rotary Module - The rotating platter that simulates the vinyl record motion, designed to hold the NFC records and provide a tactile interaction. It includes a DC motor for rotation and a bearing for smooth movement.There is inner stationary core which houses the RFID Reader and the outer geared rotating platter which is meshed to the DC Motor gear.
Rotary Module -
Display Mount - A custom mount for the TFT LCD display, designed to change into two positions: Inclined and Flat.
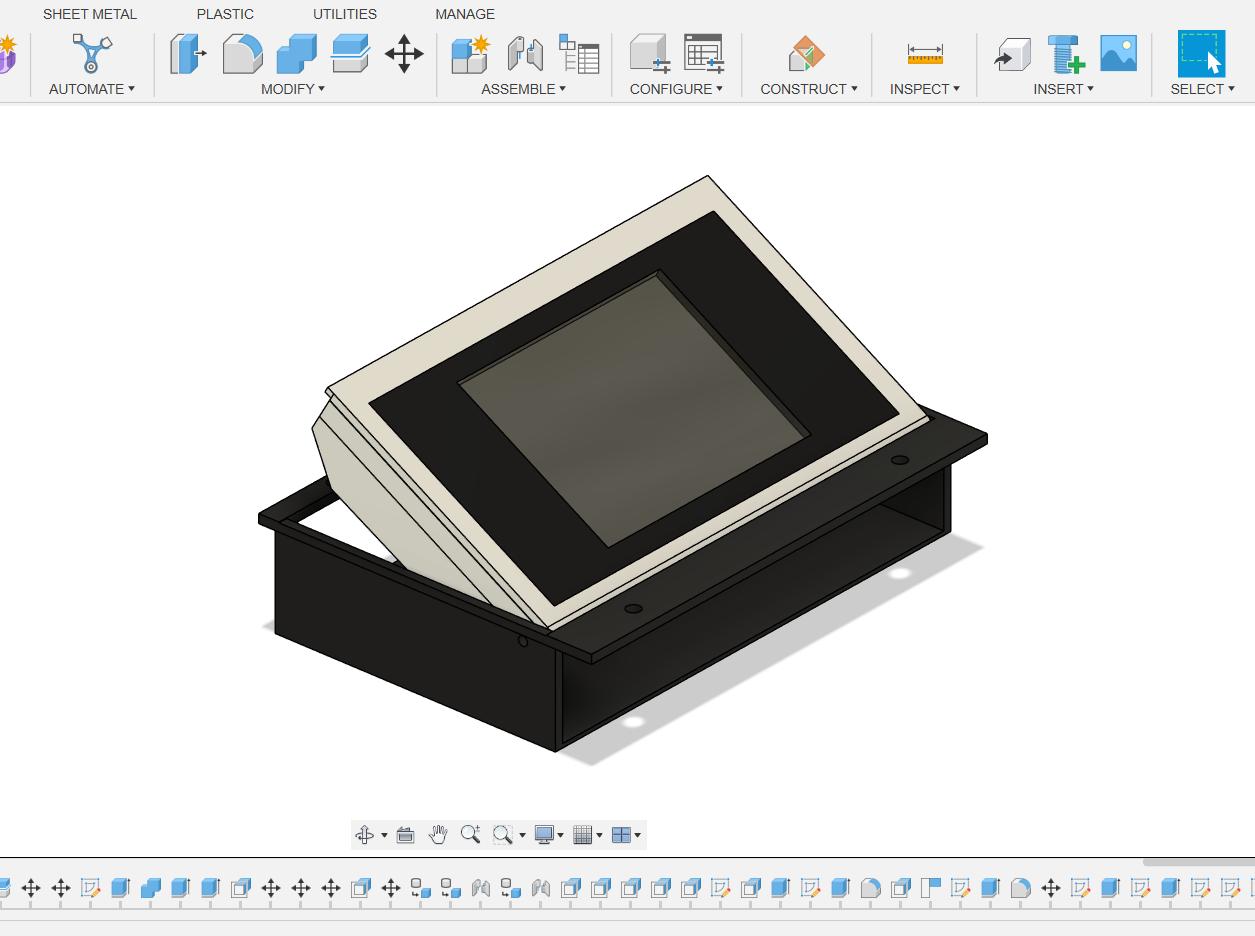
Display Mount
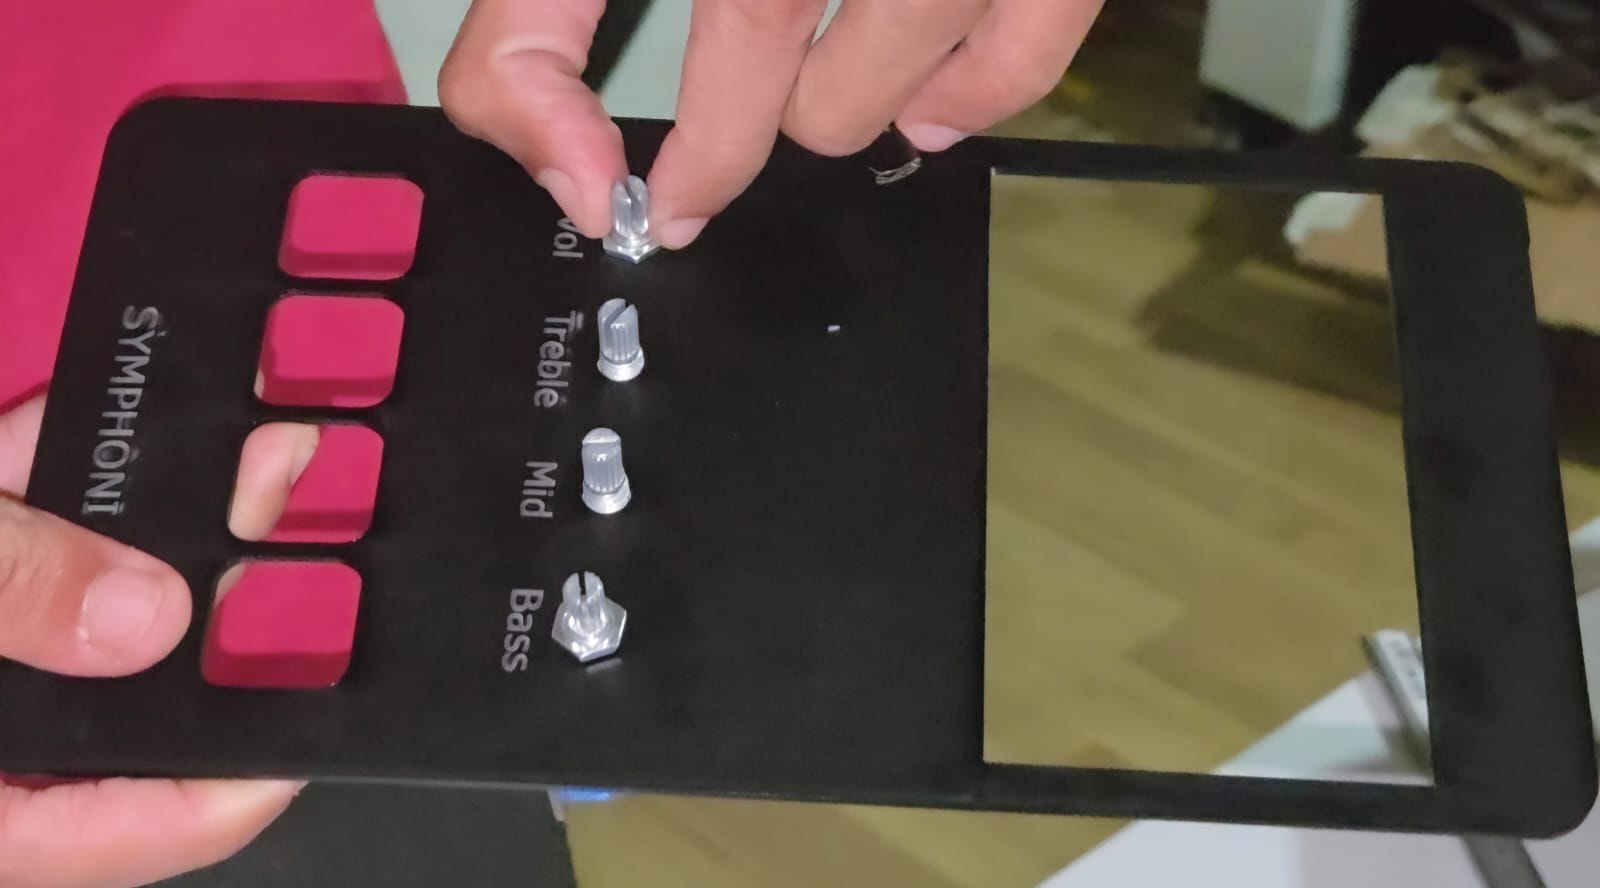
Control Panel - The top panel that houses the playback control buttons and the display. It is designed to be user-friendly and aesthetically pleasing.
-
Front, Back and Top Panels - These panels are designed to provide a sleek and modern look to the turntable, while also allowing access to the internal components for maintenance and upgrades.
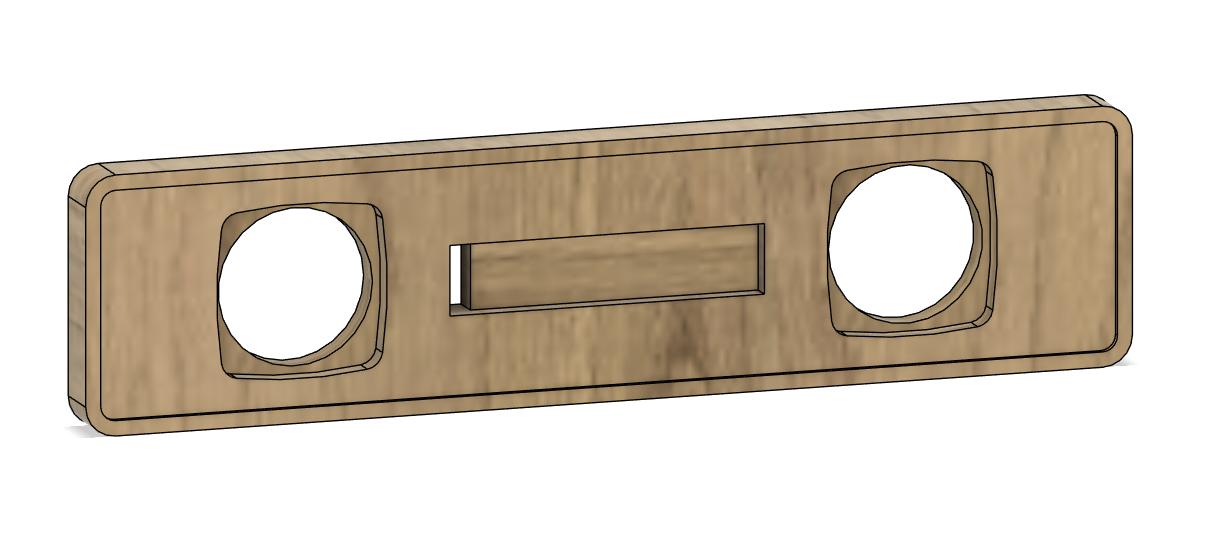
Front Panel 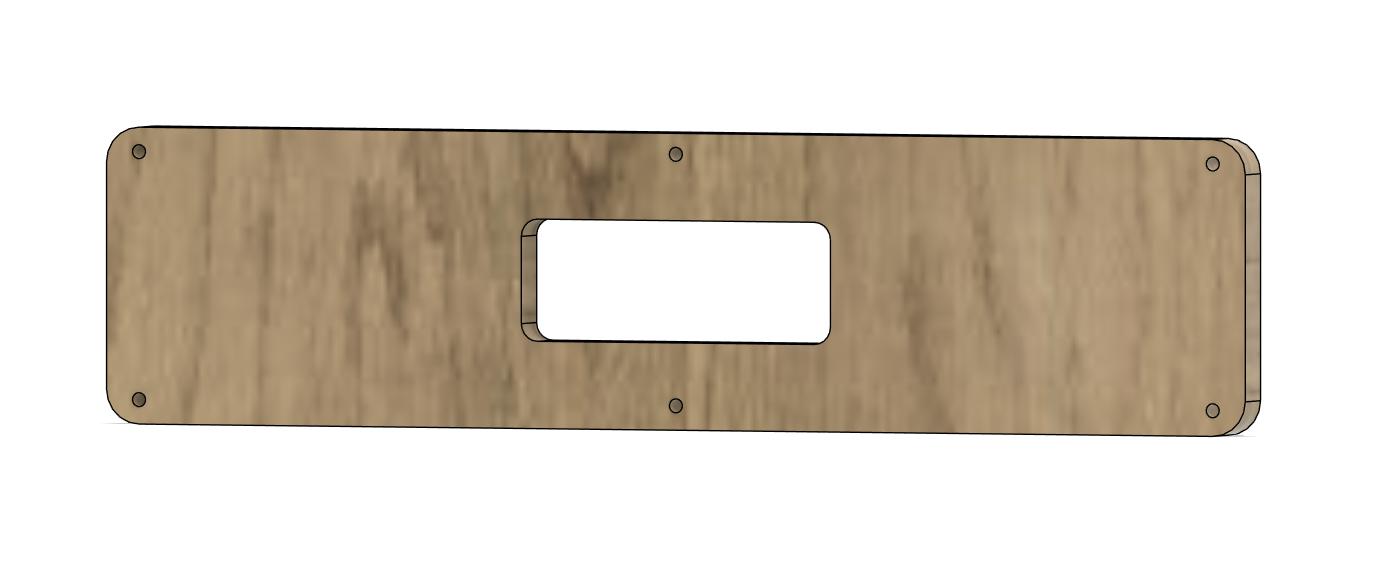
Back Panel 
Top Panel
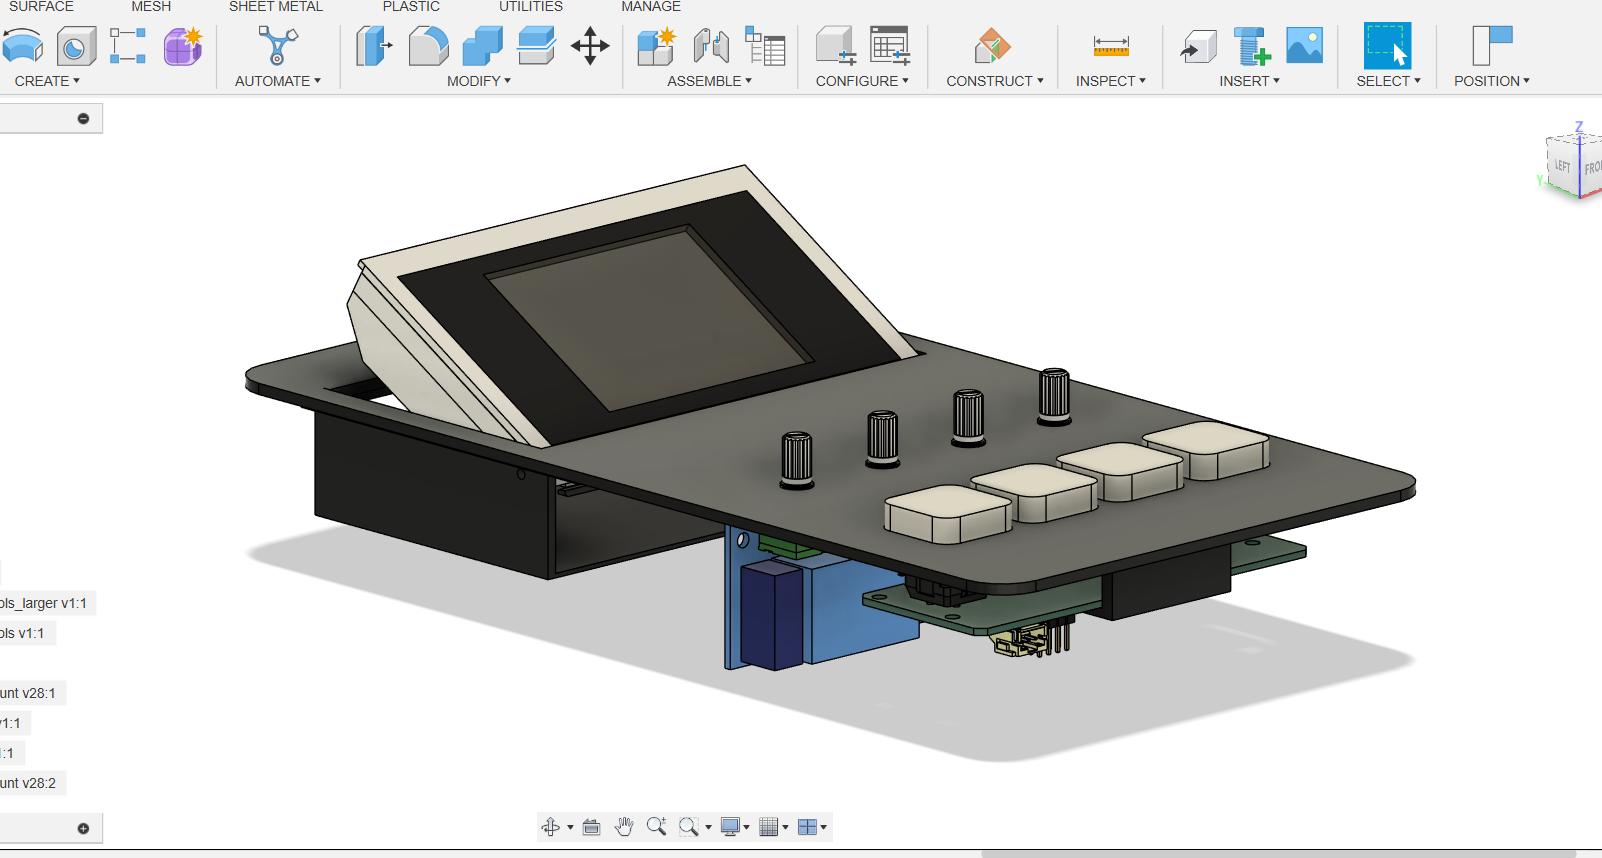
The below is an embed view of the CAD in Fusion 360
Manufacturing
The manufacturing of Symphoni involved several steps, including CNC milling for the wooden components, 3D printing for the plastic parts, laser engraving and cutting for control panel. The main materials used were plywood for the body, vegan leather for the top surface, Acrylic for Control Panel and PLA for the 3D printed parts.
3D Printing
The 3D printing was done using the BambuLab Printers: A1, A1 Mini and P1S. The parts were designed in Fusion 360 and exported as .stl files for slicing. The slicing was done using BambuStudio, with settings optimized for strength and detail.
The project utilises 3D Printing for the parts like:
-
Rotary Module Parts - The inner shaft, outer top, and gear components of the rotary module were 3D printed to ensure precise fitting and smooth operation.
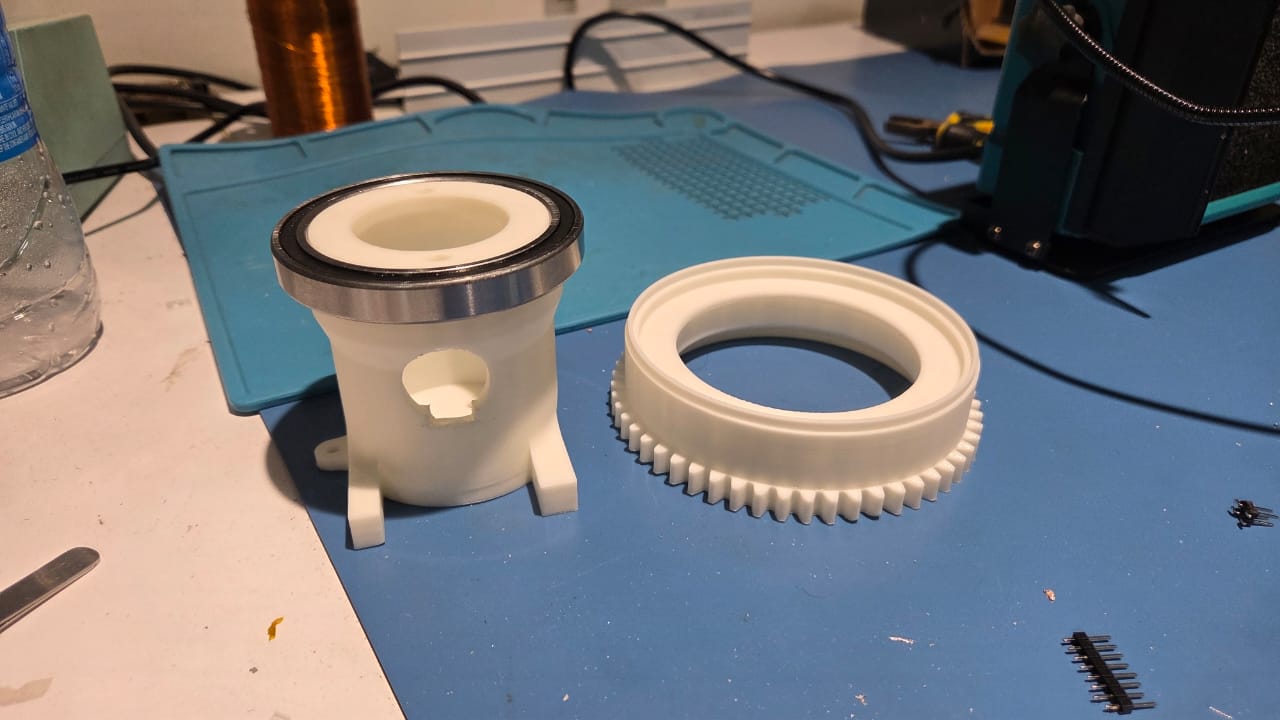
Rotary Module: Inner Core and Outer Gear 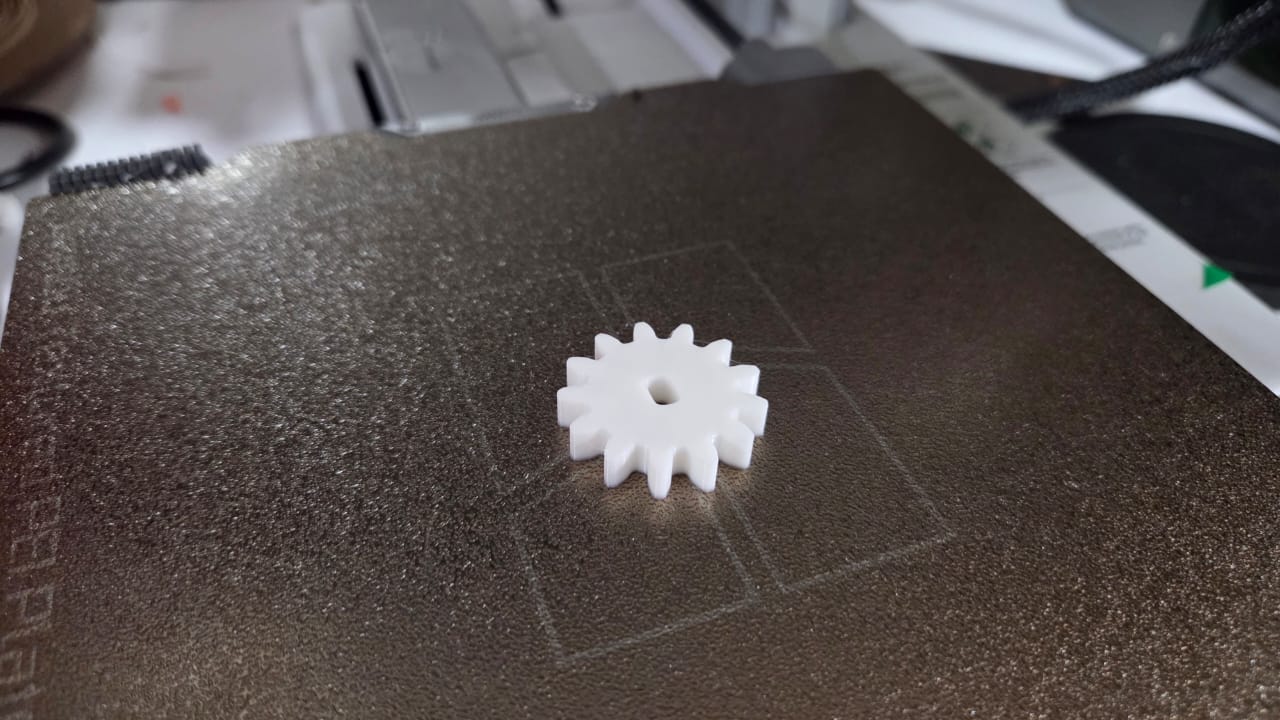
Motor Gear 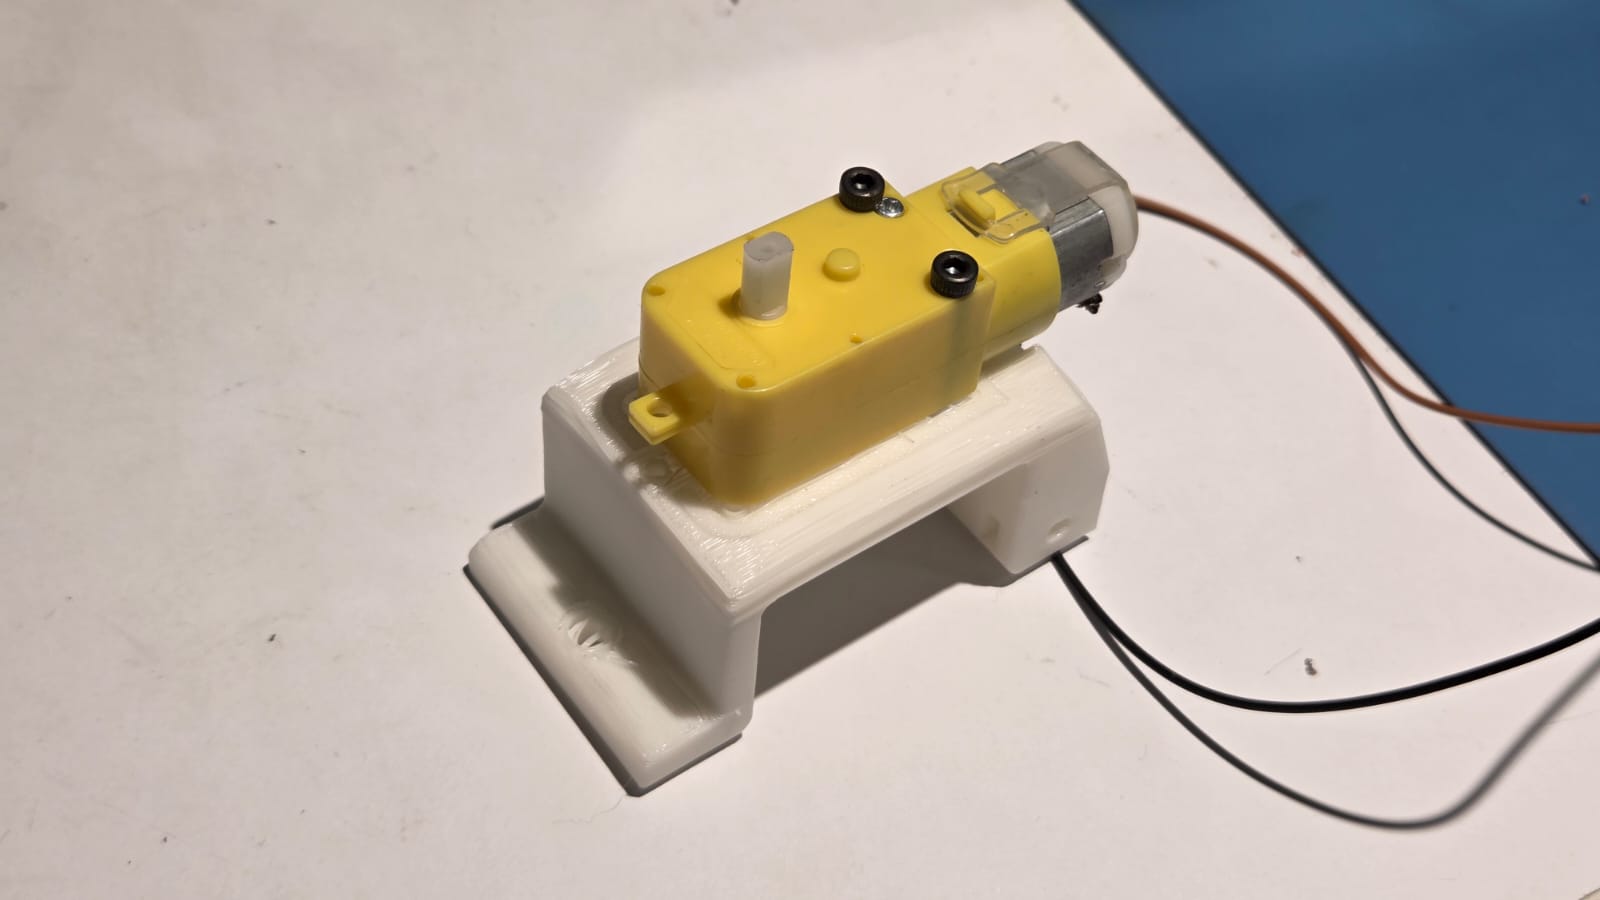
Motor Mount -
Display Mount - The custom mount for the TFT LCD display was 3D printed to achieve the desired angles and stability.

Display Mount - Control Panel Buttons - The buttons for playback control were 3D printed to provide a tactile and ergonomic interface.
-
Speaker Grills - Custom grills for the built-in speakers were 3D printed to match the aesthetic of the turntable while allowing sound to pass through effectively.
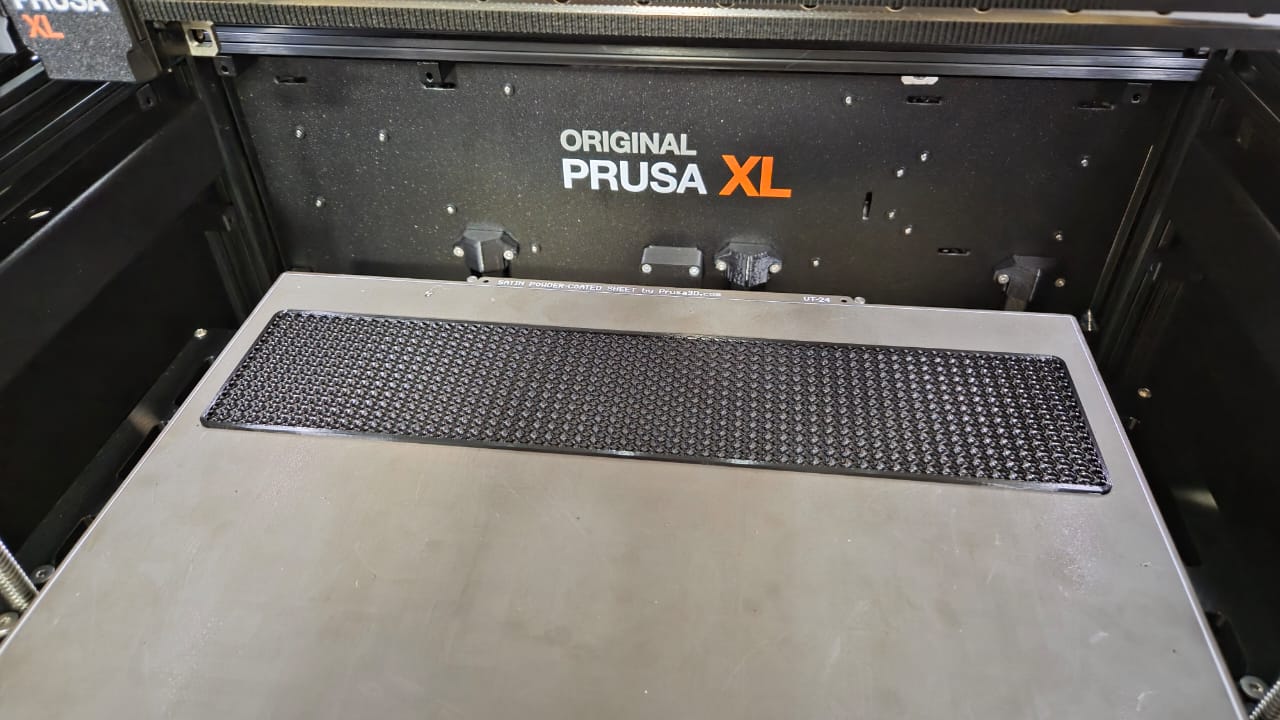
3D Printed Front Grill - PCB Mounts - Custom mounts for the PCBs were 3D printed to securely hold the electronics in place within the enclosure.
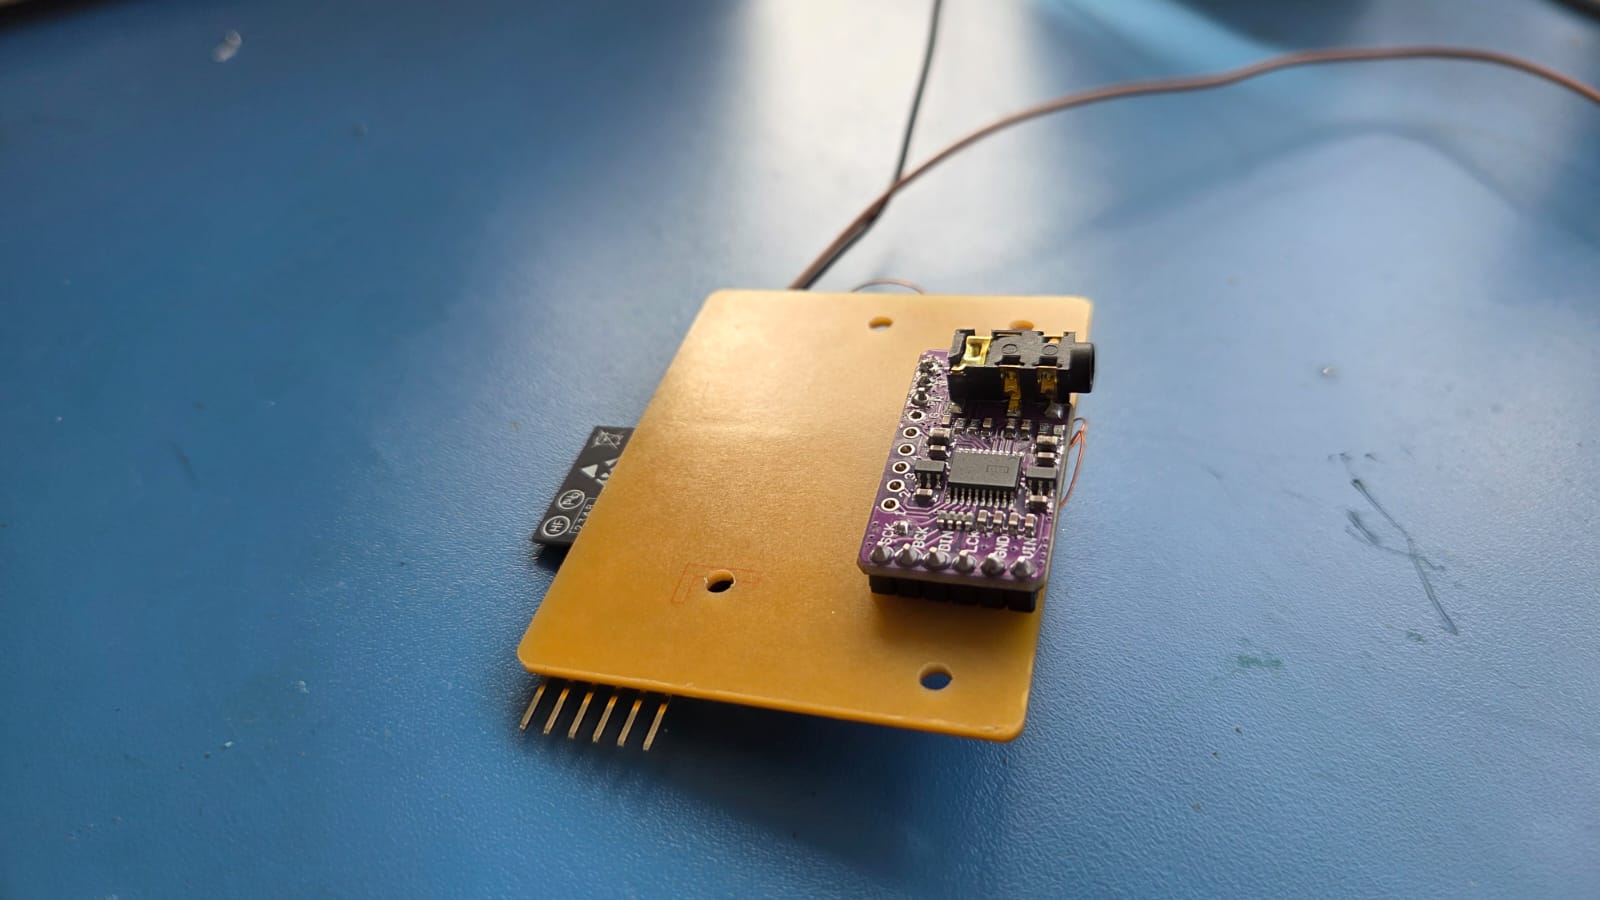
PCB Milling and Assembly
All the PCBs were milled using the Roland SRM-20 CNC machine. The boards were designed in KiCad and exported as .png files for milling. After milling, the boards were populated with components and soldered using soldering components in the Soldering Staion
Laser Cutting and Engraving
The laser cutting and engraving were done using the Trotec Speedy 400 Laser Cutter. The designs were created in Fusion 360 and exported as .dxf files for cutting. The control panel was laser engraved to add labels for the buttons and display.
The material used for the control panel is Matt Black 3mm Acrylic Sheet
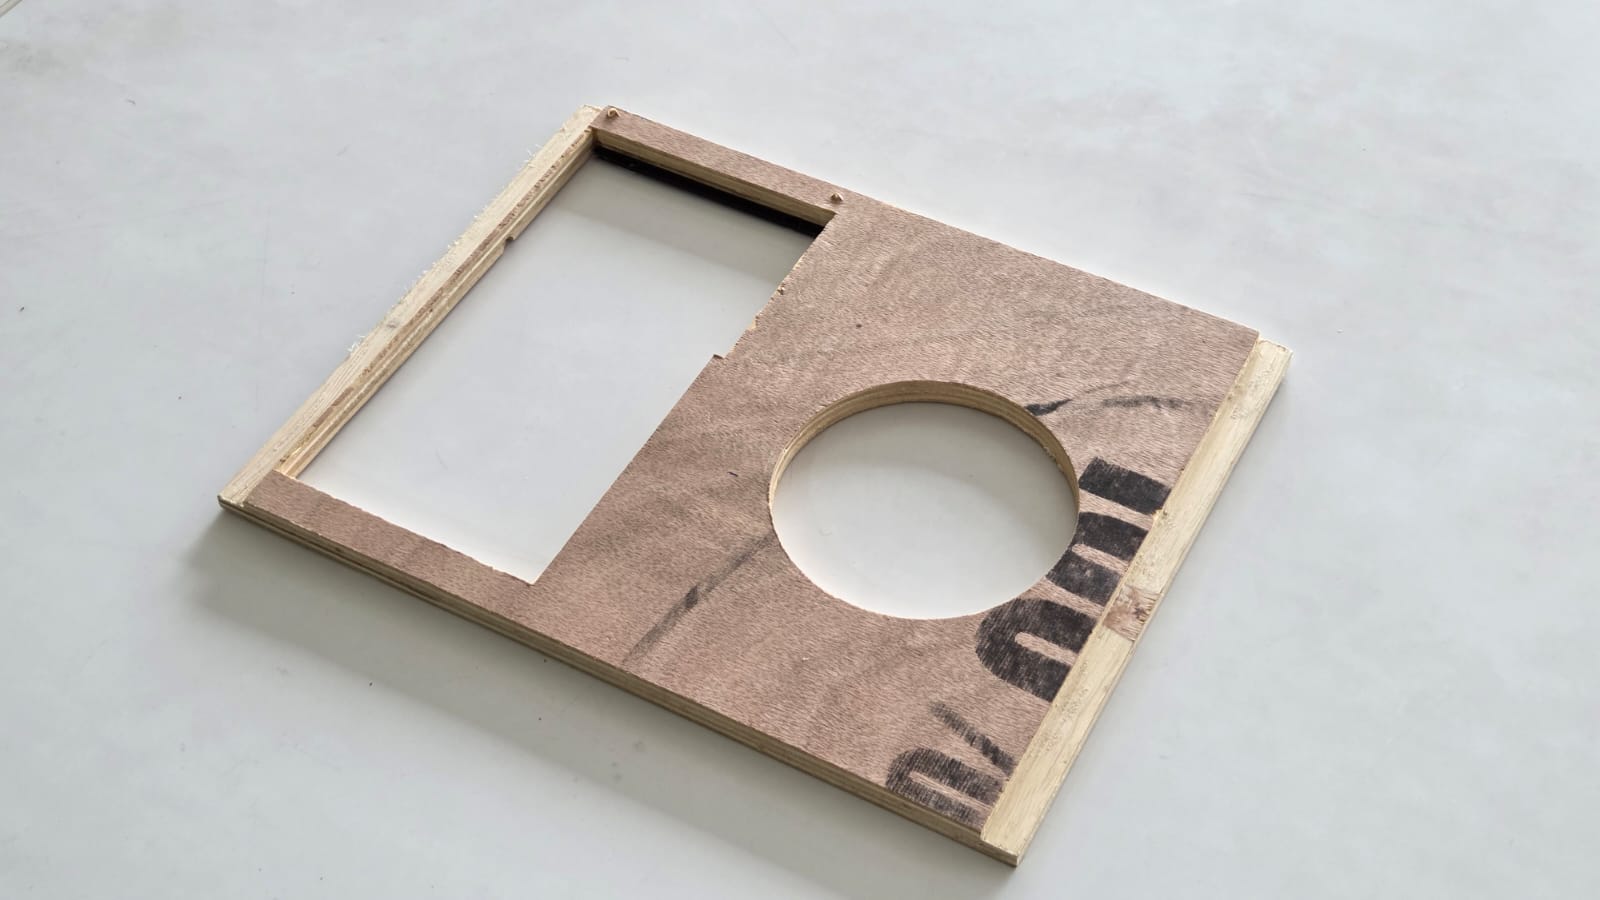
CNC Milling Plywood
The CNC milling was done using the ShopBot Alpha CNC machine. The plywood was cut into the required shapes for the enclosure, front, back, and top panels. The design files were exported as .dxf files for milling after designing in Autodesk Fusion 360.
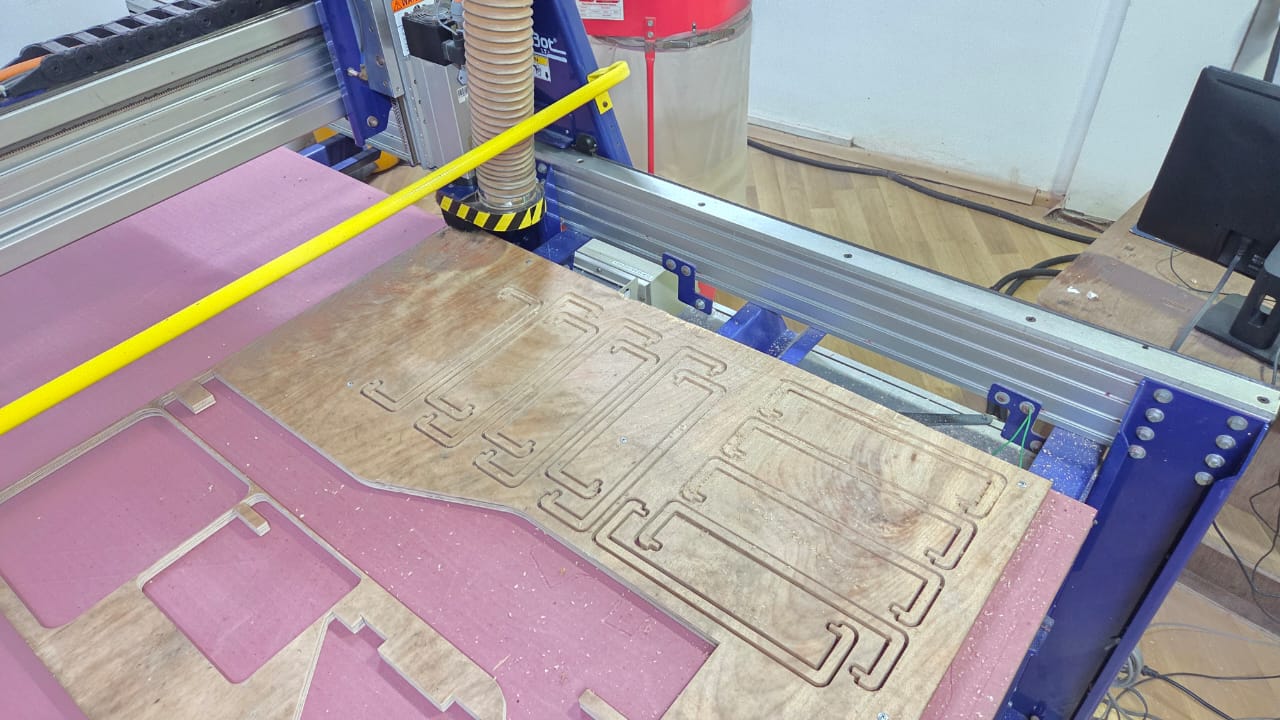
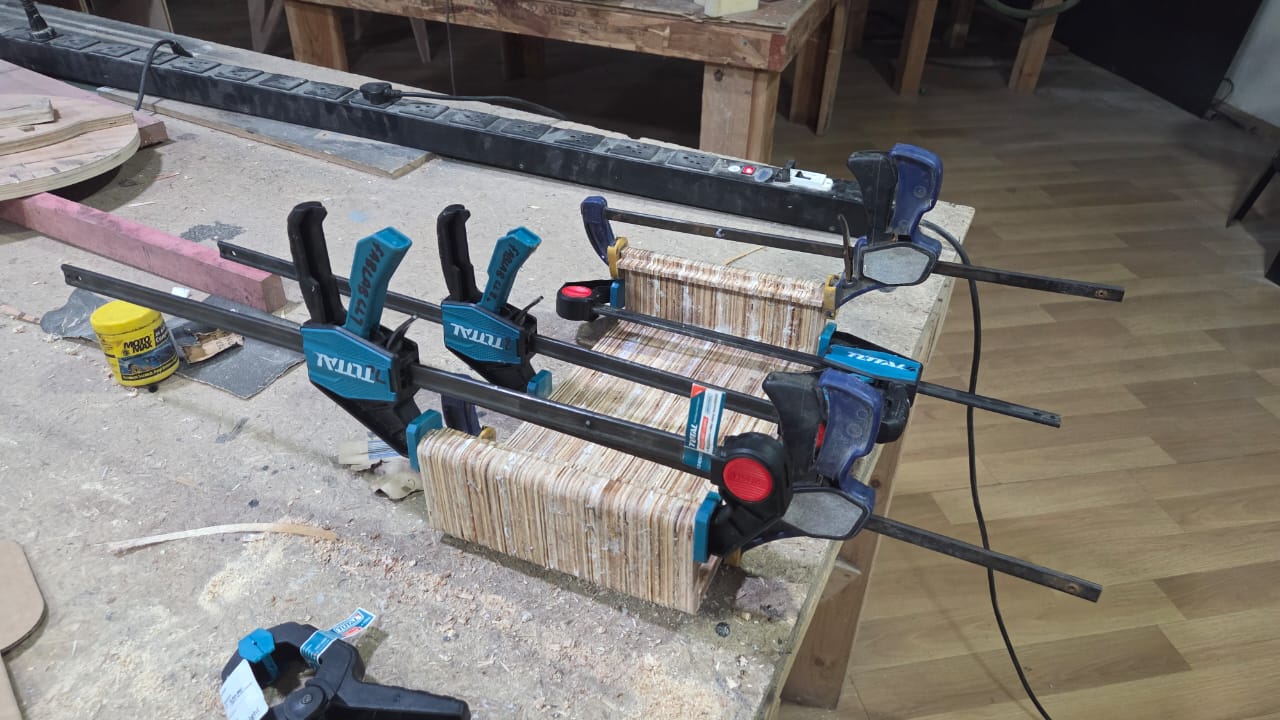
The plywood enclosure had fillet corners, therefore rather than processig the enclosure to fillet them, it was made by attaching multiple crossections of plywood together.
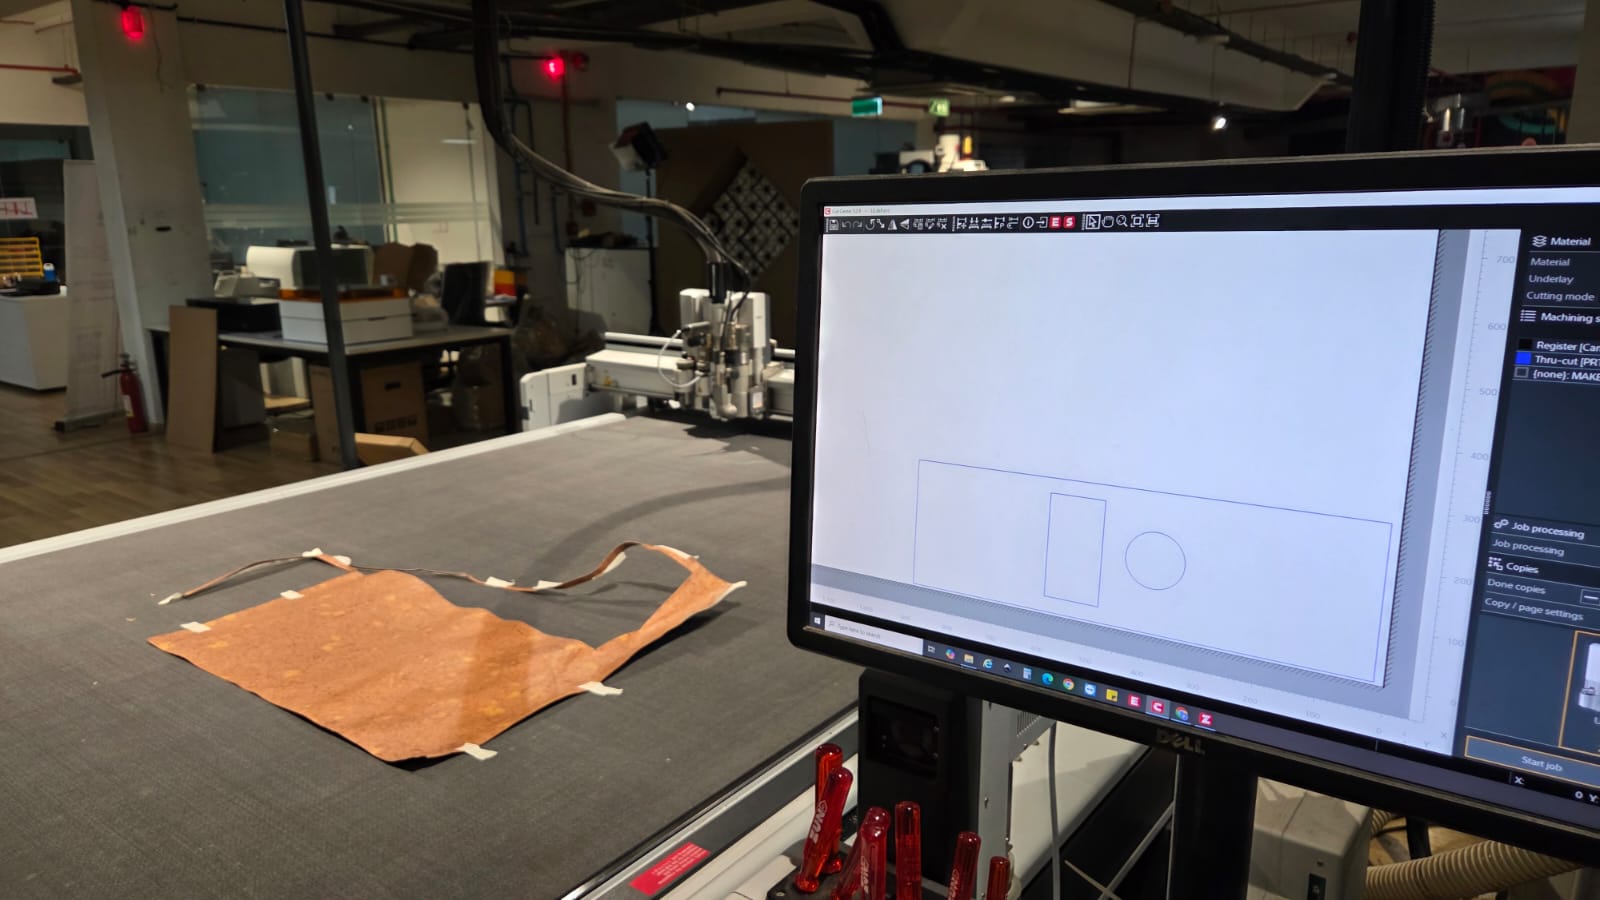
CNC Cutting: Zund
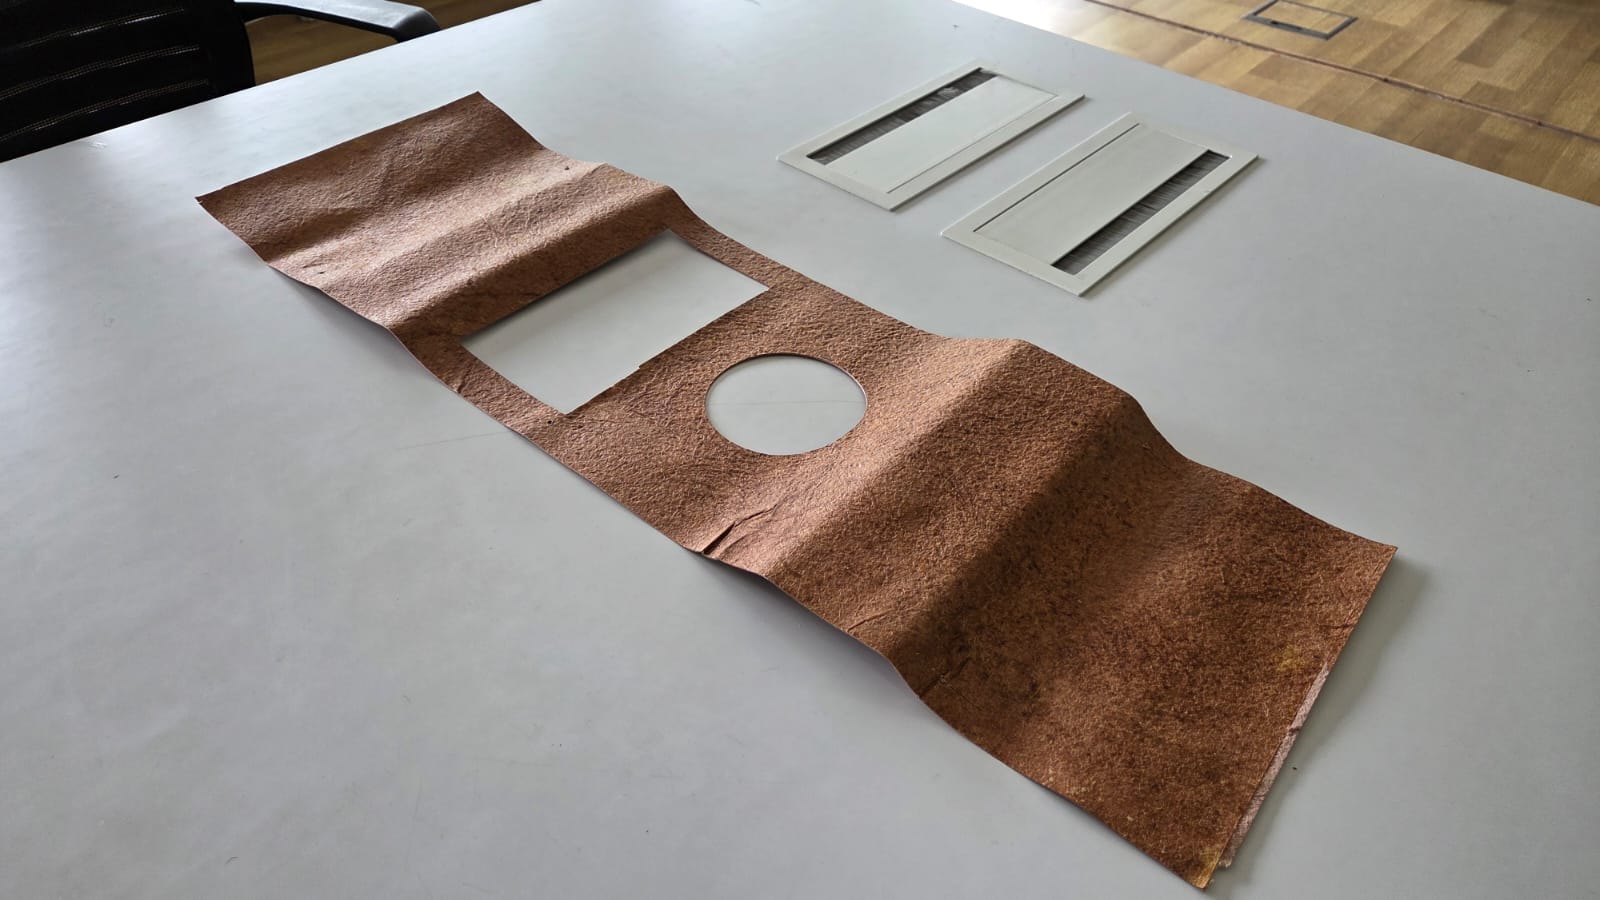
The Zund CNC cutter was used to cut the vegan leather top surface of the turntable. The design was created in Fusion 360 and exported as a .dxf file for cutting. The vegan leather was chosen for its aesthetic appeal and durability.
The vegan leather was cut to size and then glued onto the top surface of the turntable using a strong adhesive. This not only enhances the look of the turntable but also provides a soft touch surface for placing NFC records.
Assembly
The assembly of Symphoni involved integrating all the components into the wooden enclosure, ensuring that everything fits together seamlessly. The process included:
- Installing the Rotary Module - The rotary module was installed with the DC motor and bearing, allowing it to rotate smoothly.
- Mounting the PCBs - The main control board, Bluetooth speaker board, power management board, and playback control board were mounted inside the enclosure using 3D printed mounts.
- Connecting the Display - The TFT LCD display was connected to the main control board via SPI interface using a 2x4 IDC Connector.
- Wiring the Speakers - The speakers were connected to the Bluetooth speaker board, which handles audio playback.
- Final Assembly - The front, back, and top panels were attached to complete the enclosure, ensuring all components are securely housed.
- Spotify API Integration
- Recieving HTTP Requests and responding to them from the App
- RFID Reader Integration
- Display Control
- Motor Control
- Button Input Handling
The final assembly resulted in a sleek and modern turntable that not only looks good but also functions as a smart audio device, capable of streaming music from Spotify and playing it through built-in speakers or an external Bluetooth speaker.
Programming
The programming of Symphoni was done using the Arduino IDE with the ESP32 board support. The code is structured into several modules to handle different functionalities:
Main Board
The main board code handles the following tasks:
#include <Arduino.h>
#include <WiFi.h>
#include <SpotifyEsp32.h>
#include <WebServer.h>
#include <SPI.h>
#include <MFRC522.h>
#include <TFT_eSPI.h>

const char* ssid = "WIFI_SSID";
const char* password = "WIFI_SSID_PASSWORD";

byte lastUid[10];  // large enough for UID
byte lastUidSize = 0;


const char* CLIENT_ID = "YOUR_CLIENT_ID";
const char* CLIENT_SECRET = "YOUR_CLIENT_SECRET";
const char* REFRESH_TOKEN = "YOUR_REFRESH_TOKEN";

#define RST_PIN 13
#define SS_PIN 5

#define motor 27

MFRC522 mfrc522(SS_PIN, RST_PIN);

Spotify sp(CLIENT_ID, CLIENT_SECRET, REFRESH_TOKEN);

WebServer server(80);

String receivedUri = "";    // <- store latest URI
bool writePending = false;  // <- flag to indicate pending write


void setup() {
  pinMode(motor, OUTPUT);

  Serial.begin(115200);
  SPI.begin();
  mfrc522.PCD_Init();


  connect_to_wifi();

  server.on("/uri", HTTP_POST, handleUriPost);
  server.on("/play", HTTP_POST, handlePlay);
  server.on("/pause", HTTP_POST, handlePause);
  server.on("/prev", HTTP_POST, handlePrev);
  server.on("/next", HTTP_POST, handleNext);

  server.begin();
  Serial.println("HTTP server started");

  sp.begin();

  while (!sp.is_auth()) {
    sp.handle_client();
  }

  Serial.println("Authenticated");
}

void loop() {
  server.handleClient();


  read_nfc();

  mfrc522.PICC_HaltA();
  mfrc522.PCD_StopCrypto1();
  delay(3000);
}

void connect_to_wifi() {
  WiFi.begin(ssid, password);
  Serial.print("Connecting to WiFi...");
  while (WiFi.status() != WL_CONNECTED) {
    delay(1000);
    Serial.print(".");
  }
  Serial.printf("\nConnected to WiFi\n");
  Serial.println(WiFi.localIP());
}

void handleUriPost() {
  if (server.hasArg("uri")) {
    receivedUri = server.arg("uri");
    Serial.println("Received URI: " + receivedUri);

    while (writePending) {

      write_nfc();
    }
    bool writeSuccess = write_nfc();  // call directly

    if (writeSuccess) {
      server.send(200, "text/plain", "NFC card written successfully!");
    } else {
      server.send(500, "text/plain", "Failed to write NFC card. Please try again.");
    }


  } else {
    server.send(400, "text/plain", "Missing 'uri' parameter");
  }
}


void handlePlay() {


  Serial.println("Received Toggle Play/Pause Command");
  sp.start_resume_playback();

  analogWrite(motor, 30);
  server.send(200, "text/plain", "Playing Track");
}

void handlePause() {


  Serial.println("Received Pause Command");
  sp.pause_playback();
  analogWrite(motor, 0);
  server.send(200, "text/plain", "Paused Track");
}

void handlePrev() {


  Serial.println("Received Previous Command");
  sp.previous();
  server.send(200, "text/plain", "Played Previous Track");
}
void handleNext() {


  Serial.println("Received Next Command");
  sp.skip();
  server.send(200, "text/plain", "Played Next Track");
}


bool write_nfc() {
  //   memset(lastUid, 0, sizeof(lastUid));
  //   lastUidSize = 0;
  // Serial.println("Waiting for NFC card to write...");

  MFRC522::MIFARE_Key key;
  for (byte i = 0; i < 6; i++) key.keyByte[i] = 0xFF;  // Default key

  // if (!mfrc522.PICC_IsNewCardPresent()) return;
  // if (!mfrc522.PICC_ReadCardSerial()) return;

  if (!mfrc522.PICC_IsNewCardPresent() || !mfrc522.PICC_ReadCardSerial()) {
    Serial.println("No new card detected.");
    return false;
  }
  Serial.println();

  // Prepare data
  byte buffer1[16];
  byte buffer2[16];
  const char* playlistID = receivedUri.c_str();
  size_t len = strlen(playlistID);

  // Fill buffer1 with first 16 bytes
  for (byte i = 0; i < 16; i++) {
    buffer1[i] = (i < len) ? playlistID[i] : ' ';
  }

  // Fill buffer2 with next 16 bytes (if any)
  for (byte i = 0; i < 16; i++) {
    byte index = i + 16;
    buffer2[i] = (index < len) ? playlistID[index] : ' ';
  }

  // Write to block 1
  byte block = 1;
  MFRC522::StatusCode status;
  status = mfrc522.PCD_Authenticate(MFRC522::PICC_CMD_MF_AUTH_KEY_A, block, &key, &(mfrc522.uid));
  if (status != MFRC522::STATUS_OK) {
    Serial.print(F("Auth failed for block 1: "));
    Serial.println(mfrc522.GetStatusCodeName(status));
    return false;
  }
  status = mfrc522.MIFARE_Write(block, buffer1, 16);
  if (status != MFRC522::STATUS_OK) {
    Serial.print(F("Write failed for block 1: "));
    Serial.println(mfrc522.GetStatusCodeName(status));
    return false;
  }
  Serial.println(F("Block 1 written successfully."));

  // Write to block 2
  block = 2;
  status = mfrc522.PCD_Authenticate(MFRC522::PICC_CMD_MF_AUTH_KEY_A, block, &key, &(mfrc522.uid));
  if (status != MFRC522::STATUS_OK) {
    Serial.print(F("Auth failed for block 2: "));
    Serial.println(mfrc522.GetStatusCodeName(status));
    return false;
  }
  status = mfrc522.MIFARE_Write(block, buffer2, 16);
  if (status != MFRC522::STATUS_OK) {
    Serial.print(F("Write failed for block 2: "));
    Serial.println(mfrc522.GetStatusCodeName(status));
    return false;
  }
  Serial.println(F("Block 2 written successfully."));

  mfrc522.PICC_HaltA();
  mfrc522.PCD_StopCrypto1();
  delay(100);
  mfrc522.PCD_Init();

  memset(lastUid, 0, sizeof(lastUid));
  lastUidSize = 0;


  Serial.println(F("Done writing Spotify ID!"));

  writePending = false;  // clear the flag after writing

  return true;
}

void read_nfc() {


  // memset(lastUid, 0, sizeof(lastUid));
  // lastUidSize = 0;
  MFRC522::MIFARE_Key key;
  for (byte i = 0; i < 6; i++) key.keyByte[i] = 0xFF;  // Default key

  if (!mfrc522.PICC_IsNewCardPresent()) return;
  if (!mfrc522.PICC_ReadCardSerial()) return;

  // Compare with last UID
  bool sameCard = (mfrc522.uid.size == lastUidSize);
  for (byte i = 0; i < mfrc522.uid.size && sameCard; i++) {
    if (mfrc522.uid.uidByte[i] != lastUid[i]) {
      sameCard = false;
    }
  }

  if (sameCard) {
    Serial.println("Same card detected again. Ignoring.");
    return;
  }

  // Store new UID
  memcpy(lastUid, mfrc522.uid.uidByte, mfrc522.uid.size);
  lastUidSize = mfrc522.uid.size;

  Serial.print(F("Card UID: "));
  for (byte i = 0; i < mfrc522.uid.size; i++) {
    Serial.print(mfrc522.uid.uidByte[i] < 0x10 ? " 0" : " ");
    Serial.print(mfrc522.uid.uidByte[i], HEX);
  }
  Serial.println();

  byte buffer1[18];  // 16 bytes + 2 for CRC
  byte size = sizeof(buffer1);
  byte block;

  // Read block 1
  block = 1;
  if (!authenticateAndRead(block, buffer1, size, key)) return;

  // Read block 2
  block = 2;
  byte buffer2[18];
  size = sizeof(buffer2);
  if (!authenticateAndRead(block, buffer2, size, key)) return;

  // Combine both buffers into one string
  char context_uri[64];  // 32 + null terminator
  for (int i = 0; i < 16; i++) {
    context_uri[i] = (char)buffer1[i];
    context_uri[i + 16] = (char)buffer2[i];
  }
  context_uri[32] = '\0';  // null terminator

  // Trim trailing spaces
  for (int i = 31; i >= 0; i--) {
    if (context_uri[i] == ' ') {
      context_uri[i] = '\0';
    } else {
      break;
    }
  }
  char final_uri[80];
  snprintf(final_uri, sizeof(final_uri), "spotify:%s", context_uri);  //concatenating 'spotify:playlist:'+'context_uri' into 'final_uri'

  Serial.print(F("Context URI: "));
  Serial.println(final_uri);

  response resp = sp.start_resume_playback(final_uri, 0, 0, nullptr);  //send the put message to play the final_uri

  if (resp.status_code == 204 || resp.status_code == 200) {
    Serial.println(F("Playback started successfully!"));
    analogWrite(motor, 30);
  } else {
    Serial.print(F("Failed to start playback. HTTP code: "));
    Serial.println(resp.status_code);
  }
  // Serial.print(F("Playlist ID: "));
  // Serial.println(context_uri);
}

bool authenticateAndRead(byte block, byte* buffer, byte& size, MFRC522::MIFARE_Key& key) {
  MFRC522::StatusCode status;

  status = mfrc522.PCD_Authenticate(MFRC522::PICC_CMD_MF_AUTH_KEY_A, block, &key, &(mfrc522.uid));
  if (status != MFRC522::STATUS_OK) {
    Serial.print(F("Authentication failed for block "));
    Serial.print(block);
    Serial.print(F(": "));
    Serial.println(mfrc522.GetStatusCodeName(status));
    return false;
  }

  status = mfrc522.MIFARE_Read(block, buffer, &size);
  if (status != MFRC522::STATUS_OK) {
    Serial.print(F("Read failed for block "));
    Serial.print(block);
    Serial.print(F(": "));
    Serial.println(mfrc522.GetStatusCodeName(status));
    return false;
  }

  return true;
}
Bluetooth Board
The Bluetooth speaker board code focuses on:
- Bluetooth A2DP Audio Streaming
- I2S DAC Control
#include "AudioTools.h"
#include "BluetoothA2DPSink.h"

I2SStream i2s;
BluetoothA2DPSink a2dp_sink(i2s);

void setup() {
  auto cfg = i2s.defaultConfig();
  cfg.pin_bck = 27;
  cfg.pin_ws = 12;
  cfg.pin_data = 14;
  i2s.begin(cfg);

  a2dp_sink.start("Symphoni");
}

void loop() {
}
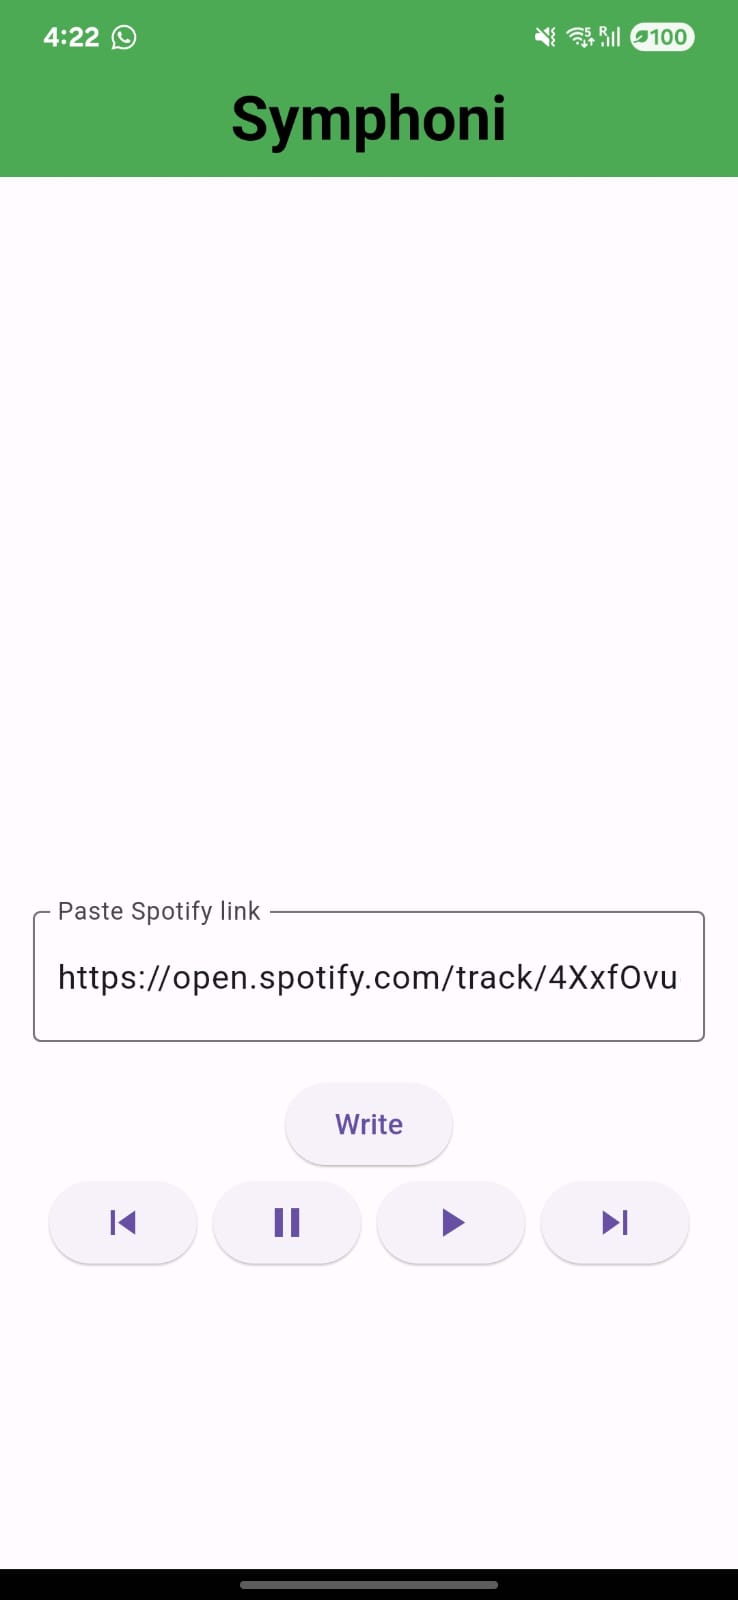
Symphoni Companion App
The Symphoni Companion App is developed using Flutter in Android Studio. The app allows users to communicate to the Main Board using HTTP POST Requests and receive responses.
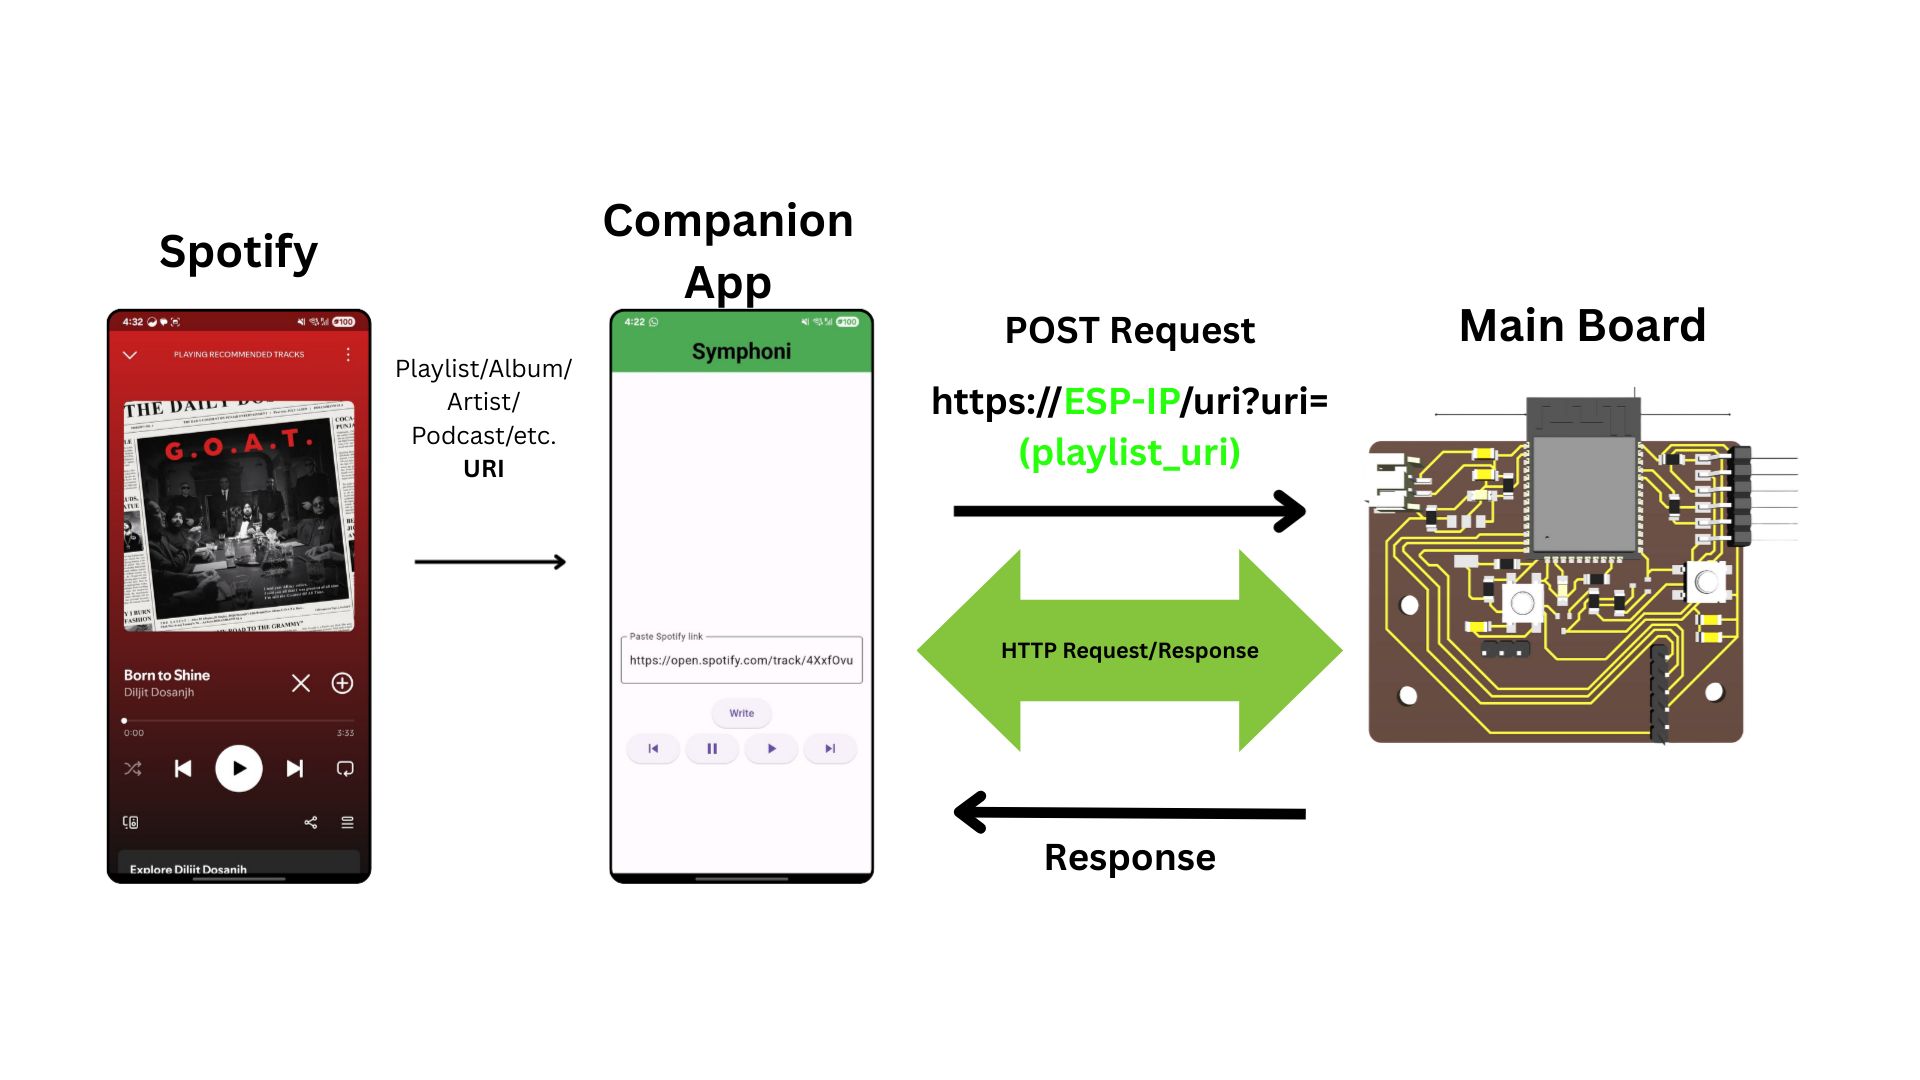
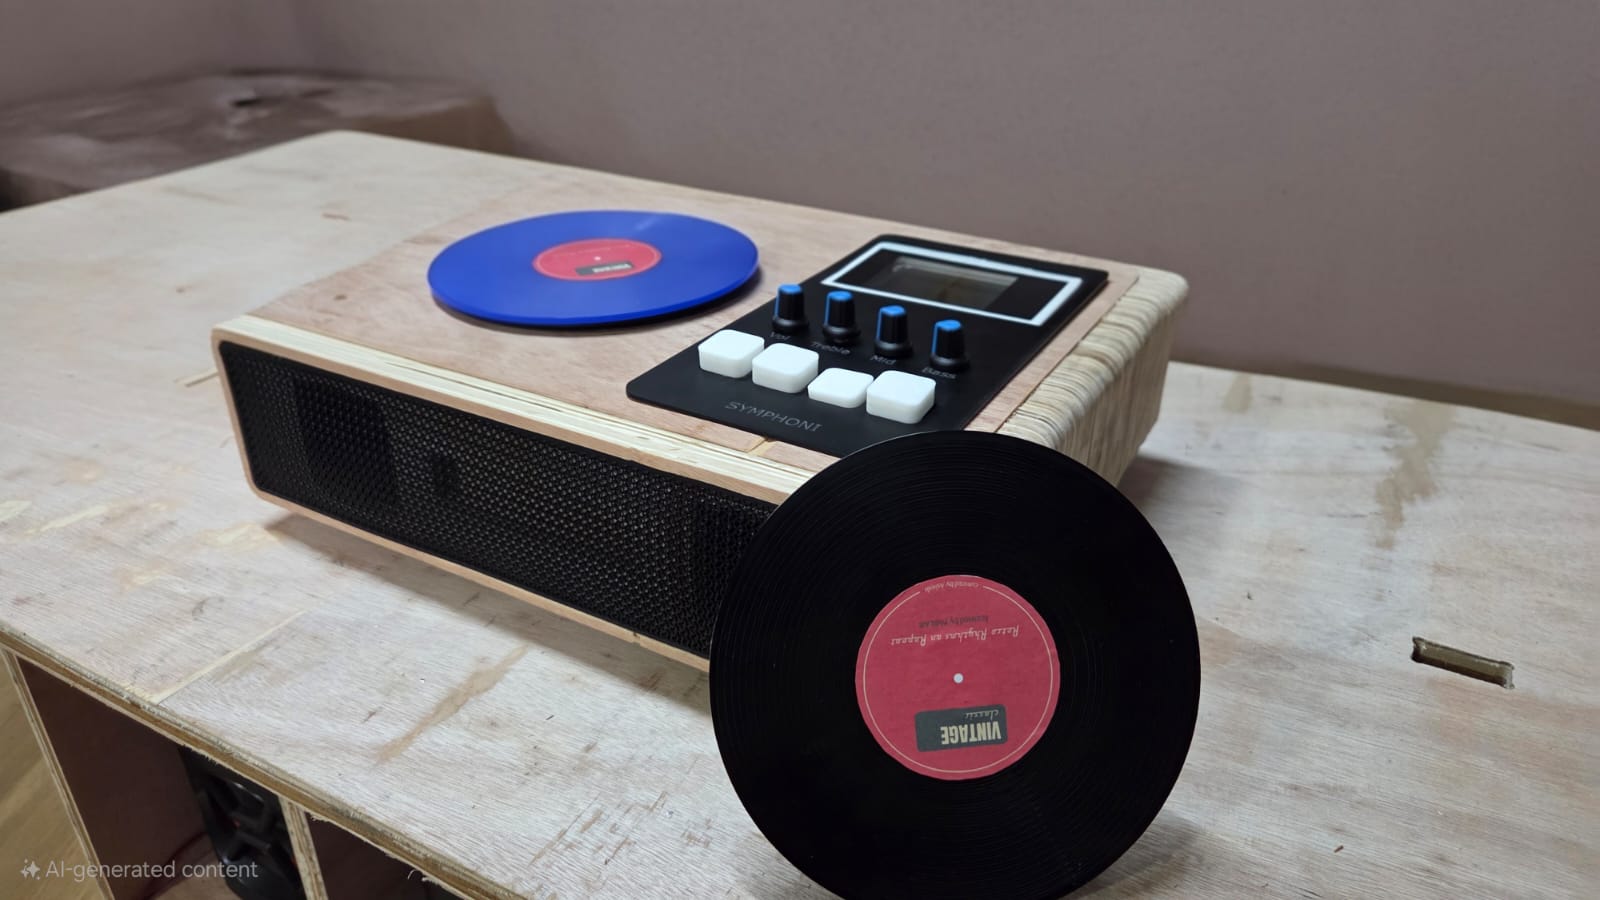
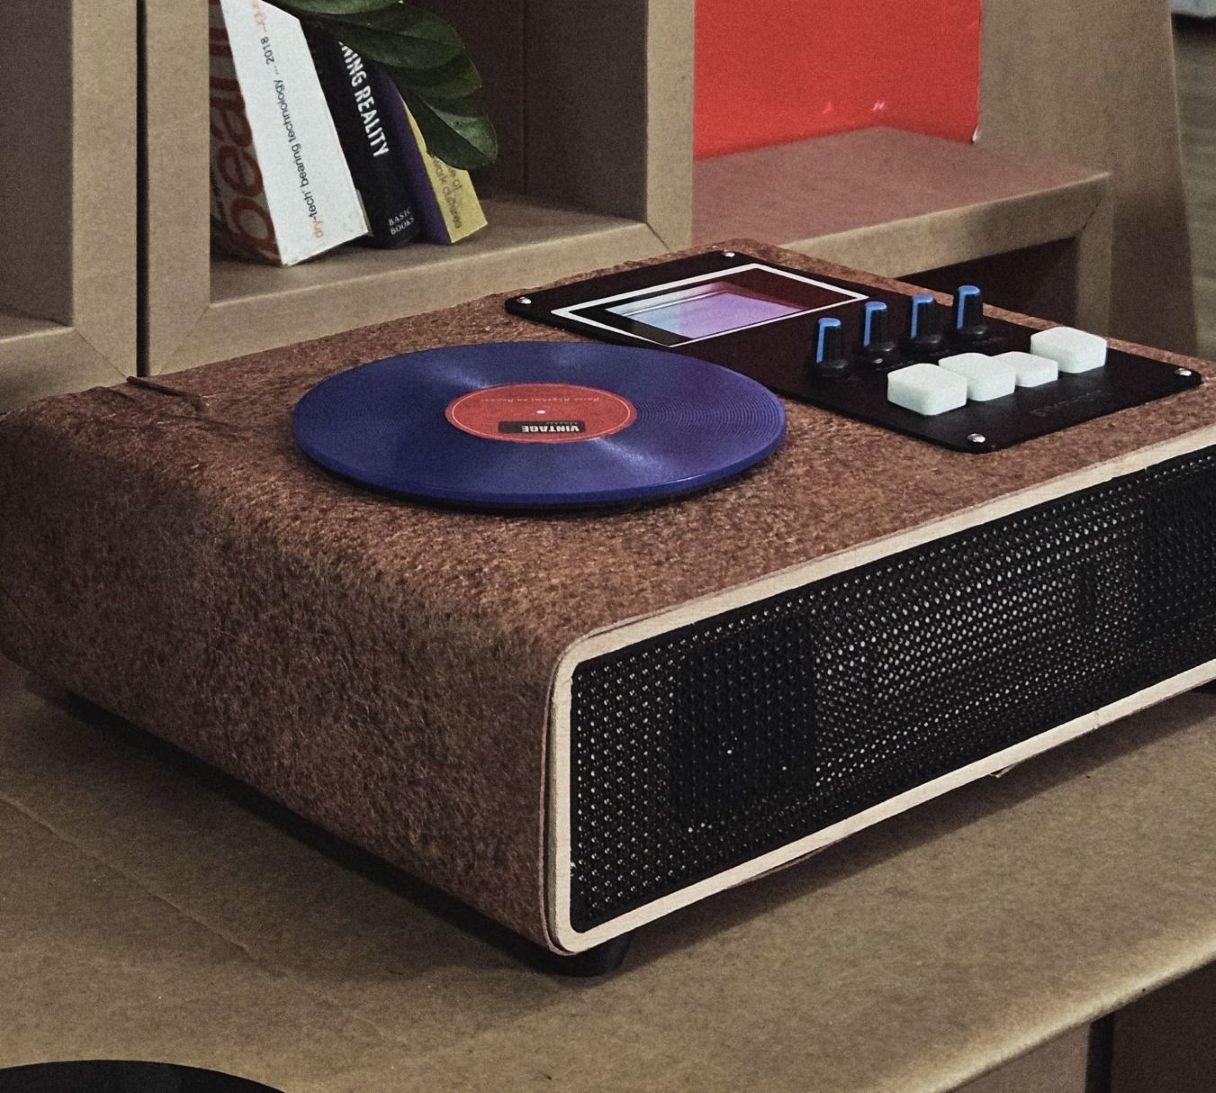
Final Result
