1. Project management
This week, I began and finished the steps for setting up my website. This consisted of installing git, python, mkdocs, vs code, setting up my ssh key, and cloning my repository on gitlab.
What is Git/Gitlab?
First, what is Git/Gitlab? Well, Git itself is one of the most widely used version control systems in the world. Because it is a distributed version control system (DVCS), Git keeps a local copy of a user’s entire repository (repo) and can track its history and versions. It also allows users to synchronize changes between “cloned” repos, which is one of the features that will be most important for Fab Academy students.
On the other hand, GitLab is a tool that hosts many Git repositories inside of it. GitLab is essentially a tool that you use to access your git repositories. So, while Git is a version control system, GitLab is a manager for those Git repositories, making them easier to access and modify.
I will explain later on how to create websites using GitLab, but the most important things for this purpose are the git add, git commit, and git push commands.
What is MkDocs?
MkDocs is a tool geared to enhance project documentation. It is mostly programmed in Python, and has no direct relation to Git/GitLab. However, it is esentially an addon that makes documentation faster and more user-friendly. GitLab has first-party support for MkDocs sites, which makes it very easy to deploy these sites for Fab documentation.
Generating my SSH key
The first thing I did was install and setup git. This was pretty easy as all I had to after installing it was enter my username and email address. After setting this up, I generated my ssh key and pasted it into gitlab. The command I used to do this is shown below:
ssh-keygen -t rsa -C “your_email”
After this, I used the following command to see and copy my ssh key:
cat ~/.ssh/id_rsa.pub
Now that I had copied my public key, I went to my account in gitlab, clicked on the tab named ‘SSH keys’, and pasted it in. This made sure that the information on my local computer could be linked to the online server for any future changes I needed to push.
Important: SSH key pairs are necessary in order to ensure secure connections between the client and the server. Every user receives their own unique SSH key, so one user cannot access another user’s repositories using their own SSH key.
Cloning the Repository
Now that I was done setting up my ssh key, I had to clone my repository, and this is where I encountered my first issue. At this time, I was following Adrian Torres’ Documentation, where I saw this line of code:
git clone git@gitlab.fabcloud.org:academany/fabacademy/2020/labs/leon/students/'file name'.git
Initially, I tried to paste this in my computer’s terminal and immediately run the code after replacing ‘file name’ with ‘ryan-zhou’, but this resulted in an error. After a while, I realized that I had forgotten to change “2020” and “leon” to “2024” and “charlotte”, respectively. After realizing this, I got the correct url by going to fabacademy.org, navigating to the 2024 page, and going to students, where I saw the correct url. I then pasted the git clone command with the correct url, and it worked!
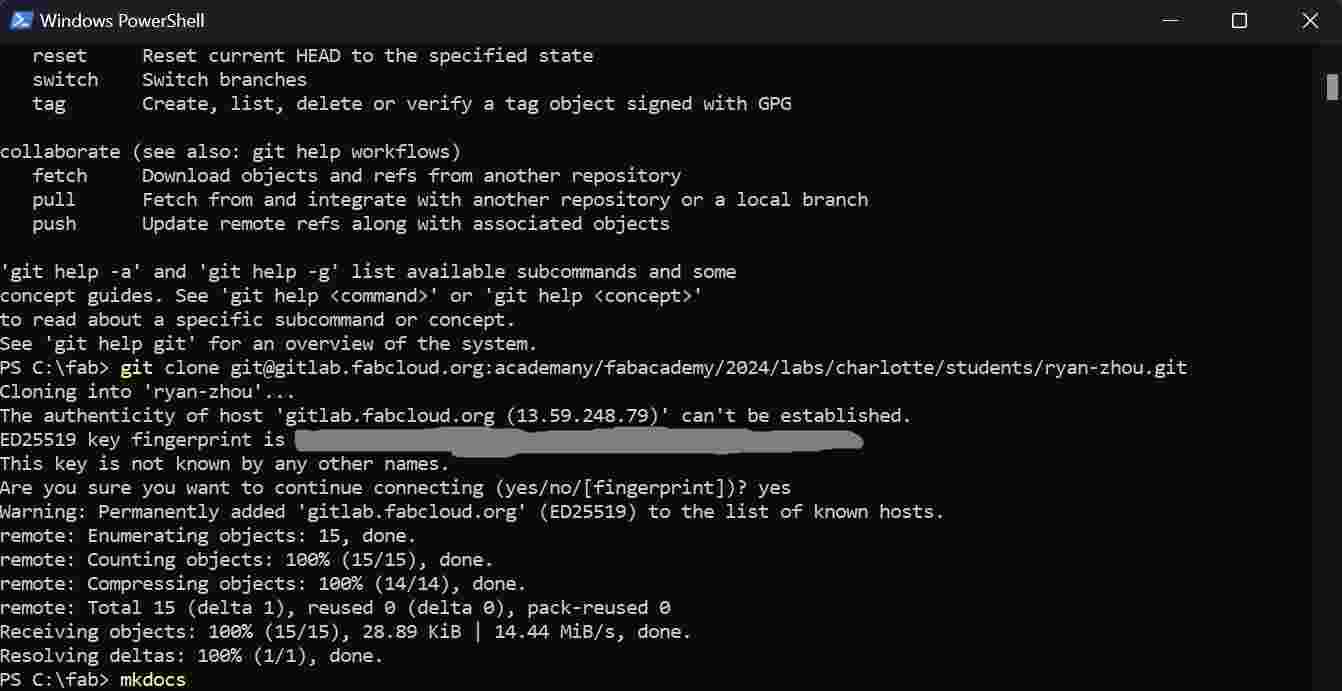
The image above shows the final step of cloning in my computer’s terminal.
Setting up mkdocs and Python
Now that my repository had been successfully cloned, I could setup python and mkdocs to actually begin editing my website. After first installing python, I ran the following command into my terminal to install mkdocs:
pip install mkdocs
Following this, I also installed Visual Studio Code (vs code) in order to open my .yml files. Now that I had mkdocs installed, I ran the following (very useful) lines of code which I found by following Griffin Orsinger’s documentation:
mkdocs new <Project-Name>

cd <Project-Name>

mkdocs serve
These 3 lines of code allowed me to create a new project in mkdocs. I then opened my file in vs code, which contained a very basic template for my website I also downloaded a file called ‘requirements.txt’ and created my first commit, which worked successfully with no issues.
Creating the website
Following this, I wanted to change the basic template I was provided with, so I downloaded a template which I got from Angelina Yang’s documentation and saved it as a zip file onto my computer. After unzipping it, I copied all of its contents into my file named ‘ryan-zhou’ (the same one I had in vs code) and expected to see its contents successfully integrated. Unfortunately, after this didn’t work, I realized I had made a mistake. After searching for a while, I finally realized that I had skipped the following line of code when installing mkdocs:
pip install mkdocs-material
Because of this, I was unable to use the template I had downloaded. After fixing this by running the code in my computer’s terminal, I successfully opened the template and its contents in vs code.
Modifying mkdocs.yml
In order to use the template that I had downloaded, I had to open mkdocs.yml and change the contents of the file. The picture below shows what the file looked like after I changed it.
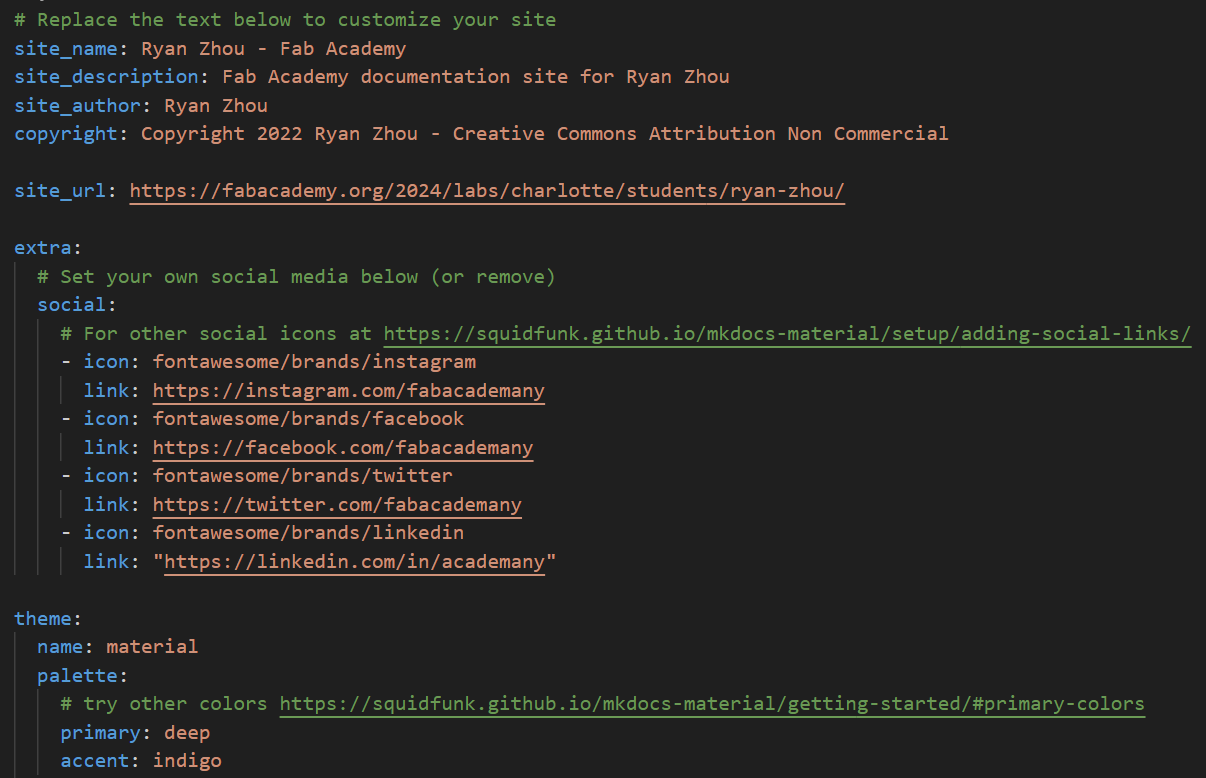
As you can see, I first manually changed the text under “site_name”, “site_description”, “site_author”, and “copyright” to contain my own name. Then, under “theme” (near the bottom of the screenshot), I changed the text in the “name” category to “material”, which is why I did “pip install mkdocs-material” previously. This is how I got the new theme to show up on my website.
Modifying gitlab-ci.yml
I also had to slightly modify .gitlab-ci.yml, as shown in the image below.
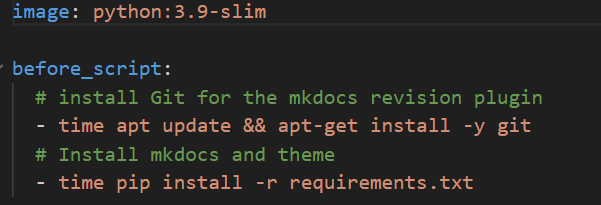
As you can see, I had to change the text under the green comments so that my website would work.
Git add, commit, and push
With my newly downloaded template, I now wanted to create my second commit and push the changes to my website. In order to do this, I used the following code:
git add .

git commit -m "<custom message for commit>"

git push
For a quick explanation:
- git add .: Adds your newly saved files to the queue so that they are ready to be committed. If you only enter this command without committing, then nothing will change on your website. If you want, you can replace “.” (which adds all files) with “file_name”, where file_name is the relative link of one file that you want to add.
- git commit -m “message”: This commits your changes to the git repository. Again, nothing will change on your website visually after this step, but changes will be sent to the git repo through a pipeline.
- git push: Once you commit, you can then push your changes. Once the push goes through, your website will be visually changed.
However, after entering these commands, I received an error message stating that the file ‘docs’ was not found and that the commit could not go through. Luckily, fixing this error wasn’t too difficult as it was fixed by simply renaming the ‘public’ file from my downloaded template to ‘docs’.
Now that this issue was fixed, I tried to make another commit. This time, however, I encountered another error:
ssh: Could not resolve hostname gitlab.fabcloud.org: Name or service not known
fatal: Could not read from remote repository.

Please make sure you have the correct access rights and the repository exists.
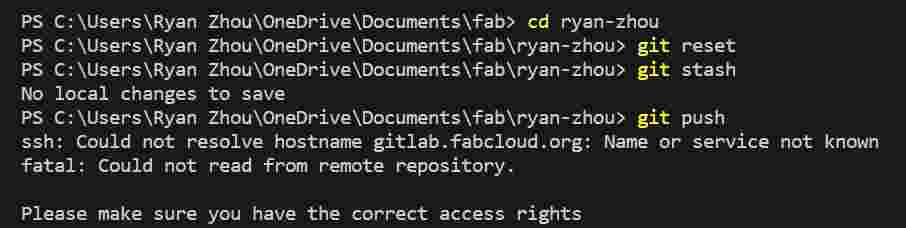
At first, I was very confused by this message because I had already cloned my repository using my ssh key. However, after asking one of my classmates, Angelina Yang, I decided to just make another ssh key and replace the old one. This wasn’t too difficult, and, after doing this and adding the new ssh key onto my account in gitlab, I was finally able to use the ‘git commit’ and ‘git push’ commands to add my new changes onto my website.
How to use Markdown
While I was trying to document, I had a few struggles trying to do things such as adding links (and adding videos), but they weren’t too difficult after I learned how to add them. Because of this, I will add a few tips for how to add images, links, and videos here.
- Adding images:
To add an image, you should follow the template below.

The text “insert-directory-here” should be replaced by the location of the file you are trying to add relative to the “docs” folder. This is because you start in the docs folder, so you have to navigate to the folder you are trying to add files from. For example, if I wanted to add a file from the “week01” folder, I would use the following:

The week01 file I have is contained another folder, “images”, so I have to first put “/images” before adding “/week01” and “/file_name.jpg”.
- Adding links
Adding a link is very similar to adding an image; all you have to do is follow the template below.
[text](insert link here)
An example how to implement this is shown below.
If you want to add a [link](insert link here), just do this
When someone accesses your website, the word in brackets will be highlighted in blue, and when someone clicks on it, they will be redirected to to the link in the parentheses.
- Adding videos
For me, adding videos was much more complicated at first than adding images or links, so I have first attached a template below before explaining further.
<video width="insert_width_here" height ="insert_height_here" controls>
    <source src="../../insert_video_here.mp4" type="video/mp4">
</video>
This is the format that I used to add videos in my documentation, and I am sure there is an easier way, but this is the first way that I discovered and it worked well for me. For more information on how to add videos, you can check out this website.
The important thing to note when adding videos this way is that you have to replace the placeholder text of “insert_width_here”, “insert_height_here”, and “insert_video_here” with your own configurations. Also, the video will only show up if you have “../../” before the relative file link for your video. If you only do “../”, the video will not appear.
Reflection
Overall, I feel like this week went pretty smoothly. Other than a few minor errors along the way when trying to create my website, the setup went well. The only major problems I encountered were when I tried to import a theme folder into mkdocs and when I tried to push my vs code changes for the first time. I want to thank Adrian Torres, Griffin Orsinger, and Angelina Yang for their extremely helpful documentation, as I would not have been able to create my website without them.