6. 3D Scanning and printing
This week was learning and doing couple of things:
-
Printing on the 3D printer, an object ~ additively. Meaning something
-
Taking an object from around the house and 3D scanning using software and having the option to print it or not.
Printing a custom made piece on the 3D printer
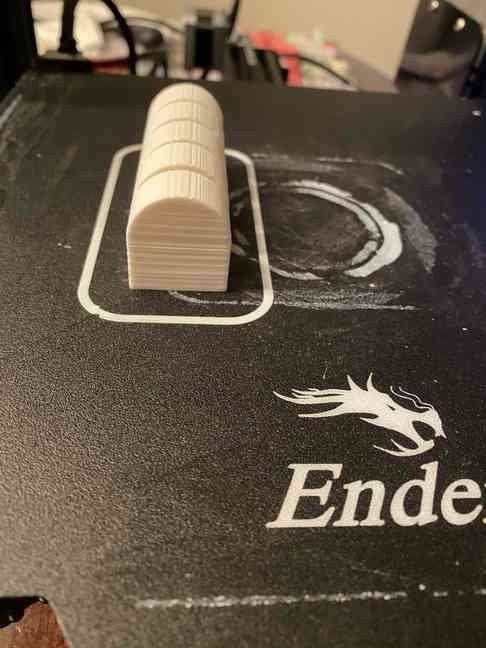
When I was pondering what to make for this portion of the assignment, my friend Nidhie happened to be in my office chatting about something random. Seeing my wooden whale watch on my desk, she made a passing comment that I should try and make a 3D hinge for it. I was quick to dismissed it because I didn’t see the need to spend time on something that I had already created [out of wood] and thought I should make something completely different. Also, when I hear the word “hinge,” I see a door hinge and know there is folks who have recreated door hinges. Eh. The funny thing is, I ended up creating this 3D whale watch hinge. (Thank you Nidhie.) See the picture:

See, not an ordinary door hinge.
I started this creation by watching 3D box by 3D Hobbee however got stuck. I was missing something critcal so the box and hinge was not working AND also it really was not turning into what I wanted within my mind. So after three hours of unsuccessfully tinkering with Fusion 360, (remember, I am a newbie) I hit pause and went to bed. At 5am I awoke, inspired to returned to the computer to create the following design. However while it met the design I had in mind, I could not quite get it to function. I spent most of the day teaching however when I had moments I would tinker and thought I was trying everything. Slight modifications here and there, pulling out the pieces I wanted to be able to rotate on the pin and make a hole large enough for them to spin however upon reinsertion the alignment of everything wasn’t working. That evening in the Fab Lab waiting for a moment to speak to Dr. Harris, I showed Tom what my challenge was. His solution was spot on, simple and exactly what I needed. In Fusion 360 there is a functionality of they eye ball seeing vs. the eye ball closed. So if I closed the parts that I did not want visable, I could easily do the work I wanted. When completed, make the parts visable again and all would be perfect. It was a success!! I was able to go home, upload the design to CURA and print the design. You can see from the YouTube video and pictures, it was a success.
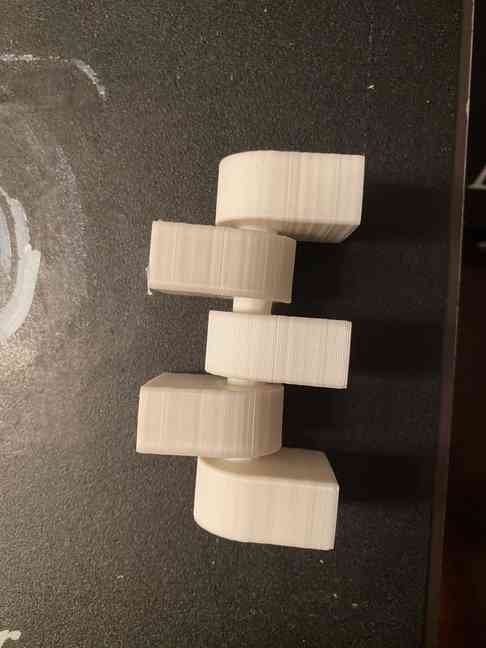
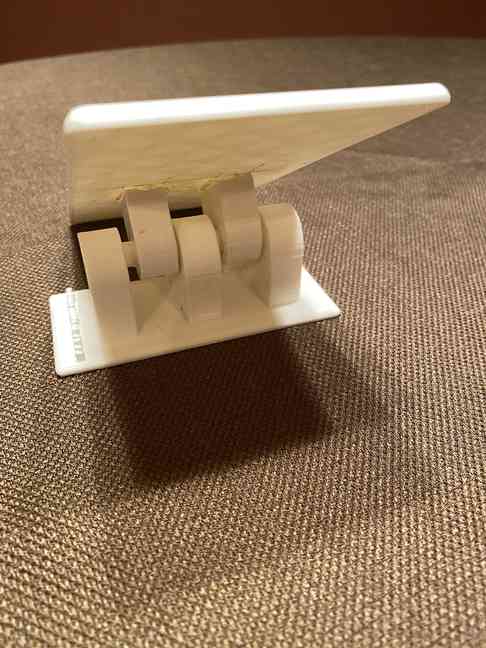
However, I couldn’t stop there. I decided to take the hinge, further modify it, and in turn create a “mini-er” version of the already made mini wooden Whale Watch I created during Week 3 & Week 4. I excruded three of the non moving parts to make them a tad longer and added them to a base plate. On the base plate I added the words, excruded those words: Whale Watch and SDMOULTON 2022 however when I sent it to Cura I had to shrink the plate down the the words did not come out well. Drat.
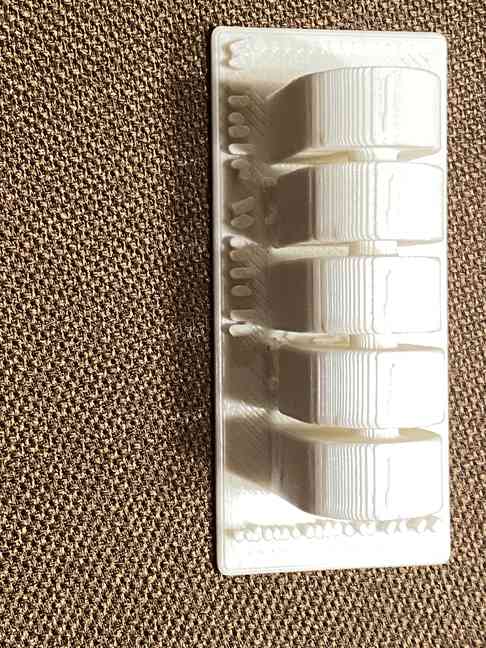
Also, to knote, when I printed the hinge, the shorter movable parts had to be printed with supports and with the aid of screw drivers I was able to pop those out those supports.

I printed the tipping plate seperately and hot glued it to the the two moving parts. This now creating, the “mini-er” version of the mini whale watch.
Scanning an Image into 3D - Photogrammetry Style
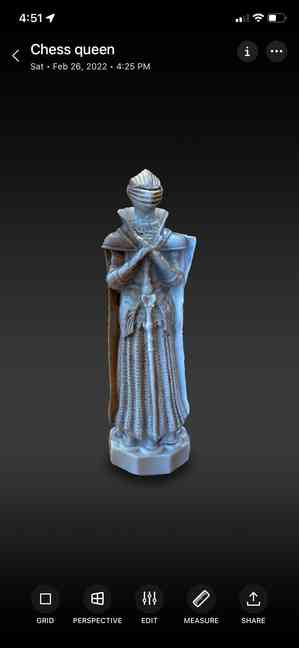
Attending the Saturday help session, I learned new iPhones could scan images into 3D print with already loaded software called Photogrammetry. However my phone is NOT a new model. So exploring the App Store I found several apps available to try and went with ScandyPro and Metascan to try. The others only had two or three people that have downloaded it and that’s not enough for me to go that direction and try yet. More people have downloaded ScandyPro however to me it was not as intuitive and easy to understand as I would like. So I tried Metascan and felt right away that I could start the 3D process without much trouble. Metascan is user friendly enough that my 10 year old son was able to figure it out enjoy testing out the app after me. The one drawback I discovered to the program was, in order to send it out as an STL file or a readable file for Fusion 360 or a 3D printer you have to pay a $7 a month fee AFTER a seven day free trial. The first object I chose was a chess piece of a queen since Zachary and I play a lot of Chess and sometimes one of us earns a spare queen.

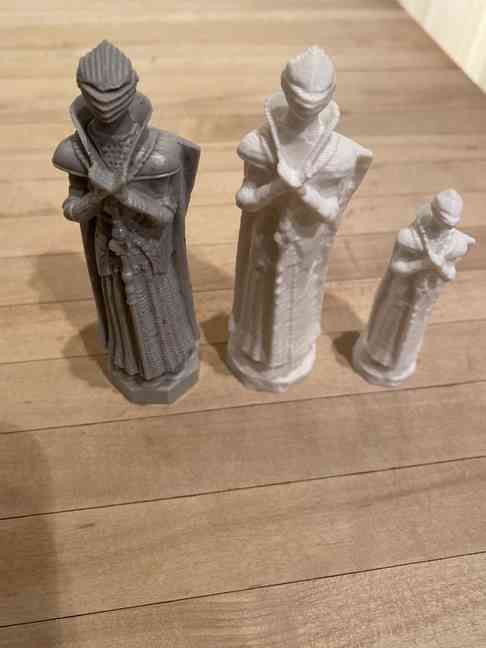
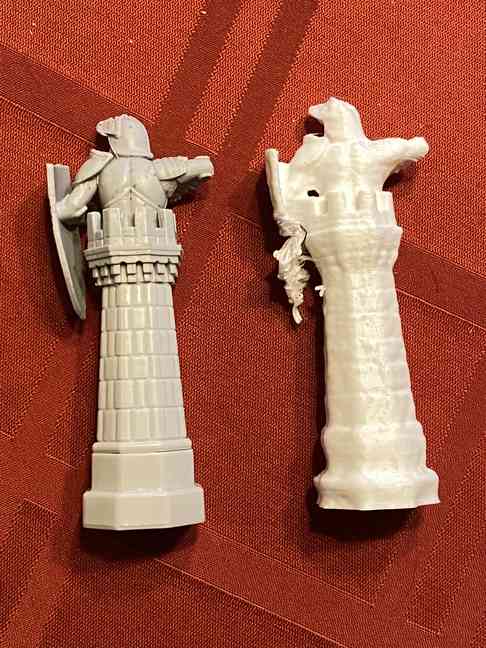
My son and I had fun of trying to make a rook. The rook on the left was the actual game piece and the rook on the right was the 3D printed version.
Below lists the process that I went through with the Metascan 3D program to Fusion 360 to Cura to Print.
| Process to scan an image into 3D & print | Notes | |
|---|---|---|
| 1. | Open Metascan App | |
| 2. | Have a chosen object to take pictures of. | I chose to scan two chess pieces, a Queen and a Rook |
| 3. | Take Pictures minimum of 20 photos. More gets better results. Warnings kept popping up suggesting I had not taken enough pictures however the “free version” only offers so many pictures so I was trying to share that free portion between the two chess pieces. | Really need to have a plain background AND consistant bright lighting. Next time I will use a “Lazy Susan,” a kitchen table top turner. (thanks Nidhie for the idea) |
| 4. | Click Done | |
| 5. | Detail: Preview or Reduced or Medium or Full | not sure what to expect so I chose medium |
| 6. | Object Masking: On | As best as I can determine, this gets rid of backgrounds automaticly |
| 7. | Click Process | Proceeds to upload and takes about one minute with 56 pictures. Must leave app open. Then it proceeds to actually process the pictures and this takes several minutes |
| 8. | Scan Processed | click continue |
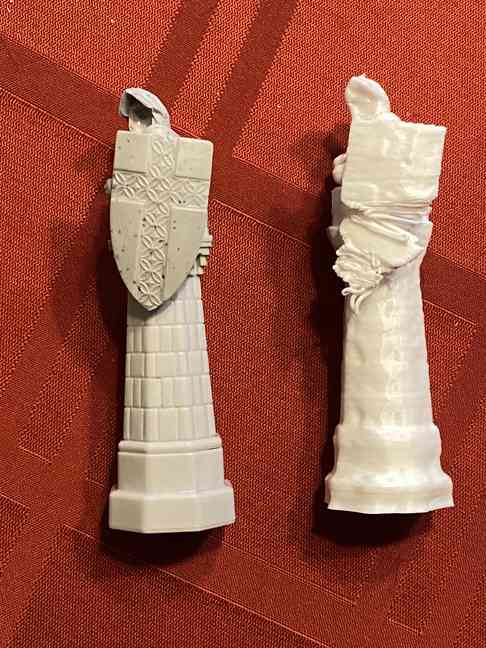
| 9. | Preview 3D image | if you don’t like image, to go three waffle dots and hit reprocess. Had to do this for the Rook and 2nd process came out better. |
| 10. | Like it? Click Share | |
| 11. | Save as an STL file for Fusion 360 | |
| 12. | I chose to AirDrop it to the school MAC to the desktop | |
| 12A. | Should be opened up in MeshLab and cleaned up | struggled with this |
| 13. | Open Fusion 360 | |
| 14. | Open File in Fusion 360 and select file name from desktop | |
| 15. | Image comes out…funky. | I could not seem to modify the image at all in Fusion 360 |
| 16. | Go to File, scroll down to Export and Export as a STL file | |
| 17. | Go to Cura and open file | This is where I ran into the BIGGEST issue to deal with during this process. The image is WAY so large to fit the “print box” of Cura. It was as if it was a Macy’s Day parade float needing to fit into a Volkswagon bug. |
| 18. | Clicked on the image and used tool bar on left to resize the image. I would have to down size it to be within 7% -10% of what the image was prior to me shrinking it. | |
| 19. | Slice it | |
| 20. | Save it to removable drive | |
| 16. | Insert removable drive into printer and print | |
| 16. | Both of the chess pieces were printed using the 0.8mm nozzle so detail was’t as rich as it could have been. Both pieces looked like they could have been excellent in detail however was some how melted by a heat gun a bit. |
| Learning moments about 3D Scanning | ||
|---|---|---|
| 1. | Take a LOT of pictures | |
| 2. | Take a LOT of pictures | |
| 3. | Take a LOT of pictures | |
| 4. | HINT: The more pictures taken the better | |
| 5. | Eliminate backgrounds as much as possible | solid color helps |
| 1. | Keep camera still and move object in slow twists | |
| 1. | Human heads don’t come out well. |
There is a process for cleaning and repairing the scan by using MeshLab or some other application. I downloaded MeshLab and really need to spend time exploring how to manipulate the queen figure. Made multiple attempts to resize and did not meet success. The program is not meant for a beginner in mind. My opinion so I am a bit at lost. Did watch several YouTube videos however did not get the assistance I needed to perform what I was seeking. Figured I could resize in Fusion 360 but that also did not meet success. I was able to resize in the Cura programing and that’ll have to do for now.
Using the below page as a place holder for our group work. Possible slight issue between the Latin students group page and the Adults group page.
Ender Pro 3D Printer Online Manual
| Ender Pro 3D Printer | |
|---|---|
| Click here for the Online Manual |
| Ender Pro 3D Printer | Notes | |
|---|---|---|
| Nozzle Sizes that came with printer | Note the differences from nozzle size .02 to .08 and know there is a progression or degression of using the nozzle sizes in between those two sizes. | |
| .02? | unmarked | ~ Use for detail ~ layering not obvious ~ slower to print ~ ultra easy to clog nozzle ~ machine will have harder time pushing melta PLA through smaller diameter hole ~ print will be weaker due to thin print |
| .03 | ||
| .04 | Two of this size came with printer. One is already installed. | |
| .05 | ||
| .06 | ||
| .08 | ~ print will be completed faster ~ stronger due to thickness ~ very noticable layering, like a sample / draft print ~ not easy to clog ~ extruder needs to be VERY hot to push out the amount of PLA coming out of nozzle | |
| If missing text or text did not come out well in the printing when using Cura program - enable “use thin wall” setting | The three print test for the Ender - this setting was not on. (Whoops) |
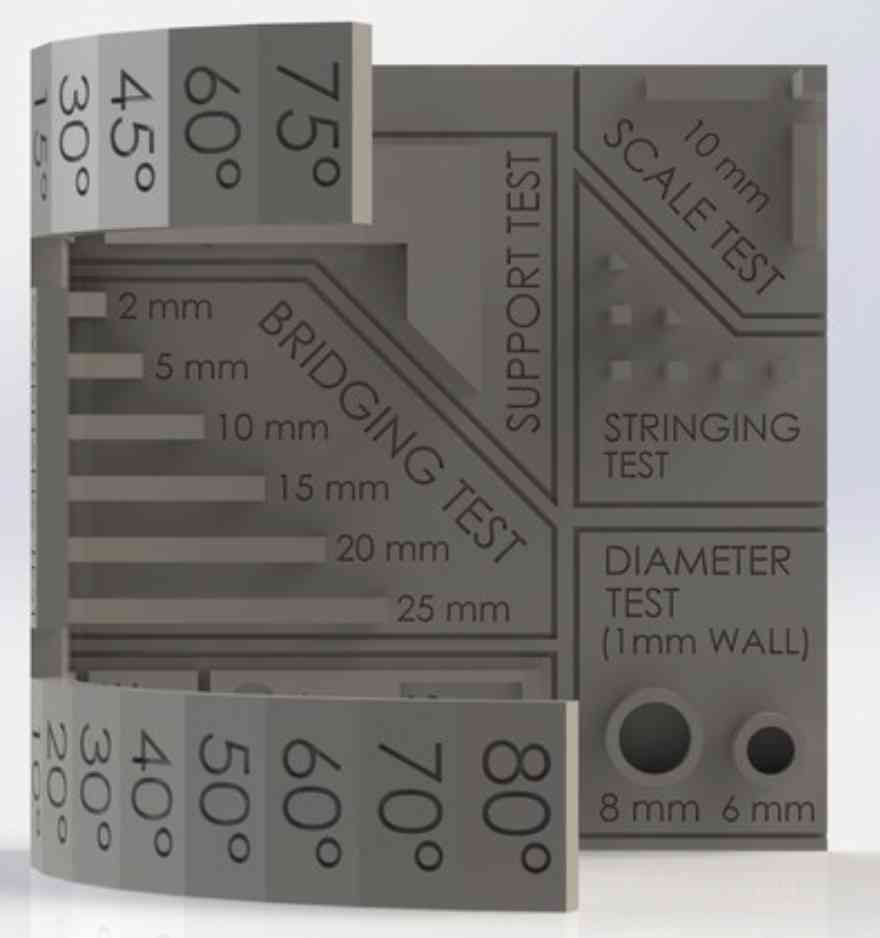
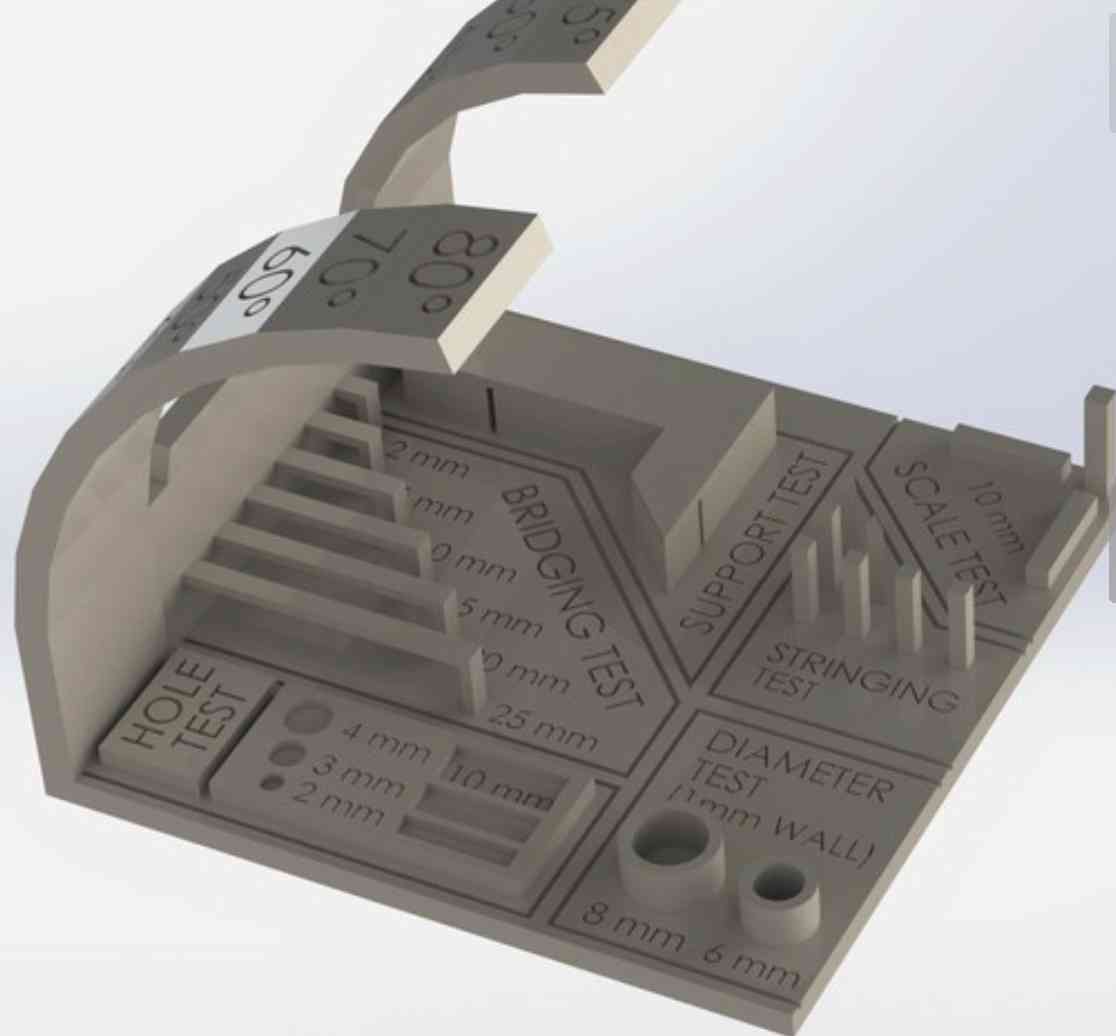
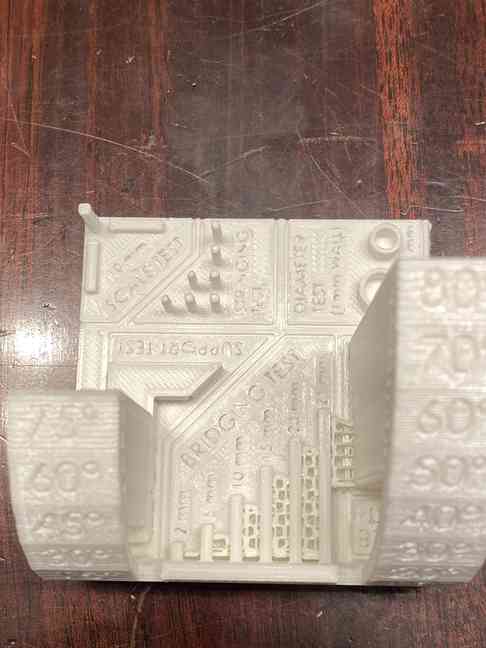
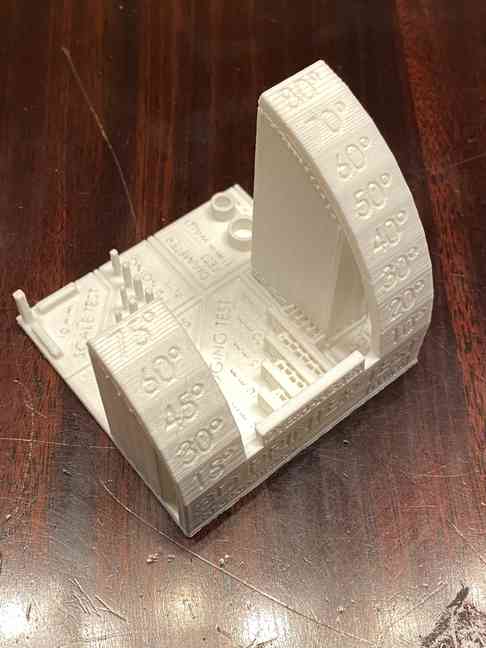
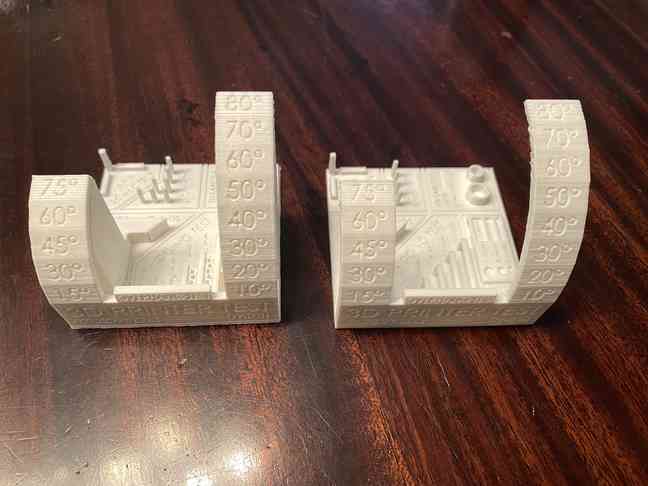
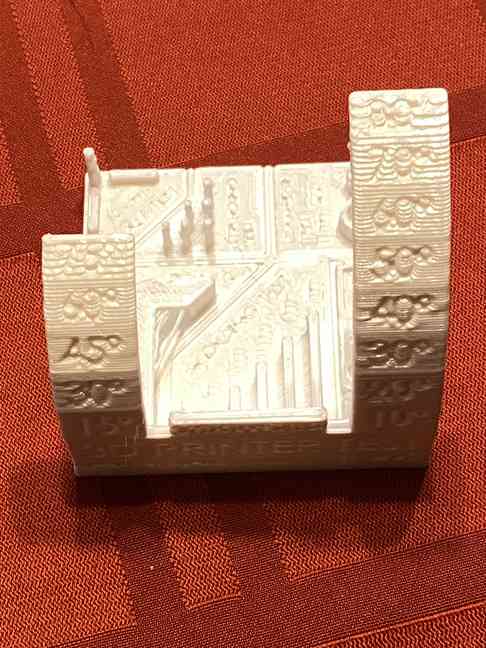
Ender Pro 3D Printer ~ Test Prints
MINI All In One 3D printer test by majda107 February 25, 2018
Click here to see 3D print test from Thingiverse
The following three pictures are majda107 pictures from his project so I can offer a comparison of what the Ender Pro 3D printers are doing in comparison.

| Nozzle Size | Time to Print | Notes | |
|---|---|---|---|
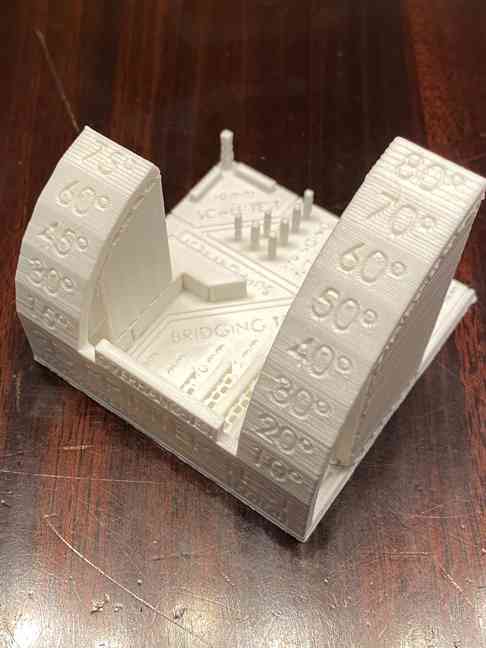
| 1. | 0.4 with support settings on | 5 hours and 51 minutes | ~ Successful Print ~ Degree markers legible ~ overhang successful (because of printed support on) ~ not easy to remove printed support ~ hole test undetermined because printed support covering |
| 2. | 0.4 support settings off | 3 hours and 50 minutes | ~ Successful Print ~ Degree markers legible ~ overhang successful ~ overhang - a little more noticable layering because overhang was flexing as printer was printing on it ~ underneath overhang obvious “stringy” starting to occur ~ hole test avail to see because of no printed supports |
| 3. | 0.8 support settings off | 1 hour and 40 minutes | ~ Successful Print ~ Layering obvious ~ not as fine detail is obvious ~ overhang successful however start losing legibility of degree markers after 60 degrees ~ Overhang laying much more noticable ~ underneath overhang obvious “stringy” starting to occur sooner vs. the 0.4 nozzle tests ~ reading print on base plate, not possible |
| Goof # 1 | All three prints the uprights for the string test printed fine. My phat fingers broke two off by accident on the first print. The second print I was curious was it a fluke that the first one broke off so easily and it was not. Since I broke the uprights for the first two test prints, on the third I was curious and thinking the upright would be stronger since it came from a bigger nozzle....nope. | ||
| Goof # 2 | Text did not come out well in the printing. Possible fault and fix for future ~ when using Cura program - enable “use thin wall” setting which may not have been turned on |
Insert Pictures using .04 with printed support:
Insert Pictures using .04 without support:
Insert Pictures using .08, biggest nozzle that came with the printers and without support:

Workflow(s) for Ender Pro 3 - 3D Printer
| Prepping a COLD Ender Pro 3D Printer | Notes | |
|---|---|---|
| 1. | Look at Extruder Nozzle and scrape off any old waste | |
| 2. | Look at Print Plate and remove any old waste with scraper | |
| 3. | Put Print Plate back on its magnetic surface | |
| 4. | Use cloth or paper towel and clean plate using Rubbing Alcohol | |
| 5. | Plug in and turn on the machine. | The switch to turn on power is at the right side of the machine near where the power cord plugs into the machine |
| WORKFLOW | Ender Pro 3D Printer | Notes |
|---|---|---|
| 1. | Press in the round knob on Ender Pro control panel to see menu screen | |
| 2. | Turn knob and go to PREPARE and press knob in to enter sub screen | |
| 3. | Turn knob and go downward to AUTO HOME and press knob in to enter the command. | This aligns the printing plate to start position and the extruder to go to the left corner of the plate. |
| 4. | Press round knob on Ender Pro control panel to see menu screen | |
| 5. | Turn knob and go to PREPARE and press knob in to enter sub screen | |
| 6. | Turn knob and go downward to PREHEAT PLA and press knob in to enter the next sub screen | |
| 7. | Turn knob and go to PREHEAT PLA and press in the knob. | This will cause both the extruder and printing plate to heat up. Both will get HOT!! After the system has warmed up and look at the extruder again and if any crud, wipe away with cloth. It STILL will be HOT! |
| 8. | Press round knob on Ender Pro control panel to see menu screen | |
| 9. | Turn knob and go to PREPARE and press knob in to enter sub screen | |
| 10. | Turn knob and go to DISABLE STEPPERS. | This allows you to move the printing plate and the extruder without doing damage to anything. (I think) The fans on the extruder may still be turning so be aware |
| 11. | Using a piece of paper, test the width between the printing plate and the extruder at all four points of the printing plate. | You will need to manually move the plate back and forth and the extruder side to side. The extruder will still be HOT!! |
| 12. | A piece copy machine paper or printer type of paper should be able to slip between the printing plate and the extruder tip without hard sticky friction and yet have the utmost ultra bare minimal friction to the point you would hardly notice any friction at all. | I have read where it was best to test the level of the printing plate and extruder while it’s HOT vs. at room temperature if in the event the printing plate thickness rises due to the heated bed… So far I have had to do this each time I am to make a print. |
| 13. | Press round knob on Ender Pro control panel to see menu screen | |
| 14. | Turn knob and go to PREPARE and press knob in to enter sub screen | |
| 15. | Turn knob and go downward to AUTO HOME (again) and press knob in to enter the command. | This aligns the printing plate back to start position and the extruder to go to the left corner of the plate. |
| 16. | Insert mini Microchip into the printer with electrodes face up. | |
| 17. | Press round knob on Ender Pro control panel to see menu screen | |
| 18. | Turn knob and go to PRINT FROM TF and press knob in to enter sub screen | |
| 19. | Select file to be printed and press knob in to enter that file into the system. | This may take several minutes as the [magical program] will determine the proper temperature of the extruder and the print bed THEN it will start printing. |