![]()
Guide
- Tests
- Casting
What questions need to be answered?
- Will the thickness of the silicone strap be robust enough/ feel good.
- Which of the different diameter ‘nipple’ fixings will fit and perform best at holding the strap ends together.
- Are the proportions of the strap (width, thickness etc) aesthetically pleasing and non-intrusive.
Tests
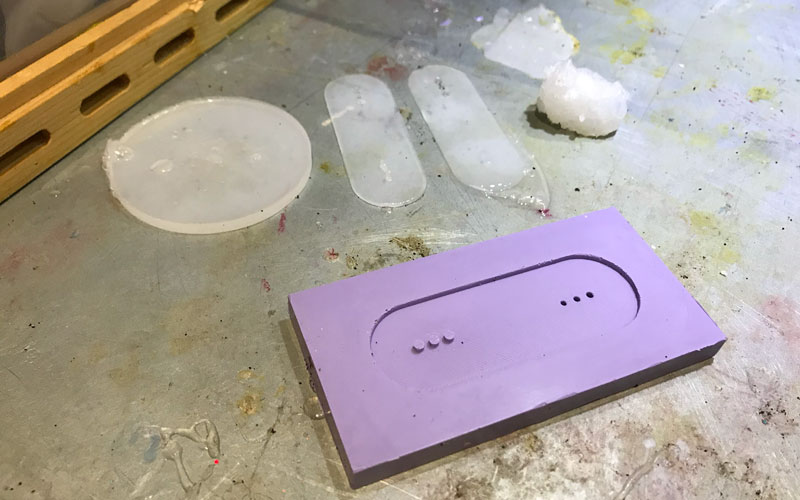
- Small silicone mould test
First of all i designed a small test to explore the aesthetics and performance of the material and overall design proportions. See CAD for more details on designing the parts.
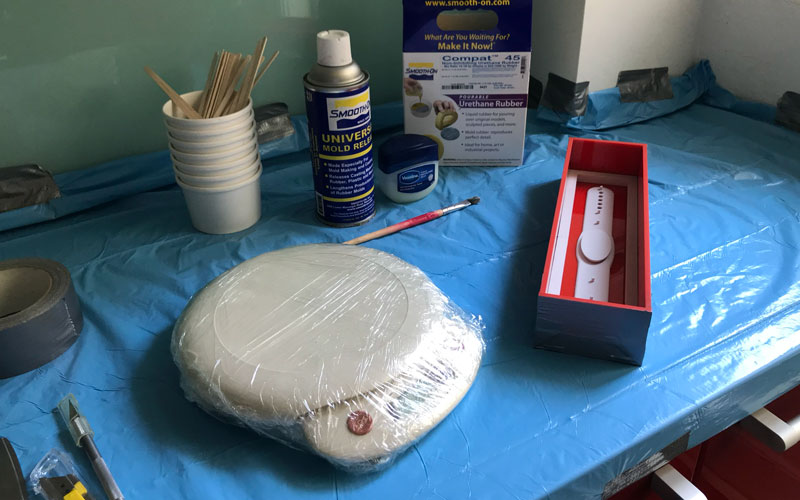
Sticking my 3D printed test piece to the bottom layer of the housing with double sided tape, i then created the ‘open’ box container for the casting silicone (OOMOO). Using duct tape to hold the sides together and block any gaps between the joints.
Measuring the length and width of the inside of the container, and the height of my test piece (plus 10mm for a good base after curing) i calculated the overall volume of material needed.
I mixed the components (1:1 by weight or volume) and stirred together until it was a consistent colour. And then gently poured a small amount into the container, pushing material into the corners, the holes and around the features with undercut. When i was satisfied i had released any trapped air bubbles i slowly poured in the rest and left it to cure.
Casting materials Test
First of all i designed a small test to explore the aesthetics and performance of the material and overall design proportions. See [CAD](../cad/ “CAD design) for more details on the design of the test piece.
From the tests I performed, my conclusions to the following questions were:
- Will the thickness of the silicone strap be robust enough/ feel good.
Ecoflex-30 was not a good choice. It was too flexible and didn’t ‘feel’ robust enough to the touch or when placed on the wrist. The 3 mm test thickness was ok as a thickness. For extra strength I changed the design thickness to 4 mm instead, this also made measurements for the two parts fo the mould more equal in values (less likely for me to get confused!).
- Which of the different diameter ‘nipple’ fixings will fit and perform best at holding the strap ends together.
The largest pairing of a 3mm hole and a 3.5 mm ‘nipple’ combination would work the best. However, the fact that in all tests the ‘nipple’ features struggled with structural strength, I decided to increase the diameter holes to 5 mm (and 5.5 mm diameter ‘nipple’) in the design to give it more of a chance to have more structural strength.
- Are the proportions of the strap (width, thickness etc) aesthetically pleasing and non-intrusive.
A 30 mm width and 4mm thickness looks and feels to be into the ‘Goldilocks’ zone - Not too small and not too big.
Materials choices
Since the tests didn’t go too well, I did some research on my own as well as taking a visit to the Special Effects shop that sells the materials for some advice. The conclusion of which is:
-
Silicones
Silicon rubbers come in 2 types. Tin or Platinum cure. These labels refer to the ingredient that is used to catalyse the material. Silicones will stick together if they are the same type, but will inhibit curing of each other if used together. Some casting materials will not cure properly in one type of silicone than the other. So its important to research this thoroughly each project.
- Dragon Skin™ platinum silicone
This silicone is skin friendly and used extensively for skin special effects prosthetic make up.
-
Urethane Rubber
This performs better as a flexible moulding material than a silicone material as it has more structural strength at a thinner thickness layer.
-
Releases
Different releases work best depending on what materials you are using. Choose the wrong one, and it can have the opposite effect that its meant to, or inhibit curing completely. ALWAYS check the data sheets!
- Universal Mould release
Even though it’s name has ‘Universal’ in it, it isn’t possible to use it all the time. IN this situation, it will be used mainly for sealing the PLA models when making the mould. Compat45 doesn’t really need a release layer when pouring onto a cured piece of mould (so I’m told), however to be safe, a layer of universal mould release will makes sure it doesn’t stick to each other.
- Mann Release 200
This specialised mould release is used when dealing with urethane rubber moulds and (platinum cured) silicone. Once the Compat45 urethane moulds are complete, this release will be a barrier between the Dragon Skin silicone.
Casting
- 1st Mould half (the bottom half, that will be the top)
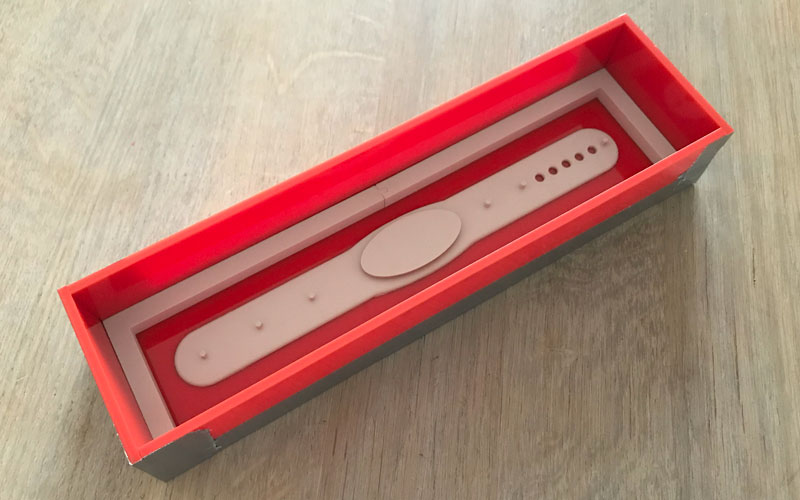
The design of this mould included several parts. The ‘bottom half’ of the bracelet model and core, this would make the seam line inconspicuous in the middle of the strap thickness. To add keys to the mould i placed a 10mm thick wall around the inside of the mould. This would make a step all around the 2nd half of the mould and allow me to place some back pressure on the top when it came to final casting. These pieces were stuck to the acrylic base with double sided tape fitted to their shape, so no material could pass underneath them.
To calculate the volume of Compat45 urethane i needed for the mould I did a crude calculation of the inside dimensions of the housing multiplied by the 1.5 times the height of the key wall I added. Crude as I wasn’t going to try and find a perfect number by finding the volume of the 3D printed walls and bottom half of the bracelet. A bit too much was safer than too little. This came out to about 4000 mm3, which converted into weight of material needed (at a ration of 85A:100B by weight) was 400 g.
I taped up the sides and any joints of the casting housing with duct tape, cleaning and degreasing the inside with a solvent. The urethane )I was told) didn’t really need a release agent when pouring onto the acrylic. Put for safety sake, I used some universal mould release to make sure it would.
The result of the first half pour turned out to be a bit more than expected. It had a good solid base and a nice thick step on which to key the 2nd half of the mould. However, it did cover up the breather holes (see issues below).
Dismantling the housing to remove the mould and 3D printed pieces after a night to cure, I discovered a very good result (if i don’t say so myself!). The key had worked, and the lip for fixing the core in place also worked very well. The pouring had left no trapped bubbles, just a serious piece of heavy shaped rubber!
Trimming any tiny bits of flashing from the mould, I cleaned and degreased the mould and housing ready for the next half of the mould to be poured.
- 2nd Mould half
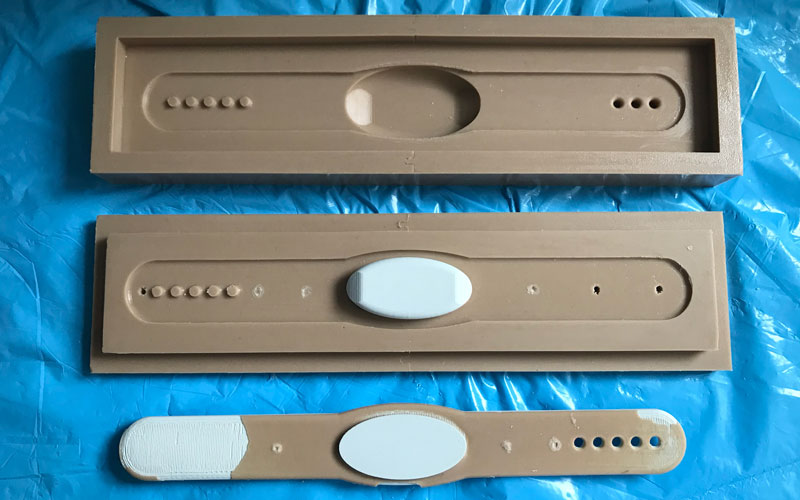
I turned the 1st mould half over to become the bottom, sticking to the acrylic base with double sided tape again. To minimise the chance of material making a mess underneath the 1st half mould. Again a layer of Universal mould release to ensure the urethane doesn’t stick to the older half mould (not really needed so I was advised, but I was conscious of Murphy’s law - at least for this part - see issues below).
I placed the 3D printed full model and combined core into the fixing on the 1st half mould. The flexibility of the urethane allowed a good fit and created a vacuum holding it in position. I used the same crude formula to calculate the amount of material needed to pour in the second time. The 1st half pour had more than enough material, so the value i expected to be in the same ‘ball park’, even though the height of the 3D printed model was higher. All was going well with the pouring, until i left it out to cure over night with a plastic bag to cover it (see below in issues). After the ritual of dismantling the mould housing, cleaning and degreasing everything, re-constructing the housing, sticking the 1st half of the mould to the acrylic and adding a release agent… (phew - a time consuming ritual, but one you have to do for each casting… pff) i was ready to pour again with a little extra material to make sure it worked (470 g at a ratio of 85A:100B by weight).
This pour and curing went better (see leakage below in issues), and after a bit of work to the second half mould (flashing and sprue etc), I had a well fitting 2 part mould that the 3D printed core would fit into and not touch the 2nd half of the mould. It was looking like this might actually succeed.
Dismantle, clean and degrease everything ready for the final casting after it had cured. (You get the picture).
- Final Casting
![]()
No need for the mould housing really this time. The two halves of the mould fit and flush together, with no movement between them thanks to the keying ‘step’ I had created. The 2nd half of the mould would be placed upside down (with the top of the bracelet cavity facing the bottom). This would allow the silicone material to reach the deepest parts of the mould, and the top half of the mould could squeeze the material around with some back pressure applied when placed on top.
This time, the mould release needed was Mann Release 200, specially formulated to be a barrier between urethanes and (platinum) silicones, without inhibiting the curing of the silicone. Not having time to make little tests with these material combination, I was putting all my trust in the advice of the people where I bought the materials from. A double layer of release just to be sure, with special attention to brush it on the PLA core and inside the bracelet fixing ‘nipple’ cavities.
Calculating the amount of Dragon Skin silicone needed to cast was more of an educated guess. Time was flying by (so much waiting for things to cure!), and I didn’t have a container big enough to fit the full 3D printed model and displace water and find out it’s volume. The moulds were already prepared to receive the silicone, so I couldn’t fill those with water to find the volume that way. So I multiplied the full length, breadth and thickness of the strap to get a rough estimate of about 50 g (at a ratio of 1A:1B by weight or volume).
Although the end result did give the light more diffusion when tested, the silicone should’ve been more consistently opaque than the material filled with minute bubbles. Lack of a vacuum vessel at home meant that I couldn’t de-gas the silicone when mixing the parts together.
When sufficiently mixed I pour a little into the bottom mould, spreading and pushing the material into the corners, edges and cavities. This would give the best chance of expelling any trapped air when I poured more material on top. A little more to fill cavities, and i paused to poke them with a paper clip to get rid of any trapped air and make sure they were full of silicone material only.
Slowly I filled the rest of the bottom mould up to its seam line. I did the same process to the top mould, even though it was only a shallow (2 mm) indentation with the core positioned in the middle, it was important to prepare the edges and the positives for the strap holes with silicone material. Air bubbles could get trapped on sharp edges.
Then the moment of truth, placing the two parts of the mould together and squashing from one side to another to allow any trapped air to move to the open end as much as possible. Adding some weights to the top of the squeezed mould, I could see some material coming out of the breather holes. So they were doing their job. I left it overnight to cure.
The first attempt wasn’t perfect, (see issues below for the first cast of dragon skin), some large air bubbles gave me cause for concern (they might have disappeared if the breather holes were open), so I decide to mix more material for the second pour (70 g).
Dismantle, clean, degrease, add release and everything is ready for another pour.
The second pour went exactly like the first, more material squeezed out of the breather holes (the re-opened ones too). So I was confident the result would be better (i also poked them with a paper clip just to make sure no air was getting trapped in the breather holes).
Add weights and wait (got to love the English language ;)).
The next morning I found a healthy amount of material had been pushed out of the breather holes, so that was a better sign than the first pour. Gingerly opening the top of the mould, i could see a better result lying in the bottom of the mould. I cut the main part of the material that had flowed into the breather hole to detach the top half of the mould (a sensation similar cutting umbilical cords). My Baby was free form the top half, I pulled the whole piece out and removed the core.
There was lots of flashing and sprue due to the extra material poured in the second casting. This needed a sharp pair of scissors to cut nicely through this flexible material. I placed he circuit and battery backing into the bracelet and it all fit together perfectly!! even the fixing held the bracelet together too!! :)
BOM
| PART | QTY | DESCRIPTION | COST |
|---|---|---|---|
| Compat™ 45 (0,9 kg) | 1 | urethane rubber which will not inhibit the cure of most Smooth-On platinum or tin cure silicone rubbers. It features a low viscosity for easy mixing and pouring and cures with minimal bubble entrapment. | € 28,20 |
| Dragon Skin™ 20 Series - Platinum Cure Silicone 30 (0,9 kg) | 1 | Dragon Skin® FX-Pro is a high quality, soft, stable platinum silicone rubber, specially designed for making silicone make-up devices and skin effects. | € 36,41 |
| Universal Mould release | 1 | Mould release between the urethane rubber mould parts and the PLA 3D printed model. | € 15,04 |
| MANN Release 200 | 1 | Mould release between the urethane rubber moulds (Compat45) and the Dragon Skin platinum silicone. | € 16,86 |
| TOTAL: | € 96,51 (ex) |
|---|
*A high initial startup cost, but through multiple castings with the same mould, the cost per unit would go down.
Disposables
| PART | DESCRIPTION |
|---|---|
| Mixing sticks | Wooden mixing sticks to mix the materials. |
| Mixing pots | Plastic pots in which to mix the materials. |
| Disposable gloves | You know what they’re for! |
| Duct tape | To fix the casting housing together and prevent leaks when pouring. |
Items sourced from FormX.
What I should’ve done
Maybe with some more experience of 3D printing and testing, I might have made the mould parts with printed PLA instead of going through the process of making the mould. The results might actually be quicker in time and cheaper overall to do it this way.
Mistakes & Issues

Ecoflex mixing issues
In the middle of measuring out the casting silicone (Smooth-on Ecoflex 30), the scales automatically turned off. :(. This lead to me guessing a bit on how much more component to add. At 10g of each component needed, an inaccurate measurement could have a big difference.
The result of the casting wasn’t good. The thickest part was solid but still slimy, as if it hadn’t cure properly even after 24 hours. The raised features were missing as well. The waste left over in the pot did actually cure properly.
Other possible problem could’ve been the use of Universal mould release, which specifies silicone on its label, but the Ecoflex datasheet only mentions one specific release product which we don’t have. The second attempt I used Mould release 400 on the mould (the same brand but different number than the one specified on the datasheet).
Mould release issues (with Ecoflex)
The first casting with Universal mould release was very slimy, and the raised features were missing. The second attempt was with the Mould Release 400. The result was slightly better, not so slimy and the raise features were present but without any structural strength. The Mould release 200 version of product, which we didn’t have is specifically designed for the silicone, unlike the 400.
Urethane Rubber test
The third test was with Urethane rubber 30 (wet), this was the best substitute material or a harder strength that was available in the lab. According to the data sheet this should work with the Oommoo tin cure silicone mould and the universal mould release we had. The result was a harder substance, however the raise features weren’t strong enough and fell off after some testing. The ‘wet’ of the description I found out meant that it exudes oil compared to the ‘dry’ version fo the product which aids the release of certain materials such as concrete etc. So not such a good choice either as it may cause irritation when worn on the skin.
Creation of the casting container (laser cutter)
Creating a press fit 5 sided box in which to cast into in Fusion360, I exported the sketch directly by right clicking on the sketch on the left hand side (‘save as dwf’). Importing this directly into the Lightburn software of the laser cutter, it contained various multiples of the lines for each side of the design. This i noticed when the the laser cutter started cutting the same path again.
This had been a problem for other students as well intermittently. Something that didn’t happen every time they imported a file directly.but enough for them to check each time, by selecting the paths and deleting them from the program until they were were all gone, and re-instating the final path using ‘control+z’. For the four walls and the bottom of the shapes, these ranged from 5 copies to 1. So not even the same amount from the same file. Very unpredictable.
Not all materials are the same, even if they are
See CAD for more details on focusing problems.
Not exactly part of casting, but there was a little problem making the container in which i would make all the castings.
Testing a different piece of 5 mm thick acrylic (red this time), I started with the same basic settings i was told to by Henk, as i had making the container for the test casting piece. This went very well, and it cut straight through. As it started cutting the real job, the acrylic piece being cut out started to bend dramatically upwards as the laser did its job. This behaviour of the material was a little unsettling, and when the laser cutter started the same path again (see above) I checked the results.
There was a lot of soot on the bottom of the cut out piece, suggesting that the ‘minimal’ settings for cutting through 5 mm acrylic was way too much - with the possibility of setting it on fire (the picture of the aftermath of the recent fire in a Belgian Fablab clear in my mind). So i did another test with less power. Down from 80% to 60% was still enough to cut all the way through, so I changed this (along with the other changed above) and wasn’t so nervous about setting fire to the place.
Over exuberance with pouring
In the first half of the mould, I over estimated the amount of Compat 45 urethane needed. OR, I under estimated the length of the breather holes. Either way, the first half of the mould was missing complete breather holes - I had covered them up.
As I had designed this to eventually be the top half of the final mould, pressing down on this top would squeeze any excess silicone and air out. So the only solution was to cut extensions to the breather holes through to the outside of the mould half with a scalpel. Tricky and time consuming, but possible with the help of tweezers to pull out scraps of urethane form the hole.
Problems when curing
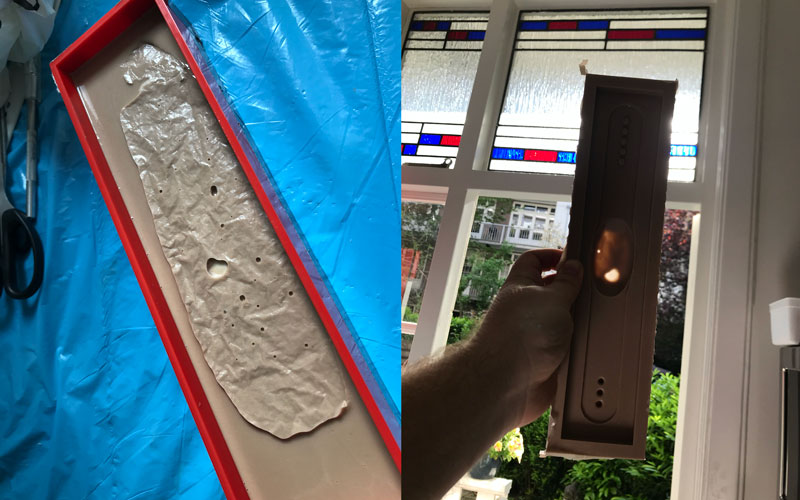
To stop anything falling into the mould whilst the 2nd part was curing I placed it outside and covered it with a plastic bag. Checking the next day to see how the mould had cured, I found the bad had sagged in the middle and touched the urethane as it was curing, giving it an uneven texture to what would be the bottom of the mould for the final casting (and present problems by not being a level mould). Worse, it had caused some air bubbles that almost exposed the model that it was trying take the form of. This left too little material for a good final casting. So I would have to re-do the 2nd part of the mould - with a little extra material to make sure it had a thick top in case this happened again.
Leakage on the 2nd moulding part

When making the 2nd part of the mould, some of the 2nd pour had leaked around the model and filled in a couple of the breather holes that I had spent time extending (well they did their job, just at the wrong casting!). I hadn’t included the breather holes in the full model that i used in making the 2nd part of the mould. Which with hindsight might have been a better idea to keep the breather holes free. However, it did highlight the differences in the measurements of the two difference prints of the same (but different amounts of) model.
For the first part of the mould i used a cut off piece of the bottom of the model so that it could easily stick to the bottom plate of the casting housing. What would’ve been more accurate would be to use one complete model (model + integrated core) for both mould parts to form around. But this would mean making a raised bed in which to hide the other half of the model in which i was going to cast (with something like clay or plasticine). Meaning more work and materials to do that, but with a likely hood of a more accurate outcome.
The bottom of the 3D printed model had a very rough surface as it had been connected to ‘supporting’ material when printed. A coat of the PLA sealant would’ve helped i’m sure, but it didn’t stick to the bottom mould that was the most important point, and the model was surplus to requirements now. It had served its purpose in shaping the 2nd half of the mould.
Like cooking a pancake
The results of the first casting never goes quite (like cooking pancakes), especially with a ‘fresh mould’ that has just finished its main curing. The resulting 1st cast of Dragon skin had some large air bubbles in it (including one of the fixing ‘nipple’s). Which highlighted the fact that i needed to cut open the breather holes again after the leak (see above) had filled in some on the second half mould pour.
To counter this I re-cut the breather holes and decided to pour a little more silicone into the mould. Hoping the extra material would compress any air bubbles left in the mould as small as possible (silicone won’t compress), and more likely to push them out the breather holes.
EVALUATION
With some previous moulding and casting experience in the past, i wasn’t so nervous about this process. But you never know if all the work has gone OK until you open up the mould for the final time. The biggest learning experience was designing the parts needed to make the mould. If something was wrong then I wouldn’t know for a long time (and a lot of wasted expensive materials). Only a few small problems slowed my progress, but timing was everything as these materials can take days to fully cure ready for the next step in the process.
The result of the mould and final casting were very good, much to the surprise of my ever supportive wife “it looks quite professional!”. A testament to the design and mould making process is that it will be easy to replicate the same quality results again and again with confidence.
FURTHER DEVELOPMENT
Combined with the development of the electronics and CAD, further development of the mould and casting process depends on those processes mentioned. In general adjustments to the proportions and thickness of the final casting. with specific interest in the diffusion of the light source and improving the fixation system so the bracelet can fit better.
FILES
No files.