Project management
Building Linux environment under Windows Subsystem for Linux (WSL)
Starting the FabAcademy course I’ve begun with setting up working environment on my Windows machine.
In order to Install a Linux distro on PC I need to enable it firs. There are two versions of subsystem which are WSL1 and WSL2.
Notice! Only version 1903 or higher, with Build 18362 or higher are compatible with WSL2 features. To check windows version go to Settings > Update & Security scroll down and click OS build info. Under Windows specification look for Version and OS buld.
Enabling features
To enable WSL, execute following commands in PowerShell ▼ press Start with mouse right button ▼ klick Windows PowerShell (Admin) ▼ run this into the terminal
dism.exe /online /enable-feature /featurename:Microsoft-Windows-Subsystem-Linux /all /norestart
▼ enable Virtual Machine feature
dism.exe /online /enable-feature /featurename:VirtualMachinePlatform /all /norestart
▼ or enable WSL using GUI
▼ Restart machine to complete WSL setup ⬤ Windows is now ready to install Linux on it.
Installing Linux
▼ Download and then install Linux kernel update package with this link
To install Linux
▼ go to Microsoft Store ▼ search and install desired distribution.
I’m using two similar Ubuntu 20.04 LTS distros with WSL1 and WSL2 due to limitations of WSL2, it doesn’t yet support Serial USB connection but WSL1 does.
▼ install Windows terminal from the same store.
Starting up Linux
▼ Run installed Linux Distro.
On start Ubuntu prompts to fill-in user name and password
▼ Fill credentials and proceed. ⬤ Now Ubuntu is up and running.
Setting up Shel
Zsh and is an alternative to default Bash shell in ubuntu. In pair with oh my zsh it offers great git tracking features with extended autofill and built in aliases (kinda shortcuts to command). I’m using Zsh with “Oh my zsh” framework and Powerlewel10k theme.
Installation commands varies on different Linux distributions.
▼ run to install Zsh on Ubuntu
sudo apt install zsh
Further steps require curl to be done. Install it using
sudo apt-get install curl. Curl is a program which allows downloading from different urls.
▼ run command to change default shell
chsh -s $(which zsh)
▼ install Oh my zsh by running this
sh -c "$(curl -fsSL https://raw.github.com/ohmyzsh/ohmyzsh/master/tools/install.sh)"
git is pre installed in Ubuntu, anyway, here is a command to install it manually.
sudo apt install git
Installing the theme
Powerlewel10k theme provides beautiful icons for git tracking and command line customization. In order to make it work in Windows Terminal some config modifications as well as recommended fonts are needed.
From this point switch to Windows terminal, it’s a good terminal with tons of features.
Here are the recommended patched powerlevel10k fonts:
MesloLGS NF Regular.ttf
MesloLGS NF Bold.ttf
MesloLGS NF Italic.ttf
MesloLGS NF Bold Italic.ttf
To configure Windows Terminal
▼ Open Windows terminal on the top panel right after tabs ▼ press on arrow and choose Settings from menu.
Now settings.json config file is open in the default editor.
▼ Look for the block with your linux distro name in it
in my case its “Ubuntu-20.04”
    {
            "colorScheme":"Spacedust",
            "guid":"{7b52e3e-de2c-5db4-bd2d-ba144ed6c273}",
            "hidden":false, "name": "Ubuntu-20.04",
            "source":"Windows.Terminal.Wsl"
    }
▼ copy contents of the brackets in "guid":"{
this number }"
▼ scroll to the top and replace similar field in "defaultProfile": "{ put it here }"
▼ look down a little for this block
"defaults": {
        // Put settings here that you want to apply
        // to all profiles.
        "colorScheme": "Spacedust",
        "startingDirectory": "C://Users//username",
        "guid": "{07b52e3e-de2c-5db4-bd2d-ba144ed6c273}",
        "hidden": false, "name": "Ubuntu-20.04",
        "source": "Windows.Terminal.Wsl"
    },
▼ add two lines to modify default font
    "fontFace": "MesloLGS NF",
    "fontSize": 13,
▼ make it look like this
"defaults": {
        // Put settings here that you want to apply
        // to all profiles.

    "fontFace": "MesloLGS NF",
    "fontSize": 13,
    "colorScheme": "Spacedust",
        "startingDirectory": "C://Users//username",
        "guid": "{07b52e3e-de2c-5db4-bd2d-ba144ed6c273}",
        "hidden": false, "name": "Ubuntu-20.04",
        "source": "Windows.Terminal.Wsl"
    },
modify
"startingDirectory":"C://Users/username"to always start in the preferred directory.
▼ Save changes to settings.json and install Powerlewel10k theme by running this command
git clone --depth=1 https://github.com/romkatv/powerlevel10k.git ${ZSH_CUSTOM:-$HOME/.oh-my-zsh/custom}/themes/powerlevel10k
▼ run this command to edit .zshrc file
sudo nano ~/.zshrc
▼ look for the line ZSH_THEME="<some_theme_here>"
▼ paste powerlevel10k/powerlevel10k into the brackets, so the result is
ZSH_THEME="powerlevel10k/powerlevel10k"
▼ press Ctrl+x, type “y” and press Enter
this will save the .zshrc file and exit
▼ Restart Windows Terminal and run the command
p10k configure
this will start theme configuration wizard.
▼ proceed choosing desired style of your prompt
⬤ Done! Now Zsh with p10k are set.
Adding alias to open files in Windows easily
WSL allows you to open files in default Windows apps from within Linux command line but its goes only to win apps that are in windows PATH directory, so I created a small script and added it to .zshrc to shortcut this process. ▼ Open .zshrc file
sudo nano ~/.zshrc
▼ paste this at the end of file
wi () {
  STR='wsl'
  HEX='check'
  S="start $(wslpath -w .)'\'$1"

  if [[ "$S" == *"$STR"* ]];
  then
  printf  '%s' $S | powershell.exe

  else
    cmd.exe /C start "$(wslpath -m .)"'\'$1
  fi
}
▼ save and exit
⬤ Now you can open any file that is stored in Windows directory with Windows app which is set default to open this filetype.
Notice! This works only from parent to target file directory and if using ZSH, add
unsetopt PROMPT_SPto.zshrcfile.
This script automatically prints current directory in linux style /mnt/c/Users/.../, adds path which is typed after “wi C:\\Users\\...\\. Then it sends this command to Windows CMD or PowerShell that eventually opens the file in default for that file extension app.
Git
Now I’m ready to proceed with git. Git is a version control software. Overall, It’s easy to use software for the starters but could be complicated in some use cases. Software tracks all the changes you’ve made to files and syncing with a server in tracked manner using commits. It allows to making branches, so you could easily spawn multiple versions of project where multiple people could work within the same branch, or even file. All commits are archived and stored, so you could easily retrieve any data from old repo states.
Setting up SSH
To start using git you will need the software, SSH key and the repo. Git goes pre installed on Ubuntu but if not it’s easy to install it using sudo apt install git. SSH is a network protocol which allows to securely connect to remote locations using cryptographic keys. To install it run sudo apt install openssh-server. From this point we need to generate SSH keys and add one of them to your git server. Let’s generate the keys using recomendations from GitLab using ED25519 key type which is more secure than RSA. So, in order to generate keys:
▼ Run
ssh-keygen -t ed25519 -C "<comment>"
👁 You’ll see tthis
Generating public/private ed25519 key pair.
Enter file in which to save the key (/home/user/.ssh/id_ed25519):
▲ Accept the suggested filename and directory pressing enter
👁 Now terminal prints
Enter passphrase (empty for no passphrase):
▲ Specify a pass phrase and proceed 👁 the final printout
Your identification has been saved in /root/.ssh/id_ed25519
Your public key has been saved in /root/.ssh/id_ed25519.pub
The key fingerprint is:
SHA256:L8lyHMxku+GZuCjhYiaQc/Z3lLQ74hhRdNIKhU/hEcQ comment
The key's randomart image is:
+--[ED25519 256]--+
|     =O+.        |
|    ooE+.        |
|     +o.o        |
|     .o=..       |
| .  .  .So       |
|+ +  . =+O       |
|.= o. o.@..      |
|ooo .+o++.       |
|+. .oooo .       |
+----[SHA256]-----+
Now there are two new files in ~/.ssh/ which are id_ed25519.pub and id_ed25519. The one with .pub extension is the public key which we will add to GitLab and the second is private. Private keys must be held securely and exposure of which implies security risks.
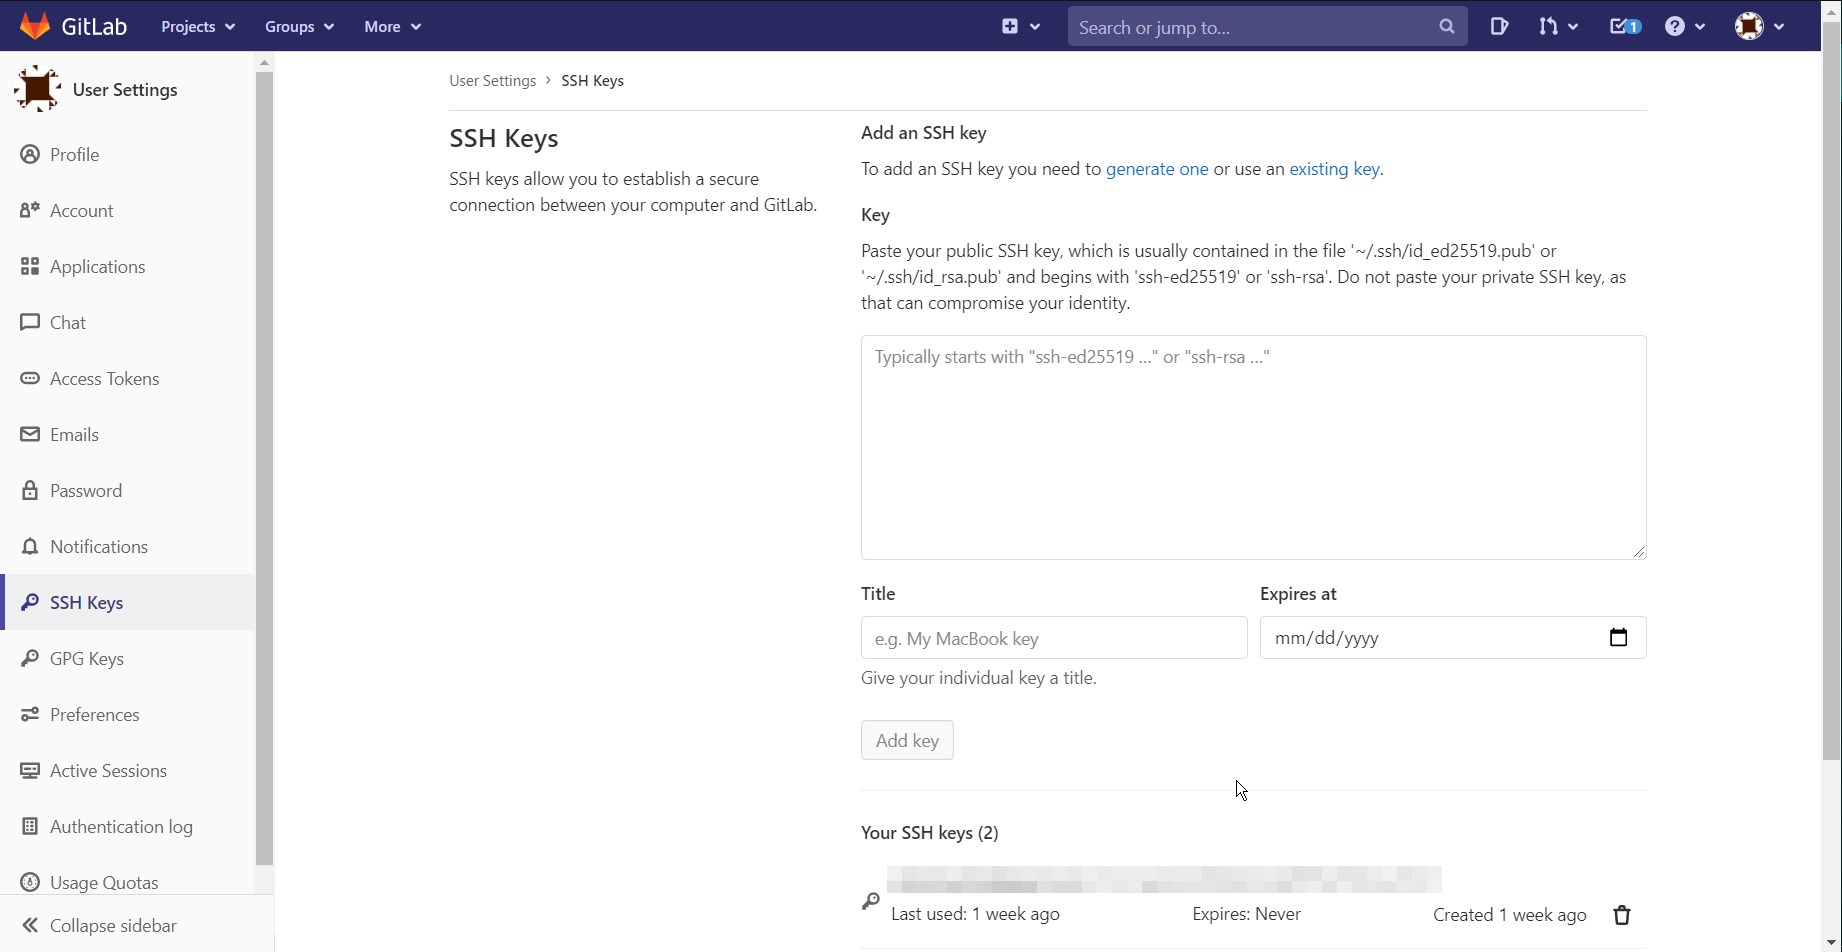
Next steps are adding public key to GitLab or any git provider of choice. ▼ Go to GitLab, press icon with your picture at the right top corner ▼ go to Settings ▼ in the left menu press SSH Keys
▼ go back to your terminal and run
this command applies only for WSL
cat ~/.ssh/id_ed25519.pub | clip.exe
▲ the .pub key is now copied to the clipboard ▼ paste it to GitLab’s field under Key paragraph ▼ press Add key ⬤ Now it’s possible to securely connect to the remote.
Using git
To start using git user.name and user.email need to be set
▼ Run replacing brackets contents with your name and email
git config --global user.name "Your Name"
git config --global user.email "youremail@yourdomain.com"
Use Git credentials, to verify that changes were made correctly run
git config --list
Git allows you to easily copy remote locations using git clone. In order to be able to commit changes to the remote SSH clone URL must be used:
▼ Go to GitLab’s repo main page and press Copy SSH clone URL
▼ switch to terminal
▼ cd to the directory you wish to clone into and run
git clone git@gitlab.something.org:something/somedir/blahblahblah/repo-name.git
▲ replacing with your SSH clone link
Now remote repos’ snapshot is present in local. To update local to the remotes’ state use git pull. To load changed files to the remote the following steps are required:
▼ git add <path to file> to add files you want to commit
▼ git commit -m <message> to commit attaching a description message
Notice! Before pushing changes to remote, run
git pullto load changes that have been made since last the pull by other users that have access to the repo.
▼ git push to push changes to the remote
⬤ Done! Commits are pushed, and the changes are made to the repo.
Using MkDocs
As a complete newbie in web development I decided to use MkDocs for my documentation process. I’s easy to use and have enough extensibility to cover my needs. I like the material theme that comes default with FabAcademy repo.
Utilizing the WSL it’s easy to install all is needed for mkdocs. First to fall I’m installing python using apt install python. Then using Python package manager Pip I’ve installed all id needed using these commands:
pip install mkdocs
pip install mkdocs-material
pip install mkdocs-git-revision-date-localized-plugin
Now going into cloned git project folder run mkdocs serve. And see the output:
INO    -  Building documentation...
INFO    -  Cleaning site directory
INFO    -  Documentation built in 4.11 seconds
[I 210318 18:07:36 server:335] Serving on http://127.0.0.1:8000
INFO    -  Serving on http://127.0.0.1:8000
[I 210318 18:07:36 handlers:62] Start watching changes
INFO    -  Start watching changes
[I 210318 18:07:36 handlers:64] Start detecting changes
INFO    -  Start detecting changesF
Following the link from printout starting with http:// would open locally built version of the website. Now writing to Week01.md would automatically update local web page. This is how I can interactively build my documentation (almost) instantly detecting changes.
MkDocs could be configured through mkdocs.yml file in the repos’ root folder.
Also you could use html code right in .md file and use extra css to achieve more.
Image optimization and scripting
Using WSL2 goes with all the goods from linux you could think of. One of them is easy to use scripting language with tons of tutorials on a web. It could be used to automate many tasks and as a good intro into coding. I’ve wrote some handy scripts to automate image optimization and append corresponding lines to .md files with corresponding tags. Now I can easily transfer last clip from some source folder, compress if needed and place it into repo’s images folder also modifying target MkDocs page file.
▼ script in action
Here you can see I’m using script named
gra.shfrom within Vim to automatically append video to this file.
▼ script itself
N="$CUW"
L="$(echo $(ls -at /mnt/c/Users/username/clips/* | head -1))"
C=$(basename ${L%.*})
T="/mnt/c/Users/username/repo-name/docs/images/week$N/$C-$1"
Z="/mnt/c/Users/username/repo-name/docs/assignments/Week_$N.md"
echo $C
if [[ $L == *.jpg ]]
then
cp "$L" "$T.jpg"
echo "▼ </br>" >> $Z
echo " " >> $Z
echo "" >> $Z
echo " " >> $Z
else
if [[ -z $2 ]] then
cp "$L" "$T.mp4"
else
ffmpeg -an -y -i $L -qmin 10 -qmax 40 -crf 30 -c:v libx264 -b:v 600k -c:a aac -ar 48000 -b:a 128k -vf 'scale=-2:min(1080\,trunc(ih/2)*2)' $T.mp4
fi
echo "▼ </br>" >> $Z
echo " " >> $Z
echo '<video controls autoplay loop width="100%">' >> $Z
echo "<source src="../../images/week$N/$C-$1.mp4" type="video/mp4">" >> $Z
echo '</video>' >> $Z
echo " " >> $Z
#convert -auto-orient -resize 1000 -strip -interlace Plane -quality 85% "$L" "$T"
fi
The first line should be shebang that points to interpreter, in my case its
#!/bin/env zsh.
links
Zsh
Oh my zsh
Powerlewel10k
Windows terminal
Ubuntu
Git
GitLab
WSL tutorial