13. Interface and application programming
This week I want to communicate with my SAMD11C based board. For this, I will use serial port with the USB connection of my board.
Like all weeks, I try new things. It was so easy to make a program in a language I already know. So after watching possibilities, I choose to try NodeJS and have both terminal and browser interaction. I can also put it online on my local network and let my computer act as a server.
It’s the first time I use nodeJS and I finally love it. The only thing missing to me is to have a IDE to have auto-completion and continuous compile like an IDE I use during 10 years for Java (Eclipse). Because I want to go fast, I don’t lost time to find enhanced IDE, I just use my swiss-knife editor : Sublime Text and write code manually.
IHM in a terminal (NodeJS)
To access Serial Port, you can’t do it purely with browser technologies like JS, HTML5 without a local hook (it’s mainly a security features to avoid hacks). This hook can be do in many ways but all have limitations like only a particular browser (chrome apps hooks, activeX for IE,..), a particular Operating System (ex: writing a dll for windows), installing specific librairies in path (Javacomm for java), install specific package manager and launch commands (NodeJS & npm).
NodeJS - finding my board & autoconnect
Because I have to choose, I start with NodeJS. I have it already installed in my computer so I won’t describe this part. After installing NodeJS with npm, you can verify all it’s working by doing it:
C:\dev-fabac\npm>node -v
v12.16.2

C:\dev-fabac\npm>npm -v
6.14.4
Go in the folder you want to create your project, then init and answer questions :
C:\dev-fabac\npm>npm init
This utility will walk you through creating a package.json file.
It only covers the most common items, and tries to guess sensible defaults.

See `npm help json` for definitive documentation on these fields
and exactly what they do.

Use `npm install <pkg>` afterwards to install a package and
save it as a dependency in the package.json file.

Press ^C at any time to quit.
package name: (npm) samdserial
version: (1.0.0) 0.1.0
description: a simply bridge for the SAMDMP board
entry point: (index.js) bridge.js
test command: test
git repository:
keywords: samd11c fabacademy bridge
author: Florent Lemaire
license: (ISC) GPL-3.0-or-later
About to write to C:\dev-fabac\npm\package.json:

{
  "name": "samdserial",
  "version": "0.1.0",
  "description": "a simply bridge for the SAMDMP board",
  "main": "bridge.js",
  "scripts": {
    "test": "test"
  },
  "keywords": [
    "samd11c",
    "fabacademy",
    "bridge"
  ],
  "author": "Florent Lemaire",
  "license": "GPL-3.0-or-later"
}


Is this OK? (yes) yes
To access serial port and then communicate with the web page, I have to install serialport
C:\dev-fabac\npm>npm install serialport
Then I want to avoid shitty hardcoding so I will try to list and find my device.
const SerialPort = require('serialport');

console.log("Listing SerialPort");

SerialPort.list()
.then(ports => {
  ports.forEach(function(port) {
    //console.log('%s / %s / %s', port.path, port.pnpId, port.manufacturer);
    console.log("Port :", port);
  });
});
I launch a first time
C:\dev-fabac\npm>node bridge.js
Listing SerialPort
I have no result, I have a keyboard & a mouse connected. It’s seems that it not detect HID devices.
Then I launch same command, first time by plugging an Wemos D1 mini pro :
C:\dev-fabac\npm>node bridge.js
Listing SerialPort
Port : {
  path: 'COM7',
  manufacturer: 'Silicon Labs',
  serialNumber: '0191193D',
  pnpId: 'USB\\VID_10C4&PID_EA60\\0191193D',
  locationId: 'Port_#0001.Hub_#0004',
  vendorId: '10C4',
  productId: 'EA60'
}
Yeah, success!
I also plug my custom SAMD board :
C:\dev-fabac\npm>node bridge.js
Listing SerialPort
Port : {
  path: 'COM7',
  manufacturer: 'Silicon Labs',
  serialNumber: '0191193D',
  pnpId: 'USB\\VID_10C4&PID_EA60\\0191193D',
  locationId: 'Port_#0001.Hub_#0004',
  vendorId: '10C4',
  productId: 'EA60'
}
Port : {
  path: 'COM8',
  manufacturer: 'Microsoft',
  serialNumber: 'AC723241514E464E574A2020FF012504',
  pnpId: 'USB\\VID_16D0&PID_0557\\AC723241514E464E574A2020FF012504',
  locationId: 'Port_#0004.Hub_#0004',
  vendorId: '16D0',
  productId: '0557'
}
I have my 2 boards, cool. Let’s try to add one more, I take an Arduino UNO and retry :
C:\dev-fabac\npm>node bridge.js
Listing SerialPort
Port : {
  path: 'COM7',
  manufacturer: 'Silicon Labs',
  serialNumber: '0191193D',
  pnpId: 'USB\\VID_10C4&PID_EA60\\0191193D',
  locationId: 'Port_#0001.Hub_#0004',
  vendorId: '10C4',
  productId: 'EA60'
}
Port : {
  path: 'COM8',
  manufacturer: 'Microsoft',
  serialNumber: 'AC723241514E464E574A2020FF012504',
  pnpId: 'USB\\VID_16D0&PID_0557\\AC723241514E464E574A2020FF012504',
  locationId: 'Port_#0004.Hub_#0004',
  vendorId: '16D0',
  productId: '0557'
}
Port : {
  path: 'COM9',
  manufacturer: 'Arduino LLC (www.arduino.cc)',
  serialNumber: '95735343533351100100',
  pnpId: 'USB\\VID_2341&PID_0043\\95735343533351100100',
  locationId: 'Port_#0002.Hub_#0004',
  vendorId: '2341',
  productId: '0043'
}
So my SAMD board is the “Microsoft” one. Why not. I try to change things like remove the hub, plug to another port, reflash with another code and relaunch to see the changes. Finally I try by plugin my SAMDMP board and my subarUSB board at the same time.
C:\dev-fabac\npm>node bridge.js
Listing SerialPort
Port : {
  path: 'COM8',
  manufacturer: 'Microsoft',
  serialNumber: 'AC723241514E464E574A2020FF012504',
  pnpId: 'USB\\VID_16D0&PID_0557\\AC723241514E464E574A2020FF012504',
  locationId: 'Port_#0002.Hub_#0004',
  vendorId: '16D0',
  productId: '0557'
}
Port : {
  path: 'COM4',
  manufacturer: 'Microsoft',
  serialNumber: '12F1E4D2514E464E574A2020FF011B22',
  pnpId: 'USB\\VID_16D0&PID_0557\\12F1E4D2514E464E574A2020FF011B22',
  locationId: 'Port_#0001.Hub_#0004',
  vendorId: '16D0',
  productId: '0557'
}
So if I want to scan and use an SAMD11C board with a mattairtech bootloader, I have to scan and keep a board with this settings :
- manufacturer = ‘Microsoft’
- pnpId starts with ‘USB\VID_16D0&PID_0557\‘ <– it’s a mix of the port type, vendorId & productId
- vendorId: ‘16D0’
- productId: ‘0557’
I’ve reworked many times scan code part, here the final version managing errors & empty list
const SerialPort = require('serialport');

console.log("Listing SerialPort");

SerialPort.list()
.then(ports => {
  if (ports.length === 0) {
    console.error('No port detected')
    process.exit(2)
    }
  ports.forEach(function(port) {
    //console.log('%s / %s / %s', port.path, port.pnpId, port.manufacturer);
    console.log("Port :", port);
  },
  err => {
   console.error('Error listing ports', err)
  });
});
SAMDMP as a receiver (blink LED) - SAMDMP side
I start to write a little code on the board side with Arduino IDE :
/**
 * USB driven led blink with SAMD MP custom board
 *
 * @author Florent Lemaire
 */

#define ledPin 2

void setup() {
   pinMode(ledPin, OUTPUT);
   SerialUSB.begin(0);

   //init blink for visual check
   digitalWrite(ledPin, HIGH);
   delay(100);
   digitalWrite(ledPin, LOW);
   }

void loop() {
   static char chr;

   if (SerialUSB.available()) {
      chr = SerialUSB.read();
   switch (chr) {
    case 'o':
      digitalWrite(ledPin, HIGH);
      SerialUSB.print("led ON");
      break;
    case 'c':
      digitalWrite(ledPin, LOW);
      SerialUSB.print("led OFF");
      break;
    case 'b':
      SerialUSB.print("blinking LED few time");
      for (int i = 0; i < 6; i++) {
        if (i%2 == 0) {
          digitalWrite(ledPin, HIGH);
        } else {
          digitalWrite(ledPin, LOW);
        }
        delay(200);
      }
    }
   }
  }
With this code, my board react to 3 commands (represented by char) sended on USB :
- o : open the LED
- c : close the LED
- b : blink a few time the LED
I finally send response with SerialUSB.print() instead of println() because I’ve got empty line after response on nodeJS.
SAMDMP as a receiver (blink LED) - NodeJS side
Now with the first part, I try to autoconnect and have an interactive terminal to send commands to my custom board
Because I want to add a menu to select board, I have to add a package to my project
npm install enquirer
After many tries (It’s the first time I write NodeJS), here is my code :
#!/usr/bin/env node

const { Select } = require('enquirer')
const { Transform } = require('stream')
const SerialPort = require('@serialport/stream')
SerialPort.Binding = require('@serialport/bindings')

const askForPort = async () => {
  const ports = await SerialPort.list()
  if (ports.length === 0) {
    console.error('No board detected')
    process.exit(2)
  }

  const portsFiltered = []
  for (const port of ports) {
    if (port.vendorId.startsWith('16D0') && port.productId.startsWith('0557')) {
      portsFiltered.push(port)
    }
  }

  if (portsFiltered.length === 0) {
    console.error('No SAMD board detected')
    process.exit(2)
  }

  const answer = await new Select({
    name: 'serial-port-selection',
    message: 'Select a serial port to open',
    choices: portsFiltered.map((port, i) => ({
      //name: `[${i + 1}]\t${port.path}\t${port.pnpId || ''}\t${port.manufacturer || ''}`,
      name: port.path
    })),
    required: true,
  }).run()
  return answer
}

/**
 * Convert carriage returns to newlines for output
 */
class OutputTranslator extends Transform {
  _transform(chunk, _encoding, cb) {
    for (let index = 0; index < chunk.length; index++) {
      const byte = chunk[index]
      if (byte === 0x0d) {
        chunk[index] = 0x0a
      }
    }
    this.push(chunk)
    cb()
  }
}

const createPort = path => {
  console.log(`Opening serial port: ${path}, press CTRL+C to quit`)

  const openOptions = {
    baudRate: 9600,
    dataBits: 8,
    parity: 'none',
    stopBits: 1,
  }

  const port = new SerialPort(path, openOptions)
  const output = new OutputTranslator()
  output.pipe(process.stdout)
  port.pipe(output)

  port.on('error', err => {
    console.error('Error', err)
    process.exit(1)
  })

  port.on('close', err => {
    console.log('Closed', err)
    process.exit(err ? 1 : 0)
  })
  process.stdin.setRawMode(true)
  process.stdin.on('data', input => {
    for (const byte of input) {
      // ctrl+c
      if (byte === 0x03) {
        port.close()
        process.exit(0)
      }
    }
    port.write(input)

    output.write(input + '\t')

  })
  process.stdin.resume()

  process.stdin.on('end', () => {
    port.close()
    process.exit(0)
  })
}

const run = async () => {
  const path = await askForPort()
  await createPort(path)
}

run().catch(error => {
  console.error(error)
  process.exit(1)
})
IHM in a browser (Node JS & html + javascript)
SAMD as a receiver (blinkLED with browser)
To communicate with a webpage, I add another package.
C:\dev-fabac>npm install ws
For this first try, I keep the LED on my board. I will make a GUI usable in a web browser.
For the board, I keep the same code. I will add use of websocket (I will write WS in rest of the page) is NodeJS and make a HTML page that talk to NodeJS. Node JS will act as a bridge/router and forward messages to my board.
Node JS
I write a new NodeJS script keeping the board selection on launch. Then the server act as a bridge between client on WS & the board. The script can have several clients on WS side.
#!/usr/bin/env node

const { Select } = require('enquirer')
const { Transform } = require('stream')
const SerialPort = require('@serialport/stream')
SerialPort.Binding = require('@serialport/bindings')

var SERVER_PORT = 1337
var connections = new Array;

const askForPort = async () => {
  const ports = await SerialPort.list()
  if (ports.length === 0) {
    console.error('No board detected')
    process.exit(2)
  }

  const portsFiltered = []
  for (const port of ports) {
    if (port.vendorId.startsWith('16D0') && port.productId.startsWith('0557')) {
      portsFiltered.push(port)
    }
  }

  if (portsFiltered.length === 0) {
    console.error('No SAMD board detected')
    process.exit(2)
  }

  const answer = await new Select({
    name: 'serial-port-selection',
    message: 'Select a serial port to open',
    choices: portsFiltered.map((port, i) => ({
      //name: `[${i + 1}]\t${port.path}\t${port.pnpId || ''}\t${port.manufacturer || ''}`,
      name: port.path
    })),
    required: true,
  }).run()
  return answer
}

const createPort = path => {
  console.log(`Opening serial port: ${path}, press CTRL+C to quit`)

  const openOptions = {
    baudRate: 9600,
    dataBits: 8,
    parity: 'none',
    stopBits: 1,
  }

  const port = new SerialPort(path, openOptions)

  port.on('open', function() {
    console.log('Successfully connected to board');
  });

  port.on('error', err => {
    console.error('Error', err)
    process.exit(1)
  })

  port.on('close', err => {
    console.log('Closed', err)
    process.exit(err ? 1 : 0)
  })

  port.on('data', function (msg) {
    broadcast(msg)
  })


  var Server = require('ws').Server
  const wss = new Server({port:SERVER_PORT})

  // adding ws bridge
  wss.on('connection', function connection(client) {
    console.log("connected to "+client._socket.remoteAddress+" on port "+SERVER_PORT)
    connections.push(client);
    client.on('message', function(data) {
      port.write(data)
      console.log('WS received : '+data)
      })

    client.on('close', function() {
      console.log("connection closed");
      var position = connections.indexOf(client);
      connections.splice(position,1);
    });

   })
}

function broadcast(data) {
  console.log('broadcast: '+data);
  for(myConnection in connections) {
    connections[myConnection].send(data+' ');
    //connections[myConnection].send(JSON.stringify(data));
  }
}

const run = async () => {
  const path = await askForPort()
  await createPort(path)
}

run().catch(error => {
  console.error(error)
  process.exit(1)
})
HTML
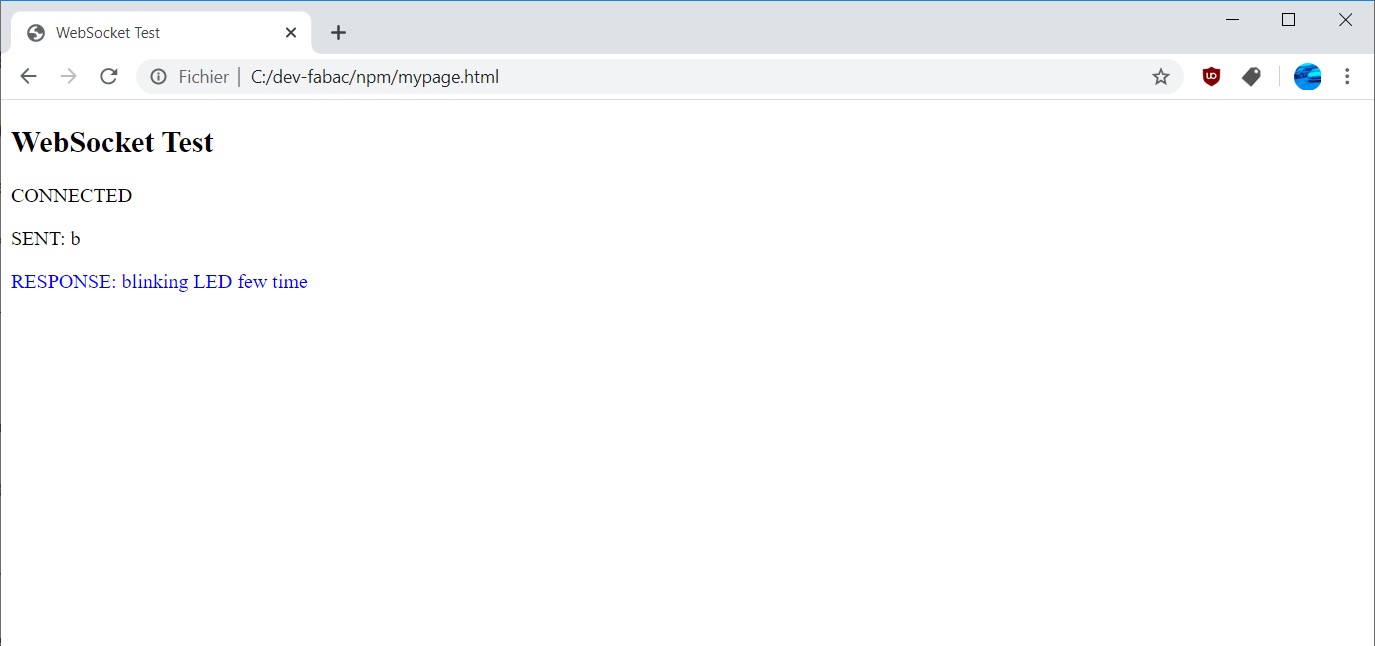
I use a simple web page with a few javascript inside to test WS. When loading this page in a browser, it connect to my nodeJS script, send a “b” command, write the response on the page and close connection.
<!DOCTYPE html>
<html>
   <meta charset = "utf-8" />
   <title>WebSocket Test</title>

   <script language = "javascript" type = "text/javascript">
      var wsUri = "ws://127.0.0.1:1337/";
      var output;

      function init() {
         output = document.getElementById("output");
         testWebSocket();
      }

      function testWebSocket() {
         websocket = new WebSocket(wsUri);

         websocket.onopen = function(evt) {
            onOpen(evt)
         };

         websocket.onmessage = function(evt) {
            onMessage(evt)
         };

         websocket.onerror = function(evt) {
            onError(evt)
         };
      }

      function onOpen(evt) {
         writeToScreen("CONNECTED");
         doSend("b");
      }

      function onMessage(evt) {
         writeToScreen('<span style = "color: blue;">RESPONSE: ' +
            evt.data+'</span>'); websocket.close();
      }

      function onError(evt) {
         writeToScreen('<span style="color: red;">ERROR:</span> ' + evt.data);
      }

      function doSend(message) {
         writeToScreen("SENT: " + message); websocket.send(message);
      }

      function writeToScreen(message) {
         var pre = document.createElement("p");
         pre.style.wordWrap = "break-word";
         pre.innerHTML = message; output.appendChild(pre);
      }

      window.addEventListener("load", init, false);

   </script>

   <h2>WebSocket Test</h2>
   <div id = "output"></div>

</html>
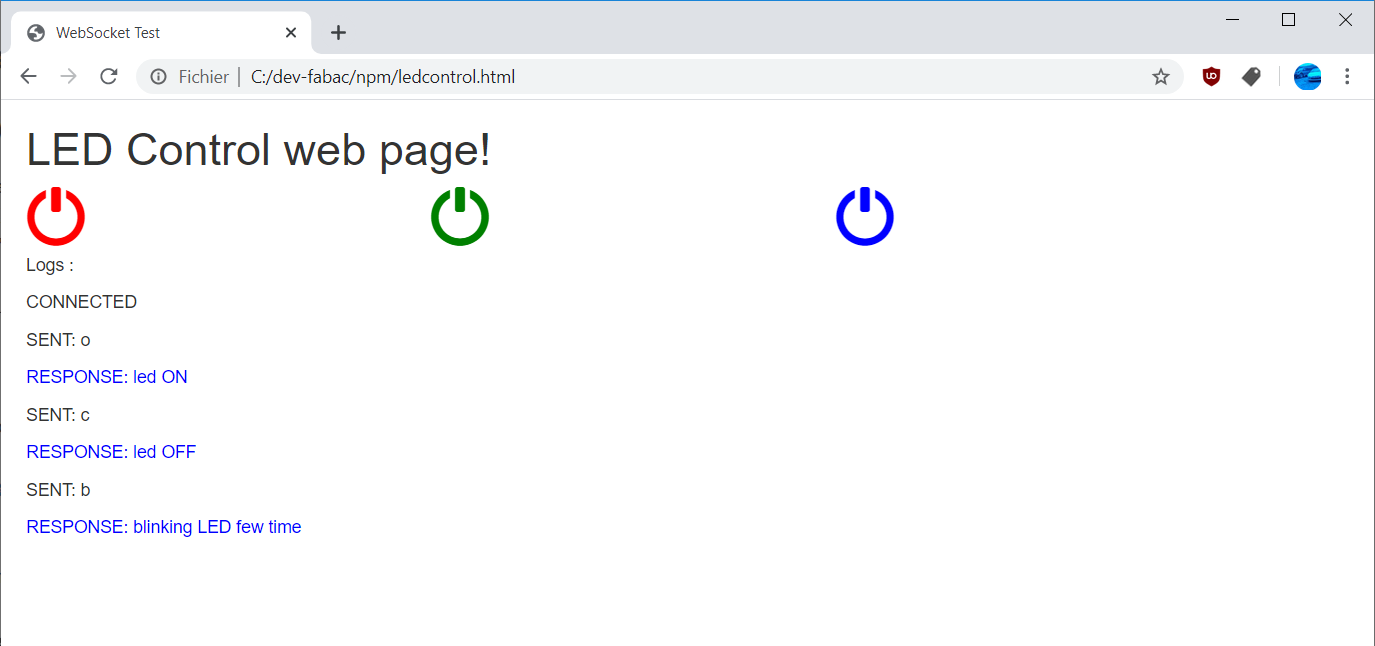
Now, I will make a page more user friendly and interactive. I will add a few buttons to send functions on WS. I put 3 buttons that launch the 3 functions of the board : on / off / blink. I also make more cleaner html code. Because I want to make code working with a single html page and don’t use local images, I use bootstrap for the glyflicon and with CSS I put different color on it for each button.
<!DOCTYPE html>
<html>
  <head>
   <meta charset = "utf-8" />
   <title>WebSocket Test</title>

   <link rel="stylesheet" href="http://maxcdn.bootstrapcdn.com/bootstrap/3.3.7/css/bootstrap.min.css">

   <script language = "javascript" type = "text/javascript">
      var wsUri = "ws://127.0.0.1:1337/";
      var output;

      function init() {
         output = document.getElementById("output");
         testWebSocket();
      }

      function testWebSocket() {
         websocket = new WebSocket(wsUri);

         websocket.onopen = function(evt) {
            onOpen(evt)
         };

         websocket.onmessage = function(evt) {
            onMessage(evt)
         };

         websocket.onerror = function(evt) {
            onError(evt)
         };
      }

      function onOpen(evt) {
         writeToScreen("CONNECTED");
      }

      function onMessage(evt) {
         writeToScreen('<span style = "color: blue;">RESPONSE: ' +
            evt.data+'</span>');
      }

      function onError(evt) {
         writeToScreen('<span style="color: red;">ERROR:</span> ' + evt.data);
      }

      function doSend(message) {
         writeToScreen("SENT: " + message); websocket.send(message);
      }

      function writeToScreen(message) {
         var pre = document.createElement("p");
         pre.style.wordWrap = "break-word";
         pre.innerHTML = message; output.appendChild(pre);
      }

      window.addEventListener("load", init, false);
      window.addEventListener("beforeunload", websocket.close());

   </script>
    <style>
        html {
            margin-left:20px;
        }
        .btn_red {
            color: red;
            font-size:48px;
            cursor:pointer;
        }
        .btn_green {
            color: green;
            font-size:48px;
            cursor:pointer;
        }
        .btn_blue {
            color: blue;
            font-size:48px;
            cursor:pointer;
        }
    </style>
  </head>
  <body style="">
            <h1>LED Control web page!</h1>
            <table width="90%" border="0">
                      <tbody><tr>
                <td><span id="btn_off" class="glyphicon glyphicon-off btn_red" onclick="doSend('c')"></span></td>
                <td><span id="btn_on" class="glyphicon glyphicon-off btn_green" onclick="doSend('o')"></span></td>
                <td><span id="btn_blink" class="glyphicon glyphicon-off btn_blue" onclick="doSend('b')"></span></td>
              </tr>
                    </tbody></table>
            <p>Logs :</p>
            <div id = "output"></div>

</body>

</html>
SAMD11C as a mini Gamepad (with NodeJS + HTML & JS & webGL)
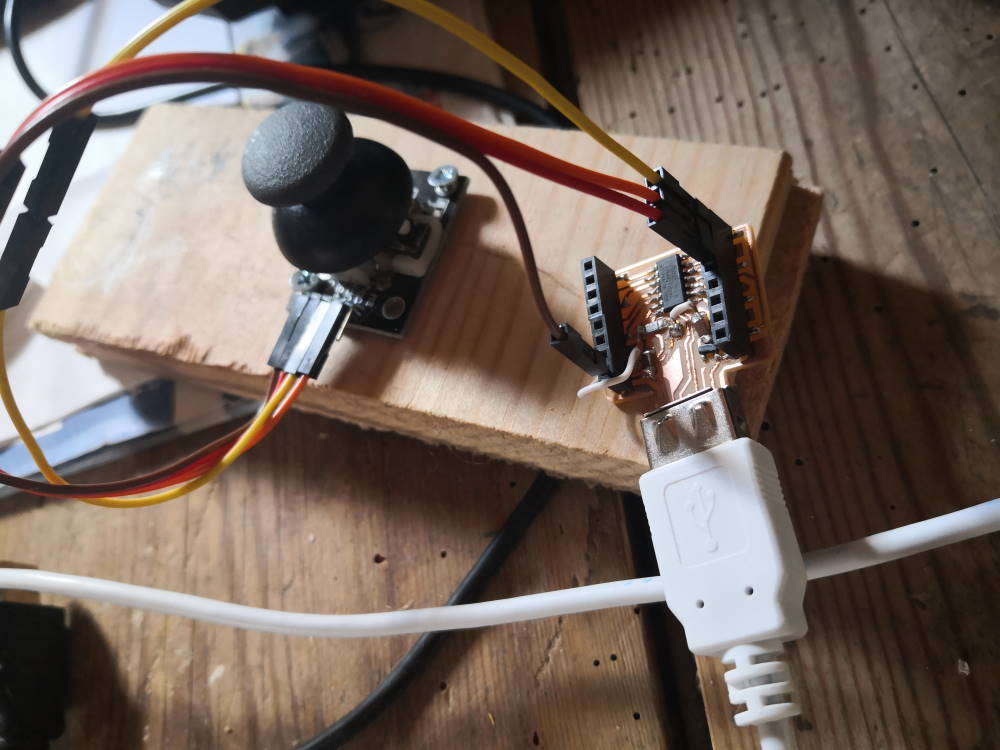
I plug a joystick on my SAMDMP board. I create a new code to send up/down/left/right on websocket. I first try to also get joystick press but it was very buggy, I often have false pressed messages.
Live demo here (of course it works only if you have the same setup or you can simulate by using my nodeJS ws command (or python version) running and push command to rotate the cube : u for up, d for down, l for left, r for right).
/**
 * USB serial gamepad with SAMD MP custom board
 *
 * @author Florent Lemaire
 */

#define xAxis 4
#define yAxis 2
#define button 30

void setup() {
   pinMode(xAxis, INPUT);
   pinMode(yAxis, INPUT);
   pinMode(button, INPUT);
   SerialUSB.begin(0);
   }

void loop() {
   while (SerialUSB.available()) {
      int xVal = analogRead(xAxis);
      int yVal = analogRead(yAxis);

    // between 0 - 1023 and remove deadzone
      if (xVal < 470) {
        SerialUSB.print('l');} //left
      if (xVal > 550) {
        SerialUSB.print('r');} //right

      if (yVal < 470) {
        SerialUSB.print('u');} //up
      if (yVal > 550) {
        SerialUSB.print('d');} //down

      delay(100);
      }
    }
I keep my forwarding nodeJS code. For IHM, I start from a webGL tutorial from mozilla. I hack the code and modify to plug this to my WS and use received message from my SAMD11C board to rotate the cube. This a part of modifications in the code, the full code is 600 lines so I don’t paste full code here.
I lost a lot of time on this switch case, I have to force retrieve of the first character on my switch case with charAt(0)
var wsUri = "ws://127.0.0.1:1337/";


  function testWebSocket() {
  websocket = new WebSocket(wsUri);

  websocket.onmessage = function(evt) {
    onMessage(evt)
    };

 }

  function onMessage(evt) {

    var toTest = evt.data.charAt(0);
      switch(toTest) {
      case "u" :
          cubeRotation1 -= 0.1;
        break;
      case "d" :
          cubeRotation1 += 0.1;
        break;
      case "l" :
          cubeRotation2 -= 0.1;
        break;
      case "r" :
          cubeRotation2 += 0.1;
      }

  }
On this demo, I show the result on (from left to right) Chrome, Edge, Firefox.
Group assignment
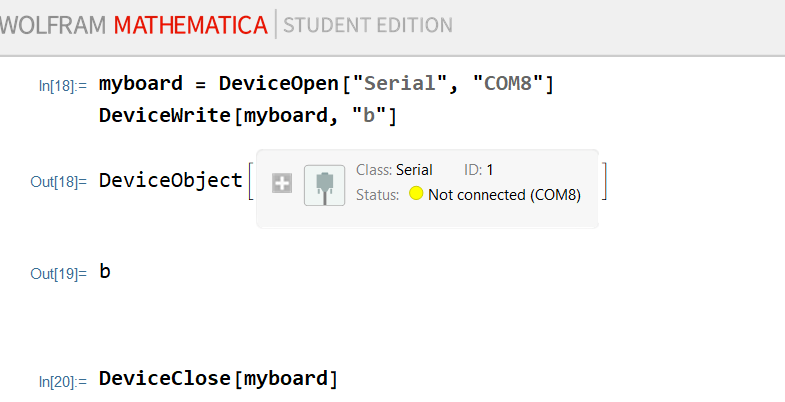
Wolfram Mathematica
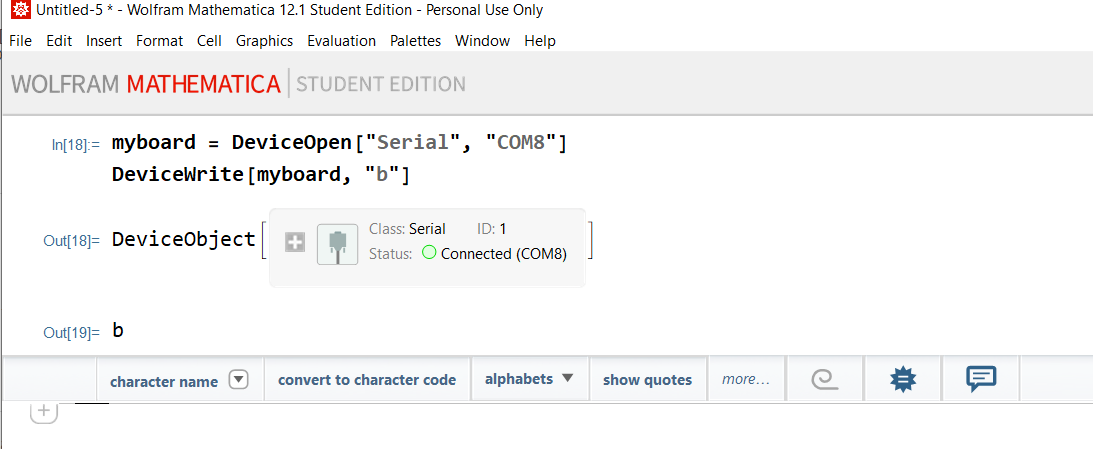
I keep the same code on my board (SAMDMP as a receiver (blink LED)) and use Mathematica. Good documentation isn’t easy to find but code is extremely simple for sending command.
You can also close connection at the end
Python
A quick code to send command to my board, still the same receiver code on board.
First you need to install a library called “pyserial”
C:\dev-fabac\npm>pip install pyserial
Collecting pyserial
  Downloading https://files.pythonhosted.org/packages/0d/e4/2a744dd9e3be04a0c0907414e2a01a7c88bb3915cbe3c8cc06e209f59c30/pyserial-3.4-py2.py3-none-any.whl (193kB)
     |████████████████████████████████| 194kB 547kB/s
Installing collected packages: pyserial
Successfully installed pyserial-3.4
The code is very simple, open the communication, and make a loop to wait user input and send command to the board.
from serial import *

with Serial(port="COM8", baudrate=9600, timeout=1, writeTimeout=1) as board:
    while 1:
        command = input("Entrez une commande : ")
        board.write(command.encode('ascii'))
References
https://www.websocket.org/echo.html
https://github.com/websockets/ws
https://github.com/serialport/node-serialport
https://community.wolfram.com/groups/-/m/t/158717
https://developer.mozilla.org/fr/docs/Web/API/WebGL_API/Tutorial/Creer_des_objets_3D_avec_WebGL
Attachments
Send command to serial in a terminal with NodeJS terminal.js
Send command to serial in a terminal with python sendCommand.py
Bridge websocket to serial with NodeJS termfwd.js
Testing websocket in html mypage.html
Control LED via websocket in html ledcontrol.html