6. 3D Scanning and printing
group assignment
test the design rules for your 3D printer(s)
We test 2 different 3D printers with FDM technology and made a little versus battle between :
- Ultimaker 3 extended
- Prusa MK3
Material : We use PLA from colorfabb. Same color on each because sometimes print settings are a little different between colors for a same material and brand. Only diameters are different : 2.85mm for Ultimaker, 1.75mm for Prusa.

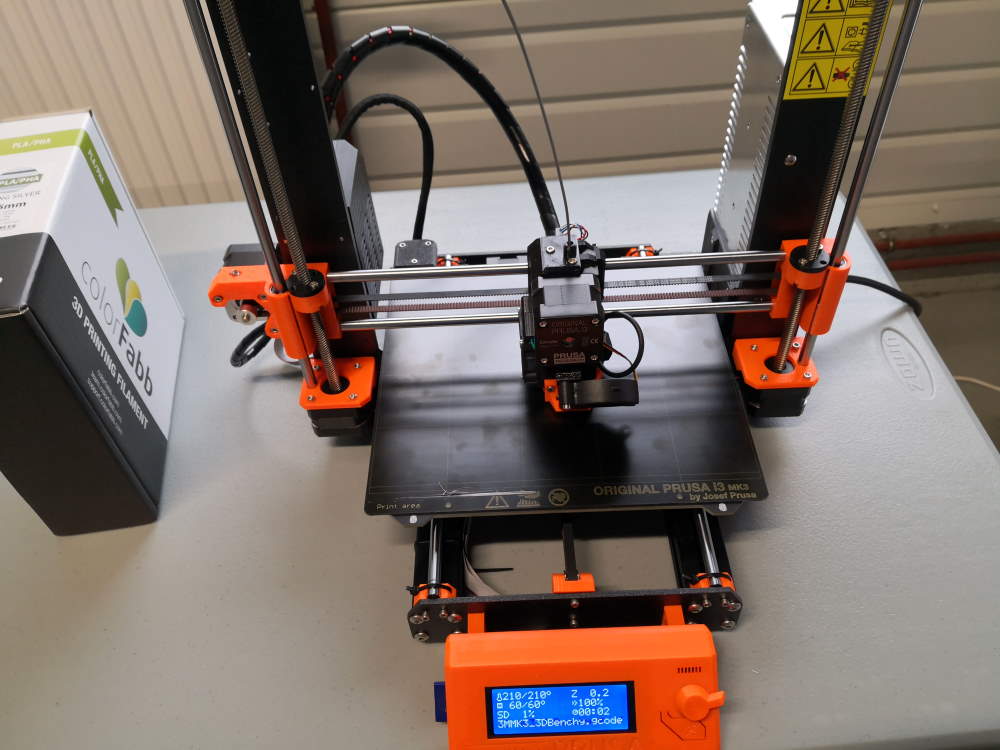
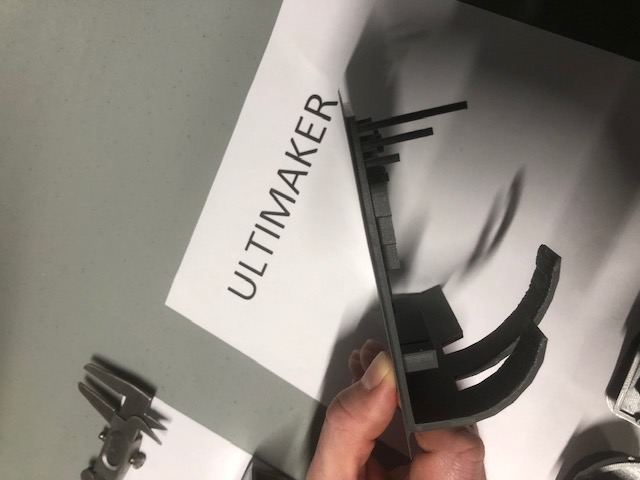
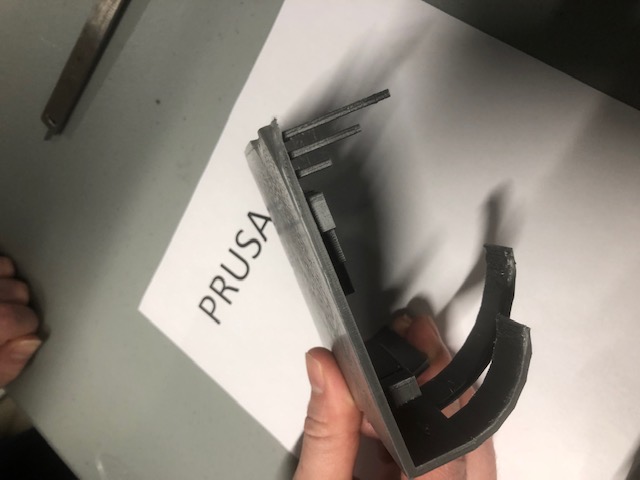
Prusa MK3
For slicing (cut in slices et generating GCODE for printers), I use Cura, it’s a open source slicing software supported by Ultimaker (I will compare with Prusa slicer when I will have more time). First, you have to have to add official Prusa settings for the MK3. Prusa mk3 settings are already in Cura but Prusa says they aren’t official and give a way to add correct settings to Cura.
https://manual.prusa3d.com/Guide/How+to+import+profiles+to+Cura+4.x+(Windows+&+macOS)/1421
Why use Cura? Because I use many printers and Cura work with all the FDM printers I use.
First test : 3DBenchy
First download 3DBenchy here on thingiverse. It’s the most famous 3D printer test on internet.
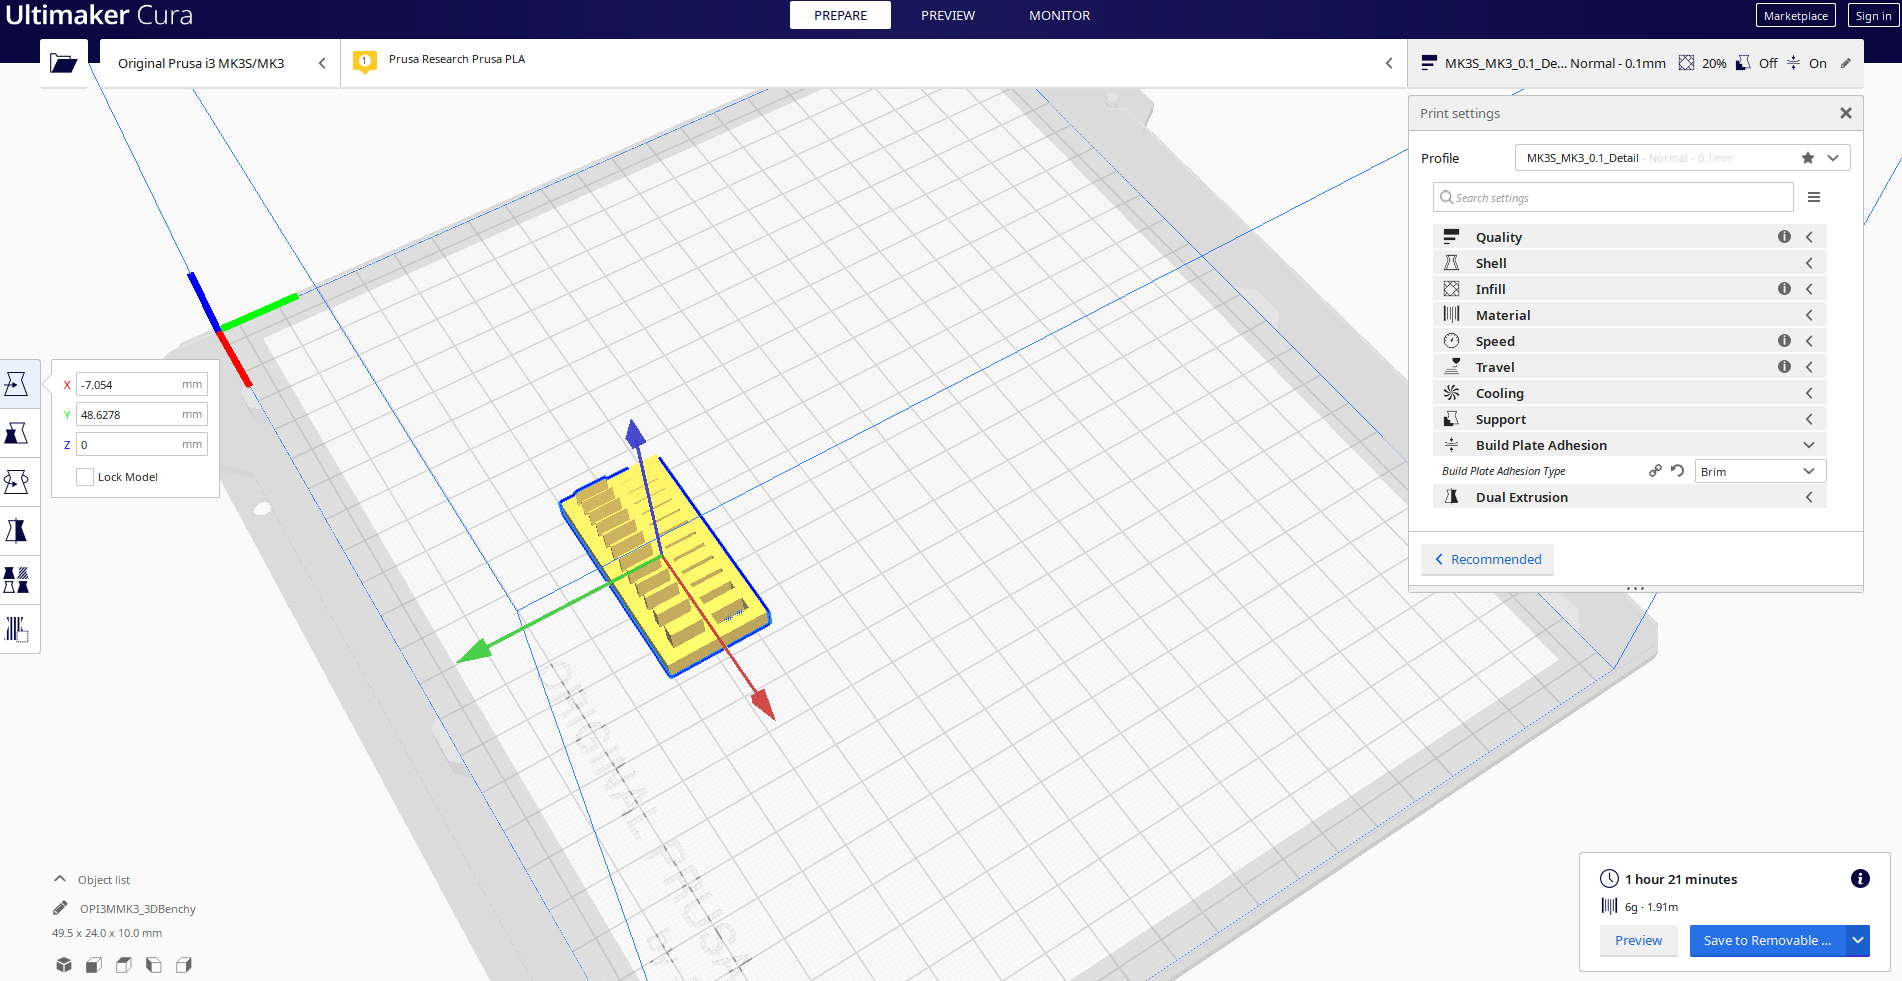
After downloading the STL file, we open it in Cura.
I want to test without optimization I usually apply. So I made a fresh install, just add the Prusa settings to a fresh install of Cura. I’ve also moved to Cura 4.x even if I have always keep my Cura 3.6 before this week. I’ve lost a lot of time with their new UI, it’s easier for newbie but awful for advanced users, especially if you have habits with previous UI.
The settings are :
- printer : Prusa MK3
- material : PLA
- profile : MK3S_MK3_0.2_fast
- infill : 20%
- no brim
- no support
- default temperature settings : 210°C for nozzle, 60°C for bed

Save GCODE to SD card. Put SD card in the prusa and launch the work.
I have also launch it in MK3S_MK3_0.1_Detail + infill 20% + brim to see differences between 0.2 and 0.1
One FabAcademy test
Other test, given in the course.
Settings applied 0.1, infill 20%, brim.
All In One 3D Printer test
You can download it here on thingiverse.
Settings applied are :
- printer : Prusa MK3
- material : PLA
- profile : MK3S_MK3_0.1_Detail
- infill : 20%
- Brim
- no support
- default temperature settings : 210°C for nozzle, 60°C for bed

We can see in layers view, no support will be added.
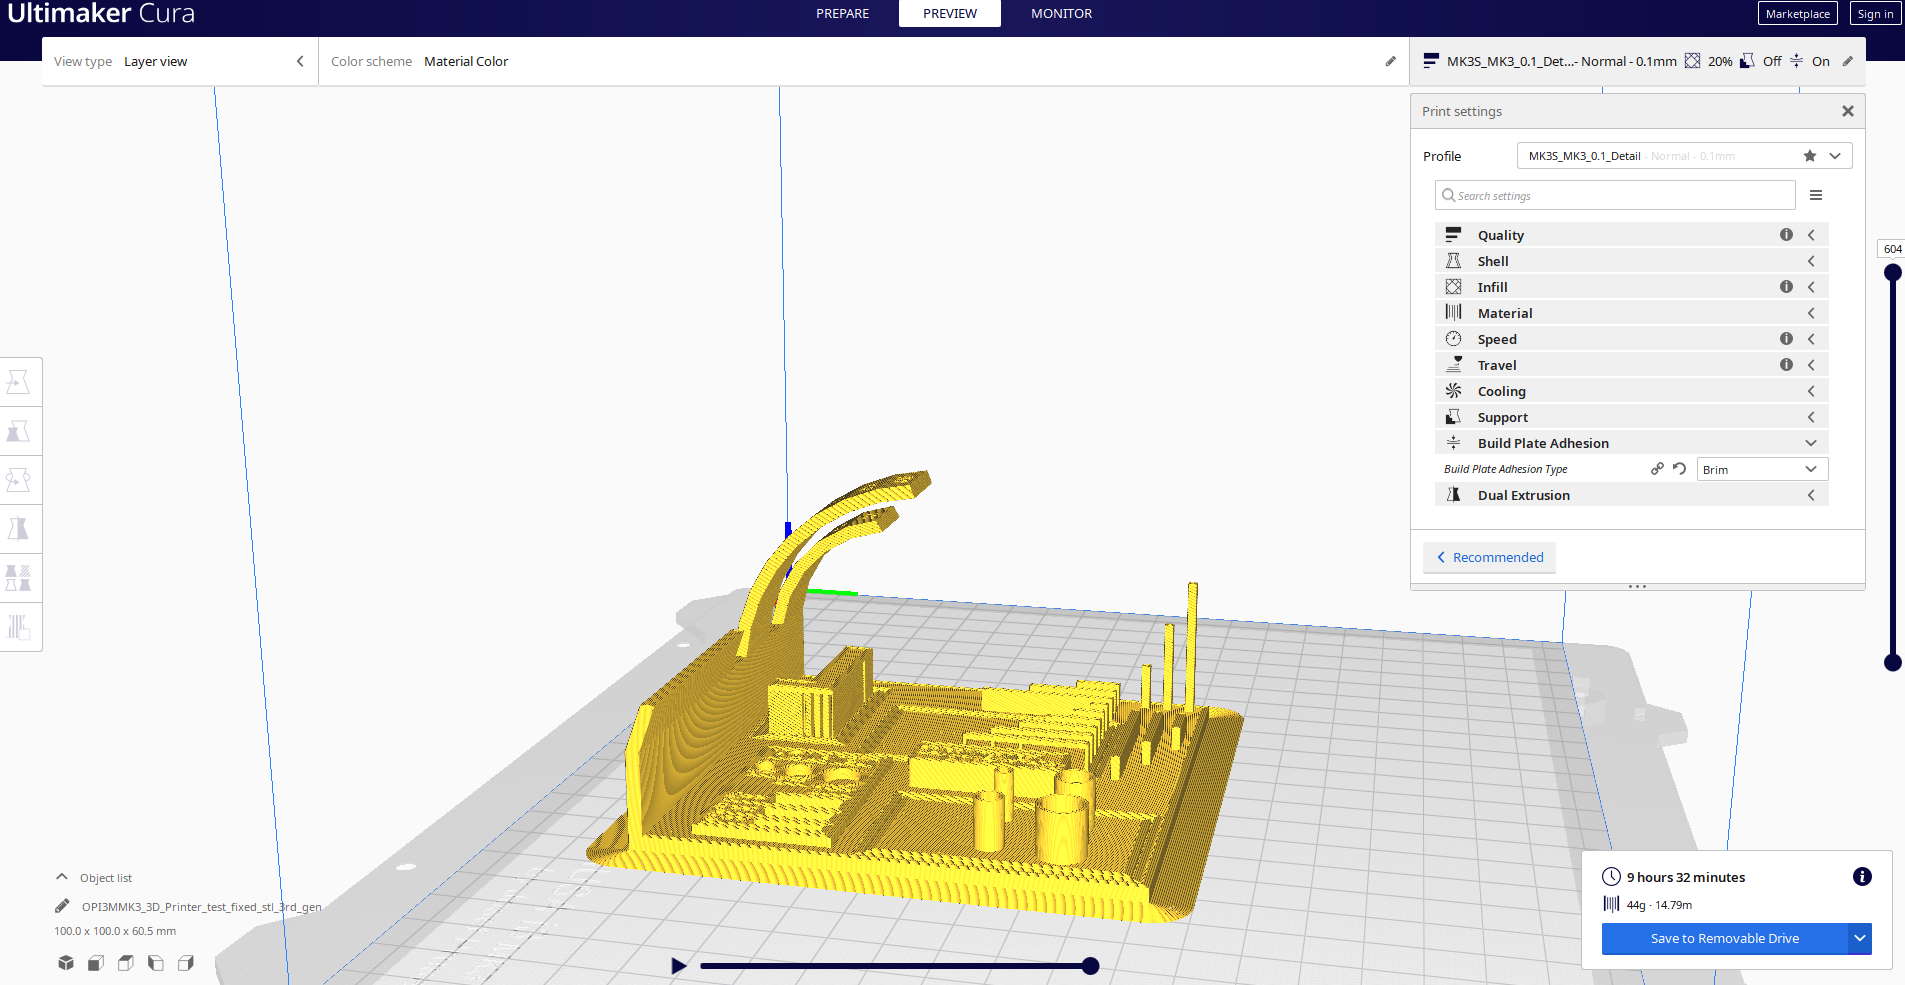
Some details aren’t present on the printed object because they have been destroy directly by the slicer.
Problems
On the Prusa MK3, in first tests in 0.1mm layer, the first layer adhesion wasn’t good. I first adding brim but still bad. Then I adjust Z calibration to lower the nozzle, it was better but still not perfect. I redo Z calibration and lower nozzle to press first layer and it was good the second time. I want launch another 0.1 mm bench and problem came back, only thing that changed is the magnetic bed I remove to get the object(s) and replace after, I think it never came exactly at same position even if I place it very carefully, I have to to test this more in future to confirm but it will be a problem if it’s the case.
Never get levelling problem with the ultimaker 3 extended even if we remove and replace glass bed. Probes on 2 systems have different technology, induction probe for Prusa MK3 and touching probe on Ultimaker MK3. Even if the Prusa make 9 points leveling it’s less accurate than Ultimaker system, I think induction probe don’t test the magnetic bed but the metallic structure under, so if the bed isn’t exactly replaced when Z calibration was made it add error when we have to be precise at 0.1mm.
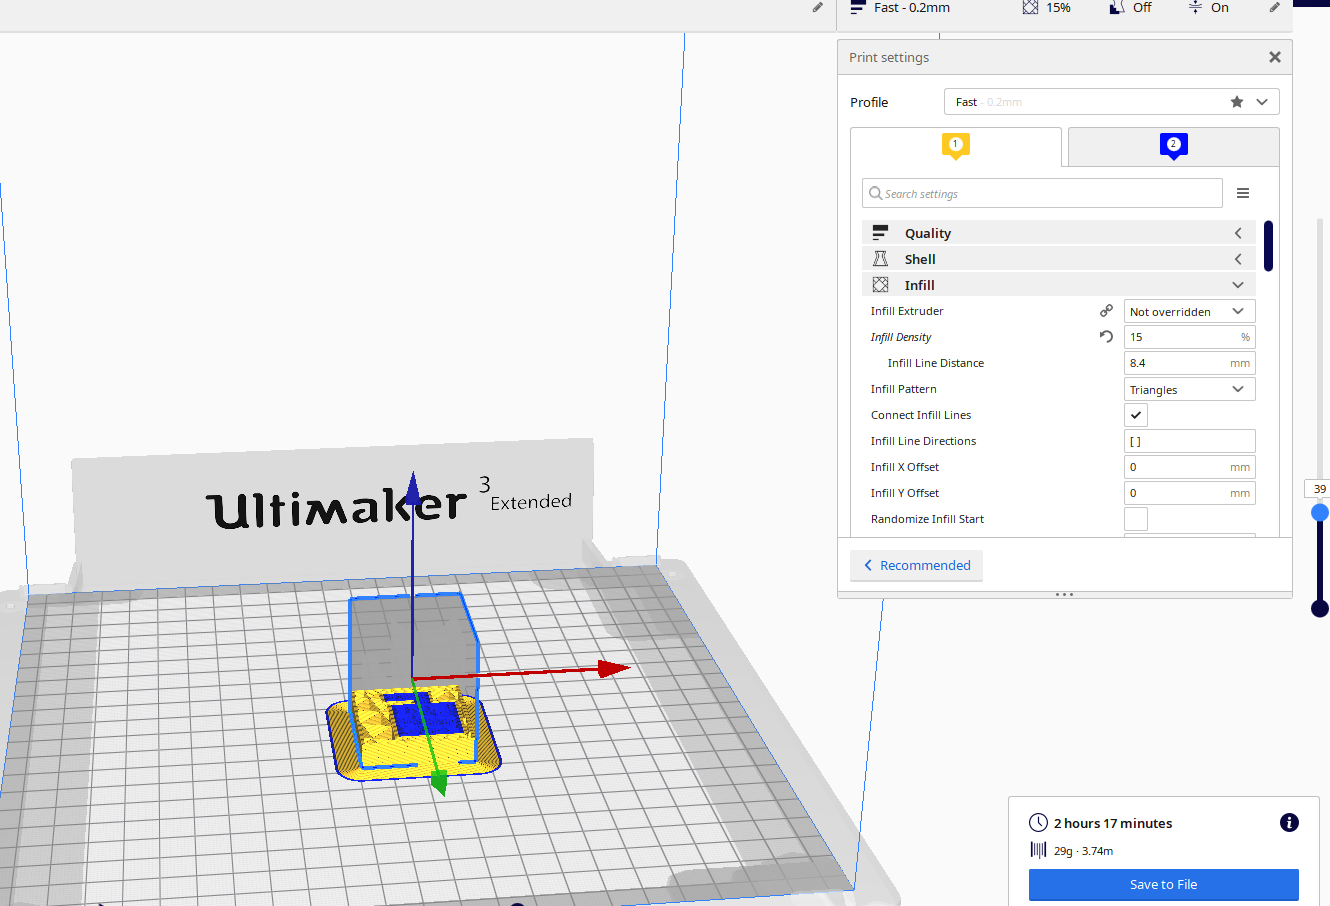
Ultimaker 3 extended
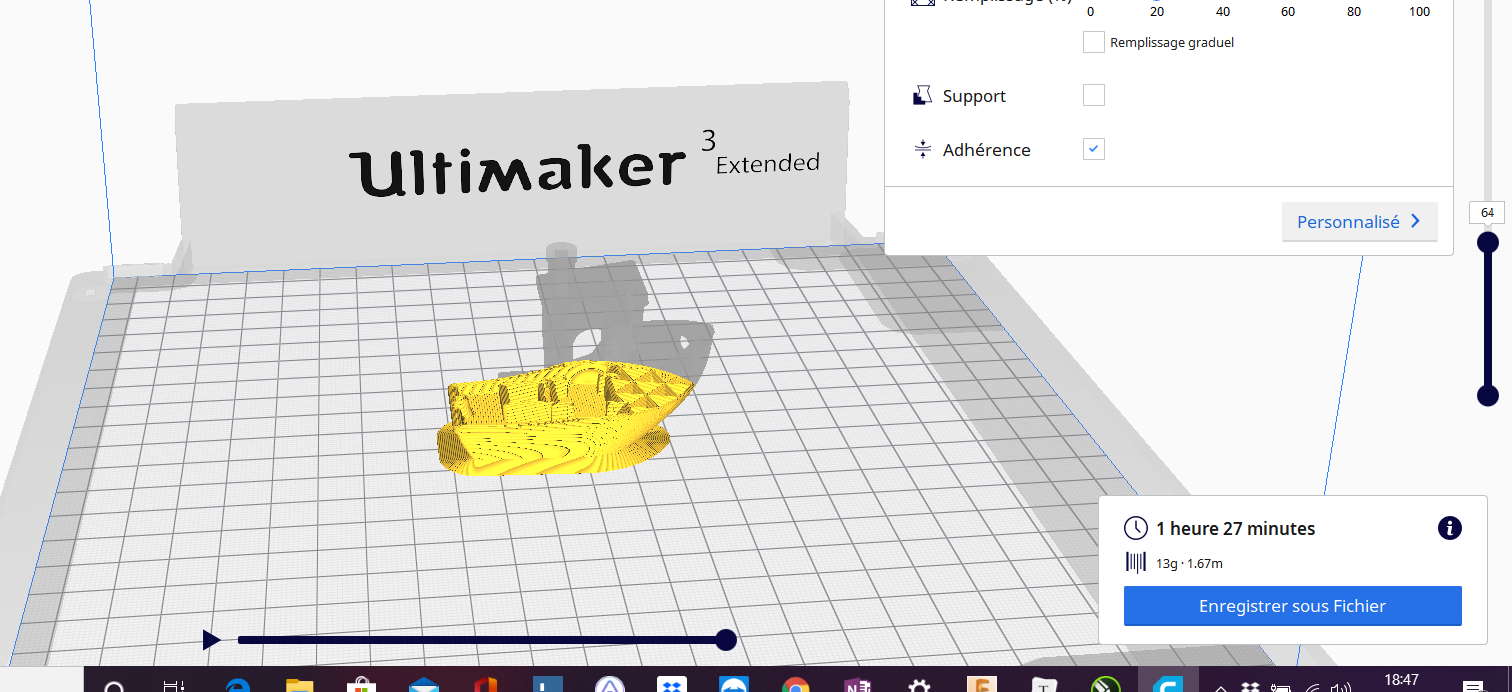
second printed of our group assigment. We printed the same test as the Prusa MK3. We used it with beginner mode (because we are beginners), so some settings are already done :
The settings are :
- material : PLA
- infill : 20%
- brim
- no support
- temperature is monitored by the printer according by the material
The Z calibration is made by the printer.
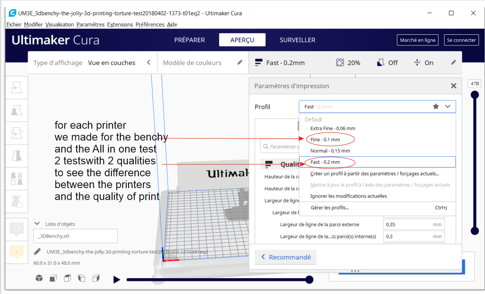
Here are the settings for the quality. we used the same settings for the Benchy and the All-in-one test.
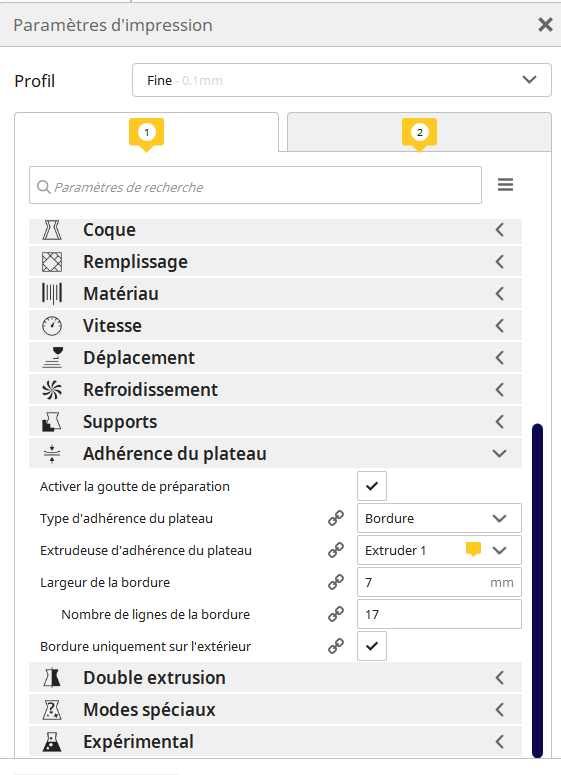
and for brim (7 mm and 17 lines)
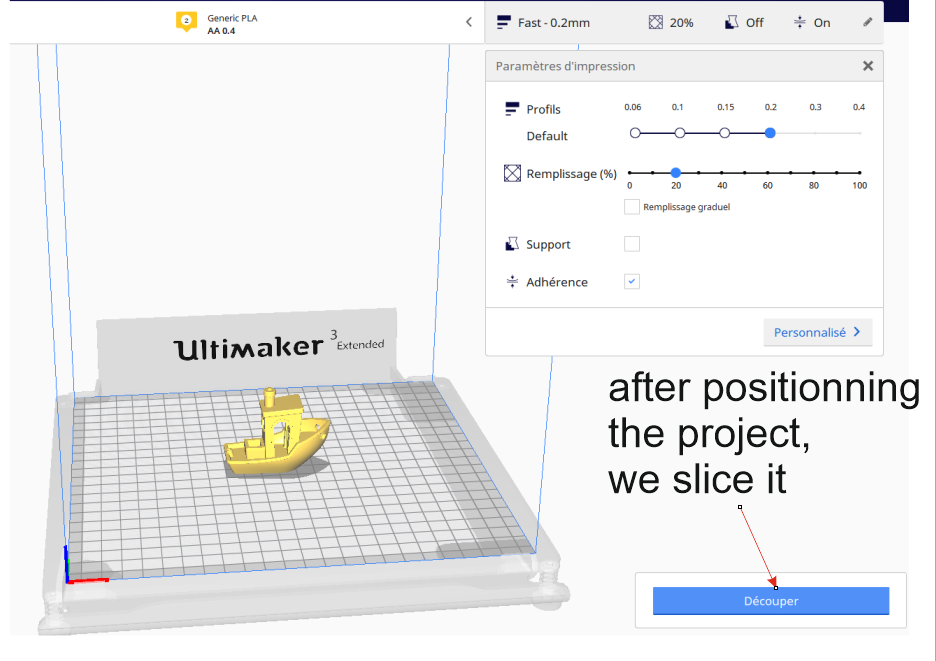
When the print is configurated with cura, you prepare the gcode
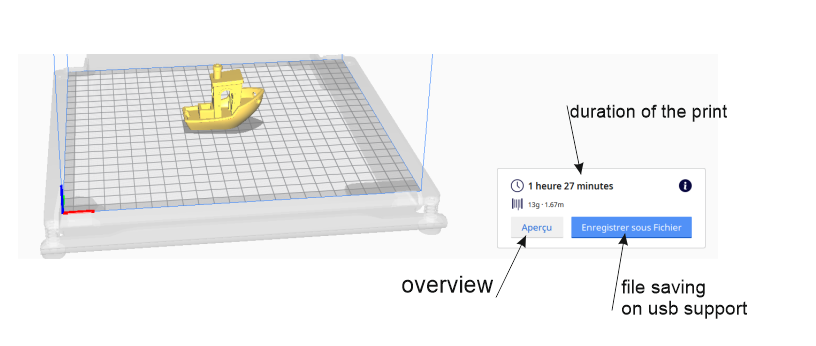
we copy the gcode prepared by Cura in an USB key to insert in the printer (near the screen)
You can check the print and the inside of the object with the overview option and scrolling on the right side
Problems
we had different problems in our printing. None when we printed the different test one by one, but many when we tried to print several tests in the same time, with brim, which is ultimately not a good idea.
the brim : when you put different objects to close on Cura with a brim in the settings, the edges may overlap, and disturb the printing by the accumulation of material entrained by the extrusion head.
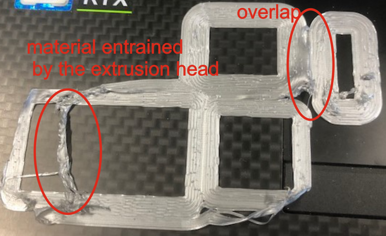
several objects : the extrusion head built in the same type all the layers of the different objects. For this, it flies over the different parts already built and tear off the material already deposited.
with the Ultimaker, the 3D printing filament got stuck during a print.
the drive mechanism that pushes the filament
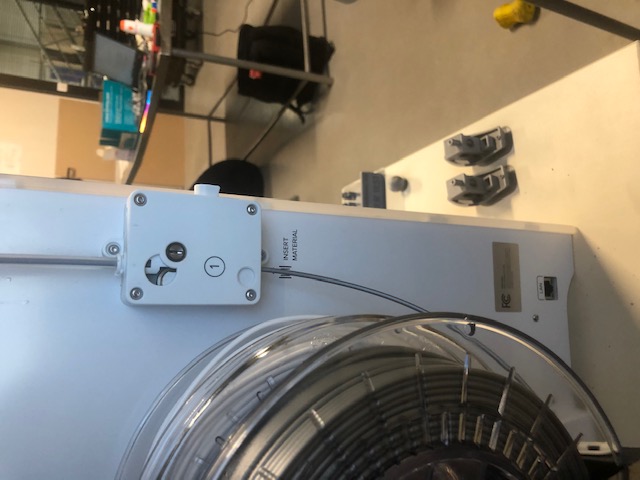
the filament eroded by the drive mechanism

in this case, you have to remove the filament and cut bevel it to re-introduce it.
printer comparison
Our different tests
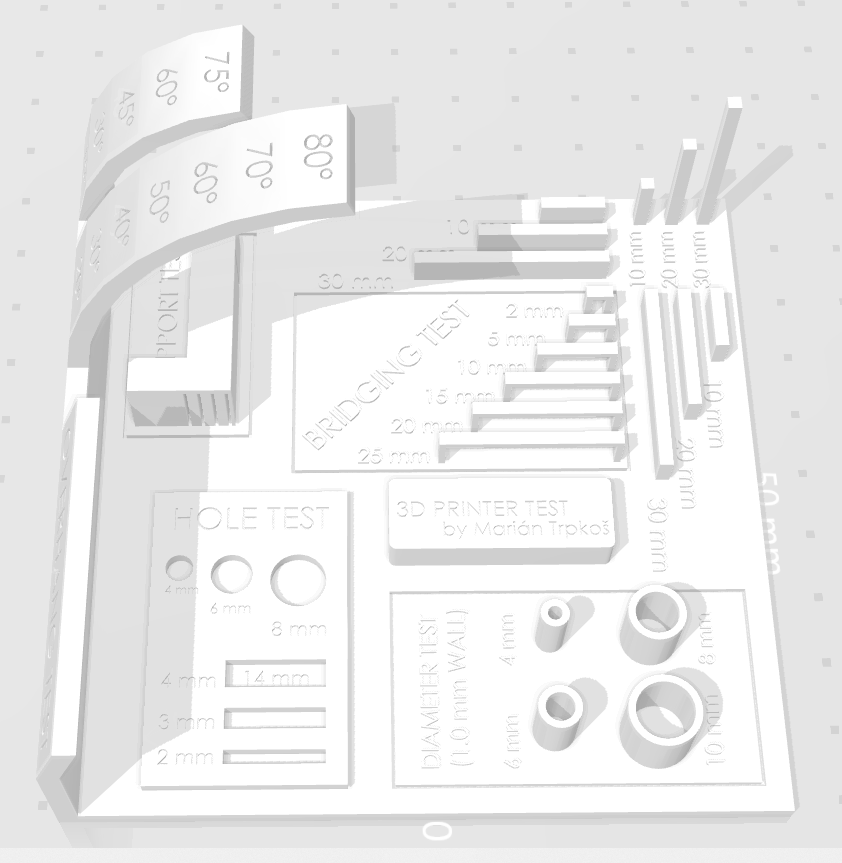
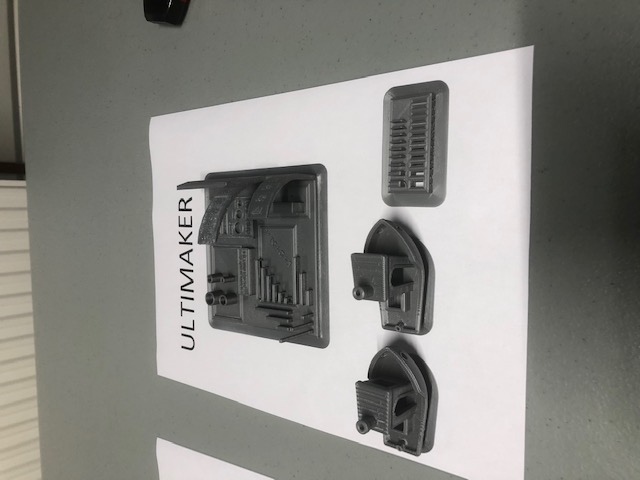
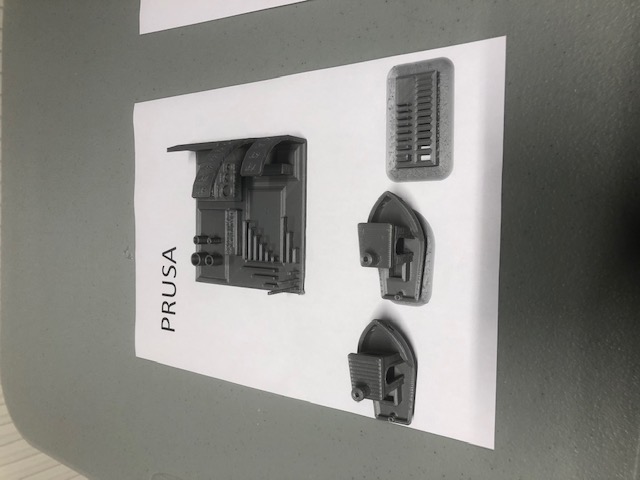
the work of the Ultimaker is a little better except for the overangle. 70° for prusa vs 50° pour ultimaker.
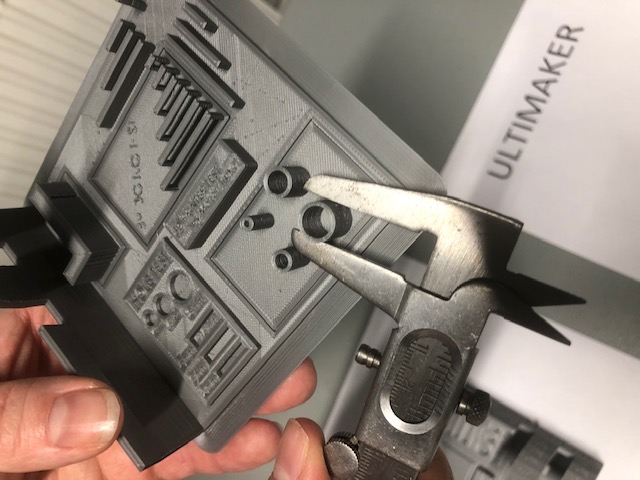
Accuracy are pretty good on both even if the Prusa seems to overflow in 0.2 and loose accuracy inside holes. Prusa is better on overangle. Bridges are good on both.
If I want to print quickly and don’t loose time on tuning, I will choose ultimaker keepings these settings. These printer is very nice for a beginner, the Z probing is always perfect!
Prusa can be good but need more tuning, to limit stringing, I have to set more filament retract or lower a little extrusion temperature. To have a better 1rst layer adhesion, I have to lower a little Z axis (but Z probe doesn’t seems accurate and it can be a problem if next user doesn’t take care of leveling, it can touch if magnetic bed is not exactly put on plate) or set a higher extrusion temperature of 1rst layer. I have to test recommended Prusa Slicer to see if result are better on vanilla settings. Lower temperature extrusion can also be a solution for the little overflow or slow a little the feedrate but it takes times to have perfect value. The room is also a big problem, I feel too many air flow and the ultimaker works better because it have an enclosure.
Other printers I’ve tested
FDM reinforced : Markforged Mark 2
If you want to make stronger object, you may have to change the process. You can just change material and use technical properties for each, or you can add fiber. For that you have 2 types, long and short fiber. Short fiber can be used with “classical” FDM printers by changing nozzle (or not but the lifetime will decrease quickly) because this kind of filaments are very abrasive.
Or you can use long fiber (stronger than short) but you need a special printer like the Markforged Mark two.
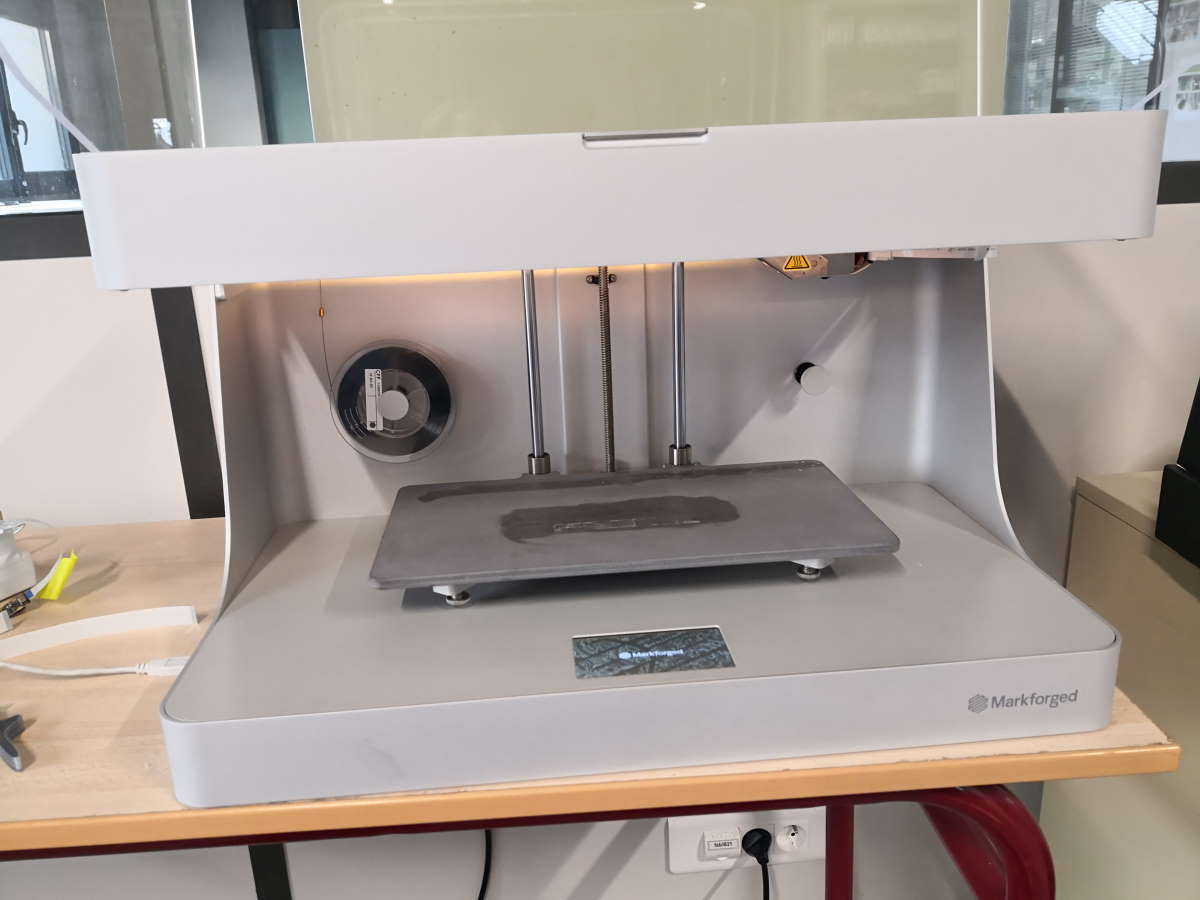
At Markforged, printer is online, so you have to go to their website https://www.eiger.io/.
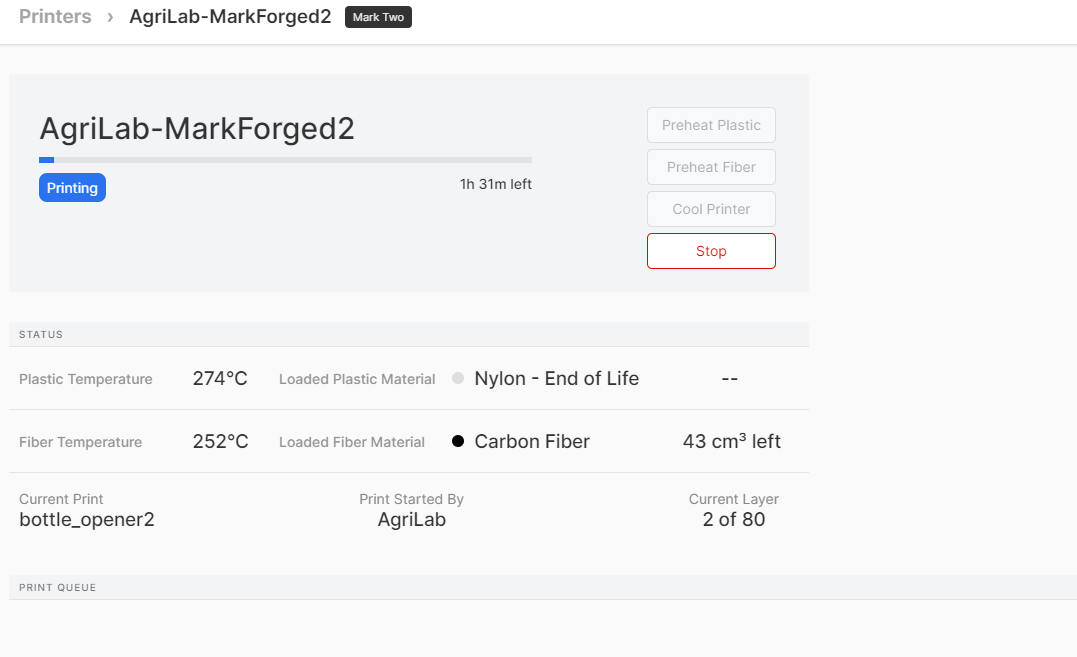
After log in, I upload the stl file (bottle_opener.stl), I choose material Nylon (here named Nylon - end of life because a newer material is arrived now), I choose reinforcement material (carbon fiber) and the printer (onyx, mark two) and I launch “calculate details”. Why a bottle opener? Because when you open a bottle, you apply many torque on them and with simply PLA, you have big chance to break it at first time.
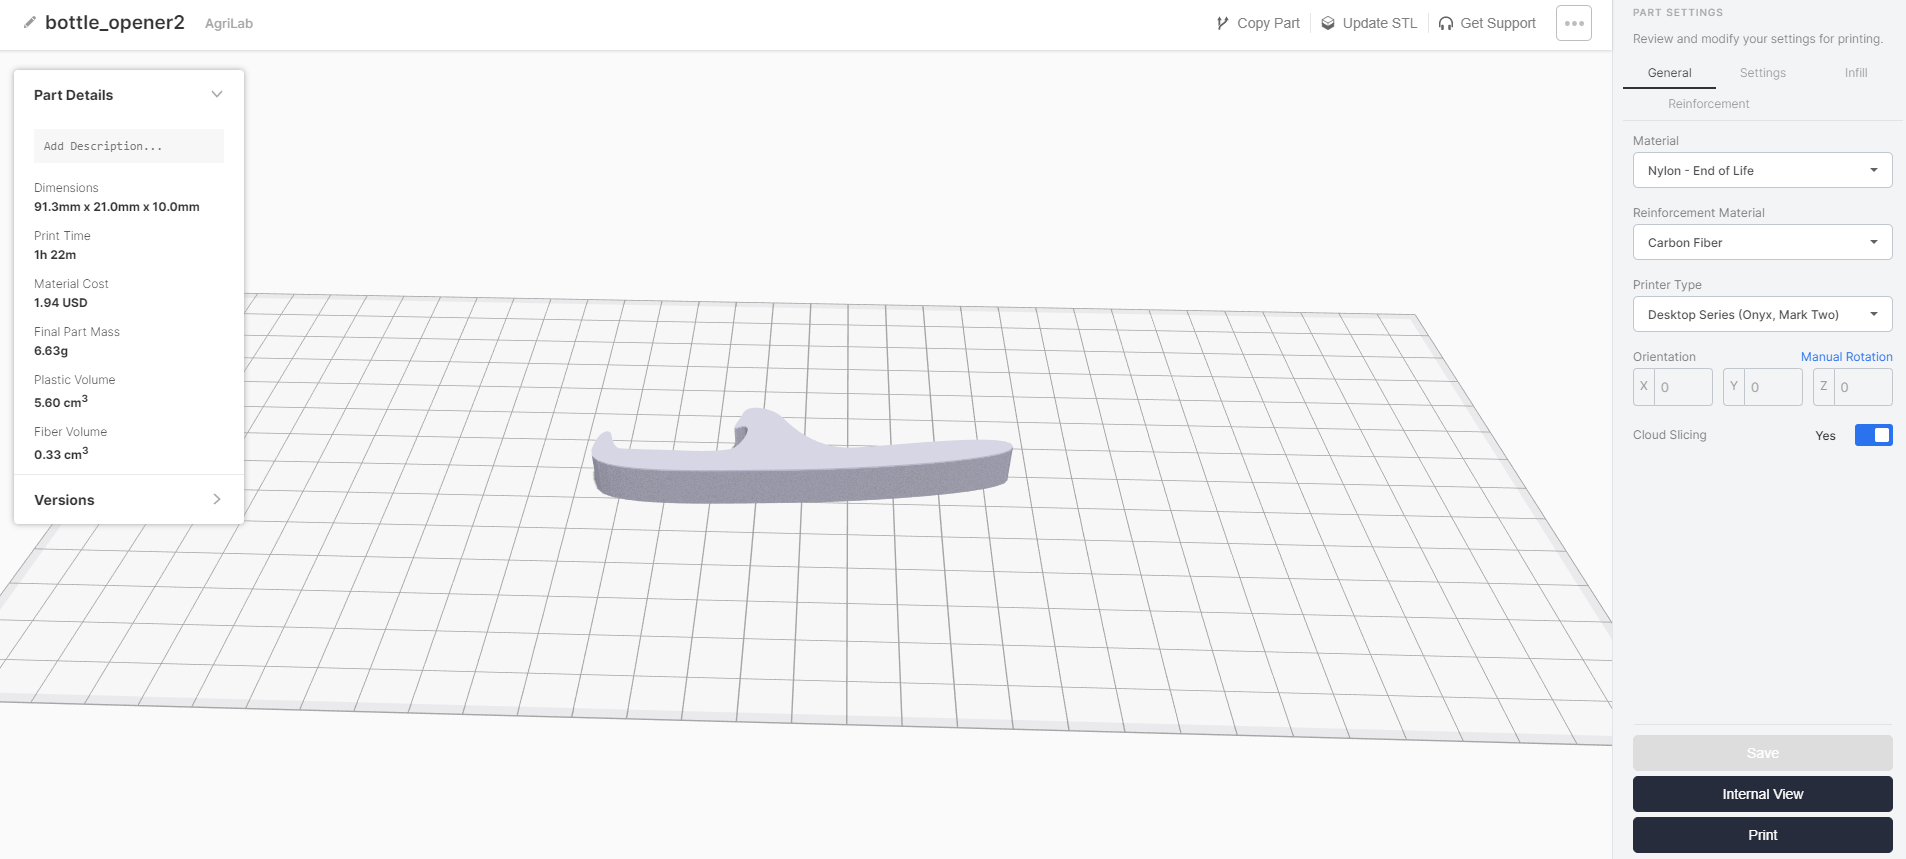
Then I go to “internal view”. Here I can view the layer and where reinforcement is added

I modify to add an internal layer carbon reinforced. I select layer in the bottom, tick “use fiber” and create group.
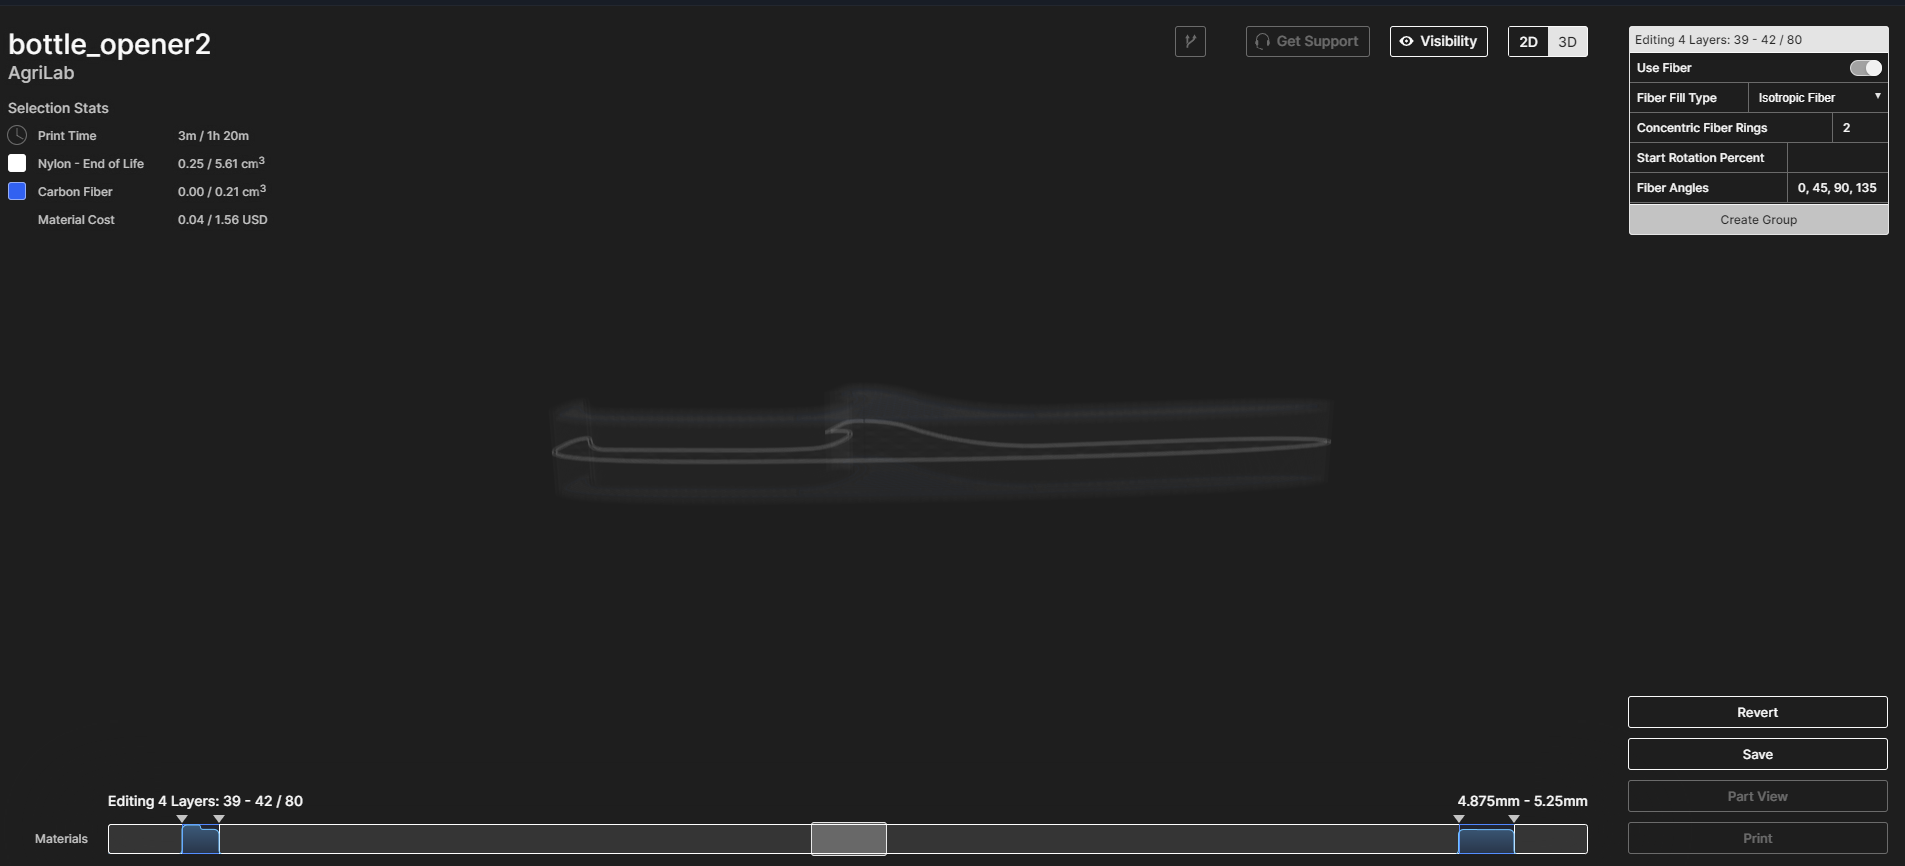
I have 80 layers. I finally choose these settings 4 layers nylon, 2 layers reinforced, 32 layers nylon, 4 layers reinforced, 32 layers nylon, 2 layers reinforced, 4 layers nylon.
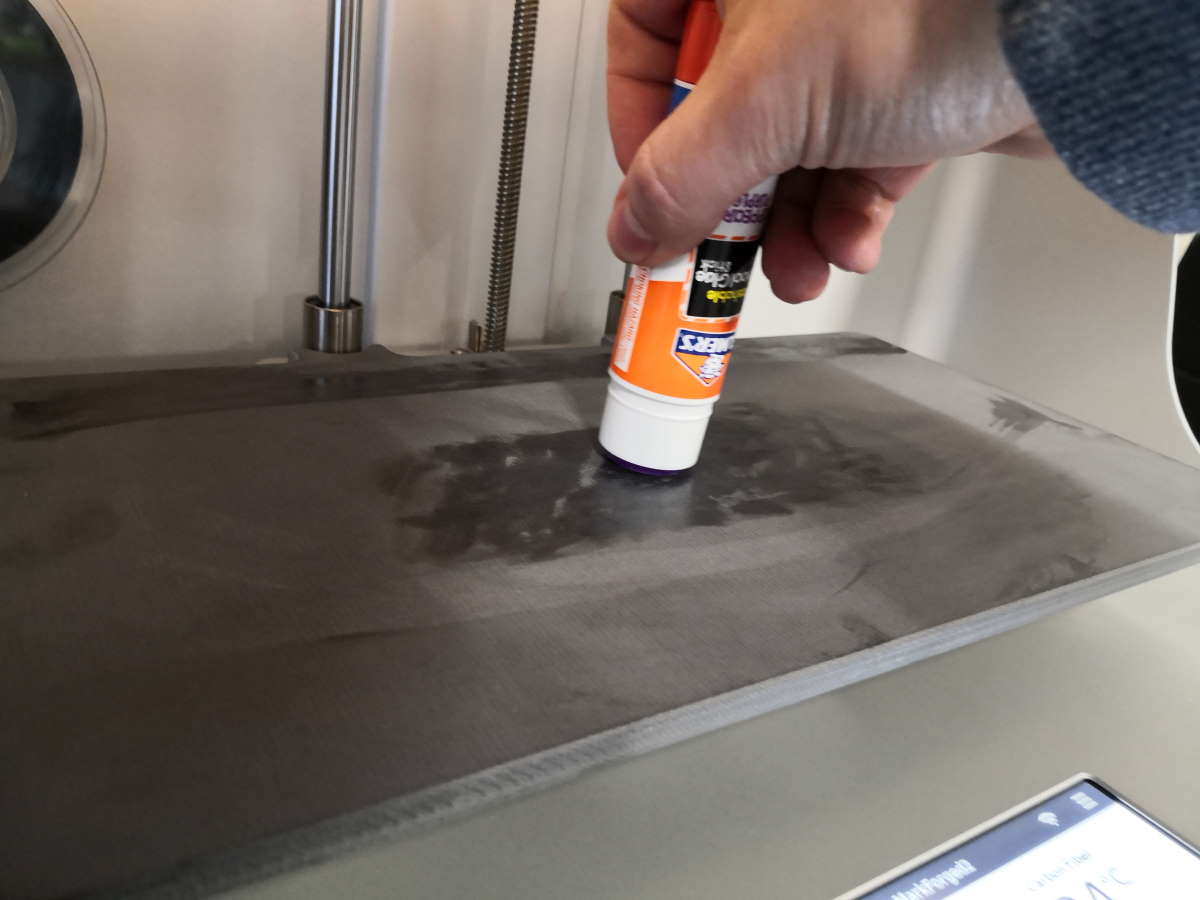
I have to put some glue on the bed. On the back, for the purge line and where you print your object, here on the center.
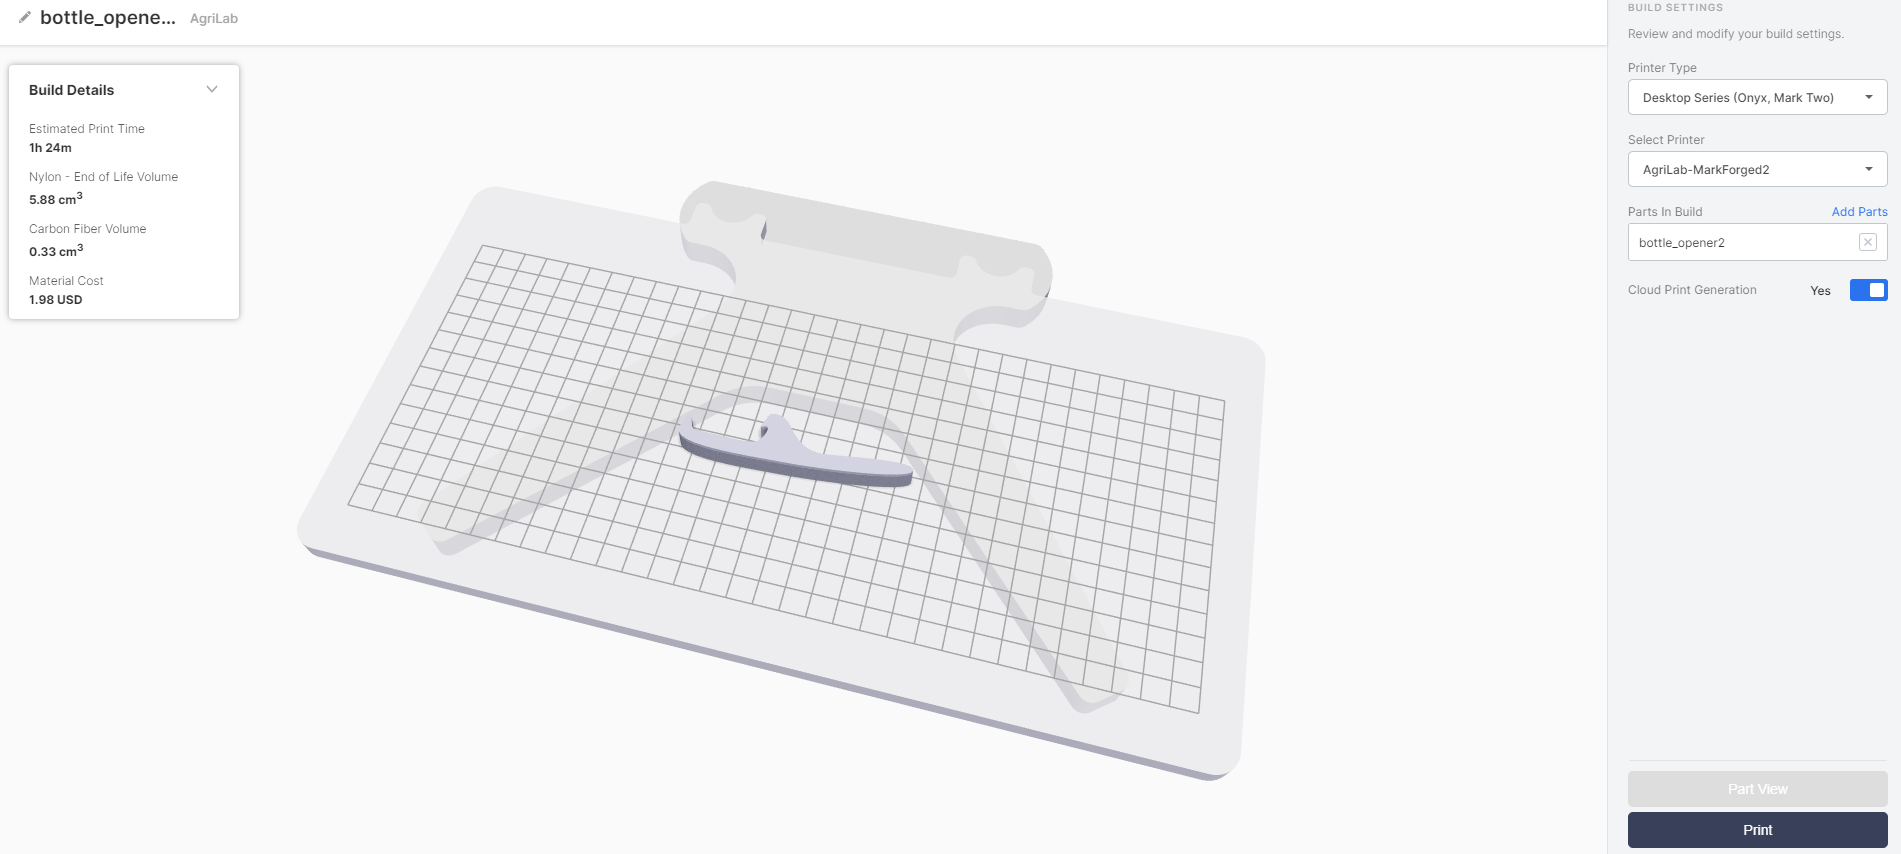
And now I launch the print.
You can also follow the print online with the web interface
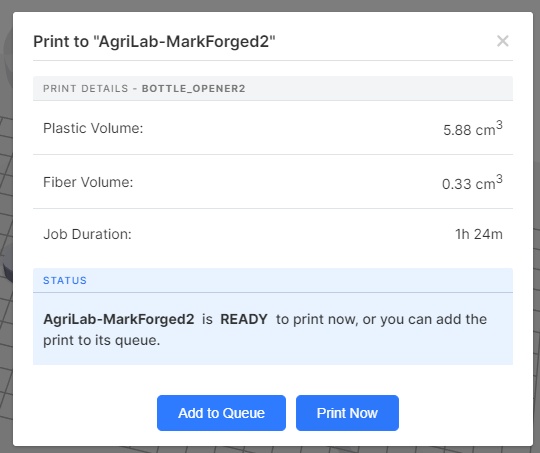
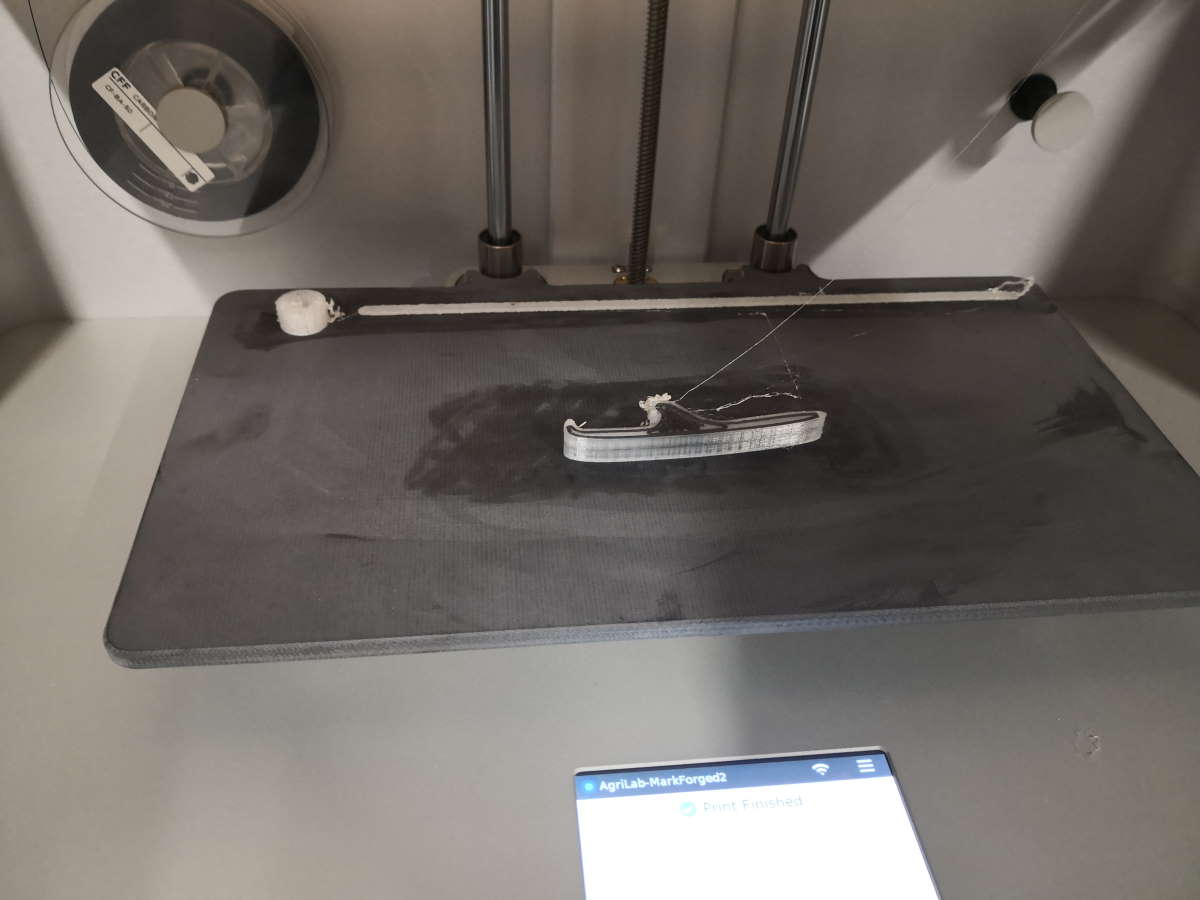
Here the result
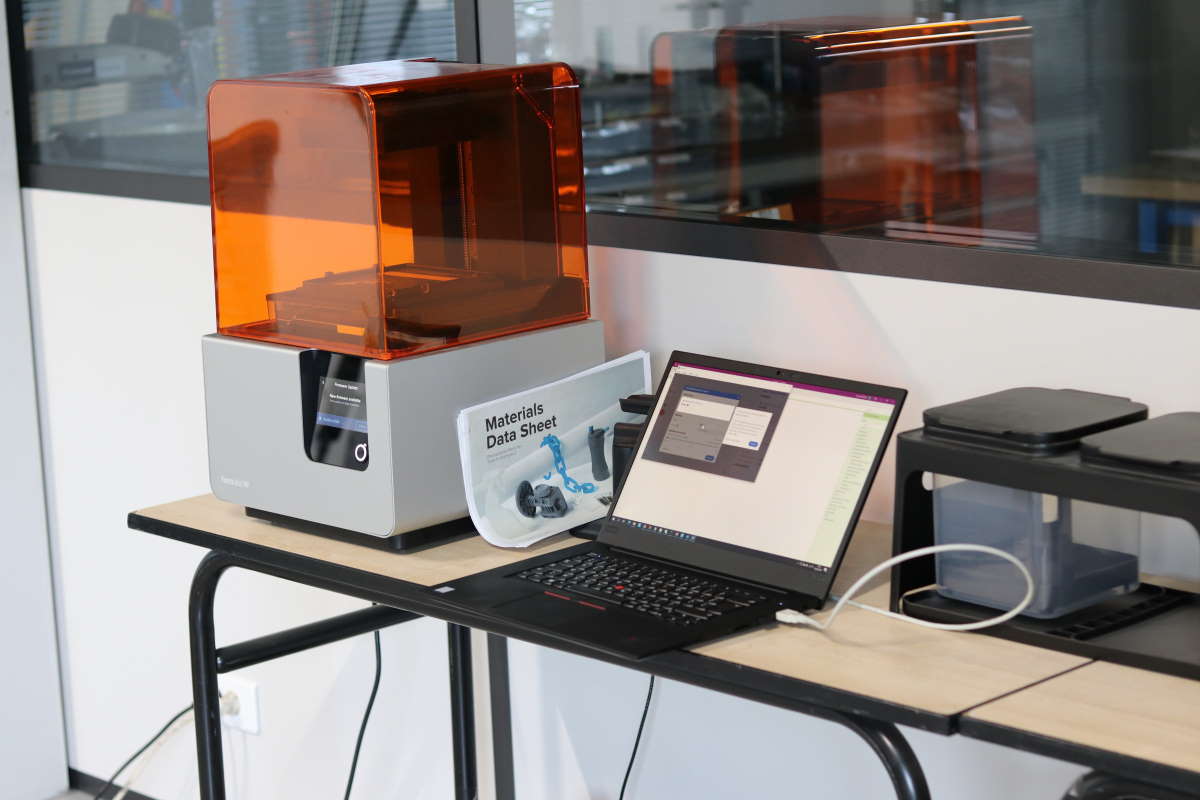
SLA : FormLabs Form 2
Stereolithography is an additive manufacturing process that, in its most common form, works by focusing an ultraviolet (UV) laser on to a vat of photopolymer resin. You can have a better resolution because you aren’t limited by a nozzle diameter on X & Y axes. Here with the FormLabs Form 2, you can push resolution up to 0.025mm
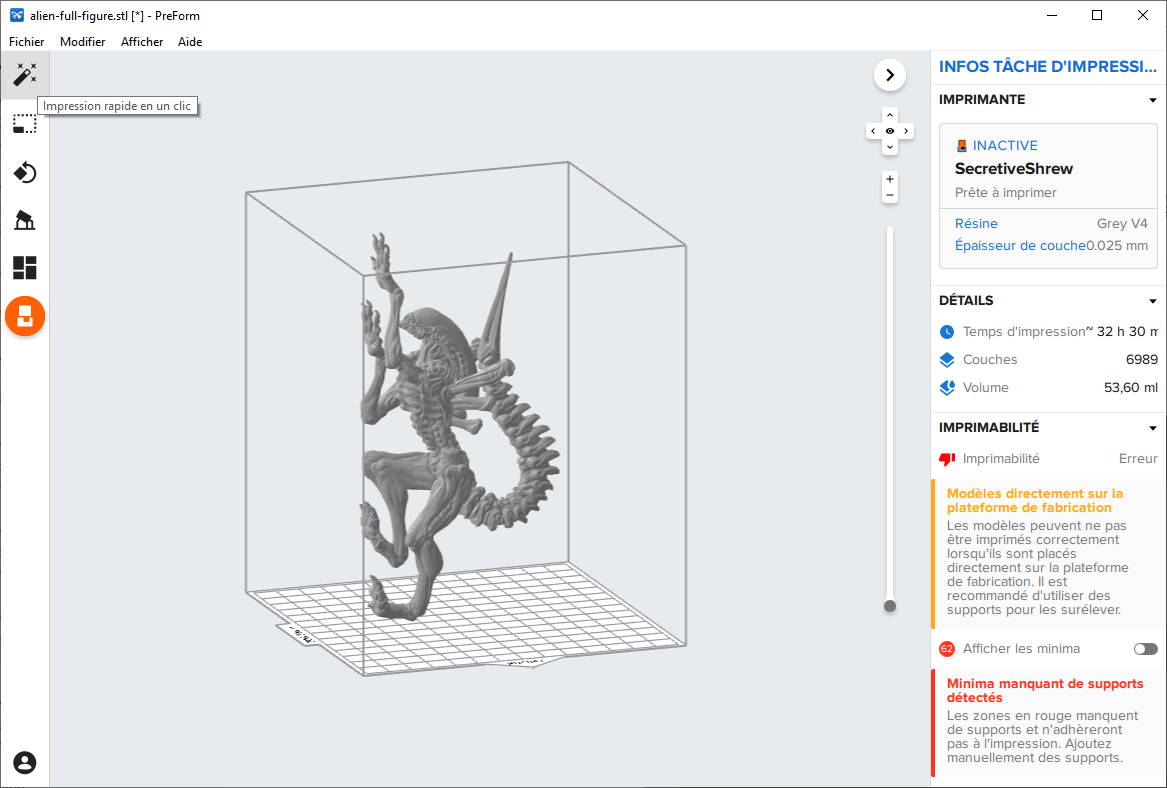
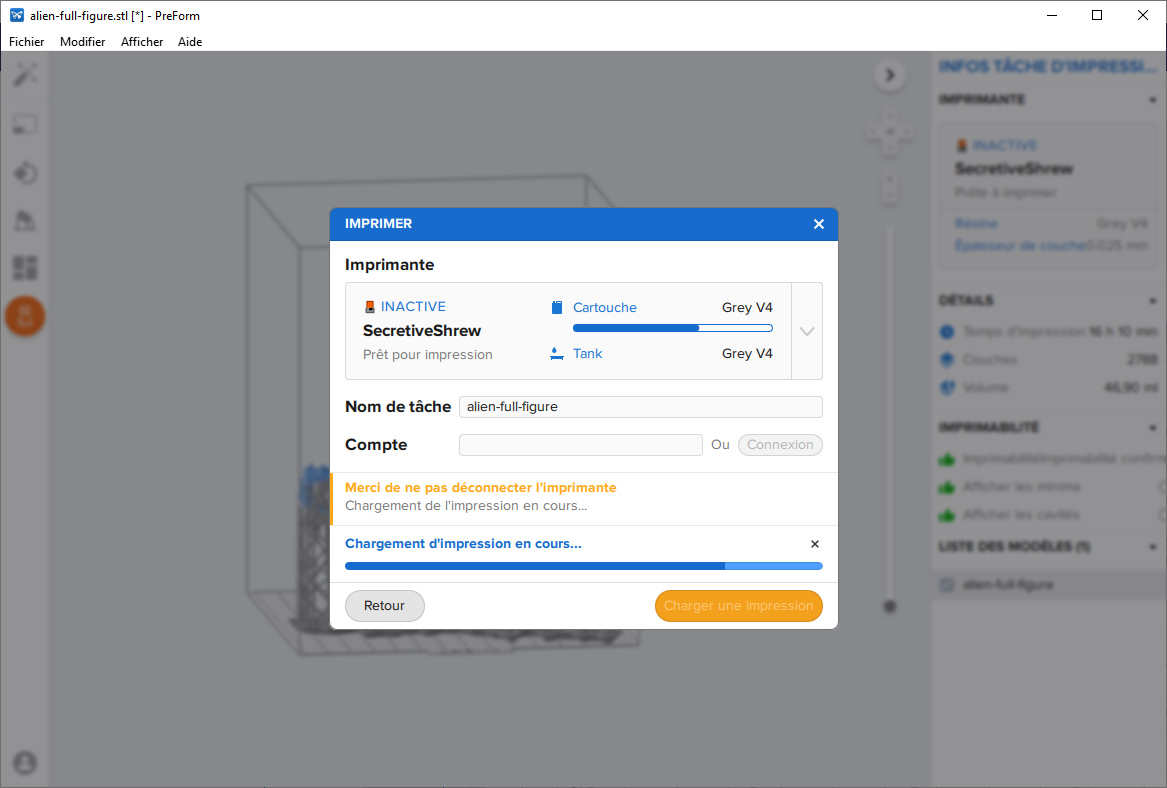
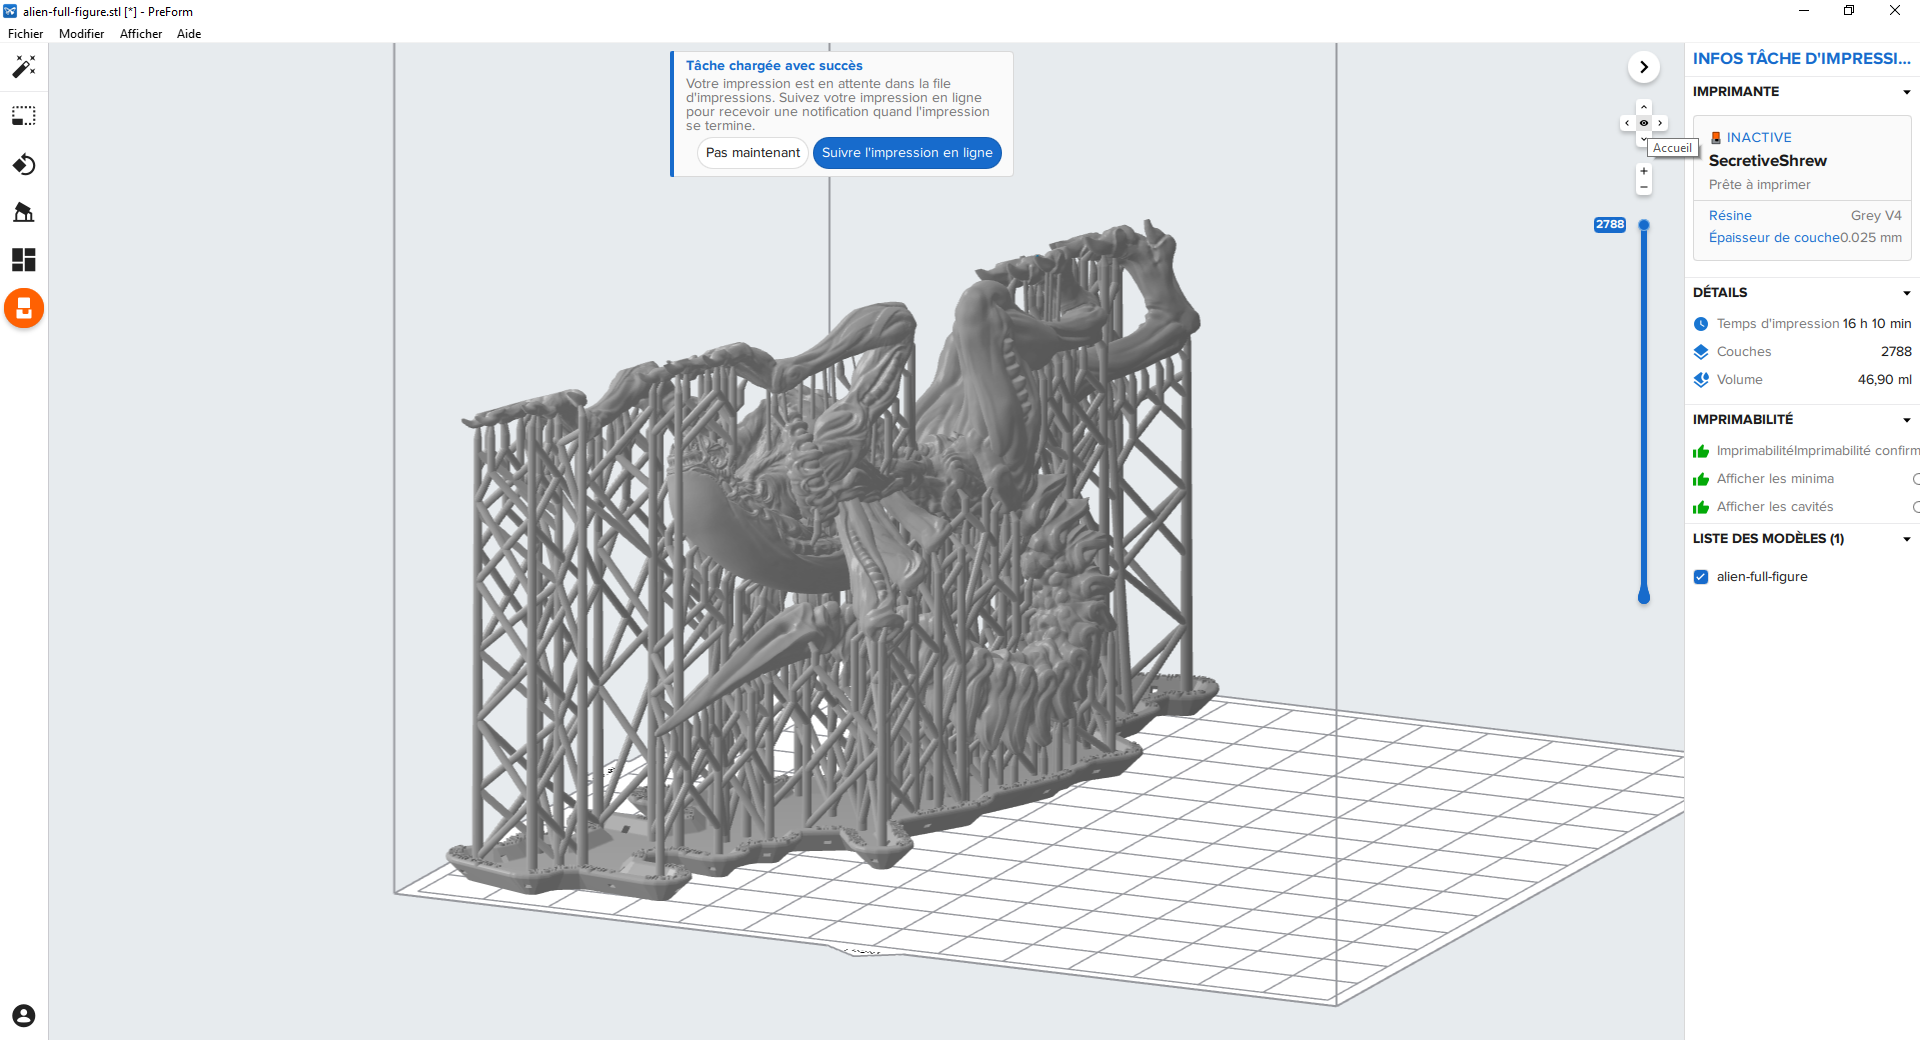
I choose a object with many details, an alien available here on thingiverse.
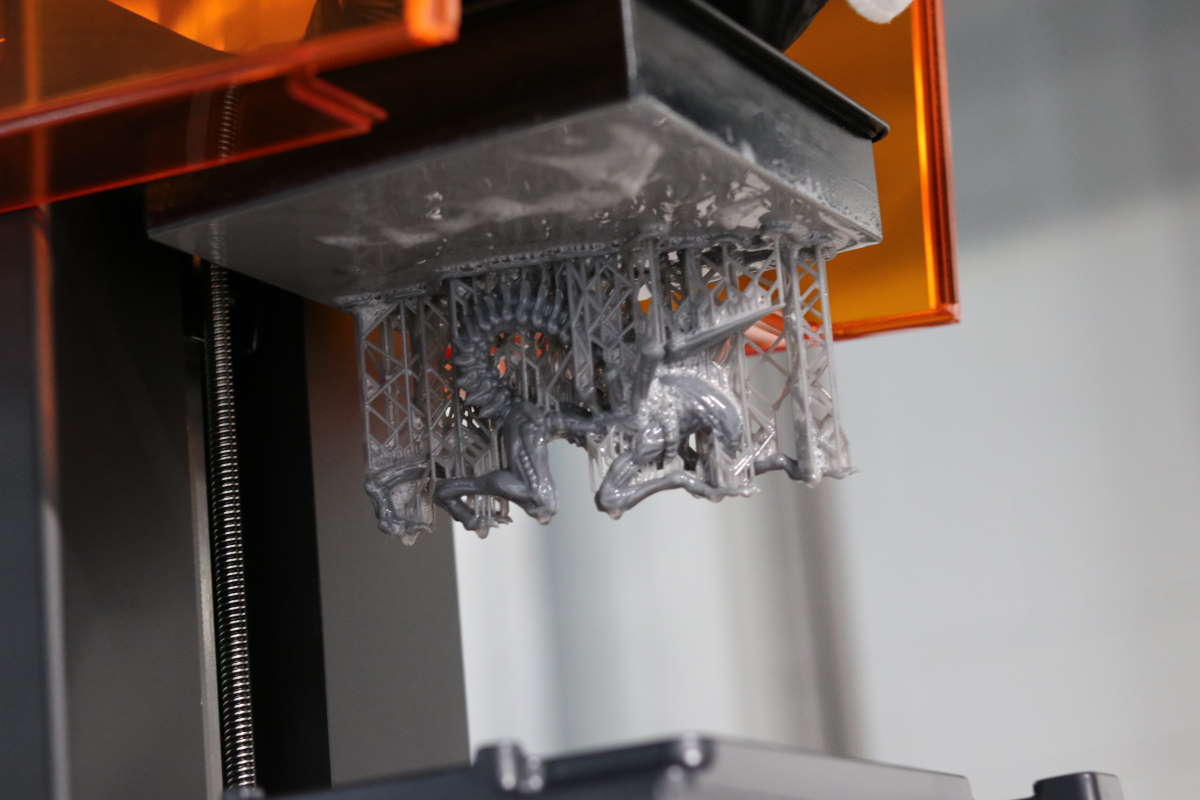
part 1 : print
After 16+ hour of printing :
part 2 : wash
I have to remove print from bed with a platter. It’s very sticky. The wash part is for removing uncured resin on the printed object.
! Warning use gloves !
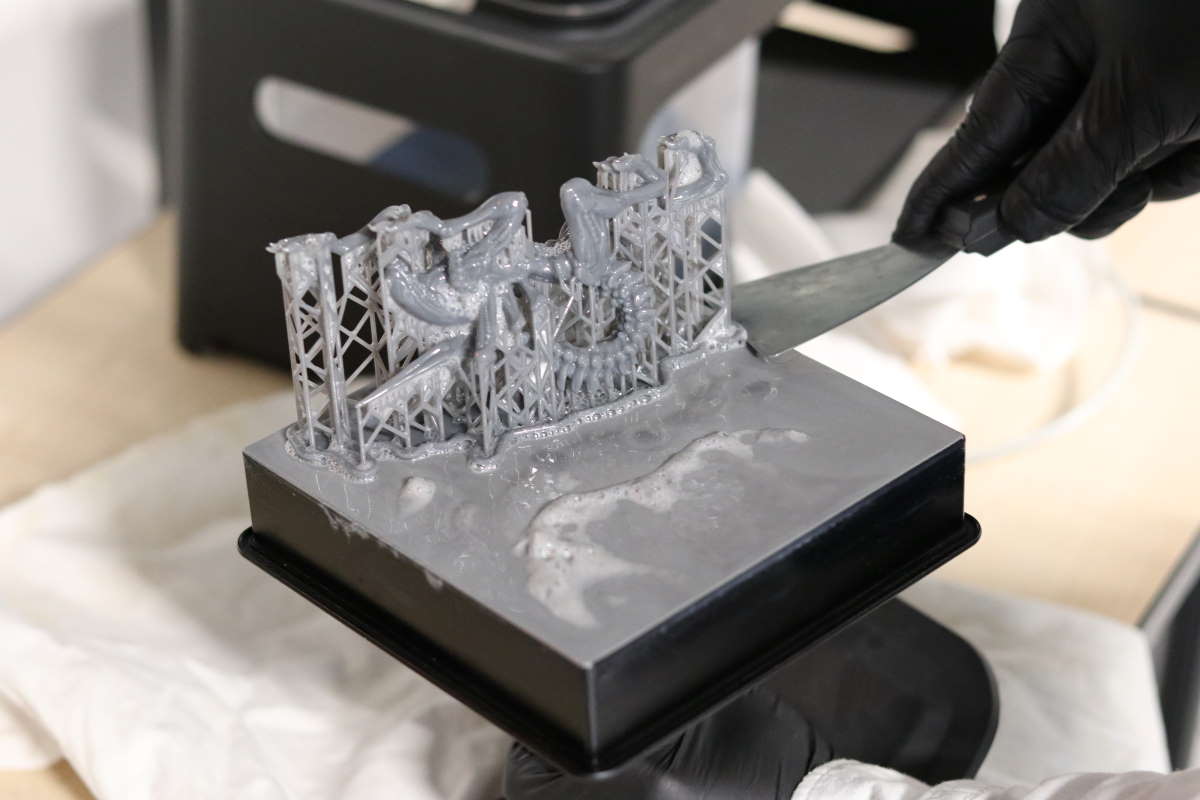
The FormLabs Wash is a device that plunge the object in IPA and agitate the liquid so the IPA can access all the geometry. This part takes 20min.
Sorry, no picture yet…
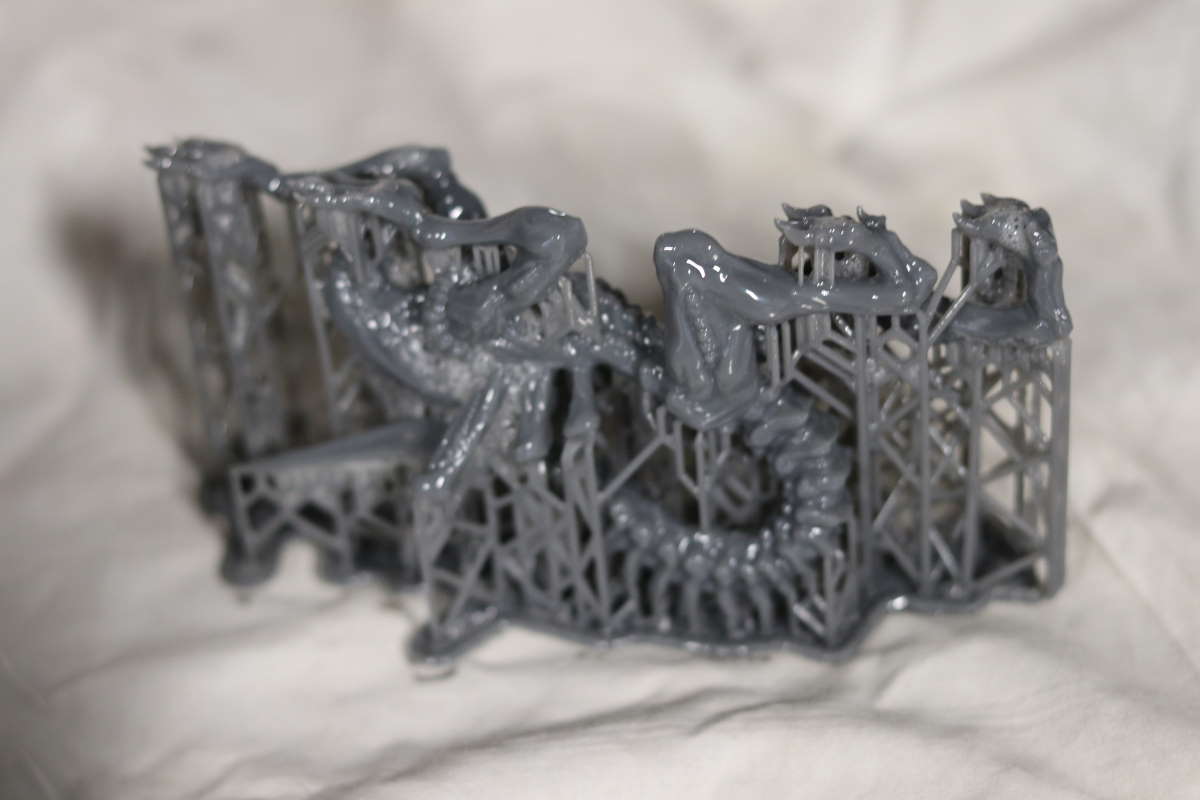
part 3 : cure
Last part of the SLA process, the curing. After removing liquid resin you have to cure. This step fixes resin and improve solidity.
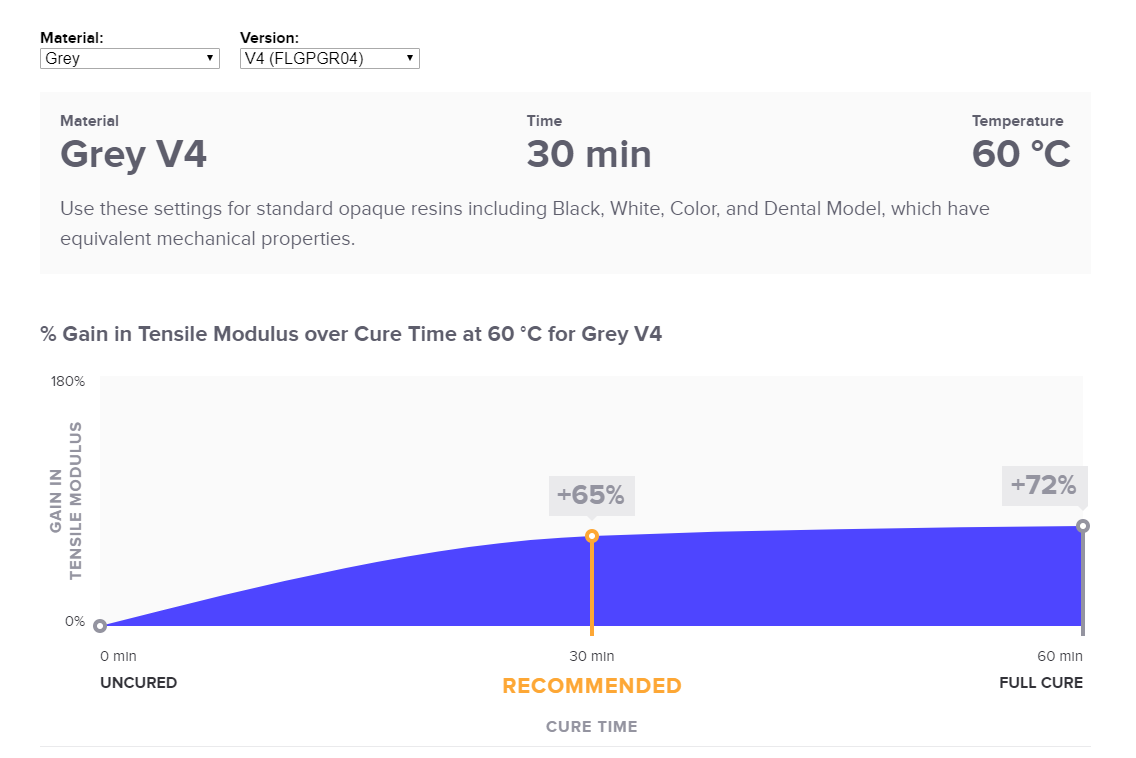
According to FormLabs documentation : https://support.formlabs.com/s/article/Form-Cure-Time-and-Temperature-Settings by using Grey resin, I have to cure at least 30min or 60min for full cure.
I choose to launch cure for 60min. Here the result after the cure :
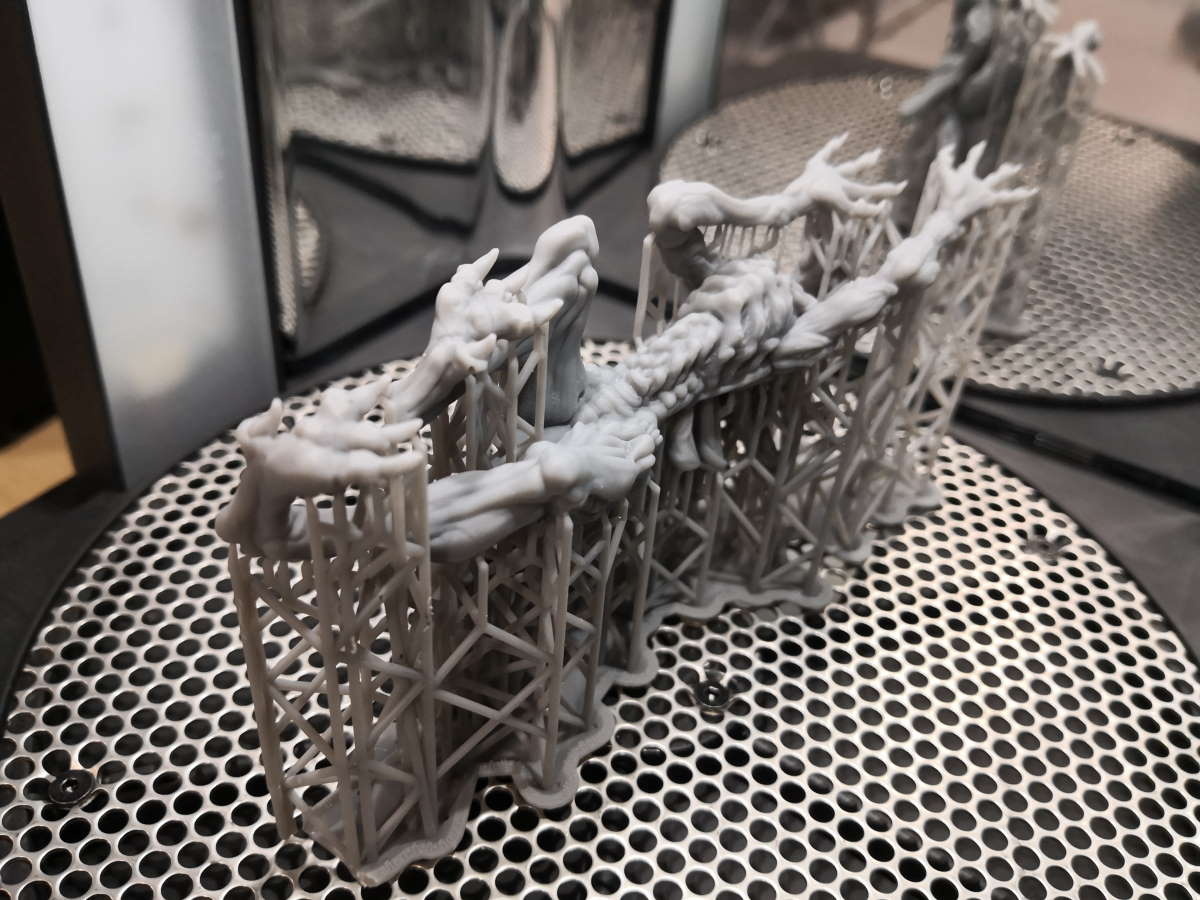
And maybe I can call it the “part 4”, I have to remove supports. For that you can do it with yours hands, I choose a plier to be faster.
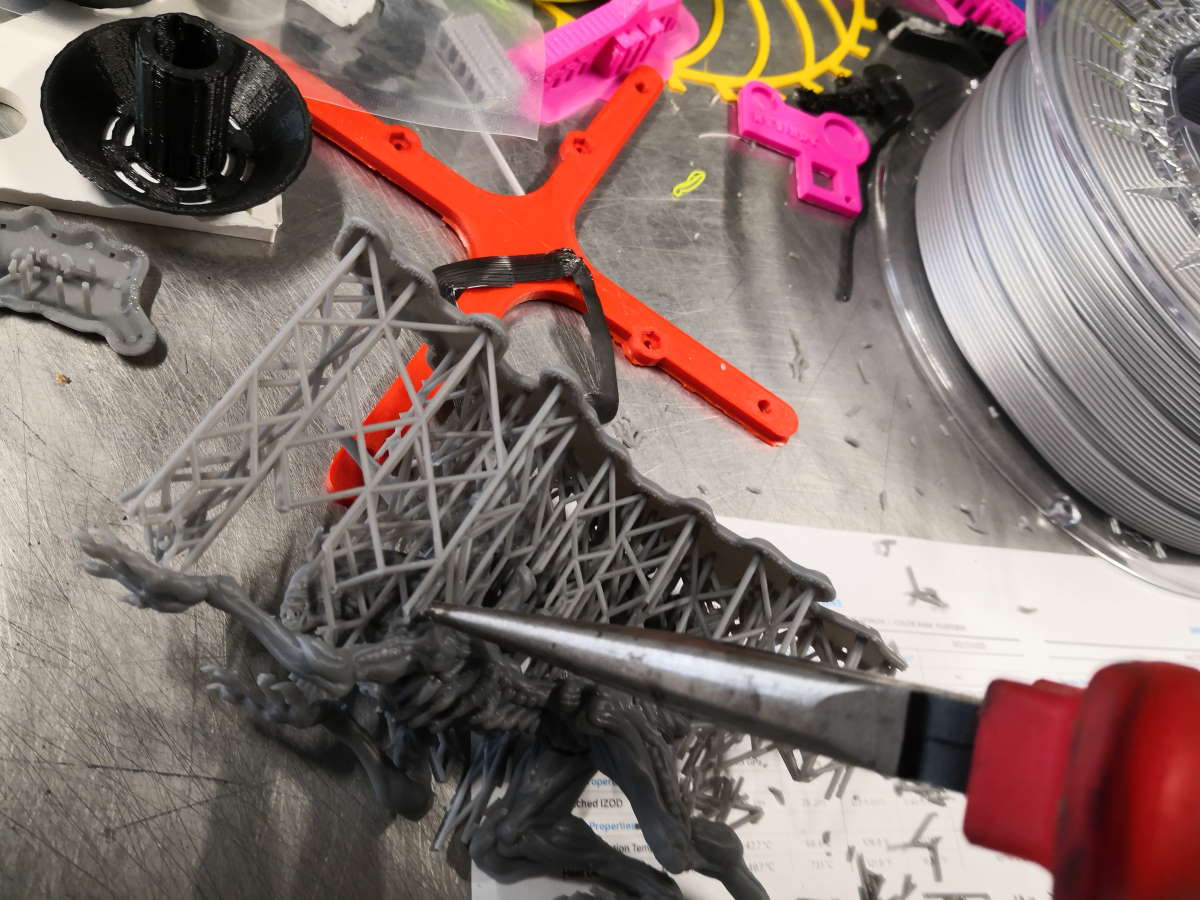
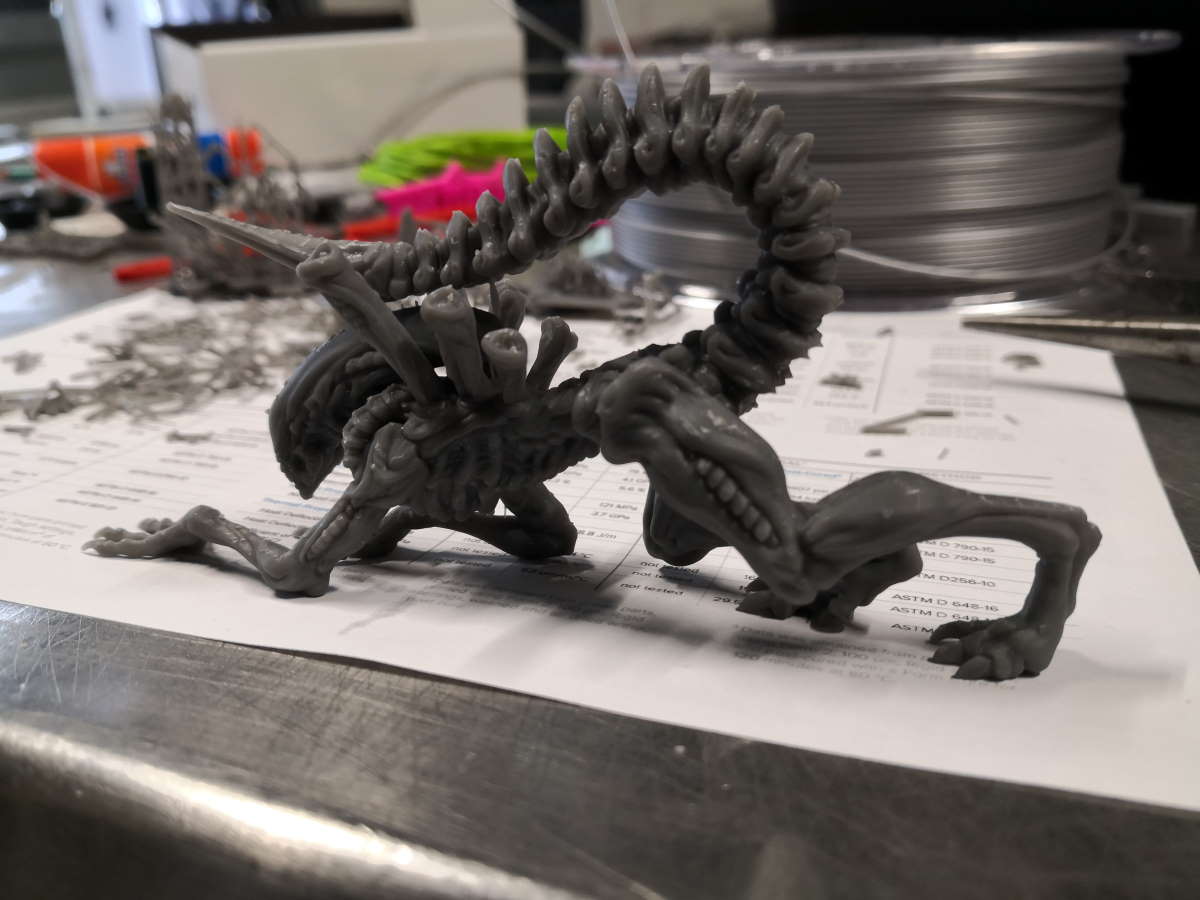
Here the final result, quality is very impressive, cannot see or touch layers. To be perfect, maybe sand a little bit on support attach.
3D scan
For 3D scan, I will test 3 different tools (and 4 softwares)
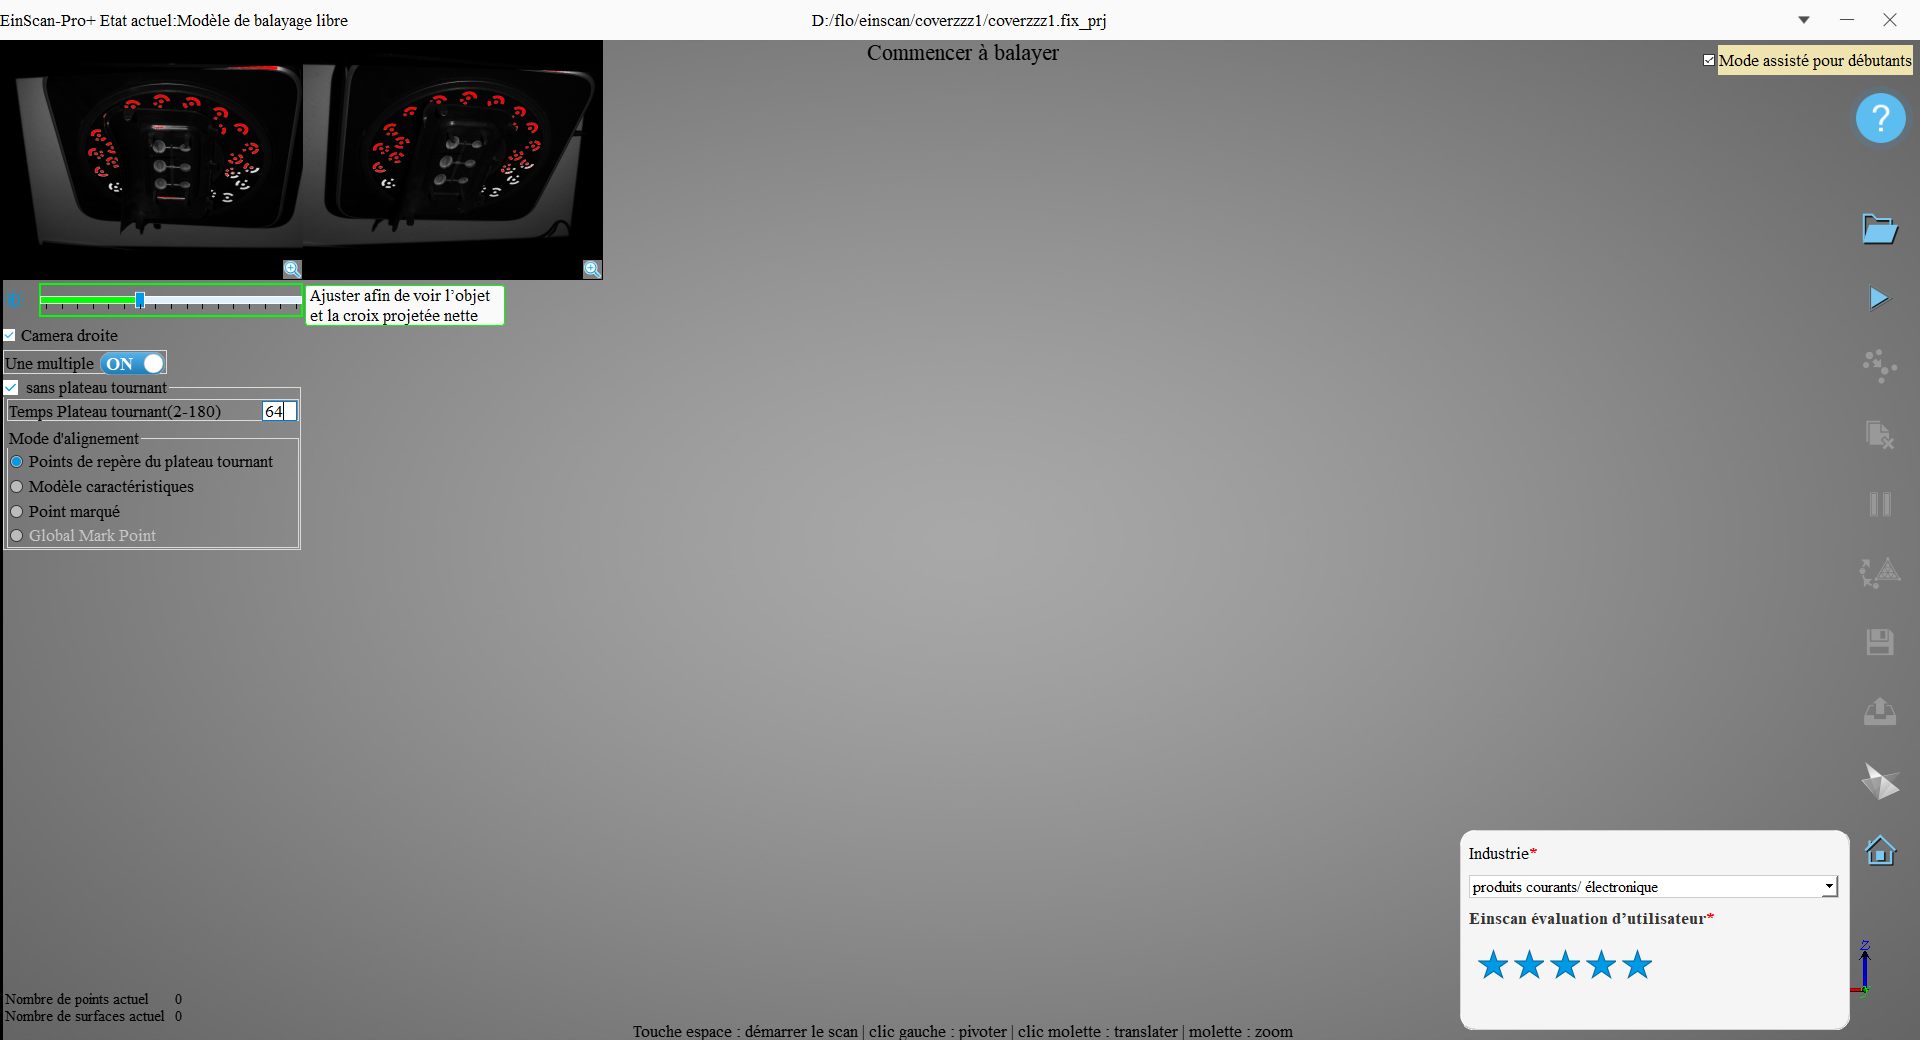
Einscan Pro +
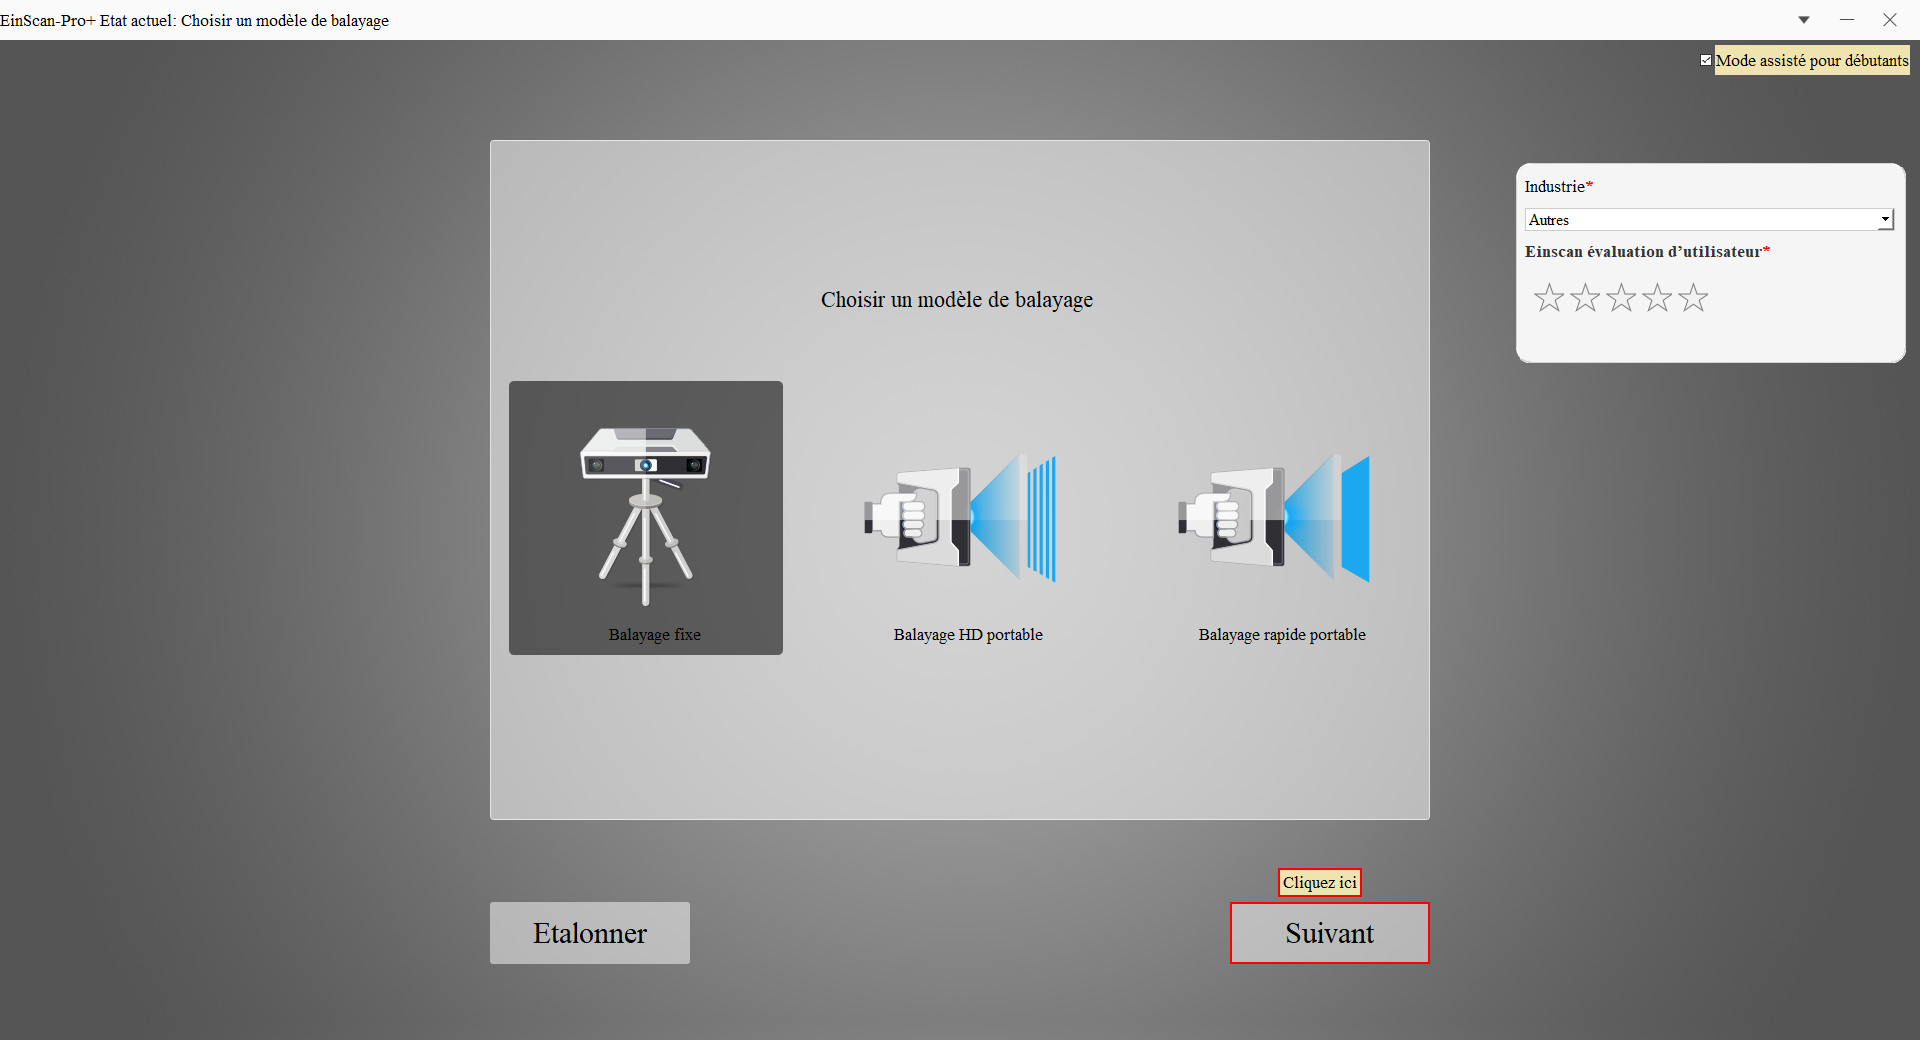
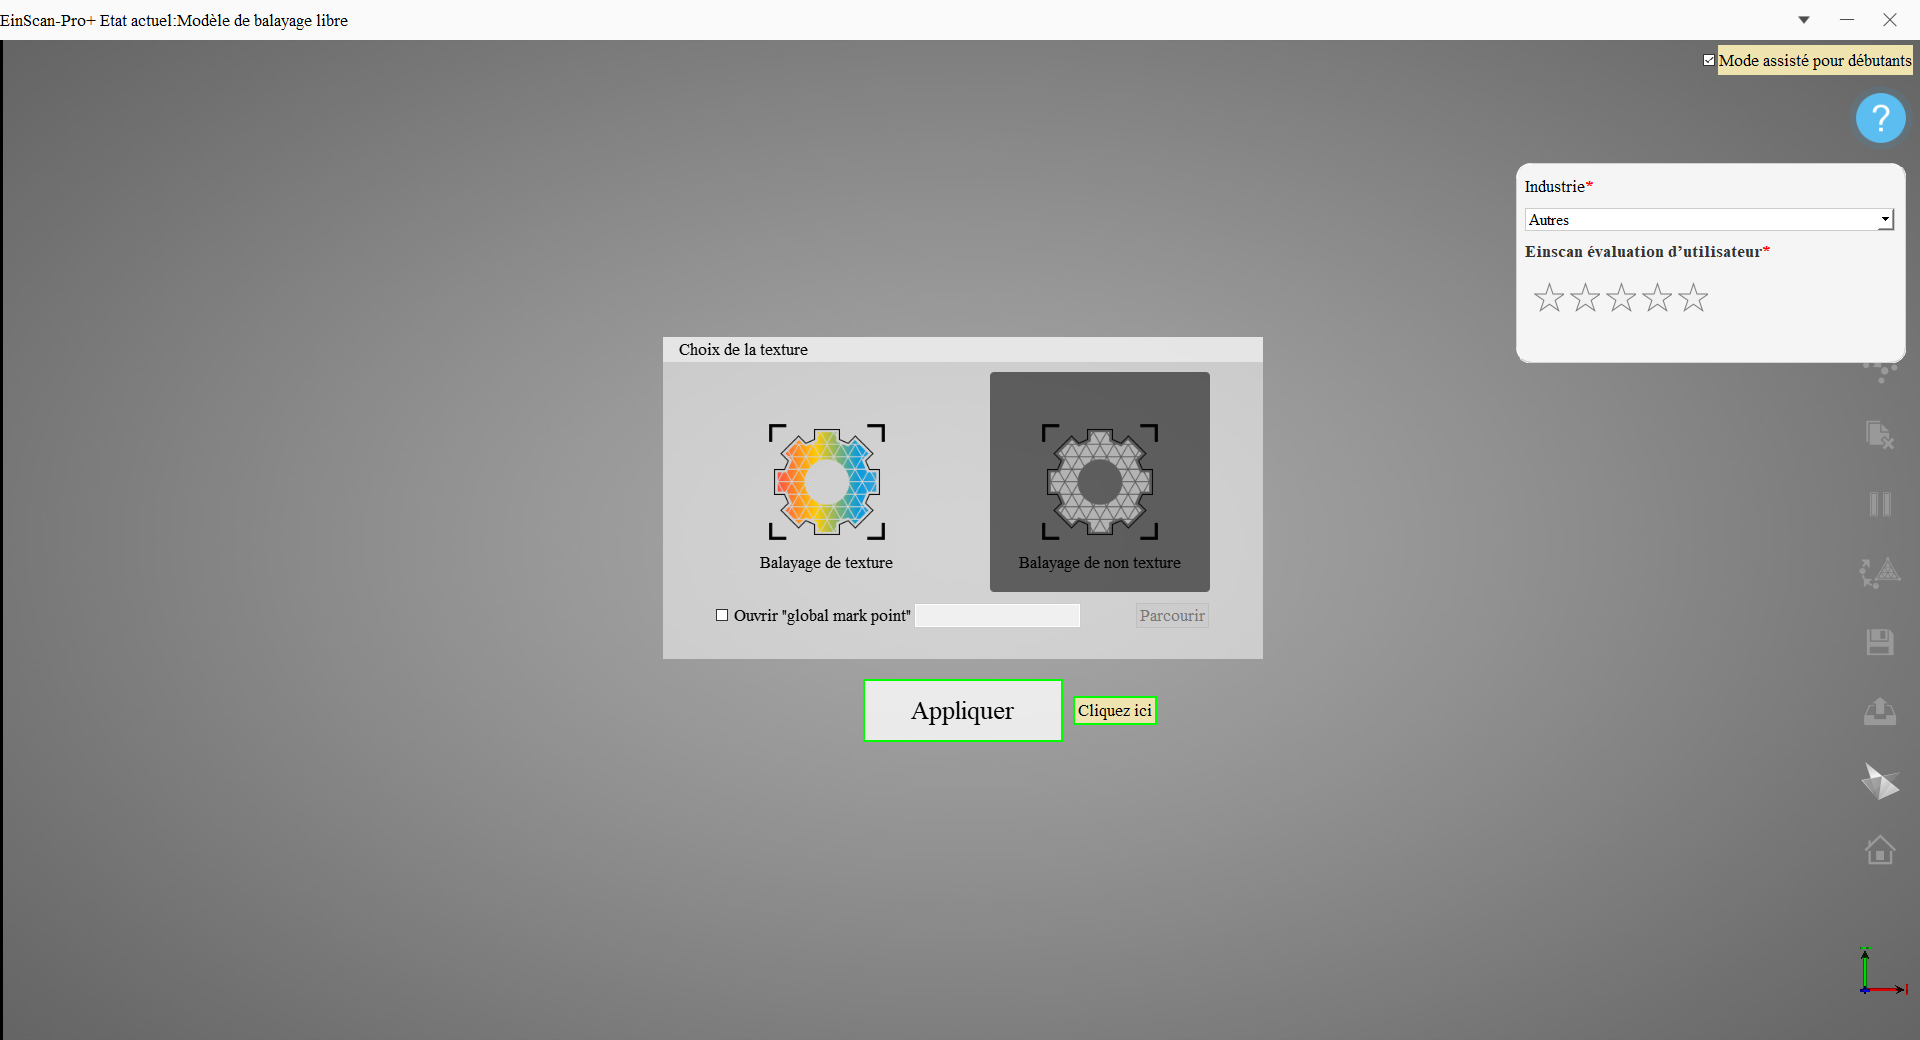
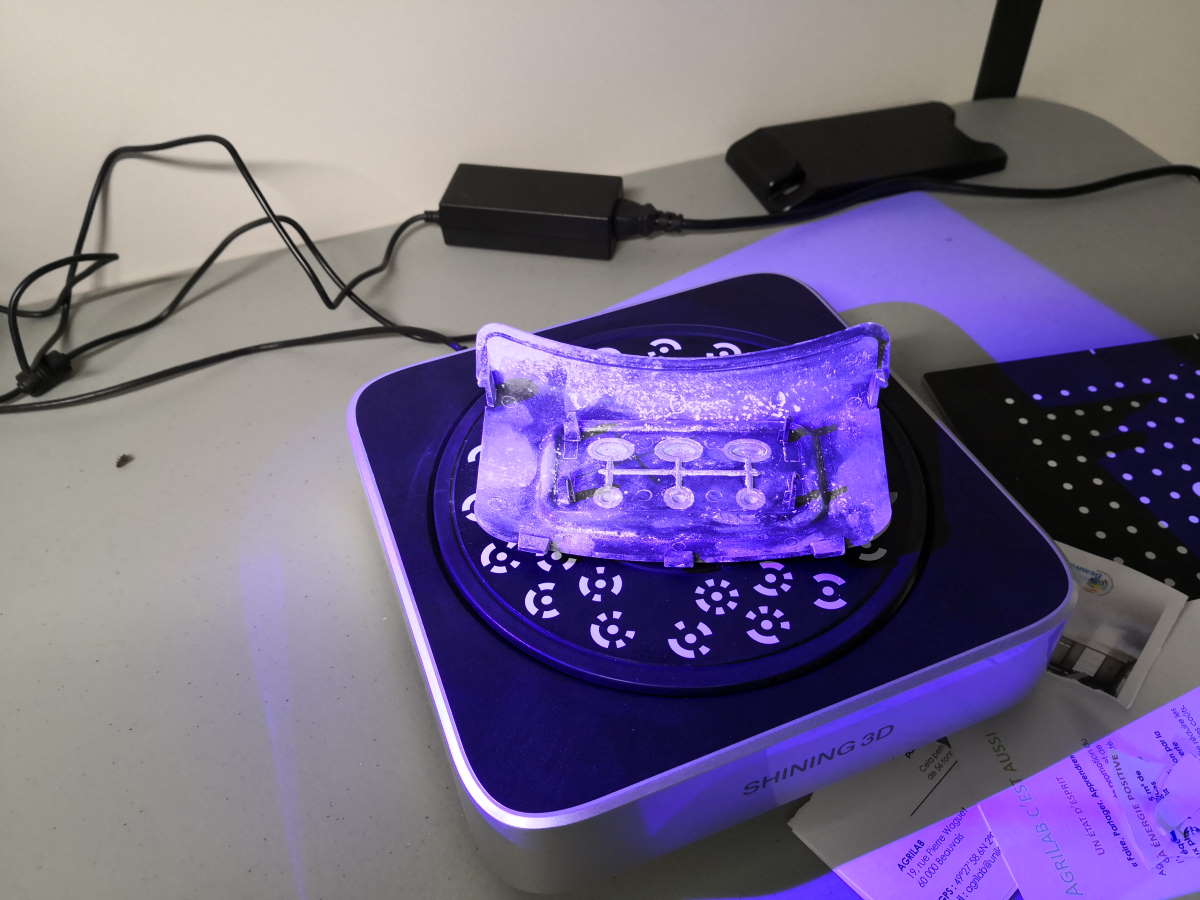
I use a professional handheld 3D scanner : Einscan Pro + from Shinning 3D https://www.einscan.com/handheld-3d-scanner/einscan-pro-plus/. It have 4 scan mode : Handheld Rapid Scan, Handheld HD Scan, Fixed Scan without Turntable, Fixed Scan with Turntable. I use the fixed scan with turntable mode because it’s the easiest and fastest mode because you have less preparation to make on object with the help of mark point already on the turntable. Move are constant and configurable, no shake by hand etc. Impossible to have texture because we haven’t the color pack plugin.
The computer used is a workstation Lenovo Thinkpad P52, 32Gb RAM, 500Gb SSD + 1Tb HDD, Quadro 3200)

Here you can see the software (it’s an old version, I don’t want to use the newer version due to lack of time),
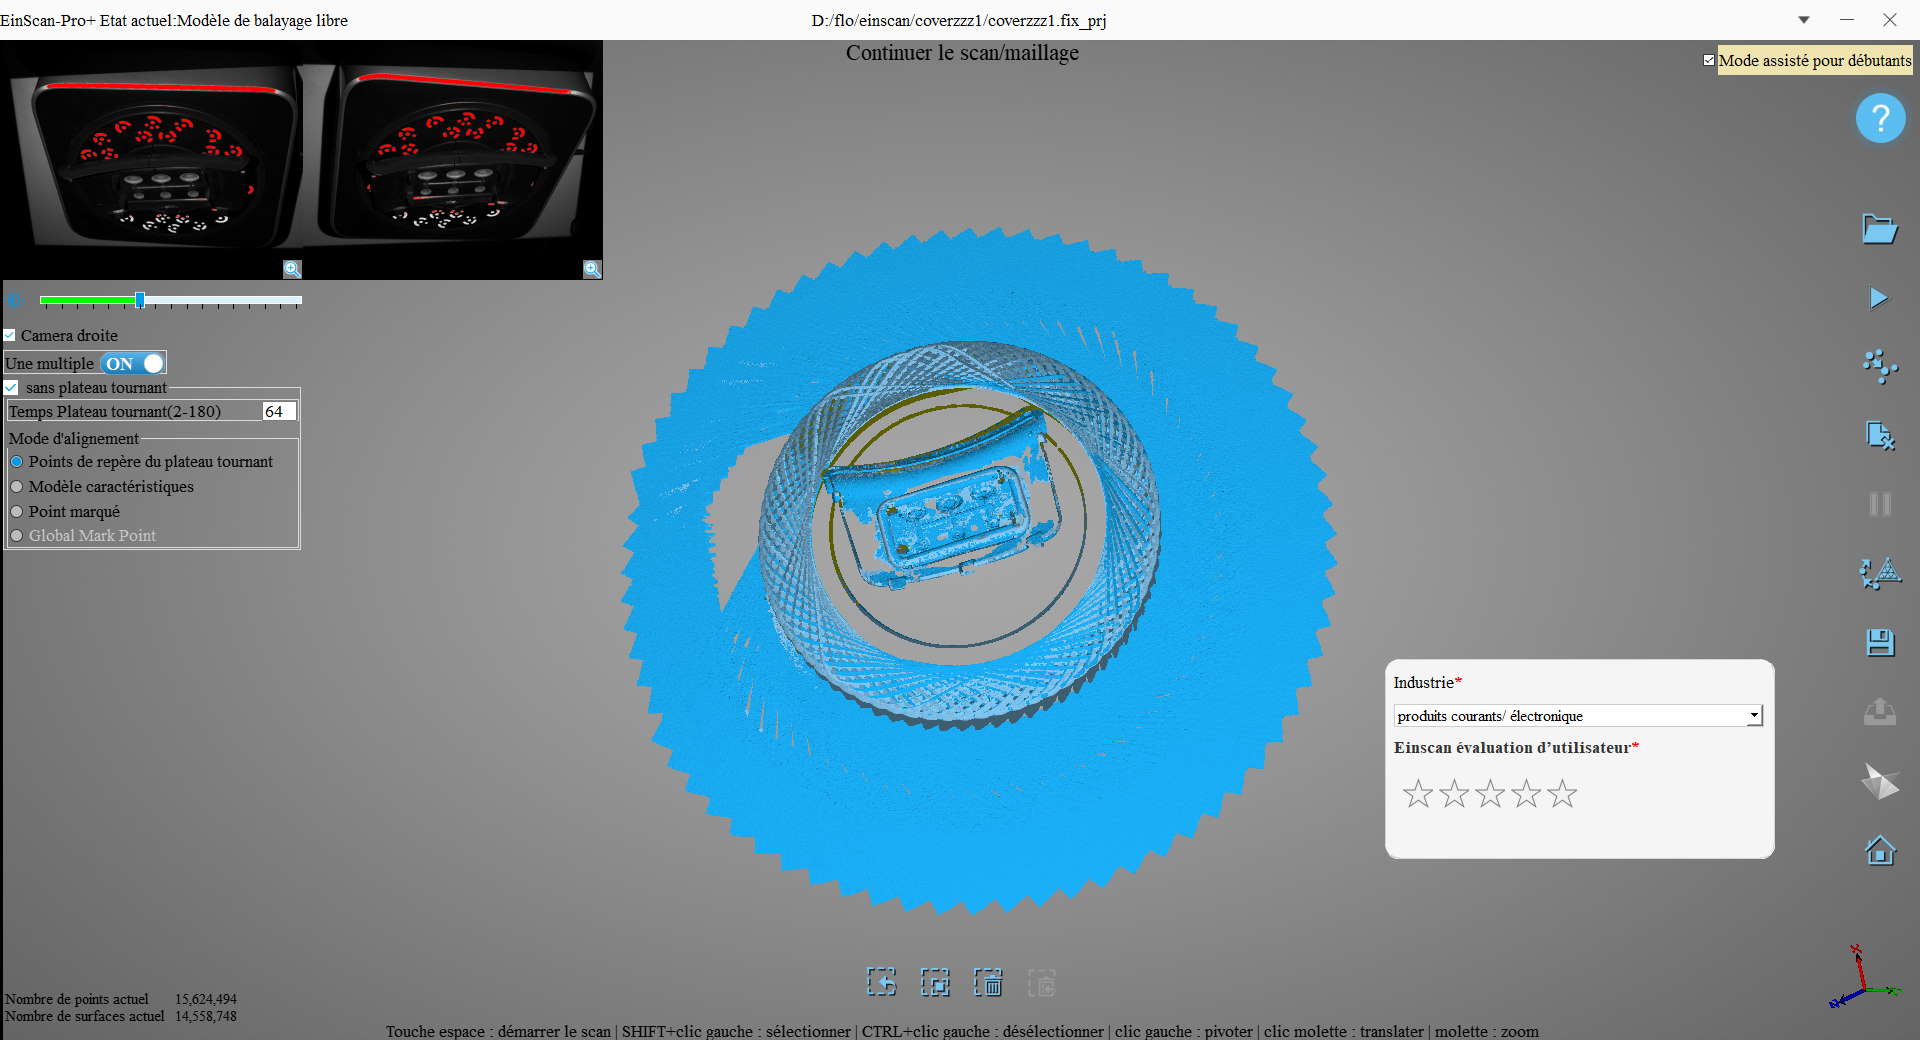
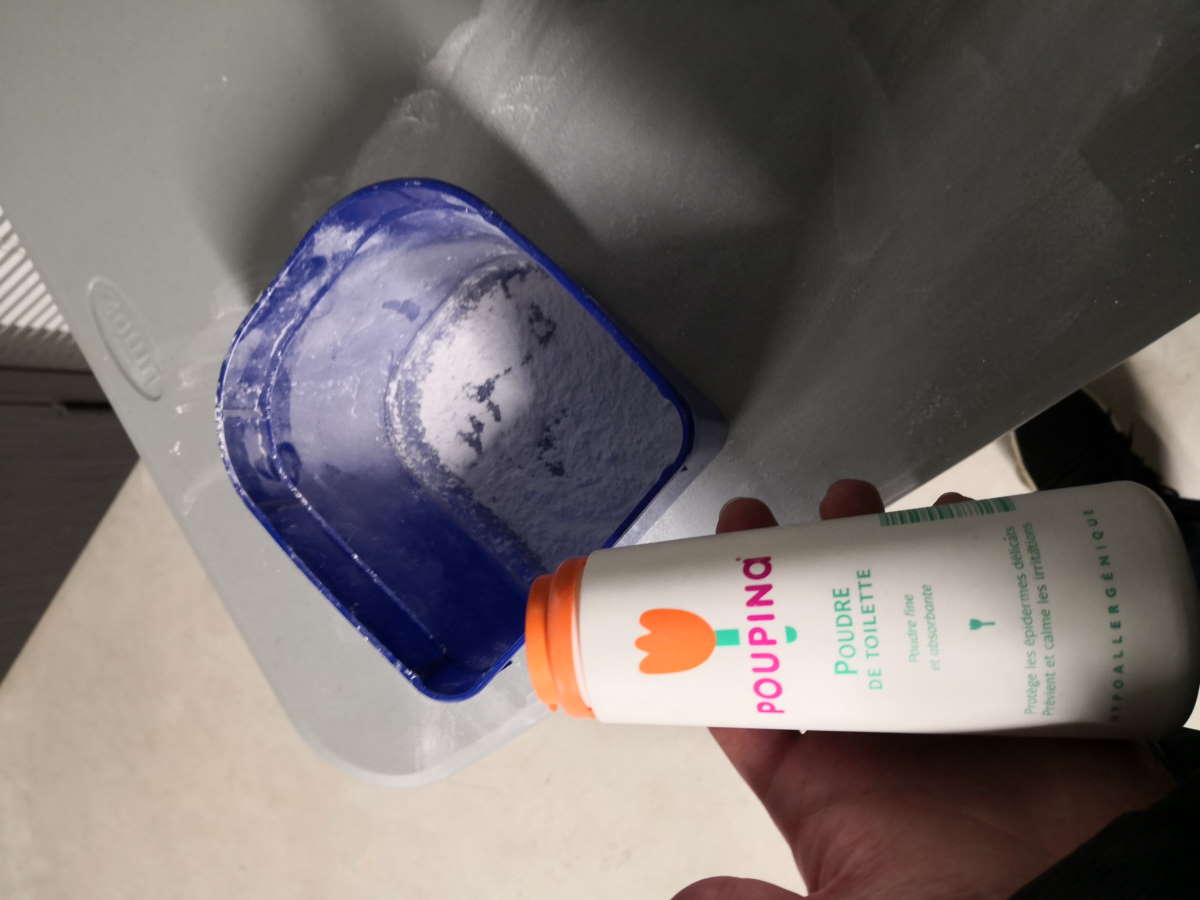
Using turntable is just for small object so I won’t scan the full litter robot but a part I will replace on my final project and I need to scan it very well and make me gain much time if haven’t to full 3D reverse engineering and redesign (and test many versions) : it’s the front panel of the litter that contains the brain of litter and some buttons to launch functions. Because it’s a mat black object, light textured scan doesn’t work very well. I don’t want to paint object so I have to find other solution. To enhance scan I use talc powder. It’s not so easy to apply because you have to make a constant and thin layer on all the object, when you touch object, you remove talc and you put more talc everywhere than on the object to scan :) but… it works very well and easy to remove at the end (with water so don’t use on object you don’t want to wash at the end).
Here you can see on 1 pass scan after put talc powder. The raw scan :
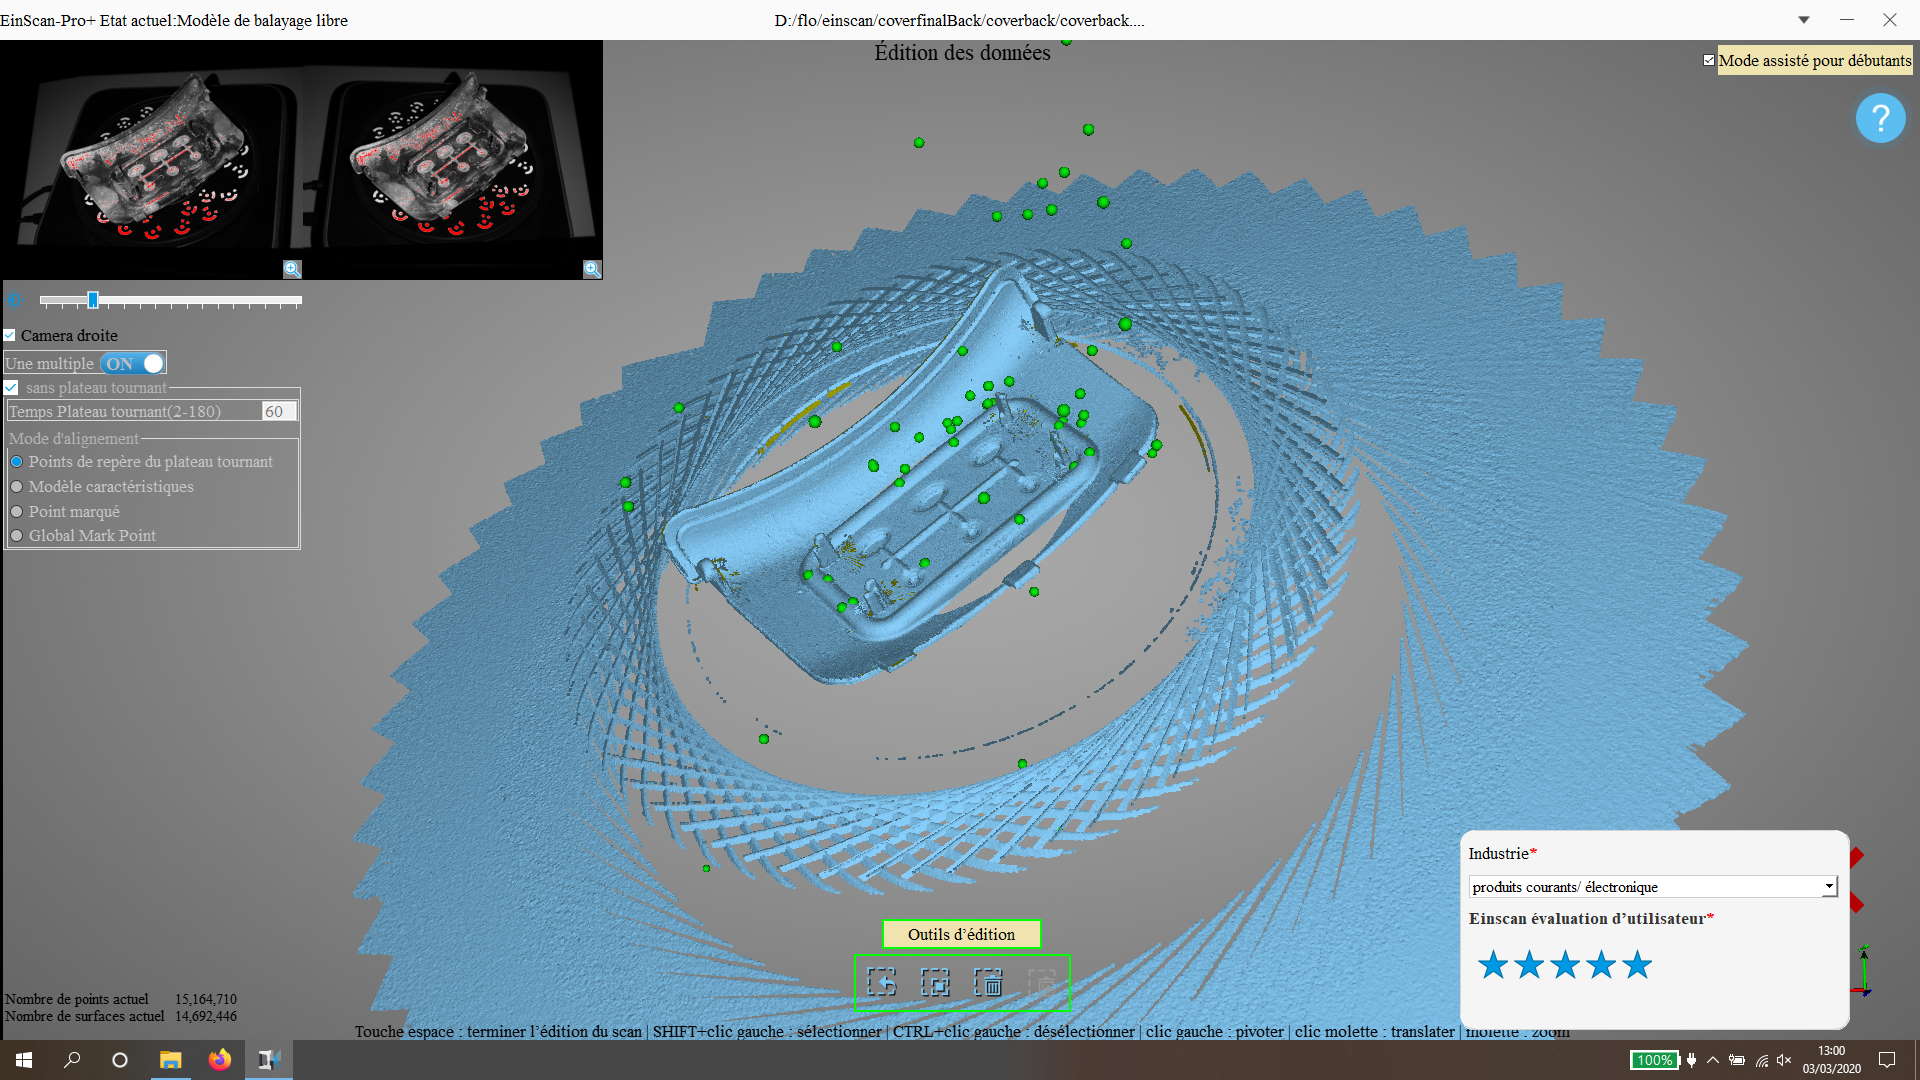
Quickly remove unwanted parts in scan directly in Einscan software (I have some green points in later scans, I don’t know why, a setting that changed? I think it’s because it was used with many computers (with newer software) and it’s in calibration? I have to find in next weeks). I haven’t have those green points before another computer and software version was used.

And the generated model in unwatertight mode by the software. I’ve also set software auto repair the model. I have holes that are corresponding to green points (still a few remains after repair) and destroy the rendering but I have the edges I need. I have 2 parts of this face I have never successfully get around the center of the part. I’ve try many scans, changing positions, try multi pass scan by changing sensor position, always the same result. Inner curvy surfaces aren’t correctly scanned, maybe I can change this by moving object and put it (with support) on the turntable and mix many results of my scans (after cleaning and keeping some subparts of scans in a software like MeshLab) and assemble all. This subject only can be a full week test ;)
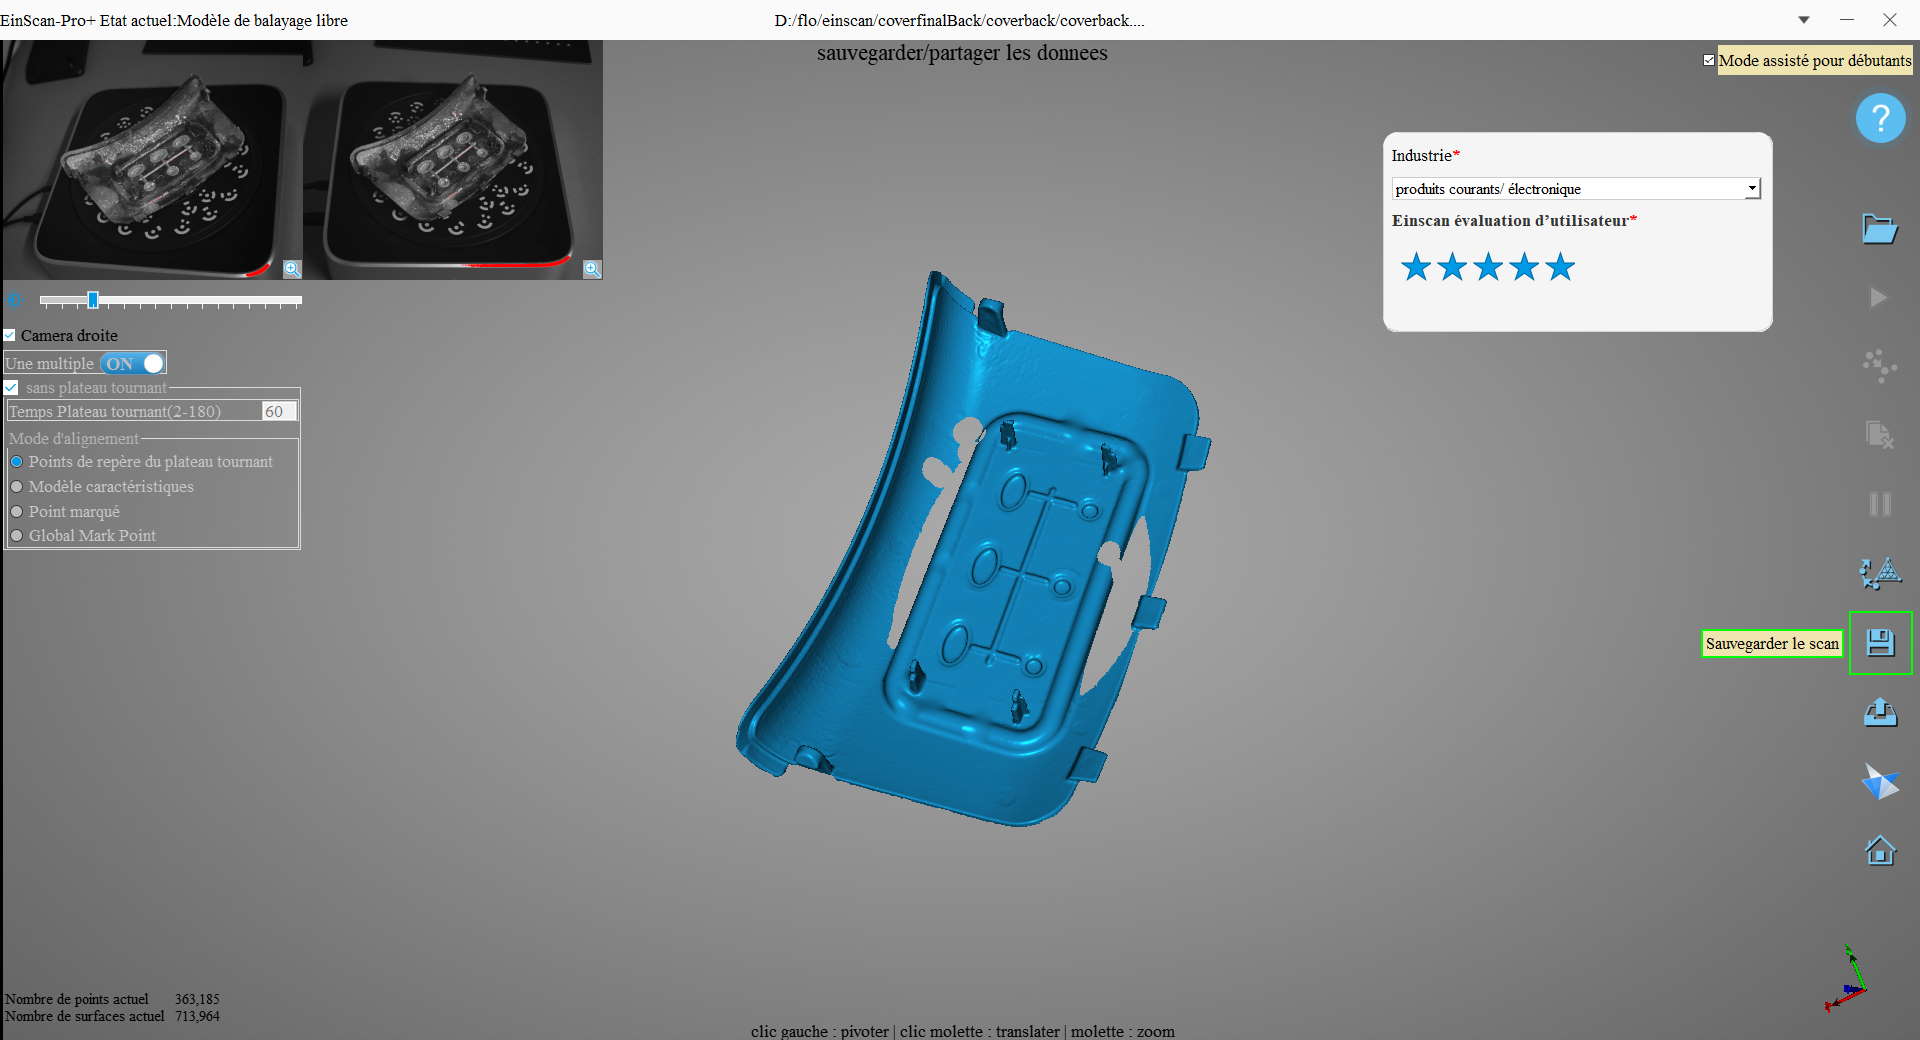
Now to have full object, I have to scan other side and combine of directly 3D design on it because I have edges I need for my object.
You can see the latest scan on sketchfab :
Photogrammetry
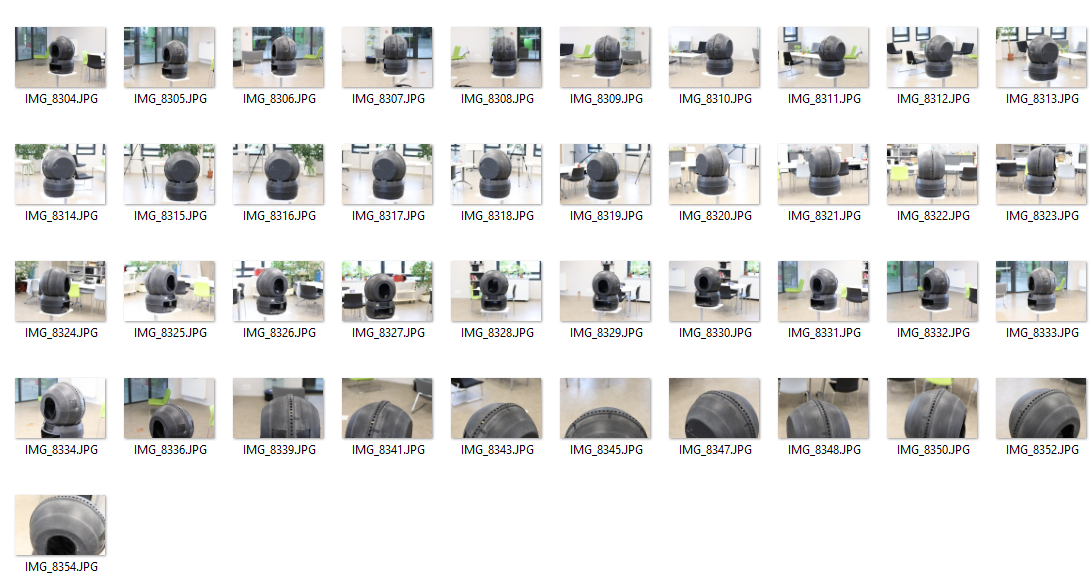
I took several pictures of the litter robot I want to modify. I use a Canon 80D with a Canon ultrasonic 50mm fixed focal zoom. I use manual mode to have full control on settings and keep exactly the same for each pictures. I let zoom in autofocus mode (obviously I need to have correct focus on object I want to scan).
To help alignment of photos, I use a background with many details. I voluntary add more objects on the floor, walls, etc. to improve recognition.
The computer configuration is Intel core i5 (need to upgrade to an i7 because it’s the bottleneck part), 64Gb of RAM, 1Tb SSHD (not SSD yet, I have to change it when I have time and… it’s the hardest to find for me!), Nvidia RTX 2070 (powerfuuuuul).
For reconstruct 3D mode, I use Agisoft Metashape Professional available here.
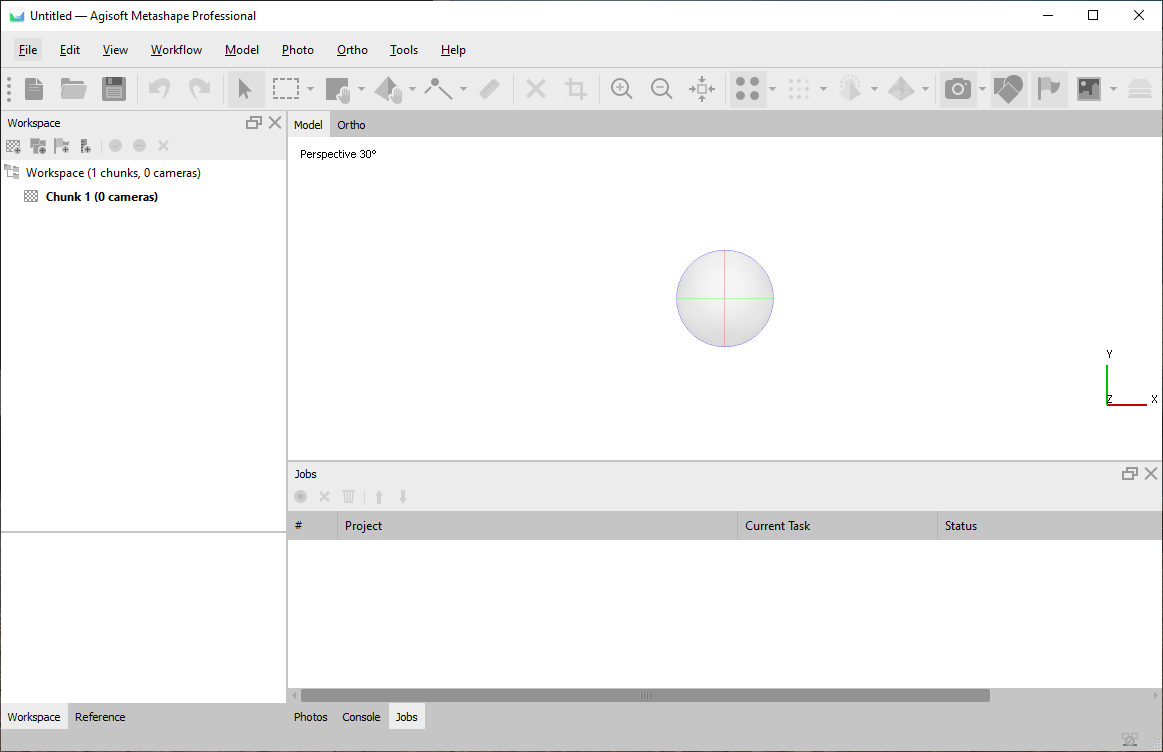
I add folder of my photos, them I align them. Software try to find where photos where taken around the subjects (the reason why I add details in background).
Then, because it’s time and CPU/GPU consuming, I launch in batch mode “build mesh, “build texture”, “build tiled model”
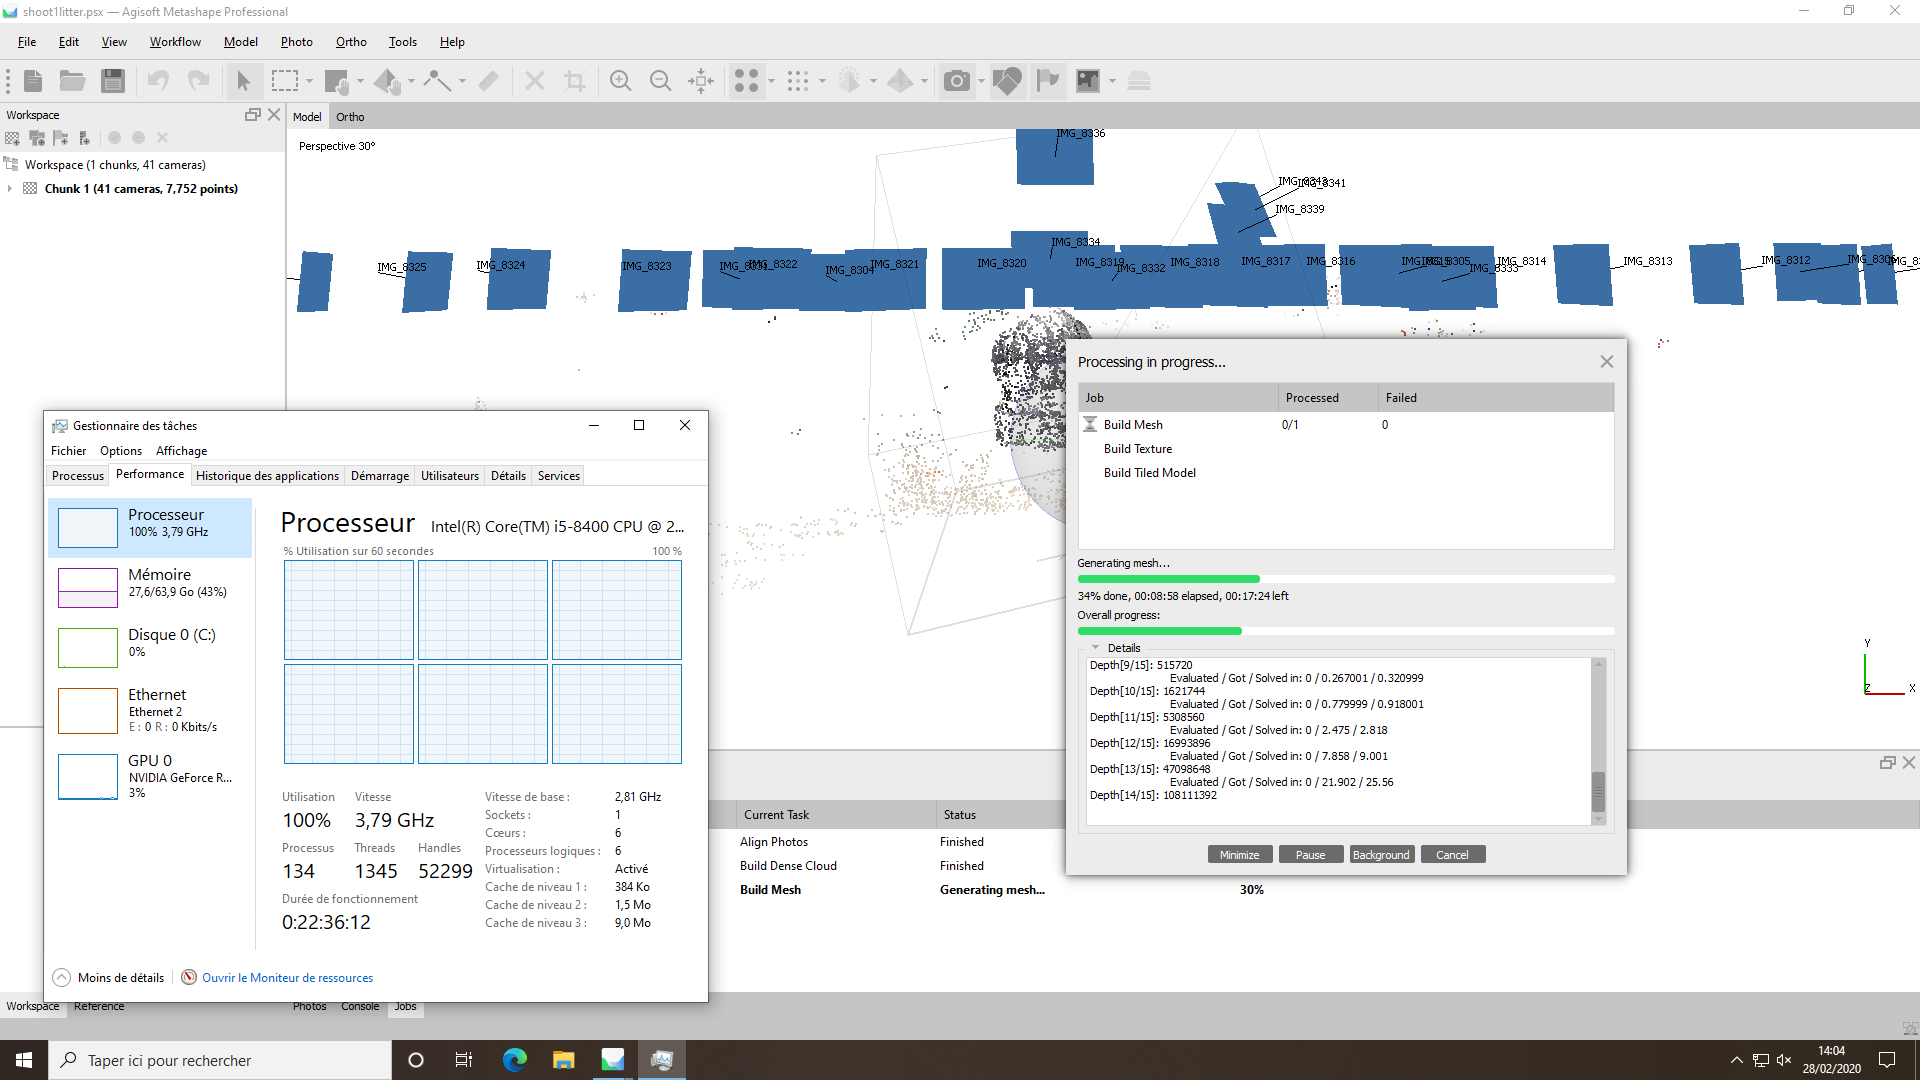
64Gb is not overkill for this work, with a “few” pictures, I use often more than 32Gb during the process, having a lot of ram avoid to swap (even more with a slow HDD).
I finally take time to decimate with meshlab from 6700000 to 150 000 faces 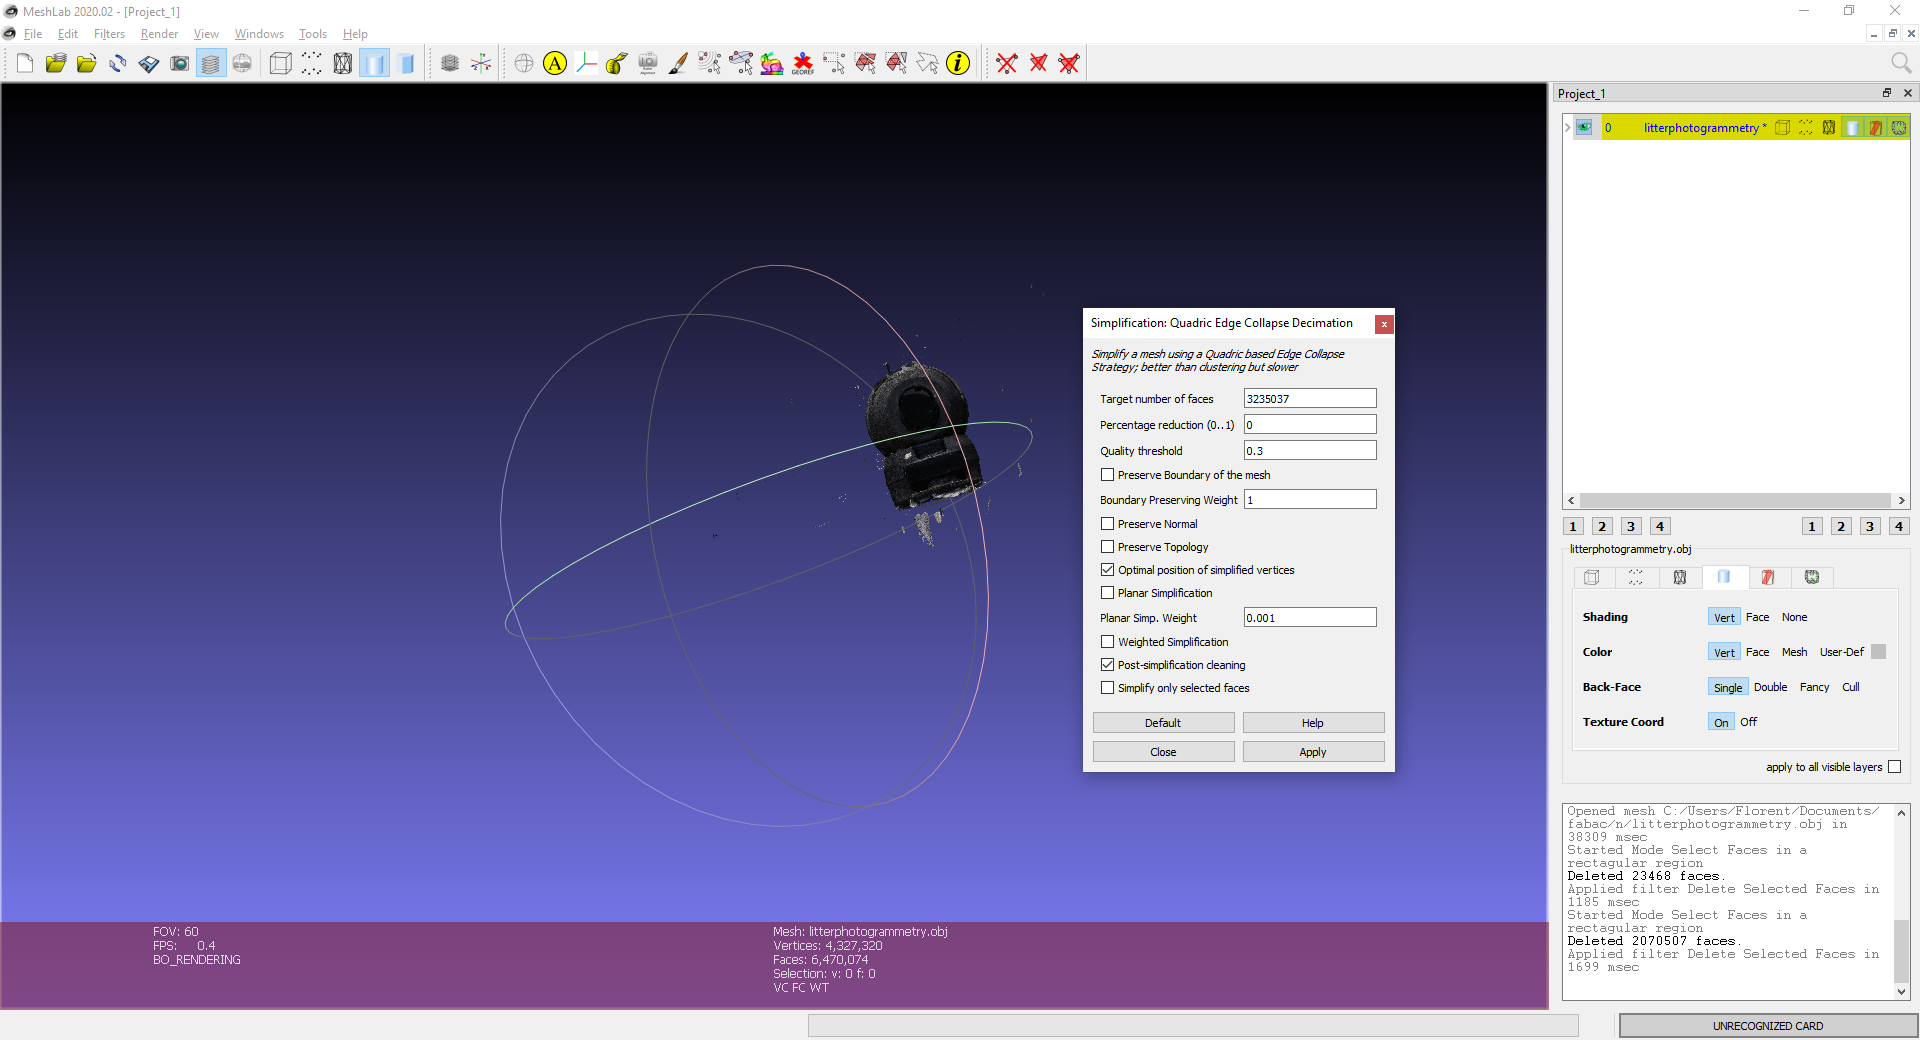
and upload it to sketchfab (but quality for uploading is very poor, need many fine rework to get best size/quality ratio)
Litter robot photogrammetry by floooooolf on Sketchfab
DIY scanner : Microsoft Kinect
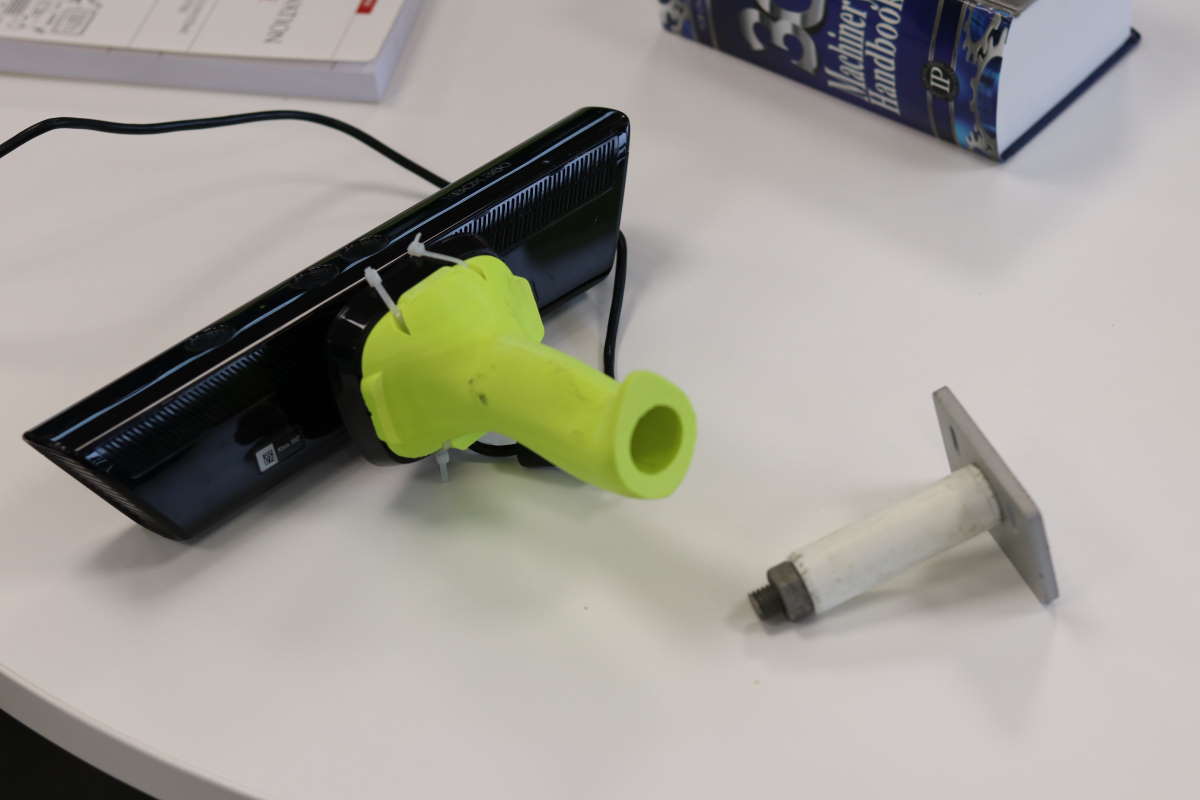
This time I use my DIY scanner, a Microsoft Kinect for xbox 360. I have made a custom 2 parts handle grip, the 3D printed green part is lightweight and designed to be easy to handle. The lower part is a heavyweight mix of aluminum/nylon/iron to keep stability when scanner is placed.
The laptop used is still the Lenovo ThinkPad P52.
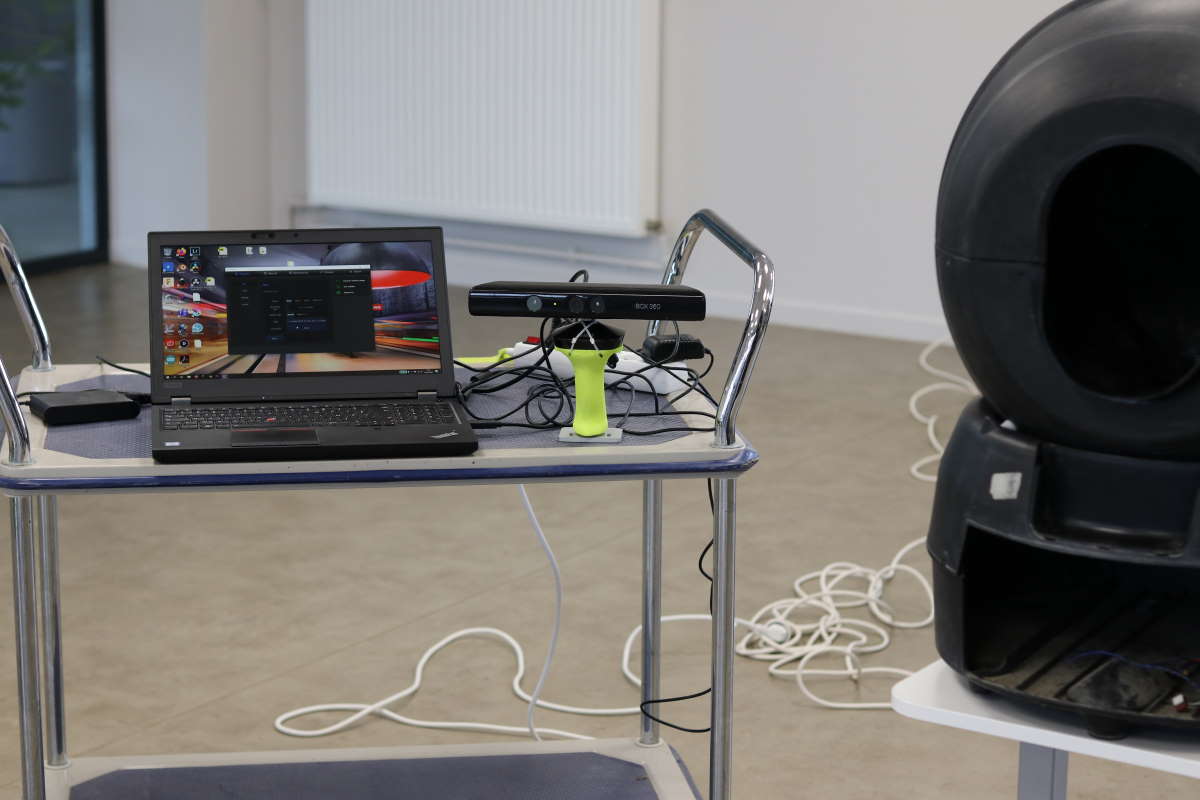
I use 2 different software to scan ReconstructMe and Skanect.
ReconstructMe
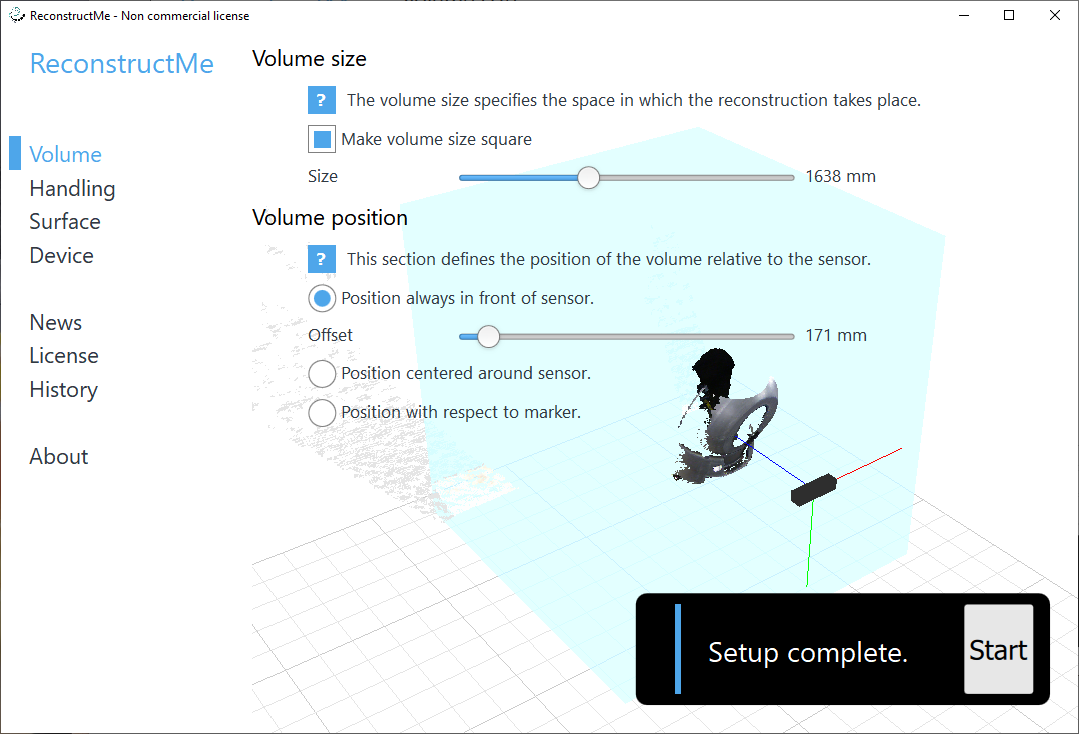
The software is available here, it’s now free for non commercial use. The interface is very simple and focused on the scan, you set the volume of scan and some settings and go. Scanning is user friendly, you see quickly a result. You get model and texture and can save 3D model. No post treatment in the software, just scanning. But no update on this software since 2017.
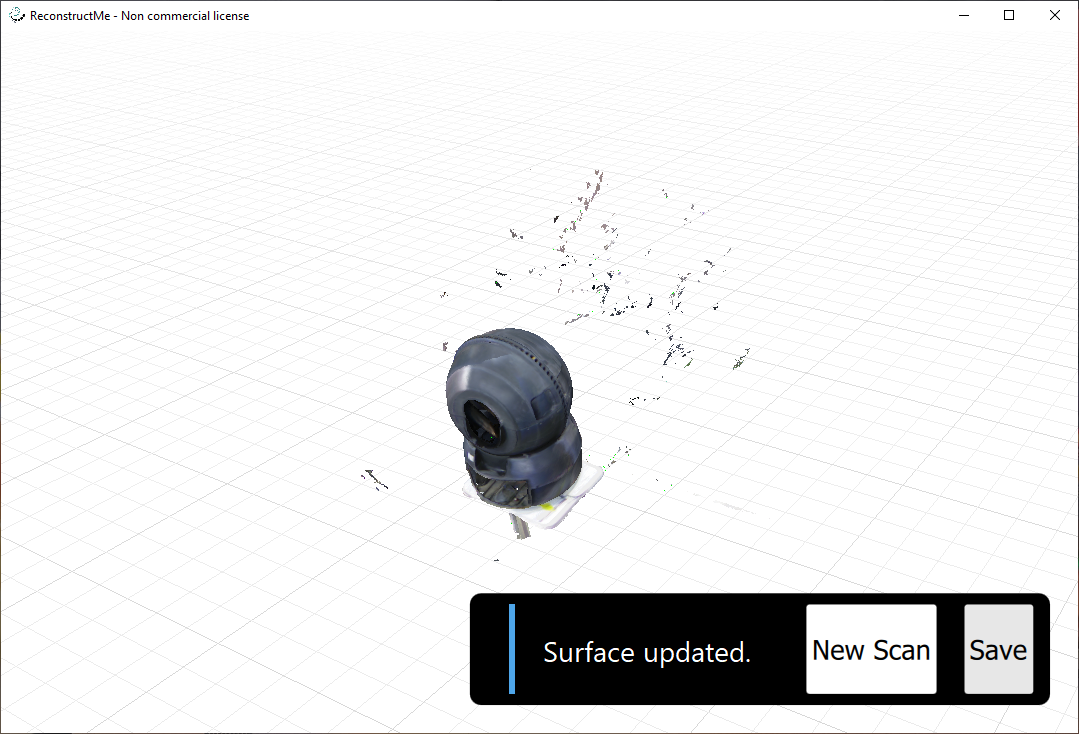
You can see without post treatment the result of scanning on sketchfab :
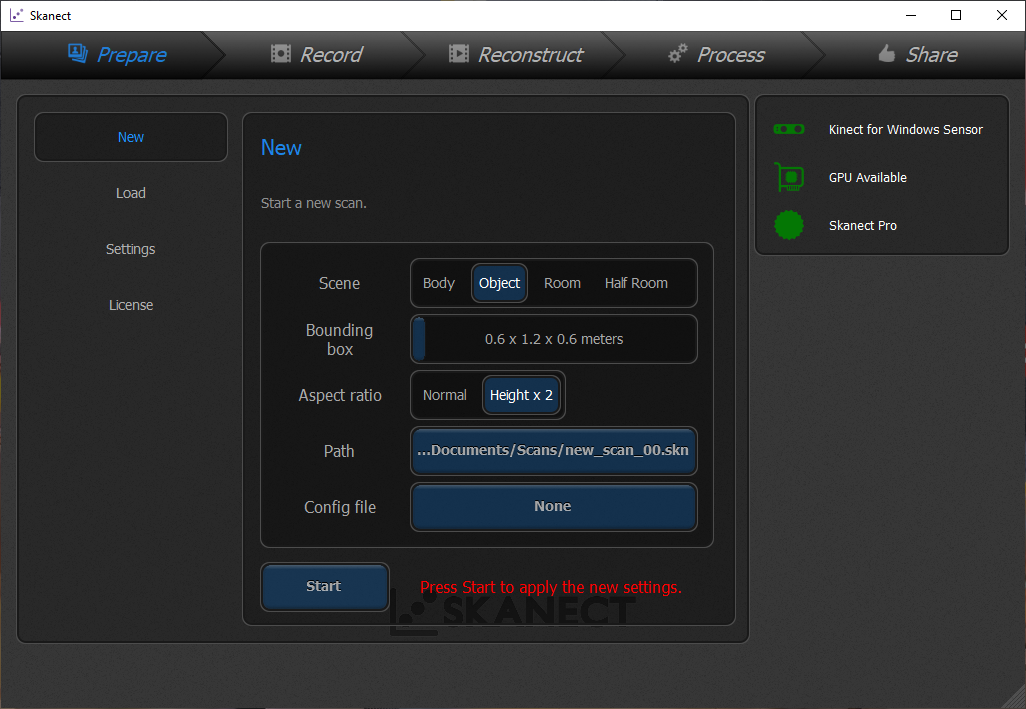
Skanect
Skanect is also a 3D realtime scanner software that can use Kinect. More settings and functionalities than ReconstructMe. It also get (for me) more details than ReconstructMe but to unlock all features (at least full resolution 3D export) you have to pay.
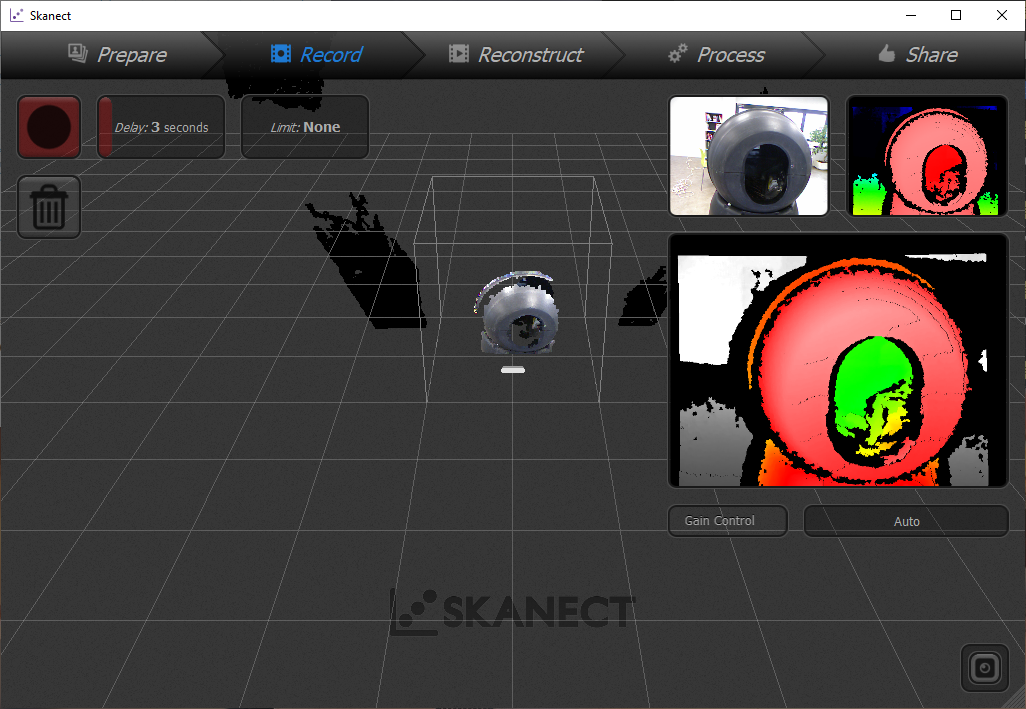
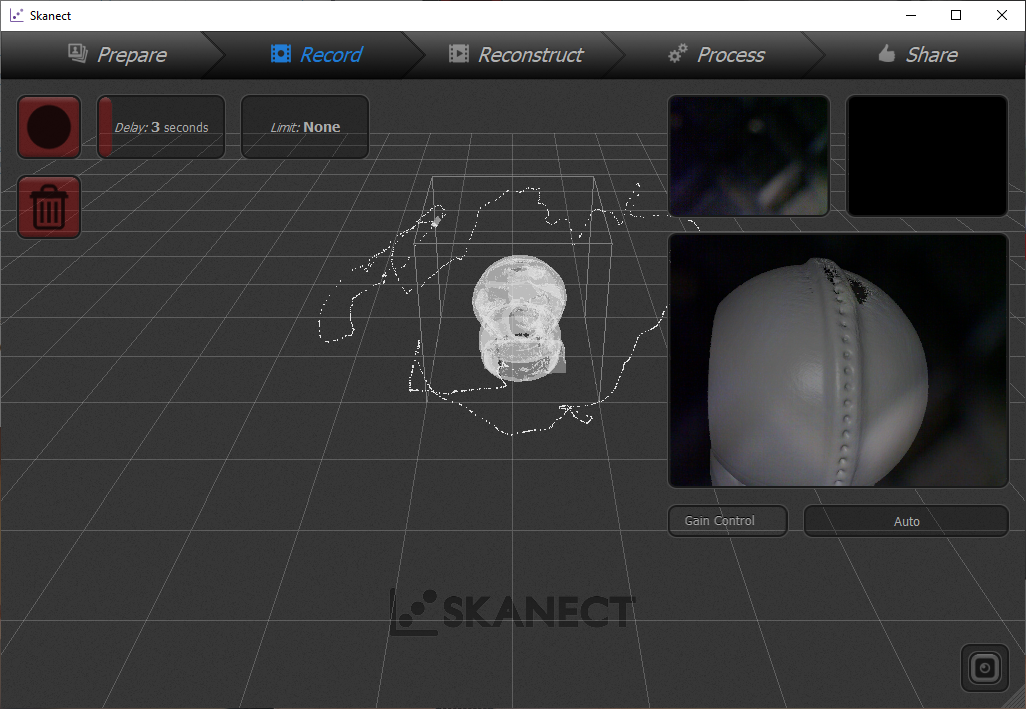
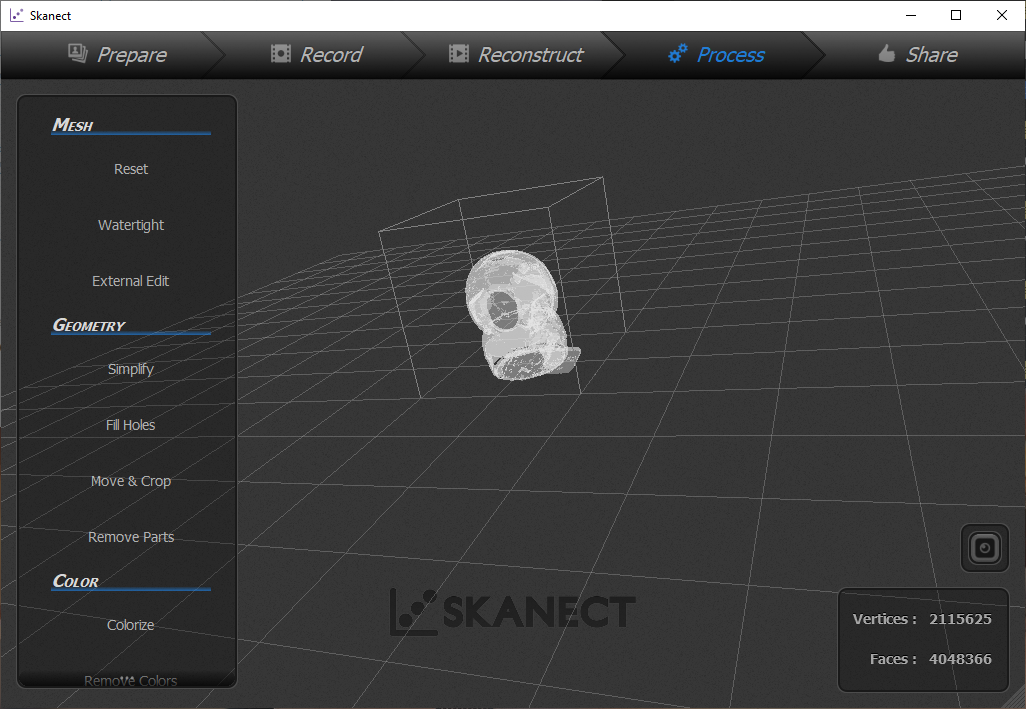
You have some tools inside the software after scan for rework directly the result. Even if I use a powerful laptop, Skanect is always running 100% of CPU, it seems don’t use graphic card and show sometimes prompt on this performance issue. It doesn’t block scan but it’s sometimes some lag.
Here the result of the scan in video (model is too big to be upload in sketchfab, I need to reduce complexity with meshlab or meshmixer) :
Conclusion
For me, if you want to quickly scan for low cost, Kinect is a good solution for object you will include in 3D scenes, because when texture are applied it makes the job. But resolution is very poor and you can’t print object after. It permit to also very quickly scan large pieces without adding many marks on the object because of built-in sensor that are used to keep tracking of moves and help to reconstruct the object. A kinect can now be found (in France) in 2nd hand store for 10€. If you haven’t the cable for connecting it to a computer, you can build it for a few € by adding a USB connector and plug a cheap 12V 3A power supply.
If you want to scan small parts, textured light professional scanner (around 5000€) is good with turntable because you already have marks and you can let it scan alone when you do something else. But you may have also to rework the model. Prepare model to have good light on it is mandatory. For scanning large object, you have to add marks and be smooth when moving.
Photogrammetry can made the best results (for a reasonable price) but it take time and need skills when shooting. It also need powerful computer for rebuilding object and you can only view the result at the end that can be a problem if you haven’t object anymore.
Design and print an object that can’t be made by substractive method
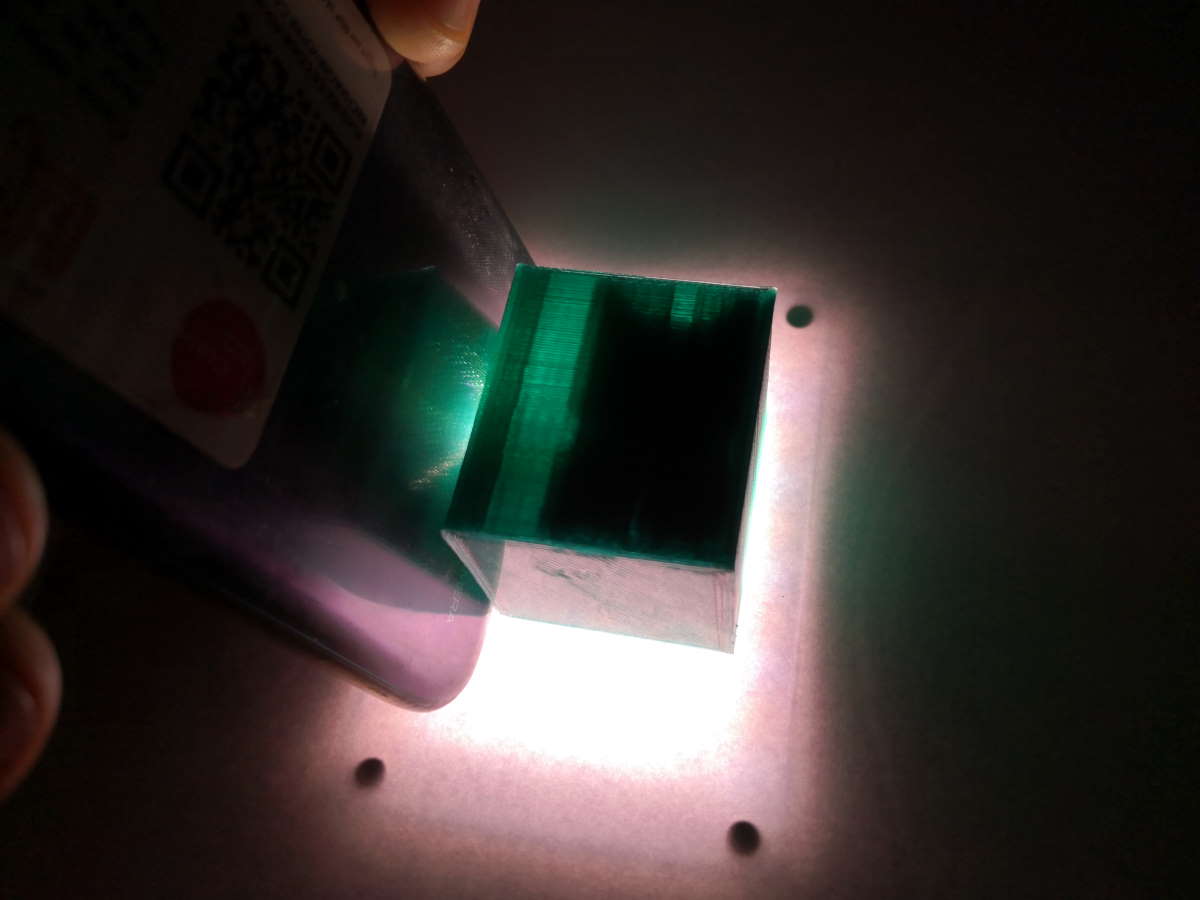
I want to make my version of Schrödinger’s Cat, so I download the Cali Cat on thingiverse here. If you want more info this well known paradox, you can find more info here. Why it can’t be made by susbtractive method? Because the box is fully closed with cat inside. Maybe he’s dead, maybe he’s alive, but you have to open (here destroy) the box to know, but by do it that you potentially change the result.
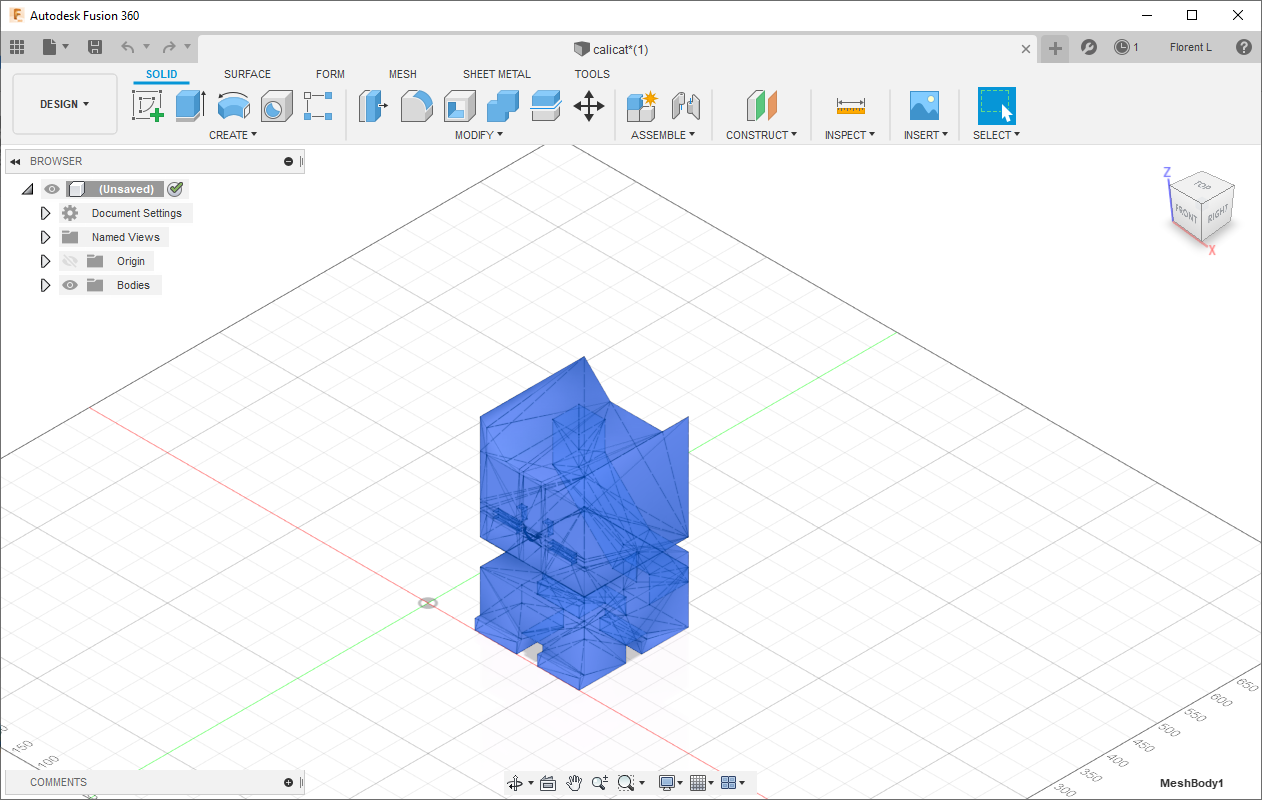
I import the STL in fusion, scale it to 0.1 factor and move it. I convert to Brep to create a body.
Then I add a box around it.
I create a copy of the cat. I use combine to remove the cat body to the box.
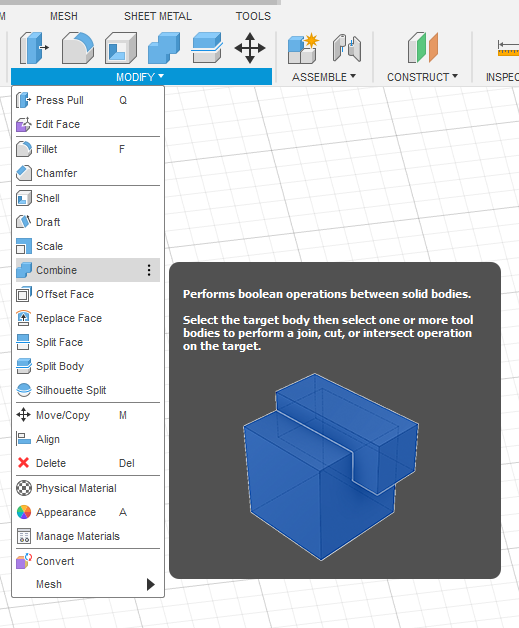
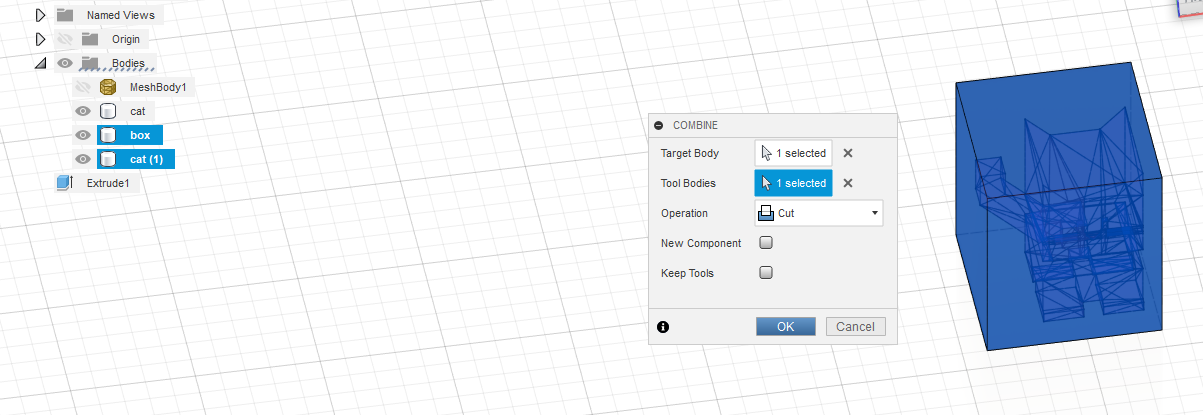
I have now a cat and a box surrounding it.
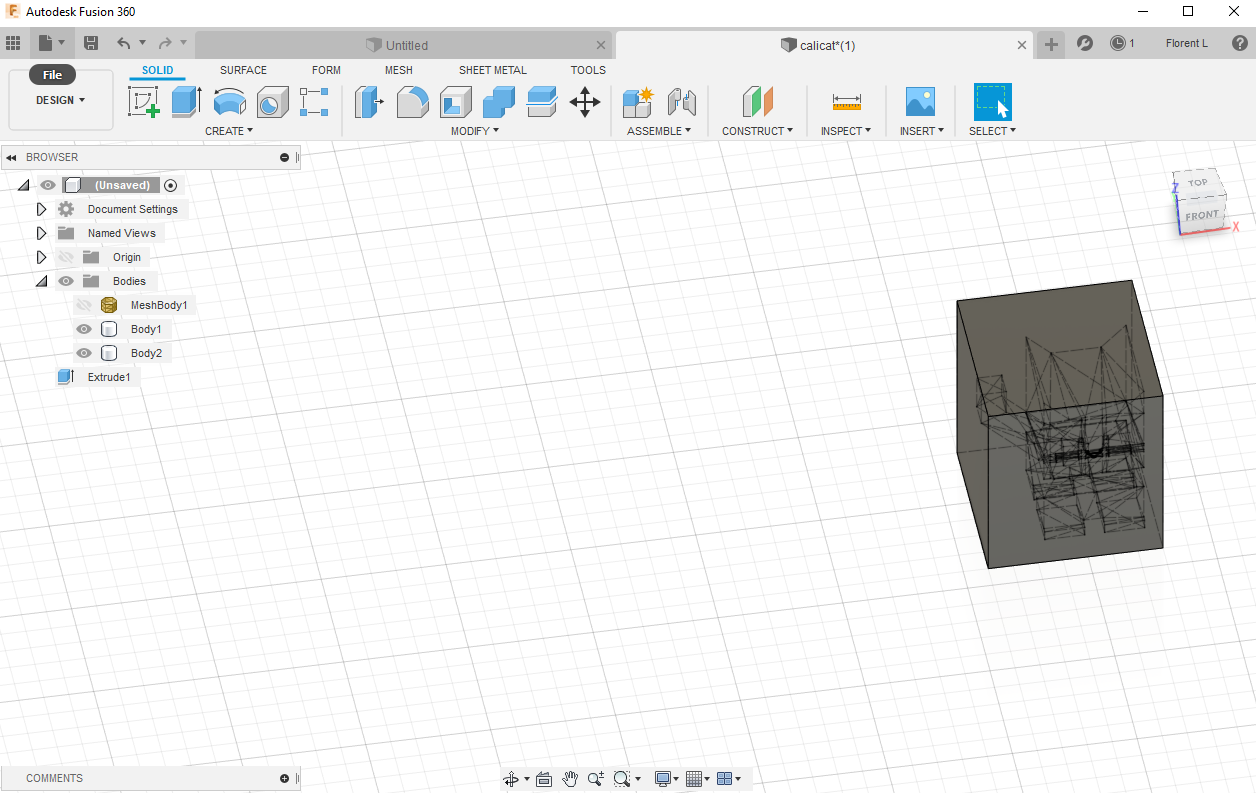
Now I export the cat & the box separately.
Right click on project > save as stl
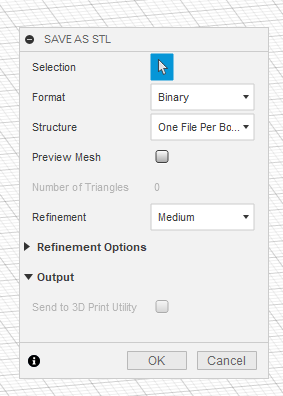
And on structure, select one file per body.
Then I import the 2 separate stl in cura, I set the box on extruder 1, the cat on extruder 2. Then I select both and click on merge.
You can see in layer view in cura the cat print inside the box.
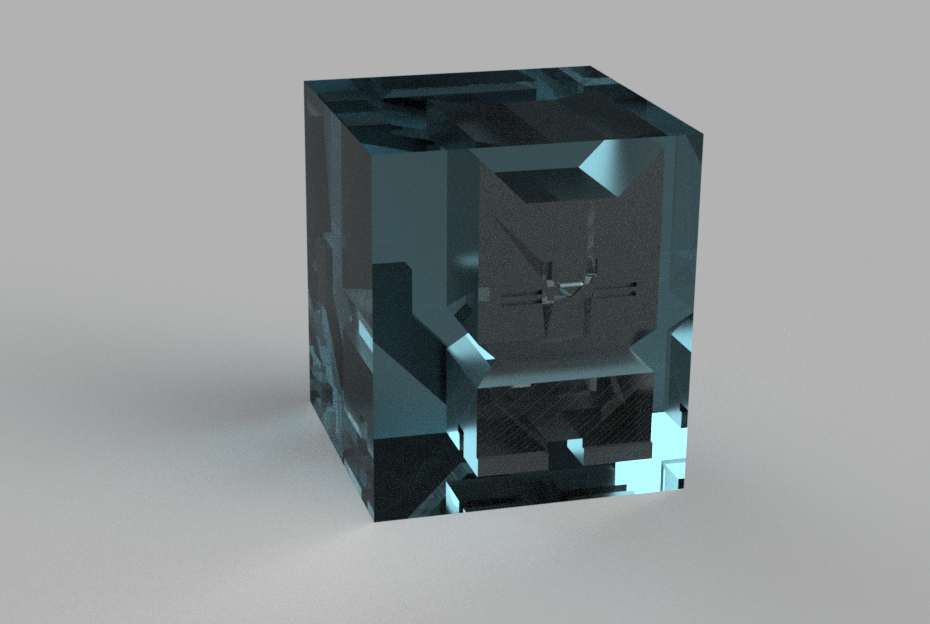
The result, with a strong light, you can see a cat inside the semi translucent box (for the demo, but for a true Schrödinger’s cat, box have to be opaque)