Week 01
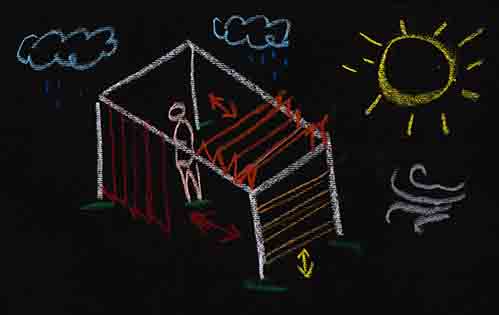
From the beginning of the Fabacademy the idea was to create a retractable shelter system so that it serves as protection for the sun.
Principles and Practices
Week 02
At FablabZOI with the help of our instructor we create a schedule as a spiral development where we propose to orient each week assignment to our final project in my case I split in parts the idea of my project and try to fit them in each week.
Project Management
Week 03
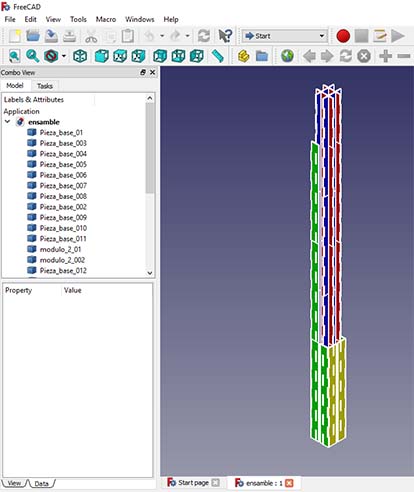
In this week I learn to use different types of softwares oriented for digital fabrication and the one I use more is Freecad a powerfull tool and easy to use.
Computer-Aided Design
Structure Modules
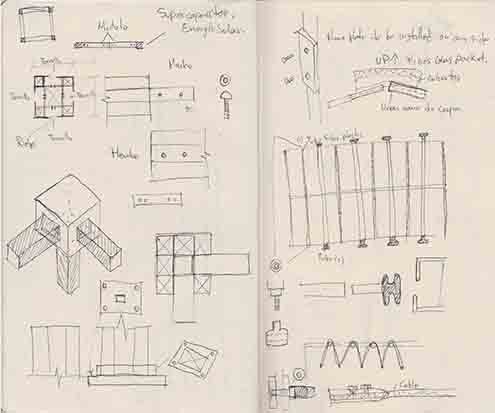
What I want is to create a structure like a single T-Slotted framing and use it as beams, columns and rails. these modules allow to increase or reduce the size of the structure.


You can download the file:
Vertex joint
The union between columns and beams was developed in Kyub web application it's really use full and cool thanks to Andreas from Fablab Erfindergarden. Check this link where I explain about the process.

You can download the file:
Bearing System
Like the wheels of a train these parts should easy slide on the rails of the structure.

You can download the file:
Motor case and tube holder.
For the retractable system I need to align the motor in one side with the tube support at the other side for that I design a motor case and a pipe holder which are inserted in the rails of the structure.

You can download the files:
Base
The columns need a bases to be stabilized so I took the same pin from my vertex joint and draw a square with a round corners.

You can download the file:
Output board case
The board need a case to be organized and also I attach two walls to limit the space for the finger and push the button.

You can download the file:
Input boar case
The board need a case to be organized and the design is like a card holder which allow to stabilize the board.

You can download the file:
Week 04
Computer-Controlled Cutting
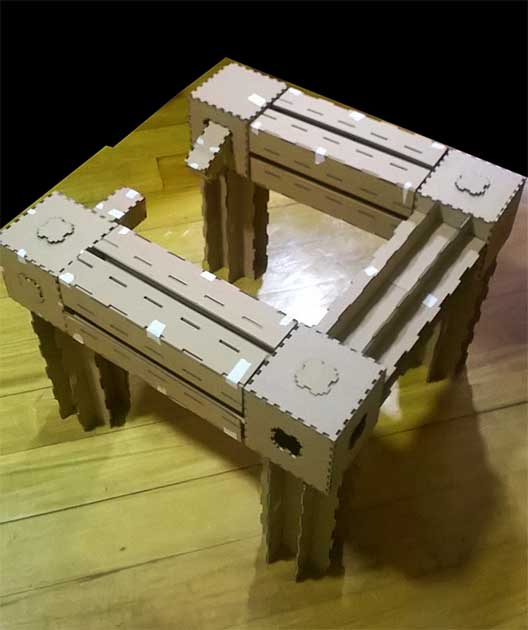
Cardboard Structure
In this week I did a a cardboard press-fit kit of the pergola structure that allows me to understand how the modules are behaving where I assemble them.
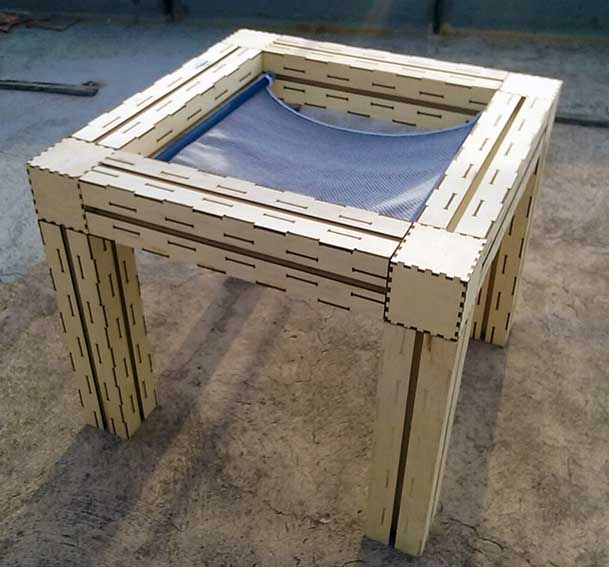
Plywood structure
I decide to use 5 mm plywood for the structure because it is light and strong when assembled and affordable. The laser cut give a good finish and highlight the joints. The kerf index is fundamental and had to be consider in the design. I enjoy assembly the parts.


Week 05
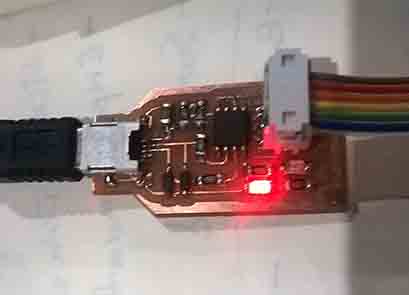
I decided to make the Alex version programmer beacause it's different from the others and is compact and has worked very well for me. This device is fundamental for the Fabacademy.
Electronics Production
Week 06
In this week we learn how to use another powerful really useful tool to bring our ideas to the real world.
3D Scanning and Printing
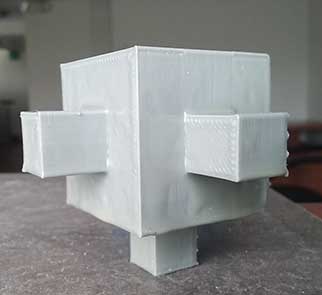
Vertex joint
The first idea was to make this part usin 3d printing so I did the part in a little scale but when I try to create the big one I realized that consume a lot of material and also take a lot of time but will be really use full for a bigger pergola version.
Bearings
I did a lot of test until reach the pieces that fit well in the rails and what I learn in that processes is that is better to make a small test of a part instead of the complete part.

Motor case
For the development of this part I had to measure the motor and calculate a tolerance for the 3d printing file.

Pipe holder
For this part I use a different 3d printer so I realized that the tolerance change because the piece fit tighter.

Output board case
The design allow to insert the board into the case and secure it.

Input board case
The design allow to secure the board and stabilize into the box.

Charger case
I download the files from thingiverse in this link for me was very use full but I did a little adaptations to fit my necessities like leveling using silicone to level the battery and also cut the middle pin because the space for the charge module was too small.

You can download the file:
TP4056 18650 (with protection circuit) Charger by Slade1972 is licensed under the Creative Commons - Attribution - Share Alike license.
Week 07
This week we learn how to design circuit boards a very powerfull skill for the fabacademy. For both of my boards I'm using a ATtinny44 microcontroller that it's enough for components that I'm using but if I would like to add more maybe I need an ATmega328p.
Electronic design


Week 08
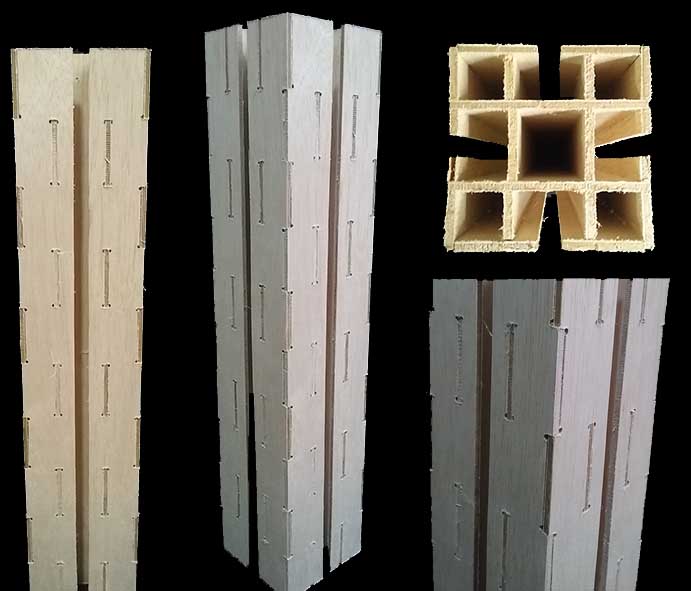
Plywood structure module
To take advantage of the make something big assignment I use it to mill the modules and assembly a column for my final project to know how was behaving and I discover that the kerf index is really different compared to the laser cutting an also the finish something important to take into account in the design.
Computer-Controlled Machining
Week 09
This week we learn how to program our boards another powerful tool that complement the fabacedmy there are many different types but the one I use for my final project is Ccode. Neil examples help me a lot because I mix some of them to reach the final result.
Embedded programming

C code for A4950 drivers:
I work a lot in this code since the output devices until reach to this one. I had to mix different examples like hello.button.45.c, hello.stepper.bipolar.44.full.c, hello.ftdi.44.echo.interrupt.c and one developed by Yue Siew Chin from the fabacademy 2016 also I need a lot of help to understand whats behind so I had to say tank you to Alex who is par of FablabZOI.
Problem:
The motor couldn't move my bearing system and with the help of my instructors we conclude that the problem probably was the driver. I try to increse the speed of the motor changing some settings but still can't move the shelter.

You can download the file:
Debugging:
C code for A3967 driver:
In the program that I use for my final project I disable the pins that Neil use for the drivers and edit it to use another driver more powerfull.
Fortunately I research of another board called easy driver in the week12 that help me to fix that problem. I connect the driver to MISO and MOSI also to 12v and GND pins from my board.

You can download the files:
Week 10
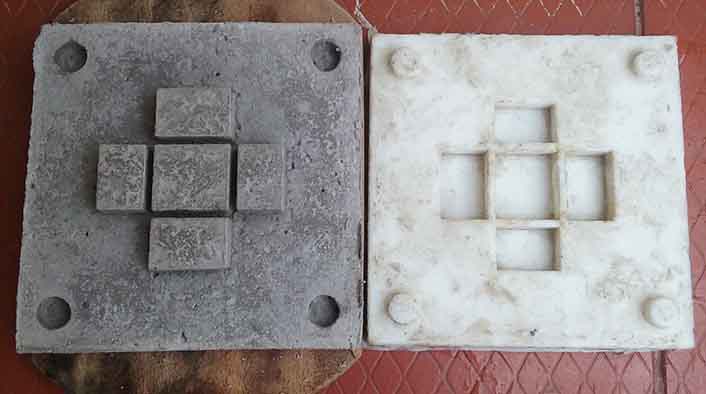
For this week I learn how to create molds and cast them and to link it to my final project I did a concrete base for the columns of the pergola structure sadly I measure wrong the distances between the pins and it doesn't work well. This concrete bases take almost 15 days until get ready I change it for another processes for the creation of the bases.
Molding and Casting

Week 11
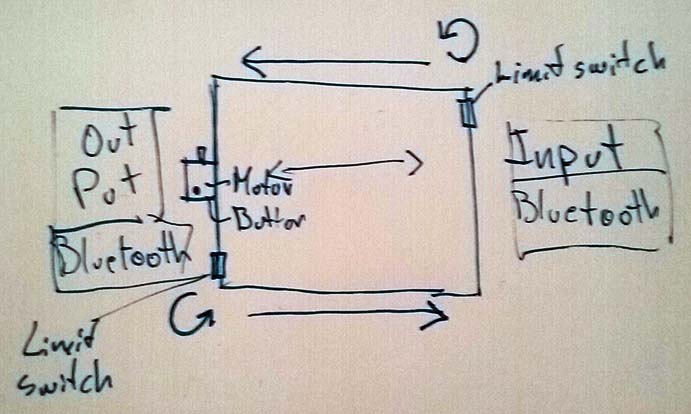
In this week I learn how to integrate sensors to my project and I relate it to my final project using a limit switch as an input to stop and change the direction of the motor.
Input Devices

Week 12
In this week we learn how to integrate an output device to our projects and I relate this assignment to my final project using a stepper motor for the retractable system of the pergola.
Output Devices

Week 13
This assignment help me to understand how it will be the integration of the different parts and devices of my final project and also to adjust my goals.
Applications and Implications
The first idea was to make a big pergola that fit the human scale but I realized that the time I had wasn't the enough so I change my goal and make a smaller pergola for pets using just one module and I reduce the number of the accessories and simplify the system.

The goal of the electronic devices was to integrate it to the retractable system the stepper motor as an output and two limit switches as an input and connect them through bluetooth to stop and change the direction of the motor.
Week 14
Int this week we learn how to communicate our boards between them and to link my final project to this assignment I'm using a bluetooth device.
Embedded Networking and Communications

I had to integrate FTDI pins to my boards so they can communicate with each other trough TX and RX ports.


Week 16
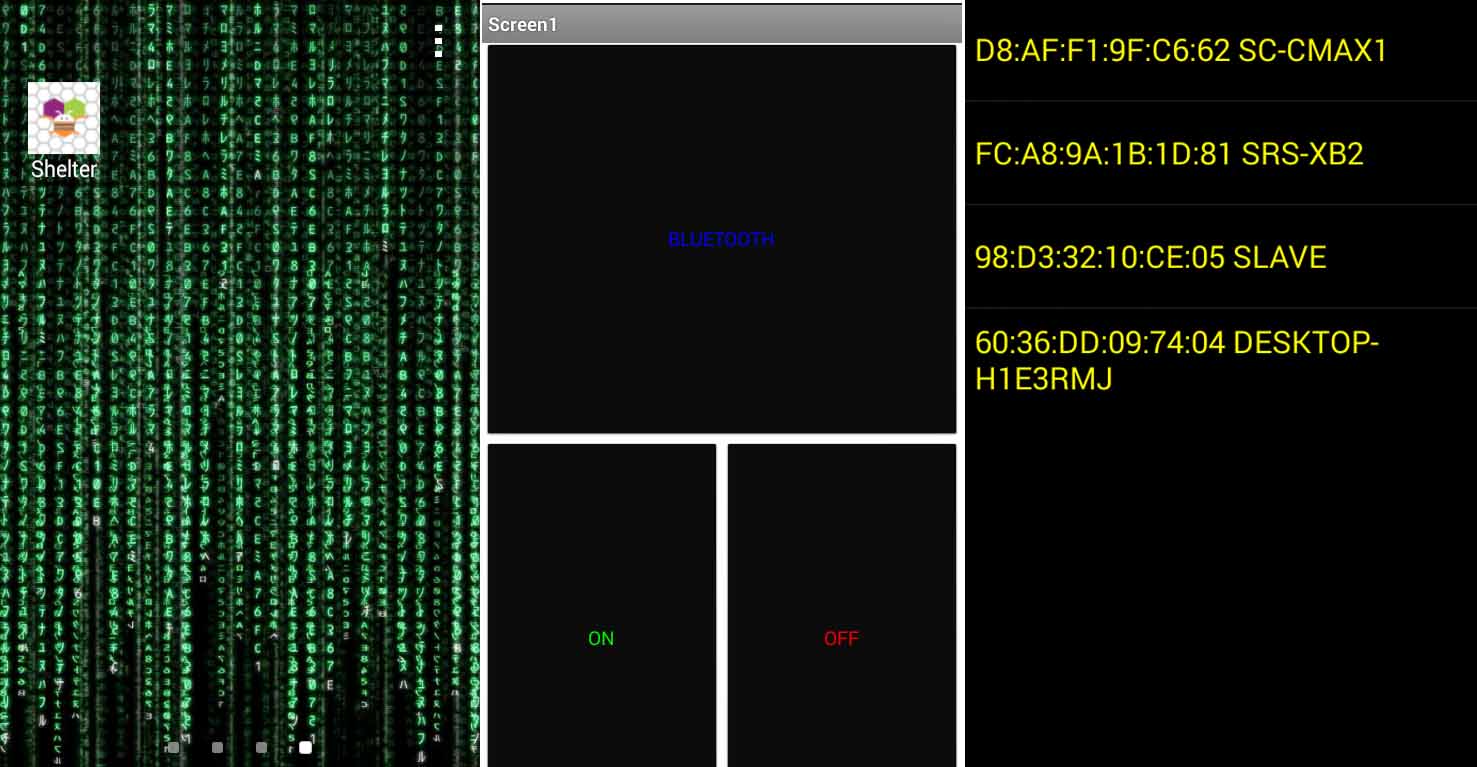
In this week we learn how to create interfaces so we an easily visualize and control our inputs and output devices.
Interface and Application Programming
The first idea was to link this app that I create with my final project but I realized That I will need more communication pins in my master board so I couldn't include in the final result but was a useful exercise that can be included in the future.
Week 17
This week we were free to choose any digital fabrication process and I choose digital Knitting for the creation of the wool shelter. I enjoy learning another processes by my self and looking for something that complement my final project.
Wildcard Week
Week 18
This week we learn how to protect our invents giving a legal support understanding the different types of intellectual properties.
Prevention, Intellectual Property and Business Models


Pergola for pets por Danny Vallejo se distribuye bajo una Licencia Creative Commons Atribución-NoComercial-CompartirIgual 4.0 Internacional.
Basada en una obra en http://fabacademy.org/2019/labs/zoi/students/danny-imbaquingo/final%20project.html.
Week 19
This week I evaluate the development of my final project thought the fabacademy analyzing my planed schedule and comparing to the executed thing related to each week assignment.
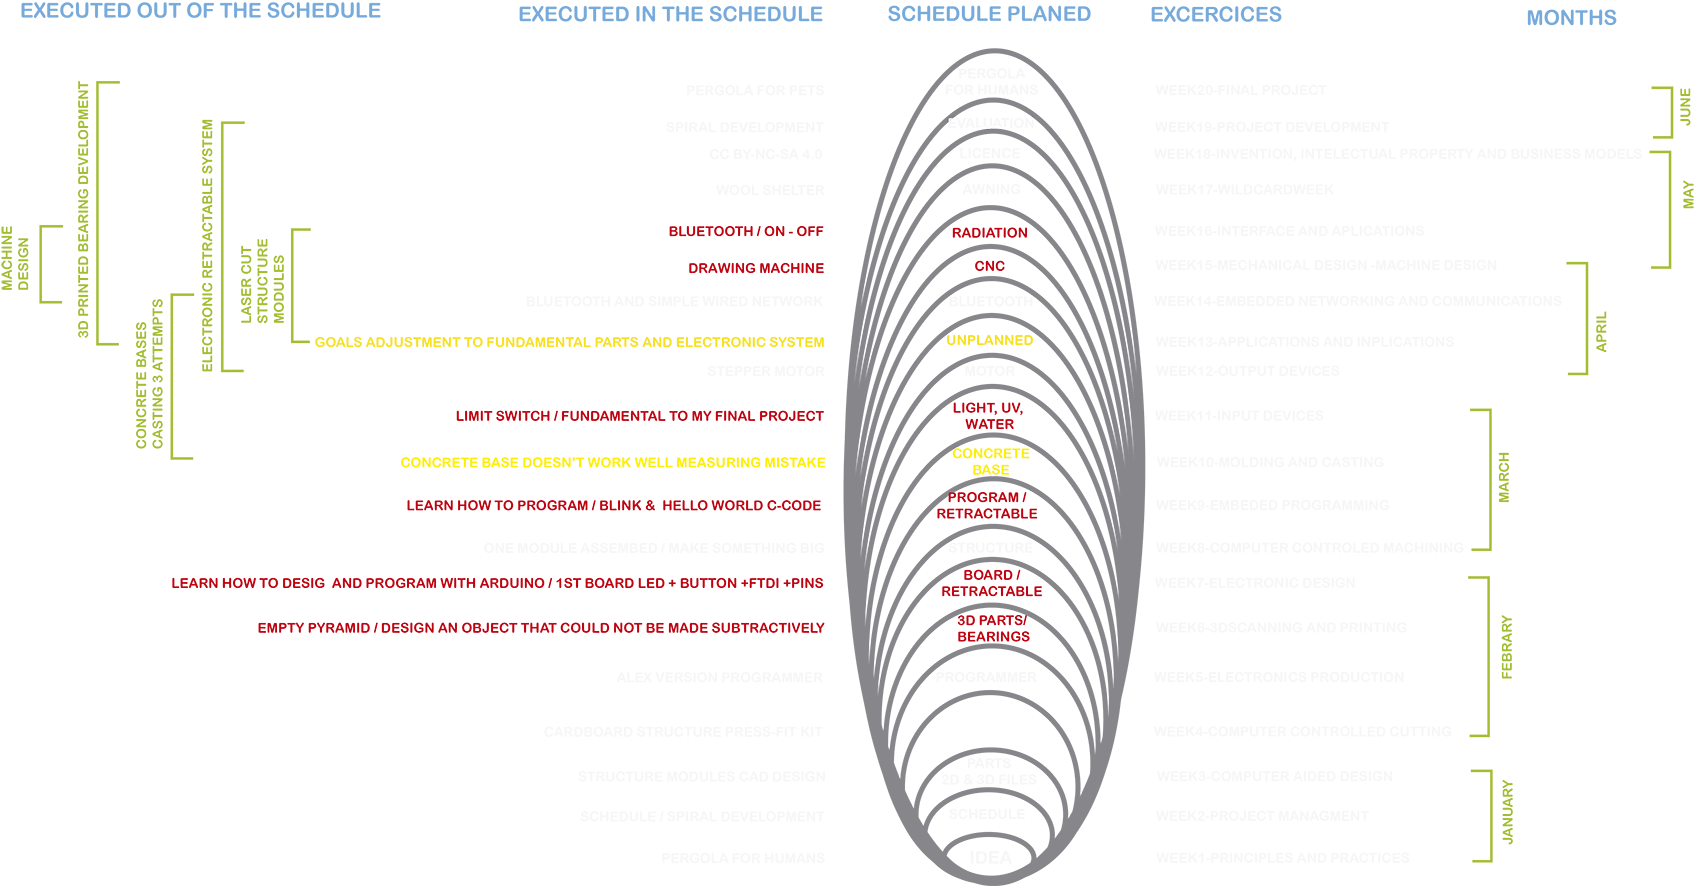
Conclusion:
I use most of the assignments in my final result except for the molding and casting week because I had a measurement mistake and I didn't have the time to correct it.