3D scanning and printing
.
lecture / slide: Fabacademy 2015 02.25D Lesson05: 3D Scanning and Printing MIT CBA 3D Scanning and Printing.
topics: additive vs subtractive processes, printing, file formats, software, scanning.
assignment: design/scan and 3D print an object!.
experimentation: 3D Selfie: jumping to 3D with the use of the Microsoft Kinect Sensor that combines RGB colors from the internal camera with Depthdata from the Infrared emitter and receiver (also part of the system). The software Skanect was used in order to capture the data and construct a 3D mesh from it. Special attention should be given to the driving speed of the camera and multiple camera angles. To do so we mounted the sensor on the seven-axis KUKA robotic arm (six axis plus rotating platform) that was driven manually and makes slow and precise movements possible. Even though the process was technically very precise, little movements of myself when turning and changing facial expressions made it hard for the software to reconstruct the geometry. Some areas of the mesh were missing; commands such as "fill hole / make watertight" reduces some of these errors but make others worse. After two iterations we obtained a pretty nice outcome: Just doing it: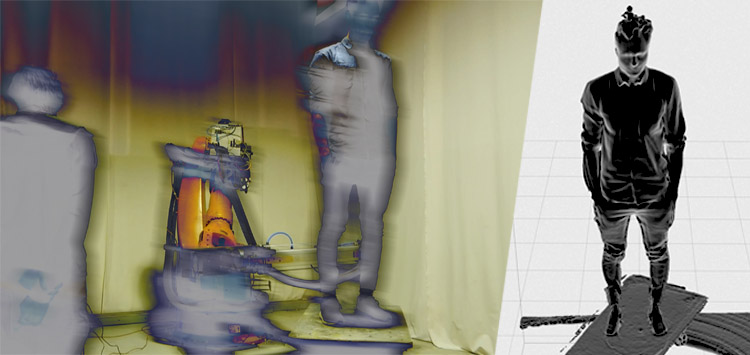 The scan after cleaning it up and adding support in Autodesk Meshmixer and exporting the G-Code for the Makerbot Replicator 2:
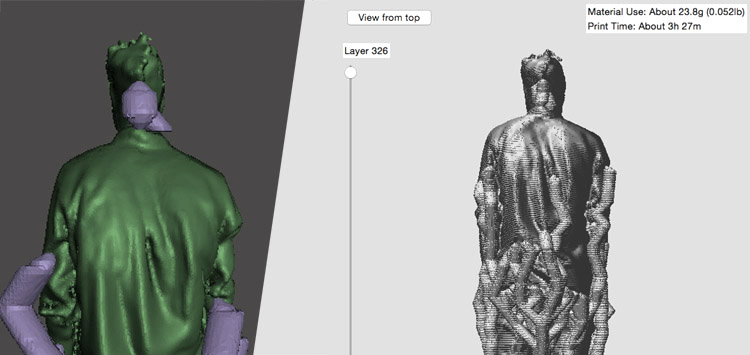 After some failed attempts to print with black filament I decided to go for red Ninjaflex Filament that allows to print flexible structures. A disadvantage is the three times slower printing time, the advantage is a soft print! I prolonged the model in one axis as to play with the perception of orthogonal view:
preview and download the final geometry here:
After some failed attempts to print with black filament I decided to go for red Ninjaflex Filament that allows to print flexible structures. A disadvantage is the three times slower printing time, the advantage is a soft print! I prolonged the model in one axis as to play with the perception of orthogonal view:
preview and download the final geometry here:
-
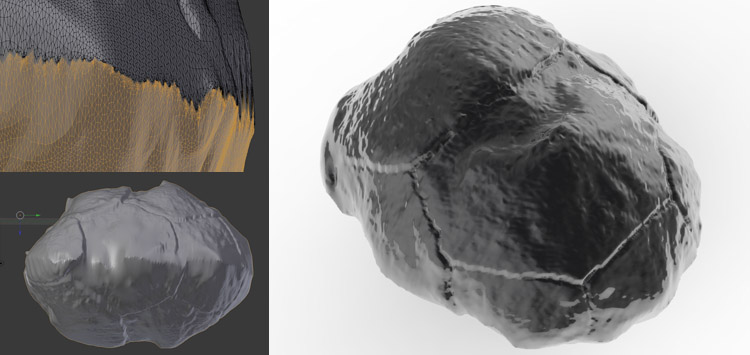
Piezo Sensor Scan: 3D scanning as we know it is usually applied to a middle to big scale, using Kinect Sensor or similar devices. The workflow this time was not to (only) use data based on photogrammetry and/or depthsensors but to use the Roland MXD-20 machine from last week's electronics production assignment with a different end effector to trace very small elements. Using the Roland Active Piezo Sensor (R.A.P.S.) technology that allows scanning objects with a resolution down to 0.05 mm! The piezo sensor is a very thin element that appears as a needle and detects when it touches a surface of an object. Since my project's aim is to print seedbombs I was looking around in nature to find interesting seed geometries and I chose a cypress seed that I found in the hills near Barcelona. I marked the median by hand to be able to properly rescan the other side as well and placed the seed for the first scan, simply using a chewing gum to fix it into position. (The machine runs very slowly but it might be possible that the object gets moved which is especially a problem when we are working on a 0,.. mm scale.) Within the software Dr. Picza I set up the trace distance to 0.20 mm (for both in x-axis and y-axis) plus additionally the minimum and maximum values in z direction. Running for roughly 2,5 hours I exported the according files and continued on the second site: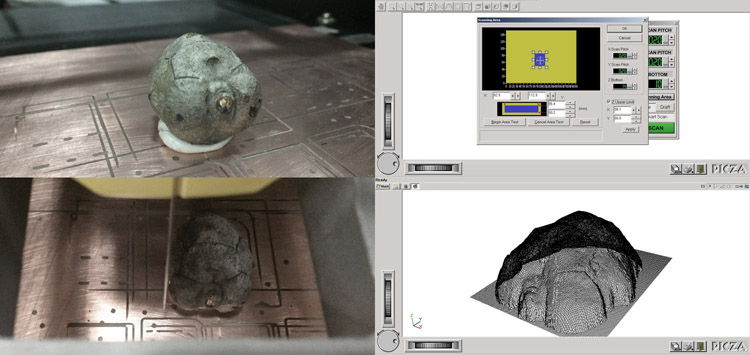 I joined both parts in Blender3D using boolean operations, smoothed a bit the seams and rendered it as you can see on the picture on the right. The resolution is incredible; size of the seed is roughly 25mm / 1 inch and the mesh resolution 0,2mm (max: 0,05):
-
Photogrammetry: Pursuing the idea of understanding a possible size for a seedbomb I asked a friend to take pictures of my hand that I then uploaded to Autodesk Recap (a cloud-based service similar to Autodesk 123D Catch but offering a better resolution). Probably the amount of pictures was not sufficient (around 30) as the alghorithm lost the back site of the hand but since I am interested rather on the position and scale of the palm and fingers I made retaking the pictures a second priority and continued working with the incomplete but still good-enough mesh (it takes roughly four hours to process the files on the cloud before a download is possible). I cut off glitches in Blender3D and obtained a scarily precised and fully textured model of my hand that could serve as max. volume for the prints: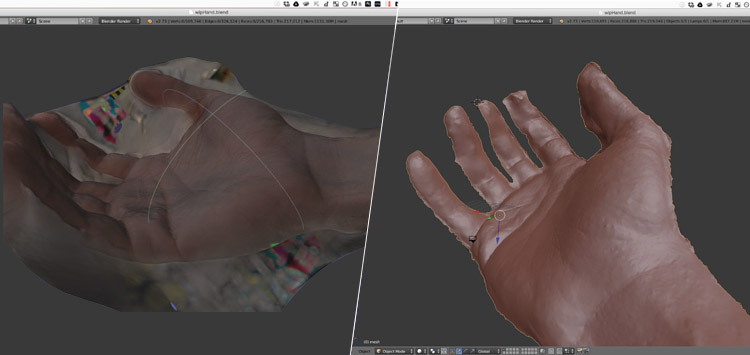
-
teaching assistance at Fab Lab Barcelona: Additionally I was happy to help assisting a workshop held last weekend at the FabLab Barcelona. The two days workshop was about 3D scanning and printing and people from different backgrounds joined us; sculptors and designers that haven't worked with Grasshopper 3D for Rhinoceros 3D before were after only one afternoon session able to print their first coffeecups that we produced overnight in the lab and picked up the next morning (printer: Ultimaker2, 0.3mm layer height):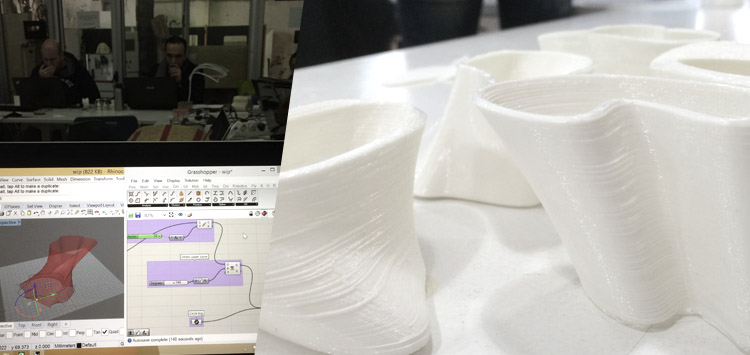
.
files: Files wlzr Fab Academy '15 // w05.
bookmarks / links: Atmel ATtiny 24 / 44 / 84 datasheet Windows XBox 360 Kinect Sensor Skanect 3D Scanning Software KUKA Industrial Robots Autodesk Meshmixer Wikipedia G-Code Makerbot 3D Printer Ninjaflex 3D Flexible Printing Filament Roland Milling and Scanning Machines Autodesk ReCap 360 Reality Capture & 3D Scanning Autodesk 123D Catch Ultimaker 3D Printer.
review: Fabacademy 2015 03.04B Review05: 3D Scanning and Printing.
topical talk: Fab Academy 2015 02.26 Topical01: The linear, the circular and the devolved-

Any content on these pages by Alexander Nikolas Walzeris licensed under a Creative Commons
Attribution-NonCommercial-ShareAlike 4.0 International License