|
Assignment 6: Make something BIG.
This assignment we worked with the shopbot, a milling machine, to make something big. I wanted to make a lamp, using one sheet of wood with slots in it that make the wood flexible. At this point the lamp is not finished yet, so here some work-in-progress pictures and my notes on the process.
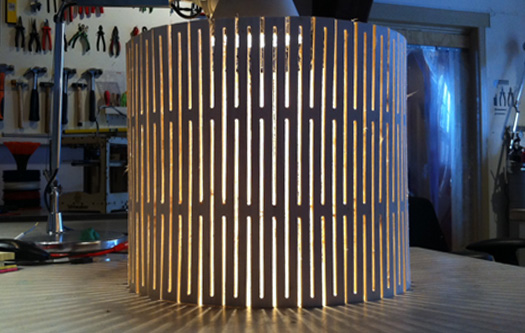
This is the shade of the lamp, I am still working on the interior structure. Before I cut out the whole sheet I tested the principle with the slots that make the wood bend. The first attempt is shown in the photographs below. After the test piece I made the bridges connecting the strips a bit thicker so it would be a bit more rigid. I chose 4 mm poplar wood for the lamp and milled with a 1/8 inch (3.175 mm) bit. At a 15.5 rpm spindle speed it makes a sharp cut without splinters. Now I am ready to make the lamp, an update will follow soon
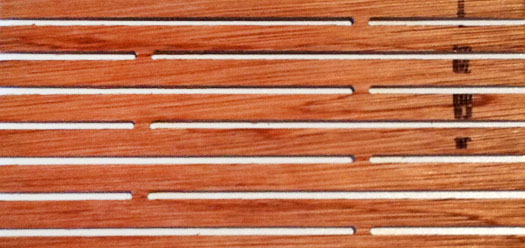

First I tested the principle. After the first attempt I made the bridges connecting the strips a bit thicker so it would be a bit more rigid. I chose 4 mm poplar wood for the lamp and milled with a 1/8 inch (3.175 mm) bit. At a 15.5 rpm spindle speed it makes a sharp cut without splinters. Now I am ready to make the lamp, an update will follow soon.
Joints
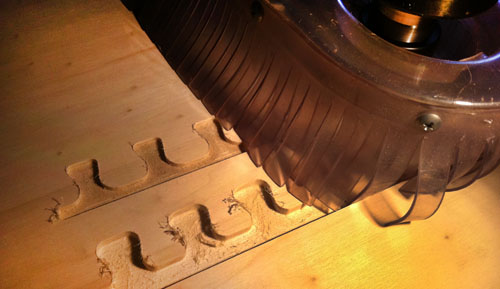
Apart from making the lamp I did made a joint that I wanted to try. I got the example from the flexiblestream website that describes a variety of wood connections. I think this one is very smart and aesthetic:
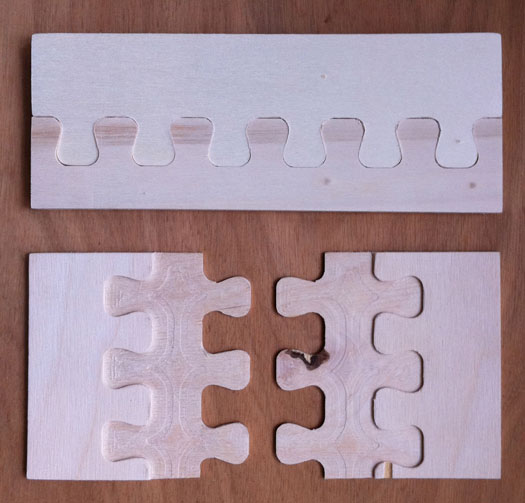
They can be made one-sided our double-sided.

This is how the pieces of 9 mm plywood came out of the machine. The first time I made the 'teeth' the same size on both parts. They just didn't fit when they came out of the milling machine, so I had to sand them off to make them mate. For the second test I offset the teeth 0.2 mm to the inside and then they were perfectly snug.
Workflow for file preparation in PartWorks
Just as a reminder for later on, these are the steps to prepare a file in partworks:
- Export the file to .dxf
- Open it in partworks
- In the first dialogue, enter material width, height and thickness where 0 = top of material
- Unclick the 'set origin axis' box
- Close first dialogue
- Place the part efficiently on the shee
- Draw out the toolpath dialogue and pin it so it doesn't slide in again
- Prepare the drillholes - save them and remove them from your list
- Prepare the other toolpaths, start with pockets and cut the outlines at the end.
- Some tips for preparing the toolpath. Select the milling bit you need from the dropdown menu. Revise all the settings, because the numbers are often not correct. Remember to indicate whether it has to cut on the vector path, on the outside (for cutting out parts at the their correct size) or on the inside (for cutting out holes at their correct size). When entering Consider the pass depth, never go deeper than 1.5 x the bitsize in one go. In this phase you don't have to worry about rpm because this you can set on the machine itself. When you are done, click 'calculate'
- Check how the path looks in the 3D view tab.
- Save the path and give it a very clear name. Save it in project files in a folder with your name. You can save all paths in one file, but maybe you want to save them separately to do the jobs one at the time.
Once all your jobs have been prepared go to the machine.
Workflow for file preparation in PartWorks
- Put in the red plug for the dust extraction
- Turn the shopbot on with the red switch
- Place the sheet on the sacrificial layer. Make sure it lies as flat as possible. If your pieces are going to be small, put strips of double sided tape underneath the sheet
- Open the shopbot programme
- Press k on your keyboard to open the control panel. Now you can move the head in x,y directions with the arrows and in the z direction with the page up and page down keys. Bring it to a location where you can easily access the head
- Replace the milling bit if necessary. Unlock the collet - be careful with your hands since it can be very tight, and make sure the bit does not fall out. Replace collet and bit. The collets don't have their size indicated, but a bit should slide smoothly in and out of the collet. First place the collet in the head and then slide in the bit. Thighten it very well using the tools
- From the top menu bar, click the go to absolute zero button. Wait until it is at its 0,0 location.
- Bring the milling bit above the corner of your material. Take notes of its x, y position relative to its 0,0 point - in this way you will always know where to go if the machine crashes. Press zero x & y axis from the 'zero' menu to make this the new 0,0 point.
- Now get the metal plate that is stored at the side of the head. Hold it against the drill and check in the red dialogue if it makes contact. If it does, place it below the drill and press the set zero button. It will give a warning, click it away if you are ready. I twill zero twice.
- Load your part file
- Put the spindle on
- Press start when the air is on and the spindle running. Use headphones if you like and always keep looking at the machine while it is working
- When the jobs are done move away the head and take the pieces out. Clean the dust from the bed and if you are done working take the sheet away.
Notes on bits and cut-settings
When milling, you want to take away as much wood as possible, as fast as possible, and with a smooth cut. The challenge is to find the optimal chip load for your milling bit. If you take away too little material the tool can overheat, and if you try to take away too much material at the time the tool and spindle get overloaded.
A lot of factors like the material and machine settings influence the chip load. A number of important considerations are described here:
Material: The softer the material, the faster the bit can cut through it. If your feed rate is high, it can also have a high rpm. If the material is harder, it is more difficult to cut chips away, so the head must move slower and the rmp must be lower as well.
Size of the bit: The bigger the bit, the more material it takes away and the more wood it can carve away in one go. Smaller bits make nicer corners, but usually they are not long enough to cut through thick sheets.
Flute: Means cutting teeth. Bits generally have between one and four flutes. The tooth cuts the material, and chips of the material are pulled up or down by the rotation of the flutes.
Up- or downcut bit: If you turn the bit you see the spirals move up or downwards. With upcut bits the woodchips exit more easily. Downcut bits turn into the material, which keeps the surface of the material more intact. Choose downcut bits if you want a sharp cut on the surface.
Feed rate: How fast the bit moves through the material in x,y direction
RPM: The faster the bit turns, the more material it can take away. If the feed rate is high, also a high rpm is needed and if feed rate is low, the rpm has to be lower as well.
Shape of your object: If your lines are straight there won't be too much heat production, but if you have a lot of corners and the spindle slows and accelerates all the time it does not cut at its optimal feed and speed rate, so there will be more heat buildup.
|
 Astrids Fab Academy Projects