6. 3D Scaning and Printing
For this week, I have learnt on 3D Printing:
-
Additive vs Substractive
3D Printing Process vs Conventional Manufacturing Process -
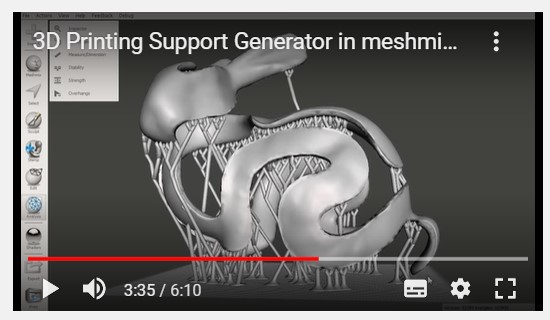
3D Scanning Tool Meshmixer
- Generate a Branching Tree Structure to Support Overhangs in 3D Printing
- Require Significantly Less Materials than other Support Structure Techniques
- Get Larger Models
- Improve Print Time
-
Create an STL file from a 3D Scan Point Cloud File in MeshLab
- is an opensource, portable, and extensible system
- for the processing and editing of unconstructed 3D triangular meshes.
For this week, I have worked on:
Group Assignment:
We have tested the design rules of our 3D printer in orer to explain what are the limits of our 3D printer. If you have interest, you can CLICK HERE to know more about the details. Some main points are mentioned below.
_The Design Rules for our 3D Printer (86Duino Enjoy)**

All the Design Rules were printed in one Plane

Rule 1 Add Support

Rule 2 Clearances

Rule 3 Angle

Rule 4 Unsupported Overhag

Rule 5 Bridging

Rule 6 Infill

Rule 7 Overhag

Rule 8 Anisotropy

Rule 9 Surface Finish

Rule 10 Dimensions

Use the Caliper for Calibration to measure the Errors of each Side:
- Outer Length

- Inner Length

- Height

The Limits of this Printer
- Size of the Product
- Limited Time for running of this Printer
- Materials used for Printing as soon as possible
- Avoid Damping for Materials used
- Appropriate Temperature for printing
Individual assignment:
- design and 3D print an object that could not be made subtractively
Step 1 Idea for Design - an Icon product for my final project

Step 2 Searching for any Similar Product


Step 3 Use Different Functions of Fusion 360 to Design my Product


Step 4 Change to a STL File for 3D Printing


Step 5 Use our Raise3D N2 Plus for 3D Printering

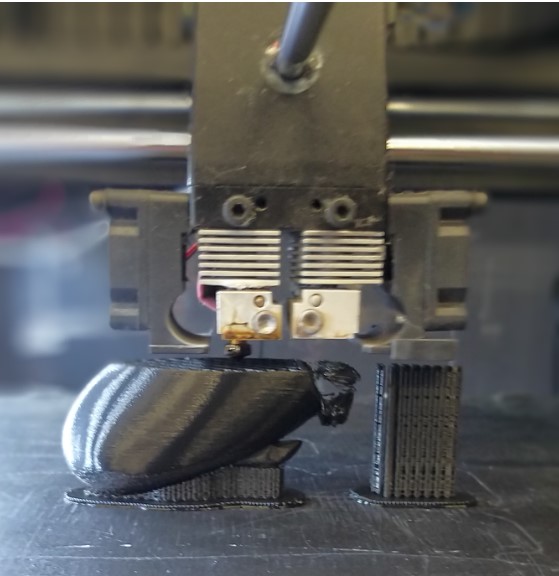


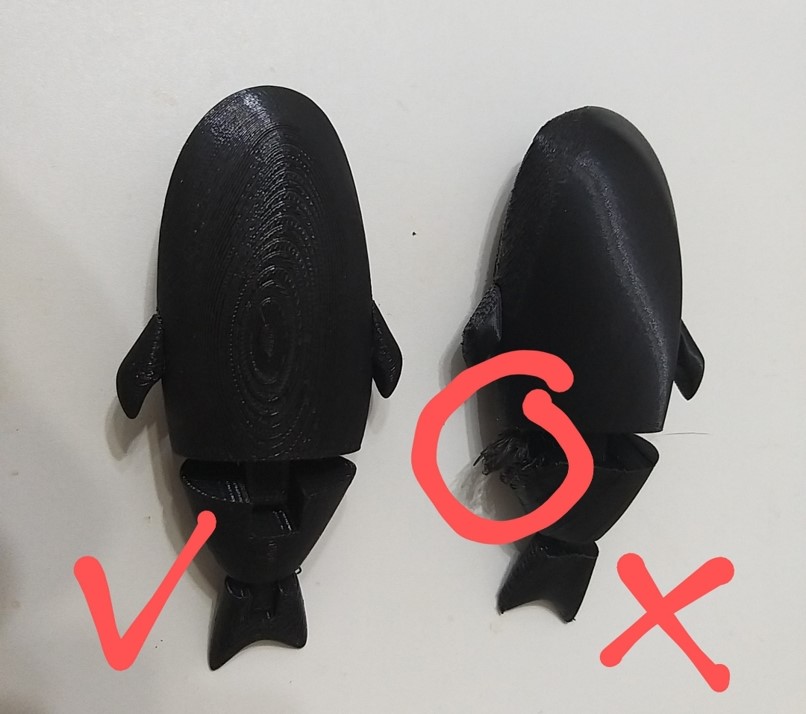
- Software for Sticking and Repairing photos - Meshmixer
Solution 1: Add more Support for Printing Process

Solution 2: Change the Printing Position and Add enough Supports

After Amendment, another improved 3D product is printed

Using Shovel to lift up the Base of 3D Product


- Size: ~ 114.92cm x 40.04cm x 31.01cm
- Weight:
- Diameter of Filament:
- Printer time: 6 hours
During my Individual 3D Printing, Design Rules were used as follows:
Rule 1 Add Support
Rule 2 Clearances
Rule 6 Infill
- Strength vs Weakness (Constraints and Failure) for 3D Printing
Strength
- Design anything you like
- Light
Weakness - Use too much time for printing the products - Some shape cannot be produced by additive fabrication

Source File for Fish with Movable Tail (FUSION360)
- 3D Scanning and 3D Printing
We have HP Sprout 3D AiO Desktop Computer, Scanner and Printer Bundle in our lab and I used this powerful computer to combine the 3D print technique from 3D scanning. “3D Capture” icon was chosen to start.

A message from the computer will send out to remind to connect the scanning stage in an appropriate place. Keep your hand and any other object are out of the scanning area to avoid the accuracy of scanning.

The object, a 3D printing cat product, you chose to scan must be placed on the stage and towards to the front of the pointer. Then, the scanning process would be continued automatically until 360 degree rotation.
2nd scanning cycle would be started after completion same instructional steps before. However, the position of the object would be changed to the other side. This could make sure every part of the objected could be scanned to get the more accurate datas of the shape of the scanned object.

After 3th scanning processes, a file would be saved in the computer. Through this software, open in 3D viewer, 3D view of the scanned cat would be shown on the computer screen in order to check any defect needed to repair by computer software. The 3D printing machine would be used to print out “another” scanned cat.

The scanned cat would removed any support waste. According to both cats’ they looked like almost thesame.

If we oberserve the front sides for both cats, they almost the same. However, when we looked at the side, the scanned cat near the foots were not very clear cut. This was only one shortcoming.


Source File for Cat (FUSION360)
Printing Process is more important than the Finsihed Product