Group
1. Send a message between two projects
Individual
1. Design, build, and connect wired or wireless node(s)
with network or bus addresses
Plan for the week

This week, we are going to learn about how to connect 2 or more boards with or without wires. The main idea for this week is that we have some way of communication between boards so that this understanding will help to to connect more boards when needed in different projects. The main reason that we need this is for following:
Types of connection:
Parallel: This the type of connection when the data transfers in parallel. These are fast but require wire equivalent to numbers of bits it is transferring.
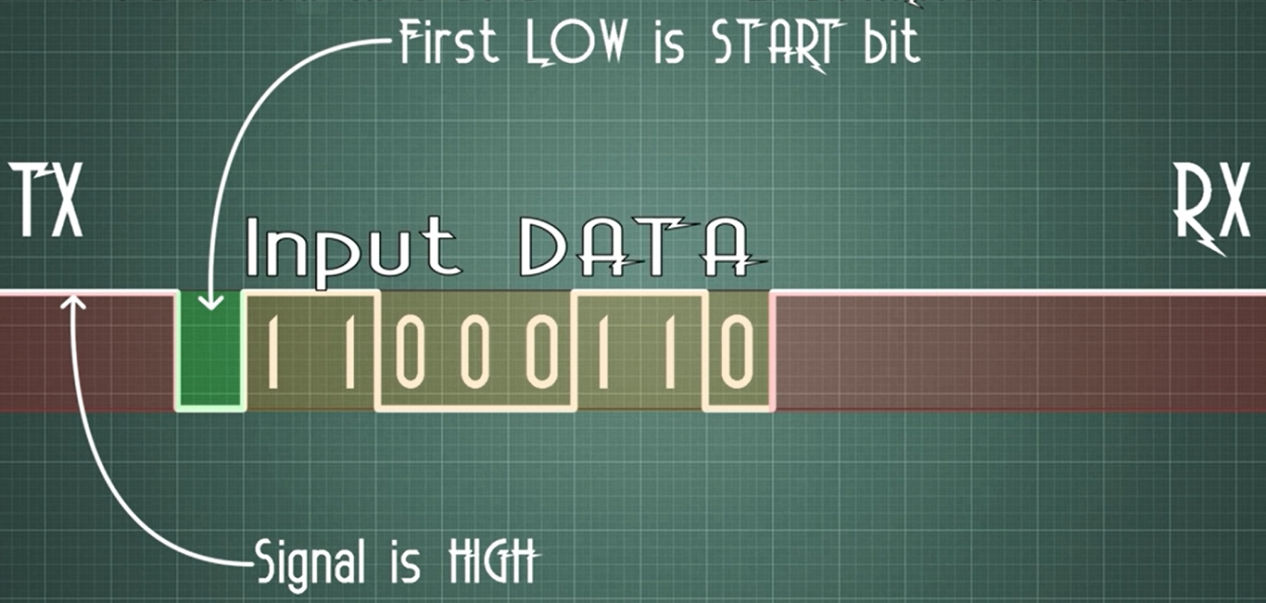
The one I will be doing is I2C type this week as this is simple connection thata can be used in my final project as well. This is a type of synchronous communication protocol. It differs with SPI which is also a synchronous protocol. Lets me first talk about SPI and then come to I2C
SPI (Serial Peripheral Interface) protocol:
[When SPI was invented, the naming was done according to Master and slave which you find in other document, but in this document, the term "slave" has been replaced with "secondary"]
This is a synchronous type serial communication protocol which consists of two data lines (MOSI and MISO), one clock line (SCK) and a Secondary select line (SS). Before moving ahead here are some terms that you should be aware of:
Master – Device which provides clock for communication
Secondary – Device other than master which utilizes master’s clock to communicate
MOSI – Master Out Secondary In (line though which master sends data to its Secondary)
MISO – Master In Secondary Out (line though which Secondary responds back to the master)
SCK – Serial Clock (clock provided by master device)
SS – Secondary Select (line used to select Secondary board to which master wants to communicate)
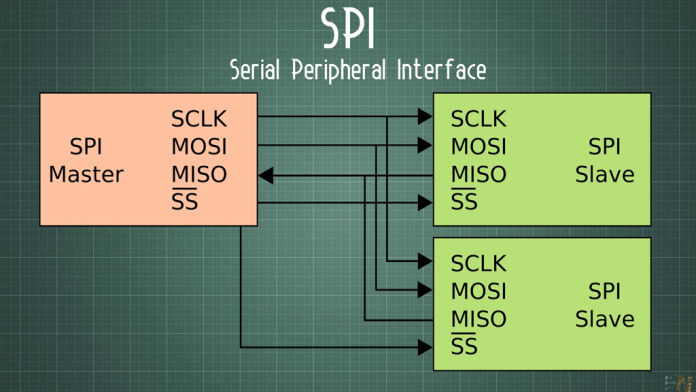
SPI is a full duplex communication protocol where both Master and Secondary can have two way communication only when Master allows to. In this protocol there could be one master and many secondaries. Each secondary board is given an address and the master sends data to all the secondary boards and the board receives the only data that is addressed to that board only. Master sends data via MOSI while Secondary boards respond via MISO line.
In the entire process SCK (serial clock) plays a very important role, every secondary device depends on this clock to read data from MOSI and respond through MISO. This way networking is done in SPI protocol.
Advantages:
1. Provides synchronous serial communication which is much more reliable over asynchronous
2. Multiple devices(Secondary boards) can be connected to single master
3. Faster form of serial communication
Disadvantages:
1. Requires multiple wires for connecting each multiple Secondary boards.
2. Only master has control over entire communication process; no two secondary board can communicate with each other directly
I2C (Inter-Integrated Circuit) protocol:
This is another type of synchronous type serial communication protocol which consists of only one data line (SDA) and one clock line (SCL) unlike SPI. It only uses two wire for the entire communication so also known as Two Wire Interface (TWI) protocol. I2C protocol can support multiple secondary devices but unlike SPI, which only supports one master device, I2C can support multiple master devices as well. Every device sends/receives data using only one wire which is SDA. SCL maintains sync between devices through common clock which is provided by the active master.
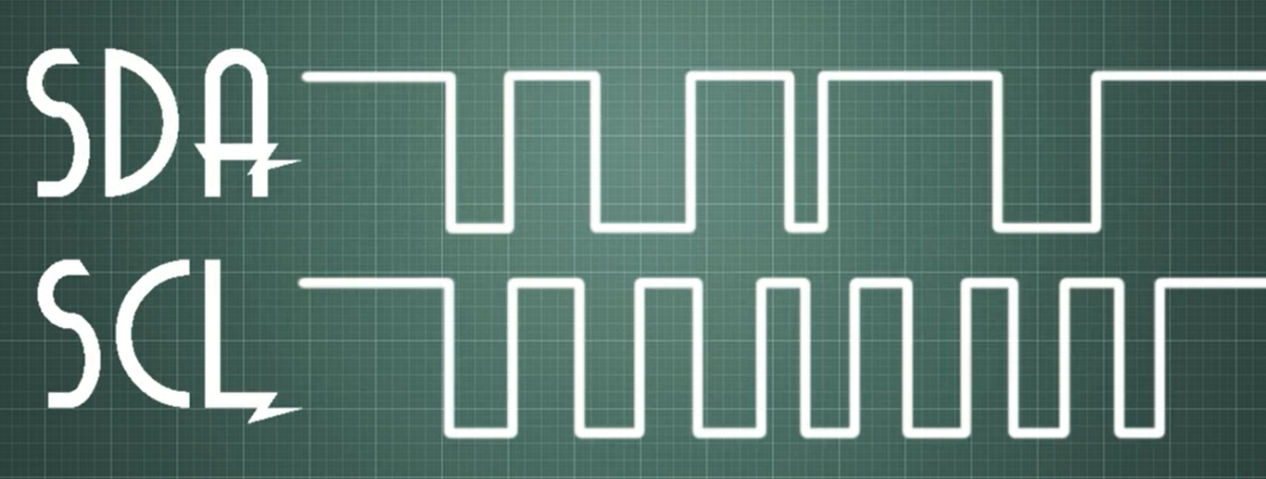
In this type, at the same time we send the data we also send the clock signal at same frequency as the bits of the data so reciever knows when the data starts and stops hence it will be faster.so the It can work upto spped of 400kB/s
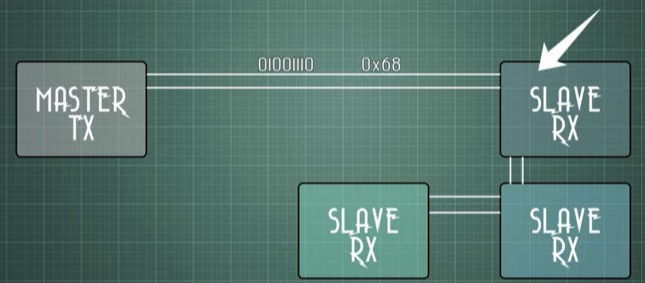
Each secondary board has its own unique 7 to 10 bit address which master uses to identify them. Whenever master wants to send data it first generates a request which has particular address of that secondary board followed by the data. Every secondary board compares the address if matches with its own, responds to the master. Every message initiates with a start condition and ends with a stop condition.
(Pull-up resistors with SDA and SCL are necessary in order to run this protocol. I did a mistake trying to connect two board without pull-up resistors in between which i learned from the data sheet)
Advantages:
1. Multiple masters and multiple slaves can be interfaced together
2. Only two wires are required for this communication
Disadvantages:
1. It is slower as compared to SPI because a lot of framing work is done within this protocol
You can follow this video link. which was very helpful for me to understand.
Since we are in lockdown and are not allowed to go out, I could not fabricate board so I tried with the board I have from design week and input week. I tried board with Hall sensor as a master and board with LEDs as a secondary board. The reason I thought it was possible was that I looked at the SDA pin and the SCL pin in both the boards. in the pin diagram and found that MOSI and SDA is same and SCL and SCK is same in both boards. I tried coding them both first master and Secondary as follows:
Master Coding
#include <
#include <SoftwareSerial.h>
int digitalValue = 0;// variable to store the value coming from sensor
int analogValue = 0;
int x = 0;
SoftwareSerial Serial(1, 2); //(Tx, Rx pins for serial response)
void setup()
{
pinMode(sensorPin, INPUT_PULLUP);
pinMode(3, OUTPUT);
Serial.begin(9600); // initialize serial communications at 9600 bps
// TinyWireM.begin();
}
void loop()
{
analogValue = analogRead(A2);
if (analogValue <= 468 || analogValue >= 568 ) {
digitalWrite(3, HIGH);
x = 1;
}
else
{
digitalWrite(3, LOW);
x = 0;
}
Serial.print(x);
TinyWireM.beginTransmission (8);
TinyWireM.write(x);
TinyWireM.endTransmission ();
delay(100);
}
Secondary Coding
#include <TinyWireS.h>
#include <SoftwareSerial.h>
SoftwareSerial Serial(0, 1); //(Tx, Rx pins for serial response)
#define LED1 7
#define LED2 2
void setup() {
TinyWireS.begin(8);
pinMode(LED1, OUTPUT);
pinMode(LED2, OUTPUT);
Serial.begin(9600);
}
void loop() {
int x=0;
digitalWrite(LED1, HIGH);
if (TinyWireS.available()) {
x = TinyWireS.receive();
if (x == 1) {
digitalWrite(LED2, HIGH);
}
else {
digitalWrite(LED2, LOW);
}
}
delay(100);
}
I connected and then tested it but it was acting weird as the blinking was there but unpredictable I tried to edit the code, tried serial output but entering characters but it was not responding properly then opened the datasheet and searched I2C in the data sheet and found that pull up resistors are required on in both SDA and SCL. Then I searched why pull up resistors are required in this type of connection. Then after searching the document for master and student from Neil's class and different sites, I found out that I2C communication works on open-drain system meaning that the line should be always high.
Both TWI lines (SDA and SCL) are bi-directional, therefore outputs connected to the TWI bus must be of an open-drain or an open-collector type. Each line must be connected to the supply voltage via a pull-up
resistor. A line is then logic high when none of the connected devices drives the line, and logic low if one
or more drives the line low.
So one option is to add resistor externally by using jumper wires but due to lockdown cannot access lab so I could not test it.
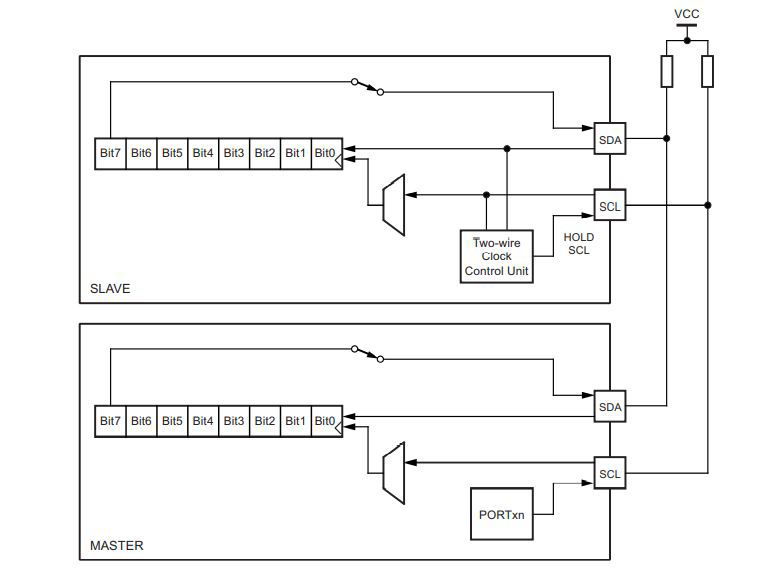
Refer Page 109 of this manual for Attiny24/44/84 to understand more about how I2C works inside the microcontroller.
Creating a new board
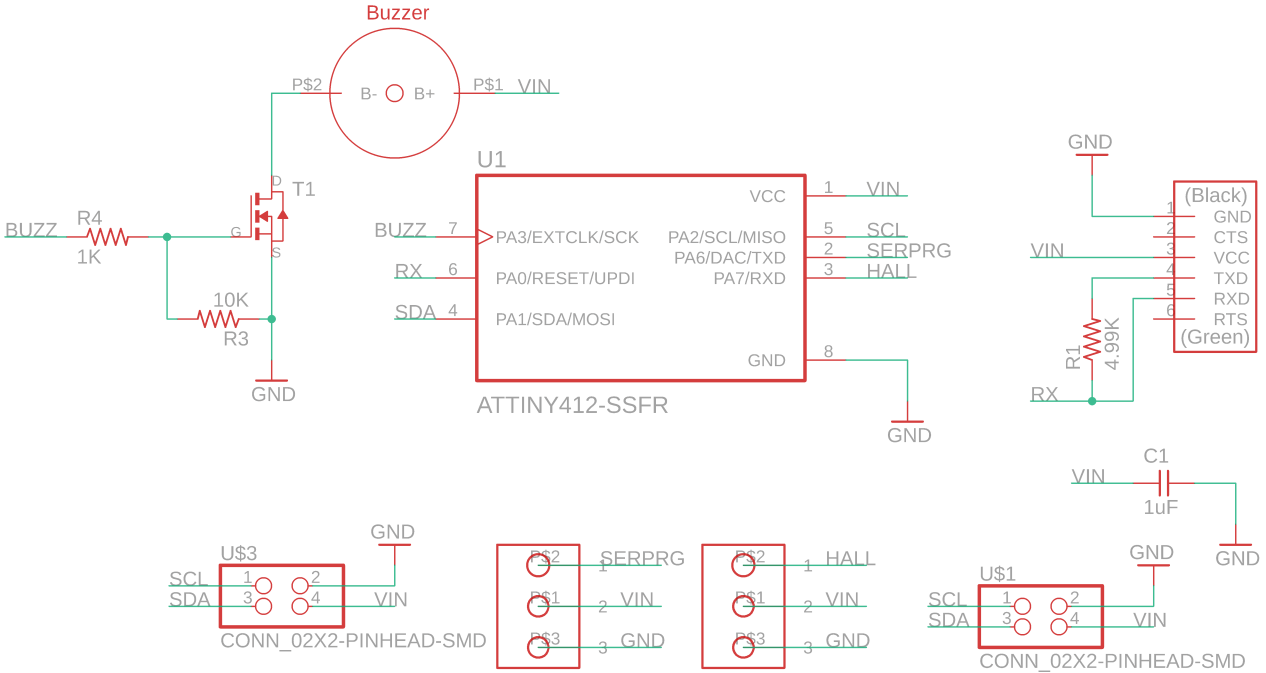
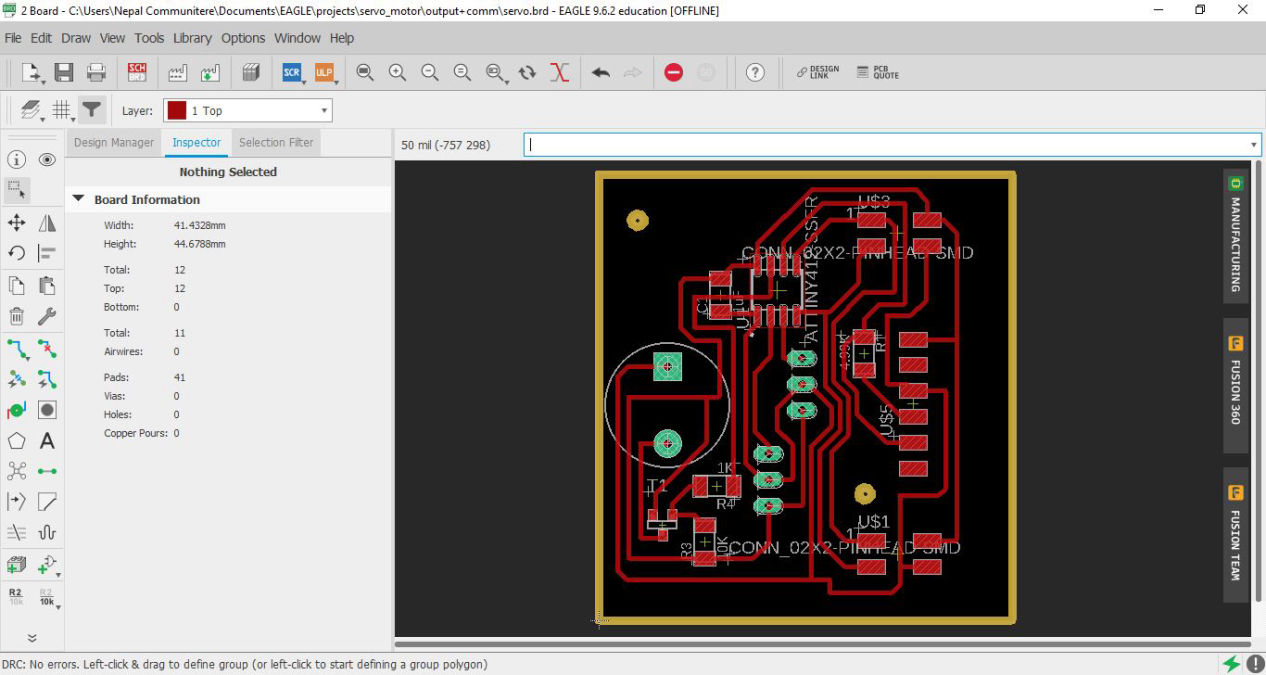
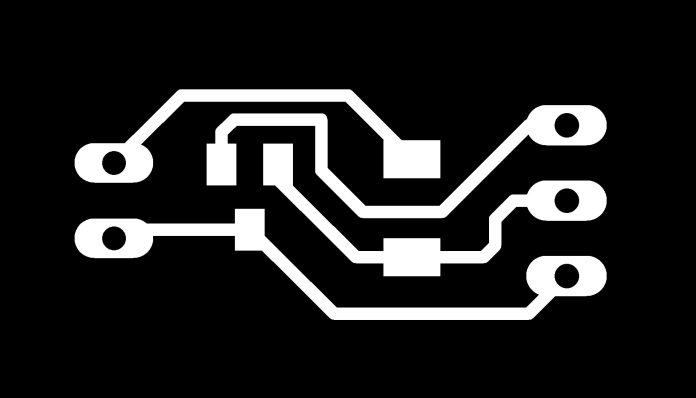
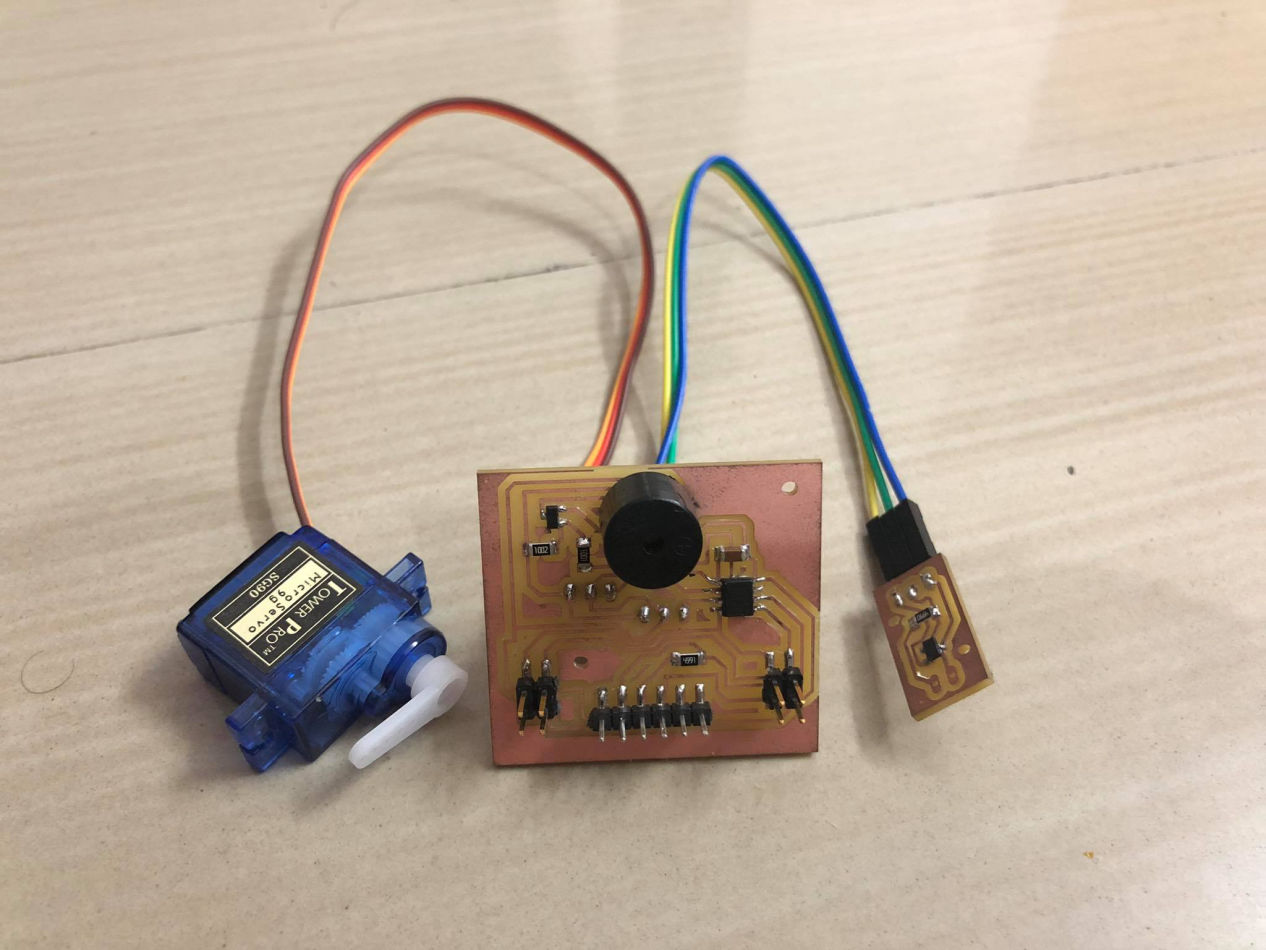
Using the leaning of Design week and referring to Neil's board, I designed the board for which can be used both for communication and output and also can be used in my final project. For the design of the board and schematics refer to this link of output week however you can download the files from the link below. However the photos of the board are as shown below.
Design
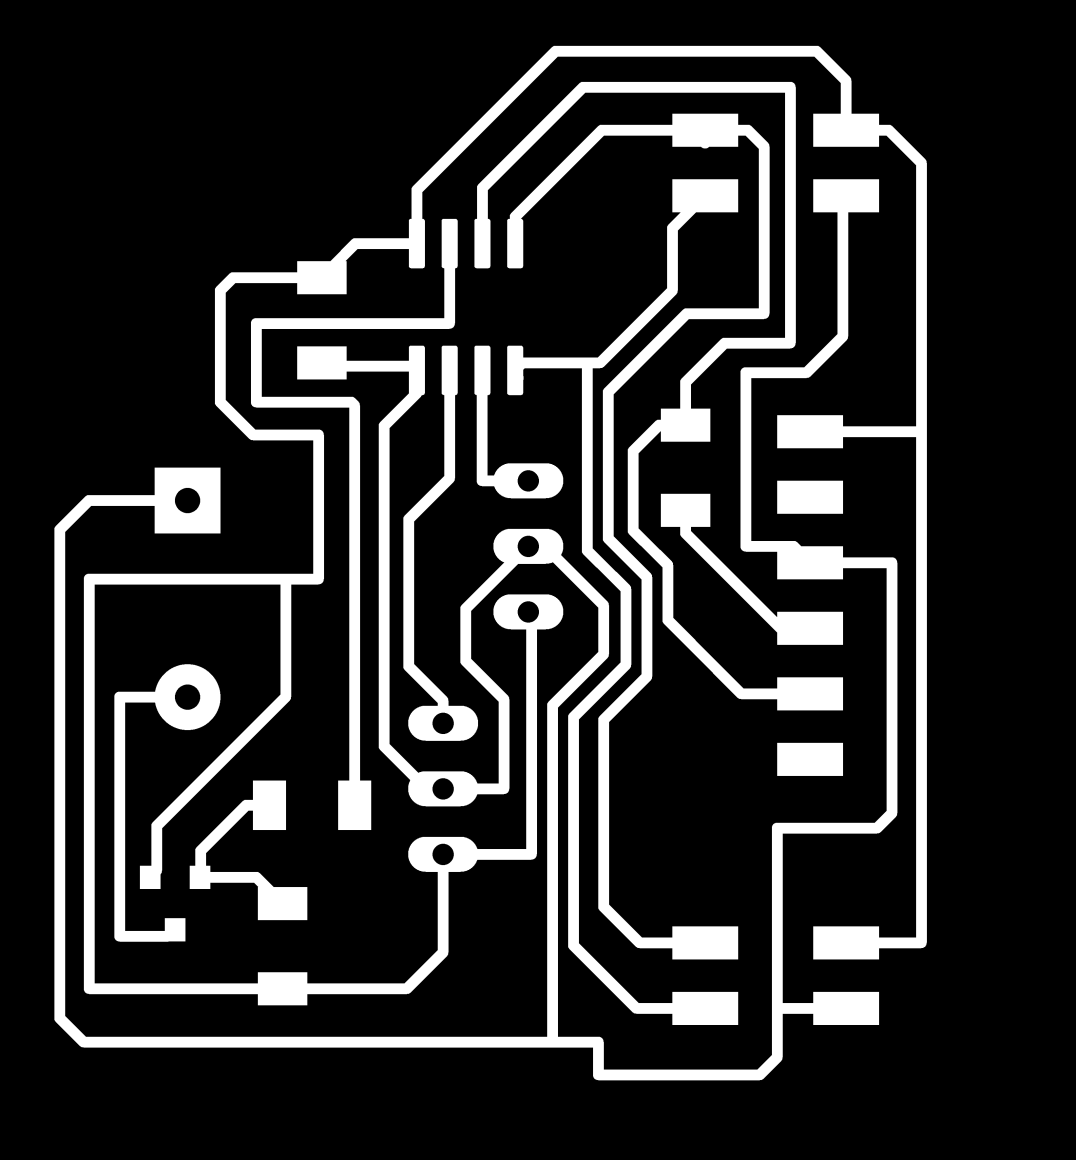
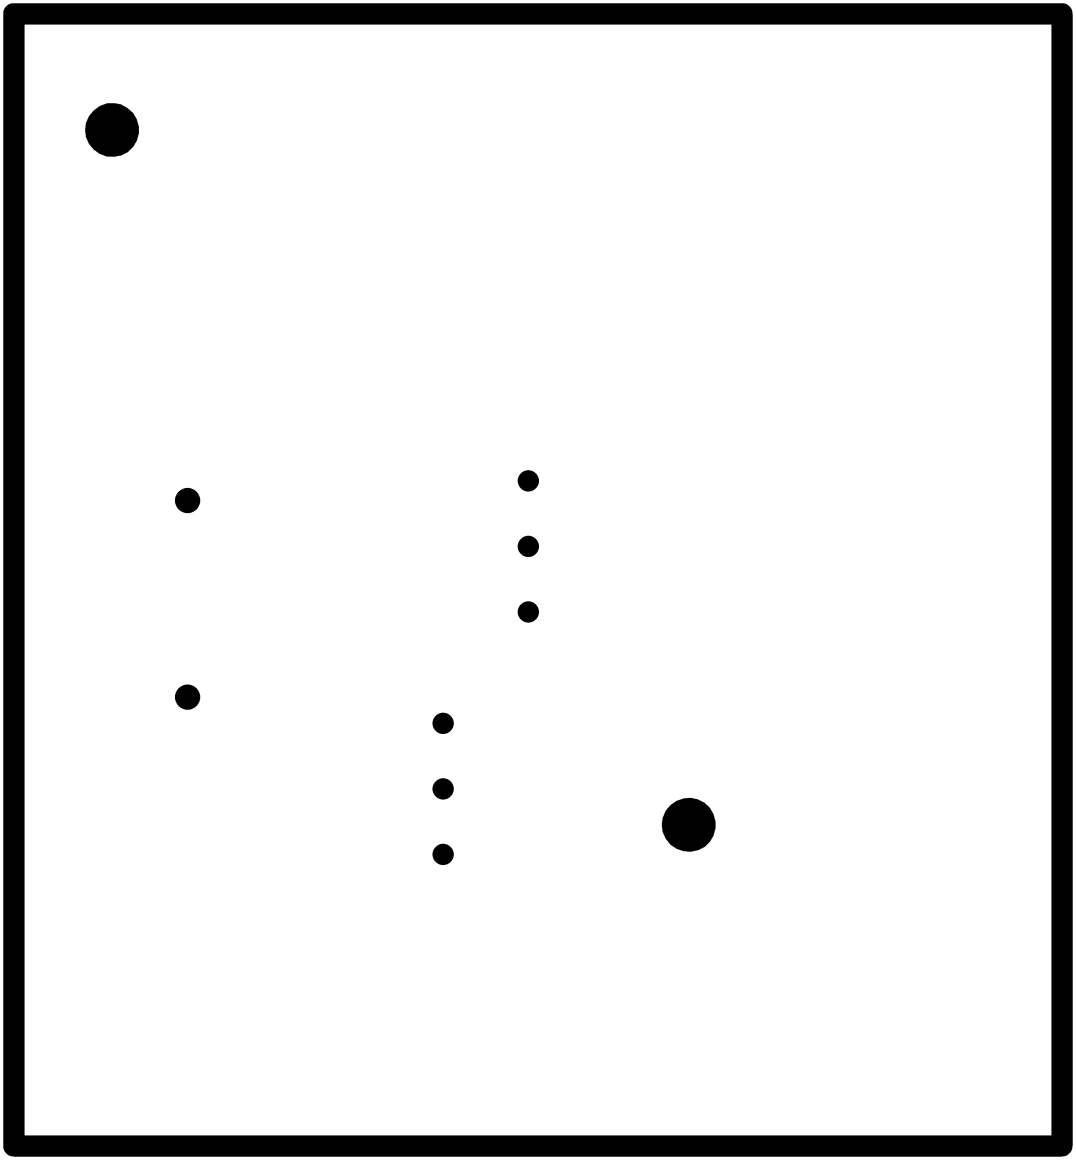
Fabrication
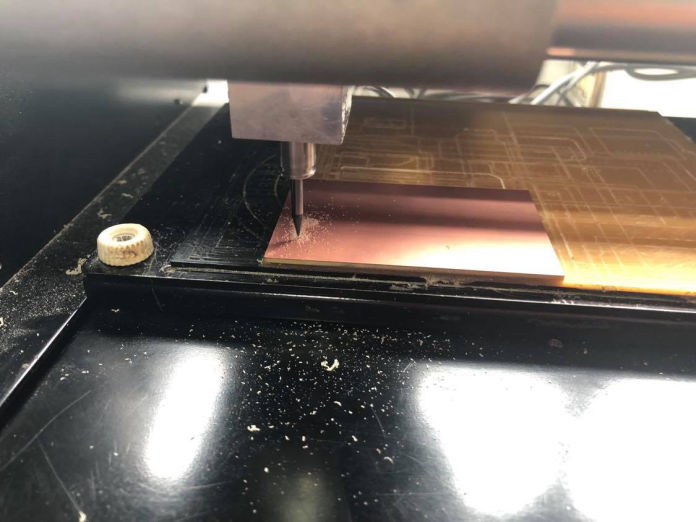
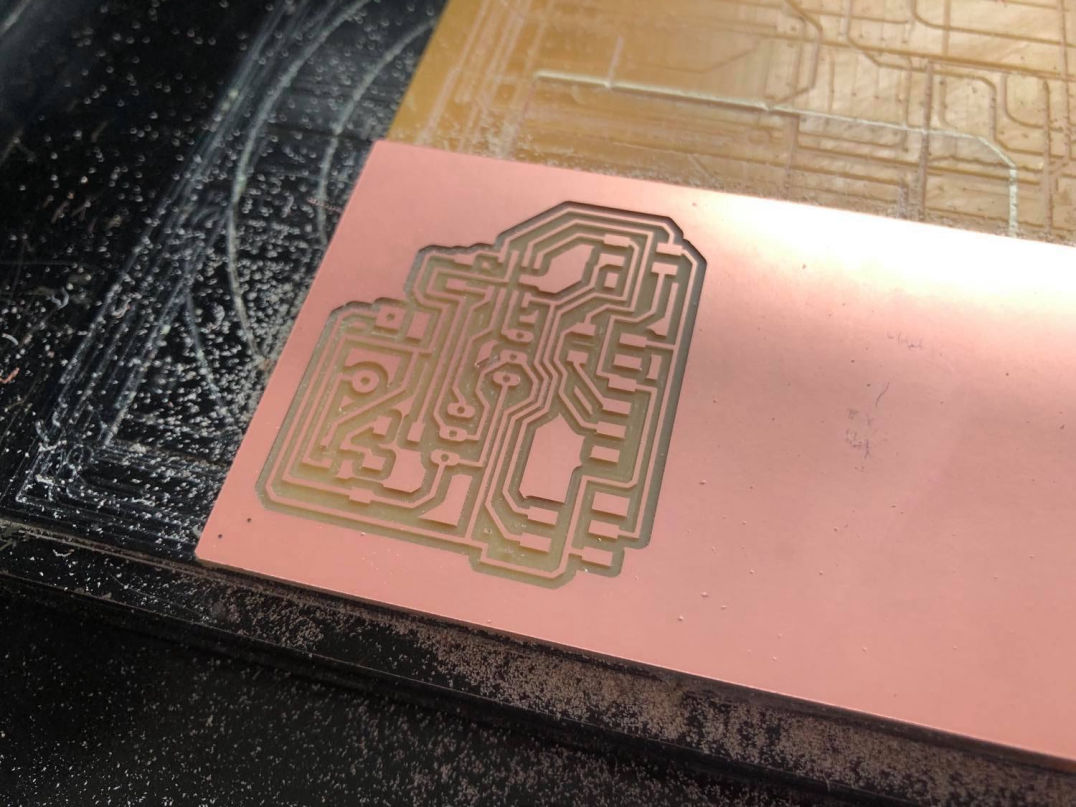
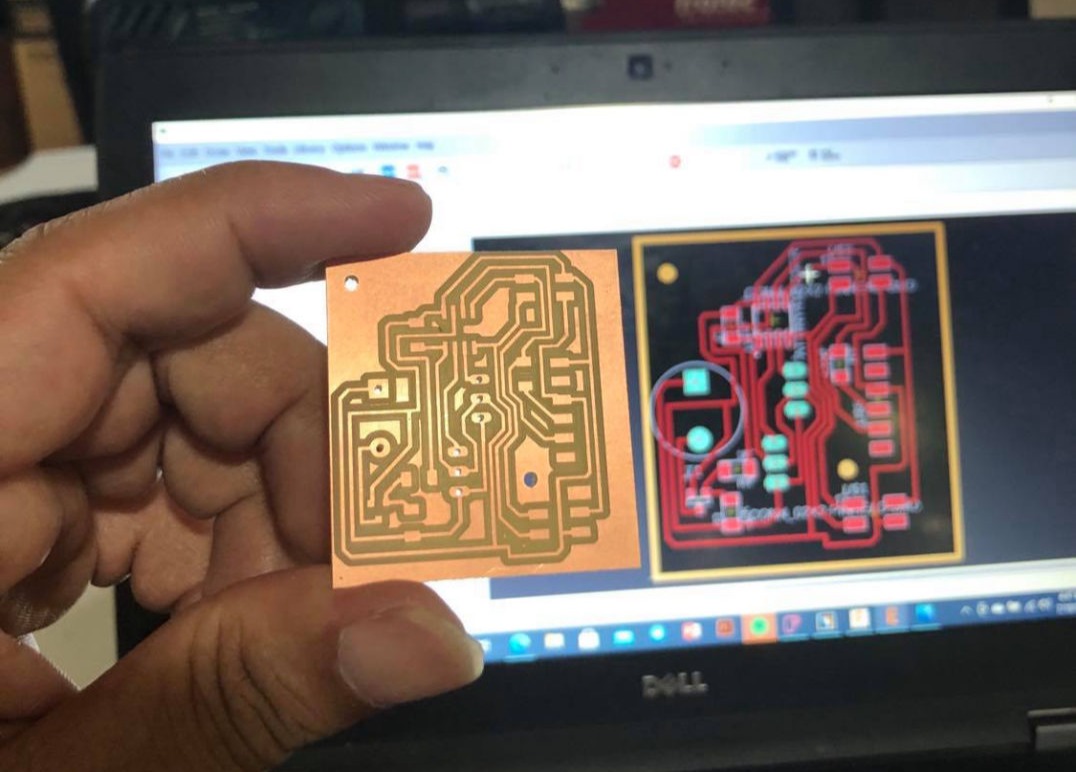
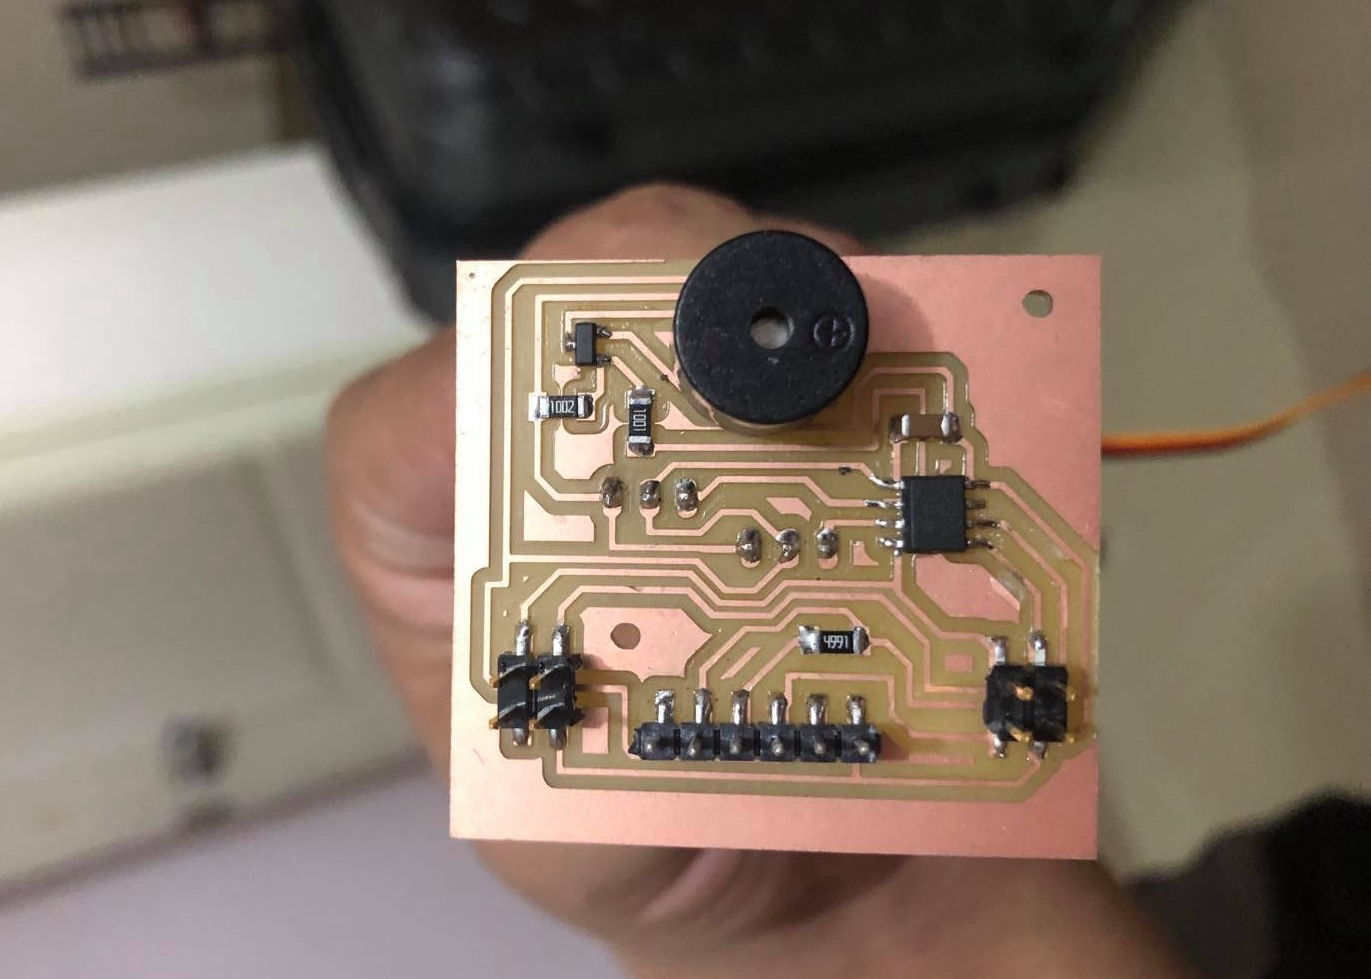
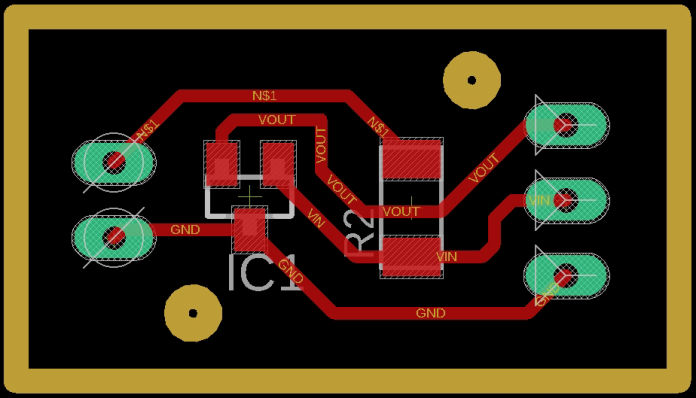
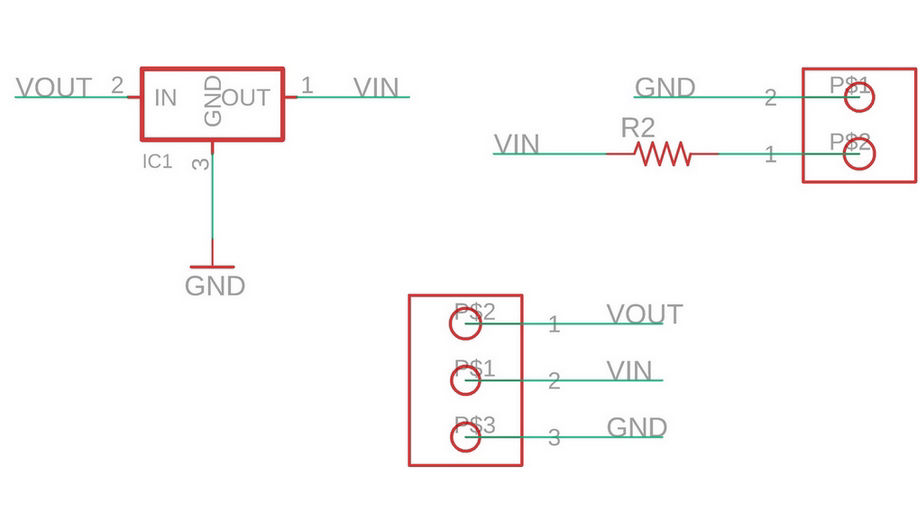
I also added a small hall sensor module with holes for through hole type led which will be used in my final project which you can see in the following picture. It is connected by 3 female to female jumper cables. While fabricating the hall sensor module, I found out that for small sized boards, when we give both trim and holes in the same process, machine will cut trim first and due to less adhesive, the part moves while making holes. Hence if you are making smaller boards with holes make it a two step process, holes first and trim at last. Design files are added on the download link below.


Time for Coding
Here, I have used identical boards for the master and secondary. 2 resistors of 5K ohm are placed is the secondary board in parallel with SDA and VCC and SCL and VCC. resistors can be kept anywhere but it is recommended to have it in master as secondary boards can be connected as well as disconnected which should not affect the communication
Master Code
#include <Servo.h
#define hall 1
Servo myservo;
void setup() {
Wire.begin();
myservo.attach(0);
}
void loop() {
if (analogRead(hall) > 460) {
Wire.beginTransmission(8); // transmit to device #8
Wire.write(1);
Wire.endTransmission(); // stop transmitting
}
else {
for (int angle = 0; angle <= 180; angle += 1) {
myservo.write(angle);
delay(10);
}
delay(100);
for (int angle = 180; angle >= 0; angle -= 1) {
myservo.write(angle);
delay(10);
}
}
}
Secondary Code
#include <Servo.h>
Servo myservo;
void setup() {
Wire.begin(8);
Wire.onReceive(receiveEvent);
myservo.attach(0);
}
void loop() {
delay(100);
}
void receiveEvent(int howMany) {
int val = Wire.read();
if (val==1){
for (int angle = 110; angle <= 130; angle += 10) {
myservo.write(angle);
delay(10);
}
delay(100);
for (int angle = 130; angle >= 110; angle -= 10) {
myservo.write(angle);
delay(10);
}
}
}
In secondary coding, i pushed it and tested it, master was working fine but in the secondary side, there was a glitch. It was not performing as expected. Then I asked my instructor, Jogin Francis, about the issue and he explained me that in I2C when you are sending something from master to secondary, the secondary continuously receives the data so if we put any program which needs some time to execute, it cant execute itself as it keeps on receiving and replacing the value of the input. Hence, I used interrupt function in order to save temporarily save data and the execute the main work that the secondary has to do. In the coding below, "flag" notifies if something is received and then val stores the value that is received and then sends to the main program.
#include <Servo.h>
Servo myservo;
volatile bool flag = 0;
volatile int val = 0;
void setup() {
Wire.begin(8);
Wire.onReceive(receiveEvent);
myservo.attach(0);
}
void loop() {
if (flag) {
if (val == 1) {
for (int angle = 126; angle <= 180; angle += 1) {
myservo.write(angle);
delay(10);
}
for (int angle = 180; angle >= 126; angle -= 1) {
myservo.write(angle);
delay(10);
}
}
flag = 0;
}
}
void receiveEvent(int howMany) {
val = Wire.read();
flag = 1;
}
Now, according to the program, the servo in the secondary unit (in the casing) should move when there is no magnet near hall sensor connected to master, and when magnet is within the range the servo of master unit should move. Lets see then.
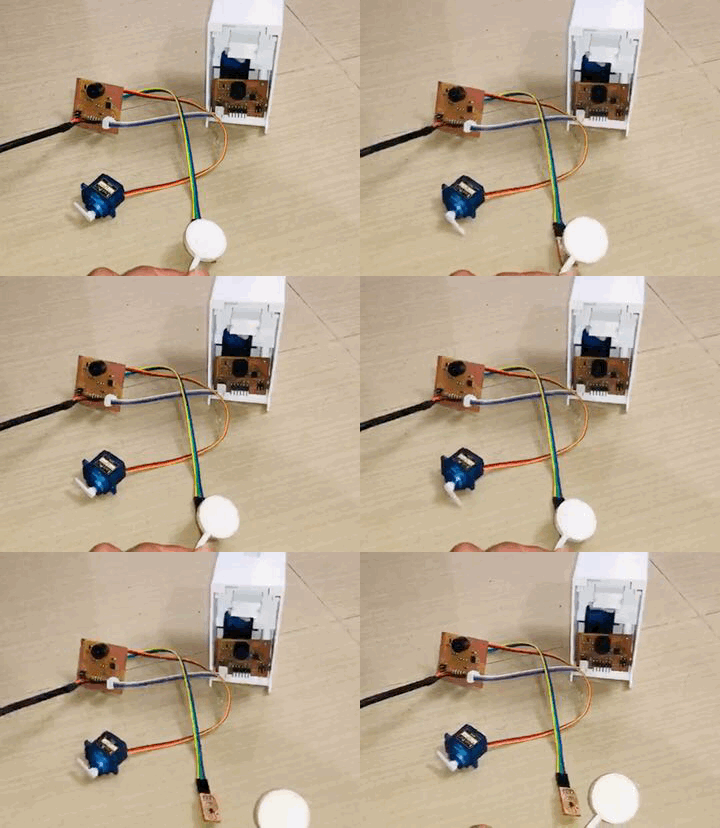
Here the board inside the white box is a secondary one and which is outside is the master board. As you can see from above,
- When magnet is near master servo is on.
- When magnet is far, servo of secondary is on.
Group Assignment
I connected it to my own project which is with ESP-32. Here in this connection, when the secondary address is matching and the button is pressed, the servo is on with the respective board. Here board with ESP-32 is the final board and two boards with ATTiny 412 are secondary one. Following are the codes used where it has an interface with blynk application.
Master Code:
#include <SPI.h>
#include <NTPClient.h>
#include <WiFiUdp.h>
#include <Servo_ESP32.h>
#include <BlynkSimpleEsp32.h>
#include <Wire.h>
#include "time.h"
#define servoPin 14 //printed G14 on the board
#define buzzer 27
#define hall 35
Servo_ESP32 servo1;
int angle = 100;
int angleMin = 100;
int angleMax = 170;
int angleStep = 1;
int med_qty = 0;
int buttonState = 0;
int setsec1 = 0;
int setsec2 = 0;
int setsec3 = 0;
int med_qty_sl1 = 0;
int buttonState_sl1 = 0;
int model1 = 0;
int setsec4 = 0;
int setsec5 = 0;
int setsec6 = 0;
int med_qty_sl2 = 0;
int buttonState_sl2 = 0;
int model2 = 0;
int setsec7 = 0;
int setsec8 = 0;
int setsec9 = 0;
char auth[] = "CXPXe4FBMq3APKm3-9C0hI5wrK1lKW5x";
const char* ssid = "iPhone"; //WiFi Name
const char* password = "NMF123!!!"; // WiFi Password
WiFiUDP ntpUDP;
NTPClient timeClient(ntpUDP, "1.asia.pool.ntp.org", 19800);
void setup()
{
Serial.begin(115200);
Blynk.begin(auth, ssid, password);
servo1.attach(servoPin);
pinMode(buzzer, OUTPUT);
pinMode(hall, INPUT);
//connect to WiFi
Serial.printf("Connecting to %s ", ssid);
WiFi.begin(ssid, password);
while (WiFi.status() != WL_CONNECTED) {
delay(500);
Serial.print(".");
}
Serial.println(" CONNECTED");
Wire.begin();
}
void loop()
{
timeClient.update();
int h = timeClient.getHours();
int m = timeClient.getMinutes();
int s = timeClient.getSeconds();
int actsec = h * 3600 + m * 60 + s;
Serial.print(h);
Serial.print(":");
Serial.println(m);
Blynk.run();
Serial.println(setsec1);
if (actsec == setsec4 || actsec == setsec5 || actsec == setsec6 || buttonState_sl1 == 1) {
Wire.beginTransmission(model1);
Wire.write(med_qty_sl1);
Wire.endTransmission();
}
if (actsec == setsec7 || actsec == setsec8 || actsec == setsec9 || buttonState_sl2 == 1) {
Wire.beginTransmission(model2);
Wire.write(med_qty_sl2);
Wire.endTransmission();
}
if (actsec == setsec1 || actsec == setsec2 || actsec == setsec3 || buttonState == 1) {
dispense(med_qty);
while (analogRead(hall) <= 3500) {
buzz();
}
}
delay(500);
}
void dispense(int med_qty) {
for (int i = 1 ; i <= med_qty; i++) {
for (int angle = angleMin; angle <= angleMax; angle += angleStep) {
servo1.write(angle);
Serial.println(angle);
delay(20);
}
delay(100);
for (int angle = angleMax; angle >= angleMin; angle -= angleStep) {
servo1.write(angle);
Serial.println(angle);
delay(20);
}
delay(100);
}
}
void buzz() {
digitalWrite(buzzer, 1);
delay(100);
digitalWrite(buzzer, 0);
delay(100);
}
BLYNK_WRITE(V0)
{
med_qty = param.asInt(); // assigning incoming value from pin V1 to a variable
}
BLYNK_WRITE(V1) {
TimeInputParam t(param);
if (t.hasStartTime())
{
Serial.println(String("Start: ") +
t.getStartHour() + ":" +
t.getStartMinute() + ":" +
t.getStartSecond());
setsec1 = (t.getStartHour() * 3600) + (t.getStartMinute() * 60) + t.getStartSecond();
}
}
BLYNK_WRITE(V2) {
TimeInputParam t(param);
if (t.hasStartTime())
{
Serial.println(String("Start: ") +
t.getStartHour() + ":" +
t.getStartMinute() + ":" +
t.getStartSecond());
setsec2 = (t.getStartHour() * 3600) + (t.getStartMinute() * 60) + t.getStartSecond();
}
}
BLYNK_WRITE(V3) {
TimeInputParam t(param);
if (t.hasStartTime())
{
Serial.println(String("Start: ") +
t.getStartHour() + ":" +
t.getStartMinute() + ":" +
t.getStartSecond());
setsec3 = (t.getStartHour() * 3600) + (t.getStartMinute() * 60) + t.getStartSecond();
}
}
BLYNK_WRITE(V4)
{
buttonState = param.asInt(); // assigning incoming value from pin V1 to a variable
}
BLYNK_WRITE(V5)
{
model1 = param.asInt(); // assigning incoming value from pin V1 to a variable
}
BLYNK_WRITE(V6)
{
med_qty_sl1 = param.asInt(); // assigning incoming value from pin V1 to a variable
}
BLYNK_WRITE(V7) {
TimeInputParam t(param);
if (t.hasStartTime())
{
Serial.println(String("Start: ") +
t.getStartHour() + ":" +
t.getStartMinute() + ":" +
t.getStartSecond());
setsec4 = (t.getStartHour() * 3600) + (t.getStartMinute() * 60) + t.getStartSecond();
}
}
BLYNK_WRITE(V8) {
TimeInputParam t(param);
if (t.hasStartTime())
{
Serial.println(String("Start: ") +
t.getStartHour() + ":" +
t.getStartMinute() + ":" +
t.getStartSecond());
setsec5 = (t.getStartHour() * 3600) + (t.getStartMinute() * 60) + t.getStartSecond();
}
}
BLYNK_WRITE(V9) {
TimeInputParam t(param);
if (t.hasStartTime())
{
Serial.println(String("Start: ") +
t.getStartHour() + ":" +
t.getStartMinute() + ":" +
t.getStartSecond());
setsec6 = (t.getStartHour() * 3600) + (t.getStartMinute() * 60) + t.getStartSecond();
}
}
BLYNK_WRITE(V10)
{
buttonState_sl1 = param.asInt(); // assigning incoming value from pin V1 to a variable
}
BLYNK_WRITE(V11)
{
model2 = param.asInt(); // assigning incoming value from pin V1 to a variable
}
BLYNK_WRITE(V12)
{
med_qty_sl2 = param.asInt(); // assigning incoming value from pin V1 to a variable
}
BLYNK_WRITE(V13) {
TimeInputParam t(param);
if (t.hasStartTime())
{
Serial.println(String("Start: ") +
t.getStartHour() + ":" +
t.getStartMinute() + ":" +
t.getStartSecond());
setsec7 = (t.getStartHour() * 3600) + (t.getStartMinute() * 60) + t.getStartSecond();
}
}
BLYNK_WRITE(V14) {
TimeInputParam t(param);
if (t.hasStartTime())
{
Serial.println(String("Start: ") +
t.getStartHour() + ":" +
t.getStartMinute() + ":" +
t.getStartSecond());
setsec8 = (t.getStartHour() * 3600) + (t.getStartMinute() * 60) + t.getStartSecond();
}
}
BLYNK_WRITE(V15) {
TimeInputParam t(param);
if (t.hasStartTime())
{
Serial.println(String("Start: ") +
t.getStartHour() + ":" +
t.getStartMinute() + ":" +
t.getStartSecond());
setsec9 = (t.getStartHour() * 3600) + (t.getStartMinute() * 60) + t.getStartSecond();
}
}
BLYNK_WRITE(V16)
{
buttonState_sl2 = param.asInt(); // assigning incoming value from pin V1 to a variable
}
Secondary Code
#include <Servo.h>
#define buzz 4
#define hall 1
Servo myservo;
volatile bool flag = 0;
volatile int val = 0;
int angle = 0;
void setup() {
Wire.begin(8); // please use the address mentioned in the product
Wire.onReceive(receiveEvent);
pinMode(buzz, OUTPUT);
myservo.attach(0);
}
void loop() {
if (flag) {
for (int i = 1; i <= val; i++) {
for (angle = 128; angle <= 180; angle += 1) {
myservo.write(angle);
delay(20);
}
delay(100);
for ( angle = 180; angle >= 128; angle -= 1) {
myservo.write(angle);
delay(20);
}
delay(100);
}
while (analogRead(hall) <= 300) {
digitalWrite(buzz, 1);
delay(100);
digitalWrite(buzz, 0);
delay(100);
}
flag = 0;
}
}
void receiveEvent(int howMany) {
val = Wire.read();
flag = 1;
}
Connection:
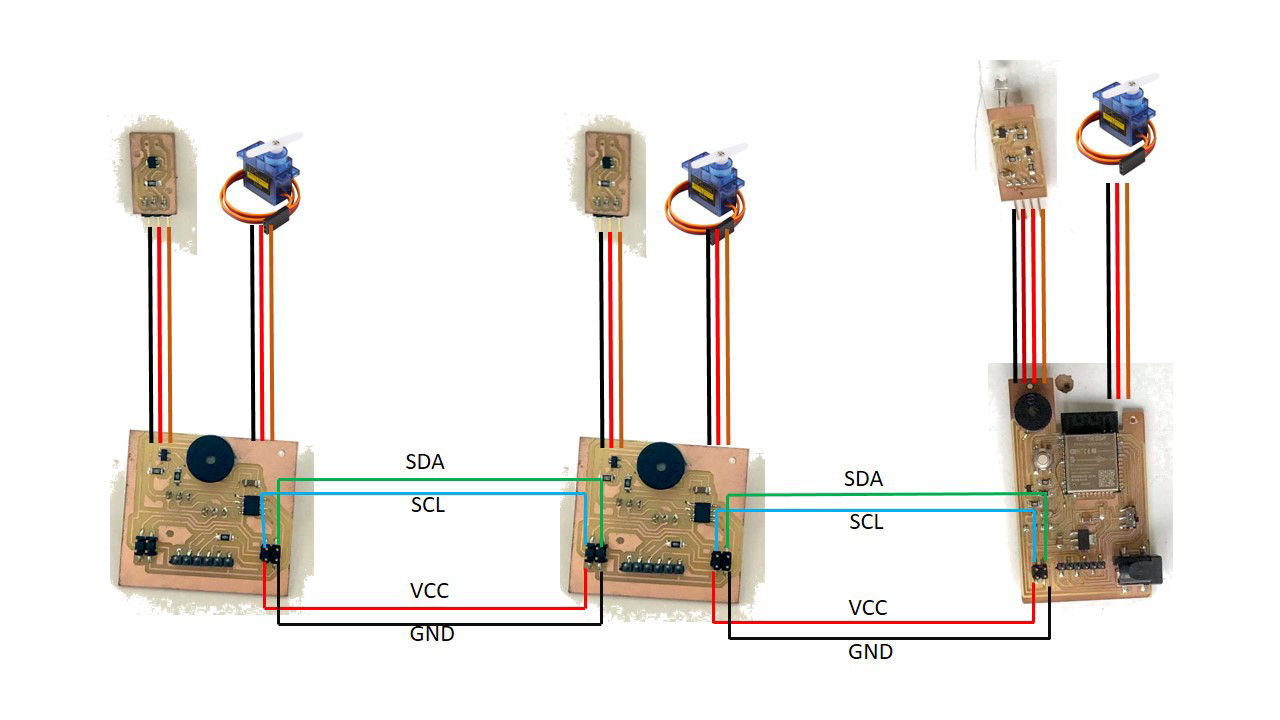
Here, there is only one 4 pin header in main esp32 board and two i2c 4 pin headers in the secondary. The reason to have it like this is to make it modular. in the following you can see the connection
Start a free site with Mobirise