14. Interface and Application Programming
For applications programming week, I decided to use processing. I already have some experience with Processing 3 and Java, but only with basic drawing applications. I haven’t done any major logic, math, or data transfer through Java/Processing, so this will be a major learning experience for me.
For my final project interface, I will try to create a program to do the following:
- Take input from a Bluetooth chip
- Turn the inputs into data points and display them
- Display the data points on a screen
- Send instructions back to the Arduino
- Allow for manual control of the car through the interface
I will start with parsing through Bluetooth data, then I will create the display, and finally, I will create the instructions back to the Arduino. Since there is a lot of programming to do for this assignment in a language I am not entirely familiar with, I will likely only complete objectives 1 and 2 this week. I will further develop this code during the final project development weeks to finalize the display.
Input from Bluetooth
To take in data from Bluetooth, I started looking for Serial libraries with Processing 3. I settled on the Serial Processing Library since it was the main one on Processing and it was well documented. I looked through some examples and found that I could just pair the Bluetooth module to my mac and process data from there. The HC-05 Bluetooth chip sends data in clumps every 3 seconds, so I will have to have code to deal with this. The main problems that arise from this are timing issues- the processing serial has a default timeout of a few seconds and in the documentation, I could not find a function to increase or decrease it. To deal with this issue, when requesting or transmitting data I will probably have to have a for or while loop to loop Serial.available for a few seconds so it does not time out. I will need to do this at a few main parts in my code- when I initialize a connection in Setup, I will send an integer and expect an integer; when I receive data points from the Arduino, I will first send a send trigger then expect data, and when I send commands, I will wait for a confirmation.
From this point, I developed some code to parse through Bluetooth serial data. I uploaded the data in packets between <> characters and added commas to separate data points. I used the split function in processing (strtok in Arduino) to split the strings. This allows me to split the large string into smaller ones based on the positions of the specified ‘tokens’- by commas. I used this principle to develop my Bluetooth data transfer code.
Main Interface
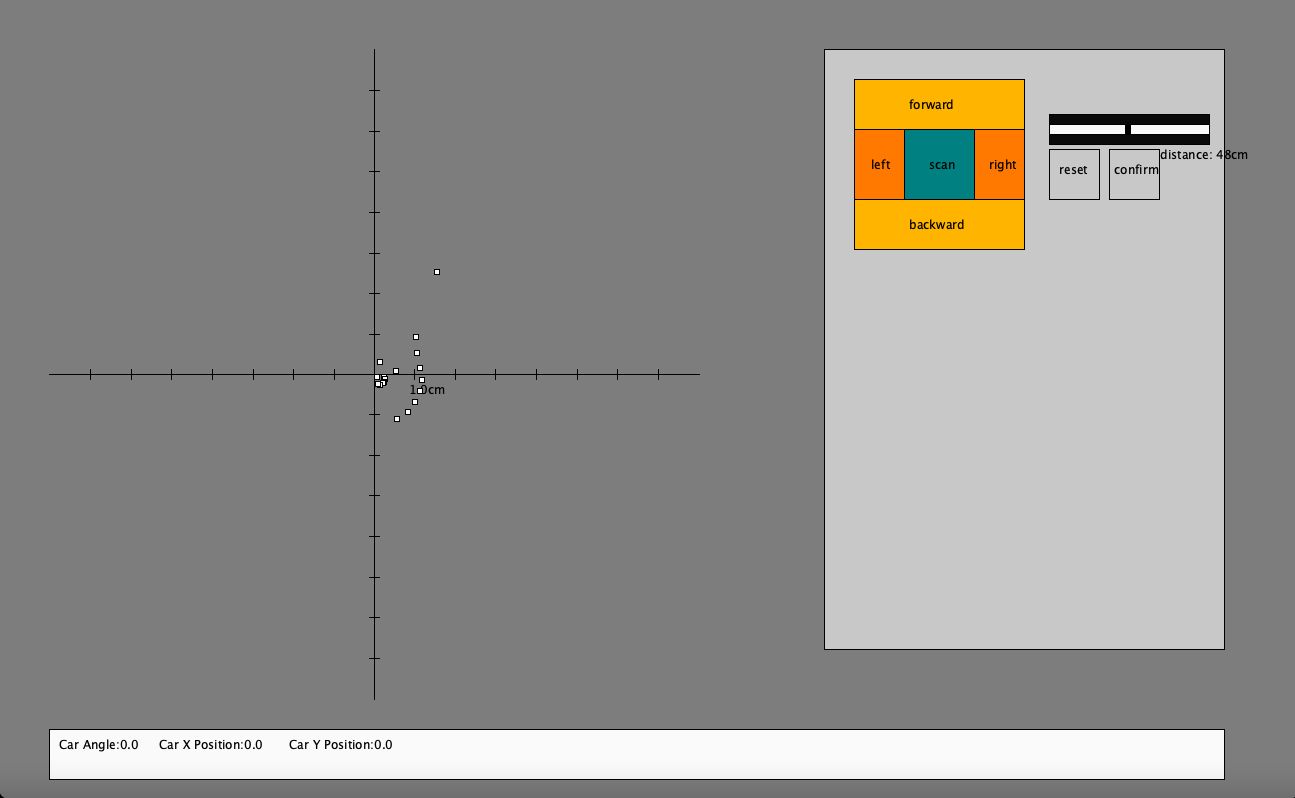
For my main interface, I want 3 main regions. The main grid display for data points of the room, a control panel for manual control, and a display for some variables about the car- likely angle, position, speed, and maybe the current action being taken.
I spent about an hour creating this interface, and I think it turned out fairly well. I added a grid with a scale and placed the other 2 bars. I may add some aesthetic details later on, such as a background image instead of a solid color. I will update the bars for sending instructions to the car and for displaying variables from the car once I finish the display and data processing code.
Turn Data Input into Datapoints and Display it
To turn the data input into data points, I will have to scale it to the size of the display. I receive a long 2d array of integers per data upload, so there is a lot of data processing to do. First, I will take the separated strings of data values, turn them into integers, and assign them to a position in a storage array for points. From there, I will map the data points to the scale and positions of the grid. The grid is offset by 50 pixels on each side, and the scale feature means I have to add to or decrease the positions of the data points. To do this, I will have a separate map data function. This function will take the main data array and add the points times a scale variable and add the 50-pixel offset, resulting in a large array of all points I want to display.
This is my final processing code for my final project.
The drawStup, controlpannel, and move functions are only artistic, and they do not deal with any data. They draw different parts of the interface, such as the control pannel and buttons for resetting and confirming the type of move to do.
The first set of variables are for the sizes of certain elements of the display. Next are the arrays for storing points that will be uploaded from the robot, and the offset for position 0,0 in the grid of the display. Next are variables for storing car data, which I might add usage for later. This would be displayed at the bottom of the screen. Next I have variables for instruction data that I would send from the interface to the car. This would be data such as drive forward x distance. Finally, I have a few global variables used by functions.
import processing.serial.*;

Serial port;


int mainwid = 1300;
int mainheight = 800;

int displaywid = 650;
int displayheight = 650;
int midpointx = displaywid/2+50;
int midpointy = displayheight/2+50;

int controlwid = 400;
int controlheight = 600;

int datawid = 1175;
int datalen = 50;

int[][] pointdata = new int [400][2];
float[][] mappeddata = new float [400][2];
int yoffset = 50 + displayheight / 2;
int xoffset = 50 + displaywid / 2;
float scale = 10;

float carangle = 0;
float carx = 0;
float cary = 0;


int tSx0;
int[] outdata = new int[5];

boolean indir = false;
boolean indir2 = false;

int x;
int angle;
int distance;
int type; //1/2 F/B, 3/4 L/R


void setup()
{
 size (1300,800);   //size
 port = new Serial(this, Serial.list()[1], 9600);
 port.bufferUntil('\n');
 drawSetup();
}

void drawSetup()
{
 fill (125);
 rect (0,0,mainwid,mainheight);   //main area rectangle

 fill (0);
 line (50,50+displayheight/2,displaywid+50,displayheight/2+50); //x axis
 line (50+displaywid/2,50,displaywid/2+50,displayheight+50);    //y axis
 for(int i = 1; i < 8; i++)
 {
   line((midpointx+i*displaywid/2/8),midpointy-5,midpointx+i*displaywid/2/8,midpointy+5);
   line((midpointx-i*displaywid/2/8),midpointy-5,midpointx-i*displaywid/2/8,midpointy+5);
   line(midpointx-5,(midpointy+i*displaywid/2/8),midpointx+5,(midpointy+i*displaywid/2/8));
   line(midpointx-5,(midpointy-i*displaywid/2/8),midpointx+5,(midpointy-i*displaywid/2/8)); //grid
 }
 text((scale/10 + "cm"), midpointx+displaywid/16-5, midpointy+20); //text for scale
 fill (200);
 rect (displaywid+100+75,50,controlwid,controlheight); //controls interface
 fill(250);
 rect (50, mainheight-70,datawid,datalen); //data line
 fill(0);
 text("Car Angle:" + carangle,60, mainheight-50);
 text("Car X Position:" + carx,160, mainheight-50);
 text("Car Y Position:" + cary,290, mainheight-50);

 controlpannelsetup();
}

void controlpannelsetup()
{
 fill(0,128,128);
 rect(855,80,170,170);
 fill(255,180,0);
 rect(855,80,170,50);
 rect(855,200,170,50);
 fill(255,120,0);
 rect(855,130,50,70);
 rect(975,130,50,70);
 fill(0);
 text("forward",910,110);
 text("backward",910,230);
 text("left",872,170);
 text("right",990,170);
 text("scan",930,170);
}
The mousePressed function activates whenever the user presses the mouse. I have a quick delay to prevent overlap of inputs, as this has potential to cause a few issues in my project. Whenever the mouse is pressed, my code runs through multiple if statements to check if the mouse is in a certain region of the interface. If it finds this to be true, it will execute certain functions, like running move if the direction buttons are pressed, setting data if already in move, and sending or resetting after this point.
void mousePressed()
{

 delay(100);
 if(mouseX > 855 && mouseY > 80 && mouseX < 855 + 170 && mouseY < 80 + 50){print("forward"); type = 1; move();}
 if(mouseX > 855 && mouseY > 200 && mouseX < 855 + 170 && mouseY < 200 + 50){print("backward"); type = 2; move();}
 if(mouseX > 855 && mouseY > 130 && mouseX < 855 + 50 && mouseY < 130 + 70){print("left"); type = 3; move();}
 if(mouseX > 975 && mouseY > 130 && mouseX < 975 + 50 && mouseY < 130 + 70){print("right"); type = 4;move();}
 if(mouseX > 855 + 50 && mouseY > 80 + 50 && mouseX < 975 && mouseY < 200){
  print("scan");
  String message = "";
  message = "<" + "9" + "," + "0" + "," +  ">";
    print(message);
  port.write(message);

  }        // print here will be replaced with btport print for final code

 if(indir && mouseX > 1050 && mouseX < 1050 + 160 && mouseY > 115 && mouseY < 115 + 30)
 {

   drawSetup();
   controlpannelsetup();

   move();

  fill(0);
  rect(mouseX, 125, 5, 10);

  if(type == 3 || type == 4){
  float fx = map(mouseX, 1050, 1050 + 160, 0, 180);
  x = round(fx);
  angle = x;
  print(angle);
  text("angle: " + x, 1161, 160);
  }

  else if(type == 1 || type == 2)
  {
    float fx = map(mouseX, 1050, 1050 + 160, 0, 100);
    x = round(fx);
    if(type == 2){text("distance: -" + x + "cm", 1161, 160);}
    else if(type == 1){text("distance: " + x + "cm", 1161, 160);}
    distance = x;
  }

  indir2 = true;

 }

 if(indir2 && mouseX > 1100 && mouseY > 150 && mouseX < 1100 + 50 && mouseY < 150 + 50)
 {
   indir = false;
   indir2 = false;
   print("confirm");


   String message = "";

   if(type == 3){
     message =  "<" + "3" + "," + angle + "," + ">";
     print(message);
   port.write(message);
   }
   else if(type == 4){
   message = "<" + "4" + "," + angle + "," + ">";
   port.write(message);
   print(message);
   }
   else if(type == 1){
   message = "<" + "1" + "," + distance + "," + ">";
   port.write(message);
   print(message);
   }
   else if(type == 2){
   message = "<" + "2" + "," + distance + "," + ">";
   port.write(message);
   print(message);
   }

//prints here will be replaced with btport prints to send the data for movements

  drawSetup();
 }
 if(indir && mouseX > 1050 && mouseY > 150 && mouseX < 1050 + 50 && mouseY < 150 + 50)
 {
   indir = false;
   indir2 = false;
   print("reset");
   drawSetup();
 }
}

 void move()
 {
   indir = true;
   fill(10);
   rect(1050,115,160,30);
   fill(250);
   rect(1050,125,160,10);
   fill(200);
   rect(1110,150,50,50);
   fill(0);
   text("confirm",1115,175);
   fill(200);
   rect(1050,150,50,50);
   fill(0);
   text("reset",1060,175);
   delay(500);

 }
The void draw function constantly runs through the mapped points and displays them. This displays the points that the robot records and sends to the computer.
void draw()
{
mapdata();
fill(255);
for(int i = 0; i < mappeddata.length; i++)
{
  if(mappeddata[i][0] == 0){break;}
  rect(mappeddata[i][0],mappeddata[i][1],5,5);
}
delay(1000);

}
The serialEvent function activates whenever the serial port (connected to my bluetooth chip) recieves data. I run a try-catch function here to prevent the program from killing itself if, for example, I try to store data in non-existant locations, or I try to store non-existant data in a location. This program disassembles a large string sent by the arduino into usable data, and if the data is in a point format (first ‘digit’ of the string is a 1), then it will add the data into the point array.
void serialEvent(Serial port) {
   port.readStringUntil('<');
   String data = port.readString(); //catch serial data
   print(data);
  try {

    int[] input = int(data.trim().split(",")); //split input string by ,
        for(int i = 0; i < 5; i++){
     println(input[i]);
   }
    if(input[0] == 1)

    {
    for(int i = 1; i < input.length; i+=2){ //for each pos in input data
     for(int j = 0; j < pointdata.length; j++){
      if(pointdata[j][0] == 0){ //check if value at incrementing pointer is set, if set, do nothing and continue, if not set, add more data starting from here
      pointdata[j][0] = input[i];
      pointdata[j][1] = input[i+1];
      break;
      }
    }
   }

  }


  }
  catch(Exception e) { //java do java reeeeeeeeeeeeeeeeeeeeeeeeeeeeeeeeeeeeeeeeeeeeeeeeeeeeeeeeeeeeeeeeeeeeeeee
    e.printStackTrace();
  }
// mapdata();
 //drawpoints();
}
The mapdata function, the last function, simply runs through the data in pointdata and maps it to the scale and maps it around the point 0,0 in the grid.
void mapdata()
{
  for(int i = 0; i < pointdata.length; i++)
  {
   float mappedpointx = pointdata[i][0]*1/scale;
   float mappedpointy = pointdata[i][1]*1/scale;
   mappeddata[i][0] = mappedpointx + xoffset;
   mappeddata[i][1] = mappedpointy + yoffset;
  }
/*  for(int i = 0; i < mappeddata.length; i++)
  {
   if((mappeddata[i][0] > displaywid + 50 || mappeddata[i][0] < 50) || (mappeddata[i][1] > displayheight + 50 || mappeddata[i][1] < 50))
  {
   scale *= 2;
  }
 }
 */
}
The code works, and it allows me to send, recieve, and display data from my project.
Group Assignment
This weeks group assignment was to compare as many tool options as possible. Click here for our lab’s group site for this week.
My files for this week can be found in this zip file.